uv24-maintenance-instructions

Create successful ePaper yourself
Turn your PDF publications into a flip-book with our unique Google optimized e-Paper software.
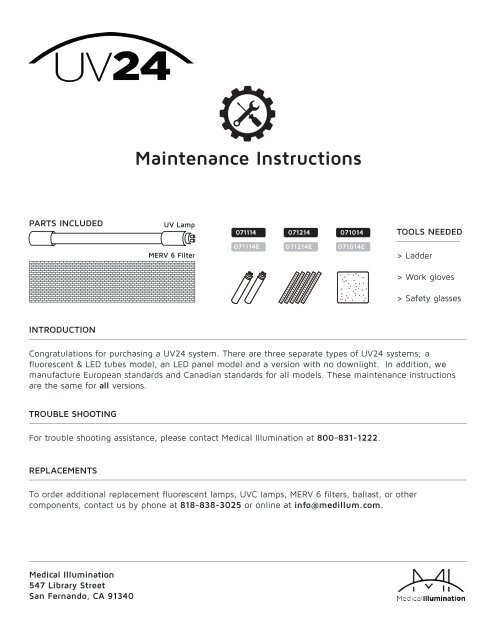
Maintenance Instructions<br />
PARTS INCLUDED<br />
UV Lamp<br />
071114<br />
071214<br />
071014<br />
TOOLS NEEDED<br />
MERV 6 Filter<br />
071114E<br />
071214E<br />
071014E<br />
> Ladder<br />
> Work gloves<br />
> Safety glasses<br />
INTRODUCTION<br />
Congratulations for purchasing a UV24 system. There are three separate types of UV24 systems; a<br />
fluorescent & LED tubes model, an LED panel model and a version with no downlight. In addition, we<br />
manufacture European standards and Canadian standards for all models. These <strong>maintenance</strong> <strong>instructions</strong><br />
are the same for all versions.<br />
TROUBLE SHOOTING<br />
For trouble shooting assistance, please contact Medical Illumination at 800-831-1222.<br />
REPLACEMENTS<br />
To order additional replacement fluorescent lamps, UVC lamps, MERV 6 filters, ballast, or other<br />
components, contact us by phone at 818-838-3025 or online at info@medillum.com.<br />
Medical Illumination<br />
547 Library Street<br />
San Fernando, CA 91340
CHANGING THE UV LAMP<br />
1<br />
Lift the UV24 fixture slightly above the<br />
ceiling frame. Press the lock bar against<br />
the fixture and rotate the fixture down<br />
to access the UV chamber.<br />
3<br />
To remove the lamp, place your fingers on<br />
the plastic ends and avoid touching the<br />
glass. The oil on your fingers can etch into<br />
the glass. Pull the lamp away from the<br />
clamp on one end and gently pull it out of<br />
the socket on the opposite end.<br />
CHANGING THE MERV 6 FILTER<br />
1<br />
To change the MERV 6 filter, disengage the<br />
door latches and lower the door assembly<br />
to access the filter.<br />
CAUTION: It is best to perform<br />
<strong>maintenance</strong> when power to the<br />
UV24 is completely disconnected.<br />
Always wear eye protection and do<br />
not look directly at the UV light.<br />
2<br />
Remove the cover from the UV chamber by<br />
releasing the 4 latches on the UV Chamber<br />
Lid on each side and both ends. Take care<br />
not to touch the reflective surface and<br />
leave fingerprints as you lay the cover<br />
aside.<br />
Insert the new UV lamp the same way. Put<br />
the 4 prong end into the socket and gently<br />
push the opposite end where it snaps into<br />
the clamp. Be sure it fits snugly into place.<br />
NOTE: Use protective eye wear and gloves<br />
while you are handling the MERV 6 filter.<br />
Use proper disposal <strong>instructions</strong> for<br />
hazardous waste materials.<br />
4<br />
After the UV lamp has been changed, put<br />
the UV chamber lid cover back on taking<br />
care to secure the latches back in place. To<br />
complete installation, you should rotate<br />
the UV24 back into the ceiling and<br />
make sure the lock bar is resting on the<br />
ceiling frame and secure it fully.<br />
5<br />
Replacement <strong>maintenance</strong> is complete for<br />
changing the UV lamp.<br />
NOTE: In the event of a UV lamp or UV<br />
ballast failure, a light will come on<br />
indicating that the UV lamp or ballast<br />
needs <strong>maintenance</strong>. The light is red for<br />
the 071114 & 071014, green for the<br />
071214.<br />
2<br />
Slide the MERV 6 filter out of the housing<br />
and dispose of it properly. Slide a new,<br />
clean filter into the same slot ensuring that<br />
it is fitted correctly into the space.<br />
3<br />
Close the door assembly and reengage the<br />
door latches.<br />
4<br />
Replacement <strong>maintenance</strong> is complete for<br />
changing the MERV 6 filter.<br />
NOTE: The Snap Switch which is located in<br />
one of the top right hand corner of the UV<br />
Chamber, will be deactivated when the UV<br />
Chamber lid is removed.<br />
071114, 071014<br />
NOTE: Deactivating the Snap Switch only<br />
shuts off electricity to the UV Light and<br />
Fans. The UV Light will be off if you have<br />
either disconnected the main power<br />
connector or removed the UV Lid to release<br />
the Snap Switch. Once the switch is<br />
released as you remove the UV chamber<br />
cover, the UV lamp will turn off<br />
automatically if the unit is still powered on.<br />
071214