Practical Wax Modeling
DESCRIPTION In this book jewelry wax modeling techniques are introduced and explained in detail, illustrated with step-by-step photographs. Some special features of Practical Wax Modeling include: a) Practical applications when using a variety of waxes b) Mitsuro and its uses c) Demonstrations of a variety of textures d) Methodology of finishing castings. Practical Wax Modeling was written as an applied compilation of projects for the authors' introductory book Basic Wax Modeling. TABLE OF CONTENTS Samples of Wax Modeling Techniques 4 Samples of Finished Products 5,6,7 Wax Modeling for Professionals 9 Special Features and Suggestions 10 I. HARD WAX MODELING TECHNIQUES 11 Textured Ring 13 Two Part Ring 21 Ring with a Floating Twist 27 Built-Up Ring 31 Hollow Pendant 35 Brooch Using Hard and Soft Wax 43 Brooch with Realistic Modeling 47 II. SOFT WAX MODELING TECHNIQUES 59 Embossed Figure Brooch 61 Floral Patterned Ring 65 Ring of Wax Wire Construction 69 Pendant Constructed of Wax Wire 73 Making Mitsuro 79 Mitsuro Ring 83 Mitsuro Brooch 89 Mitsuro Pendant 95 Modeling Mitsuro with Other Materials 99 Free Forming 103 III. MODELING TECHNIQUES WITH GEMSTONES 109 Cabochon Mounting for a Pendant in Soft Wax 111 Cabochon Mounting for a Ring in Hard Wax 117 IV. OTHER MODELING TECHNIQUES 125 Sizing 126 Applying Various Textures 128 Reworking a Wax Pattern 130 V. CASTING PROCESSES & RUBBER-MOLD MAKING 135 Casting Processes 136 Rubber-Mold Making 140 VI. PROCESSING & FINISHING AFTER CASTING 143 AFTERWORD 151 APPENDIX 152 Hardcover, 160 pages, 385 detailed black and white photos and illustrations.
DESCRIPTION
In this book jewelry wax modeling techniques are introduced and explained in detail, illustrated with step-by-step photographs.
Some special features of Practical Wax Modeling include:
a) Practical applications when using a variety of waxes
b) Mitsuro and its uses
c) Demonstrations of a variety of textures
d) Methodology of finishing castings.
Practical Wax Modeling was written as an applied compilation of projects for the authors' introductory book Basic Wax Modeling.
TABLE OF CONTENTS
Samples of Wax Modeling Techniques 4
Samples of Finished Products 5,6,7
Wax Modeling for Professionals 9
Special Features and Suggestions 10
I. HARD WAX MODELING TECHNIQUES 11
Textured Ring 13
Two Part Ring 21
Ring with a Floating Twist 27
Built-Up Ring 31
Hollow Pendant 35
Brooch Using Hard and Soft Wax 43
Brooch with Realistic Modeling 47
II. SOFT WAX MODELING TECHNIQUES 59
Embossed Figure Brooch 61
Floral Patterned Ring 65
Ring of Wax Wire Construction 69
Pendant Constructed of Wax Wire 73
Making Mitsuro 79
Mitsuro Ring 83
Mitsuro Brooch 89
Mitsuro Pendant 95
Modeling Mitsuro with Other Materials 99
Free Forming 103
III. MODELING TECHNIQUES WITH GEMSTONES 109
Cabochon Mounting for a Pendant in Soft Wax 111
Cabochon Mounting for a Ring in Hard Wax 117
IV. OTHER MODELING TECHNIQUES 125
Sizing 126
Applying Various Textures 128
Reworking a Wax Pattern 130
V. CASTING PROCESSES & RUBBER-MOLD MAKING 135
Casting Processes 136
Rubber-Mold Making 140
VI. PROCESSING & FINISHING AFTER CASTING 143
AFTERWORD 151
APPENDIX 152
Hardcover, 160 pages, 385 detailed black and white photos and illustrations.

Create successful ePaper yourself
Turn your PDF publications into a flip-book with our unique Google optimized e-Paper software.
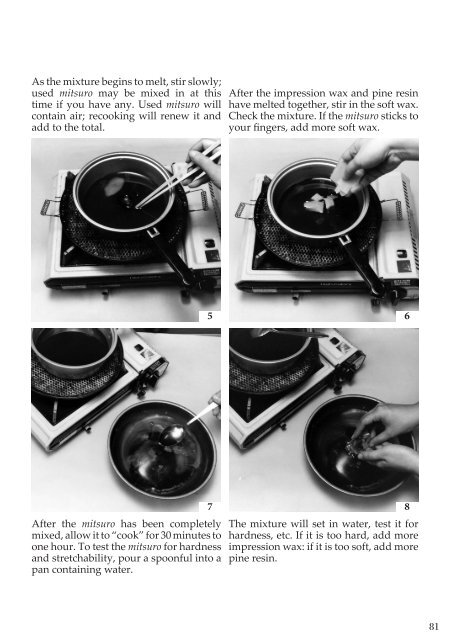
As the mixture begins to melt, stir slowly;<br />
used mitsuro may be mixed in at this<br />
time if you have any. Used mitsuro will<br />
contain air; recooking will renew it and<br />
add to the total.<br />
After the impression wax and pine resin<br />
have melted together, stir in the soft wax.<br />
Check the mixture. If the mitsuro sticks to<br />
your fingers, add more soft wax.<br />
5 6<br />
After the mitsuro has been completely<br />
mixed, allow it to “cook” for 30 minutes to<br />
one hour. To test the mitsuro for hardness<br />
and stretchability, pour a spoonful into a<br />
pan containing water.<br />
7 8<br />
The mixture will set in water, test it for<br />
hardness, etc. If it is too hard, add more<br />
impression wax: if it is too soft, add more<br />
pine resin.<br />
81