
You also want an ePaper? Increase the reach of your titles
YUMPU automatically turns print PDFs into web optimized ePapers that Google loves.
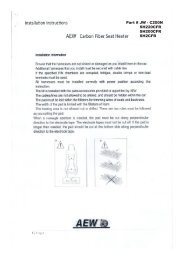
Installation <strong>Instructions</strong><br />
AEW Carbon Fiber Seat Heater<br />
Part # <strong>JW</strong>-<strong>C400</strong><br />
1.<br />
2.<br />
3.<br />
4.<br />
5.<br />
6.<br />
7.<br />
8.<br />
9.<br />
Before beginning the installation, determine if the seat has built in sensors. We recommend using our SH220CFR kit in this<br />
situation as it can be cut or trimmed to work around the sensors. Removal of the seat might be necessary to see if a different kit<br />
is required.<br />
After determining the type of seat, remove it out of the vehicle and place it on a table or workbench for easier access.<br />
Remove any screws or clips that hold the seat cover on to the seat cushion and frame.<br />
You will have to cut the existing hog rings that hold the factory cover on to the cushion.<br />
Make sure you have extra hog rings and hog ring pliers for the re installment of the seat cover. If you do not have the hog rings<br />
and pliers they can be purchased through Accele. Pt. #C1000HP for pliers, C1000HR for hog rings.<br />
This kit comes with 2 pads, one for the bottom part of the seat and the other for the back part. Each pad can be installed on<br />
either the back or bottom.<br />
Once the hog rings have been removed, position the pad on the seat with the wires coming out of the back of the seat. The pad<br />
can be cut if it is too long for the seat.<br />
Cut across the open spots on the pad and make sure you cover the cut edge with electrode tape. Remove the paper cover off of<br />
the tape on the pad and adhere it to the seat. Repeat steps for the rear part of the seat. Most of the time, hog rings are not<br />
needed for the rear seats.<br />
Route the harnesses for the pads under the seat and zip tie to existing harnesses.<br />
At this point, the seat cover can be re installed to the cushion using the hog rings and pliers for a more secure and tight fit.<br />
Do not re install the seat into the vehicle. Route your seat heater harness from where the seat would be mounted or from the<br />
front to the back whichever is more convenient.<br />
10.<br />
11.<br />
12.<br />
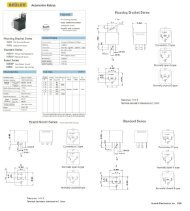
Find a spot on a dash knockout or on the center console to mount the control switch. You will have to drill a hole for the switch.<br />
Check behind the panel to make sure there is no obstruction behind the desired location.<br />
Wire the seat heaters. Red wire to 12V battery power, Red/White wire to 12v ignition / accessory, Black to chassis ground,<br />
Yellow/Green to Parking lights (+) and Blue to ground activation from external remote start<br />
system( aux 1, aux 2, etc.). Use relay to trigger and give proper ground signal.<br />
You can now re install the seat back in to the vehicle. When positioning the seat, attach the seat heater connectors from the seat<br />
to the corresponding connectors in the vehicle.<br />
13.<br />
Once the seat is installed, turn the vehicle on and check for full functionality of seat heaters.<br />
14. Finally, make sure all wires are zip tied and routed under / behind panels for a cleaner<br />
1 | P a g e
Installation <strong>Instructions</strong><br />
Part # <strong>JW</strong>-<strong>C400</strong><br />
2 | P a g e
Installation <strong>Instructions</strong><br />
Part # <strong>JW</strong>-<strong>C400</strong><br />
3 | P a g e
Installation <strong>Instructions</strong><br />
Part # <strong>JW</strong>-<strong>C400</strong><br />
4 | P a g e
Installation <strong>Instructions</strong><br />
Part # <strong>JW</strong>-<strong>C400</strong><br />
5 | P a g e
Installation <strong>Instructions</strong><br />
Part # <strong>JW</strong>-<strong>C400</strong><br />
6 | P a g e
Installation <strong>Instructions</strong><br />
Part # <strong>JW</strong>-<strong>C400</strong><br />
7 | P a g e
Installation <strong>Instructions</strong><br />
Part # <strong>JW</strong>-<strong>C400</strong><br />
8 | P a g e
Installation <strong>Instructions</strong><br />
Part # <strong>JW</strong>-<strong>C400</strong><br />
9 | P a g e
Installation <strong>Instructions</strong><br />
Part # <strong>JW</strong>-<strong>C400</strong><br />
10 | P a g e