Local Solutions for Individual Customers Worldwide - Oil Solutions
Local Solutions for Individual Customers Worldwide - Oil Solutions
Local Solutions for Individual Customers Worldwide - Oil Solutions

Create successful ePaper yourself
Turn your PDF publications into a flip-book with our unique Google optimized e-Paper software.
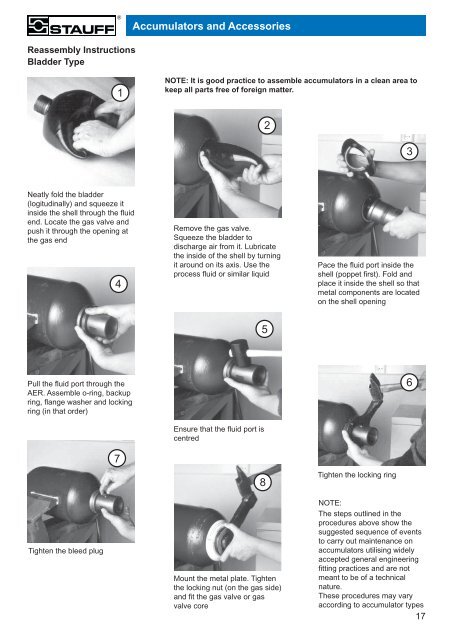
Reassembly Instructions<br />
Bladder Type<br />
Neatly fold the bladder<br />
(logitudinally) and squeeze it<br />
inside the shell through the fl uid<br />
end. Locate the gas valve and<br />
push it through the opening at<br />
the gas end<br />
Pull the fl uid port through the<br />
AER. Assemble o-ring, backup<br />
ring, fl ange washer and locking<br />
ring (in that order)<br />
Tighten the bleed plug<br />
1<br />
4<br />
7<br />
Accumulators and Accessories<br />
NOTE: It is good practice to assemble accumulators in a clean area to<br />
keep all parts free of <strong>for</strong>eign matter.<br />
Remove the gas valve.<br />
Squeeze the bladder to<br />
discharge air from it. Lubricate<br />
the inside of the shell by turning<br />
it around on its axis. Use the<br />
process fl uid or similar liquid<br />
Ensure that the fl uid port is<br />
centred<br />
2<br />
5<br />
8<br />
Mount the metal plate. Tighten<br />
the locking nut (on the gas side)<br />
and fi t the gas valve or gas<br />
valve core<br />
Pace the fl uid port inside the<br />
shell (poppet fi rst). Fold and<br />
place it inside the shell so that<br />
metal components are located<br />
on the shell opening<br />
Tighten the locking ring<br />
3<br />
6<br />
NOTE:<br />
The steps outlined in the<br />
procedures above show the<br />
suggested sequence of events<br />
to carry out maintenance on<br />
accumulators utilising widely<br />
accepted general engineering<br />
fi tting practices and are not<br />
meant to be of a technical<br />
nature.<br />
These procedures may vary<br />
according to accumulator types<br />
17