Aufbauanleitung Sunrise Englisch - Herzog
Aufbauanleitung Sunrise Englisch - Herzog
Aufbauanleitung Sunrise Englisch - Herzog

You also want an ePaper? Increase the reach of your titles
YUMPU automatically turns print PDFs into web optimized ePapers that Google loves.
Z E L T F A B R I K<br />
__________________________________________________________________________________________<br />
Instructions for „<strong>Sunrise</strong>“ erection<br />
_________________________________________________________________________________<br />
Dear Customer,<br />
Congratulations on your purchase of your new <strong>Herzog</strong> awning, we wish you many<br />
happy relaxing days ahead. You have purchased a top quality product, manufactured<br />
to the highest standard using optimum materials, which will give you years of trouble<br />
free use.<br />
Specification:<br />
Frame: 2x Aluminium poles Ø 14mm (1 shorter pole, 1 longer pole); 2 fitting<br />
bars, steel.<br />
Roof & Walls: Roof combined with side walls, 1 detachable front wall with<br />
mosquito net, windows with mosquito net and flap.<br />
Accessories: Holdall, pegs, guy ropes<br />
Caution: Please note, that the aluminium poles, when bent into place, are<br />
under stress and caution should be taken to prevent damage or<br />
injury.<br />
Erection:<br />
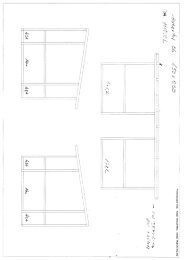
Draw the canvas in to the caravan awning rail, ensuring that the awning<br />
roof does not extend down the curve of the caravan roof (a).<br />
Please connect the pole parts.<br />
Push the longer Aluminium pole (b2) in to behind transversal leading<br />
pole-seam. Do not fix this pole first at all.<br />
Push the shorter Aluminium pole (b1) in to the transversal leading<br />
anterior pole-seam. Do not fix this pole first at all.<br />
Tipp: Please draw the both transversal leading floor-ribbons wide apart as<br />
possible, than it is easier to mount the poles.<br />
Afterwards, please fix one end of each pole-bow on adjustable floorribbons<br />
(stick in little bag)<br />
Stand 07.11.2005 F:/Vorlagen/<strong>Aufbauanleitung</strong>en/<strong>Aufbauanleitung</strong> <strong>Sunrise</strong> <strong>Englisch</strong>
The frame will bend to creating a tunnel effect (a little force is<br />
necessary).<br />
Fix now the other ends of each poles in adjustable floor-ribbons (stick in<br />
little bag).<br />
Please fix the side walls which touch the caravan by the enclosed pegs.<br />
Draw now the awning away from the caravan, until creating the figure.<br />
Please fix the awning by the enclosed pegs on the floor (d).<br />
Please fix the fitting bars.<br />
(b1) shorter<br />
pole<br />
(b2) longer pole<br />
(c, inner side)<br />
Indication: The <strong>Sunrise</strong> was constructed as a light weight awning. It is not<br />
constructed for permanent putting and snow/winter.<br />
<strong>Herzog</strong> GmbH & Co KG<br />
Planen- + Zelte - Fabrik, Camping + Freizeit<br />
Max-Eyth-Str.8 · 74366 Kirchheim/Neckar · Telefon ++49 7143/8944-0<br />
Telefax ++49 7143/92950 · e-mail: herzog.info@herzog-freizeit.de Internet:<br />
http:/www.herzog-freizeit.de<br />
Stand 07.11.2005 F:/Vorlagen/<strong>Aufbauanleitung</strong>en/<strong>Aufbauanleitung</strong> <strong>Sunrise</strong> <strong>Englisch</strong><br />
(a)<br />
(d)