Installing O2 Bluetooth Car Kit - Australian Nissan X-TRAIL Forum ...
Installing O2 Bluetooth Car Kit - Australian Nissan X-TRAIL Forum ...
Installing O2 Bluetooth Car Kit - Australian Nissan X-TRAIL Forum ...

Create successful ePaper yourself
Turn your PDF publications into a flip-book with our unique Google optimized e-Paper software.
© Copyright Drew 06<br />
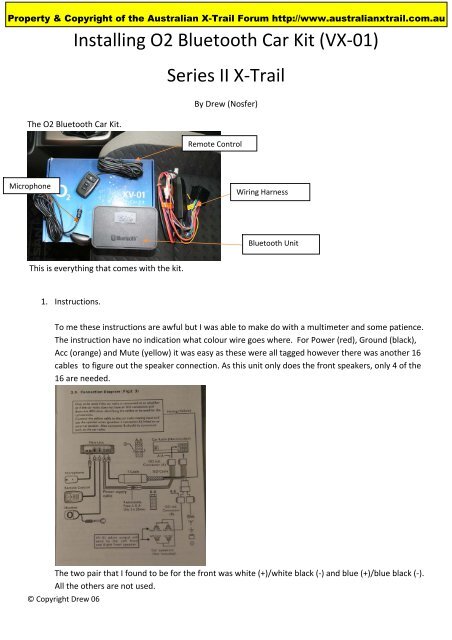
<strong>Installing</strong> <strong>O2</strong> <strong>Bluetooth</strong> <strong>Car</strong> <strong>Kit</strong> (VX‐01)<br />
The <strong>O2</strong> <strong>Bluetooth</strong> <strong>Car</strong> <strong>Kit</strong>.<br />
Microphone<br />
This is everything that comes with the kit.<br />
1. Instructions.<br />
Series II X‐Trail<br />
By Drew (Nosfer)<br />
Remote Control<br />
Wiring Harness<br />
<strong>Bluetooth</strong> Unit<br />
To me these instructions are awful but I was able to make do with a multimeter and some patience.<br />
The instruction have no indication what colour wire goes where. For Power (red), Ground (black),<br />
Acc (orange) and Mute (yellow) it was easy as these were all tagged however there was another 16<br />
cables to figure out the speaker connection. As this unit only does the front speakers, only 4 of the<br />
16 are needed.<br />
The two pair that I found to be for the front was white (+)/white black (‐) and blue (+)/blue black (‐).<br />
All the others are not used.
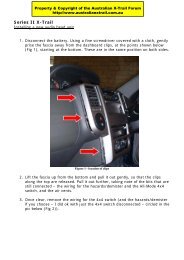
2. Removal of Stereo.<br />
Remove facia to expose the radio.<br />
The series II X‐trail has T‐20 Torx head screws. I don’t know if the older models do.<br />
Remove the Stereo to expose the car wiring harness.<br />
© Copyright Drew 06
<strong>Bluetooth</strong><br />
Speaker<br />
Cables<br />
Extra Cables<br />
3. Connect the <strong>O2</strong> Harness to the Audio harness.<br />
Again the pairs are White (+) / White Black (‐) and Blue (+) / Blue Black (‐). I don’t think it really<br />
matters which is left and which is right as there is no balance only volume control.<br />
4. I moved the fuse holder to near the connector end of the harness as it makes it easier to replace<br />
the fuse if it blows.<br />
© Copyright Drew 06<br />
Power Cables<br />
Fuse holder<br />
Rear<br />
Speaker<br />
Cables
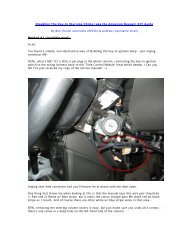
5. <strong>Installing</strong> the unit.<br />
Originally I was going to install it in the cavity behind the stereo.<br />
But this proved to not be an appropriate place. Extremely hard to secure with very little room to<br />
move. I ended up installing it on the drivers side inside the centre console. This has heaps of room<br />
underneath.<br />
It was secured with two cable ties. The power and speaker harness was easily run down from the<br />
stereo harness.<br />
© Copyright Drew 06
6. Running the Microphone.<br />
I placed the microphone up near the rear view mirror. This seemed to be the most central place for<br />
the front of the cabin. Remove the cover on the mirror.<br />
Run the cable through the roof to the door pillar and continue down to the tweeter speaker box.<br />
Once the cable is in run under the speaker box, I removed the little cover in the driver side glove<br />
box, this was a good halfway point for running the cable.<br />
© Copyright Drew 06
7. Remote Installation<br />
The remote I decided to install on the right hand side of the driver on the dash.<br />
The cable was run the same way the microphone was. There is plenty of room under the speaker<br />
cover to run the cable without having to cut/drill any holes. The cables will come out behind in the<br />
stereo cavity. Run them down to the unit and plug them in.<br />
Once these are all plugged in, all that is left is to clean up and put everything back.<br />
© Copyright Drew 06<br />
Fuse holder should be repositioned to this end of<br />
the harness. This will make changing the fuse<br />
much easier. As access is a single screw not the<br />
whole stereo.<br />
Remote Cable<br />
Microphone Cable<br />
Installed Microphone
Everything back together<br />
These are the ISO connectors that come with the units harness, These are not compatible with the X‐Trails<br />
harness. So become extra bits to be stored in the original box.<br />
This is all there is to this install. If you have changed the stereo already it is really quite easy to<br />
finish within about two hours. I currently have it paired with a <strong>O2</strong> Atom and a Sony K750i, both<br />
phones work extremely well and were easy to pair with the unit. It will automatically pair with up to<br />
four devices, not just <strong>O2</strong>.<br />
Good Luck<br />
© Copyright Drew 06