ADJUSTING THE NECK PICKUPS - Ibanez
ADJUSTING THE NECK PICKUPS - Ibanez
ADJUSTING THE NECK PICKUPS - Ibanez

You also want an ePaper? Increase the reach of your titles
YUMPU automatically turns print PDFs into web optimized ePapers that Google loves.
<strong>ADJUSTING</strong> <strong>THE</strong> <strong>NECK</strong><br />
The neck bears the tension of the strings. The curvature of the neck is subtly affected not<br />
only by the tuning state and string gauge, but also by changes in temperature and humidity.<br />
For this reason, the neck contains an internal truss rod that allows the curvature<br />
to be precisely adjusted.<br />
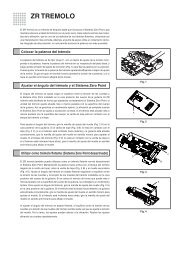
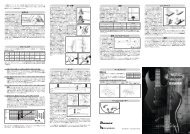
Tune the strings accurately, hold the guitar in playing position, then press the first string<br />
at the first fret and at the fret that is nearest to the point where the neck joins the body,<br />
as shown in Fig. 1. (It will be more convenient to use a capo at the first fret.) Measure<br />
the gap between the string and fret at the eighth fret. Do the same for the sixth (lowest)<br />
string. For each string, the gap should be in the range of 0.3-0.5 mm (a slight bow in<br />
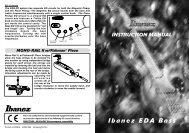
the neck). Although symptoms may vary depending on the type of neck and on how the<br />
neck is joined to the body, problems such as excessive string height, string buzz for high<br />
notes, or intonation difficulties may occur due to an excessively bowed neck (Fig. 2 A),<br />
which will cause this gap to be larger. Conversely, problems such as insufficient string<br />
height, string buzz for low notes, or muted notes may be due to a neck that is bowed<br />
in the reverse direction (Fig. 2 B), which will cause this gap to be smaller. Try to refrain<br />
from simply making a visual judgment. Rather, determine the problem based on the<br />
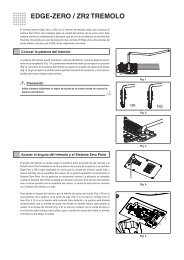
symptoms that occur, and make the appropriate adjustment. The truss rod nut is located<br />
at the headstock end of the neck. Using the Allen wrench or socket wrench included with<br />
the guitar, tighten the nut toward the right (Fig. 3 C) if you want to bend the neck in the<br />
convex direction, or loosen the nut toward the left (Fig. 3 D) if you want to bend the neck<br />
in the concave direction. Make adjustments in quarter-turns, alternating steps of tuning<br />
and adjustment.<br />
Caution<br />
You must exercise appropriate care when adjusting the neck. If the truss rod<br />
nut does not turn as you expect, or if you are unable to make adjustments<br />
accurately, do not attempt to force the adjustment; contact your dealer or the<br />
<strong>Ibanez</strong> company.<br />
<strong>PICKUPS</strong><br />
By adjusting the pickup height, you can make fine adjustments to the volume and tone. For<br />
a commonly used pickup height, adjust the adjustment screws (Fig. 4 E) on both sides of<br />
the pickup with a Phillip screwdriver to create a space of 2-5 mm between the pickup/pole<br />
piece and the strings pressed at the last fret. However, this adjustment will depend on your<br />
playing style or on the characteristics of your amp, so you should make this adjustment while<br />
listening to the actual sound. For pickups of the type that allows the pole piece to be adjusted,<br />
you can correct the volume balance for each string. (Note that you can only make adjustment<br />
within a given adjustment range.) Depending on the type of pole piece, use either an Allen<br />
wrench (Fig. 4 F) or a slot head screwdriver, whichever is suited for the pickups.<br />
The volume will increase as the distance between the pickup and string decreases, but if<br />
the spacing is too close, you may get cracked sounds or the string may buzz due to the<br />
magnetic field of the pickup. Conversely, increasing the distance between the string and<br />
pickup will produce a clearer sound with less distortion, but the high-frequency range<br />
may be attenuated and the volume may drop.<br />
For the LZ series of <strong>Ibanez</strong> active pickups, the pickup characteristics and equalizer balance<br />
are adjusted according to the model hosting them. It is designed to enable correct<br />
action to be taken by making correct combinations of the pickups installed on the guitar<br />
and the equalizer to be used. No other combination will work. Do not use this series with<br />
LZ pickups used with some other models or in conjunction with active pickups produced<br />
by other manufacturers. This is also applicable to equalizer selection.<br />
E<br />
D<br />
D<br />
Fig. 1<br />
Fig. 2<br />
C<br />
Fig. 3<br />
E<br />
Fig. 4<br />
C<br />
8th fret<br />
F
BATTERY<br />
If your guitar has a built-in preamp or equalizer and requires a battery, you will need to<br />
replace the battery when you notice that the volume has decreased or the sound has<br />
become distorted. The battery is housed in a battery compartment or within the control<br />
cavity. (The location may differ depending on the model of the guitar.) Depending on the<br />
model, either 006P (9 V) battery or two AA (1.5 V x 2) batteries are used. When replacing<br />
the battery, check the orientation carefully to place it in the battery compartment or<br />
control cavity in the correct orientation. For a guitar that requires two batteries, do not<br />
mix old and new or alkaline and manganese batteries together. Also, do not use a battery<br />
whose voltage or shape is different from that of the initially installed one.<br />
For a guitar that requires a battery (batteries), the output jack also functions as a power<br />
switch, and the power will turn on when you insert a plug into the output jack. To prevent<br />
battery power leakage and depletion, remove the plug from your guitar if you will not be<br />
using it for an extended period of time. To prevent your amp or other equipment from being<br />
damaged when you plug in your guitar, turn off the power of your equipment or turn<br />
down the volume before you make connections.<br />
Caution<br />
The battery shipped with the guitar is for testing.<br />
<strong>ADJUSTING</strong> <strong>THE</strong> INTONATION<br />
(STRING lENGTH)<br />
The fret position is set according to a calculation of the correct musical scale existing under<br />
certain conditions, referring to the scale from the nut to the bridge. However, conditions under<br />
which the guitar is played greatly vary depending on the thickness of strings, neck condition,<br />
and tuning. In order to correct subtle interval diversions arising from these differences, you will<br />
need to carry out fine adjustment for the string length (intonation adjustment). When replacing<br />
with new strings, or when adjusting the neck, be sure to adjust intonation.<br />
After completing adjustment of the neck or each section of the strings on the higher<br />
side, you should perform accurate tuning (use of a tuning meter is recommended). Hold<br />
it in playing position, and compare the pitch of the string pressed down at the 12th fret<br />
with the harmonic played at the 12th fret. If the pitch played at the 12th fret is lower than<br />
the harmonic, move the bridge saddle forward (Fig. 5 G) to shorten the string length.<br />
Conversely, if the pitch played at the 12th fret is higher than the harmonic, move the<br />
bridge saddle backward (Fig. 5 H) to lengthen the string length. The method of adjusting<br />
depends on the type of bridge your guitar has, so carry out adjustments referring to the<br />
adjustment manual for your bridge.<br />
Caution<br />
The string may break if the saddle is moved a substantial distance, so be sure<br />
to loosen the string before you adjust the saddle if a major adjustment is required.<br />
12F<br />
Fig. 5<br />
G H