Intermate100 Plus/Intermate101 as a .print Client Gateway (e)
Intermate100 Plus/Intermate101 as a .print Client Gateway (e)
Intermate100 Plus/Intermate101 as a .print Client Gateway (e)

You also want an ePaper? Increase the reach of your titles
YUMPU automatically turns print PDFs into web optimized ePapers that Google loves.
White Paper<br />
<strong>Intermate100</strong> <strong>Plus</strong>/101 <strong>as</strong> a .<strong>print</strong> <strong>Client</strong> <strong>Gateway</strong><br />
Example for practice<br />
With Driver Free Native Printing<br />
Driver Free Native Printing with the <strong>Intermate100</strong> <strong>Plus</strong> <strong>as</strong> a .<strong>print</strong> <strong>Client</strong> <strong>Gateway</strong><br />
A .<strong>print</strong> <strong>Client</strong> <strong>Gateway</strong> can greatly simplify the introduction<br />
of ThinPrint .<strong>print</strong> because it can receive <strong>print</strong><br />
jobs for an entire group of clients and <strong>print</strong>ers, decompress<br />
them, and then distribute them conventionally in<br />
a local network – like a local <strong>print</strong> server. Then the<br />
.<strong>print</strong> <strong>Client</strong> is only necessary on the “local <strong>print</strong><br />
server” for this remote LAN. Otherwise, the .<strong>print</strong> client<br />
must be installed on each end device.<br />
The following example helps you install a .<strong>print</strong> <strong>Client</strong><br />
<strong>Gateway</strong> using the <strong>Intermate100</strong> <strong>Plus</strong> or<br />
<strong>Intermate101</strong> <strong>as</strong> a test scenario. Once you get a feel<br />
for the functionality, you can install it according to your<br />
system’s individual requirements.<br />
With Driver Free Native Printing, it is unnecessary<br />
to install <strong>print</strong>er drivers on terminal servers because<br />
<strong>print</strong> jobs are sent “driver free” – in EMF format – to a<br />
central <strong>print</strong> server. The central <strong>print</strong> server renders<br />
the <strong>print</strong> data and sends it <strong>print</strong>-ready – “native“ – to<br />
the <strong>Intermate100</strong> <strong>Plus</strong> or <strong>Intermate101</strong>.<br />
Why ThinPrint .<strong>print</strong> and <strong>Client</strong> <strong>Gateway</strong>?<br />
Sample configuration<br />
Installation<br />
■ Printer and <strong>Intermate100</strong> <strong>Plus</strong>/101<br />
■ <strong>Client</strong> machine(s)<br />
■ Terminal server<br />
■ Central dedicated <strong>print</strong> server<br />
Configuration<br />
■ Network<br />
■ <strong>Intermate100</strong> <strong>Plus</strong>/101<br />
■ Central dedicated <strong>print</strong> server<br />
■ Terminal server<br />
■ Test <strong>print</strong><br />
Appendix<br />
■ Additional sources<br />
■ Abbreviations
© Copyright<br />
This document is the intellectual property of ThinPrint GmbH. This document may be copied in<br />
whole or in part, provided this Copyright notice is included in every copy.<br />
® Registered Trade Marks<br />
All hardware and software names mentioned in this document are the registered trademarks of<br />
their respective company or should be regarded <strong>as</strong> such.<br />
ThinPrint GmbH<br />
Alt-Moabit 91 a/b<br />
10559 Berlin<br />
Germany/Alemania<br />
ThinPrint Pty. Ltd.<br />
L 10, 275 Alfred Street<br />
North Sydney / NSW / 2060<br />
Australia<br />
ThinPrint, Inc.<br />
20525 Center Ridge Rd, Suite 630<br />
Cleveland, Ohio 44116<br />
USA/EEUU<br />
ThinPrint, Inc.<br />
8703 Yates Drive, Suite 200<br />
Westminster, Colorado 80031<br />
USA/EEUU<br />
E-mail: info@thin<strong>print</strong>.com<br />
www: www.thin<strong>print</strong>.com<br />
Issued: December 5, 2006 (v24)
© ThinPrint GmbH 2006<br />
Contents<br />
Foreword ...................................................................................................................... 4<br />
Why ThinPrint .<strong>print</strong> and <strong>Client</strong> <strong>Gateway</strong>? .................................................... 5<br />
Sample configuration .............................................................................................. 6<br />
Installation .................................................................................................................. 7<br />
Safety warning ............................................................................................................... 7<br />
Printer and Intermate10x ................................................................................................ 7<br />
<strong>Client</strong> machine(s) ........................................................................................................... 7<br />
Central <strong>print</strong> server ......................................................................................................... 7<br />
Terminal server .............................................................................................................. 8<br />
Configuration .............................................................................................................. 8<br />
Network ........................................................................................................................ 8<br />
<strong>Client</strong> <strong>Gateway</strong> Intermate10x ........................................................................................... 8<br />
Central <strong>print</strong> server ....................................................................................................... 12<br />
Terminal server ............................................................................................................ 15<br />
Test <strong>print</strong> .................................................................................................................... 15<br />
Appendix .................................................................................................................... 17<br />
Additional sources ........................................................................................................ 17<br />
Abbreviations ............................................................................................................... 17<br />
Intermate10x White Paper 3
Foreword<br />
Foreword<br />
A .<strong>print</strong> <strong>Client</strong> <strong>Gateway</strong> can greatly simplify the introduction of ThinPrint .<strong>print</strong><br />
because it can receive <strong>print</strong> jobs for an entire group of clients and <strong>print</strong>ers, decompress<br />
them, and then distribute them conventionally in a local network – like a local<br />
<strong>print</strong> server. Then the .<strong>print</strong> <strong>Client</strong> is only necessary on the “local <strong>print</strong> server” or<br />
.<strong>print</strong> <strong>Client</strong> <strong>Gateway</strong> for this remote LAN. Otherwise, the .<strong>print</strong> client must be<br />
installed on each end device: PCs, <strong>print</strong>ers, <strong>print</strong> servers (<strong>print</strong> boxes), thin clients,<br />
PDAs, etc. This could mean that with thin clients, for example, a firmware or BIOS<br />
update is necessary. Even mixed environments pose no problem: The .<strong>print</strong> client is<br />
installed onto all devices where simple installation is possible, and all others are<br />
served by a <strong>Client</strong> gateway.<br />
Any machine with .<strong>print</strong> <strong>Client</strong> installed can be used <strong>as</strong> a <strong>Client</strong> <strong>Gateway</strong> (e.g., a<br />
Windows or a Linux workstation). Thin clients or external <strong>print</strong> servers with embedded<br />
.<strong>print</strong> <strong>Client</strong>s can also be used. The following example helps you install a .<strong>print</strong><br />
<strong>Client</strong> <strong>Gateway</strong> using the external <strong>Intermate100</strong> <strong>Plus</strong> or 101 <strong>print</strong> server <strong>as</strong> a test<br />
scenario. Once you get a feel for the functionality, you can install it according to your<br />
system’s individual requirements.<br />
An Intermate10x 1 h<strong>as</strong> an embedded .<strong>print</strong> <strong>Client</strong>. It can address up to five <strong>print</strong>ers:<br />
■ one local <strong>print</strong>er via LPT and/or<br />
■ up to four network <strong>print</strong>ers via LPR/LPD or Raw-Socket (= Standard TCP/IP)<br />
See also www.intermate.com.<br />
1 = <strong>Intermate100</strong> <strong>Plus</strong> or <strong>Intermate101</strong><br />
4 White Paper Intermate10x<br />
© ThinPrint GmbH 2006
© ThinPrint GmbH 2006<br />
Why ThinPrint .<strong>print</strong> and <strong>Client</strong> <strong>Gateway</strong>?<br />
Why ThinPrint .<strong>print</strong> and <strong>Client</strong> <strong>Gateway</strong>?<br />
General .<strong>print</strong><br />
Use • Bandwidth control and <strong>print</strong><br />
data compression, especially<br />
for server b<strong>as</strong>ed environments<br />
• Print data encryption<br />
• Driver Free Printing<br />
• Driver Free Native Printing<br />
Function .<strong>print</strong> Server component provides<br />
bandwidth control, <strong>print</strong><br />
data compression, streaming,<br />
and encryption, then sends <strong>print</strong><br />
data to the .<strong>print</strong> <strong>Client</strong> component.<br />
.<strong>print</strong> components<br />
to be installed<br />
Windows, Unix, AS/400,<br />
or IBM mainframes:<br />
•.<strong>print</strong> Engine<br />
•.<strong>print</strong> <strong>Client</strong><br />
Windows only:<br />
• .<strong>print</strong> AutoConnect<br />
• .<strong>print</strong> Connection Service<br />
if necessary<br />
• .<strong>print</strong> Virtual Channel <strong>Gateway</strong><br />
if necessary<br />
ThinPrint licenses Windows:<br />
• .<strong>print</strong> Application Server<br />
Engine and/or .<strong>print</strong> Server<br />
Engine<br />
• .<strong>print</strong> Connected <strong>Gateway</strong><br />
if necessary<br />
Others:<br />
•.<strong>print</strong> Engine Unix<br />
• .<strong>print</strong> Engine AS/400<br />
•.<strong>print</strong> Engine Host<br />
.<strong>print</strong> <strong>Client</strong> <strong>Gateway</strong><br />
with Intermate10x<br />
Not necessary to install .<strong>print</strong><br />
<strong>Client</strong> on every client device; it's<br />
embedded in the Intermate10x<br />
<strong>print</strong> server<br />
Receipt and decompression of<br />
<strong>print</strong> data, transmission to local<br />
and/or network <strong>print</strong>er(s)<br />
• .<strong>print</strong> Engine onto the<br />
machines, where the <strong>print</strong> jobs<br />
are initiated (e.g., terminal<br />
servers or central dedicated<br />
<strong>print</strong> servers)<br />
• .<strong>print</strong> <strong>Client</strong> (TCP/IP) is<br />
embedded in the Intermate10x<br />
Windows:<br />
• without central <strong>print</strong> server/s:<br />
.<strong>print</strong> Application Server<br />
Engine license<br />
• with central <strong>print</strong> server/s:<br />
.<strong>print</strong> Server Engine license on<br />
each <strong>print</strong> server and .<strong>print</strong><br />
Application Server Engine<br />
license on each terminal server<br />
Others:<br />
• .<strong>print</strong> Engine Unix<br />
• .<strong>print</strong> Engine AS/400<br />
•.<strong>print</strong> Engine Host<br />
Intermate10x White Paper 5
Sample configuration<br />
Sample configuration<br />
By way of example, we will <strong>as</strong>sume an environment with two Windows servers –<br />
a terminal server and a central (dedicated) <strong>print</strong> server. The components necessary<br />
for the example in Illus. 1 are:<br />
■ At le<strong>as</strong>t one PC (<strong>as</strong> terminal client)<br />
■ 1 Intermate10x<br />
■ 2 network <strong>print</strong>ers with their own network card (= internal <strong>print</strong> server)<br />
without integrated .<strong>print</strong> <strong>Client</strong><br />
■ 1 terminal server2 – ThinPrint Output <strong>Gateway</strong> installed (.<strong>print</strong> version 7.0)<br />
■ 1 central <strong>print</strong> server – .<strong>print</strong> Engine installed (.<strong>print</strong> version 7.0)<br />
Tips 1. .<strong>print</strong> <strong>Client</strong> <strong>Gateway</strong> (Intermate10x) works exclusively with the protocol<br />
TCP/IP.<br />
2. The following .<strong>print</strong> (demo) licenses are necessary for this sample configuration:<br />
.<strong>print</strong> Server Engine and .<strong>print</strong> Application Server Engine<br />
Illus. 1<br />
Illus. 1 Sample configuration with <strong>Intermate100</strong> <strong>Plus</strong><br />
2 with or without Citrix Presentation Server<br />
6 White Paper Intermate10x<br />
© ThinPrint GmbH 2006
© ThinPrint GmbH 2006<br />
Installation<br />
Safety warning<br />
Installation<br />
All ThinPrint products are pure software solutions. For safety warnings for your hardware,<br />
ple<strong>as</strong>e consult the technical documentation provided by the respective manufacturer<br />
and supplier of each hardware device and component.<br />
Printer and Intermate10x<br />
– Connect a <strong>print</strong>er (here: OKI C5300) to the Intermate10x’s local interface<br />
(LPT), and connect the Intermate10x to the network (left in Illus. 2).<br />
– Connect the second <strong>print</strong>er’s network card (here: Lexmark T630) to the network<br />
(right in Illus. 2).<br />
Illus. 2<br />
<strong>Client</strong> machine(s)<br />
– Install 32-bit Windows and a RDP or ICA client onto a PC (see Illus. 1).<br />
Central <strong>print</strong> server<br />
Illus. 2 Connecting Intermate10x to the OKI <strong>print</strong>er’s parallel interface and to the network<br />
(left); connecting Lexmark <strong>print</strong>er to the network (right)<br />
– Install the .<strong>print</strong> Engine onto a Windows server; see Illus. 1 and:<br />
•the “.<strong>print</strong> Server Engine quick installation“ manual or<br />
• the chapter “Installing .<strong>print</strong> Engine (per central, dedicated <strong>print</strong> server)”<br />
in the “.<strong>print</strong> Server Engine” manual; Page 17.<br />
Intermate10x White Paper 7
Configuration<br />
Terminal server<br />
Configuration<br />
Network<br />
– Install .<strong>print</strong> AutoConnect and the ThinPrint Output <strong>Gateway</strong> <strong>print</strong>er driver<br />
onto a Microsoft or Citrix terminal server; see Illus. 1 and:<br />
•the “.<strong>print</strong> Server Engine quick installation“ manual or<br />
• the chapter “Installing AutoConnect, Virtual Channel <strong>Gateway</strong>, and Output<br />
<strong>Gateway</strong> (per terminal server)” in the “.<strong>print</strong> Server Engine” manual; Page 17.<br />
– Assign all devices IP addresses within the same subnet; in this example:<br />
•for the Intermate10x 192.168.130.219<br />
•for the Lexmark network <strong>print</strong>er 192.168.130.50<br />
• for the terminal server 192.168.130.111<br />
• for the central <strong>print</strong> server 192.168.130.47<br />
<strong>Client</strong> <strong>Gateway</strong> Intermate10x<br />
Configuring IP address and network <strong>print</strong>ers<br />
IP address – If you do not know the IP address of the Intermate10x or if it is not reachable,<br />
install and start the Intermate Management & Configuration Utility (IMCU) 3<br />
on the PC or the terminal server.<br />
– Enter the IMCU’s IP address in a web browser (Illus. 3). Enter admin in the<br />
logon window which opens – <strong>as</strong> both USER NAME and PASSWORD (= default<br />
account and p<strong>as</strong>sword). Confirm with OK.<br />
3 Included in delivery of the Intermate10x or can be downloaded at www.intermate.com/imcu<br />
8 White Paper Intermate10x<br />
© ThinPrint GmbH 2006
© ThinPrint GmbH 2006<br />
Illus. 3<br />
Illus. 3 Intermate Management & Configuration Utility: Login<br />
– Expand the table of <strong>print</strong> servers (Illus. 4)<br />
Illus. 4<br />
Illus. 4 Intermate Management & Configuration Utility: Select EXPAND<br />
Configuration<br />
Intermate10x White Paper 9
Configuration<br />
– Find the IP address of the Intermate10x here (Illus. 5). Close the IMCU. Further<br />
configuration can be made with a the Intermate10x web interface.<br />
Illus. 5<br />
Illus. 5 IMCU: IP address of the <strong>Intermate100</strong> <strong>Plus</strong><br />
Intermate10x web interface<br />
Login – Now open the Intermate configuration page (192.168.130.219) with a web<br />
browser: Internet Explorer version 6 (!) or later or Netscape.<br />
– Click LOGIN (left arrow in Illus. 6).<br />
Illus. 6<br />
Illus. 6 Intermate configuration page: Choose LOGIN<br />
– Enter admin in the logon window which opens – <strong>as</strong> both USER NAME and<br />
PASSWORD (= default account and p<strong>as</strong>sword). Confirm with OK (Illus. 7).<br />
The Intermate main menu appears (Illus. 8).<br />
10 White Paper Intermate10x<br />
© ThinPrint GmbH 2006
© ThinPrint GmbH 2006<br />
Illus. 7<br />
Illus. 8<br />
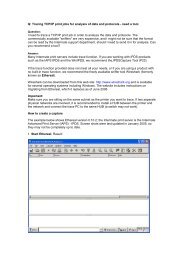
Illus. 8 Intermate’s main menu: Choose THINPRINT<br />
– Choose here THINPRINT (arrow in Illus. 8).<br />
• Choose at ENABLE THINPRINT: Yes (Illus. 9)<br />
• Choose at CURRENT PRINTER 4 : Network Destination 3<br />
• Click SAVE & CONT.<br />
Illus. 9<br />
Configuration<br />
– Now choose NETWORK DESTINATION OPTION (left arrow in Illus. 9).<br />
• Enter at Hostname 3: 192.168.130.50 (Illus. 10)<br />
• Click SAVE & CONT.<br />
– Click REBOOT (IMMEDIATE) to activate the new configuration<br />
(left arrow in Illus. 10).<br />
– CONFIRM the next prompt.<br />
4 = “Output to” of older Intermate <strong>print</strong> servers (= ThinPrint’s default <strong>print</strong>er)<br />
Illus. 7 Login: Enter admin twice,<br />
then click OK<br />
Illus. 9 ThinPrint menu: ENABLE THINPRINT: YES + NETWORK DESTINATION 3 +<br />
choose SAVE & CONT.<br />
Intermate10x White Paper 11
Configuration<br />
Illus. 10<br />
Central <strong>print</strong> server<br />
Illus. 10 Network destination menu: Enter HOSTNAME 3 and choose SAVE & CONT.<br />
Both ThinPrint’s native <strong>print</strong>ing and Driver Free Native Printing can be used with the<br />
Intermate10x <strong>print</strong> servers.<br />
Creating <strong>print</strong>ers<br />
– Create the relevant <strong>print</strong>ers (<strong>print</strong>er objects) on the <strong>print</strong> server for both of the<br />
network <strong>print</strong>ers connected to the Intermate10x. When doing so, install the<br />
<strong>print</strong>er drivers, too. Connect both <strong>print</strong>ers with a ThinPrint port (Illus. 11). In<br />
Port Manager (Illus. 12), select TCP/IP <strong>as</strong> port type (the protocol), 4000 <strong>as</strong> TCP<br />
port and specify the name convention for the <strong>print</strong>er name syntax for each used<br />
ThinPrint port.<br />
Illus. 11<br />
Illus. 11 Port Manager in the MMC: <strong>print</strong>ers connected to ThinPrint ports<br />
12 White Paper Intermate10x<br />
© ThinPrint GmbH 2006
© ThinPrint GmbH 2006<br />
Illus. 12<br />
Illus. 12 Setting <strong>print</strong>er port properties<br />
– Next, rename the <strong>print</strong>ers in the following format:<br />
<strong>print</strong>er_name#ip_address:<strong>print</strong>er_id<br />
Or:<br />
ip_address:<strong>print</strong>er_id#<strong>print</strong>er_name<br />
The following name convention is used below (right in Illus. 12):<br />
<strong>print</strong>er_name#ip_address:<strong>print</strong>er_id<br />
Configuration<br />
The IP address is the .<strong>print</strong> <strong>Client</strong> <strong>Gateway</strong>’s (Intermate10x), and the <strong>print</strong>er ID is 13<br />
for Network Destination 3 or 14 for Network Destination 4. Instead of the IP address,<br />
you can also use the host name of the Intermate10x.<br />
In our example, this creates the two <strong>print</strong>ers connected to the Intermate10x<br />
(Illus. 13):<br />
• Lexmark T630#192.168.130.219:13<br />
• OKI C5300#192.168.130.219:1<br />
Illus. 13<br />
Illus. 13 Printers and Faxes folder on the central <strong>print</strong> server<br />
(The <strong>print</strong>er name before the # is unimportant for addressing <strong>print</strong> data; it only<br />
serves to distinguish the <strong>print</strong>ers.)<br />
Intermate10x White Paper 13
Configuration<br />
– For native <strong>print</strong>ing – without Driver Free Native Printing – share the <strong>print</strong>ers<br />
shown in Illus. 13. Otherwise continue <strong>as</strong> follows:<br />
Driver Free Native Printing settings<br />
– Create for each of these <strong>print</strong>ers a second <strong>print</strong>er, namely an Output <strong>Gateway</strong><br />
<strong>print</strong>er, which can be connected to any port, and share it (Illus. 14).<br />
32 bit – Open the command prompt and change to the following directory on 32-bit systems:<br />
%windir%\system32\spool\drivers\w32x86\3<br />
x64 – ... or on x64 systems:<br />
%windir%\system32\spool\drivers\x64\3<br />
– Assign a suitable target <strong>print</strong>er to each Output <strong>Gateway</strong> <strong>print</strong>er. This is done<br />
each time with the following command (c<strong>as</strong>e sensitive!):<br />
Rundll32 TPPrnUI.dll, TPSetOption_RUNDLL<br />
“source_<strong>print</strong>er” DFNP “target_<strong>print</strong>er”<br />
Here, the Output <strong>Gateway</strong> <strong>print</strong>er is entered <strong>as</strong> each source_<strong>print</strong>er and one<br />
with native <strong>print</strong>er driver <strong>as</strong> target_<strong>print</strong>er. Example (Illus. 14 and 15):<br />
Rundll32 TPPrnUI.dll, TPSetOption_RUNDLL “Lexmark<br />
T630(TPOG)” DFNP “Lexmark T630#192.168.130.219:13”<br />
– L<strong>as</strong>tly, restart the <strong>print</strong> spooler.<br />
Illus. 14<br />
Illus. 15<br />
Illus. 14 Native and Output <strong>Gateway</strong> <strong>print</strong>ers on a central <strong>print</strong> server<br />
Illus. 15 Assign native <strong>print</strong>ers to the Output <strong>Gateway</strong> <strong>print</strong>ers<br />
(example for 32-bit Windows)<br />
14 White Paper Intermate10x<br />
© ThinPrint GmbH 2006
© ThinPrint GmbH 2006<br />
Terminal server<br />
Configuration<br />
Configuring .<strong>print</strong> AutoConnect<br />
The following settings must be made so that AutoConnect can create the necessary<br />
<strong>print</strong>ers in the terminal sessions:<br />
1. Start AutoConnect configuration in the Microsoft Management Console (MMC).<br />
You can use the program group .PRINT ENGINE in START menu (Illus. 16).<br />
Illus. 16<br />
2. Enter all shares under MAP ADDITIONAL PRINTERS on the central <strong>print</strong> server<br />
(Illus. 14). Use the ADD button each time. When finished, confirm by clicking<br />
APPLY (Illus. 17).<br />
Illus. 17<br />
Test <strong>print</strong><br />
Illus. 16 Starting configuration of AutoConnect with MMC<br />
Illus. 17 MMC: adding <strong>print</strong> server shares for connection<br />
Now test your .<strong>print</strong> <strong>Client</strong> <strong>Gateway</strong> installation. Print from within a session on the<br />
terminal server to each of the <strong>print</strong>ers created by .<strong>print</strong> AutoConnect, Lexmark T630<br />
and OKI C5300 (Illus. 18).<br />
Intermate10x White Paper 15
Configuration<br />
Illus. 18<br />
How does <strong>print</strong> data find its way to the correct <strong>print</strong>er?<br />
All <strong>print</strong> jobs are first sent “Driver Free” from the terminal server to the <strong>print</strong> server –<br />
without bandwidth control or compression. The <strong>print</strong> server renders the <strong>print</strong> data<br />
using the native <strong>print</strong>er driver and sends it in <strong>print</strong> format (RAW), compressed, and<br />
across controlled bandwidth to the Intermate10x – the .<strong>print</strong> <strong>Client</strong> <strong>Gateway</strong><br />
(IP address: 192.168.130.219).<br />
After decompressing it the Intermate10x forwards <strong>print</strong> data to the <strong>print</strong>er. Which<br />
<strong>print</strong>er receives what <strong>print</strong> job is decided by the <strong>print</strong>er ID:<br />
Printer<br />
■ Print data with the ID 13 is sent to the Lexmark T630.<br />
■ Print data with the ID 1 is sent to the OKI C5300.<br />
■ Print jobs with no or incorrect ID will be sent to the CURRENT PRINTER – here,<br />
Network Destination 3 (Illus. 9); i.e., to the Lexmark T630 (Illus. 10).<br />
Done!<br />
Next step? Try renaming the <strong>print</strong>ers (<strong>print</strong>er objects) on the central <strong>print</strong> server by<br />
replacing the IP address with the Intermate10x’s host name (DEVICE NAME in Illus. 8;<br />
Page 11). First, though, you must delete the <strong>as</strong>signments for Driver Free Native<br />
Printing (Illus. 15) and then specify new ones (Page 14). Use the following command<br />
prompt command to delete <strong>as</strong>signments:<br />
Example:<br />
Illus. 18 Printers created in the terminal session<br />
Printer ID in the<br />
Intermate10x<br />
Printer (object) name<br />
on the <strong>print</strong> server<br />
Lexmark T630 13 Lexmark T630#192.168.130.219:13<br />
OKI C5300 1 OKI C5300#192.168.130.219:1<br />
Rundll32 TPPrnUI.dll, TPSetOption_RUNDLL<br />
“source_<strong>print</strong>er” DFNP “”<br />
Rundll32 TPPrnUI.dll, TPSetOption_RUNDLL<br />
“Lexmark T630(TPOG)” DFNP “”<br />
Ple<strong>as</strong>e also note that the <strong>print</strong> spooler must then be restarted.<br />
16 White Paper Intermate10x<br />
© ThinPrint GmbH 2006
© ThinPrint GmbH 2006<br />
Appendix<br />
Additional sources<br />
Appendix<br />
■ At www.intermate.com/intermate100plus/ or<br />
www.intermate.com/intermate101/ you will find all documentation on the<br />
<strong>Intermate100</strong> <strong>Plus</strong> or <strong>Intermate101</strong>.<br />
■ At www.thin<strong>print</strong>.com/→ FIND PRODUCT→ .PRINT SERVER ENGINE→ MANUAL(S)<br />
you will find the use manuals for the server and client components of ThinPrint<br />
.<strong>print</strong>.<br />
■ At www.thin<strong>print</strong>.com/→ FIND PRODUCT→ .PRINT SERVER ENGINE→ WHITE<br />
PAPERs or www.thin<strong>print</strong>.com/→ SUPPORT & SERVICES→ WHITE PAPER DOWN-<br />
LOAD you will find additional documentation on ThinPrint.<br />
Abbreviations<br />
BIOS B<strong>as</strong>ic Input/Output System<br />
DFNP Driver Free Native Printing (ThinPrint)<br />
EMF Enhanced Meta File (a <strong>print</strong>er driver independent Windows <strong>print</strong> data type)<br />
IBM International Business Machines Co.<br />
ICA Independent Computing Architecture (Citrix)<br />
ID Identification (number)<br />
IMCU Intermate Management & Configuration Utility<br />
IP see TCP/IP<br />
LAN Local Area Network<br />
LPD Line Printer Daemon<br />
LPR Line Printer Remote<br />
LPT Windows Line Printer Port<br />
MMC Microsoft Management Console<br />
OKI Oki Electric Industry Co.<br />
PDA Personal Digital Assistant<br />
PC Personal Computer<br />
PCL Printer Command Language<br />
RAW Standard <strong>print</strong> data type (<strong>print</strong> jobs are rendered with a native <strong>print</strong>er driver)<br />
RDP Remote Desktop Protocol (Microsoft)<br />
RFC Request for Comments (series of documents, begun in 1969, which describe the<br />
Internet Protocol Suite and relevant experiments)<br />
TCP/IP Transport Control Protocol/Internet Protocol<br />
TP ThinPrint<br />
WAN Wide Area Network<br />
Intermate10x White Paper 17