bbbb vvvvvvvvvvvvvvvvvvvvvvvvvvvvvvvvvvvvvvvvvvv - rumia.edu.pl
bbbb vvvvvvvvvvvvvvvvvvvvvvvvvvvvvvvvvvvvvvvvvvv - rumia.edu.pl
bbbb vvvvvvvvvvvvvvvvvvvvvvvvvvvvvvvvvvvvvvvvvvv - rumia.edu.pl

You also want an ePaper? Increase the reach of your titles
YUMPU automatically turns print PDFs into web optimized ePapers that Google loves.
Instruction manual N025/T125/T145 1<br />
1. Introduction<br />
NMRA-DCC/Motorola<br />
Locomotive Decoder with<br />
Load Control<br />
The decoders N025, T125 and T145 are compatible with NMRA-DCC-standard and the<br />
Marklin Motorola digital format (old and new), therefore can be used with command<br />
stations by various sup<strong>pl</strong>iers such as Marklin, Lenz, Uhlenbrock (Intellibox),<br />
Fleischmann Twin-Center, Arnold, Digitrax, SystemOne, Roco, Zimo, etc. . The decoder<br />
can be used with DC motors and coreless motors (for exam<strong>pl</strong>e Escap, Faulhaber).<br />
Decoder types :<br />
decoder Motor Function outputs Interface <strong>pl</strong>ug Order-no.<br />
current<br />
(incl. light outputs)<br />
N025 0,7 A 2 no 81310<br />
N025-P 0,7 A 2 yes, NEM 651 81330<br />
T125 1,1 A 2 no 81610<br />
T125-P 1,1 A 2 yes, NEM 652 81620<br />
T145 1,1 A 4 no 81710<br />
T145-P 1,1 A 4 yes, NEM 652 81720<br />
Technical specifications and Features :<br />
• short and extended (4-digit) addresses and 14, 28 und 128 speed steps (DCC-mode)<br />
• with Motorola digital format 255 addresses and 14 or 28 speeds steps<br />
• adjustable load control<br />
• high frequency (approx. 16 kHz) and low frequency motor control<br />
• switchable shunting gear, adjustable low-, medium- and maximum speed<br />
• programming on the mains<br />
• function outputs with programmable light effects and dimming<br />
• maximum operating voltage (track voltage) 24 V<br />
• maximum current per light output 0.15 A<br />
• maximum current per function output (only T145) 0.30 A<br />
• total load (analogue/digital operation) N025 0.7 A/0.8 A<br />
• total load (analogue/digital operation) T125/145 1.1 A/1.2 A<br />
• operating temperature 0 ... 60°C<br />
• dimensions (mm) N025 approx.. 8.9 x 11.4 x 3.3<br />
• dimensions (mm) T125/145 approx.. 13.9 x 24.6 x 2.9<br />
The motor and light outputs of the decoder are protected against excess current.<br />
However, damage may be caused by short circuit between current pickup and motor,<br />
short circuit between motor output and locomotive chassis or overloading the decoder.<br />
This locomotive decoder is intended for installation in model railroads.<br />
Please note : This decoder is not suitable for operation with conventional AC<br />
sup<strong>pl</strong>y and the voltage pulse for change the direction! The high voltage of this pulse<br />
will cause the destruction of the decoder.<br />
2. Safety instructions<br />
This product is not a toy! Not suitable for children under 14 years. Not suitable for<br />
children under 3 years because of danger of their swallowing the small constituent<br />
pieces! At an incorrect use there exist a danger of hurting because of cutting edges and<br />
tips. Please retain these instructions for further reference.<br />
3. Installing the decoder<br />
3.1. Preparation<br />
Only locomotives, which run smoothly in analogue mode, should be equipped with a<br />
digital decoder. A secure and uninterrupted current pickup is important especially in<br />
digital mode. Change worn coal brushes and defect lights and clean wheel pick-ups. The<br />
decoder should be installed inside the locomotive in such a way as to avoid overheating.<br />
Tools : For installing the decoder <strong>pl</strong>ease use a soldering iron with 30 Watts max. (if<br />
possible with temperature control), electronic solder (no soldering paste), side cutters (to<br />
shorten the leads) and small screw drivers. You also need insulation tape (to cover any<br />
metal parts of the locomotive) and double sided tape to fasten the decoder.<br />
Before installing the decoder you have to com<strong>pl</strong>etely insulate the motor, which means<br />
there should not be any electrical connection between motor and wheel pick-up. Don’t<br />
forget which motor terminals were connected with the right or left wheel pick-up.<br />
Advice for older Fleischmann locomotives: Often in these locomotives the motor<br />
shield is part of the motor’s power sup<strong>pl</strong>y and therefore connected with one of the wheel<br />
pick-ups. To insulate the motor you have to cut off this connection or re<strong>pl</strong>ace the motor<br />
shield.<br />
3.2. Maximum current load capacity<br />
Besides the desired functions and the available installation space the current draw of the<br />
motor under full load determines the selection of a suitable decoder.<br />
The decoder sup<strong>pl</strong>ies a motor current of 1.1 A. Values regarding current draw of locos<br />
generally refer to a voltage of 12 or 14 Volts. Is the digital voltage of your command<br />
station higher (e.g. Roco “Lokmaus”, LGB, Intellibox), the current rises and could<br />
potentially exceed the permitted value of 1.1A. For operating H0 gauge we recommend a<br />
track voltage of 16 V.<br />
The total current load capacity of the decoder in digital mode is 1.2 A. If the motor draws<br />
e.g. 1.0 A, then the total current available for all light and function outputs is 200mA. The<br />
partitioning of the current for exam<strong>pl</strong>e could look like this: For directional headlight<br />
50mA (outputs A and B), output C=50mA (e.g. for interior lighting). Then at output D<br />
100mA are still available (e.g. for a smoke generator).<br />
Each light output of the decoder can sup<strong>pl</strong>y 150mA. The two function outputs have got a<br />
load capacity of 300mA each.<br />
Please observe the maximum load capacity of the decoder and each individual output.<br />
The decoder may be destroyed through overload!<br />
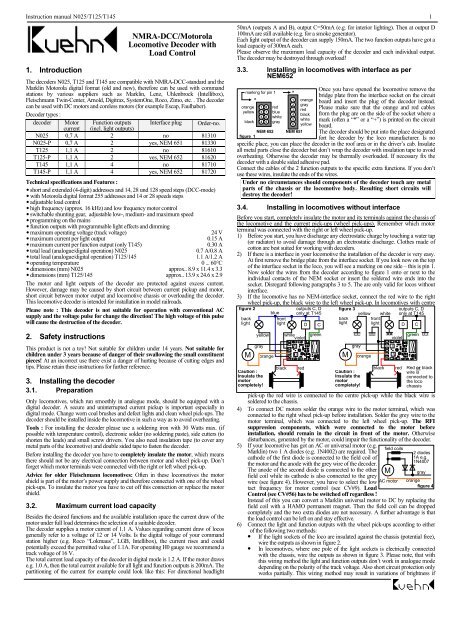
3.3. Installing in locomotives with interface as per<br />
NEM652<br />
marking for pin 1 *<br />
orange<br />
yellow<br />
black<br />
*<br />
1 8<br />
2 7<br />
3 6<br />
4 5<br />
NEM 652<br />
figure 1<br />
red<br />
blue<br />
white<br />
gray<br />
1<br />
2<br />
3<br />
4<br />
5<br />
6<br />
NEM 651<br />
orange<br />
gray<br />
red<br />
black<br />
white<br />
yellow<br />
Once you have opened the locomotive remove the<br />
bridge <strong>pl</strong>ate from the interface socket on the circuit<br />
board and insert the <strong>pl</strong>ug of the decoder instead.<br />
Please make sure that the orange and red cables<br />
from the <strong>pl</strong>ug are on the side of the socket where a<br />
mark (often a “*” or a “+”) is printed on the circuit<br />
board.<br />
The decoder should be put into the <strong>pl</strong>ace designated<br />
fort he decoder by the loco manufacturer. Is no<br />
specific <strong>pl</strong>ace, you can <strong>pl</strong>ace the decoder in the roof area or in the driver’s cab. Insulate<br />
all metal parts close the decoder but don’t wrap the decoder with insulation tape to avoid<br />
overheating. Otherwise the decoder may be thermally overloaded. If necessary fix the<br />
decoder with a double sided adhesive pad.<br />
Connect the cables of the 2 function outputs to the specific extra functions. If you don’t<br />
use these wires, insulate the ends of the wires.<br />
Under no circumstances should components of the decoder touch any metal<br />
parts of the chassis or the locomotive body. Resulting short circuits will<br />
destroy the decoder!<br />
3.4. Installing in locomotives without interface<br />
Before you start, com<strong>pl</strong>etely insulate the motor and its terminals against the chassis of<br />
the locomotive and the current pick-ups (wheel pick-ups). Remember which motor<br />
terminal was connected with the right or left wheel pick-up.<br />
1) Before you start, you have discharge any electrostatic charge by touching a water tap<br />
(or radiator) to avoid damage through an electrostatic discharge. Clothes made of<br />
cotton are best suited for working with decoders.<br />
2) If there is a interface in your locomotive the installation of the decoder is very easy.<br />
At first remove the bridge <strong>pl</strong>ate from the interface socket. If you look now on the top<br />
of the interface socket in the loco, you will see a marking on one side – this is pin 1.<br />
Now solder the wires from the decoder according to figure 1 onto or next to the<br />
individual contacts of the NEM socket or insert the soldered wire ends into the<br />
socket. Disregard following paragraphs 3 to 5. The are only valid for locos without<br />
interface.<br />
3) If the locomotive has no NEM-interface socket, connect the red wire to the right<br />
. wheel pick-up, the black wire to the left wheel pick-up. In locomotives with centre<br />
figure 2<br />
back<br />
light<br />
M<br />
yellow<br />
gray<br />
Caution :<br />
Insulate the<br />
motor<br />
com<strong>pl</strong>etely!<br />
orange<br />
blue<br />
front<br />
light<br />
black<br />
white<br />
violet<br />
outputs C, D<br />
only at T145<br />
red<br />
D C<br />
green<br />
figure 3<br />
yellow white<br />
back<br />
light<br />
front<br />
light<br />
pick-up the red wire is connected to the centre pick-up while the black wire is<br />
soldered to the chassis.<br />
4) To connect DC motors solder the orange wire to the motor terminal, which was<br />
connected to the right wheel pick-up before installation. Solder the grey wire to the<br />
motor terminal, which was connected to the left wheel pick-up. The RFI<br />
suppression components, which were connected to the motor before<br />
installation, should remain in the circuit in front of the motor. Otherwise<br />
disturbances, generated by the motor, could impair the functionality of the decoder.<br />
5) If your locomotive has got an AC or universal motor (e.g.<br />
Marklin) two 1 A diodes (e.g. 1N4002) are required. The<br />
cathode of the first diode is connected to the field coil of<br />
the motor and the anode with the grey wire of the decoder.<br />
The anode of the second diode is connected to the other<br />
field coil while its cathode is also connected to the grey<br />
wire (see figure 4). However, you have to select the low<br />
tact frequency for motor control (see CV#9). Load<br />
Control (see CV#56) has to be switched off regardless !<br />
field coils<br />
2 diodes<br />
1A e.g.<br />
1N4007<br />
M gray<br />
AC motor<br />
Red or black<br />
wire is<br />
connected to<br />
the loco<br />
chassis<br />
orange<br />
figure 4<br />
Instead of this you can convert a Marklin universal motor to DC by re<strong>pl</strong>acing the<br />
field coil with a HAMO permanent magnet. Then the field coil can be dropped<br />
com<strong>pl</strong>etely and the two extra diodes are not necessary. A further advantage is that<br />
the load control can be left on and stay effective.<br />
6) Connect the light and function outputs with the wheel pick-ups according to either<br />
of the following two methods:<br />
• If the light sockets of the loco are insulated against the chassis (potential free),<br />
wire the outputs as shown in figure 2.<br />
• In locomotives, where one pole of the light sockets is electrically connected<br />
with the chassis, wire the outputs as shown in figure 3. Please note, that with<br />
this wiring method the light and function outputs don’t work in analogue mode<br />
depending on the polarity of the track voltage. Also short circuit protection only<br />
works partially. This wiring method may result in variations of brightness if<br />
M<br />
gray<br />
Caution :<br />
Insulate the<br />
motor<br />
com<strong>pl</strong>etely!<br />
orange<br />
black<br />
violet<br />
outputs C, D<br />
only at T145<br />
red<br />
D C<br />
green
Instruction manual N025/T125/T145 2<br />
used with command stations, with transmit signals in Marklin Motorola digital<br />
format or signals in Marklin digital format and DCC-signals simultaneously.<br />
Light outputs A (white) and B (yellow) may be operated in two different ways.<br />
The adjustment is done with CV#56:<br />
• When using the outputs for directional headlights connect the white wire with<br />
the forward bulb and the yellow wire with the rear bulb. Connect the other pole<br />
of the bulbs with the blue wire. When using LEDs, connect the anodes to the<br />
blue wire and the cathodes via a resistor (approx. 1kOhms/0.125W) to the<br />
yellow respectively white wire.<br />
• When using the function outputs A and B for non-directional head light and an<br />
auxiliary function, connect the white wire with the lights and the yellow wire<br />
with the auxiliary function. Connect the other pole of the head lights and the<br />
auxiliary function to the blue wire.<br />
7) Afterwards check the entire wiring, the decoder and the motor connections for<br />
possible short circuits.<br />
8) Are there any metal parts close to the decoder, cover them with insulation tape.<br />
Don’t wrap the decoder in insulation tape to avoid overheating. Fasten the<br />
decoder with a double sided adhesive tape inside the locomotive.<br />
Under no circumstances should components of the decoder touch any metal<br />
part of the chassis or the locomotive body. The motor terminals must not have<br />
any connections to the wheel pick-ups or chassis. Resulting short circuits will<br />
destroy the decoder.<br />
4. Checking for correct installation<br />
The first test should be carried out on track with current limiter e.g. on the programming<br />
track of your DCC command station. If you use the Intellibox or the Twin-Center<br />
previously switch it to the programming mode. Put the locomotive onto the<br />
programming track and read out the primary address (CV#1). All new decoders are set to<br />
value 03. If there is no feedback, check the wiring of the wheel pick-ups and motor<br />
connections. If you use an “old” Arnold command station you cannot read out the<br />
address. Instead read out the start voltage (R2= 2 bars). The start voltage of all new<br />
decoders is set to value 1, 3 or 7. Once this first test was successful, you may put the<br />
locomotive onto any normal track connected to the DCC command station.<br />
The decoder N025/T125/T145 indicates a short circuit (or an overload) through<br />
blinking headlights. In this case switch off the power immediately! Warning:<br />
Even in case of a motor short circuit the decoder may provide feedback to the<br />
command station when standing on the programming track. Therefore check<br />
very carefully that the wiring is correct.<br />
Now try to operate the locomotive under address 03 (initially switch off any functions)<br />
and check the direction of travel. If not correct, the wheel pick-ups or motor connections<br />
have been swapped. Now you can test the lights and auxiliary functions. If the headlight<br />
don’t match the direction of travel, change the connecting wires (white, yellow). If the<br />
locomotive stops when lights or extra functions are switched on, there is a short circuit in<br />
the wiring or an overload of the light or function outputs. An overload can occur for<br />
exam<strong>pl</strong>e through high digital voltages and the starting current of the bulbs. If necessary,<br />
put a resistor of 47Ohm/0.25 W between the headlight and the light output.<br />
If the overload protection trips during acceleration, the track voltage may be too high. A<br />
locomotive, which according to the data sheets, draws a current of 0.8 A at 12 V, will<br />
draw a current of approx. 1.4 A at 21 V (e.g. Roco „Lokmaus“, Lenz „compact“ or the<br />
Intellibox in setting „gauge H0“.<br />
5. Programming of the decoder<br />
kuehn-decoders can be adapted to your locomotives and the desired operating<br />
characteristics through programming of so called configuration variables (CVs). Follow<br />
the instructions of your digital command station when programming. Programming on<br />
the programming track can be done through “Physical Register Addressing”, “Paged CV<br />
Addressing” or “Direct Mode Addressing”. In mode “Physical Register Addressing”<br />
only certain CVs can be adjusted. The following allocation ap<strong>pl</strong>ies:<br />
Register R 1 R 2 R 3 R 4 R 5 R 6 R 7 R 8<br />
bar 1 2 3 4 5<br />
CV-No. CV#1 CV#2 CV#3 CV#4 CV#29 - CV#7 CV#8<br />
Additionally all configuration variables of the kuehn-decoder (except the addresses)<br />
can be changed during operation with “Operation mode programming“ (also called<br />
“programming on the main”).<br />
Programming with the “old” Arnold command station, equivalent to Marklin<br />
digital “=” (6027) : The command stations by Arnold and Marklin operate with<br />
programming mode Physical register addressing and can only program registers R1 to<br />
R5. Please refer to the above table for the correct number of bars for each CV. The<br />
address and all register, which contain a value of 0, can be programmed but not read out.<br />
The decoders cannot be fully programmed since the range of values of these command<br />
stations is limited from 1 to 99.<br />
Programming with Lenz “compact” command station : With Lenz „compact“<br />
version 3.1 you can only program registers R1 to R6. With later versions you can<br />
program and read out all CVs.<br />
Programming with Trix “Command Control 2000” : The Trix Command Control<br />
2000 cannot program DDC-decoders. Limited operation is possible in 14 speed step<br />
mode for the addresses 2, 4, 6 and 8.<br />
Programming with Marklin „Control Unit“ 6021: Programming of all parameters is<br />
carried out electronically without opening the locomotive (no DIP-switches required).<br />
Proceed as follows:<br />
Make certain, that only the locomotive to be programmed is on the track. Now switch on<br />
the Marklin command station or press the “Stop” and “Go” buttons at the same time until<br />
a reset is triggered. Enter the address (alternately address 80 if you don’t know the correct<br />
address), turn the speed control knob as far left as possible (change of direction) and hold<br />
it down for about 8 to 12 seconds. Thus the decoder changes to programming mode,<br />
which is indicated by the blinking lights. Release the speed knob now.<br />
Now enter the number of the configuration register, which you want to change (e.g. 05<br />
for CV#5: maximum speed). Confirm this entry by turning the speed control knob to the<br />
far left (change of direction). The lights will flash repeatedly. Now you can enter the<br />
appropriate value of the configuration register. Should you want to r<strong>edu</strong>ce the maximum<br />
speed of the locomotive enter for instance 48. This entry also has to be confirmed by<br />
turning the speed control knob to the far left. Now this entry is stored in the memory of<br />
the decoder. The lights come on for about three seconds. Then the decoder is ready fort<br />
he next entry, which is indicated by the blinking lights.<br />
To exit the programming mode enter number 80 or press the “Stop” key of the command<br />
station.<br />
You can only enter the values 1 to 64 for configuration registers (and 80 to exit), thus the<br />
registers 0 to 63 can be programmed. To write a value of 0 into the decoder you have to<br />
enter the address 80 at the control unit.<br />
The values entered for the maximum and medium speed (CV#5 and CV#6) are<br />
multi<strong>pl</strong>ied by 4 within the decoder to achieve the correct adaptation to the values used in<br />
DCC mode (from 0 to 255).<br />
Decoder - Reset : If you don’t know how to proceed after programming and you<br />
want to restore the factory settings of the decoder, you have to program a value of<br />
8 into CV#8.<br />
Table 1: configuration variables of the decoder :<br />
CV-No. Description Range of Factory Your<br />
values settings values<br />
CV#1 Primary (short) address 1...127 3<br />
CV#2 Start voltage 0 ... 255 1<br />
CV#3 Acceleration rate 0 ... 63 2<br />
CV#4 Deceleration rate 0 ... 63 2<br />
CV#5 Maximum voltage 0 ... 255(15) 0<br />
CV#6 Medium voltage 0 ... 255 0<br />
CV#7 Manufacturer version number - min. 32<br />
CV#8 Manufacturer ID number - 157<br />
CV#9 Motor control frequency 0,1 0<br />
CV#17 Extended address, part 1 192...231 192<br />
CV#18 Extended address, part 2 0 ... 255 0<br />
CV#19 Consist address 0 ... 255 0<br />
CV#29 Configuration register 0 ... 63 6<br />
CV#49 Special effects output A (white) 0 ... 255 0<br />
CV#50 Special effects output B (yellow) 0 ... 255 0<br />
CV#51 *<br />
Special effects output C (green) 0 ... 255 0<br />
CV#52 *<br />
Special effects output D (violet) 0 ... 255 0<br />
CV#53 I-value for load control 0...63 2<br />
CV#54 P-value for load control 0...63 16<br />
CV#55 Cycle time of effects 0 ... 7 0<br />
CV#56 User configuration register 1 0 ... 7 6<br />
CV#58 Mapping output B (yellow) 0 ... 255 0<br />
CV#59 * Mapping output C (green) 0 ... 255 1<br />
CV#60 * Mapping output D (violet) 0 ... 255 2<br />
CV#67-94 Speed table 0 ... 255 Curve 1<br />
CV#95 Reverse trim 0 ... 255 0<br />
CV#105 User-ID 1 0 ... 255 0<br />
CV#106 User-ID 2 0 ... 255 0<br />
*) use this CVs with decoder T145, without function at decoders N025 and T125<br />
Description of configuration registers :<br />
• CV#1 (primary address) ,CV#17,18 (extended address) : The primary address can<br />
have values from 1 to 127. If you need more addresses, then use the extended address<br />
mode (CV#17,18). Only one type of address can be active (primary or extended<br />
address). The type of address can be selected in CV#29.<br />
• CV#2 (start voltage), CV#6 (medium voltage), CV#5 (maximum voltage) : Each<br />
speed step must relate to a certain motor voltage dependent on the number of speed<br />
steps. The allocation can be done by calculating the start, medium and maximum<br />
voltage or by using a table, which contains the motor voltage for each speed step<br />
(CV#67 to CV#94). The higher the motor voltage, the higher is the speed of the loco.<br />
With CV#2, 5 and 6 you can adapt the speed curve (see graphic) very easily and<br />
quickly. When using the speed table you may have to adapt all 28 CVs.<br />
The start voltage is the voltage provided to the motor at speed step 1. The medium<br />
voltage is ap<strong>pl</strong>ied at a medium speed step (depending on the mode 7, 14 or 64) and the<br />
maximum voltage is ap<strong>pl</strong>ied at the highest speed step. Value of 2 equals about 0.8%, a<br />
value of 255 equals 100% of the maximum motor voltage. The values of all other<br />
speed steps are calculated from these edge values. CV#5, for instance, allows the<br />
r<strong>edu</strong>ction of the maximum speed of “racing locomotives”. When entering a speed<br />
curve the values must always be as follows: start voltage (CV#2)
Instruction manual N025/T125/T145 3<br />
⇒Hints : Shunting locomotive is too fast, then CV#5=128 (maximum speed set to<br />
50%). If the locomotive drives troubledly at speed step 1, then enter 3...7<br />
in CV#2.<br />
CV-Werte Motorspannung (=Geschwindigkeit)<br />
255 100%<br />
191<br />
127<br />
63<br />
0<br />
75%<br />
50%<br />
25%<br />
0<br />
b) lineare Geschwindigkeitskennlinie<br />
(CV#6=1), CV#5 je nach<br />
gewünschter Vmax<br />
c) leicht geknickte Geschwindigkeitskennskennlinie,<br />
CV#5=190 (ca. 75%)<br />
und CV#6=90 (ca. 35%)<br />
CV#2 (Startspg.)<br />
CV#5 (Maximalspg.)<br />
a) exponentielle Geschwindigkeitskennlinie,<br />
wenn CV#6=0<br />
(Auslieferungszustand)<br />
Anpassung Vmax mit CV#5<br />
1 2 3 4 5 6 7 8 9 10 11 12 13 14<br />
2 4 6 8 10 12 14 16 18 20 22 24 26 28<br />
Geschwindigkeitstufen (Speed steps, 14- und 28-step-Modus)<br />
• CV#3 (acceleration rate) : The content of this CV corresponds to the time in seconds<br />
needed for accelerating from 0 to maximum speed. The value of 0 represents an<br />
immediate change of speed. The maximum value is 63.<br />
• CV#4 (deceleration rate) : The value defines the deceleration similar to CV#3.<br />
• CV#7,8 : Here you find the manufacturer identification number (kuehn-decoders<br />
have got the 157) and the version number of the decoder.<br />
• CV#9 (motor control frequency) : This CV defines the motor control frequency. The<br />
possible values for CV#9 you can find in the table:<br />
Bit-No. Description Bit value CV value<br />
High frequency motor control (15.6kHz) for modern 0 0<br />
0<br />
DC and coreless motors (for exam<strong>pl</strong>e Escap,Faulhaber)<br />
Low frequency motor control (120Hz) for older DC<br />
motors or AC/universal motors (for exam<strong>pl</strong>e Marklin)<br />
1 1<br />
• CV#17,18 (extended address) : See CV#1 (primary address)<br />
• CV#19 : The consist address in this register is set by the command station, provided it<br />
supports this feature. You don’t have to program this register yourself. It is preset to 0.<br />
• CV#29 (configuration register): Configuring of basic properties of the decoder, e.g.<br />
number of speed steps (14 or 28/128) and addressing mode (short or extended<br />
addresses). The values of your desired functions must be added and entered into<br />
CV#29.<br />
Bit-No. *) Description Bit-value CV-value<br />
0<br />
Normal direction of travel<br />
Reverse direction of travel<br />
0<br />
1<br />
0<br />
1<br />
1<br />
14 speed step mode (resp. 27 speed steps too)<br />
28/128 speed step mode<br />
0<br />
1<br />
0<br />
2<br />
2<br />
No analogue operation<br />
Permit analogue operation<br />
0<br />
1<br />
0<br />
4<br />
4<br />
Form the speed curve with CV#2,5,6<br />
Use speed table (CV#67-94)<br />
0<br />
1<br />
0<br />
16<br />
5<br />
Use primary (short) address (CV#1)<br />
Use extended address (CV#17,18)<br />
0<br />
1<br />
0<br />
32<br />
*) Lenz digital <strong>pl</strong>us system counts the bits in reverse order from 1 to 8 unlike the NMRA standard.<br />
⇒Hint : frequently used values for CV#29 (factory setting is 6):<br />
CV#29= Description<br />
0 (8)* 14 (27) speed steps, short address, no analogue mode<br />
2 28/128 speed steps, short address, no analogue mode<br />
4 14 (27) speed steps, short address, analogue operation possible<br />
6 28/128 speed steps, short address, analogue operation possible<br />
38 28/128 speed steps, extended address, analogue operation possible<br />
* : When using the “old” Arnold command station enter value 8<br />
• CV#49, 50, 51, 52 (special effects) : With this registers you can set special lighting<br />
effects for light and function outputs A, B, C and D.<br />
CV-No. Colour of wire CV-No. Colour of wire<br />
49 white 51 green<br />
50 yellow 52 violet<br />
Add the required value (1, 2, 4, 8 or 16) for the desired lighting effect to the operation<br />
conditions and enter the result into the appropriate register. Value “0” switches off all<br />
effects of the output, only ON and OFF is active. If the intensity of the lamps is too<br />
high because of the high digital voltage, you can r<strong>edu</strong>ce that by dimming. Enter a<br />
value 16 into the CV of the appropriate light or function output. The operation<br />
conditions “off, when forward” and “off, when reverse” will be set automatically for<br />
directional lighting and should remain 0. If you use outputs C or D with F1 to F8 you<br />
can set a directional condition.<br />
Operating conditions Lighting effects<br />
Bit-No. 7 6 5 4 3 2 1 0<br />
Descrip- Dimming, Off, Off, Dim- Blinking Blinking Flash Pulsing<br />
tion when F3 when when ming phase A phase B light light<br />
ON forward reverse<br />
CV-value 128 64 32 16 8 4 2 1<br />
• CV#53,54 (parameters of load control) : With this CVs you can adapt the load control<br />
to many different motors and drive systems. The factory settings provide satisfactory<br />
results with many newer type motors. For older types of motors the parameters may<br />
have to be adjusted. Besides the adaptation of the parameters, the motor control<br />
frequency (see CV#9) has a tremendous influence on running properties, particularly<br />
with older type motors. The parameter “P” in CV#54 determines the intensity of load<br />
control. The greater the “P”-value (16…32) the stronger the control effect (and r<strong>edu</strong>ce<br />
speed fluctuations at medium speed steps), however, this results in a higher creeping<br />
speed. The parameter “I” in CV#53 determines how quickly the decoder responds to<br />
deviations from the desired speed. If the “I”-value is too high it may lead to speed<br />
fluctuations. The “I”-value should be r<strong>edu</strong>ced for coreless motors (1...3), while it<br />
should be increased for motors whit large flywheels (2…8). If you increase the “I”value<br />
you should also increase the “P”-value. If the locomotive runs unevenly in speed<br />
step 1 the set CV#2 to 3…4.<br />
• CV#55 (cycle time of effects/dimming rate) : With the low digit (x0..x7) of CV#55<br />
you can adjust the dimming rate (brightness) of the function outputs – a value of “0”<br />
is maximum and a value of “7” minimum brightness. You must allow the dimming in<br />
the effect registers for every output (CV#49…52). With the high digit of CV#55<br />
(0x...9x) you can adapt the frequency of the blinking effects (value 0 correspond to a<br />
cycle time of 0,5s ; a value of correspond to a cycle time of 3,0s).<br />
• CV#56 (user-configuration register 1) : Here you can select additional features of the<br />
decoder, for exam<strong>pl</strong>e activating the load control or selecting the function of output B.<br />
Add the values for the desired function and enter the result into CV#56.<br />
Bit-No. *) Description Bit-value CV-value<br />
Directional lighting (FL/F0 controls the white and 0 0<br />
yellow wire = output A and B)<br />
0<br />
Non-directional lighting (the selected function in 1 1<br />
CV#58 controls the yellow wire = output B)<br />
Load control off 0 0<br />
1<br />
Load control on 1 2<br />
Shunting gear of 0 0<br />
2<br />
Shunting gear switchable with F4 (on/off) 1 4<br />
Reserved 0 0<br />
3<br />
Reserved 1 8<br />
*) Lenz digital <strong>pl</strong>us system counts the bits in reverse order from 1 to 8 unlike the NMRA standard.<br />
At a value 1 (or 3, 5 or 7) the directional lighting feature is deactivated. F0 (light) now<br />
controls output A. With the yellow wire the output B will be controlled through the<br />
function in CV#58.<br />
• CV#58, 59 and 60: Here you can program which function controls which output<br />
(function mapping). Output A (white) is always controlled through F0 (light). Should,<br />
for exam<strong>pl</strong>e, output B (yellow) be controlled with F1, enter value 1 into CV#58 and<br />
set non directional lighting in CV#56. Should, for exam<strong>pl</strong>e, output C (green) be<br />
controlled with function F5, then set CV#59 to value 16. Factory settings is: Output<br />
C=F1, output D=F2.<br />
Bit-No. 7 6 5 4 3 2 1 0<br />
CV#58 output B (yellow) F8 F7 F6 F5 F4 F3 F2 F1<br />
CV#59 output C (green) F8 F7 F6 F5 F4 F3 F2 F1<br />
CV#60 output D (violet) F8 F7 F6 F5 F4 F3 F2 F1<br />
Value 128 64 32 16 8 4 2 1<br />
• CV#67 (speed step 1) to CV#94 (speed step 28) speed table: Represents the motor<br />
voltage for each of the 28 speed steps. A value of 1 represents 0.4%, 255 corresponds<br />
to 100% motor voltage. With 14 speed step mode only the odd positions in the table<br />
are utilised (#CV#67, 69, 71 etc.). With 128 speed steps the table is not utilised.<br />
• CV#95 (reverse trim) : You can lower (or higher) the speed for reverse travel with<br />
CV#95 using the following formula: motor voltage reverse = (motor voltage forward)<br />
* (CV#95/128). At value 128 (or 0) the speed is the same in both directions. If CV#95,<br />
for exam<strong>pl</strong>e, is set to 64, then the reverse speed is only half the speed when travelling<br />
forwards.<br />
• CV#105,106 (User-Data) : You may store any date in these registers. The values in<br />
these registers have no impact on the operation of the decoder.<br />
6. Problem solving<br />
Lights go on and off corresponding with the speed steps :<br />
The different settings of the speed step modes in the command station and the<br />
decoder causes this effect. The command station transmits driving commands with<br />
28 speed steps. The decoder is set to 14 (=27) speed step mode. The speed step<br />
mode of the command station and the decoder must be set to the same number of<br />
speed steps. You can set the decoder to 28 speed steps by programming for exam<strong>pl</strong>e<br />
the value of 2 or 6 into CV#29 (resp. R5).<br />
Lights cannot be switched on or off :<br />
The speed step mode of the command station and the decoder are not the same. The<br />
command station transmits driving commands with 14 (or 27) speed steps. The<br />
decoder is set to 28/128 speed step mode. The speed step mode of the command<br />
station and the decoder must be set to the same number of speed steps.<br />
Locomotive does not operate in 128 speed step mode :<br />
The decoder accepts the commands in 128 speed step mode only, when bit 1 is set<br />
CV#29, for exam<strong>pl</strong>e if you program the values of 2 or 6.<br />
The locomotive “jerks” during fast acceleration :<br />
The current draw during acceleration is particularly high. If the current exceeds the<br />
permitted maximum, the decoder switches off the motor (and the lights) for a short<br />
time and tries to accelerate once more. R<strong>edu</strong>ce the track voltage (change settings of<br />
your command station or r<strong>edu</strong>ce the secondary voltage of the transformer) or
Instruction manual N025/T125/T145 4<br />
increase acceleration rate in CV#3.<br />
The lights blinking (and/or the locomotive jerk or stop) when the direction are changed or<br />
the lights are switched on :<br />
The light outputs are designed for a current of 150mA and have a short circuit<br />
protection. When turning on the cold lamp(s) the current through the lamps is higher<br />
a can activate the short circuit protection. In this case motor and lights are switch off.<br />
The locomotive address cannot be read out with the “old” Arnold command station :<br />
The command station uses obsolete DCC command, which is not used anymore.<br />
The address, however, can be programmed. The resulting error message may be<br />
ignored.<br />
Locomotives with load control move slower without load control :<br />
The load control must have a reserve of power for proper operation at maximum<br />
speeds.<br />
In analogue mode the direction of travel changes after the changing of track polarity :<br />
The decoder has a short time memory (some seconds) for proper operation on dirty<br />
tracks. After changing the direction on a analogue controller the decoder sees in the<br />
first step a current interrupt and need a short time to identify the new polarity<br />
(direction of travel).<br />
Further hints for usage of the decoder you can find in the internet :<br />
www.kuehn-digital.de<br />
7. Operation of the decoder with Intellibox/TwinCenter<br />
The Intellibox is preset to the Marklin-Motorola-format. If you want to use DCC<br />
decoders you have to change the format as per instruction in the Intellibox manual<br />
(special option 25=1, special option 907=4 or 5). If the Intellibox is not set to DCC<br />
operation, locomotives with DCC decoders may start moving uncontrolled after<br />
switching on the Intellibox, because some DCC decoders interpret the Motorola signal as<br />
an analogue signal. Set to “N” gauge to limit the track voltage to 18V. This saves the<br />
motors of your locomotives.<br />
Advice to the programming track : The first test after the installation of a decoder<br />
should be performed on a track with current limiter. First switch the Intellibox or<br />
TwinCenter to the programming mode! You will hear the click of a relay inside the<br />
command station. Only after that you can put the locomotive onto the<br />
programming track without risk for the decoder and read out the decoder.<br />
The Intellibox recognized long addresses and automatically switch to extended address<br />
mode (CV#29, bit 5=1). Therefore the decoder does not operate with its shorts address.<br />
To activate the short address delete bit 5 in CV#29. Just program the short address and<br />
the decoder will delete CV#29, bit 5 automatically.<br />
8. Warranty<br />
Every decoder is fully tested before delivery. The warranty period is 2 years from date of<br />
purchase. Should a failure occur during this period <strong>pl</strong>ease contact your dealer or<br />
manufacturer directly. Should the inspection of the decoder indicate faulty material or<br />
workmanship then we will re<strong>pl</strong>ace this decoder free of charge.<br />
Our warranty becomes null and void in case of damage caused by inappropriate use of<br />
the product, disregard of the instruction manual, abnormal operating conditions,<br />
overload, voltage pulse for change of direction (AC sup<strong>pl</strong>y), faulty wiring (e.g. through<br />
short circuits between current pick-up and motor, short circuits between motor output and<br />
chassis), unauthorized modifications, overheating etc. .<br />
Marklin is a registered trademark of Gebr. Märklin & Cie.GmbH, Göppingen<br />
We accept no responsibility for direct or indirect damage resulting from improper use,<br />
non observance of instructions, unauthorized modifications, abnormal operating<br />
conditions, overheating, overload, exposure to humidity etc. .<br />
Nicht für Kinder unter 3 Jahren geeignet.<br />
Not suitable for children under 36 months.<br />
Ne convient pas aux enfants en dessous de 36 mois.<br />
©T. Kühn Ausgabe 1/03 Subject to technical change !<br />
Di<strong>pl</strong>.-Ing. T.Kühn<br />
Im Bendel 19 • D-53619 Rheinbreitbach • Tel . 02224/967780 • Fax. 02224/967781<br />
Internet : www.kuehn-digital.de