AV Control Receiver - Operating Manuals for Panasonic Products ...
AV Control Receiver - Operating Manuals for Panasonic Products ...
AV Control Receiver - Operating Manuals for Panasonic Products ...

You also want an ePaper? Increase the reach of your titles
YUMPU automatically turns print PDFs into web optimized ePapers that Google loves.
Others<br />
RQT6847<br />
16<br />
Other settings<br />
POWER<br />
8<br />
SPEAKERS<br />
SFC MODE<br />
< ><br />
SFC MODE<br />
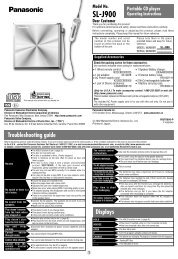
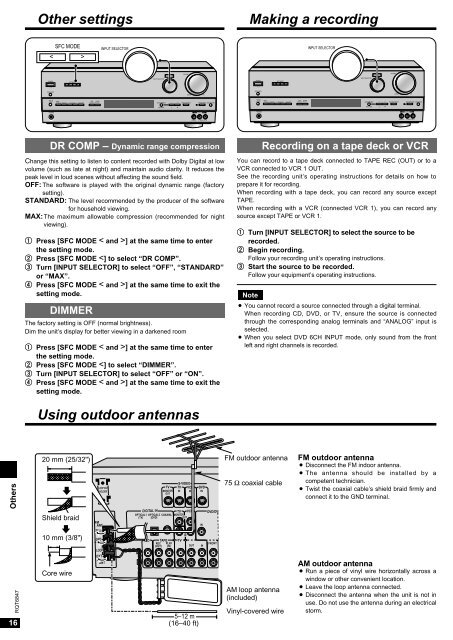
DR COMP – Dynamic range compression<br />
Change this setting to listen to content recorded with Dolby Digital at low<br />
volume (such as late at night) and maintain audio clarity. It reduces the<br />
peak level in loud scenes without affecting the sound field.<br />
OFF: The software is played with the original dynamic range (factory<br />
setting).<br />
STANDARD: The level recommended by the producer of the software<br />
<strong>for</strong> household viewing.<br />
MAX:The maximum allowable compression (recommended <strong>for</strong> night<br />
viewing).<br />
1 Press [SFC MODE < and >] at the same time to enter<br />
the setting mode.<br />
2 Press [SFC MODE ] at the same time to exit the<br />
setting mode.<br />
DIMMER<br />
INPUT SELECTOR<br />
INPUT SELECTOR<br />
The factory setting is OFF (normal brightness).<br />
Dim the unit’s display <strong>for</strong> better viewing in a darkened room<br />
1 Press [SFC MODE < and >] at the same time to enter<br />
the setting mode.<br />
2 Press [SFC MODE ] at the same time to exit the<br />
setting mode.<br />
VOLUME<br />
DOWN UP<br />
DSP<br />
SOUND MODE<br />
DOLBY<br />
-HE LP<br />
–RESET -BAND<br />
–FM MODE PRESET 2 TUNING 1 MEMORY<br />
PRO LOGIC2<br />
BASS/TREBLE – + DVD 6CH INPUT TAPE MONITOR SUB WOOFER<br />
PHONES VCR 2<br />
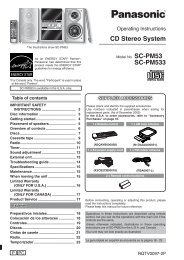
Using outdoor antennas<br />
20 mm (25/32")<br />
;;;<br />
;;;<br />
;;;<br />
Shield braid<br />
;;<br />
;;<br />
10 mm (3/8")<br />
Core wire<br />
LOOP ANT<br />
HOLDER<br />
FM<br />
ANT<br />
75Ω<br />
GND<br />
LOOP<br />
EXT<br />
AM<br />
ANT<br />
OPTICAL1<br />
(TV)<br />
;;<br />
;; L<br />
R<br />
DIGITAL IN<br />
CD<br />
OPTICAL2<br />
(DVD)<br />
BALANCE<br />
REC<br />
(OUT)<br />
TAPE<br />
DIGITAL INPUT<br />
TV<br />
MONITOR<br />
OUT<br />
COAXIAL<br />
PLAY<br />
(IN)<br />
L R<br />
VIDEO IN L AUDIO IN R<br />
S-VIDEO<br />
TV VCR DVD<br />
IN<br />
TV<br />
MONITOR<br />
OUT<br />
TV<br />
IN<br />
VCR DVD/DVD 6CH<br />
IN<br />
IN IN<br />
OUT<br />
5–12 m<br />
(16–40 ft)<br />
IN<br />
IN<br />
FRONT<br />
CENTER SURROUND<br />
SUBWOOFER<br />
L<br />
R<br />
Making a recording<br />
You can record to a tape deck connected to TAPE REC (OUT) or to a<br />
VCR connected to VCR 1 OUT.<br />
See the recording unit’s operating instructions <strong>for</strong> details on how to<br />
prepare it <strong>for</strong> recording.<br />
When recording with a tape deck, you can record any source except<br />
TAPE.<br />
When recording with a VCR (connected VCR 1), you can record any<br />
source except TAPE or VCR 1.<br />
1 Turn [INPUT SELECTOR] to select the source to be<br />
recorded.<br />
2 Begin recording.<br />
Follow your recording unit’s operating instructions.<br />
3 Start the source to be recorded.<br />
Follow your equipment’s operating instructions.<br />
Note<br />
POWER<br />
8<br />
SPEAKERS<br />
SFC MODE<br />
INPUT SELECTOR<br />
INPUT SELECTOR<br />
Recording on a tape deck or VCR<br />
¡ You cannot record a source connected through a digital terminal.<br />
When recording CD, DVD, or TV, ensure the source is connected<br />
through the corresponding analog terminals and “ANALOG” input is<br />
selected.<br />
¡ When you select DVD 6CH INPUT mode, only sound from the front<br />
left and right channels is recorded.<br />
L<br />
R<br />
SUBWOOFER<br />
OUT<br />
VOLUME<br />
DOWN UP<br />
DSP<br />
SOUND MODE<br />
DOLBY<br />
-HE LP<br />
–RESET -BAND<br />
–FM MODE PRESET 2 TUNING 1 MEMORY<br />
PRO LOGIC2<br />
BASS/TREBLE – + DVD 6CH INPUT TAPE MONITOR SUB WOOFER<br />
FM outdoor antenna<br />
75 Ω coaxial cable<br />
AM loop antenna<br />
(included)<br />
Vinyl-covered wire<br />
PHONES VCR 2<br />
BALANCE<br />
DIGITAL INPUT<br />
L R<br />
VIDEO IN L AUDIO IN R<br />
FM outdoor antenna<br />
¡ Disconnect the FM indoor antenna.<br />
¡ The antenna should be installed by a<br />
competent technician.<br />
¡ Twist the coaxial cable’s shield braid firmly and<br />
connect it to the GND terminal.<br />
AM outdoor antenna<br />
¡ Run a piece of vinyl wire horizontally across a<br />
window or other convenient location.<br />
¡ Leave the loop antenna connected.<br />
¡ Disconnect the antenna when the unit is not in<br />
use. Do not use the antenna during an electrical<br />
storm.