User Manual Rackmount TeraStation Pro TS-RHTGL/R5
User Manual Rackmount TeraStation Pro TS-RHTGL/R5
User Manual Rackmount TeraStation Pro TS-RHTGL/R5

You also want an ePaper? Increase the reach of your titles
YUMPU automatically turns print PDFs into web optimized ePapers that Google loves.
www.buffalotech.com<br />
<strong>User</strong> <strong>Manual</strong><br />
<strong>Rackmount</strong> <strong>TeraStation</strong> <strong>Pro</strong><br />
<strong>TS</strong>-<strong>RHTGL</strong>/<strong>R5</strong><br />
v1.2
Introduction<br />
Congratulations on your new <strong>TeraStation</strong>! Your <strong>TeraStation</strong> <strong>Pro</strong> is a powerful file server<br />
that’s as easy to use as a hard drive. With its straightforward configuration GUI, anyone<br />
can easily configure the <strong>TeraStation</strong>’s settings. You don’t even necessarily need to configure<br />
it at all; right out of the box it’s ready to be plugged in and put to work. But the <strong>TeraStation</strong><br />
remains a fast, reliable Linux-based server, with four hard drives that may be configured in<br />
RAID 0, RAID 1, RAID 5, or RAID 10 arrays. It also includes SAMBA 3.0, allowing it to join<br />
Active Directory domains, download users, passwords, and groups, and keep them up to<br />
date. This user manual is intended to assist you in configuring your new <strong>TeraStation</strong>.<br />
Because we’re constantly updating our product, the images and text in this manual may vary<br />
slightly from the images and text displayed by your <strong>TeraStation</strong>. These changes are minor<br />
and should not affect the ease of setup adversely. As time passes, future user interfaces,<br />
updated software, and later versions of this manual may be freely available for download at<br />
our web site: www.buffalotech.com.<br />
If you run into difficulties or need additional help, feel free to contact our technical support.<br />
Contact information for Buffalo Technology and our technical support is available on pages<br />
73 and 74.
<strong>TeraStation</strong> Layout............................................................4<br />
Installation .......................................................................7<br />
Accessing <strong>TeraStation</strong> Data from a PC .............................10<br />
Accessing <strong>TeraStation</strong> Data from a Mac...........................14<br />
<strong>TeraStation</strong> Expansion ...................................................18<br />
Advanced Settings ...........................................................19<br />
Network Settings .............................................................23<br />
Hard Drive Settings .........................................................25<br />
Adding Extra Hard Drives ...............................................31<br />
Shared Folders ................................................................37<br />
Groups ...........................................................................41<br />
<strong>User</strong>s ..............................................................................42<br />
Troubleshooting Multiple Shares..................... ................44<br />
Backups .........................................................................46<br />
Maintenance Settings ......................................................50<br />
UPS Settings ...................................................................51<br />
System Information .........................................................58<br />
Client Utility ...................................................................63<br />
Troubleshooting ..............................................................65<br />
Changing Hard Drives .....................................................67<br />
Technical Specifications ..................................................72<br />
Technical Support ...........................................................73<br />
GPL Information .............................................................75<br />
Table of Contents
Power<br />
Switch<br />
Display Mode<br />
Switch<br />
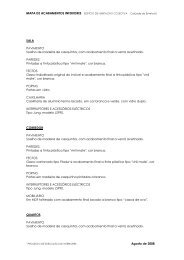
<strong>TeraStation</strong> Layout<br />
Front Panel lock<br />
(Turn counter-clockwise to release)
Hard Drives<br />
(Squeeze tabs to release)<br />
Init Button<br />
(Hold down to reset all settings)<br />
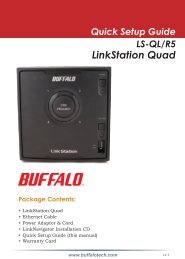
<strong>TeraStation</strong> Layout
UPS<br />
Ethernet<br />
(to router)<br />
USB in<br />
<strong>TeraStation</strong> Layout<br />
Power Cable
Insert the TeraNavigator CD into your computer’s CD-ROM drive.<br />
On a PC, setup should automatically launch. If it does not, manually<br />
launch setup.exe by pressing Start and selecting the Run... option.<br />
When the Run dialog opens, type d:\<strong>TS</strong>navi.exe (where d is the drive<br />
letter of your CD-ROM drive). Press OK to continue.<br />
If you are installing the software on a Mac, open the CD and click<br />
TeraNavigator to begin installation.<br />
Installing Software<br />
Begin by connecting your <strong>TeraStation</strong>’s power and Ethernet cables. For best results, the Ethernet<br />
cable should be connected to a router, hub, or switch on your network. Turn the <strong>TeraStation</strong> on<br />
by pushing the power button on the front panel. It will take about a minute to boot.
If you’re installing on a PC, click on Easy Installation (the<br />
pink, upper button). Mac users can skip this step.<br />
Click Next to step through the installation.<br />
Press the Begin Installation button to begin.<br />
TeraNavigator Setup
When installation is complete, click Finish.<br />
TeraNavigator Setup<br />
Follow the steps shown and continue pressing Next to step<br />
through the installation.
Using your <strong>TeraStation</strong> with a Windows PC<br />
Two new icons will be on your desktop: Shortcut for <strong>TS</strong>-<strong>TeraStation</strong>_<br />
name and Buffalo NAS Navigator.<br />
Clicking Shortcut for <strong>TS</strong>-<strong>TeraStation</strong>_name takes you directly to the<br />
folders on your <strong>TeraStation</strong>. Share is the main folder that you can<br />
put files and folders in. Info contains a copy of your user manual.<br />
The Buffalo NAS Navigator icon opens the <strong>TeraStation</strong>’s client utility.<br />
Turn to page 59 for more on using the NAS Navigator client utility.<br />
10
To Access <strong>TeraStation</strong> Data from a PC:<br />
Accessing <strong>TeraStation</strong> Data from your PC<br />
Your <strong>TeraStation</strong> uses “shares” (folders) to hold data. A share called “share” is already configured on<br />
your <strong>TeraStation</strong>, and you can create additional shares on page 37. To start using your <strong>TeraStation</strong>,<br />
you can either click on the Shortcut for <strong>TeraStation</strong> on your desktop, or you may just use drive T in<br />
My Computer, which setup has mapped to the default share in your <strong>TeraStation</strong>.<br />
11
Accessing <strong>TeraStation</strong> Data from your PC<br />
You can map additional driveletters to shares on your <strong>TeraStation</strong>.<br />
From the Start menu, select Run.... Enter your <strong>TeraStation</strong>’s<br />
hostname (you can get it from the NAS Navigator utility) or IP address.<br />
Press OK.<br />
Your <strong>TeraStation</strong> should open. “Share” is a data folder in your<br />
<strong>TeraStation</strong> by default. “Info” contains your user manuals. If you<br />
have created other folders, they will be visible here too. You can map<br />
drive letters to any of these folders.<br />
1
Accessing <strong>TeraStation</strong> Data from your PC<br />
From the Tools pull-down menu, select Map Network Drive. Choose a drive letter from the Drive:<br />
pull down menu. To specify the folder to map, either find it with Browse or enter \\<strong>TeraStation</strong>_<br />
Name\share_name in the Folder: field, where <strong>TeraStation</strong>_Name is your <strong>TeraStation</strong>’s hostname<br />
and share_name is the name of a folder on your <strong>TeraStation</strong>. Check the Reconnect at logon checkbox<br />
to have Windows connect to this mapped drive everytime it starts. When finished, press the Finish<br />
button. Your share is now mapped to a drive letter.<br />
1
Using your <strong>TeraStation</strong> with a Mac<br />
After installing the TeraNavigator software, your Mac will have a NAS<br />
Navigator icon on the desktop.<br />
Clicking the NAS Navigator icon opens the <strong>TeraStation</strong>’s client utility.<br />
1
You can add a link from your <strong>TeraStation</strong>’s<br />
Shares (folders) to your desktop by adding<br />
them to the Mac’s server list. Begin by clicking<br />
Go, and then choose Connect to Server.<br />
Accessing <strong>TeraStation</strong> Data from a Mac<br />
1<br />
In the Server Address field, enter your<br />
<strong>TeraStation</strong>’s IP address in the form smb://<br />
ipaddress (where “ipaddress” is your<br />
<strong>TeraStation</strong>’s IP address), and click Connect.<br />
If you don’t know your <strong>TeraStation</strong>’s IP<br />
address, see page 17.
Accessing <strong>TeraStation</strong> Data from a Mac<br />
Select Guest and click on Connect. Note: If you have configured share<br />
permissions on your <strong>TeraStation</strong>, select Registered <strong>User</strong> and enter your<br />
Registered <strong>User</strong> credentials.<br />
Select the volume that you want to mount, such as share or share-mac,<br />
from the list of folders on the <strong>TeraStation</strong>.<br />
The share will open. A link to the shared folder will appear on your<br />
desktop.<br />
1
If you don’t know your <strong>TeraStation</strong>’s IP address, there are<br />
several ways to get it.<br />
One simple method is to use the NAS Navigator client utility<br />
(included on your CD) to find your <strong>TeraStation</strong>(s). Just click<br />
on the tab for your <strong>TeraStation</strong> and you’ll be able to read its IP<br />
address.<br />
You can get the <strong>TeraStation</strong>’s IP address from the LCD display<br />
on the front of the <strong>TeraStation</strong> as it boots up.<br />
You can always get the <strong>TeraStation</strong>’s IP address from your<br />
router’s configuration utility. Many Buffalo routers list this<br />
information on the Client Monitor page, as shown to the right.<br />
Consult your router’s documentation for instructions on<br />
identifying the <strong>TeraStation</strong>’s IP address.<br />
Accessing <strong>TeraStation</strong> Data from a Mac<br />
1
1<br />
<strong>TeraStation</strong> Expansion<br />
<strong>TeraStation</strong> <strong>Pro</strong> has two USB 2.0 ports on the rear. These ports can be used for adding external<br />
USB Hard Drives or UPS systems. <strong>TeraStation</strong> will share connected USB storage devices, allowing<br />
everyone on the network to use them. Up to two external USB hard drives may be added to<br />
<strong>TeraStation</strong> <strong>Pro</strong>. To connect a USB hard drive or UPS to <strong>TeraStation</strong>, simply plug it into one of the<br />
USB Ports.<br />
You may plug in additional USB hard drives to either of the USB ports on your <strong>TeraStation</strong>. See<br />
page 31 for setting up your USB hard drive on the <strong>TeraStation</strong>. Page 46 shows you how to set up<br />
<strong>TeraStation</strong> to backup to a USB Hard Drive.<br />
See page 51 for more information on using the <strong>TeraStation</strong> with a UPS.
The Configuration GUI<br />
1<br />
Advanced Settings<br />
The Configuration GUI may be accessed at any time<br />
by typing the IP address of your <strong>TeraStation</strong> into<br />
the URL bar of a browser running on a computer<br />
connected to the same network as the <strong>TeraStation</strong>.<br />
This works perfectly with OS X, Linux, and other<br />
non-Windows PCs.<br />
You may also open the Configuration GUI from<br />
NAS Navigator by clicking on Setup and choosing<br />
Configuration Settings.
This login prompt will appear. Enter admin for the user name. Until you change it, the password<br />
for the admin account will be password. Press the OK button when finished.<br />
0<br />
<strong>User</strong> name: admin<br />
Password: password<br />
Advanced Settings<br />
See page 43 to change your password.<br />
If this login prompt does not appear,<br />
your DHCP server may not be<br />
functioning correctly. If DHCP is<br />
disabled, you may re-enable it, or verify<br />
that the <strong>TeraStation</strong>’s IP Address is in the same range as that of your PC.<br />
Note: Pages 63 and 64 describe how to configure the <strong>TeraStation</strong> with a Static IP Address.
Welcome to the configuration GUI for the <strong>TeraStation</strong>! Bookmark this page in your browser so it<br />
can be easily accessed for future configuration changes. If the <strong>TeraStation</strong>’s IP Address changes,<br />
you will need to recreate the link. You can also get here by typing http://<strong>TeraStation</strong>_Name into a<br />
Web browser, where <strong>TeraStation</strong>_Name is the name of your <strong>TeraStation</strong>.<br />
You are now at Home. Notice that the Home button is lit up in yellow. You can navigate this menu<br />
by clicking on the buttons at the left of the screen. Here at “Home”, you can see basic information<br />
about your <strong>TeraStation</strong>’s current configuration. You may close this screen by clicking Logout at the<br />
bottom left, or just by closing the browser window. If you have lost your <strong>TeraStation</strong>, clicking I’m<br />
here! at the bottom left will cause it to beep, making it easier to find.<br />
1<br />
Advanced Settings
Basic<br />
You may modify your <strong>TeraStation</strong>’s hostname<br />
and description under Hostname Setup.<br />
A friendly, easy-to-remember name (e.g.<br />
“<strong>TeraStation</strong>”) is recommended.<br />
Make sure that the date and time are correct<br />
in Date and Time Setup. To synchronize time<br />
settings with those in your computer, press<br />
Use Local Time. To have your system time<br />
automatically set by an NTP server, enable NTP<br />
Server and enter an IP Address for the NTP<br />
server (e.g. 192.43.244.18) or use the supplied<br />
default NTP server.<br />
Ensure that both the Display Language and the<br />
Windows Client Language are set to languages<br />
that you’re comfortable with.<br />
Once desired fields have been completed, press<br />
the Apply button.<br />
Advanced Settings
Network (IP Address <strong>Pro</strong>perties)<br />
Advanced Settings<br />
In most networks, <strong>TeraStation</strong> will get its IP<br />
Address automatically from a DHCP server.<br />
You may disable DHCP here. If DHCP is<br />
disabled and an IP Address is not set manually,<br />
it will default to 1 .1 .11.1 0. The<br />
<strong>TeraStation</strong>’s IP Address, Subnet Mask, Default<br />
Gateway Address, and DNS Server address<br />
may all be entered manually under IP Address<br />
<strong>Pro</strong>perties.<br />
Ethernet Frame Size may also be set manually<br />
on this page. Only use JumboFrame settings<br />
when operating in a Gigabit environment where<br />
all other clients support the same JumboFrame<br />
setting.<br />
Click Apply after making any changes.
Network (Workgroup/Domain)<br />
Advanced Settings<br />
If you are unfamiliar with Domain/Active Directory<br />
networking, then please leave the Network Type selected as<br />
Workgroup and Workgroup Name set to Workgroup.<br />
To make your <strong>TeraStation</strong> a member of a workgroup or<br />
domain, enter the appropriate information into the fields<br />
on this page and click Apply. Do not select Domain<br />
unless you have a Windows Server Domain Controller on<br />
your network. Please leave the network type selected as<br />
Workgroup unless you are a network administrator or have<br />
been instructed to do so by one.<br />
NOTE: If using Domain, <strong>TeraStation</strong> must be added as a<br />
member computer in the Domain Server.<br />
Domain & Active Directory Authentication integrates the <strong>TeraStation</strong> <strong>Pro</strong> with Windows Domain and Active<br />
Directory Servers. The <strong>TeraStation</strong> <strong>Pro</strong> participates as a member device in the Domain and Active Directory<br />
networks, allowing the <strong>TeraStation</strong> to use <strong>User</strong>s and Groups that reside on the Domain or Active Directory<br />
System and update them automatically. If Active Directory is used, then FTP access to the <strong>TeraStation</strong> will<br />
be automatically disabled. To configure the <strong>TeraStation</strong> <strong>Pro</strong> on an Active Directory network, you must have<br />
the Domain Administrator login credentials. In an NT Domain environment, select NT Domain as the Network<br />
Type. Enter the Domain Name and Domain Controller into the appropriate fields. In an Active Directory<br />
environment, check the Active Directory Domain checkbox and fill in the fields. The Authentication Setup<br />
fields will be automatically filled out, so no input is needed there. Once you have finished, press Apply.
Disk Management (Drive <strong>Pro</strong>perties)<br />
This page shows the current properties of your hard drives<br />
and RAID Arrays. To change these settings, click on RAID<br />
Setup at left.<br />
Advanced Settings
Note on RAID Arrays<br />
<strong>TeraStation</strong> uses RAID (“Redundant Array of Independent Disks”) technology to control the four<br />
hard drives in your <strong>TeraStation</strong>. RAID may be configured several ways:<br />
RAID 0 - All four drives are combined into one large, fast drive, giving the maximum capacity for<br />
your <strong>TeraStation</strong>. This size is the one listed on your <strong>TeraStation</strong>’s box and shows the total capacity<br />
of the <strong>TeraStation</strong> with no data used for redundancy. RAID Spanning is fast and efficient, but with<br />
no redundancy, if one hard drive fails, all data on the <strong>TeraStation</strong> is lost.<br />
RAID 1 (mirroring) - Hard drives are arranged in mirrored pairs. Each half of the pair reads and<br />
writes exactly the same data. This costs you half the total capacity of the array, but provides<br />
excellent redundancy. If a hard drive fails, the mirror continues to supply data, so you may work<br />
on normally. You may replace the damaged or defective drive at any time, and normal RAID 1<br />
mirroring will then be automatically restored.<br />
RAID (parity) - All drives in a RAID 5 array reserve part of their data space for parity information,<br />
allowing all data to be recovered if a single drive fails. The parity information takes up about one<br />
hard drive’s worth of space, so if you set up all four drives in the <strong>TeraStation</strong> as a RAID 5 array,<br />
your usable capacity will be about 3/4 of the total capacity of the <strong>TeraStation</strong>. This is how your<br />
<strong>TeraStation</strong> is set up out of the box.<br />
RAID 10 - Combines RAID 1 and RAID 0 for a fast, secure array. Half of the <strong>TeraStation</strong>’s total<br />
capacity is used for redundant information.<br />
Buffalo Technology recommends RAID for its excellent balance of efficiency and security.
Disk Management (RAID Setup)<br />
This page shows your current RAID arrays. You may delete<br />
old arrays or create new ones by clicking on the underlined<br />
RAID Array # under RAID Array Configuration.<br />
The RAID Scanning Settings set a specific time for the<br />
<strong>TeraStation</strong> to scan and inspect its RAID arrays. It is<br />
recommended to set a time where the <strong>TeraStation</strong>s<br />
usage will be minimal (perhaps the middle of the night).<br />
<strong>TeraStation</strong> will be significantly slower while the RAID<br />
scan occurs. Begin Immediate RAID Scan specifies the<br />
<strong>TeraStation</strong> to run a RAID Scan immediately.<br />
Advanced Settings<br />
You may also disable RAID Array Error Detection Response from this page. Normally, this is set to<br />
automatically shut down the RAID array when an error is detected. Though it is not recommended,<br />
you may disable that behavior by selecting Disable.<br />
NOTE: <strong>TeraStation</strong> has four internal hard drives. Before creating a new RAID array, you may have<br />
to delete one or more pre-existing RAID Arrays to clear up the hard drives for your new one. This<br />
will destroy all data currently on the disks, so back up any important data before deleting RAID<br />
arrays. Whether you want to clear out an old array or create a new one, begin by clicking on the<br />
array’s underlined RAID Array #, under Name.
Disk Management (RAID Configuration)<br />
A configured RAID array may be deleted by pushing the Delete<br />
RAID Array button. This will free up all hard drives listed under<br />
Disk Structure.<br />
You will need to enter a confirmation number from the screen<br />
before the RAID array will be deleted.<br />
Advanced Settings
To configure an unconfigured array, begin by double clicking on<br />
the array you want to configure, e.g. “RAID Array 1”.<br />
Choose your RAID mode under RAID Settings and put checks<br />
next to the hard disks you want included in the array under<br />
Disk Structure. Click Setup RAID Array when ready. It may take<br />
several minutes to complete setting up the RAID array. When<br />
it’s finished, a Disk Check will run.<br />
Advanced Settings
Disk Management (Disk Check)<br />
0<br />
Advanced Settings<br />
When RAID Configuration is done, a disk<br />
check will run automatically. This may take<br />
several hours to complete. Performance of the<br />
<strong>TeraStation</strong> will be slower than normal while<br />
the disk check is running.
Disk Management (RAID Configuration)<br />
1<br />
Advanced Settings<br />
You’ll see this screen when your new<br />
RAID Array is completely configured.<br />
Click on Shared Folders and turn to<br />
page 37 to begin setting up shares on<br />
your <strong>TeraStation</strong>.
Disk Management (USB Settings)<br />
If you’ve plugged an external USB hard<br />
drive into one of the USB ports on your<br />
<strong>TeraStation</strong>, you may set it up from this<br />
page. Click on its name under USB<br />
Disk Setup to begin.<br />
Advanced Settings
Disk Management (USB hard drive setup)<br />
Advanced Settings<br />
From here you can see your USB hard<br />
drive’s setup information. If the hard drive’s<br />
information isn’t displayed properly, try<br />
restarting your USB hard drive and then<br />
restarting your <strong>TeraStation</strong>. Some USB<br />
hard drives must be reformatted from within<br />
<strong>TeraStation</strong> before they can be assigned<br />
shares. Press Format USB Disk, or choose<br />
Disk Format from the left-side menu, to begin<br />
reformatting your USB hard disk. Turn to<br />
page 35 for more information on reformatting<br />
disks. Turn to page 36 to set up shares on<br />
your USB hard drives.
Disk Management (Disk Check)<br />
Advanced Settings<br />
To initiate a comprehensive disk check on a hard drive or array of drives, select the hard drive<br />
or array that you want to check from the Target dropbox and click the Start Disk Check button.<br />
Performance will be slower while the disk check is running.
Disk Management (Disk Format)<br />
Advanced Settings<br />
To format a hard drive or array, select it from<br />
the Target Disk drop box. Choose the file<br />
system desired from the File System dropbox<br />
(internal drives can only be formatted with XFS).<br />
Note that FAT32 has a 2 gigabyte single file size<br />
limit. If you choose FAT32 for your file system,<br />
you will not be able to store single files larger<br />
than 2 gigabytes on the drive. Use of the XFS or<br />
EXT file systems is recommended. Press Select<br />
Target Disk when done.<br />
Depending on the size of the target hard disk or<br />
array, a Disk Format may take several hours to<br />
complete. Performance will be slow during the<br />
disk format.
Shared Folders<br />
Advanced Settings<br />
To add new shares to your <strong>TeraStation</strong>, select Shared Folders from the left side menu, and then<br />
click the Add button.<br />
To delete a share or shares, check the checkbox next to the shares you’d like to delete, and press<br />
the Delete button. Deleting shares will remove the share and erase all of the files and folders<br />
inside that share.
Add a new Shared Folder<br />
Advanced Settings<br />
To add a new shared folder, enter a name for it in the<br />
Shared Folder Name box and choose the Volume it<br />
will reside in. You may also choose which operating<br />
systems and features the share will support by putting<br />
the appropriate checks next to Shared Folder Support,<br />
and whether the share supports the Recycle Bin by<br />
putting a selecting Enable or Disable. Enter a Shared<br />
Folder Description and a Remote Backup Password if<br />
desired. Click Apply to build the new shared folder.<br />
Note: If AD is used on the <strong>TeraStation</strong>, FTP support<br />
will be disabled.<br />
Checking “Apple” by Shared Folder Support enables<br />
Appletalk for legacy Macs. This gives you all of<br />
Appletalk’s limitations, including a 2GB maximum<br />
filesize and a 32 character limit for filenames. If a<br />
folder with AppleTalk enabled is accessed from a<br />
modern OS through SMB, these limitations will not<br />
apply.<br />
Remote Backup Password will set a password on this share for other <strong>TeraStation</strong>s who want to<br />
use it as a remote backup target. This password will not affect users attempting to access the<br />
share; it only pertains to remote <strong>TeraStation</strong>s trying to access this share for backup tasks.
Shared Folders (Access restrictions)<br />
Advanced Settings<br />
To use Access Restrictions for a share, select<br />
Enable.<br />
Highlight groups or users in the All Groups/<br />
<strong>User</strong>s column and use the left-pointing arrow<br />
buttons (located just to the left of each box) to<br />
move individual groups or users from the All<br />
Groups/<strong>User</strong>s column to the Read Only box (if<br />
you want to give them read access only) or all<br />
the way to the Writable box, if you want to give<br />
them full access to the share. Right-pointing<br />
arrows will move highlighted users or groups<br />
back to the right.<br />
Click Apply when you have your groups and<br />
users in the appropriate boxes.<br />
To set up new groups and users, see pages 41<br />
and 42.
Shared Folders (Service Setup)<br />
Advanced Settings<br />
To allow FTP Access to <strong>TeraStation</strong>, choose Enable for FTP Server. To enable legacy AppleTalk<br />
support, choose Enable for AppleTalk <strong>Pro</strong>tocol. FTP access will not be available if AD is in use.<br />
FTP Server Info: Enabling the FTP Server will allow users to connect to shares via FTP protocol.<br />
Their username and password is used for their login credentials, and they will only have access to<br />
shares that have read-only or writeable access to on the <strong>TeraStation</strong>. The network administrator<br />
of your network may need to enable traffic on port 21 to the <strong>TeraStation</strong> for FTP to work over the<br />
Internet.<br />
Click the Apply button to set up these services.
Shared Folders (DFS Setup)<br />
0<br />
Advanced Settings<br />
To allow Distributed File System (DFS) technologies for Windows Server 2003 R2, select Enable and<br />
click the Apply button.
Group Management<br />
Add a name and a description to the Add New<br />
Group fields. Put checks next to each Member <strong>User</strong><br />
that you want to be part of the group. Click Apply<br />
when your group is set up the way you want it.<br />
Active Directory and Domain Groups are not shown<br />
here but are available under Share Management.<br />
Members can be added or removed from a group<br />
at any time by editing the group. This is done by<br />
clicking on the Group name on the main Group<br />
Settings page.<br />
1<br />
Advanced Settings<br />
Groups allow for easier management of permissions<br />
in some networks, specifically networks with a lot of<br />
users in different departments.<br />
To Delete a group, put a check next to its name and<br />
click Delete. To add a group to your <strong>TeraStation</strong>, click<br />
Add.
<strong>User</strong> Management<br />
The Add New <strong>User</strong> dialog will appear. Enter a<br />
<strong>User</strong> Name, Password, and <strong>User</strong> Description for<br />
the new user and click the Apply button. If a user<br />
will be accessing the <strong>TeraStation</strong> from a Windows<br />
95/98 computer, their password should be 15<br />
characters or less. Mac OS 8 and OS 9 users’s<br />
passwords should be 9 characters or less.<br />
A Domain <strong>User</strong> List will be displayed if the<br />
<strong>TeraStation</strong> <strong>Pro</strong> is a member of a Domain or<br />
Active Directory environment.<br />
Advanced Settings<br />
<strong>TeraStation</strong> is preconfigured with two users,<br />
admin and guest, out of the box. The admin<br />
and guest user accounts cannot be deleted. To<br />
delete any other user, put a check next to their<br />
name and click Delete. To add a new user, click<br />
Add Local <strong>User</strong>.
<strong>User</strong> Management (changing passwords)<br />
Enter the desired new password in both boxes<br />
and click Apply.<br />
Advanced Settings<br />
To change an account’s password, click on the<br />
name of the account under <strong>User</strong> Settings. Note:<br />
if a user name and password are used to log into<br />
a user’s windows computer or domain, the same<br />
user name and password should be used when<br />
creating the user’s account on the <strong>TeraStation</strong>, or<br />
problems accessing shared folders may occur.
Troubleshooting Multiple Shares<br />
Advanced Settings<br />
When accessing multiple shares to a Windows<br />
PC, you may see this error message.<br />
This is caused by having multiple shares to the<br />
same resource using different login credentials.<br />
The error occurs when connecting to at least one secure, restricted share. Due to a constraint in<br />
Microsoft Windows, only one set of login credentials can access or map drive letters for a network<br />
resource such as the <strong>TeraStation</strong>. As such, only one username and password can be used while<br />
mapping drives to a PC. If unsecure, unrestricted shares are mapped and then an attempt to map<br />
a secure, restricted share is made from the same PC, then this error will occur. To prevent this,<br />
you must create all mapped shares using the same login and password information. Please follow<br />
the steps on the next page to remedy this problem.
Mapping Multiple Shares<br />
Advanced Settings<br />
When mapping any share, select the Connect using a different<br />
user name option. A login and password prompt will appear.<br />
Use the username and password required by any secure,<br />
restricted shares for all shares. All mapped shares on a<br />
single PC must use the same username and password!<br />
If only unrestricted shares are being mapped, then it’s not necessary to set a username and<br />
password for shares. Multiple mapped drives to unrestricted shares can exist without a username<br />
or password as long as no restricted, secure shares are mapped. If an unrestricted share and a<br />
restricted share are being mapper or accessed, use the restricted username and password for the<br />
unrestricted share login by using the Connect using a different user name option. This will allow a<br />
Windows PC to access both shares without any problems.
Disk Backup<br />
Advanced Settings<br />
To create a backup job, click on a Job Number.<br />
The Edit Backup Job dialog will appear.
Disk Backup (Edit Backup Job)<br />
Advanced Settings<br />
A Backup Job can run regularly on a daily or weekly<br />
schedule, or immediately by appropriate choices in<br />
the Backup Job Schedule field. Date and Time for<br />
the backup may be entered, and Encryption and<br />
Compression enabled or disabled. Enable Overwrite<br />
Backup to have each scheduled backup write over the<br />
previous backup, or Differential Backups to backup<br />
only files changed since the previous backup.<br />
Select the folder to be backed up from the Local<br />
Backup Shared Folder dropbox, and the destination<br />
for the backup files from the Destination Backup<br />
Shared Folder dropbox. The destination folder may<br />
be on a USB drive attached to the <strong>TeraStation</strong>, or<br />
another <strong>TeraStation</strong> on the network. Click on Select<br />
to approve the backup targets.<br />
Click the Apply button when your backup job is set<br />
up the way you want it, or Clear Job to stop a job<br />
from running again.
Disk Backup (<strong>TeraStation</strong> List)<br />
Advanced Settings<br />
The <strong>TeraStation</strong> list shows other <strong>TeraStation</strong>s in your network that you can configure network<br />
backups to.<br />
Press Refresh to get a list of <strong>TeraStation</strong>s on your network.
Disk Backup (Add <strong>TeraStation</strong>)<br />
Advanced Settings<br />
To add a remote <strong>TeraStation</strong> to your network, enter its numerical IP Address in the Remote<br />
<strong>TeraStation</strong> IP Address field and click the Add to List button. For remote <strong>TeraStation</strong> backups,<br />
make sure both firewalls are configured to allow traffic in and out of their networks.<br />
Note: Disk Backups between two <strong>TeraStation</strong>s use port 8873 for encrypted backups and port 873<br />
for backups with no encryption.
Maintenance (Notification)<br />
0<br />
Advanced Settings<br />
If your <strong>TeraStation</strong> is remotely managed, you<br />
may choose to receive nightly status reports<br />
and be notified of any disk events by email.<br />
To set this up, enable Mail Notification and<br />
enter the IP Address of your SMTP server*<br />
in the SMTP Server Address field. Select a<br />
Subject line for the emails (i.e. “<strong>TeraStation</strong><br />
Status Report”) and enter the email address of<br />
each person you want to receive notification<br />
emails into a Recipient Mail Address field.<br />
* SMTP server must be an open type server. Currently, there’s no provision for entering a<br />
username or password.
Maintenance (UPS Settings)<br />
1<br />
Advanced Settings<br />
You may enable Synchronize with UPS<br />
and UPS Shutdown Conditions from this<br />
page. Consult your Uninterruptable<br />
Power Supply’s documentation for further<br />
information about setting up your UPS<br />
system.<br />
Buffalo Technology recommends the use<br />
of APC SmartUPS Serial Uninterruptable<br />
Power Supplies. Other UPSs may use<br />
different pin configurations. Compatibility<br />
cannot be guaranteed with other UPSs. See<br />
page 52 for more on the <strong>TeraStation</strong>’s UPS<br />
serial port.
Maintenance (UPS Settings)<br />
Advanced Settings<br />
This is <strong>TeraStation</strong>’s serial port pin<br />
assignment for serial UPS products.
Maintenance (Alert Settings)<br />
Advanced Settings<br />
Alerts can be configured on the <strong>TeraStation</strong> to make audible noises when a problem is detected.<br />
Along with the audible noise, alert emails will be sent out if Mail Notification was properly configured.<br />
Please select the features you would like to receive an audible sound alert from and then press the<br />
Apply button.
Maintenance (Status LCD)<br />
Advanced Settings<br />
The Status LCD Setup allows configuration for<br />
the LCD display on the front of <strong>TeraStation</strong>.<br />
Please select the type of information that the<br />
front panel should display from the LCD Display<br />
Items. Automatically Switch LCD Items tells<br />
the <strong>TeraStation</strong> to cycle through the selected<br />
display items every 10 seconds. Disabling this<br />
feature means the LCD display does not cycle,<br />
and it will stay on the same display item until<br />
the Display button on the front of <strong>TeraStation</strong><br />
is pressed. The LCD screen and green LED<br />
buttons brightness can be controlled via their<br />
respective settings. Press the Apply button once<br />
all of the settings have been configured.
Maintenance (Syslog Transfer)<br />
Advanced Settings<br />
Check Enable to allow system logs to be<br />
transferred. Press Apply once all of the<br />
settings have been configured.
Maintenance (Shutdown)<br />
Advanced Settings<br />
From the Shutdown page, press<br />
Apply to shutdown <strong>TeraStation</strong>. This<br />
has the same function as holding<br />
down the power button on the front<br />
of <strong>TeraStation</strong>, but may be done<br />
remotely. Turning on the <strong>TeraStation</strong><br />
after a shutdown requires a<br />
physical button push on the front of<br />
<strong>TeraStation</strong>. The Restart Now button<br />
simply reboots the <strong>TeraStation</strong>,<br />
bringing it back to functionality after<br />
about 120 seconds.
Maintenance (Initialization)<br />
Initialization is a reset procedure that restores<br />
all settings back to the default, out of box,<br />
configuration. All configuration, users, groups,<br />
and backup jobs are lost, but actual data and<br />
shares on the hard are NOT lost. If you want<br />
all data to be erased, reformat the drive.<br />
Specify whether the <strong>TeraStation</strong> shall keep its<br />
administrator password after a initialization<br />
or whether the password should be reset to<br />
the default password (default password is<br />
password). Press the Apply button once you<br />
make the selection.<br />
Advanced Settings<br />
Press the Restore button to begin the initialization process; this will restore all settings to factory<br />
defaults but will NOT erase the data on the hard drives. Start Disk Formatting begins a complete<br />
disk format that will erase all information on the <strong>TeraStation</strong>’s internal hard drives. This cannot<br />
be undone.
This page shows you the System Information for your <strong>TeraStation</strong>.<br />
System Status (System Information)<br />
Firmware updates are occasionally available from www.buffalotech.com for the <strong>TeraStation</strong> <strong>Pro</strong>.<br />
These must be executed from a Windows PC on the same network. Your router, switch, or hub<br />
should pass through ports 8873 and 22939 for this to work (most do).
System Status (USB Details)<br />
Advanced Settings<br />
This page shows you details on USB hard drives and UPSs plugged into your <strong>TeraStation</strong>.
System Status (Drive <strong>Pro</strong>perties)<br />
This page shows you the properties of all hard drives and<br />
RAID arrays in and attached to your <strong>TeraStation</strong>.<br />
0<br />
Advanced Settings
System Status (Network Information)<br />
1<br />
Advanced Settings<br />
This page shows you the System Information for your network connection.
Log Information<br />
System Status<br />
This page lets you save or display system log information. Choose the log you want from the Log<br />
Type dropdown and click Save. The dialog will let you save or display (“Open”) the logfile.
<strong>TeraStation</strong> Client Utility<br />
This is the <strong>TeraStation</strong> Client Utility. Installed<br />
on your PC, it allows you to access each of the<br />
<strong>TeraStation</strong>s on your network. Click Refresh<br />
List to get tabs for each of your <strong>TeraStation</strong>s.<br />
Each tab shows the Host Name, Workgroup, IP<br />
Address, and Subnet Mask of the associated<br />
<strong>TeraStation</strong>, as well as the version of firmware<br />
it’s running.<br />
With a <strong>TeraStation</strong>’s tab selected, you can click<br />
on the View Shares button to go directly to its<br />
root share. Clicking the Setup pulldown menu<br />
and selecting Browser Management takes you<br />
to the configuration GUI. And clicking Setup<br />
and choosing Modify IP Address takes you to<br />
the following screen . . .
IP Address Setup<br />
<strong>TeraStation</strong> Client Utility<br />
Here, you may enter your IP Address and Subnet Mask manually, or enable your <strong>TeraStation</strong> to<br />
acquire them automatically from a DHCP server. You’ll need the administrator password to use<br />
this screen. Press OK when you’re done.
Troubleshooting<br />
If <strong>TeraStation</strong> encounters a disk error, it will be reported in the <strong>TeraStation</strong> status on the top of<br />
any of the Web-Based configuration screens. Run a Disk Scan in the event of this error. If that<br />
does not resolve the problem, a format is recommended. Formatting the drive will delete all of the<br />
data on it, so back up any data you can before formatting. Finally, if none of the above solutions<br />
help, then please contact Technical Support (see pages 73 and 74 for Technical Support contact<br />
information).
DIAG LCD Codes:<br />
Troubleshooting<br />
Error Code Description Alert Sound<br />
E00 MPU error: Main MPU is not responding. A<br />
E01 Error on DRAM DATA LIN A<br />
E02 Error on DRAM ADDRESS LINE A<br />
E03 Error on RTC CHIP A<br />
E04 Failed to load kernel (FLASH error) A<br />
E10 UPS AC LINE FAIL Error B<br />
E11 FAN Error: Fan rotation speed is low or fan is stopped. B<br />
E12 Cooling Error: Cooling by fan cannot catch up. B<br />
E13 Error has occurred on RAID Array x. B<br />
E14 Cannot mount RAID Array x. B<br />
E15 Not Used<br />
E16 Cannot find HDDx. B<br />
E17 Cannot communicate with RTC chip (IC12). A<br />
E18 Cannot communicate with SATA chip (IC1). A<br />
E19 Cannot communicate with SATA chip 2 (IC2) A<br />
E20 Cannot communicate with USB chip (IC5) A<br />
E21 Cannot communicate with Ethernet chip (IC13) A<br />
E22 Cannot mount HDDx B<br />
E23 HDDx faulty (HDDx is excluded from raid because of errors) B
Turn the key counterclockwise to unlock the front panel.<br />
Pull on the right hand side of the front panel to remove<br />
it.<br />
Replacing a Hard Drive
Replacing a Hard Drive<br />
Squeeze the tabs gently and swing the tray latch<br />
upward.<br />
Slide out the drive tray.
Lower the drive carefully to the work surface.<br />
Replacing a Hard Drive<br />
Pull the plug straight out.
0<br />
Replacing a Hard Drive<br />
To remove the hard drive from its<br />
cage, set the assembly on a soft<br />
surface and remove these four screws.
Install a new hard drive by doing the same steps in reverse order:<br />
Begin by screwing the new hard drive into the cage.<br />
Plug the power/data connector into the hard drive.<br />
Slide the hard drive cage back into the <strong>TeraStation</strong>.<br />
Press the latch down to lock the hard drive cage in place.<br />
Reattach the front cover to the <strong>TeraStation</strong>.<br />
1<br />
Replacing a Hard Drive
Technical Specifications<br />
LAN Standards: IEEE 802.3u 100BASE-TX; IEEE 802.3 10BASE-T<br />
Transmission Types: 1000Mbps/100Mbps/10Mbps; 100BASE-TX<br />
4B/5B, MLT-3;10BASE-T Manchester Coding<br />
UPS: UPS Compatible (Serial/USB connection)<br />
Media Interface: RJ-45<br />
USB Standard: USB 2.0<br />
Hi-Speed (HS)<br />
Full-Speed (FS)<br />
Low-Speed (LS)<br />
USB Connector: USB A Connector (2)<br />
Data Transmission Speed: Max: 480 Mbps (HS Mode)<br />
Max: 12 Mbps (FS Mode)<br />
Power Consumption: ~17-56W (Varies with size)<br />
Dimensions: 16.9” x 3.4” x 13.8” (430 x 86 x 350 mm)<br />
Weight: ~15.8 lb. (7.2 kg.) (Weight varies with size)<br />
Operating Environment: 32° - 113° F; 20-80% non-condensing
Buffalo Technology USA Inc.<br />
11100 Metric Blvd, Suite 750<br />
Austin, TX 78758<br />
GENERAL INQUIRIES<br />
Contact Information (North America)<br />
Monday through Friday<br />
8:30am-5:30pm CST<br />
Direct: 512-794-8533 | Toll-free: 800-456-9799 | Fax: 512-794-8520 | Email: sales@<br />
buffalotech.com<br />
TECHNICAL SUPPORT<br />
North American Technical Support by phone is available 24 hours a day, 7 days a week. (USA<br />
and Canada).<br />
Toll-free: (866) 752-6210 | Email: info@buffalotech.com
Buffalo Technology UK Ltd.<br />
2 Bracknell Beeches, Old Bracknell Lane<br />
Bracknell, Berkshire, SL1 4RD<br />
United Kingdom<br />
GENERAL INQUIRIES<br />
Email: sales@buffalo-technology.com<br />
TECHNICAL SUPPORT<br />
Buffalo Technology provides technical support in English, German, French, Italian, and<br />
Spanish. For opening hours and relevant telephone numbers, please go to<br />
www.buffalo-technology.com/contact<br />
Contact Information (Europe)
Thank you for your interest in Buffalo products. Our GPL software delivery policy is outlined below.<br />
For each individual product and revision, please send one individually packaged self addressed padded CD<br />
shipping envelope, containing a blank CD-R to the following address:<br />
Buffalo Technology USA Inc.<br />
11100 Metric Blvd., Suite 750<br />
Austin, TX 78758<br />
Attn. GPL Department<br />
Within the envelope containing the self addressed padded CD shipping envelope, please include a bank draft<br />
or money order for $20 (USD) (Made out to: Buffalo Technology) to cover our handling fee, postage and CD<br />
preparation. The CD-R should have the name of the product and revision number clearly written on the<br />
actual CD-R (not on the insert).<br />
We do not send GPL source in bulk on a DVD. And order confirmation is not required by the GNU General<br />
Public License.<br />
We are more than happy to comply with your request; however, we must ask you to comply with our GPL<br />
distribution policy, which complies with the GNU General Public License.<br />
Sincerely,<br />
Buffalo Technology GPL Department<br />
GPL Information (North America)
Thank you for your interest in Buffalo products. Our GPL software delivery policy is outlined below.<br />
For each individual product and revision, please send one individually packaged self addressed padded CD<br />
shipping envelope, containing a blank CD-R to the following address:<br />
Buffalo Technology Ireland Ltd<br />
Free Zone East, Shannon, Co. Clare<br />
Ireland<br />
Attn. GPL Department<br />
Within the envelope containing the self addressed padded CD shipping envelope, please include a bank draft<br />
or money order for €20 (Euro) (Made out to: Buffalo Technology) to cover our handling fee, postage and CD<br />
preparation. The CD-R should have the name of the product and revision number clearly written on the<br />
actual CD-R (not on the insert).<br />
We do not send GPL source in bulk on a DVD. And order confirmation is not required by the GNU General<br />
Public License.<br />
We are more than happy to comply with your request; however, we must ask you to comply with our GPL<br />
distribution policy, which complies with the GNU General Public License.<br />
Sincerely,<br />
Buffalo Technology GPL Department<br />
GPL Information (Europe)