SpA - Benassi
SpA - Benassi
SpA - Benassi

You also want an ePaper? Increase the reach of your titles
YUMPU automatically turns print PDFs into web optimized ePapers that Google loves.
01/07/2008<br />
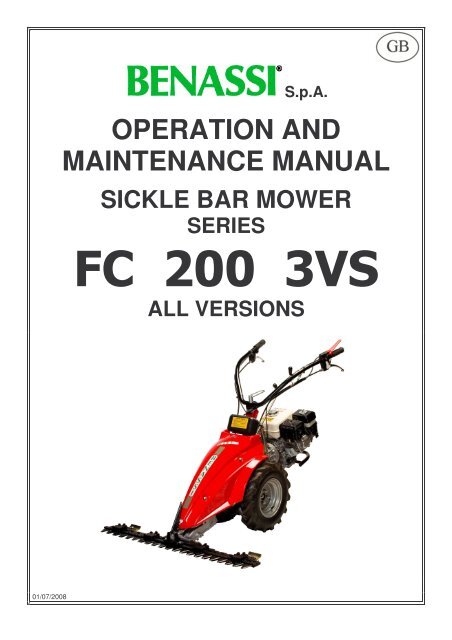
S.p.A.<br />
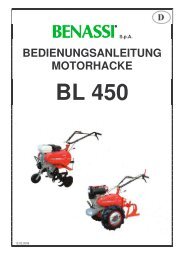
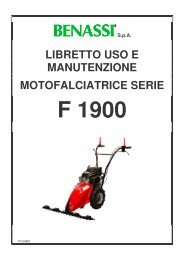
OPERATION AND<br />
MAINTENANCE MANUAL<br />
SICKLE BAR MOWER<br />
SERIES<br />
ALL VERSIONS
2<br />
S.p.A.<br />
INTRODUCTION<br />
DETAILS OF THE MACHINE<br />
IDENTIFICATION AND TECHNICAL<br />
CHARACTERISTICS<br />
PACKING AND TRANSPORT<br />
SAFETY RULES<br />
CONTENTS<br />
INTRODUCTION<br />
STARTING AND STOPPING THE MACHINE<br />
OPERATING AND REGULATING THE MACHINE<br />
MAINTENANCE<br />
ACCESSORI<br />
WARRANTY<br />
SAFETY TESTS AND CERTIFICATION<br />
♦ Thank you for having selected our product. We would like to welcome you among our many customers.<br />
♦ We are certain that you will appreciate the performance and the operating ease of this machine.<br />
♦ Our wide experience in the sector, the use of top grade materials and the high quality production ensure the<br />
flawless efficiency of the machine, which is designed to give many years of use if operated and maintained<br />
correctly.<br />
♦ We have therefore composed this manual to familiarise you with the use of the machine, its construction,<br />
operating features and applications, which will also facilitate maintenance.<br />
♦ Pay special attention to the rules in this manual that are preceded by the symbol below:<br />
CAUTION<br />
♦ This symbol indicates that the failure to comply with these rules may lead to personal injury.<br />
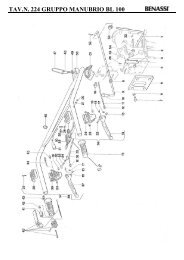
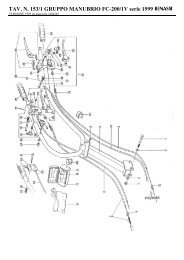
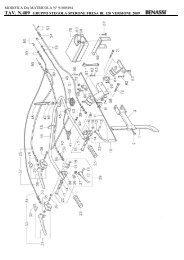
1- Accelerator level<br />
2- Engine-stop safety device<br />
3- Clutch lever for wheels<br />
4- Fuel cap<br />
5- Clutch lever for cutter bar<br />
6- Gear lever<br />
7- Handlebar adjustment<br />
8- Tools bag<br />
9- Air filter<br />
10- Side cutter bar<br />
11- Central cutter bar<br />
12- Cutting height adjusting skid<br />
13- Grass divider<br />
14- Oil cap<br />
DETAILS OF THE MACHINE
S.p.A.<br />
IDENTIFICATION AND TECHNICAL CHARACTERISTICS<br />
FOR THE ENGINE FEATURES SEE THE ENGINE INSTRUCTION BOOKLET DELIVERED WITH THE MACHINE.<br />
• All the engines which can be fitted on this machine have the recoil<br />
starter and protection on the exhaust.<br />
• Fuel for 4-stroke engine : Unleaded petrol<br />
• Fuel for Diesel engine: Diesel oil<br />
• Safety device on handles to stop machine<br />
• Air filter in oil bath<br />
• Consumption at 3600 r.p.m.: 0.8 Kg/hour<br />
• ENGINE LUBRICATION: SAE 30 OIL<br />
• Oil quantity in motor: 0.6 lt.<br />
• Transmission : 2 forward gears + Reverse gear<br />
• TRANSMISSION LUBRICATION : SAE 80W/90 OIL<br />
• Oil quantity in gearbox : 0.5 Kg.<br />
• Manually controlled wheel release and cutting bar<br />
• Steering handles mounted on vibration-damping supports<br />
• "Tractor" type rubber wheels 4.00X8 and rubber wheels 3.50X8<br />
• Central mowing unit<br />
• Manual-control clutch<br />
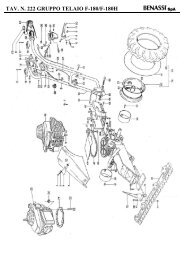
• For machine identification (serial number, motor, weight, power), refer to the data plate as shown in the photo.<br />
See Pict. n.2.<br />
3
4<br />
WIDTH: 116 cm<br />
DEPTH: 42 cm<br />
HEIGHT: 63 cm<br />
S.p.A.<br />
PACKING AND TRANSPORT<br />
Remove the power mower from its packing.<br />
Secure the handles with the screw (Pict. 10 Ref. “A”). The handle support is secured on anti-vibration devices<br />
(see Pict. 4 Ref. “B”).<br />
Fit the cutter bar into the machine by the quick coupling (see Pict. 6)<br />
If the machine is to be transported, empty out the petrol tank and always apply the plastic protective strip to<br />
the E.S.M. cutting bar blade. Read the E.S.M. sheet attaché.<br />
IMPORTANT: THE PACKED MACHINE IS SUPPLIED WITH THE MOTOR WITHOUT OIL OR PETROL.<br />
SAFETY RULES<br />
• Read carefully the operation and maintenance manual enclosed with the machine.<br />
• The use of the machine is prohibited to persons under 16 years of age.<br />
• The operator is liable for damages since the machine is under his control.<br />
• Those unfamiliar with the machine or who have never used it are obliged to read the operation and<br />
maintenance manual before operation.<br />
• In case of transport, disassemble the bar and empty the petrol out of the tank.<br />
• If the machine is left unattended, ensure that it cannot start up again.<br />
• Before running the machine, the operator must have a 5 meter radius of free space around him.<br />
• Dry any petrol leaks.<br />
• Fill up the tank with the motor off. Filling the tank or transferring fuel must always be performed outdoors, away<br />
from flames or heat sources. Do not smoke during this operation.<br />
• When mowing in mountainous areas or on slopes, mow horizontally and use non-skid equipment on shoes and<br />
wheels.<br />
• If the blade needs replacement, observe E.S.M. operation and maintenance procedures.<br />
• If the bar suffers impact, check the condition of the bar before resuming work.<br />
• Keep feet and hands far away from the cutting bar and all rotating parts.<br />
• Do not run the motor where exhaust containing carbon monoxide may accumulate.<br />
• Never use the mower incomplete or without its safety device.<br />
• Do not assemble/disassemble or clean the cutting bar or other equipment with the motor running.<br />
• Caution! Do not mow areas with slopes exceeding 50%.<br />
• We will not be held liable for accidents caused by the failure to observe these rules.
S.p.A.<br />
Every time you get ready to start the motor,<br />
make a careful check of the following:<br />
• Make sure that fuel is in the tank.<br />
• Check engine oil level. IMPORTANT:<br />
ENGINES OF NEWLY MANUFACTURED<br />
MACHINES DO NOT CONTAIN OIL. In this<br />
case, fill with oil up to the oil plug stick.<br />
• CONSULT THE OPERATION AND<br />
MAINTENANCE MANUAL OF THE MOTOR<br />
UNDER "BEFORE START-UP"<br />
• Make sure oil is up to the level in the<br />
gearbox (Pict. 12 Ref. B)<br />
• Check that all safety systems are released and functioning.<br />
• Before starting the machine, when the engine is cold, pull the choke, if it is fitted on your machine.<br />
• Always start the motor up outdoors.<br />
• For versions FC 209 and 210 H 3VS, lower the starter lever (when starting a cold engine), for version FC 200 D 3VS, turn<br />
the lever of the air pump, located above the cylinder head.<br />
• For versions FC 209 and 210 H 3VS, turn the accelerator lever (Pict. 6A Ref. “F”) to “START” position, for the FC 200 D<br />
3VS version, turn the lever by a ¾ turn (Pict. 6B Ref. “F”) . Pull the clutch lever (Pict. 8 Ref. “A”), lower the engine stop lever<br />
(Ref. “C”) and lock it with the push-button (Pict. 8 Ref. “B”). Grip the handle of the self-winding device (Pict. 7), pull gently<br />
until you meet resistance, and then pull it firmly. Do not allow the cord to return to its position on its own, but accompany it<br />
with your hand.<br />
• For best start-up, read the operation and maintenance manual on the motor under "START-UP".<br />
• After starting the engine, disengage the starter lever.<br />
• With the motor running, bring the accelerator lever (Pict. 6A-B Ref. "F") to the middle position.<br />
• To move the mower forward, grip the clutch lever (Pict. 8 Ref. “A”) , select the speed your require with the gear-stick (Pict. 4<br />
Ref. “A”), slowly lower the clutch lever (Ref. “A”), releasing it from the push-button (Pict. 8 Ref. “B”). To engage the mowing<br />
bar, lower the lever (Pict. 8 Ref. “D”) taking care to always do this while the engine is idling. After engaging the bar, you<br />
may accelerate.<br />
• To move the mower freely forward or back, lift up the wheel release lever (Pict. 8 Ref. “E”).<br />
BEFORE STARTING, ALWAYS CHECK IF THE MACHINE IS IDLING AND IF THE CLUTCH HAND-LEVER<br />
IS LIFTED AND LOCKED WITH THE PUSH-BUTTON (Pict. 8 Ref. “A” and “B”).<br />
BEFORE STARTING, THE BAR MUST BE DISABLED BY USING ITS COMMAND (Pict. 8 Ref. “D”).<br />
SAFETY DEVICE FOR STOPPING THE MOTOR<br />
The main function of the lever Ref. "A" Pict. 9 is to turn off the motor when releasing your hands from the steering handles. Do<br />
not ever tie the "MOTOR STOP" lever "A" to the handlebar knob. Before you start to mow, check that the motor shuts off with<br />
the "STOP" lever raised. MOTOR STOP: lever "A" is squeezed; MOTOR START : lever "A" is lowered.<br />
In case of danger the machine will immediately stop after releasing with the left<br />
hand the "stop engine safety device".<br />
!<br />
5
6<br />
S.p.A.<br />
OPERATING AND REGULATING THE MACHINE<br />
Before you start mowing, oil the cutting blade, then start the motor as follows:<br />
• The release of the wheels and bar clutches should be done with the engine running at low<br />
speed.<br />
• Engaging the transmission to the wheels and the cutting bar by means of the clutch lever<br />
must be carried out with the motor at a middle r.p.m. and by slowly releasing the lever.<br />
• When starting to mow, position the accelerator lever at 3/4 or at "MAX" to ensure adequate<br />
power.<br />
• When mowing along a wall or the edge of a sidewalk, be careful to keep a safety distance<br />
so that the blade does not suffer impact. If not, the cutting bar may undergo damage.<br />
• When moving forward or back with the mower running, first squeeze the clutch lever which<br />
will block the bar, then squeeze the wheel release lever and move as needed.<br />
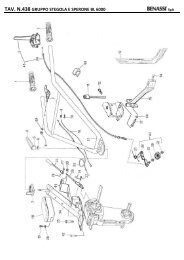
• The handles can be adjusted in height and sideways (Pict. 10 Ref. “a”) by a multitoothed<br />
device.<br />
• You can adjust the cutting height of the grass by the skids on the cutter bar (see<br />
instructions on the bars)<br />
• To regulate the motor, read the manual on the motor under "REGULATIONS".<br />
• ATTENTION: DO NOT LEAVE THE MACHINE RUNNING WHEN NOT IN<br />
OPERATION<br />
MAINTENANCE<br />
For changing the oil and other maintenance operations on the motor (spark plugs, air filter, regulations), refer to the motor<br />
manual provided.<br />
Make a regular check of the oil level in the gearbox with the cap (Pict. 12 Ref. "b") and topping up if necessary.<br />
Change the oil completely every 200 hours. Empty the gearbox of oil by unscrewing the oil drain plug (Pict. 5 Ref. "C")<br />
Allow oil to flow out completely. Then, screw down the plug completely, and fill with new oil of the recommended type,<br />
unscrewing breather plug (Ref. “A” Fig 12), up to the correct level - see the screw Ref. “B” Fig 12.<br />
If the grass is not cut in a satisfactory manner despite the adjustments (see Pict. 11), the blade must be sharpened or<br />
replaced. Follow the instructions on the E.S.M. maintenance sheet.<br />
For any mechanical repair, especially during the warranty period, we recommend to go to a specialised repair shop of the<br />
dealer.<br />
For transporting convenience, the handles can be disassembled by means of the two knobs (Pict. 10 Ref. "a"). The same is<br />
recommended for the cutting bar, which is easily disassembled by after moving the locking knob (see Pict. 5). Always use<br />
gloves and apply the protective strip to the blade.<br />
Regularly check that screws are tight. Pay special attention to the screws fastening the bar to its support.<br />
Once a year, be sure to check oil level in the bar gearbox (see Pict. 13).<br />
In the types with air filter in oil bath check the oil and clean the filter box every 10 working hours (see Pict. 14).
TYPE OF BAR :<br />
S.p.A.<br />
ESM BAR 117 cm<br />
SPECIAL BAR 107 cm<br />
SEMI-DENSE BAR 112 cm<br />
PAIR OF RUBBER WHEELS 4.00.8<br />
ACCESSORIES<br />
PAIR OF RUBBER WHEELS 16/650.8 (with 50 mm spacers)<br />
PAIR OF IRON WHEELS<br />
PAIR OF “DAISY” TYPE IRON WHEELS (applies to 4.00.8 wheels only)<br />
PAIR OF 50 mm SPACERS FOR WHEELS<br />
PAIR OF 112 mm SPACERS FOR WHEELS<br />
PAIR OF HUBS FOR TWIN-WHEELS<br />
PAIR OF SIDE WINDROWING ATTACHMENTS FOR SEMI-DENSE MOWING UNIT<br />
PAIR OF EXTENSIONS FOR WINDROWING ATTACHMENTS<br />
SNOW PLOUGH 50 x 45 cm<br />
LARGE BRUSH 100 cm<br />
FRONT SNOW-PLOYGH BLADE<br />
WARRANTY<br />
The machines and accessories are guaranteed for 2 YEARS, with the exception of electrical parts or parts in rubber. The<br />
manufacturer shall replace pieces recognised as defective free of charge. Labour and transport shall be at the expense of the<br />
purchaser. Warranty requests must be made through dealers authorised by the manufacturer.<br />
With regard to materials not of our manufacture, with special reference to the motor, the rules laid down by the respective<br />
manufacturers shall apply. Any requests for repair shall therefore be directed to the specific service centres in the respective<br />
areas.<br />
For any problem or repair, contact the dealer where the machine was purchased.<br />
IMPORTANT: using the machine for a long time you should use ear protection<br />
system.<br />
7
8<br />
S.p.A.<br />
SAFETY TESTS AND CERTIFICATION<br />
Declaration of CE conformity in accordance with the directive 98/37 CE and the directive EMC 89/336/CE<br />
S.p.A. Via Lampedusa n°1 - 40017 San Matteo della Decima BO Italy<br />
We hereby declare that the machine complies with the essential requirements for health and safety in accordance with Directive<br />
98/37/CE.<br />
TYPE: POWER MOWER SERIES: FC 200 3VS MODEL: FC 210 KD 3VS / FC 210 H 3VS<br />
For verification of the conformity with the above-mentioned Directives reference has been made to following specifications: UNI<br />
EN ISO 12100-1 and UNI EN ISO 12100-2; UNI EN 12733 for pushed motor mowers with rotating cutting blades or with<br />
reciprocating motion used in agriculture, forestry and horticulture.<br />
CHAIRMAN OF THE BOARD<br />
RESULT AND TESTS<br />
S.Matteo della Decima 18/10/2007<br />
TYPE: POWER MOWER MODEL: FC 210 KD 3VS / FC 210 H 3VS<br />
Acoustic power level LwA = from LdB (A) 104 to 109 LdB (A)<br />
Acoustic pressure to the operator’s ear: LpA = from 91,5 dB (A) to 99,4 dB (A)<br />
Testing conditions height 1.6 m handle midpoint.<br />
Vibration to handles with weighting UNI EN 1033-1 value: from 14,9 m/sec 2 to 24,61 m/sec 2.<br />
This declaration of CE conformity is valid only if the product doesn’t undergo any changes or modifications without authorization.<br />
S.p.A.<br />
VIA LAMPEDUSA 1<br />
40017 S. MATTEO DELLA DECIMA (BO) – ITALY<br />
TEL. +39/051/820534 TELEFAX +39/051/820526<br />
Web: www.benassi.eu e-mail: export@benassispa.it<br />
Dealer stamp