
Create successful ePaper yourself
Turn your PDF publications into a flip-book with our unique Google optimized e-Paper software.
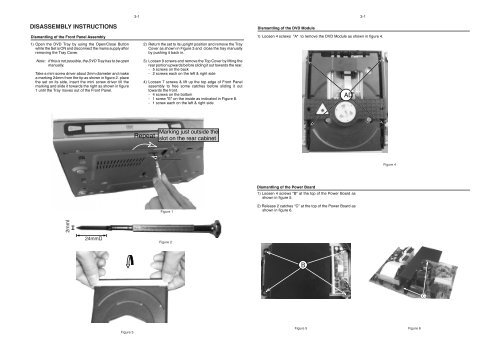
DISASSEMBLY INSTRUCTIONS<br />
Dismantling of the Front Panel Assembly<br />
1) Open the DVD Tray by using the Open/Close Button<br />
while the Set is ON and disconnect the mains supply after<br />
removing the Tray Cover.<br />
Note: If this is not possible, the DVD Tray has to be open<br />
manually.<br />
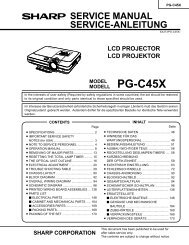
Take a mini screw driver about 2mm diameter and make<br />
a marking 24mm from the tip as shown in figure 2. place<br />
the set on its side, insert the mini screw driver till the<br />
marking and slide it towards the right as shown in figure<br />
1 until the Tray moves out of the Front Panel.<br />
2mm<br />
24mm<br />
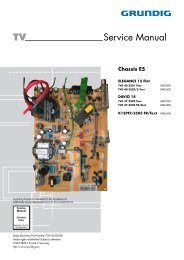
Figure 3<br />
3-1<br />
2) Return the set to its upright position and remove the Tray<br />
Cover as shown in Figure 3 and close the tray manually<br />
by pushing it back in.<br />
3) Loosen 9 screws and remove the Top Cover by lifting the<br />
rear portion upwards before sliding it out towards the rear.<br />
- 5 screws on the back<br />
- 2 screws each on the left & right side<br />
4) Loosen 7 screws & lift up the top edge of Front Panel<br />
assembly to free some catches before sliding it out<br />
towards the front.<br />
- 4 screws on the bottom<br />
- 1 screw "E" on the inside as indicated in Figure 8.<br />
- 1 screw each on the left & right side<br />
Repeat<br />
Marking just outside the<br />
slot on the rear cabinet<br />
Figure 1<br />
Figure 2<br />
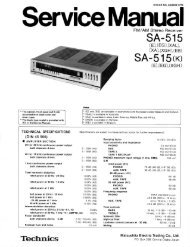
Dismantling of the DVD Module<br />
1) Loosen 4 screws "A" to remove the DVD Module as shown in figure 4.<br />
Dismantling of the Power Board<br />
1) Loosen 4 screws "B" at the top of the Power Board as<br />
shown in figure 5.<br />
2) Release 2 catches "C" at the top of the Power Board as<br />
shown in figure 6.<br />
B<br />
Figure 5<br />
A<br />
3-1<br />
Figure 4<br />
Figure 6<br />
C