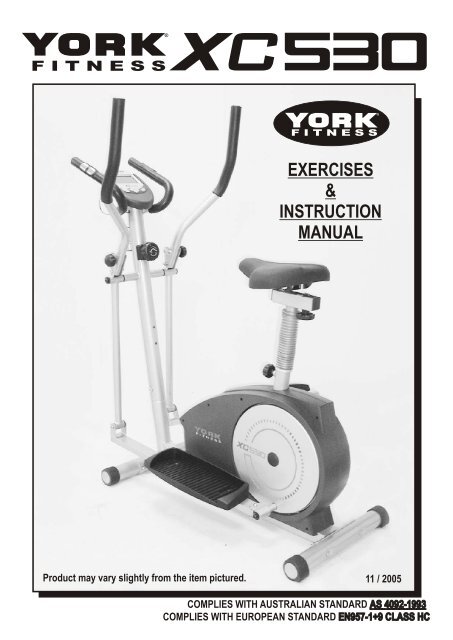
XC530 Cycle Cross Trainer - York Fitness
XC530 Cycle Cross Trainer - York Fitness
XC530 Cycle Cross Trainer - York Fitness

You also want an ePaper? Increase the reach of your titles
YUMPU automatically turns print PDFs into web optimized ePapers that Google loves.
YORK <strong>XC530</strong> 2in1 CYCLE ROWER<br />
SAFETY GUIDELINES:<br />
Please read and follow the following safety guidelines:<br />
It is recommended that you undergo a complete physical examination before<br />
beginning any exercise program.<br />
Read this owner’s manual and follow the instructions.<br />
Assemble and operate the YORK <strong>XC530</strong> on a solid, level surface.<br />
Keep the area behind the YORK <strong>XC530</strong> clear.<br />
Always use your YORK <strong>XC530</strong> in adequate space e.g., at least 2 ft. (60cm) clearance on each side.<br />
Never allow children on or near the YORK <strong>XC530</strong>.<br />
Always check the YORK <strong>XC530</strong> before using it, in particular make sure all parts<br />
are assembled, and nuts and bolts are tightened.<br />
Do not use the YORK <strong>XC530</strong> if the unit is disassembled in any way.<br />
WARNING: Injuries could occur particularly to young children if the guards are removed and<br />
not correctly reinstated.<br />
WE DO NOT RECOMMEND THE REMOVAL OF THE GUARDS.<br />
Always check the guards to ensure they are secured before use.<br />
If guards are not secured tighten the screws of the guards.<br />
Keep hands away from moving parts.<br />
The max. user weight of 220lbs ( 100kg ) has been determined according to European Standards.<br />
This product is not suitable for therapeutic purposes ( Class B & C ).<br />
Wear proper workout clothing: Do not wear loose clothing.<br />
Do not wear shoes with leather soles or high heels. Tie all long hair back.<br />
Do not rock the unit from side to side.<br />
Care should be taken when mounting and dismounting the unit.<br />
Do not place any liquids on any part of YORK <strong>XC530</strong>.<br />
Do not use any accessories that aren't specifically recommended by<br />
the manufacturer, these might cause injuries or cause the unit to fail.<br />
Always consult your doctor before undertaking any exercise programme.<br />
Work within your recommended exercise level, do NOT work to exhaustion.<br />
If you feel any pain or abnormal symptoms, STOP YOUR WORKOUT IMMEDIATELY.<br />
Consult your physician immediately.<br />
TAKE CARE TO PROTECT CARPETS AND FLOOR<br />
in case of leakages. This product is a machine<br />
and contains moving parts which have been greased / lubricated and could leak.<br />
The safety level of the equipment can be maintained only if it is regularly examined for damage and<br />
wear e.g. ropes, pulleys & connection points.<br />
Replace defective components immediately and/or keep the equipment out of use until repair.<br />
Component such as pulleys, bearings and cables are always more susceptible to wear. Special<br />
attention should be taken to inspect these component before use.<br />
WARNING: Injuries to health may result from incorrect use of this equipment. Always correctly<br />
follow the instructions that are set out in this manual.<br />
That adjustment devices are not left projecting as they may interfere with people.<br />
Assemble and operate the product on a solid and level surface.<br />
The YORK <strong>XC530</strong> is designed for the use and enjoyment of the beginner as well as the dedicated user.<br />
By following the above precautions and using good judgement and common sense, you will have a safe<br />
and pleasurable exercise regimen with the YORK <strong>XC530</strong>.<br />
CARE AND MAINTENANCE<br />
TOOLS REQUIRED<br />
The tools enclosed in the carton are two allen keys (one has a<br />
Use a warm damp cloth with mild detergent<br />
to keep your YORK <strong>XC530</strong> clean.<br />
screwdriver function) and two multi-purpose spanners.<br />
SHOULD YOU REQUIRE ANY ASSISTANCE REGARDING THIS PRODUCT PLEASE CONTACT YORK DIRECTLY.<br />
U.K. AUSTRALIA<br />
F I T N E S S<br />
HELP LINE (8:30am- 16:30pm)<br />
YORK BARBELL (U.K.) LTD.<br />
CHURCHILL WAY, DAVENTRY,<br />
NORTHANTS, NN11 4YB ENGLAND<br />
TEL: (01327) 701-824<br />
FAX: (01327) 706-704<br />
E-MAIL: helpdesk@yorkfitness.co.uk<br />
YORK <strong>XC530</strong> / 01<br />
F I T N E S S<br />
HELP LINE (8:00am- 16:00pm)<br />
YORK BARBELL (AUST.) PTY. LTD.<br />
UNIT 1, LOT 2, SWAFFHAM ROAD,<br />
MINTO, N.S.W. 2566 AUSTRALIA<br />
TEL: (02) 9603-8444<br />
FAX: (02) 9603-8555<br />
E-MAIL: service@yorkfitness.com.au<br />
U.S.A.<br />
F I T N E S S<br />
HELP LINE (8:00am- 17:00pm)<br />
YORK BARBELL USA.<br />
3300 BOARD ROAD.<br />
YORK, PA 17402<br />
TEL: +1-717-767-6481<br />
FAX: +1-717-764-0416<br />
E-MAIL: info@yorkbarbell.com
GENERAL<br />
WE RECOMMEND YOU HAVE SOMEONE ASSIST YOU IN LIFTING AND ASSEMBLING<br />
YOUR YORK <strong>XC530</strong>.<br />
REMOVE ALL THE PARTS OF YOUR YORK <strong>XC530</strong> FROM THE CARTON AND PLACE<br />
THEM ON THE FLOOR CAREFULLY.<br />
FOLLOW THESE INSTRUCTIONS CAREFULLY AND IT WILL MAKE IT EASIER FOR<br />
YOU TO ASSEMBLE YOUR YORK <strong>XC530</strong>.<br />
ASSEMBLY INSTRUCTIONS<br />
1.<br />
A<br />
2.<br />
A<br />
REAR<br />
STABILIZER<br />
END CAP<br />
NOTE: This equipment has been supplied<br />
with some Nylon Locknuts.<br />
It is essential that the nuts are fully<br />
tightened onto the bolts, so that<br />
the bolt penetrates through the<br />
nylon insert.<br />
MOVING<br />
WHEEL<br />
FRONT<br />
STABILIZER<br />
ATTACH THE REAR STABILIZER<br />
The rear stabilizer has end caps that can vary<br />
in height to enable you to level the trainer on<br />
uneven floors.<br />
Fix the rear stabilizer to the main frame and<br />
secure, using two carriage bolts, spring washers,<br />
washers and nylon locknuts.<br />
Fix the plastic caps onto the locknut heads.<br />
#5677-09<br />
#5677-10 #5677-11 #5677-12<br />
#5677-29<br />
ATTACH THE FRONT STABILIZER<br />
The front stabilizer has moving wheels near each end.<br />
Fix the front stabilizer to the main frame and<br />
secure, using two carriage bolts, washers,<br />
spring washers and nylon locknuts.<br />
* SHOULD YOU REQUIRE ANY ASSISTANCE REGARDING THIS PRODUCT PLEASE CONTACT YORK DIRECTLY. *<br />
X4<br />
X4<br />
NOTE: MAKE SURE you fasten the nuts and bolts<br />
securely for your safety and comfort when<br />
pedalling.<br />
Fix the plastic caps onto the locknut heads.<br />
YORK <strong>XC530</strong> / 02
3.<br />
A<br />
B<br />
C<br />
RIGHT<br />
PEDAL<br />
POST<br />
CURVE<br />
EDGE<br />
CURVE<br />
EDGE<br />
FOOT<br />
PEDAL<br />
LEFT<br />
PEDAL<br />
LEFT<br />
PEDAL<br />
POST<br />
ATTACH THE PEDALS TO THE POSTS<br />
Attach the pedal brackets to the pedal posts and<br />
secure, using six allen head bolts, spring washers<br />
and washers.<br />
#5677-23 #5677-11 #5677-10<br />
NOTE: MAKE SURE<br />
you fasten the bolts securely<br />
for your safety and comfort when pedalling.<br />
Insert the foot pedal washers into the slot in the foot<br />
pedal securely as shown.<br />
NOTE: The fixing hole of the pedal washer must be<br />
fixed facing towards the flat edge of the<br />
pedal.<br />
Attach the pedals to the pedal post and secure,<br />
using four carriage bolts, washers, spring washers<br />
and fixing knobs.<br />
NOTE: The curved edge of each pedal must be<br />
on the same side of the pedal post as the<br />
pedal bracket.<br />
#5677-28<br />
There are three adjustable holes on the<br />
pedal post for you to adjust the pedal to a<br />
suitable position.<br />
MAKE SURE you fix both pedals into the<br />
same positions on the pedal posts.<br />
#5677-27<br />
#5677-32<br />
* SHOULD YOU REQUIRE ANY ASSISTANCE REGARDING THIS PRODUCT PLEASE CONTACT YORK DIRECTLY. *<br />
YORK <strong>XC530</strong> / 03<br />
PEDAL<br />
BRACKET<br />
PEDAL<br />
BRACKET<br />
FLAT<br />
EDGE<br />
LEFT<br />
PEDAL<br />
POST<br />
PEDAL<br />
BRACKET<br />
CURVE<br />
EDGE<br />
#5677-49<br />
X6<br />
X4<br />
X4
4. ATTACH THE FRONT POST<br />
A<br />
CONNECTING<br />
BRACKET<br />
UPPER<br />
TENSION<br />
CABLE<br />
B<br />
UPPER<br />
TENSION<br />
CABLE<br />
LOWER<br />
TENSION<br />
CABLE<br />
C<br />
UPPER<br />
TENSION<br />
CABLE<br />
METAL<br />
END<br />
D<br />
MIDDLE<br />
WIRE<br />
SENSOR<br />
WIRE<br />
LOWER<br />
TENSION<br />
CABLE<br />
CONNECTING<br />
BRACKET<br />
INSIDE<br />
BRACKET<br />
CONNECTING<br />
BRACKET<br />
You may find that you prefer to support the front post<br />
either between your legs or with your hand.<br />
Connect the upper tension cable to the inside bracket<br />
at the end of the lower tension cable.<br />
UPPER<br />
TENSION<br />
CABLE<br />
INSIDE BRACKET<br />
CONNECTING<br />
BRACKET<br />
Once the upper tension cable is connected to<br />
the inside bracket, firmly pull the upper<br />
tension cable upwards, above the connecting<br />
bracket as shown.<br />
UPPER<br />
TENSION<br />
CABLE<br />
METAL<br />
END<br />
Position the upper tension cable in the slot<br />
at the top of the connecting bracket.<br />
Ensure the metal end of the upper tension<br />
cable is engaged in the slot as shown.<br />
Connect the sensor wire plug protruding from the main<br />
frame to the middle wire plug protruding from the end<br />
of the front post.<br />
Check the middle wire runs up the front post and<br />
out of the top - later this will connect to the computer.<br />
* SHOULD YOU REQUIRE ANY ASSISTANCE REGARDING THIS PRODUCT PLEASE CONTACT YORK DIRECTLY. *<br />
YORK <strong>XC530</strong> / 04
E<br />
F<br />
FRONT<br />
POST<br />
HAND<br />
PULSE<br />
SENSOR<br />
CABLES<br />
CENTRE<br />
BAR<br />
FIXING<br />
BRACKET<br />
Insert the front post into the front post mounting<br />
tube and secure, using four allen head bolts,<br />
spring washers and washers.<br />
#5677-23 #5677-11<br />
NOTE: TAKE CARE to ensure that the wire does<br />
not get trapped when you attach<br />
the front post.<br />
Fix the centre bar to the front post via the fixing<br />
bracket using two washers, spring washers and<br />
locknuts.<br />
#5677-50 #5677-49 #5677-60<br />
NOTE: TAKE CARE<br />
to ensure that the hand pulse<br />
sensor cables do not get trapped when<br />
you attach the centre bar.<br />
* SHOULD YOU REQUIRE ANY ASSISTANCE REGARDING THIS PRODUCT PLEASE CONTACT YORK DIRECTLY. *<br />
YORK <strong>XC530</strong> / 05<br />
#5677-10<br />
X4<br />
X2<br />
MAKE SURE you fasten the nuts securely<br />
for your safety and comfort when pedalling.
5.<br />
A<br />
B<br />
C<br />
D<br />
E<br />
RIGHT<br />
HANDLE<br />
BAR<br />
POST<br />
ATTACH THE HANDLE BAR POSTS<br />
Insert the handle bar pivot rod from the left side, and<br />
centre through the handle bar bracket.<br />
NOTE: TAKE CARE not to push the nylon bushing<br />
out of the handle bar bracket when inserting<br />
the pivot rod.<br />
Attach the left handle bar post onto the handle bar<br />
pivot rod from the left hand side as shown.<br />
Secure the left handle bar post to the handle bar<br />
bracket with one allen head bolt, spring washer<br />
and washer.<br />
Attach the right handle bar post onto the handle bar<br />
pivot rod from the right hand side as shown.<br />
Secure the right handle bar post to the handle bar<br />
bracket with one allen head bolt, spring washer<br />
and washer.<br />
#5677-23 #5677-11 #5677-20<br />
* SHOULD YOU REQUIRE ANY ASSISTANCE REGARDING THIS PRODUCT PLEASE CONTACT YORK DIRECTLY. *<br />
YORK <strong>XC530</strong> / 06<br />
X1
6.<br />
A Attach the left handle bar to the left handle bar<br />
B<br />
LEFT<br />
HANDLE<br />
BAR<br />
ATTACH THE HANDLE BAR<br />
adjustable bracket and secure, using the hex<br />
head bolt, metal bush and locknut into the<br />
bottom hole of bracket as shown.<br />
#5677-10<br />
#5677-95<br />
#5677-74<br />
#5677-95 #5677-10 #5677-12<br />
NOTE: The hex head bolt and metal bush must<br />
be threaded from the outside of the bracket<br />
toward to the handle bar so the metal bush<br />
sits inside the hole in the bracket.<br />
Secure the top hole of the bracket with fixing<br />
knob as shown.<br />
#5677-97<br />
Repeat the same process for the Right Handle<br />
Bar Assembly.<br />
* SHOULD YOU REQUIRE ANY ASSISTANCE REGARDING THIS PRODUCT PLEASE CONTACT YORK DIRECTLY. *<br />
YORK <strong>XC530</strong> / 07<br />
X1<br />
X1<br />
X1<br />
X1<br />
X2
7.<br />
A<br />
B<br />
C<br />
D<br />
I<br />
Repeat the same process for the Right Pedal Post Assembly.<br />
* SHOULD YOU REQUIRE ANY ASSISTANCE REGARDING THIS PRODUCT PLEASE CONTACT YORK DIRECTLY. *<br />
YORK <strong>XC530</strong> / 08
8.<br />
A<br />
B<br />
C<br />
HAND<br />
PULSE<br />
SENSOR<br />
WIRE<br />
COMPUTER<br />
BRACKET<br />
MIDDLE WIRE PLUG<br />
ATTACH THE COMPUTER<br />
Insert two batteries ( AA size 1.5V ) into the<br />
compartment in the back of the computer.<br />
Attach the computer to the computer bracket by<br />
using two machine screws. ( The machine screws are<br />
located in the back of the computer console. )<br />
#5677-30<br />
NOTE: TAKE CARE<br />
to ensure that the wire does not<br />
get trapped when you attach the computer.<br />
Plug the hand pulse sensor into the left hand side<br />
socket on the back of the computer.<br />
Plug the middle wire into the right hand side socket<br />
on the back of the computer.<br />
SHOULD YOU REQUIRE ANY ASSISTANCE REGARDING THIS PRODUCT PLEASE CONTACT YORK DIRECTLY.<br />
* *<br />
YORK <strong>XC530</strong> / 09<br />
X2
9.<br />
A<br />
SEAT POST<br />
ASSEMBLY<br />
SEAT POST<br />
CLAMP<br />
ASSEMBLY SEAT<br />
B<br />
C<br />
SEAT<br />
HEIGHT<br />
ADJUSTING<br />
KNOB<br />
SEAT POST<br />
TUBE COVER<br />
ATTACH THE SEAT & SEAT POST<br />
Release the seat post clamp assembly firstly.<br />
Attach the seat post assembly to the seat.<br />
Adjust the seat to the desired angle then<br />
fasten the seat post clamp assembly<br />
securely.<br />
NOTE: MAKE SURE you fasten the nuts on<br />
both sides evenly and tightly for your<br />
safety and comfort when cycling.<br />
Slide the seat post tube cover onto the<br />
seat post.<br />
Fit the seat post into the seat post mounting<br />
tube and secure in position with the seat<br />
height adjusting knob.<br />
RECHECK THAT ALL THE BOLTS AND NUTS ARE TIGHTENED<br />
SECURELY FOR YOUR SAFETY & COMFORT.<br />
* SHOULD YOU REQUIRE ANY ASSISTANCE REGARDING THIS PRODUCT PLEASE CONTACT YORK DIRECTLY. *<br />
YORK <strong>XC530</strong> / 10
DESCRIPTION<br />
YORK <strong>XC530</strong> / 11
DESCRIPTION<br />
YORK <strong>XC530</strong> / 12
PARTS LIST<br />
KEY NO. PART NO. Q'TY(PCS) DESCRIPTION<br />
1 5677-01 1 MAIN FRAME<br />
2 5677-02 1 LEFT CHAIN COVER<br />
3 5677-03 1 RIGHT CHAIN COVER<br />
4 5677-04 2 PLASTIC DISC CAP<br />
5 5677-05 1 FRONT STABILIZER<br />
6 5677-06 2 MOVING WHEEL ASSEMBLY<br />
7 5677-07 4 #8 X 16mm SELF TAPPING SCREW<br />
8 5677-08 2 FRONT STABILIZER END CAP<br />
9 5677-09 4 M8 X 70mm CARRIAGE BOLT<br />
10 5677-10 24 M8 FLAT WASHER<br />
11 5677-11 20 M8 SPRING WASHER<br />
12 5677-12 9 M8 NYLON LOCKNUT<br />
13 5677-13 1 REAR STABILIZER<br />
14 5677-14 1 REAR STABILIZER END CAP ( L )<br />
15 5677-15 1 SENSOR WIRE<br />
16 5677-16 1 MIDDLE WIRE<br />
17 5677-17 1 CABLE CONNECT BRACKET<br />
18 5677-18 1 TENSION CONTROL ASSEMBLY<br />
19 5677-19 4 PLASTIC INSERT PAD<br />
20 5677-20 4 M8 X 28mm WASHER<br />
21 5677-21 2 PEDAL BRACKET<br />
22 5677-22 1 FRONT POST<br />
23 5677-23 12 M8 X 15mm ALLEN HEAD BOLT<br />
24 5677-24 14 INSERT BUSHING<br />
25 5677-25 1 RIGHT PEDAL POST<br />
26 5677-26 2 RIGHT FOOT PEDAL<br />
27 5677-27 4 M6 X 45mm CARRIAGE BOLT<br />
28 5677-28 5 M6 WASHER ( t=1.2mm )<br />
29 5677-29 4 PLASTIC NUT CAP<br />
30 5677-30 4 M5 X 10mm MACHINE SCREW<br />
31 5677-31 2 PEDAL POST PIVOT BOLT<br />
32 5677-32 4 FIXING KNOB<br />
33 5677-33 1 LEFT PLASTIC DISC COVER<br />
34 5677-34 2 PEDAL POST END CAP<br />
35 5677-35 1 LEFT PEDAL POST<br />
36 5677-36 1 SEAT POST INSERT<br />
37 5677-37 2 M8 X 45mm ALLEN HEAD BOLT<br />
38 5677-38 1 PIVOT ROD<br />
39 5677-39 1 RIGHT HANDLE BAR<br />
40 5677-40 1 LEFT LOW HANDLE BAR POST<br />
41 5677-41 1 LEFT HANDLE BAR<br />
42 5677-42 2 HANDLE BAR FOAM GRIPS<br />
43 5677-43 2 HANDLE BAR END CAP<br />
44 5677-44 1 RIGHT LOW HANDLE BAR POST<br />
45 5677-45 4 FOOT PEDAL FIXING WASHER<br />
46 5677-46 2 HAND PULSE SENSOR ASSEMBLY<br />
47 5677-47 1 CENTRE BAR<br />
48 5677-48 1 M5 X 25mm MACHINE SCREW<br />
49 5677-49 6 M6 SPRING WASHER<br />
50 5677-50 3 M6 NYLON LOCKNUT<br />
51 5677-51 1 COMPUTER<br />
52 5677-52 2 CENTRE BAR END CAP - BOTTOM<br />
YORK <strong>XC530</strong> / 13
KEY NO. PART NO. Q'TY(PCS) DESCRIPTION<br />
53 5677-53 2 CENTRE BAR END CAP - TOP<br />
54 5677-54 2 M8 X 25mm ALLEN HEAD BOLT<br />
55 5677-55 2 WAVE WASHER<br />
56 5677-56 1 RIGHT PLASTIC DISC COVER<br />
57 5677-57 1 REAR STABILIZER END CAP ( R )<br />
58 5677-58 1 M5 FLAT WASHER<br />
59 5677-59 2 M8 X 20mm ALLEN HEAD BOLT<br />
60 5677-60 2 M8 CURVE WASHER<br />
61 5677-61 1 HAND PULSE SENSOR WIRE<br />
62 5677-62 2 PEDAL POST CONNECT BRACKET<br />
63 5677-63 1 DRIVE BELT PULLEY WHEEL<br />
64 5677-64 1 MAGNET<br />
65 5677-65 3 CLIP C17 ( ID 15.7mm )<br />
66 5677-66 4 M6 X 16mm FIXING SCREW<br />
67 5677-67 1 PULLEY WHEEL AXLE<br />
68 5677-68 1 JOCKEY PULLEY BRACKET<br />
69 5677-69 1 JOCKEY PULLEY BRACKET SPRING<br />
70 5677-70 3 SPACER SLEEVE<br />
71 5677-71 3 M6 WASHER ( 1.5mm )<br />
72 5677-72 3 M6 X 14mm FIXING SCREW<br />
73 5677-73 1 MAGNET HOLDER<br />
74 5677-74 3 M8 X 52mm HEX HEAD BOLT<br />
75 5677-75 1 DISC FRAME SUPPORT ( R )<br />
76 5677-76 1 M6 X 65mm MACHINE SCREW<br />
77 5677-77 1 M6 SELF - LOCKING NUT<br />
78 5677-78 1 M6 NYLON WAHSER<br />
79 5677-79 1 MAGNET HOLDER SPRING<br />
80 5677-80 1 FLYWHEEL ASSEMBLY<br />
81 5677-81 2 BEARING ( 6001ZZ )<br />
82 5677-82 1 FLYWHEEL AXLE<br />
83 5677-83 2 CLIP C12 ( ID 11.1mm )<br />
84 5677-84 1 DRIVE BELT - RIBBED<br />
85 5677-85 3 M10 WASHER ( t=2mm )<br />
86 5677-86 2 3/8" WH NUT<br />
87 5677-87 2 M8 X 16mm HEX HEAD BOLT<br />
88 5677-88 1 SENSOR FIXING BRACKET<br />
89 5677-89 1 #6 X 12mm FIXING SCREW<br />
90 5677-90 4 BEARING ( 6203ZZ )<br />
91 5677-91 1 22mm X 17mm X 0.3mm WASHER<br />
92 5677-92 1 DISC FRAME SUPPORT ( L )<br />
93 5677-93 8 M5 X 12mm HEX HEAD BOLT<br />
94 5677-94 1 BOTTOM END CAP<br />
95 5677-95 4 SPACER SLEEVE<br />
96 5677-96 1 PLASTIC PAD ( SEAT BRACKET )<br />
97 5677-97 2 HAND WHEEL FIXING KNOB<br />
98 5677-98 1 SEAT HEIGHT ADJUSTING KNOB<br />
99 5677-99 1 SEAT POST<br />
100 5677-100 1 SEAT POST TUBE COVER<br />
101 5677-101 1 SEAT<br />
102 5677-102 2 PLASTIC END CAP<br />
103 5677-103 1 SLIDING SEAT POST<br />
104 5677-104 1 FIXING PLATE ( SEAT BRACKET )<br />
105 5677-105 1 ADJUSTABLE SEAT POST HAND KNOB<br />
YORK <strong>XC530</strong> / 14
YORK <strong>XC530</strong> COMPUTER INSTRUCTION<br />
INTRODUCTION<br />
Your computer is ideal for monitoring your performance and setting yourself targets.<br />
By measuring your pulse rate you can ensure you exercise within your range.<br />
At the same time you can monitor closely your improving condition and<br />
cardiovascular fitness.<br />
TO START/ Press the SET button to activate the unit.<br />
The computer will automatically start/stop when you exercise.<br />
B. FUNCTION BUTTONS<br />
F IT N E S S<br />
C530<br />
MODE: Guides you through each display function.<br />
Your computer will change modes in the following order.<br />
TIME DISTANCE CALORIE PULSE<br />
Press and hold MODE for several seconds to reset all of the target values<br />
in the computer.<br />
SET: Allows you to set the target values for TIME, DISTANCE, CALORIE<br />
& PULSE.<br />
Please make sure the computer is in the “STOP“ status before using this key<br />
If you hold this key continuously for 2 seconds the value will increase quickly.<br />
* SHOULD YOU REQUIRE ANY ASSISTANCE REGARDING THIS PRODUCT PLEASE CONTACT YORK DIRECTLY. *<br />
YORK <strong>XC530</strong> / 15
RECOVERY: The time it takes you to recover after exercise is an indication of your fitness<br />
,, ,,<br />
level. The computer is equipped with RECOVERY to measure your heart<br />
rate recovery time, you can use this feature to compare your recovery rate<br />
over a period of time e.g. When you first start to train and again after a few<br />
weeks training. To make an accurate comparison you should really exercise<br />
at the same speed and load, and for the same amount of time, e.g., 10 minutes,<br />
at load 3. For an approximate comparison it is not necessary to put your hands<br />
on the hand pulse sensor during the exercise period. When you finish<br />
exercising, put your hands onto the hand pulse sensors, press “RECOVERY”<br />
and the computer will continue to monitor your pulse. When the computer has<br />
counted down to 0.00 the screen will display a heart rate recovery grade from<br />
F1 to F6 ( F1 being good and F6 poor ).<br />
Press the “RECOVERY” button again to return to the main functions.<br />
C. SETTING FUNCTIONS<br />
You can set a target time, distance or calories on your computer.<br />
When you start exercising the computer will begin to count down from<br />
your target to zero.<br />
When it reaches zero an alarm will beep, then start to count up if<br />
you continue exercise.<br />
SCAN Automatically scans all the functions in sequence displaying your progress<br />
without requiring you to press the MODE key.<br />
Your computer will change modes in the following order -<br />
SPEED RPM TIME DISTANCE CALORIES PULSE<br />
SPEED The speed is shown in KPH, when the YORK <strong>XC530</strong> is in use. (Max 99:9 KPH).<br />
TIME Counting commences when the YORK <strong>XC530</strong> is active. (Max 99:59 MIN).<br />
, ,<br />
To set the timer to countdown select TIME by using the MODE button.<br />
Enter the required time target by pressing the SET button. (Max 99:00 MIN).<br />
DISTANCE Distance is automatically displayed in KM, when the YORK <strong>XC530</strong> is in use.<br />
(Max 99.99KM).<br />
, ,<br />
To set a target distance select DISTANCE by using the MODE button.<br />
Enter the desired distance by pressing the SET button. (Max 99.50 KM).<br />
CALORIES Approximate calories consumed is displayed, once the YORK <strong>XC530</strong> is in use.<br />
(Max 9999 CAL.)<br />
To set a target calorie consumption select “CALORIE” by using<br />
the MODE button.<br />
Enter the target calories to be consumed by pressing the SET button.<br />
(Max 9990 CAL.)<br />
(This data is a rough guide for comparison of different exercise sessions<br />
which can not be used in medical treatment.)<br />
, , ,, ,,<br />
PULSE When using the PULSE function a is displayed, and your current<br />
(USING THE heart rate is shown.<br />
HAND PULSE<br />
SENSOR)<br />
The user may need to consult a doctor before using this equipment.<br />
The user can set a target heart rate with this information.<br />
To set a target heart rate select “PULSE” by using the MODE button.<br />
Enter your target pulse by pressing the SET button. (Max. 240)<br />
* SHOULD YOU REQUIRE ANY ASSISTANCE REGARDING THIS PRODUCT PLEASE CONTACT YORK DIRECTLY. *<br />
YORK <strong>XC530</strong> / 16
HAND PULSE SENSOR<br />
LEFT HAND PULSE<br />
SENSOR<br />
To obtain a pulse reading you must have your left and right hands holding the sensors at the<br />
same time.<br />
Grip the hand pulse sensors normally (NOT TOO TIGHT) during exercise and after a few seconds<br />
the computer will display your pulse reading.<br />
Some people will not be able to obtain an accurate hand pulse reading e.g.due to hand skin or<br />
variations in circulation.<br />
NOTE: 1. When targets / limits have been reached an alarm will sound.<br />
2. Without any signal for 5 minutes, the LCD display will shut off<br />
automatically, with all values reset to zero. Press any key or start cycling<br />
to reactivate.<br />
3. The computer is equipped with an auto start / stop device. It will activate<br />
when you start to pedal and switch off some time after you stop pedalling.<br />
4. The mode function will only work when all activity has stopped.<br />
5. If the display becomes faint, replace the batteries.<br />
6. Battery spec: 2 AA size.<br />
RIGHT HAND PULSE<br />
SENSOR<br />
SHOULD YOU REQUIRE ANY ASSISTANCE REGARDING THIS PRODUCT PLEASE CONTACT YORK DIRECTLY.<br />
U.K. AUSTRALIA<br />
F I T N E S S<br />
HELP LINE (8:30am- 16:30pm)<br />
YORK BARBELL (U.K.) LTD.<br />
CHURCHILL WAY, DAVENTRY,<br />
NORTHANTS, NN11 4YB ENGLAND<br />
TEL: (01327) 701-824<br />
FAX: (01327) 706-704<br />
E-MAIL: helpdesk@yorkfitness.co.uk<br />
F I T N E S S<br />
HELP LINE (8:00am- 16:00pm)<br />
YORK BARBELL (AUST.) PTY. LTD.<br />
UNIT 1, LOT 2, SWAFFHAM ROAD,<br />
MINTO, N.S.W. 2566 AUSTRALIA<br />
TEL: (02) 9603-8444<br />
FAX: (02) 9603-8555<br />
E-MAIL: service@yorkfitness.com.au<br />
U.S.A.<br />
F I T N E S S<br />
HELP LINE (8:00am- 17:00pm)<br />
YORK BARBELL USA.<br />
3300 BOARD ROAD.<br />
YORK, PA 17402<br />
TEL: +1-717-767-6481<br />
FAX: +1-717-764-0416<br />
E-MAIL: info@yorkbarbell.com<br />
* SHOULD YOU REQUIRE ANY ASSISTANCE REGARDING THIS PRODUCT PLEASE CONTACT YORK DIRECTLY. *<br />
YORK <strong>XC530</strong> / 17
YORK <strong>XC530</strong> / 18
CHECK SET-UP FOR STANDING CROSS TRAINING<br />
Check seat in<br />
lowest position.<br />
ADJUST THE FOOT-PLATFORMS SO THAT YOU CAN EXERCISE IN THE CORRECT<br />
POSITION, AND WITHOUT YOUR KNEES HITTING THE FRAME.<br />
ALWAYS KEEP YOUR BACK STRAIGHT AND YOUR SHOULDERS SQUARE.<br />
ALLOW FOR A NATURAL LIFT FROM YOUR HEEL.<br />
Check handle<br />
bars set in<br />
forward position.<br />
* SHOULD YOU REQUIRE ANY ASSISTANCE REGARDING THIS PRODUCT PLEASE CONTACT YORK DIRECTLY. *<br />
YORK <strong>XC530</strong> / 19
CHECK SET-UP FOR SEATED CROSS TRAINING<br />
Check handle bars in rear<br />
position.<br />
Check seat height.<br />
Your knees should not go above<br />
horizontal when cross training<br />
in a seated position adjust seat<br />
height accordingly.<br />
* SHOULD YOU REQUIRE ANY ASSISTANCE REGARDING THIS PRODUCT PLEASE CONTACT YORK DIRECTLY. *<br />
YORK <strong>XC530</strong> / 20
STRETCHING<br />
EXERCISES<br />
QUADRICEPS STRETCH<br />
With one hand, hold lace of shoe, knees together,<br />
stand tall with abdominals engaged. Squeeze<br />
hips slightly forward to increase the stretch.<br />
Hold for 8-10 seconds or until muscle eases.<br />
DELTOID STRETCH<br />
Take arm across body at shoulder height. Press<br />
gently on fleshy part of arm above elbow until<br />
you feel a stretch in shoulder area. Hold for<br />
8-10 seconds.<br />
CAT STRETCH<br />
Starting with a neutral not arched spine lift back<br />
up towards ceiling hold for 8-10 seconds return<br />
to neutral spine.<br />
PECTORALS<br />
Lace fingers and with abdominals<br />
pulled firmly in and knees slightly<br />
bent ease arms away from you.<br />
Hold for 8-10 seconds or until<br />
muscle eases.<br />
HAMSTRING STRETCH<br />
Holding back of thigh with leg straight, gently<br />
ease leg towards chest hold and increase<br />
stretch gently. This stretch can be developed<br />
slowly 20-30 seconds.<br />
CALF STRETCH<br />
Take leg back ensuring toe point in directly<br />
forward. Rest hands on thigh. Hold for 8-10<br />
seconds or until muscle eases.<br />
ABDOMINAL STRETCH<br />
Lengthen and gently lift upper body keeping<br />
head in line until stretch felt. Hold for 8-10<br />
seconds.<br />
TRICEP STRETCH<br />
Engage abdominals and drop fingers down back<br />
pressing gently on fleshy part of arm until stretch<br />
is felt in tricep area. Avoid arching back.<br />
GLUTEALS<br />
<strong>Cross</strong> one ankle over opposite knee, using<br />
hands lift leg off floor to increase stretch if<br />
necessary. Hold for 8-10 seconds.<br />
INNER THIGH & LOWER BACK STRETCH<br />
Sit with soles of feet together. Sit tall and gently<br />
lean forwards until a stretch is felt. Hold of 8-10<br />
seconds.<br />
SHOULD YOU REQUIRE ANY ASSISTANCE REGARDING THIS PRODUCT PLEASE CONTACT YORK DIRECTLY.<br />
* *<br />
YORK <strong>XC530</strong> / 21
BEFORE EXERCISING CHECK:<br />
You have adequate space ie. at least 2ft. (60cm) clearance on<br />
each side.<br />
Check all bolts and locking pins are secured and<br />
not protruding. In particular check all the bolts and pins for<br />
wear, replace doubtful parts before using the equipment.<br />
Always use your elliptical trainer on a flat, level, solid surface.<br />
Always work within your exercise level, do not work to exhaustion.<br />
If you feel pain or unwell STOP YOUR WORKOUT IMMEDIATELY.<br />
Injuries to health may result from incorrect or excessive training.<br />
Please make sure you have read the safety guidelines.<br />
( These pictures shows the YORK 3100 ELLIPTICAL CYCLE )<br />
EXERCISE<br />
GUIDE<br />
STEPPING ON<br />
Make sure the nearest pedal to you<br />
is downwards. Grasp the handlebars<br />
securely with both hands.<br />
Then step on. (Toes towards the<br />
front of the pedal).<br />
Your body should be centred over<br />
the pedals, always remain in a<br />
vertical, upright position.<br />
TENSION KNOB<br />
Change the level of difficulty of your<br />
workout by adjusting the tension<br />
knob. Begin with low tension. Adjust<br />
resistance to intensify your workout<br />
according to your personal fitness<br />
level.<br />
CROSS TRAINING<br />
A cardio-vasular (heart and lungs etc) workout as well as toning buttocks,<br />
lower abdominals, hips and thighs.<br />
STANDING CROSS TRAINING<br />
Check set-up is correct (see set-up guide).<br />
Step on to the trainer (as explained above).<br />
Select a lead foot and press down in a forward or reverse motion.<br />
Keep your knees slightly bent. Make several full cycles slowly.<br />
Gradually increase speed, as you become familiar with the trainer.<br />
Select any of the routines A to D.<br />
SEATED CROSS TRAINING<br />
Check set-up is correct (see set-up guide). Make sure the seat is high enough<br />
that your thigh does not go above horizontal each cycle. Select a lead foot and<br />
press down in a forward or reverse motion. Make several full cycles slowly.<br />
Gradually increase speed, as you become familiar with the trainer.<br />
Select any of the routines A to D.<br />
ROUTINE A: <strong>Cross</strong> train in a forward or reverse direction for 10-20 minutes<br />
(depending on your fitness level). Maintain a secure grip on the<br />
handlebars and keep your feet firmly in position at all times.<br />
ROUTINE B: Make 4 to 10 cycles forward slowly, then same number quickly.<br />
Repeat for 5-20 minutes according to exercise intensity and<br />
fitness level. Maintain a secure grip on the handlebars and<br />
keep your feet firmly in position at all times.<br />
ROUTINE C: Make 4 to 10 cycles backwards slowly, then same number<br />
quickly. Repeat for 5-20 minutes according to exercise intensity<br />
and fitness level. Maintain a secure grip on the handlebars and<br />
keep your feet firmly in position at all times.<br />
* SHOULD YOU REQUIRE ANY ASSISTANCE REGARDING THIS PRODUCT PLEASE CONTACT YORK DIRECTLY. *<br />
YORK <strong>XC530</strong> / 22
EXERCISE<br />
GUIDE cont.i<br />
( These pictures shows the YORK 3100 CYCLE ELLIPTICAL )<br />
ROUTINE D: ALTERNATE FORWARD AND REVERSE MOTION.<br />
Exercise in the forward motion for 3 to 5 minutes, then slow<br />
down to a stop. Change to reverse motion for 1 to 3 minutes.<br />
Continue to alternate direction for the duration of your workout<br />
- between 5-20 minutes according to exercise intensity and<br />
fitness level.<br />
ALWAYS SLOW DOWN GRADUALLY TO A STOP BEFORE<br />
CHANGING DIRECTION.<br />
Product may vary slightly form pictured.<br />
( These pictures shows the YORK 2100 ELLIPTICAL TRAINER )<br />
CAUTION:<br />
Your legs will probably tire quicker in reverse motion than in forward motion.<br />
We suggest you train for less time in reverse motion than in forward motion.<br />
DURATION AND RESISTANCE LEVEL<br />
You should aim to exercise for 10-20 minutes each session. Begin at low<br />
intensity (short time & low resistance level) and build up your workout routine<br />
gradually - increase the exercise time then increase resistance.<br />
DO NOT OVER TRAIN.<br />
FORWARD SQUAT/KNEE<br />
BEND WORKOUT<br />
(STANDING CROSS TRAINING)<br />
Select a lead foot and press down in a<br />
forward motion. Keep your knees slightly<br />
bent, pedal slowly - whilst pedalling<br />
slowly lower your body (Approx 4 inches<br />
- 10cm) keep your back straight and<br />
vertical. In this position, make 8 full<br />
cycles. Return to normal body position<br />
and make 8 full cycles. Repeat for 4<br />
cycles then 2 cycles.<br />
ROUTINE: 8 FORWARD<br />
(LOWERING YOUR BODY)<br />
8 FORWARD<br />
(NORMAL BODY POSITION)<br />
REPEAT FOR 4 & 2 CYCLES.<br />
THEN TRY THE WHOLE ROUTINE<br />
PEDALLING IN REVERSE MOTION.<br />
WORKOUTS: VARY YOUR WORKOUTS<br />
AND MAKE UP NEW ROUTINES.<br />
IT IS IMPORTANT YOU MAINTAIN GOOD BODY POSITION AND KEEP YOUR BACK STRAIGHT.<br />
* SHOULD YOU REQUIRE ANY ASSISTANCE REGARDING THIS PRODUCT PLEASE CONTACT YORK DIRECTLY. *<br />
YORK <strong>XC530</strong> / 23
FITNESS<br />
Many things contribute to fitness and well being but the most important factor is the condition of<br />
your heart and lungs and how efficient they are in delivering oxygen via your blood to your muscles.<br />
Your muscles use this oxygen to provide enough energy for daily activity.<br />
This is called aerobic activity (with oxygen).<br />
When you are fit your heart and lungs work well and efficiently.<br />
This means your heart will not have to work so hard. It will pump a lot fewer times per minute so<br />
reducing the wear and tear on your heart.<br />
This in turn reduces the chances of your suffering heart disease.<br />
<strong>Fitness</strong> also helps you control your weight and reduces the effects of aging and stress.<br />
You come across the need for fitness continually in everyday life.<br />
When you are fit you can walk briskly up hills and stairs without being too out of breath once at the<br />
top you recover quickly.<br />
As you can see there are great advantages in being fit.<br />
HOW TO IMPROVE YOUR FITNESS<br />
EXERCISE GUIDE<br />
Like any muscle in your body your heart can be strengthened by systematic physical exercise which<br />
requires an increased blood flow and heart rate.<br />
You can measure your heart rate by taking a pulse reading.<br />
Your heart of pulse rate corresponds directly to your exertion level and exercise efficiency.<br />
To improve your fitness in a safe and effective way you need to exercise at a high enough level to<br />
improve your aerobic fitness.<br />
The area between these 2 levels is called the target zone.<br />
It is important to exercise at the right intensity to stay within this zone.<br />
For the best results you should exercise within the target zone and gradually increase the duration.<br />
Ideally you should aim to exercise (within zone) for at least 15-20 minutes continuously,<br />
3-4 times per week.<br />
CAUTION<br />
DO NOT TRY TO DO TOO MUCH TO QUICKLY START GRADUALLY AND BUILD UP.<br />
IF YOU BECOME ILL, IF YOU ARE UNDER DOCTOR CARE, OR OVER 35-40 AND NOT CURRENTLY<br />
TAKING REGULAR EXERCISE THEN WE WOULD ADVISE YOU NOT TO START TO EXERCISE<br />
WITHOUT CONSULTING YOUR DOCTOR.<br />
SHOULD YOU REQUIRE ANY ASSISTANCE REGARDING THIS PRODUCT PLEASE CONTACT YORK DIRECTLY.<br />
* *<br />
YORK <strong>XC530</strong> / 24
TARGET ZONE<br />
PULSE<br />
RATE<br />
85% OF MAX.<br />
70% OF MAX.<br />
55% OF MAX.<br />
RESET PULSE<br />
MAXIMUM PULSE RATE<br />
WARM UP<br />
EXERCISE SO THAT YOUR PULSE STAYS IN<br />
THIS RATE FOR AT LEAST 15-20 MINUTES<br />
COOL DOWN<br />
COOL DOWN LEVEL<br />
THIS IS HOW YOUR PULSE SHOULD BEHAVE DURING GENERAL FITNESS EXERCISE.<br />
REMEMBER TO WARM UP AND COOL DOWN FOR A FEW MINUTES.<br />
HEART ZONE SELECTION GUIDELINES<br />
In order to set your personal target heart zone, you will need to:<br />
- Calculate your maximum heart rate.<br />
- Select a zone based on your current fitness level.<br />
Calculating your maximum heart rate<br />
The standard method for calculating heart rate training zone is based on estimating maximum<br />
heart rate using the formula 220 minus the persons age in years. Some practitioners believe<br />
that a woman estimated maximum heart rate can be calculated more accurately by using 226<br />
instead of 220.<br />
The important issue with all estimating calculations is that in reality they can vary by plus or<br />
minus 15 bpm and at best are only an indication of actual results.<br />
Estimated Maximum Heart Rate = 220 - Age (Year)<br />
SHOULD YOU REQUIRE ANY ASSISTANCE REGARDING THIS PRODUCT PLEASE CONTACT YORK DIRECTLY.<br />
* *<br />
YORK <strong>XC530</strong> / 25<br />
TIME
SELECTING THE ZONE<br />
If you have not exercised for some time begin your exercise program in the Healthy Heart Zone.<br />
Start for the first few weeks, and gradually progress up to the zone that meets your personal<br />
fitness goal.<br />
ZONE 1.- HEALTHY HEART - 50 to 59% of Max Heart Rate.<br />
If you are a beginner with the goal of improving overall fitness, losing weight or reducing stress,<br />
exercise in this zone.<br />
ZONE 2.- WEIGHT MANAGEMENT - 60 to 69% of Max Heart Rate.<br />
If you already exercise regularly with the aim of losing body fat, exercise in this zone.<br />
ZONE 3.- AEROBIC - 70 to 79% of Max Heart Rate.<br />
Progress to this zone if your goal is to improve your aerobic conditioning.<br />
ZONE 4.- ANAEROBIC THRESHOLD - 80 to 89% of Max Heart Rate.<br />
This is the zone in which to improve anaerobic threshold. Exercising I this zone requires a high<br />
degree of fitness, and should not be used by those who are unfit.<br />
ZONE 5.- RED LINE - 90 to 100% of Max Heart Rate.<br />
For professional supervised athletes only.<br />
HEART RATE<br />
200<br />
180<br />
160<br />
140<br />
120<br />
100<br />
80<br />
60<br />
TARGET ZONE<br />
RED-LINE ZON E 90-10 0% MHR<br />
ANAEROBIC THRESHOLD ZONE 80-90% MHR<br />
AEROBIC ZO NE 70-80% MHR<br />
WEIGHT MANAGEMENT ZON E 6 0-70 % MHR HEALTHY HEAR T ZON E 50- 60% MHR<br />
Maximum Heart Rate (MHR) = 220 - AGE<br />
200<br />
180<br />
160<br />
140<br />
120<br />
100<br />
60<br />
20 30 40 50 60 70 AGE<br />
80<br />
HEART RATE<br />
Percentage of Max Heart Rate (Beats per Minute)<br />
Max<br />
HR<br />
Healthy Heart<br />
50 - 59%<br />
Weight Loss Aerobic<br />
60 - 69% 70 - 79%<br />
Anaerobic Red line<br />
80 - 89% 90 - 100%<br />
155 65 78 - 93 94 - 109 110 - 124 125 - 139 140 - 155<br />
160 60 80 - 96 97 - 112 113 - 128 129 - 144 145 - 160<br />
165 55 83 - 99 100 - 116 117 - 132 133 - 148 149 - 165<br />
170 50 85 - 102 103 - 119 120 - 136 137 - 153 154 - 170<br />
175 45 88 - 105 106 - 123 124 - 140 141 - 157 158 - 175<br />
180 40 90 - 108 109 - 126 127 - 144 145 - 162 163 - 180<br />
185 35 93 - 111 112 - 129 130 - 147 148 - 166 167 - 185<br />
190 30 95 - 114 115 - 133 134 - 152 153 - 171 172 - 190<br />
195 25 98 - 117 118 - 137 138 - 156 157 - 175 175 - 195<br />
200 20 100 - 120 121 - 140 141 - 160 161 - 180 181 - 200<br />
205
HOW TO MONITOR YOUR HEART RATE DURING EXERCISE<br />
Now that you know where your training zone is, you’ll have to monitor yourself to be sure you’re<br />
'<br />
in it. Here is a simple rule, if you can t hold a conversation without gasping for breath you are<br />
probably above your training zone.<br />
To know precisely where you’re working - making sure you’re getting all the benefits -<br />
We recommend you check your heart rate periodically throughout your workout.<br />
You can use the electronic pulse monitor which will count and display your heart rate for you.<br />
CONTROL YOUR PULSE RATE TO KEEP WITHIN ZONE<br />
How hard you exercise affects your pulse rate, it is determined by two things:<br />
1. Rate: How fast you exercise.<br />
e.g. The speed you cycle, run or step.<br />
2.<br />
Load: The resistance against which you exercise.<br />
e.g. The tension you apply on a cycle or stepper, or the incline set on a treadmill.<br />
THE PULSE RATE RULES<br />
If your pulse rate is too low exercise faster or increase load.<br />
If your pulse rate is too high exercise slower or decrease load.<br />
If your pulse rate goes up towards the end of your exercise, you are trying to exercise for too<br />
long, shorten the time.<br />
If your pulse rate does not quickly return to normal after exercise (5-10 minutes) you are not<br />
giving your body a chance to recover, reduce how often you exercise.<br />
REMEMBER - GENERAL FITNESS IS BEST IMPROVED BY INCREASING HOW LONG<br />
YOU EXERCISE RATHER THAN BY HOW HARD.<br />
* SHOULD YOU REQUIRE ANY ASSISTANCE REGARDING THIS PRODUCT PLEASE CONTACT YORK DIRECTLY. *<br />
YORK <strong>XC530</strong> / 27
HOW LONG TO EXERCISE?<br />
To qualify as a true aerobic exercise with all the benefits we're mentioned, you must maintain your<br />
heart rate within your training zone for at least 12 uninterrupted minutes.<br />
If you exercise longer than 60 minutes the benefits are reduced and the risk of injury is increased.<br />
If you're just starting out on a new exercise program we're commend you stay at the 12 minute<br />
minimum for at least a week. When you feel you're ready to go longer, increase your time no more<br />
than 10% a week. Don't push yourself too hard.<br />
You should never feel exhausted during or following exercise.<br />
TEST YOUR FITNESS LEVEL AND CHECK YOUR PROGRESS<br />
You can use your computer to control your exercise intensity and to monitor your progress.<br />
The time it takes for your pulse to return to normal, after exercise, is an indicator of<br />
your fitness level.<br />
During the first minute of your cool-down phase you will experience a drop in your pulse rate.<br />
The bigger the drop in that minute -- the fitter you are.<br />
TO CHECK YOUR PROGRESS:<br />
1. Monitor your pulse rate the moment you end the aerobic phase of your workout and note your<br />
pulse rate.<br />
2. Begin slowing down for the cool down phase.<br />
3. After 60 seconds note the rate again.<br />
The bigger the drop in that minute-the fitter you are.<br />
To check your progress repeat this test every few weeks using the same duration and exercise<br />
intensity each time.<br />
Keep a record of the results to help you monitor your progress.<br />
SHOULD YOU REQUIRE ANY ASSISTANCE REGARDING THIS PRODUCT PLEASE CONTACT YORK DIRECTLY.<br />
* *<br />
YORK <strong>XC530</strong> / 28
YORK BARBELL LIMITED WARRANTY INFORMATION<br />
<strong>York</strong> Barbell Ltd warrants this product to be free from defects in workmanship and material<br />
under normal use and conditions from the date of original purchase. This excludes normal<br />
wear and tear and is applicable to the original purchaser with sales receipt as proof of<br />
purchase.<br />
The warranty period varies according to the type of product, model or parts concerned and<br />
may vary according to country. Please request full warranty details from the <strong>York</strong> office in<br />
your location (see below).<br />
This warranty covers the product for home/domestic use only and not for commercial or<br />
rental usage.<br />
<strong>York</strong> Barbell Ltd will not be responsible for damages or failures that occur as a result of<br />
improper assembly, adjustment or failure to operate the product as detailed in the manual.<br />
This warranty does not cover accidental damage, misuse, abuse, lack of reasonable care for<br />
the product, freight damage or alterations or repairs not made by <strong>York</strong> Barbell Ltd or a<br />
recommended service centre.<br />
During the warranty period, <strong>York</strong> Barbell will at no additional charge replace parts or repair<br />
the product if it becomes defective, malfunctions or otherwise fails to conform to this<br />
warranty under usual, non commercial use.<br />
In repairing the product, <strong>York</strong> Barbell Ltd may replace defective parts and reserves the right<br />
to use serviceable used parts that are equivalent to new parts in performance.<br />
In the unlikely event of a problem occurring, please contact your local <strong>York</strong> Barbell authorised<br />
dealer. Please have your proof of purchase ready.<br />
If the problem cannot be fixed by sending parts, you will need to arrange to send the goods to<br />
a <strong>York</strong> authorised repair centre. You must prepay any shipping charges and you are<br />
responsible for insuring any product or part shipped or returned. Returns will not be<br />
accepted without written authorisation by <strong>York</strong> Customer Service Department.<br />
WARRANTY REGISTRATION<br />
It is strongly recommended that you complete the warranty card enclosed<br />
with your product and return it to your authorized local YORK dealer.<br />
HELP LINE (8:30am- 4:30pm)<br />
YORK <strong>XC530</strong> / 29<br />
The warranty for <strong>York</strong> <strong>XC530</strong> <strong>Cycle</strong> Rower is 12 month.<br />
U.K. AUSTRALIA<br />
F I T N E S S<br />
YORK BARBELL (U.K.) LTD.<br />
YORK WAY, DAVENTRY,<br />
NORTHANTS, NN11 4YB ENGLAND<br />
TEL: (01327) 701-824<br />
FAX: (01327) 706-704<br />
E-MAIL: helpdesk@yorkfitness.co.uk<br />
F I T N E S S<br />
HELP LINE (8:00am- 4:00pm)<br />
YORK BARBELL (AUST.) PTY. LTD.<br />
UNIT 1, LOT 2, SWAFFHAM ROAD,<br />
MINTO, N.S.W. 2566 AUSTRALIA<br />
TEL: (02) 9603-8444<br />
FAX: (02) 9603-8555<br />
E-MAIL: service@yorkfitness.com.au<br />
CANADA TAIWAN<br />
F I T N E S S F I T N E S S<br />
HELP LINE (8:30am- 4:30pm)<br />
HELP LINE (9:00am- 6:00pm)<br />
YORK BARBELL CO. LTD.<br />
1450 S. SERVICE ROAD WEST,<br />
OAKVILLE (TORONTO), ONTARIO,<br />
CANADA L6L 5T7<br />
TEL: (905) 827-6362<br />
FAX: (905) 827-9593<br />
YORK FITNESS (TAIWAN) LTD.<br />
ROOM A2 4F, NO.51, GONG-YI ROAD,<br />
SEC. 2, TAICHUNG CITY, TAIWAN<br />
TEL: +886-4-2319-3448<br />
FAX: +886-4-2319-3449<br />
E-MAIL: yorktwn@ms25.hinet.net<br />
U.S.A.<br />
F I T N E S S<br />
HELP LINE (8:00am- 5:00pm)<br />
YORK BARBELL USA.<br />
3300 BOARD ROAD.<br />
YORK, PA 17402<br />
TEL: +1-717-767-6481<br />
FAX: +1-717-764-0416<br />
E-MAIL: info@yorkbarbell.com<br />
Authorized Dealer
WARRANTY REGISTRATION<br />
IMPORTANT: Please complete and return this page, with a copy of your receipt, to your local <strong>York</strong> dealer within 14 days.<br />
Alternatively, you can register your warranty on-line - please visit www.yorkfitness.com<br />
Which product did you buy? _________________________________________________________________________<br />
Where from (name of retailer)? _______________________________________________________________________<br />
Date Purchased _____________________________ Serial / Batch No _______________________________<br />
Name (Mr/Miss/Mrs)_________________________________________________________________________________<br />
Address __________________________________________________________________________________________<br />
__________________________________________________________________________________________________<br />
Telephone Number ____________________________________<br />
E-mail address _______________________________________<br />
Please help us to improve our products and services by answering the following questions:<br />
How did you buy this product?<br />
In a shop<br />
Mail order catalogue<br />
Over the internet<br />
Other, please specify<br />
Why did you choose this product (tick all that apply)?<br />
Discounted price<br />
<strong>York</strong> brand name<br />
Best specification at the price you wanted to pay<br />
Word of mouth recommendation<br />
Sales staff recommendation<br />
Received as a present<br />
Did you search the web before buying this product?<br />
Yes<br />
No<br />
Were you aware of <strong>York</strong> before you bought this product?<br />
Yes<br />
No<br />
How old are you?<br />
Under 18<br />
18 29<br />
30-39<br />
40-49<br />
50+<br />
Any other comments<br />
Are you a member of a gym or fitness club?<br />
Yes<br />
No<br />
What prompted you to buy fitness equipment (tick all<br />
that apply)?<br />
Replacing old equipment<br />
Saw an advert with big price savings<br />
Medical advice<br />
Thought it was about time to get fit<br />
Want to look good<br />
Do you have access to a PC at home?<br />
Yes<br />
No<br />
How would you rate the product you have just<br />
purchased (1 = poor, 10 = excellent)?<br />
Quality<br />
Looks<br />
Usability<br />
Instruction manual<br />
Ease of assembly<br />
On average, how many times a week do you<br />
exercise / work out?<br />
0<br />
1 - 2<br />
2 - 3<br />
4 or more<br />
This information will be held by <strong>York</strong> Barbell Ltd and will not be passed onto third parties. Please tick this box if you would not like to<br />
receive further information from <strong>York</strong> Barbell<br />
YOUR WARRANTY IS ONLY VALID IF YOU CAN PROVIDE PROOF OF THE ORIGINAL PURCHASE.<br />
This can be the receipt, invoice, delivery note or internet confirmation.<br />
YORK <strong>XC530</strong> / 30
F I T N E S S<br />
PLACE<br />
STAMP<br />
HERE
PARTS ORDER FORM<br />
Enclose a check or money order<br />
with this form for replacement parts.<br />
Date of purchase<br />
Name of location where purchased<br />
Model number<br />
Last name, First name<br />
Telephone number<br />
Address City State Zip/Postcode<br />
Part No. Q'ty Part Description Unit Price Total<br />
Send your order to:<br />
YORK BARBELL (AUST.) PTY. LTD.<br />
UNIT 1, LOT 2, SWAFFHAM ROAD,<br />
MINTO N.S.W. 2566<br />
AUSTRALIA<br />
YORK BARBELL (U.K.) LTD.<br />
CHURCHILL WAY,<br />
DAVENTRY, NORTHANTS,<br />
ENGLAND, NN11 4YB<br />
Total value of order $
F I T N E S S<br />
PLACE<br />
STAMP<br />
HERE<br />
PLACE<br />
STAMP<br />
HERE<br />
PLACE<br />
STAMP<br />
HERE