Mini -Extruder
Mini -Extruder
Mini -Extruder

Create successful ePaper yourself
Turn your PDF publications into a flip-book with our unique Google optimized e-Paper software.
The<br />
<strong>Mini</strong> -<strong>Extruder</strong><br />
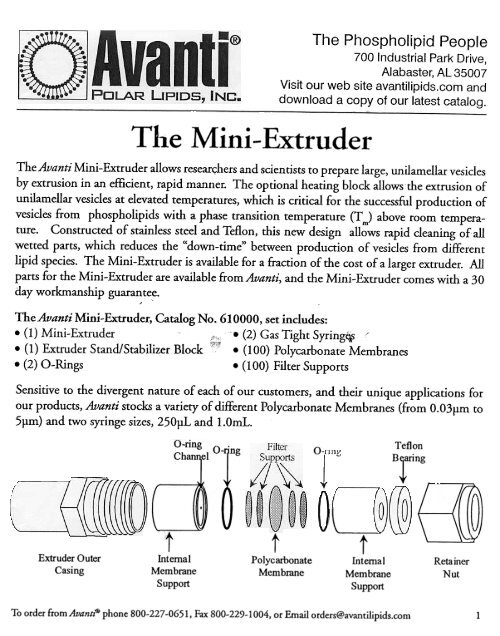
The Phospholipid People<br />
700 Industrial Park Drive,<br />
Alabaster, AL 35007<br />
Visit our web site avantilipids.com and<br />
download a copy of our latest catalog.<br />
The Avanti <strong>Mini</strong>- <strong>Extruder</strong> allows resear«hers and scientists to prepare large, unilamellar vesicles<br />
by extrusion in an efficient, rapid manner. The optional heating block allows the extrusion of<br />
unilamellar vesicles at elevated temperatures, which is critical for the successful production of<br />
vesicles from phospholipids with a phase transition temperature (T m) above room tempera-<br />
ture. Constructed of stainless steel and Teflon, this new design allows rapid cleaning of all<br />
wetted parts, which reduces the «down-time" between production of vesicles from different<br />
lipid species. The <strong>Mini</strong>- <strong>Extruder</strong> is available for a fraction of the cost of a larger extruder. All<br />
parts for the <strong>Mini</strong>-<strong>Extruder</strong> are available from Avanti, and the <strong>Mini</strong>-<strong>Extruder</strong> comes with a 30<br />
day workmanship guarantee.<br />
"<br />
The Avanti <strong>Mini</strong>-<strong>Extruder</strong>, Catalog No.610000, set includes:<br />
.(1) <strong>Mini</strong>-<strong>Extruder</strong> -.(2) Gas Tight Syring~ "<br />
.(1) <strong>Extruder</strong> Stand/Stabilizer Block. (100) Polycarbonate Membranes<br />
.(2) O-Rings .(100) Filter Supports<br />
Sensitive to the divergent nature of each of our customers, and their unique applications for<br />
our products, Avanti stocks a variety of different Polycarbonate Membranes (from O.O3rm to<br />
5~m) and two syringe sizes, 250~L and 1.0mL.<br />
<strong>Extruder</strong> Outer<br />
Casing<br />
Internal<br />
Membrane<br />
Support<br />
t<br />
PoJycarbonate<br />
Membrane<br />
0<br />
'L<br />
t<br />
Internal<br />
Membrane<br />
Support<br />
Teflon<br />
To order from Avantt'@ phone 800-227-0651, Fax 800-229-1004, or Email orders@avantilipids.com<br />
Tg<br />
Retainer<br />
Nut<br />
"<br />
v<br />
~<br />
1
~<br />
1~<br />
.<br />
~.,<br />
,.<br />
u -.<br />
..<br />
2 e .<br />
8.<br />
E<br />
~ .<br />
.<br />
" ..u<br />
Time (minutes)<br />
The <strong>Mini</strong> -<strong>Extruder</strong><br />
Placing the Stabilizer block-extruder assembly<br />
on a hot plate achieves rapid temperature control<br />
for lipids that have transition temperatures<br />
above room temp.erature. --<br />
The particle size distribution of unilanlellar vesicles prepared byextrusion is ?;a<br />
function of the number of passes through the <strong>Extruder</strong> Membrane. Hy- 0(/)<br />
drated lipid solutions will initially form large, multi-lamellar vesicles. After 55<br />
the initial pass through a membrane, the particle size distribution will tend<br />
towards a binlodal distribution. After sufficient passes through the mem-<br />
E<br />
-<br />
brane, a unimodal, normal distr!bution is obtained. A minimum of eleven<br />
passes through the <strong>Extruder</strong> membrane is recommended for most lipids.<br />
N4 The Plus particle submicron size information particle size in ~ Figure analyLer. _2 was The obtaineS, INC<br />
Figure 2<br />
1 10 100<br />
Size (nm)<br />
1000 7000<br />
References.<br />
Subbarao, N .K., RI. MacDonald, K Takeshita, and R. C. MacDonald. ( 1991) .Characteristics of spectrin-induced leak -<br />
ageofextruded, phosphatidylserinevesicles. BiochimBiophysActa 1063:147-54.<br />
MacDonald, R.C., R.I. MacDonald, B.E Menco, K. Takeshita, N.K Subbarao, and L.R Hu. (1991). Small-volume<br />
extrusion apparatu.~ for preparation oflarge, unilamellar vesicles. Biochim Biophys Acta 1061:297-303.<br />
To order from Avantt'@ phone 800-227-0651, Fax 800-229-1004, or Email orders@avantilipids.com 2
The <strong>Mini</strong> -<strong>Extruder</strong><br />
Assembly Instructions<br />
Before assembling the extruder for the first time, thoroughly clean all parts (except for the Polycarbonate<br />
Membranes and the Filter Supports) with a nilld detergent solution, followed by rinsing with hot<br />
tap water and deionized or distilled water. Allow all parts. to dry before a.~sembling apparatus.<br />
Important Note. The original <strong>Mini</strong>-<strong>Extruder</strong> design contains flat washers, and a bearing washer, that<br />
are not stainless steel and will rust if not thoroughly dried. Rinse with methanol or acetone and dry<br />
immediately. The all-teflon <strong>Mini</strong>-<strong>Extruder</strong> design replaces these components with a teflon bearing.<br />
Assembly -refer to the diagram on page 1 to identify the parts in these instructions.<br />
I) Place the 2 Internal Membrane Supports on a flat surface with the O-rings facing up.<br />
2) Pre-wet 2 Filter Supports with Dl water, or buffer, and place over orifice. The Filter Support.~<br />
should adhere to the teflon orifice inside the O-ring inner diameter.<br />
3) Insert the Internal Membrane Support, with the Filter Support, into the <strong>Extruder</strong> Outer Casing<br />
with the O-ring facing up.<br />
4) Place I Polycarbonate Membrane in the <strong>Extruder</strong> Outer Casing over the Filter Support and O-ring.<br />
Note. The Polycarbonate Membrane is the thin, shiny disk -do not install one of the blue paper<br />
disks which separate the Polycarbonate Membranes.<br />
5) Pre-wet a secfuld pair of Filter Supports with Dl water, or buffer. and place over orifice ofremaining<br />
Internal Membrane Support. ~<br />
6) Carefully place the second Internal Membrane Support into the casing (O-ring facing down) being<br />
careful not to twist the Membrane Support when it comes in contact with the Membrane.<br />
7) If you have the original <strong>Mini</strong>-<strong>Extruder</strong> design. place the flat washers on either side of the bearing<br />
washer and insert into the Retainer Nut. For the all-teflon <strong>Mini</strong>-<strong>Extruder</strong>. place the teflon bearing into<br />
the Retainer Nut.<br />
8) Place the Retainer Nut on the threaded end of the <strong>Extruder</strong> Outer Casing and tighten. Tighten the<br />
Retainer Nut by hand just until it is finger tight; do not use a wrench.<br />
Important Note. Autoclaving the Teflon inserts is not recommended as slight distortion may<br />
occur (pO.OO2mm). The use of ethylene oxide or gamma irradiation is<br />
suggested as an alternative. The syringes should be sterilized with ethanol.<br />
To order from Avantt.~ phone 800-227-0651, Fax 800-229-1004, or Email orders@avantilipids.com 3
The <strong>Mini</strong> -<strong>Extruder</strong><br />
Care and Cleaning Instructions for Unimetric Syringes<br />
1) Immediately after use, carefully disassaemble both Unimetric syringes.<br />
2) Depending upon your application, rinse the syri~ges with either isopropyl alcohol, Dl<br />
water, or a weak detergent solution. If a detergent solution is used, rinse the syringe immedi-<br />
atelywith copious quantities ofDI water.<br />
3) Rinse the syringes with Dl water after cleaning.<br />
4) Dry the syringes.<br />
5) If it is necessary to use a sonic cleaner, only clean the needle with the sonic cleaner.<br />
Immediately after cleaning in the sonic cleaner, rinse with D I water and dry.<br />
6) The teflon tip on the plunger may need to be replaced if the syringes are used at elevated<br />
temperatures for extended periods of time. Replacement teflon tips are available.<br />
Important Note: Do not allow the syringes to come into contact with any solvents other<br />
than Dl water or alcohol. Some organic solvents will interact with the glue holding the<br />
threaded insert onto the tip of the syringe possibly weakening the bond between the<br />
barrel and the insert. TIle syringes must not be soaked in any solvent for the same reason.<br />
To order from Avantt'@ phone 800-227-0651, Fax 800-229-1004, or Email orders@avantilipids.com 4
1) Prepare dry lipid mixture by lyophilization or evaporation.<br />
2) Place the extruder stand/heating block onto a hot plate. Insert a thermometer into the well provided in the<br />
heating block. Switch the hot plate on, and allow to reach the desired temperature. Allow the temperature<br />
of the heating block to reach the desired value (approximately 15 minutes).<br />
3) Hydrate lipid mixture using a suitable buffer for ~30 min. The lipid suspension should be kept above the<br />
phase transition temperature of the lipid during hydration and extrusion. To increase the efficiency of<br />
entrapment of water-soluble compounds, one may subject the hydrated lipid suspension to 3- 5 freeze/thaw<br />
cycles by alternately placing the sample vial in a dry ice bath and warm water bath.<br />
4) Once the sample is fully hydrated, load the,sample into one of the gas-tight syringes and carefully place into<br />
one end of the <strong>Mini</strong>-Extmder. Note: to reduce the dead volume, pre-wet the extruder parts by passing a<br />
syringe full ofbuffer through the extruder; discard the buffer. New syringes may have tight fitting parts; to<br />
facilitate extrusion, pre-wet syringe barrel and plunger with buffer prior to inserting plunger into barrel.<br />
5) Place the empty gas-tight syringe into the other end of the <strong>Mini</strong>-Extmder. Make sure the empty syringe<br />
plunger is set to zero; the syringe will fIll automatically as the lipid is extruded through the membrane.<br />
6) Check the temperature of the heating block BEFORE placing the assembled extruder apparatus into the<br />
heating block. The temperature must be below 80°C, or the syringes will be damaged.<br />
7) Insert the fully assembled extruder apparatUS into the extruder stand. Insert the hex nut so that any two<br />
-opposing apexes fall in the v.ertical plane. Use the swing-arm clips to hold the syringes in good thermal<br />
~~ contact with the heating block.<br />
~ N OT;g: The ext~er it<br />
will be damaged. 'i -,/<br />
8) Allow the temperature of the lipid suspension to equilibrate with the temperature of the heating block<br />
(approximately 5-10 minutes).<br />
9) Gently push the plunger of the filled syringe until the lipid solution is completdy transferred to the alternate<br />
syrInge.<br />
10) Gently push the plunger of the alternate syringe to transfer the solution back to the original syringe.<br />
11) Repeat steps 9 & 10 a minimum of 4 times (total of 10 passes through membrane). In general, the more<br />
passes though the membrane, the more homogenous the lipid solution becomes.<br />
12) The final extrusion should fill the alternate syringe. This is to reduce the chances of contamination with<br />
larger particles or foreign material.<br />
13) After the final extrusion, remove the <strong>Mini</strong>-Extmder from the heating block.<br />
14) Remove the filled syringe from the extruder and inject the lipid solution into a clean sample vial.<br />
IMPORTANT: When removing syringes, pull the syringe straight out of the extruder; removing at an<br />
angle could result in cracking the syringe.<br />
15) Store the vesicle preparation above the transition temperature of the lipid during the experiment.<br />
When not in use, store the ve-sicle solution at 4 °C. Do not freeze. Vesicle solution.s are not stable in aqueous<br />
media for more than 3-4 days when stored at 4°C. Storage of vesicle solutions at higher temperatures and<br />
pH 8 may reduce the lifetime of the vesicle suspension.<br />
16) Clean apparatus thorougWy before using with a new lipid preparation.<br />
To order from Avantt'Ci) phone 800-227-0651, Fax 800-229-1004, or Emajl orders@avantilipids.com 5
RESEAF 'M<br />
In our continuing effort to resolve workmanship quality issues with the syringe for the<br />
Avanti <strong>Mini</strong>-<strong>Extruder</strong>, Avanti has contracted The Hamilton Company to provide syringes<br />
for the extruder. The syringes provided by The Hamilton Company have a larger<br />
diameter glass barrel than previous syringes. Therefore it is necessary to make minor<br />
adjustments to the syringe holding clips on the extruder heating block/stand to<br />
accommodate the larger syringes. Using a hex wrench, slightly loosen the hex screws<br />
which secure the syringe holding clips until they will easily pass over the syringe barrel,<br />
making sure that sufficient pressure is applied to the barrel to provide complete contact<br />
with the heating block/stand for heat transfer. Also, if the syringes do not lie flat in the<br />
heating block/stand syringe channel, rotate the syringe in the extruder one-half turn<br />
clockwise or until the syringe lies flat in the syringe channel (see photos).<br />
Important: never rotate the syringe in the extruder counterclockwise as this will<br />
loosen the needle assembly from the glass barrel causing sample leakage.<br />
If you have any questions or need additional assistance, please do not hesitate to<br />
contact our Technical Support group at (205) 663-2494 or technical@avantiliQids.com.<br />
700 INDUSTRIAL PARK DRIVE, ALABASTER, AL 35007-9105<br />
FAX 800-229-1004 (UsA & CANADA) 205-663-0756 (iNTI .E-MAIL INFO@AVANTlLIPIDs.COM OR VISIT OUR WEB SITE WWW.AVANTlLIPIDs.COM<br />
FOR INFORMATION PLEASE CONTACT OUR PRODUCT HOTLINE 800-227-0651 (USA & CANADA) OR 205-663-2494 (iNT)
~ tic! ~P~D!~!C.<br />
In our continuing effort to resolve workmanship quality issues with the syringe for the<br />
Avanti <strong>Mini</strong>-<strong>Extruder</strong>, Avanti has contracted The Hamilton Company to provide syringes<br />
for the extruder. The syringes provided by The Hamilton Company have a larger<br />
diameter glass barrel than previous syringes. Therefore it is necessary to make minor<br />
adjustments to the syringe holding clips on the extruder heating block/stand to<br />
accommodate the larger syringes. Using a hex wrench, slightly loosen the hex screws<br />
which secure the syringe holding clips until they will easily pass over the syringe barrel,<br />
making sure that sufficient pressure is applied to the barrel to provide complete contact<br />
with the heating block/stand for heat transfer. Also, if the syringes do not lie flat in the<br />
heating block/stand syringe channel, rotate the syringe in the extruder one-half turn<br />
clockwise or until the syringe lies flat in the syringe channel (see photos).<br />
Important: never rotate the syringe in the extruder counterclockwise as this will<br />
loosen the needle assembly from the glass barrel causing sample leakage.<br />
If you have any questions or need additional assistance, please do not hesitate to<br />
contact our Technical Support group at (205) 663-2494 or technical@avantiliQids.com.<br />
700 INDUSTRIAL PARK DRIVE, ALABASTER, AL 35007-9105<br />
FAX 800-229-1004 (USA & CANADA) 205-663-0756 (INT) .E.MAIL INFO@;AVANTlLIPIDS.COM OR VISIT OUR WEB SITE WWW.AVANTlLIPIDS.COM<br />
FOR INFORMATION PLEASE CONTACT OUR PRODUCT HOTLINE 800-227-0651 (USA & CANADA) OR 205-663-2494 (INT)