EC Declaration of Conformity - Beko
EC Declaration of Conformity - Beko
EC Declaration of Conformity - Beko

Create successful ePaper yourself
Turn your PDF publications into a flip-book with our unique Google optimized e-Paper software.
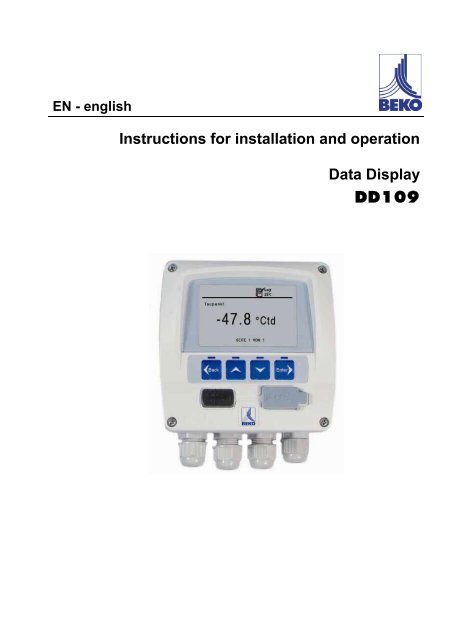
EN - english<br />
Instructions for installation and operation<br />
Data Display<br />
DD109
Dear customer,<br />
Thank you very much for deciding in favour <strong>of</strong> the data display DD109. Please read this installation and<br />
operation manual carefully before mounting and iniciating the device and follow our advice. A riskless<br />
operation and a correct functioning <strong>of</strong> the data display are only guaranteed in case <strong>of</strong> careful observation <strong>of</strong><br />
the described instructions and notes.<br />
Headquarter :<br />
Deutschland / Germany<br />
BEKO T<strong>EC</strong>HNOLOGIES GMBH<br />
Im Taubental 7<br />
D-41468 Neuss<br />
Tel.: +49 (0)2131 988 0<br />
beko@beko.de<br />
India<br />
BEKO COMPRESSED AIR<br />
T<strong>EC</strong>HNOLOGIES Pvt. Ltd.<br />
Plot No.43/1, CIEEP, Gandhi Nagar,<br />
Balanagar, Hyderabad - 500 037, INDIA<br />
Tel +91 40 23080275<br />
eric.purushotham@bekoindia.com<br />
Benelux<br />
BEKO T<strong>EC</strong>HNOLOGIES B.V.<br />
Vaartveld 25<br />
NL - 4704 SE Roosendaal<br />
Tel. +31 165 320 300<br />
info@beko.nl<br />
España / Spain<br />
BEKO Tecnológica España S.L.<br />
Polígono Industrial "Armenteres"<br />
C./Primer de Maig, no.6<br />
E-08980 Sant Feliu de Llobregat<br />
Tel. +34 93 632 76 68<br />
info.es@beko.de<br />
/eská Republica / Czech Republic<br />
BEKO T<strong>EC</strong>HNOLOGIES s.r.o.<br />
Mlýnská 1392<br />
CZ - 562 01 Usti nad Orlici<br />
Tel. +420 465 52 12 51<br />
info.cz@beko.de<br />
�� ����� / China<br />
BEKO T<strong>EC</strong>HNOLOGIES (Shanghai) Co.<br />
Ltd.<br />
Rm.606 Tomson Commercial Building<br />
710 Dongfang Rd.<br />
Pudong Shanghai China<br />
P.C. 200122<br />
Tel. +86 21 508 158 85<br />
beko@beko.cn<br />
Italia / Italy<br />
BEKO T<strong>EC</strong>HNOLOGIES S.r.l<br />
Via America 14<br />
I - 10071 Borgaro Torinese (TO)<br />
Tel. +39 0114 500 576<br />
info.it@beko.de<br />
Polska / Poland<br />
BEKO T<strong>EC</strong>HNOLOGIES Sp. z o.o.<br />
ul. ChCapowskiego 47<br />
PL-02-787 Warszawa<br />
Tel +48 (0)22 855 30 95<br />
info.pl@beko.de<br />
South East Asia<br />
BEKO T<strong>EC</strong>HNOLOGIES S.E.Asia<br />
(Thailand) Ltd.<br />
75/323 Romklao Road<br />
Sansab, Minburi<br />
Bangkok 10510<br />
Thailand<br />
Tel. +66 (0) 2-918-2477<br />
BEKO-info@beko-seasia.com<br />
United Kingdom<br />
BEKO T<strong>EC</strong>HNOLOGIES LTD.<br />
2 West Court<br />
Buntsford Park Road<br />
Bromsgrove<br />
GB-Worcestershire B60 3DX<br />
Tel. +44 1527 575 778<br />
beko@beko-uk.com<br />
France<br />
BEKO T<strong>EC</strong>HNOLOGIES S.a.r.l.<br />
Zone Industrielle<br />
1 Rue des Frères Remy<br />
F- 57200 Sarreguemines<br />
Tel. +33 387 283 800<br />
beko@wanadoo.fr<br />
�� / Japan<br />
BEKO T<strong>EC</strong>HNOLOGIES K.K<br />
KEIHIN THINK 8 Floor<br />
1-1 Minamiwatarida-machi<br />
Kawasaki-ku, Kawasaki-shi<br />
JP-210-0855<br />
Tel. +81 44 328 76 01<br />
info@beko-technologies.co.jp<br />
Scandinavia<br />
BEKO T<strong>EC</strong>HNOLOGIES AS<br />
P.O.Box 12 N-1393 Vollen<br />
Leangbukta 31<br />
N-1392 VETTRE<br />
Tel +47 31 29 10 50<br />
kjell@beko-technologies.no<br />
�� / Taiwan<br />
BEKO T<strong>EC</strong>HNOLOGIES Co.,Ltd<br />
16F.-5, No.79, Sec. 1,<br />
Sintai 5th Rd., Sijhih City,<br />
Taipei County 221,<br />
Taiwan (R.O.C.)<br />
Tel. +886 2 8698 3998<br />
info@beko.com.tw<br />
USA<br />
BEKO T<strong>EC</strong>HNOLOGIES CORP.<br />
900 Great SW Parkway<br />
US - Atlanta, GA 30336<br />
Tel. +1 (404) 924-6900<br />
beko@bekousa.com<br />
2 Data Display DD109
Table <strong>of</strong> contents<br />
1 Safety instructions 4<br />
2 Field <strong>of</strong> application 6<br />
3 Functions <strong>of</strong> the data display 6<br />
4 Data display with sensors 6<br />
5 Technical data 7<br />
6 Dimensions 8<br />
7 Mounting 9<br />
8 Plug reverse side 10<br />
9 Connecting diagram reverse side 10<br />
10 Connecting diagrams 10<br />
10.1 Power supply 10<br />
10.2 Alarm connection 11<br />
11 Analogue current signal 11<br />
11.1 Analogue current signal flow sensor 11<br />
11.2 Analogue current signal DPsensor 11<br />
12 Galvanic isolated pulse output 12<br />
12.1 Connecting diagram pulse output flow sensor 12<br />
13 Connection pulse: active high 12<br />
13.1 Connection pulse: active low 12<br />
14 Operation 13<br />
14.1 Description <strong>of</strong> the display icons 13<br />
14.1.1 Description <strong>of</strong> the status icons 13<br />
14.2 Operation <strong>of</strong> the main keys 14<br />
14.2.1 Concept for key operation 14<br />
14.3 Typical menu display layout 14<br />
14.3.1 Selection fields 15<br />
14.3.2 Figure settings 15<br />
14.4 Information after switching on the instrument 15<br />
14.5 Main menu points 16<br />
14.5.1 Logger operation 16<br />
14.5.2 Alarm settings 17<br />
14.5.3 Sensor settings 17<br />
14.5.4 System status and settings 17<br />
15 Scope <strong>of</strong> delivery 17<br />
16 <strong>Conformity</strong> declaration 18<br />
Data Display DD109 3
Safety instructions<br />
1 Safety instructions<br />
Please check whether this manual corresponds with the instruments type.<br />
Please observe all notes indicated in this instruction manual. It contains essential information<br />
which have to be observed during installation, operation and maintenance. Therefore this<br />
instruction manual has to be read categorically by the technician as well as by the responsible<br />
user / qualified personnel before installation, initiation and maintenance.<br />
This instruction manual has to be available at the operation site <strong>of</strong> data display at any time.<br />
Regional respectively national regulations have to be observed in addition to this instruction<br />
manual if necessary.<br />
In case <strong>of</strong> any obscurities or questions with regards to this manual or to the instrument please<br />
contact BEKO T<strong>EC</strong>HNOLOGIES.<br />
Warning!<br />
Supply voltage!<br />
Contact with supply voltage carrying non-insulated parts may cause an electric shock<br />
with injury and death.<br />
Measures :<br />
Observe all applicable regulations for electrical installations (e. g. VDE 0100)!<br />
Carry out maintenance work only in strainless state!<br />
All electric works are only allowed to be carried out by authorized qualified personnel.<br />
Warning !<br />
Inadmissible operating parameters !<br />
Undercutting or exceeding <strong>of</strong> limit values may cause danger to persons and material<br />
and may lead to functional and operational disturbances.<br />
Measures :<br />
Make sure that the data display is only operated within the admissible limit values indicated on the<br />
type label.<br />
Careful observation <strong>of</strong> the performance data <strong>of</strong> the data display in connection with the application.<br />
Do not exceed the admissible storage and transportation temperature.<br />
4 Data Display DD109
Safety instructions<br />
Further safety instructions:<br />
Also the applicable national regulations and safety instructions have to be observed during installation<br />
and operation.<br />
The data display is not allowed to be used in explosive areas.<br />
Additional remarks:<br />
Do not overheat the instrument!<br />
r<br />
Attention !<br />
Malfunctions at the data display<br />
Faulty installation and insufficient maintenance may lead to malfunctions <strong>of</strong> the data<br />
display which may affect the measuring results and which may lead to<br />
misinterpretations.<br />
Data Display DD109 5
Field <strong>of</strong> application<br />
2 Field <strong>of</strong> application<br />
The data display is a stationary display instrument with data logger e. g. for corresponding consumption<br />
and dew point sensors (please see "Technical data")<br />
The data display is used e. g. in the following applications<br />
Flow station<br />
Dew point set<br />
For functioning the data display requires an operating voltage (see Technical data).<br />
The data display is not suitable for an application in explosive areas<br />
3 Functions <strong>of</strong> the data display<br />
Graphics display for an easy user interface<br />
Flexible voltage supply: 100… 240 VAC/ 50… 60Hz<br />
2 inputs for BEKO consumption and dew point sensors<br />
4… 20 mA – output for further processing<br />
2 relay outputs for alarm<br />
USB interface<br />
Housing mountable at the wall or in the panel<br />
Data logging function for 1,000,000 values<br />
4 Data display with sensors<br />
BEKO consumption sensor<br />
BEKO dew point sensor<br />
alarm output<br />
4… 20 mA – output for further<br />
processing<br />
USB interface<br />
6 Data Display DD109
5 Technical data<br />
Dimensions wall housing Dimensions: 118mm x 115mm x 93mm<br />
Dimensions panel mounting Dimensions: 92mm x 92mm<br />
Housing material ABS synthetic material<br />
Protection type housing IP 65<br />
Operating temperature 0… 50°C<br />
Transportation temperature -20… 70 °C<br />
Sensor inputs<br />
Interface USB<br />
Keypad 4 keys<br />
2 inputs for dew point and consumption sensors<br />
(optional 2 analogue inputs)<br />
Power supply 100 .… 240 VAC / 50-60 Hz / 10 VA<br />
Display Graphics display, 160 x 100 pixels<br />
Settings The data display is supplied with standard settings<br />
Alarm output 2 relays, 230 VAC, 3 A, potential-free, change-over contact<br />
Analogue output<br />
Data logger<br />
S<strong>of</strong>tware<br />
Technical data<br />
Connection <strong>of</strong> the 4… 20 mA signals <strong>of</strong> the dew point and consumption<br />
sensors (maximum burden < 500 Ohm)<br />
up to 1,000,000 values<br />
start time programmable and manually adjustable<br />
logging interval, Min. 1 Sec., Max. 59 Min. 59 Sec.<br />
average value storage<br />
Factory settings:<br />
Logging interval 10 Sek.<br />
Wrap around mode<br />
The data logging starts as soon as the instrument is put into operation<br />
The BEKO s<strong>of</strong>tware SW 109 is available as an option. With this<br />
s<strong>of</strong>tware all settings can be done at DD109 and the logger data can be<br />
read-out.<br />
Data Display DD109 7
Dimensions<br />
6 Dimensions<br />
Dimensions<br />
wall housing<br />
Dimensions for<br />
panel mounting<br />
8 Data Display DD109
7 Mounting<br />
Mounting wall housing:<br />
Mounting<br />
The cables for sensors and for the power supply<br />
are already wired at DD10:<br />
Do not connect mains cable to the power line<br />
Release the 4 screws at the front housing<br />
Remove plug from the reverse side <strong>of</strong> the front<br />
housing<br />
Drill holes into the wall according to the given grid<br />
dimension (please see drawing)<br />
Mount wall housing (anchor and screws included<br />
in the scope <strong>of</strong> delivery)<br />
Attach again plug for the power supply and for<br />
the sensors<br />
Insert the front housing into the wall housing and<br />
tighten the 4 screws<br />
At DD109 the cables for sensors and for the power<br />
supply are not wired:<br />
Release the 4 screws at the front housing<br />
Drill holes into the wall according to the given grid<br />
dimension (please see drawing)<br />
Mount wall housing (anchor and screws included<br />
in the scope <strong>of</strong> delivery)<br />
Carry out wiring <strong>of</strong> the power supply and the<br />
sensor(s) according to the below instructions<br />
Insert the front housing into the wall housing and<br />
tighten the 4 screws<br />
Tighten the clamp screwings <strong>of</strong> the cables<br />
Panel mounting<br />
Cut-out<br />
92 mm (+0.8, -0.0) x 92 mm (+0.8, -0.0)<br />
Maximum sheet thickness 8 mm (see above<br />
drawing)<br />
Insert front housing for panel mounting into the<br />
prepared cut-out<br />
Insert the fixing clips and fix the housing by<br />
twisting the thread rods<br />
Carry out wiring <strong>of</strong> the power supply and the<br />
sensor(s) according to the below instructions<br />
Data Display DD109 9
Plug reverse side<br />
8 Plug reverse side<br />
Supply:<br />
AWG12 – AWG24, cable cross-sections: 0.2 ... 2.5 mm 2<br />
Signals:<br />
AWG16 ... AWG28, cable cross-sections: 0.14 ... 1.5 mm 2<br />
9 Connecting diagram reverse side<br />
Wiring scheme reverse side data display:<br />
A: Alarm 1<br />
B: Alarm 2<br />
C: Power supply<br />
D: no use<br />
E: optional<br />
F: optional<br />
G: Flow sensor<br />
H: Galvanically separated pulse output<br />
flow sensor<br />
I: DPsensor<br />
Important information:<br />
Please make sure that the configuration you ordered has been matched with the sensors.<br />
10 Connecting diagrams<br />
10.1 Power supply<br />
100-240 VAC, 50-60 Hz<br />
10 Data Display DD109
10.2 Alarm connection<br />
11 Analogue current signal<br />
Analogue current signal<br />
NC and COM are closed in case <strong>of</strong>:<br />
- alarm<br />
- power failure<br />
- sensor break<br />
The flow sensor and the DPsensor <strong>of</strong>fer the possibility to provide the measured values as analogue current<br />
signal 4…20 mA for further process treatment . The connection schemes have already been set for this.<br />
11.1 Analogue current signal flow sensor<br />
11.2 Analogue current signal DPsensor<br />
Terminal G "Flow sensor“<br />
The flow sensor is connected to the clamps<br />
at terminal G according to the scheme<br />
indicated at the left. The analogue signal<br />
(4...20mA) is at clamp 1 and 3 and can be<br />
tapped if required (maximum burden<br />
< 500 Ohm)<br />
Terminal I „DP sensor“<br />
The DP sensor is connected to the clamps<br />
at terminal I according to the scheme<br />
indicated at the left. The analogue signal<br />
(4...20mA) is at clamp 1 and 2 and can be<br />
tapped if required (maximum burden<br />
< 500 Ohm). If the analogue signal is not<br />
used a wire jumper has to be inserted here<br />
obligatorily (factory-provided)<br />
Data Display DD109 11
Galvanic isolated pulse output<br />
12 Galvanic isolated pulse output<br />
A galvanic isolated pulse output is available for the flow sensor. It deals with a semi-conductor relay which is<br />
galvanic isolated from the supply voltage by means <strong>of</strong> optoelectronic couplers.<br />
Maximum switching capacity : Umax: 32V, Imax: 20 mA<br />
12.1 Connecting diagram pulse output flow sensor<br />
13 Connection pulse: active high<br />
13.1 Connection pulse: active low<br />
Pulse counter flow sensor to terminal H<br />
clamps 1 and 2<br />
active high<br />
active low<br />
12 Data Display DD109
14 Operation<br />
Operation<br />
The measured values will be indicated page by page. Depending on the sensor and the settings one or<br />
several values can be indicated on one display page. These settings can be changed via the optional<br />
s<strong>of</strong>tware or - on request - by BEKO T<strong>EC</strong>HNOLOGIES.<br />
14.1 Description <strong>of</strong> the display icons<br />
14.1.1 Description <strong>of</strong> the status icons<br />
ALM1<br />
Status display<br />
Indication <strong>of</strong> measured value:<br />
Only one page <strong>of</strong> measured values will be shown at a time.<br />
The use can utilize the „arrow up“ or „arrow down“ keys in order to<br />
scroll through all available pages.<br />
Page view indication:<br />
Shows the current number <strong>of</strong> pages <strong>of</strong> measured values as well as the<br />
total number <strong>of</strong> pages.<br />
These icons show the system status.<br />
Explanation <strong>of</strong> the single icons:<br />
USB connection icon:<br />
The data display is connected to a PC via USB<br />
Alarm status icon: Alarm 1 (pre-alarm)<br />
Alarm 1 is exceeded<br />
Alarm status icon: Alarm 1 (pre-alarm)<br />
Alarm 1 is undercut<br />
Alarm status icon: Alarm 2 (main alarm)<br />
Alarm 2 is exceeded<br />
Alarm status icon: Alarm 2 (main alarm)<br />
Alarm 2 is undercut<br />
Logger module icon:<br />
WAIT: Time and start conditions are set, waits for start logging<br />
LOG: Logger module is recording data<br />
STOP: Logging stopped<br />
DEL: Logger deletes protocol data<br />
ERR: Error occured during data logging<br />
LOG 100%: Free memory <strong>of</strong> logger module in percent<br />
CYCLE: Logger memory works in circular mode<br />
Data Display DD109 13
Operation<br />
14.2 Operation <strong>of</strong> the main keys<br />
14.2.1 Concept for key operation<br />
Back<br />
Enter<br />
14.3 Typical menu display layout<br />
use these keys to browse and select different items in the menu and<br />
scroll through different pages <strong>of</strong> measurement values<br />
use these keys to alter or adjust the setting option or numbering<br />
use this key to exit the current menu level<br />
use it to leave all setting state without saving the changes<br />
use this key to enter the submenu or next menu level <strong>of</strong> the currently<br />
selected menu item<br />
use it to confirm the setting changes<br />
The currently selected menu item will be shown in negative colour<br />
If there is a ">“ sign at the right edge it means we can exit the current<br />
menu or go to the next higher level<br />
It there is a "
14.3.1 Selection fields<br />
14.3.2 Figure settings<br />
14.4 Information after switching on the instrument<br />
Options for selection <strong>of</strong> the parameters<br />
- Selection field for deselected point<br />
Operation<br />
- Selection field for selected point<br />
Selection <strong>of</strong> the selection field via the "arrow up“ and<br />
"arrow down“ keys<br />
By means <strong>of</strong> the "Enter“key the selected option can be activated<br />
Leaving the menu point:<br />
Use the "Back“ key to get back to the last menu level without<br />
activating the selected option<br />
Example figure settings:<br />
Time and date setting in submenu "system status and setting"<br />
1. Time setting via "arrow up" and "arrow down" keys<br />
2. Change from HOUR to MINUTE to S<strong>EC</strong>OND with the "Enter“ key<br />
3. Upon entry <strong>of</strong> the S<strong>EC</strong>ONDS the setting is terminated and<br />
stored by the "Enter“ key.<br />
By using the "Back" key the menu point "Time and date<br />
setting" can be left without storing the settings.<br />
System information are indicated for approx. 5 seconds after<br />
switching on the data display:<br />
The system information is helpful for service questions in order to<br />
determine e. g. the version number and the firmware version.<br />
The system information can be called up at any time in the menu<br />
point "system info".<br />
If the sensors are connected in accordance with the configuration<br />
the data display will automatically recognize them and start to<br />
indicated real time measured values which are received from the<br />
sensors. It is possible that measured values are indicated on more<br />
than one page. The "arrow up" or the "arrow down" key can be used<br />
in order to indicate a further page.<br />
Data Display DD109 15
Operation<br />
14.5 Main menu points<br />
The data display is supplied with standard settings.<br />
Main menu points in the data display:<br />
Logger operation<br />
Set Alarm 1<br />
Set Alarm 2<br />
Sensor setting<br />
Communication settings (Option BUS systems)<br />
System status and setting<br />
14.5.1 Logger operation<br />
Set logging rate<br />
Key start logging<br />
Set time start condition<br />
Memory status<br />
View protocol<br />
Set storage interval and average value determination<br />
The storage interval defines the time interval in which the data should be<br />
recorded. One value is recorded <strong>of</strong> each activated channel. The option average<br />
value determination can be used in order to determine the average value, i. e.<br />
the data display measures every second and if the storage interval is 10<br />
seconds the average from the last 10 values will be made up and stored as<br />
measured value.<br />
Start/stop, recording<br />
Starts or stops the data recording. A new file is created in the memory as soon<br />
as a new recording is started.<br />
Set time, start conditions<br />
The data display can be programmed so that it starts measurement at a certain<br />
point <strong>of</strong> time.<br />
Show logger memory status<br />
Shows the status and the size <strong>of</strong> the available memory<br />
Single protocols (files) or the whole memory can be indicated and if necessary<br />
deleted. The data display shows the available protocols with date, the number <strong>of</strong><br />
channels, the number <strong>of</strong> recorded date per channel and the min/max/average<br />
value.<br />
Delete protocol Deletes the selected protocol.<br />
Format logger Deletes the internal memory.<br />
16 Data Display DD109
14.5.2 Alarm settings<br />
It is possible to set 2 individual alarm thresholds:<br />
1. “Set Alarm 1 threshold”<br />
2. ”Set Alarm 2 threshold”<br />
Scope <strong>of</strong> delivery<br />
In this example the sensor is connected to terminal I.<br />
„Type: High" means:<br />
The alarm is triggered if the value is higher than the threshold.<br />
If the alarm is exceeded or dropped below the background<br />
becomes red resp. starts blinking.<br />
The factory setting <strong>of</strong> the hysteresis is 2.00 °Ctd.<br />
Please observe that these adjustments cannot be changed directly<br />
in the Data Display.<br />
Please turn to BEKO T<strong>EC</strong>HNOLOGIES GMBH<br />
14.5.3 Sensor settings<br />
Sensor settings for our consumption or dew point sensors are stored within the sensor itself. The Data<br />
Display can be used in order to change those settings. For this purpose select in the menu the function<br />
“Sensor settings”. On the next screen the available inputs are shown: e. g.<br />
Terminal I: Dew point<br />
Terminal G: Consumption<br />
Select the desired entry mask in order to carry out the sensor settings.<br />
If a sensor is connected to a switched on Data Display the configuration <strong>of</strong> the Data Display will be<br />
transferred to the sensor without any prior query. (e.g. analogue output, diameter for consumption probes …)<br />
On delivery <strong>of</strong> a unit Data Display/sensor the adjustments are matched. Please check the coordination if you<br />
connect sensors with deviant adjustments to the Data Display.<br />
14.5.4 System status and settings<br />
Setup time/date Set the integrated clock.<br />
Show system status This screen contains important information for service enquiries.<br />
Change LCD contrast Contrast <strong>of</strong> the display can be changed.<br />
System reset<br />
15 Scope <strong>of</strong> delivery<br />
Data Display in wall housing according to your order<br />
Fastening clips for panel mounting<br />
Instruction manual<br />
In case other sensors are connected it is recommended to use this<br />
function in order to update the system settings.<br />
Data Display DD109 17
<strong>Conformity</strong> declaration<br />
16 <strong>Conformity</strong> declaration<br />
18 Data Display DD109
BEKO T<strong>EC</strong>HNOLOGIES GMBH<br />
41468 Neuss, GERMANY<br />
Phone: +49 2131 988-0<br />
www.beko.de<br />
<strong>EC</strong> <strong>Declaration</strong> <strong>of</strong> <strong>Conformity</strong><br />
<strong>Conformity</strong> declaration<br />
We herewith declare that the product indicated in the following in the version supplied by us corresponds<br />
with the requirements <strong>of</strong> the relevant standards:<br />
Product designation: DD109<br />
Voltage supply: 100 – 240 VAC / 50-60 Hz / 10 VA<br />
Product description and function: Data display for recording and indication <strong>of</strong> measured<br />
data<br />
Low voltage directive 2006/95/EG<br />
Applied harmonized standards: EN 61010-1:2001<br />
EN 61010-31:2002 + A1:2008<br />
Year <strong>of</strong> fitting with CE mark: 09<br />
EMV directive 2004/108/EG<br />
Applied standards: Emitted interference:<br />
EN 61326:1997 + A1:1998 + A2:2001 + A3:2003<br />
The products are labeled with the indicated mark:<br />
Interference resistance:<br />
EN 61326:1997 + A1:1998 + A2:2001 + A3:2003<br />
This declaration only refers to the products in the state in which they are put into circulation, parts which are<br />
not attached by the manufacturer and/or subsequently taken interventions stay unconsidered.<br />
Neuss, 30.03.2009 BEKO T<strong>EC</strong>HNOLOGIES GMBH<br />
i.V. Christian Riedel<br />
Head <strong>of</strong> Quality Management<br />
Data Display DD109 19
A<br />
Active high ..........................................................12<br />
Active low............................................................12<br />
Alarm 1 (pre-alarm) ............................................13<br />
Alarm 1 exceeded...............................................13<br />
Alarm 1 undercut ................................................13<br />
Alarm 2 (main alarm) ..........................................13<br />
Alarm connection................................................11<br />
Alarm exceeded or dropped below.....................17<br />
Alarm settings.....................................................17<br />
Analogue current signal 4...20 mA .....................11<br />
Applications ..........................................................6<br />
B<br />
Back key .............................................................14<br />
C<br />
Concept for key operation ..................................14<br />
<strong>Conformity</strong> declaration........................................18<br />
Connecting diagram reverse side.......................10<br />
Connection pulse: active high ............................12<br />
Connection pulse: active low..............................12<br />
Contrast <strong>of</strong> the display........................................17<br />
D<br />
Data display with sensors.....................................6<br />
Dimensions...........................................................8<br />
Dimensions for panel mounting............................8<br />
Dimensions wall housing ......................................8<br />
Display icons ......................................................13<br />
E<br />
Enter key.............................................................14<br />
Explosive area ......................................................6<br />
F<br />
Faulty installation..................................................5<br />
Field <strong>of</strong> application................................................6<br />
Figure settings ....................................................15<br />
G<br />
Galvanically separeted pulse output ..................12<br />
H<br />
Hysteresis ...........................................................17<br />
I<br />
Information after switching on the instrument.....15<br />
L<br />
Logger module icon ............................................13<br />
Logger operation.................................................16<br />
M<br />
Main functions <strong>of</strong> the data display ........................6<br />
Main menu points ...............................................16<br />
Maximum switching capacity ..............................12<br />
Mounting ...............................................................9<br />
Mounting wall housing ..........................................9<br />
O<br />
Operating voltage .................................................6<br />
Operation <strong>of</strong> the main keys.................................14<br />
P<br />
Panel mounting.....................................................9<br />
Power supply ......................................................10<br />
Process treatment...............................................11<br />
Pulse counter......................................................12<br />
Pulse output flow sensor.....................................12<br />
Q<br />
Qualified personnel...............................................4<br />
R<br />
Red background .................................................17<br />
S<br />
Safety instructions ................................................5<br />
Safety instructions ................................................4<br />
Scope <strong>of</strong> delivery ................................................17<br />
Selection field parameters ..................................15<br />
Sensor settings ...................................................17<br />
Status icons ........................................................13<br />
System status and settings.................................17<br />
T<br />
Technical data ......................................................7<br />
Typical menu display layout................................14<br />
U<br />
USB interface........................................................6<br />
W<br />
Warning inadmissible operating parameters ........4<br />
Warning supply voltage ........................................4<br />
20 Data Display DD109
<strong>Conformity</strong> declaration<br />
Data Display DD109 21
22 Data Display DD109
<strong>Conformity</strong> declaration<br />
Data Display DD109 23
Technical changes and errors excepted.<br />
DD109_manual_en_2009-03