Compact - Laser CL plus - Silberbauer
Compact - Laser CL plus - Silberbauer
Compact - Laser CL plus - Silberbauer

You also want an ePaper? Increase the reach of your titles
YUMPU automatically turns print PDFs into web optimized ePapers that Google loves.
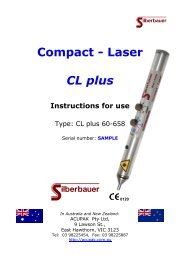
<strong>Compact</strong> - <strong>Laser</strong><br />
<strong>CL</strong> <strong>plus</strong><br />
Instructions for use<br />
Type: <strong>CL</strong> <strong>plus</strong> 60-660 L 0120<br />
Serial number: 60660 L 601 J<br />
assembled by<br />
<strong>Silberbauer</strong> India<br />
�����������<br />
with the European know how of<br />
<strong>Silberbauer</strong> Medical Electronics, Vienna,<br />
Austria, Europe
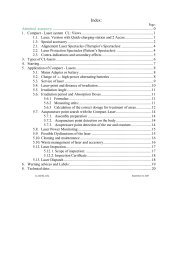
Content:<br />
1 Intended Use ............................................................................................................. 4<br />
2 Safety precautions to be observed during the use of therapy<br />
lasers ................................................................................................................................. 4<br />
2.1 Alignment <strong>Laser</strong> Spectacles (Therapist’s Spectacles): ............... 5<br />
2.2 <strong>Laser</strong> Protection Spectacles (Patient’s Spectacles): ................... 6<br />
2.3 Indications .................................................................................................. 6<br />
2.4 Contraindications ..................................................................................... 7<br />
3 <strong>Compact</strong> - <strong>Laser</strong> <strong>CL</strong> <strong>plus</strong> : View ........................................................................ 8<br />
3.1 Accessory ..................................................................................................... 8<br />
3.2 Initial use ..................................................................................................... 9<br />
4 Use of the <strong>Compact</strong> – <strong>Laser</strong>s <strong>CL</strong> <strong>plus</strong> ............................................................... 9<br />
4.1 Commissioning ........................................................................................... 9<br />
4.2 <strong>Laser</strong>-point and distance of irradiation........................................... 13<br />
4.3 Irradiation Angle ...................................................................................... 14<br />
4.4 Use of the assessory .............................................................................. 14<br />
4.5 Location of Acupuncture points with the <strong>Compact</strong> – <strong>Laser</strong> <strong>plus</strong>: ........................ 15<br />
4.5.1 Preparation of the assembly ............................................... 15<br />
4.5.2 Acupuncture point detection on the body ..................... 15<br />
4.5.3 Detection of ear- and skull acupuncture points ......... 16<br />
4.6 Irradiation period and Absorption Doses ....................................... 16<br />
4.6.1 Formule ....................................................................................... 16<br />
4.6.2 Measuring units ........................................................................ 16<br />
4.6.3 Calculation of the correct dose .......................................... 17<br />
4.7 Checking the output power of the laser ......................................... 17<br />
4.8 Charge of the NiMH- Battery .............................................................. 18<br />
5 Possible dysfunctions of the laser .................................................................... 19<br />
6 Cleaning and maintenance .................................................................................. 20<br />
7 Waste management of laser and accessory ................................................. 20<br />
8 Warranty .................................................................................................................... 21<br />
9 <strong>Laser</strong> inspection ....................................................................................................... 22<br />
9.1 Scope of inspection: .............................................................................. 22<br />
9.2 Inspection Certificate............................................................................. 23<br />
10 <strong>Laser</strong> dispatch ........................................................................................................ 23<br />
11 Warning advices and Label Information : .................................................. 24<br />
12 Technical Data: ..................................................................................................... 25<br />
Declaration of Conformity 23<br />
Calibration Certificate ............................................................................................................. 24<br />
<strong>CL</strong>_<strong>plus</strong>_BED2_e.doc June 15, 2010<br />
Page:
� <strong>Compact</strong><br />
- <strong>Laser</strong> Series <strong>CL</strong> <strong>plus</strong> Instructions for use<br />
Delivery :<br />
� 2 ea. NiMH – Batteries „Green“, 2050mAh,<br />
� Charger for NiMH- Batteries,<br />
� <strong>Laser</strong> – Storage, Acrylic Glass,<br />
� lockable Casket, Aluminum,<br />
� Instructions for use<br />
� Applications of the Soft–<strong>Laser</strong><br />
� <strong>Laser</strong> goggles „Comfort“ ( = for the patient),<br />
� <strong>Laser</strong> goggles „Mini-Soft-Caps“ (= for children),<br />
� <strong>Laser</strong> adjustment goggles „Comfort“ (=for the therapist),<br />
� Measurement templet for wounds<br />
� Instruments book<br />
� <strong>Laser</strong> sign board (Attention <strong>Laser</strong> Beam)<br />
Admitted Assessory:<br />
Lightning cable bent (Dental top)<br />
Power reducing tip<br />
Admitted Protection Goggles:<br />
see also page 2 – 3!<br />
Soft-Caps <strong>Laser</strong> goggles (=glasses for the patient)<br />
Mini-Soft-Caps <strong>Laser</strong> goggles for children<br />
Comfort <strong>Laser</strong> goggles (=glasses for the patient)<br />
Comfort <strong>Laser</strong> adjust glasses (=glasses for the therapist)<br />
Comfort <strong>Laser</strong> goggles for children<br />
Admitted Device in connection with the <strong>CL</strong> <strong>plus</strong> <strong>Laser</strong>:<br />
Point Detector PS3, with Connection Cable
1 Intended Use<br />
The <strong>Compact</strong> – <strong>Laser</strong> <strong>plus</strong> is a Soft <strong>Laser</strong> (Low Level <strong>Laser</strong>) for radiation of<br />
skin, mucous membrane and dental applications in human and veterinary medicine<br />
(LLLT = Low Level <strong>Laser</strong> Therapy).<br />
It is a “Medical Product“ in accordance with the EU Medical Product Law and<br />
with the Essential Requirements 93/42 EWG and 2007/47 EC. This unit is also<br />
approved by TGA.<br />
The main applications are divided into the parts<br />
� Acceleration of wound healing and to avoid obstructions in healing, especially<br />
for older patients, for diabetics and patients with wound healing<br />
complications,<br />
� Reduction of pain e.g. after traumata and post surgeryand at chronicdegenerative<br />
diseases,<br />
� Acupuncture instead of needles.<br />
2 Safety precautions to be observed during the use<br />
of therapy lasers<br />
� The appropriate legal security precautions are to be observed!<br />
� Direct irradiation of the opened eye should be avoided at all costs! Irreparable<br />
damage can be expected!<br />
� even the closed eye should not be irradiated!<br />
� During radiation to the face use Soft Caps!<br />
� <strong>Laser</strong> therapy should be conducted by trained personnel only!<br />
� The use of the operating facilities or installation contingencies in any methods other<br />
than mentioned in these user instructions can lead to dangerous irradiation!<br />
� <strong>CL</strong> <strong>plus</strong>- <strong>Laser</strong> must be used and stored within the following temperature range:<br />
Case Temperature: during use 10 to 45 o C (50 to 112 o F),<br />
Storage temp. 5 bis 50 o C (40 to 122 o F)!<br />
Being the maximum temperature of the crystal, it is required!<br />
Caution is recommended during its transport by car in the summer!<br />
Permissible humidity: 30 till 95 % rel ,<br />
The humidity should not condense on the case/body (no dew-drops)!<br />
� The use of inflammable anaesthetic gases or oxidized gases like nitrogen (N 2 O) and<br />
oxygen should be avoided. Some materials like cotton, that are saturated with oxygen,<br />
could be set on fire at these high temperatures, created at the because of the laser’s<br />
direction. Before the laser is put into operation, there should be a specific period for<br />
evaporation of solvents in adhesives and inflammable solvents, which are used for<br />
cleaning and disinfection. Attention should be drawn to the fact that the body’s gases<br />
too can set on fire.<br />
It is further recommended that:<br />
Therapy duration for babies being treated at the cranial region should be short (approx. 50%)!
� <strong>Compact</strong><br />
- <strong>Laser</strong> Series <strong>CL</strong> <strong>plus</strong> Instructions for use<br />
2.1 Alignment <strong>Laser</strong> Spectacles (Therapist’s Spectacles):<br />
At the use of lasers of the laser-protection-class 2M the therapist can wear<br />
the laser alignement spectacles as in accordance with the current edition of<br />
international standard EN208.<br />
For class 3B lasers and especially for infraret lasers the therapist MUST<br />
wear those spectacles.<br />
Minimal specifications of these spectacles for the<br />
<strong>CL</strong> <strong>plus</strong> corresponding to EN208:<br />
for <strong>CL</strong> <strong>plus</strong> until 100 mW: R 2<br />
for all other <strong>CL</strong> <strong>plus</strong> models: R 3<br />
and admitted for laser mode D (continuous operation)<br />
� <strong>Silberbauer</strong> - laser alignment spectacles offer only protection against accidental<br />
irradiation through laser up to these levels!<br />
� They are NOT ALLOWED to be used for the deliberate view of beam!<br />
� They are only protection against casual irradiation, when the eye lid closure<br />
reflex is not suppressed or slowed down (medical treatment, illness ...); and<br />
thus repeated irradiations of the eye have to be reduced.<br />
� Attention! Colour identification is disturbed by the glasses!<br />
� Clean glasses only with a glasses-cleaning-cloth or cloth and windowsdetergent.<br />
Appropriate Protection eyewear from the<br />
<strong>Silberbauer</strong> – Programme:<br />
For all RED lasers until 200 mW: Comfort<br />
Justierbrille (green);<br />
for all other models (IR also) until 500 mW:<br />
Comfort- Schutzbrille for Patient and<br />
Therapeut (dark blue).
� <strong>Compact</strong><br />
- <strong>Laser</strong> Series <strong>CL</strong> <strong>plus</strong> Instructions for use<br />
2.2 <strong>Laser</strong> Protection Spectacles (Patient’s Spectacles):<br />
At the use of lasers of the laser-protection-class 2M the patient can wear<br />
the laser protection spectacles.<br />
For class 3B lasers and especially for infraret lasers the patient MUST wear<br />
those spectacles.<br />
Minimal Specification of laser protection spectacles correspond to EN 207 for Model<br />
<strong>CL</strong> <strong>plus</strong>:<br />
Protection level at the wavelength of the laser : L3;<br />
<strong>Laser</strong> mode: D (continuous operation)<br />
� The <strong>Silberbauer</strong> laser protection spectacles offer only protection against<br />
accidental irradiation through laser up to these powers!<br />
� They are NOT ALLOWED to be used for the deliberated view into the beam!<br />
� They protect only then against casual irradiation, when the eye lid closure<br />
reflex is not suppressed or slowed down (medical treatment, illness ...); and<br />
thus repeated irradiations of the eye have to be reduced.<br />
�Attention! Colour identification is disturbed by the glasses!<br />
� Clean glasses only with a glasses-cleaning-cloth or cloth and windowsdetergent.<br />
Appropriate Protection eyewear from the <strong>Silberbauer</strong> – Programme:<br />
Adults:<br />
for all <strong>Laser</strong> models (IR also) until 500<br />
mW: Soft-Caps;<br />
for red <strong>Laser</strong>s until 500 mW: Comfort-<br />
Schutzbrille (blue);<br />
for infrared <strong>Laser</strong>s until 1000 mW:<br />
Comfort-Schutzbrille IR (pink<br />
coloured).<br />
Children:<br />
for all <strong>Laser</strong> models (IR also) until 400 mW: Mini-Soft-Caps;<br />
for red <strong>Laser</strong>s until 500 mW: Comfort-Schutzbrille for<br />
Children;<br />
for infrared <strong>Laser</strong>s until 1000 mW: Comfort-Schutzbrille IR<br />
for children (pink).<br />
2.3 Indications<br />
See scientific literature and soft laser courses!
� <strong>Compact</strong><br />
2.4 Contraindications<br />
- <strong>Laser</strong> Series <strong>CL</strong> <strong>plus</strong> Instructions for use<br />
The laser treatment has a low risk only. Different authors have controversial<br />
positions because the laser is especially successful in applications where you for<br />
forensic reasons might have concerns. However, if no sufficient tests are available,<br />
some contraindications should be observed:<br />
� Direct irradiation of the open eye, it is essential to avoid!<br />
� In the area of open fontanelles or open skullcaps, as well as growth gaps in<br />
childhood and adolescence should not be irradiated.<br />
� During pregnancy, the penetration of the abdominal area is to be avoided.<br />
Attention! Sopme acupuncture points can trigger labour (Bl31, Bl32, Bl60, Bl67, Di4,<br />
Di5, Gbl21, Gbl34, LG20, MP6)<br />
� Endocrine organs may not be treated!<br />
� For epileptics, the scalp region may not be treated.<br />
� In the literature, there are notes at the one side that tumors and malignant<br />
skin diseases should not be treated, at the other side tumor pains and damages due<br />
to radiation are a successful field of application. In the veterinary medicine there are<br />
good results after laser penetration of tumors because the lymphatic jam and the<br />
pain eases back.<br />
� In case of higher photosensibility, it is not allowed to penetrate (for all kinds<br />
of dermatoses which react with formation of erythems or vesicles to small doses of<br />
light).<br />
� Pacemakers cannot be affected by penetration with the cw- laser, so there<br />
are no contraindications.<br />
� Too long therapy time<br />
does not give better results,<br />
but also no harmful side<br />
effects. Exceptions are<br />
penetrations in the scalp<br />
region (more minutes), which<br />
can cause headache, and<br />
daily penetration with high<br />
doses which can cause that<br />
pain comes again.<br />
See also scientific literature!
� <strong>Compact</strong><br />
- <strong>Laser</strong> Series <strong>CL</strong> <strong>plus</strong> Instructions for use<br />
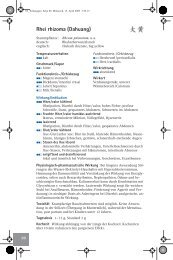
3 <strong>Compact</strong> - <strong>Laser</strong> <strong>CL</strong> <strong>plus</strong> : View<br />
1 2 3 4<br />
11<br />
5 6<br />
"Hidden Monitor"<br />
Ser.Nr.:<br />
xxxx H<br />
7<br />
8<br />
<strong>Compact</strong> - <strong>Laser</strong><br />
<strong>CL</strong> <strong>plus</strong> xx-658<br />
1 <strong>Laser</strong> Point 7 Rotary Switch 2 (Dose)<br />
2 Aluminium Body 8 Type Plate and Details<br />
3 Lamp multi colour<br />
9 Socket for<br />
(performance monitoring) <strong>Silberbauer</strong> Point Detector PS3<br />
4 Push-button (Start / Stop) 10 Battery Cap<br />
5 Lamp<br />
(ready / battery low)<br />
6 Rotary Switch 1<br />
(Function / Area)<br />
11 <strong>Laser</strong> Warning Label<br />
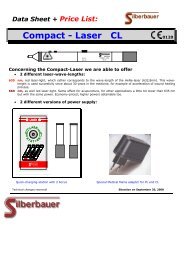
3.1 Accessory<br />
Optic Fibre, bent:<br />
Power loss with optic fibre: 25 % almost!<br />
Power-reducing-tip:<br />
D ire cti o n o f th e<br />
L a s e r B e a m<br />
Transmission 50%<br />
D i re cti o n o f th e<br />
L a s e r B e a m<br />
9<br />
10
� <strong>Compact</strong> - <strong>Laser</strong> Series <strong>CL</strong> <strong>plus</strong> Instructions for use<br />
3.2 Initial use<br />
The <strong>Silberbauer</strong> <strong>Compact</strong> -<br />
<strong>Laser</strong> <strong>plus</strong> is delivered together<br />
with NiMH- Batteries in size AA and<br />
with a charger. These batteries<br />
have a very low self discharge<br />
rate: after ONE year, yet 85% of<br />
the initial charge are available!<br />
Turn Rotary Switch 1 (6) into „Off“ position. Open Battery Cap (10) at the<br />
end of the laser and insert battery with negative end pointing into the tube; close<br />
the cap and turn it clockwise until it stops.<br />
Now your <strong>Silberbauer</strong> <strong>Compact</strong> - <strong>Laser</strong> mini is ready to use!<br />
4 Use of the <strong>Compact</strong> – <strong>Laser</strong>s <strong>CL</strong> <strong>plus</strong><br />
4.1 Commissioning<br />
The left Rotary Switch 1 (6) is for<br />
switching the device on and off and to select<br />
the function or the area.<br />
In “Off“ – position the device is<br />
switched off completely, no waste of battery<br />
power.<br />
Nevertheless the battery should be removed from the laser if it is not used for<br />
a longer period because there is the risk of the battery leaking and then the risk of<br />
oxidation of the contacts. This causes a defect of the device!<br />
In position „Acup. Child“ the laser power will be set to ¼ of the nominal<br />
output power and the penetration time to 5 sec., in position „Acup. Adult“ to ½ of<br />
output power and to 15 sec.<br />
The other positions of this Rotary Switch are for setting the area which should<br />
be penetrated if the laser is used to penetrate larger areas.<br />
The right Rotary Switch 2 (7) is used to adjust the Dose in Joule/cm 2 .<br />
After switching in the laser cannot be started promptly, but only after a<br />
security delay of 2 sec. During this time there sounds a warning signal and the lamp<br />
(3) blinks in orange colour. The green lamp (5) flashes slowly and shows that the<br />
device is switched on and the battery is charged enough. If this lamp flashes fast the<br />
charge will soon come to an end.<br />
Now the laser can be started by shortly pressing the Push Button (4). The<br />
laser can be stopped soddenly by pressing this Push Button again during<br />
penetration.
� <strong>Compact</strong> - <strong>Laser</strong> Series <strong>CL</strong> <strong>plus</strong> Instructions for use<br />
� Place the laser perpendicular to the area to be irradiated ( see chapters 4.2 and<br />
4.3).<br />
The built-in timer will start immediately after pressing the start button. The<br />
Lamp (3) will lit yellow and shows that the laser power has the desired value. A<br />
short warning tone resounds. The Timer will automatically switch off the laser after<br />
the necessary therapy time, the yellow lamp extinguishes and again a short tone is<br />
audible.<br />
Shorter Treatment Times than choosed: press Push-Button during<br />
treatment and the laser will stop immediately.<br />
� At the end of every session the Rotary Switch 1 must be turned again into<br />
"Off" position.
� <strong>Compact</strong><br />
For your information only – it calculates automatically:<br />
Therapy time depending of the position of the switches (in minutes : seconds):<br />
(for blank cells, time is over 1 hour)<br />
60 mW- Model:<br />
- <strong>Laser</strong> Series <strong>CL</strong> <strong>plus</strong> Instructions for use<br />
Geriatrics<br />
Pain therapy<br />
new scars old scars<br />
Gynecology, Surgery<br />
Dermatology Sports, Physiotherapy<br />
Children, depending of age<br />
Dose (J/cm 2 ): � 0,5 1 2 3 4 5 6 8<br />
Acup. Child 5s 5s 5s 5s 5s 5s 5s 5s<br />
Power:<br />
25%<br />
Acup. Adult 15s 15s 15s 15s 15s 15s 15s 15s 50%<br />
1 cm 2<br />
2 cm 2<br />
5 cm 2<br />
100 mW- Model:<br />
8s 17s 33s 50s 1m:7s 1m:23s 1m:40s 2m:13s 100%<br />
17s 33s 1m:7s 1m:40s 2m:13s 2m:47s 3m:20s 4m:27s 100%<br />
42s 1m:23s 2m:47s 4m:10s 5m:33s 6:57s 8m:20s 11m:7s 100%<br />
10 cm 2 1m:23s 2m:47s 5m:33s 8m:20s 11m:7s 13m:53s 16m:40s 22m:13s 100%<br />
20 cm 2 2m:47s 5m:33s 11m:7s 16m:40s 22m:13s 27m:47s 33m:20s 44m:27s 100%<br />
30 cm 2 4m:10s 8m:20s 16m:40s 25min 33m:20s 41m:40s 50 min 100%<br />
50 cm 2 6m:57s 13m:53s 27m:47s 41m:40s 55m:33s 100%<br />
Geriatrics<br />
Pain therapy<br />
new scars old scars<br />
Gynecology, Surgery<br />
Dermatology Sports, Physiotherapy<br />
Children, depending of age<br />
Dose (J/cm 2 ): � 0,5 1 2 3 4 5 6 8<br />
Acup. Child 5s 5s 5s 5s 5s 5s 5s 5s<br />
Power:<br />
25%<br />
Acup. Adult 15s 15s 15s 15s 15s 15s 15s 15s 50%<br />
1 cm 2<br />
2 cm 2<br />
5 cm 2<br />
10 cm 2<br />
5s 10s 20s 30s 40s 50s 1min 1m:20s 100%<br />
10s 20s 40s 1min 1m:20s 1m:40s 2min 2m40s 100%<br />
25s 50s 1m:40s 2m:30s 3m:20s 4m:10s 5min 6m:40s 100%<br />
50s 1m:40s 3m:20s 5min 6m:40s 8m:20s 10min 13m:20s 100%<br />
20 cm 2 1m:40s 3m:20s 6m:40s 10min 13m:20s 16m:40s 20min 26m:40s 100%<br />
30 cm 2 2m:30s 5min 10min 15min 20min 25min 30min 40min 100%<br />
50 cm 2 4m:10s 8m:20s 16m:40s 25min 33m:20s 41m:40s 50min 100%<br />
For long treatments you can fix the laser into a tripod.
� <strong>Compact</strong><br />
Kind of operation of the indicator lamps:<br />
Buzzer:<br />
- <strong>Laser</strong> Series <strong>CL</strong> <strong>plus</strong> Instructions for use<br />
Back lamp green dark If the laser is turned off or if<br />
the battery is wholly empty<br />
green blinks If the device is turned on<br />
slowly and the battery is ok<br />
green blinks If the battery is charged<br />
fast poor<br />
Front lamp orange blinks During the safety delay of<br />
2 secounds<br />
yellow glows <strong>Laser</strong> is working and power<br />
is ok<br />
red blinks Power too low<br />
red glows Power was too high (<strong>Laser</strong><br />
switches off in this case) or<br />
temperature is still too high<br />
(<strong>Laser</strong> cannot be switched<br />
on)<br />
sounds<br />
� At startup of the laser,<br />
� At stopping (at the end of the penetration time);<br />
� If the output power is too high and the laser has switched off because of security.
� <strong>Compact</strong><br />
- <strong>Laser</strong> Series <strong>CL</strong> <strong>plus</strong> Instructions for use<br />
4.2 <strong>Laser</strong>-point and distance of irradiation<br />
D i re cti o n o f th e<br />
L a s e r B e a m<br />
The point of the <strong>Silberbauer</strong> - <strong>CL</strong>-<strong>plus</strong> <strong>Laser</strong> is made of stainless steel. It is<br />
created in the shape of a small tube that follows the cone. So it is easy to watch the<br />
point where the laser beam comes to the skin. Normally, nearly inaccessible points,<br />
like behind the ear are easily radiated with no problems.<br />
At the point there is a short light conductor. This light conductor serves<br />
among other things as mechanical protection for the heart of your therapy<br />
equipment, the laser diode. The impact point or the areas of operation are specified<br />
by this laser point. With all models the light emerges, whereby the size of points can<br />
be changed according to requirements through the choice of the distance from the<br />
skin.<br />
The irradiation distance can be selected at will! Therefore the laser is<br />
allowed to be set on the skin's surface. The skin can also be pressed in with smooth<br />
pressure by the laser-point, to reduce the distance between deeper-set areas<br />
needing to be irradiated (e.g. area of abdomen).<br />
Apart from this the laser-point is conductive and is connected with the socket<br />
at the rear end of the laser battery. The point-searcher PS3 can be connected to this<br />
socket with a connecting cable. Herewith the laser-point can be used at the same<br />
time as searching point-peak for acupuncture points.
� <strong>Compact</strong><br />
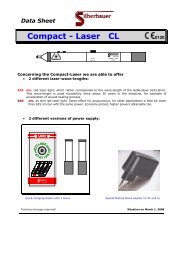
4.3 Irradiation Angle<br />
- <strong>Laser</strong> Series <strong>CL</strong> <strong>plus</strong> Instructions for use<br />
To obtain optimal success during treatment, the laser must be positioned<br />
perpendicular to the skin's surface.<br />
Low reflection, wide reflection,<br />
Optimal penetration depth lower penetration depth<br />
= optimal success = less success<br />
4.4 Use of the assessory<br />
If necessary put the bent light conductor or the power reducing tip onto the<br />
point until a limit is reached (see drawing):<br />
D i re cti o n o f th e<br />
L a s e r B e a m<br />
D i re cti o n to p u t o n<br />
Po w e r-re d u ci n g -ti p<br />
D i re cti o n o f th e<br />
L a s e r B e a m<br />
L i g h t Co n d u cto r,<br />
bent<br />
D i re cti o n o f th e<br />
L a s e r B e a m
� <strong>Compact</strong><br />
- <strong>Laser</strong> Series <strong>CL</strong> <strong>plus</strong> Instructions for use<br />
4.5 Location of Acupuncture points with the <strong>Compact</strong> – <strong>Laser</strong> <strong>plus</strong>:<br />
4.5.1 Preparation of the assembly<br />
As well as the <strong>Silberbauer</strong> <strong>Compact</strong> - <strong>Laser</strong> mini (without power reducing tip!)<br />
a <strong>Silberbauer</strong> Point Detector PS3 and a connection cable is required.<br />
Put one plug of the connecting cable into the rear socket of the laser. The<br />
other cable plug is required to be inserted into the golden socket of the <strong>Silberbauer</strong><br />
PS3 instead of the point-search-tip.<br />
The point finder <strong>Silberbauer</strong> Punktsucher PS 3 must now be handed over into<br />
the hand of the patient. The laser-tip can now serve now as a point finder.<br />
4.5.2 Acupuncture point detection on the body<br />
The <strong>Silberbauer</strong> Point Detector PS 3 indicates the electrical conductivity of the<br />
skin both optically (with higher or lower frequency of the installed light-diode) and<br />
acoustically (with a varying tone pitch). The latter can be heard by the doctor while<br />
focussing his eyes on the acupuncture point.<br />
Turn Rotary Switch 1 in position „Acup. Child“ or „Acup. Adult“. Set the laser<br />
point close to the acupuncture point which you want to seek, slightly diagonally onto<br />
the skins surface. The area assumed to be an acupuncture point is sought out; then<br />
search the area, where you suppose the acupuncture point is, without lifting the tip<br />
from the skin. The pressure of the tip should be light and consistent while<br />
searching.<br />
Continue the search in the direction of a higher tone or a quicker signal. The<br />
tone pitch reaches its maximum light and maximum pitch or frequency at the centre<br />
of the acupuncture point.<br />
The push-button must be pressed on the laser above the acupuncture point<br />
thus beginning the irradiation. The time of therapy programmed in the <strong>Silberbauer</strong><br />
<strong>Compact</strong>-<strong>Laser</strong> <strong>plus</strong> is optimised for this kind of application required in every model.
� <strong>Compact</strong> - <strong>Laser</strong> Series <strong>CL</strong> <strong>plus</strong> Instructions for use<br />
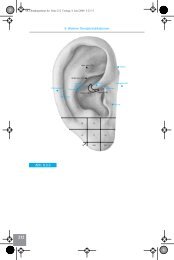
4.5.3 Detection of ear- and skull acupuncture points<br />
The acupuncture points at the cranial zone<br />
because of Yamamoto and at the ear are “silent“ -<br />
in contrast to acupuncture points for the rest of<br />
the body. This indicates that the electrical<br />
conductivity of the skin is very low there. However<br />
if a disturbance in the organism is projected to the<br />
reflexion zones, the electric conductivity of the<br />
skin changes at the relevant acupuncture points<br />
and zones. These points can be located like with<br />
the body’s acupuncture. Very high tones appear at<br />
points with strong disturbances which should be<br />
irradiated.<br />
4.6 Irradiation period and Absorption Doses<br />
Suggested references: e.g.:<br />
Baxter: Therapeutic <strong>Laser</strong>s – Theory and Practice<br />
Füchtenbusch/Bringmann: <strong>Laser</strong> Therapy and <strong>Laser</strong> Acupuncture, Treatment tables<br />
Tunér/Hode: <strong>Laser</strong> Therapy – Clinical Practice and Scientific Background<br />
Tunér/Hode: The <strong>Laser</strong> Therapy Handbook<br />
A large number of scientific papers, books, announcements of exhibitions and<br />
congresses about Soft <strong>Laser</strong>s you will find at www.laser.nu .<br />
4.6.1 Formule<br />
Energy = <strong>Laser</strong> power x irradiation period<br />
Irradiation dose = Energy /unit area<br />
4.6.2 Measuring units
� <strong>Compact</strong><br />
Energy: in Joules (J) = Watt-seconds (Ws)<br />
- <strong>Laser</strong> Series <strong>CL</strong> <strong>plus</strong> Instructions for use<br />
Power: in milli-watt (mW) 1 mW = 0,001 W<br />
Time: in seconds (s)<br />
Unit area: in cm²<br />
Irradiation-doses: in Joule / cm²<br />
4.6.3 Calculation of the correct dose<br />
Checking the area of a wound with the card:<br />
Place the card close to the wound. Seek a circle which has approximately the<br />
same area like the wound.<br />
Close to this circle you will find a number which shows the size of this area in<br />
cm² . Set the size switch at the laser in this position.<br />
4.7 Checking the output power of the laser<br />
The <strong>Silberbauer</strong> <strong>Compact</strong> - <strong>Laser</strong> <strong>plus</strong> has a mechanism for control of the laser<br />
output power:<br />
A yellow lamp which glows only if the laser works between 90% und 110% of ist<br />
nominal output power, and a red one which will blink 2x per secound if the power is<br />
too low, and which will glow permanently together with a 5 secound long warning
� <strong>Compact</strong><br />
tone if the power is too high. In this case the laser will switched off automatically<br />
and can be switched in after the Rotary Switch 1 is turned into ist off- position.<br />
- <strong>Laser</strong> Series <strong>CL</strong> <strong>plus</strong> Instructions for use<br />
4.8 Charge of the NiMH- Battery<br />
Attention! Don’t try to charge normal one use batteries!
� <strong>Compact</strong><br />
- <strong>Laser</strong> Series <strong>CL</strong> <strong>plus</strong> Instructions for use<br />
5 Possible dysfunctions of the laser<br />
Attention must be paid to the existing danger involved in meddling<br />
with a damaged instrument and being exposed to dangerous laserradiations!<br />
If the green lamp (5) doesn’t glow after switching in the laser:<br />
� Battery is totally empty; turn out battery cap, put out battery and replace it<br />
by a charged one; close battery cap.<br />
If the yellow lamp (3) diesn’t glow after pressing the start buttom, then<br />
release buttom and check:<br />
� are there several secounds since you switched in the device? ( it will last 2<br />
secounds delay time until the laser can be started)<br />
� is the green lamp (5) blinking?<br />
It is enough to charge the empty battery for several minutes to make a short<br />
treatment!<br />
If the lamp (3) blinks red, so the laser power is too low for any reason. If this lamp<br />
glows permanently, either the laser power was too high or the case was too hot; the<br />
device has made a security switchoff. You have to turn the rotary switch 1 (6) into<br />
ist off- position to resert the device. (Only after switching off respectively after<br />
cooling the device may be used again. If the red lamp glows again please bring<br />
or send the device to our service station!<br />
If the laser doesn’t work althouigh the battery is charged, so please<br />
do not use the device and do not make any further attempts, but bring or<br />
send the laser and the battery to our service station for checking!<br />
Fluid traces or small colorless or white crystals at the battery or at contacts indicate<br />
that a battery or a rechargeable battery has leaked and the contacts do not work. In<br />
this case, please send the device to the service for professional cleaning!
� <strong>Compact</strong><br />
- <strong>Laser</strong> Series <strong>CL</strong> <strong>plus</strong> Instructions for use<br />
6 Cleaning and maintenance<br />
To avoid any danger of infection, the laser point must be disinfected<br />
before and after each treatment (and the power-reducing-tip and the bent<br />
light conductor).<br />
The laser can be cleaned carefully with a cloth moistened with alcohol or<br />
surgical disinfection. No liquid should be allowed to enter the openings.<br />
The laser point itself can be cleaned with a pad or cloth moistened with<br />
alcohol.<br />
The drill of the “power-reducing-tip“ can be cleaned with a toothpick and<br />
thereafter be washed with alcohol. For this, the power-reducing-tip must be pulled<br />
out of the laser always.<br />
The "bent light conductor" can be cleaned like the laser top. The rear<br />
surface is well protected with a black hull made out of synthetic material. If this<br />
surface does get soiled the hull must be taken off. The lighting cable can then be<br />
proceeded to be cleaned, see laser-point. Ensuing which the hull must remain<br />
attached to the lighting cable again, in such a way that the lighting cable just<br />
touches the front-surface of the laser point after the hull is pulled up, whereby the<br />
hull has to loom until the end of the cylindrical area of the laser point.<br />
D i re cti o n to p u t o n<br />
L i g h t co n d u cto r, b e n t<br />
Cleaning of the <strong>Laser</strong> storage:<br />
D i re cti o n o f th e<br />
L a s e r B e a m<br />
As this storage is made from acrylic it must be cleaned with lukewarm water with<br />
some dishwashing or soap added. Take the best with a soft cloth or with the water<br />
sucked sponge.<br />
Regard! Do not use disinfectants, abrasive cleaners, glass cleaners or cleaners<br />
containing alcohol, because they attack the material! As a result, the formation of<br />
hairline cracks and breaks the clipboard!<br />
There is no additional maintainance necessary by the user.<br />
7 Waste management of laser and accessory<br />
For waste management please regard the valid legal regulations of each<br />
country/region!<br />
Disposal of the device: Not like household waste, but in the nearest<br />
receiving depot for disposal of electric devices!<br />
The batteries have to be brought to the next receiving depot for<br />
special waste disposal.
� <strong>Compact</strong> - <strong>Laser</strong> Series <strong>CL</strong> <strong>plus</strong> Instructions for use<br />
8 Warranty<br />
We will provide free replacement of all parts which are defective because of<br />
material failure or mistake in production or we will repair them.<br />
Guarantee:<br />
All recently manufactured <strong>Silberbauer</strong> products: 3 years<br />
All used products: 1 year.<br />
Excluded from the warranty are<br />
batteries, accumulators and<br />
damage by effect of mechanical force eg dropping or<br />
by too high or too long working- or storage- temperature and<br />
damage by inappropriate handling.<br />
Also excluded from warranty are all damages at any device or accessory<br />
caused by leaked batteries.<br />
After demounting of the device by non-authorized ones there is no more<br />
warranty!
� <strong>Compact</strong><br />
9 <strong>Laser</strong> inspection<br />
- <strong>Laser</strong> Series <strong>CL</strong> <strong>plus</strong> Instructions for use<br />
The <strong>CL</strong>-<strong>Laser</strong> mini must be inspected at regular intervals of<br />
2 years.<br />
The inspection will be made in Vienna by Labor <strong>Silberbauer</strong>. Please, send<br />
the <strong>Laser</strong> with all accessories and Instruments book!<br />
If you want to get a spare device during the time of inspection, pleasse contact us.<br />
9.1 Scope of inspection:<br />
1. Examination of controlling elements<br />
Due to danger of mechanical abrasion, the laser-button (4) must be checked and<br />
also the rotary switches (6+7).<br />
Scope of examination:<br />
a) Control of strokes of rotary switch: The switch must be turned to its intended<br />
positions. The blue lines at the top of the knobs must corrspond to the labeling.<br />
b) Procedure for monitoring function of the rotary switches (6+7) and laser-button<br />
(4):<br />
Turn the rotary switch (6) into its off position.<br />
Insert battery.<br />
Press the laser-button.<br />
No laser radiation has to emerge out of the instrument.<br />
Turn rotary switch (6) in position “Acup. Child“ and immediately press the<br />
laser-button (4) (within less then 2 secounds)<br />
No laser radiation has to emerge out of the instrument.<br />
Suddenly after you have turned the rotary switch into ist position the front<br />
lamp (3) must flash for 2 secounds in orange colour.<br />
Press button again after more than 2 secounds.<br />
The laser must work for 5 s (check this time), at the beginning and at the end<br />
of the time the warning signal must be audible.<br />
2. Examination of Output Power:<br />
Measuring Equipment required:<br />
Measuring device for the laser output with a large Si-photo-diode (at least 10<br />
x 10 mm) is well suited for the measurement of every monitoring phase of the laser<br />
output and the wave-length of the <strong>CL</strong> mini <strong>Laser</strong>.<br />
Specification:<br />
Measuring accuracy: +/- 5%<br />
Measuring Process: The output power is measured when the laser is turned on and<br />
the sensor is hold perpendicular to the laser beam.
� <strong>Compact</strong><br />
- <strong>Laser</strong> Series <strong>CL</strong> <strong>plus</strong> Instructions for use<br />
The output power should be: in position „Acup. Child“ 25% of the nominal output<br />
power, in Position „Acup. Adult“ 50% and in all other positions 100% of the nominal<br />
output power.<br />
Range of tolerance of the measured power: Nominal Power +/- 5%<br />
If the measured power is out of the mentioned range of tolerance, the laser must be<br />
calibrated or repaired.<br />
3. Checking the readability of all labels<br />
All labels must be perfectly readible!<br />
4. Checking of all accessories<br />
Inspection of all accessories by visual inspection for breaks or wear should be<br />
done. Also goggles for deep scratches which disturb the view.<br />
9.2 Inspection Certificate<br />
To confirm the accurate functioning of the instrument the owner will receive an<br />
inspection certificate including its measured power. The results are given in the<br />
instruction book.<br />
10 <strong>Laser</strong> dispatch<br />
The laser is delivered in its original packing, devoid of any defects by post as bulk goods.<br />
Pull the battery out of the laser during transport!<br />
Storage temperature must not exceed 50 °C (122 °F) !
� <strong>Compact</strong><br />
- <strong>Laser</strong> Series <strong>CL</strong> <strong>plus</strong> Instructions for use<br />
11 Warning advices and Label Information :<br />
For the <strong>Laser</strong> there are used different warning labels depending of the model:<br />
e.g. for the model <strong>CL</strong> <strong>plus</strong> 100 - 658:<br />
Caution! <strong>Laser</strong> radiation!<br />
Application part type BF<br />
All other models have the same warning<br />
labels with other values for power and<br />
wavelength.<br />
Disposal of the device: Not like<br />
household waste, but in the nearest depot for<br />
disposal of electric devices!<br />
The batteries have to be brought to the<br />
nearest depot for special waste disposal.<br />
Year of manufacturing: coded at the end of the serial number:<br />
letter A for 2001, B for 2002, etc.<br />
! Attention! The attached documents are to be noted!<br />
The manufacturer is only considered responsible to bearing on security, reliability and<br />
capacity of the instrument, when<br />
A. changes or repairs are made by personnel authorized by him,<br />
B. the electrical installation of the room is according to the regulations of ÖVE-EN 7,<br />
C. the instrument is used in accordance with the directions of use.<br />
The instrument must not to be used with volatile gases or fumes during narcosis. This<br />
could cause sparks in the button or at the contacts. Apart from normal valid regulations the<br />
“Instructions to avoid explosive dangers in operational equipment“of BM for social<br />
administration Zl. V-88015-17 are to be considered in the advisory statement made by the<br />
medical experts from 03.02.1968 and ÖVE-EN 7 regarding the use of the instrument in an<br />
atmosphere enriched with oxygen.
� <strong>Compact</strong> - <strong>Laser</strong> Series <strong>CL</strong> <strong>plus</strong> Instructions for use<br />
12 Technical Data:<br />
<strong>Laser</strong> device, Series <strong>Compact</strong> - <strong>Laser</strong> <strong>CL</strong> <strong>plus</strong> xx - xxx :<br />
Manufacturer and distributor: Prof. Dipl.Ing. Gerhard <strong>Silberbauer</strong><br />
Medizinische und physikalische Elektronik<br />
Hießgasse 15, 1030 Wien, Österreich<br />
Intended use: for laser radiation of skin, mucosa and dental applications<br />
Accessory: see page 0<br />
Internal power source: Alkali-Mangan- battery or NiMH- battery, Size AA = LR 6<br />
Classification: -protection level against electr. shock: Internal el. Power source<br />
0120<br />
Part of application type BF<br />
-protection level against harmful water invasion: Common device<br />
-protection level during application together with explosive mixtures of<br />
anaesthesias with air or with oxygen or laughing-gas:<br />
Instrument is not to be used in an explosive atmosphere or with explosive mixtures<br />
from anaesthesias with oxygen or laughing-gas!<br />
-Kind of operation: Permanent operation<br />
-due to EC – directive 93 / 42 / EWG: II A<br />
- <strong>Laser</strong> class: je 2 M oder 3B<br />
Divergence of beam: 0,33 rad +/- 10%<br />
Therapy time: depending of position of rotary switches and model<br />
automatically, +/-2%<br />
Battery current: max. 1 A<br />
Weight: without / with battery: 145 g / 173 g<br />
Dimensions: 20 x 220 mm (D x L)<br />
Model: <strong>CL</strong> <strong>plus</strong> 60-658 <strong>CL</strong> <strong>plus</strong> 100-658<br />
Nominal laser power +/-10% (mW): 60 100<br />
Wavelength (nm): 658 658<br />
Beam diameter at output (mm): 3,2 3,2<br />
Admitted case temperature (operation):<br />
10 bis 45 o C 10 bis 45 o C<br />
<strong>Laser</strong> class: 2M 2M<br />
Operating time with Alkali-Mangan-Batt. (hours): 3,5 2,5<br />
Operating time with 2050 mAh- NiMH-Batt. (hours): 5,5 4,5<br />
Mdell: <strong>CL</strong> <strong>plus</strong> 100-78<br />
Nennleistung +/-10% (mW): 100<br />
Wellenlänge (nm): 788<br />
Strahlenaustrittsdurchmesser(mm) 6,2<br />
Zulässige Gehäusetemperatur (Betrieb):<br />
10 bis 45 o C<br />
<strong>Laser</strong>klasse 3B<br />
Therapiezeit mit Alkali-Mangan-Batt. (Stunden): 2,5<br />
Therapiezeit mit 2050 mAh- NiMH-Akku (Stunden): 4,5<br />
Interval for periodical inspection: 2 years<br />
Rights for technical changes reserved! <strong>CL</strong>_<strong>plus</strong>_BED2_e.doc
� <strong>Compact</strong><br />
- <strong>Laser</strong> Series <strong>CL</strong> <strong>plus</strong> Instructions for use
� <strong>Compact</strong> - <strong>Laser</strong> Series <strong>CL</strong> <strong>plus</strong> Instructions for use<br />
Calibration - Certificate<br />
Device: <strong>Compact</strong> - <strong>Laser</strong><br />
Model: <strong>CL</strong> <strong>plus</strong> ................<br />
Serial number: ……………………………………..<br />
It is hereby confirmed that the instrument mentioned<br />
above, has been examined and calibrated at its time of<br />
manufacturing.<br />
Measured output-capacity: _ _ , _ mW<br />
The date of examination of the output power of the laser<br />
is planned at intervals of 2 years.<br />
The test badge on the instrument serves as a reminder of<br />
this test.<br />
Vienna................ _______________________<br />
Technical examiner