Compact - Laser CL plus - Silberbauer
Compact - Laser CL plus - Silberbauer
Compact - Laser CL plus - Silberbauer

Create successful ePaper yourself
Turn your PDF publications into a flip-book with our unique Google optimized e-Paper software.
� <strong>Compact</strong><br />
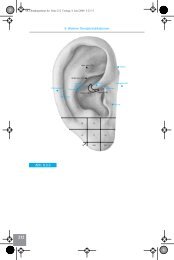
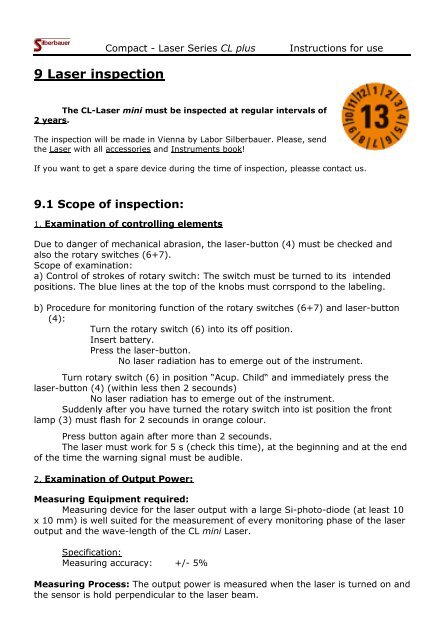
9 <strong>Laser</strong> inspection<br />
- <strong>Laser</strong> Series <strong>CL</strong> <strong>plus</strong> Instructions for use<br />
The <strong>CL</strong>-<strong>Laser</strong> mini must be inspected at regular intervals of<br />
2 years.<br />
The inspection will be made in Vienna by Labor <strong>Silberbauer</strong>. Please, send<br />
the <strong>Laser</strong> with all accessories and Instruments book!<br />
If you want to get a spare device during the time of inspection, pleasse contact us.<br />
9.1 Scope of inspection:<br />
1. Examination of controlling elements<br />
Due to danger of mechanical abrasion, the laser-button (4) must be checked and<br />
also the rotary switches (6+7).<br />
Scope of examination:<br />
a) Control of strokes of rotary switch: The switch must be turned to its intended<br />
positions. The blue lines at the top of the knobs must corrspond to the labeling.<br />
b) Procedure for monitoring function of the rotary switches (6+7) and laser-button<br />
(4):<br />
Turn the rotary switch (6) into its off position.<br />
Insert battery.<br />
Press the laser-button.<br />
No laser radiation has to emerge out of the instrument.<br />
Turn rotary switch (6) in position “Acup. Child“ and immediately press the<br />
laser-button (4) (within less then 2 secounds)<br />
No laser radiation has to emerge out of the instrument.<br />
Suddenly after you have turned the rotary switch into ist position the front<br />
lamp (3) must flash for 2 secounds in orange colour.<br />
Press button again after more than 2 secounds.<br />
The laser must work for 5 s (check this time), at the beginning and at the end<br />
of the time the warning signal must be audible.<br />
2. Examination of Output Power:<br />
Measuring Equipment required:<br />
Measuring device for the laser output with a large Si-photo-diode (at least 10<br />
x 10 mm) is well suited for the measurement of every monitoring phase of the laser<br />
output and the wave-length of the <strong>CL</strong> mini <strong>Laser</strong>.<br />
Specification:<br />
Measuring accuracy: +/- 5%<br />
Measuring Process: The output power is measured when the laser is turned on and<br />
the sensor is hold perpendicular to the laser beam.