CARE INSTRUCTIONS - JACK WOLFSKIN
CARE INSTRUCTIONS - JACK WOLFSKIN
CARE INSTRUCTIONS - JACK WOLFSKIN

Create successful ePaper yourself
Turn your PDF publications into a flip-book with our unique Google optimized e-Paper software.
<strong>CARE</strong> ANd TREATMENT OF SLEEPINg bAgS (dOWN OR SyNThETIC FIbRES) <strong>CARE</strong> ANd TREATMENT OF ThERMAL MATS<br />
General:<br />
You should turn your sleeping bag in-<br />
side out every morning and air it well.<br />
If a sleeping bag is still damp, it should<br />
never be left packed into the carrying<br />
pouch for longer than the following<br />
day.<br />
When packing your sleeping bag into<br />
the carrying pouch supplied, push it<br />
in feet end first. This is easier for you<br />
and less damaging for the sleeping<br />
bag filler material.<br />
Protection against soiling:<br />
The less often you have to wash your<br />
sleeping bag the better. We strongly<br />
recommend the use of a liner (thin<br />
inner sleeping bag) made from cotton<br />
or silk to protect the sleeping bag from<br />
dirt or sweat inside. A liner is easy to<br />
care for and can also be washed out<br />
quickly when you are travelling. Additionally,<br />
a liner will improve the thermal<br />
insulation of the sleeping bag<br />
slightly and means that the sleeping<br />
bag does not need to be washed as<br />
often.<br />
Storage:<br />
Never store your sleeping bag squash ed<br />
into the carrying bag for any length<br />
of time; instead, fold it loosely or hang<br />
it on a coat hanger. A large, air-perme<br />
able bag is also ideal. Store your<br />
sleeping bag in a dry room.<br />
Cleaning:<br />
Small surface marks can be removed<br />
with a damp cloth. After about 40 - 50<br />
nights, or more if you use a liner, you<br />
will need to clean the sleeping bag<br />
thoroughly. The best way to do this is<br />
by washing it by hand or in your own<br />
washing machine.<br />
Please read the care instructions for<br />
the product before washing and drying.<br />
With its UNIVERSAL CLEANER PLUS<br />
(synthetic fibres) and DOWN CLEANER<br />
(down) products, <strong>JACK</strong> <strong>WOLFSKIN</strong> offers<br />
the ideal washing detergent for<br />
products filled with down or synthetic<br />
fibres because all insulating fillings are<br />
delicate. Using the incorrect detergent<br />
(including standard liquid or wool detergent)<br />
can ruin the loft of the insulation<br />
and render a down product unusable.<br />
Hand washing:<br />
The most gentle way of washing is to<br />
wash the sleeping bag in the bathtub.<br />
Soak the sleeping bag in lukewarm<br />
water (approx. 30 °C) and UNIVERSAL<br />
CLEANER PLUS or DOWN CLEANER<br />
(two capfuls). Do not wring out or<br />
scrub. With severe soiling, repeat the<br />
wash with fresh de tergent. Then rinse<br />
the sleeping bag thor oughly several<br />
times in lukewarm water and carefully<br />
press out the water.<br />
Machine washing:<br />
The machine must have a large drum<br />
with a capacity of at least 8 kg or preferably<br />
12 kg into which the sleeping<br />
bag will fit without being squashed.<br />
Launderettes offer the ideal opportunities.<br />
Close all zips and Velcro fastenings<br />
and remove all residue from<br />
the detergent slot in the washing machine.<br />
Add UNIVERSAL CLEANER PLUS<br />
or DOWN CLEANER (two capfuls) to<br />
the detergent slot. Do not use fabric<br />
conditioner. Wash on a gentle or wool<br />
wash at 30 °C. Then rinse the sleeping<br />
bag thoroughly twice or three times<br />
and spin very briefly at a low spin<br />
speed.<br />
If you have a down sleeping bag, you<br />
should add a few clean tennis balls<br />
to the load so that the down stays in<br />
constant motion.<br />
Hand washing offers a gentler and thus<br />
better option for down sleeping bags.<br />
Drying:<br />
Carefully lift the sleeping bag from the<br />
bathtub or washing machine. It will<br />
weigh much more when wet than<br />
when dry and the weight may cause<br />
seams to rip if not treated with care.<br />
Sleeping bags take between two and<br />
four hours to dry in the tumble dryer.<br />
It must fit in the drum without being<br />
compressed (drum size of at least 180 l).<br />
Select a medium setting for the dryer,<br />
max. 40 °C. Adding five to six clean<br />
tennis balls to the dryer has the same<br />
effect as shaking the sleeping bag<br />
thoroughly (every ten minutes).<br />
We recommend air-drying for down<br />
sleeping bags, which takes around two<br />
to three days. The best method is to<br />
support the sleeping bag over several<br />
washing lines or lay it down flat on<br />
the floor.<br />
In order to break up clumps of down<br />
and distribute it evenly among the<br />
chambers inside, you must compress<br />
the down every hour during the drying<br />
process and shake the sleeping bag<br />
well two or three times per day. Your<br />
down product is only dry once you<br />
can no longer feel any clumps inside.<br />
General:<br />
Do not expose the mat to extreme heat<br />
(e.g. in a heated car) or open fire; do<br />
not use it as a base for cutting work;<br />
when using the mat in the open air,<br />
look out for thorns and other sharp<br />
or pointed objects, and protect the<br />
mat with a groundsheet. This mat is not<br />
suitable for use in water or as a sledge<br />
in winter. When travelling, always use<br />
the carrying pouch provided.<br />
Blowing up:<br />
Inside, a thermal mat has an open-cell<br />
foamed material core. When the valve<br />
on the mat is opened, the foam core<br />
expands and the mat draws in air. If<br />
the valve is then closed, the air is enclosed<br />
in the mat. You can regulate<br />
the hardness of the mat by blowing it<br />
up more.<br />
The first time you use the mat, or if<br />
it has been left rolled up for some<br />
time, it may be necessary to blow up<br />
the mat by blowing into it. If the<br />
weath er is particularly cold, body heat<br />
can speed up the filling process.<br />
If the mat is used at extremely low<br />
temperatures for any length of time<br />
(use on expeditions), it should not be<br />
blown up using the mouth, since the<br />
moisture introduced in this way can<br />
freeze in the mat.<br />
Packing:<br />
Open the valve, roll up the mat tightly<br />
from the end away from the valve and<br />
then close the valve.<br />
If you wish the packed mat to be particularly<br />
small, spread the mat out<br />
again, roll it up again and briefly let<br />
out the remaining air, using the valve.<br />
You can also fold the mat lengthways<br />
and then roll it up to reduce the<br />
pack ed dimensions even further. Use<br />
the carrying pouch provided.<br />
Storage:<br />
Keep your thermal mat, blown up or<br />
with the valve open, in a dry place, e.g.<br />
behind a cupboard or under the bed,<br />
because the foam core loses its capac ity<br />
to expand if it is kept compressed for<br />
too long.<br />
Cleaning:<br />
You can clean your mat, with the valve<br />
closed, using plain water and a soft<br />
sponge/brush/cloth. Afterwards, rinse<br />
well and leave to dry. If the mat stays<br />
damp for too long, mould can destroy<br />
the coating.<br />
Repairs:<br />
Your thermal mat can be patched up<br />
easily with the repair set provided.<br />
If the mat is leaking, you can find the<br />
leak by blowing up the mat as far as<br />
possible and then holding it under<br />
wa ter. You will see air bubbles at the<br />
point where the leak is. Mark the<br />
place, dry the mat, empty it as described<br />
and close the valve.<br />
Holes are repaired in the same way as<br />
a bicycle inner tube. With small punctures,<br />
apply one or two drops of adhesive<br />
onto the leak. Leave to dry for<br />
at least 60 minutes before using the<br />
mat.<br />
With larger leaks, apply the adhesive<br />
thinly in circular movements to the dry,<br />
clean surface, which you may need to<br />
roughen slightly. Apply adhesive thinly<br />
to the back of the patch too. Do not<br />
touch the adhesive when wet!<br />
After the adhesive has dried (about<br />
2 - 3 minutes), place the patch on the<br />
mat and smooth gently into place from<br />
the centre outwards. Smooth out any<br />
bubbles or folds. Then press firmly and<br />
leave to dry for at least 60 minutes (or<br />
120 minutes for tears longer than<br />
1 cm), or preferably 24 hours. If the<br />
weather is damp or the temperature<br />
is below 5 °C, extend the drying times<br />
by 50 %.<br />
<strong>CARE</strong> <strong>INSTRUCTIONS</strong><br />
FOR<br />
APPAREL<br />
FOOTWEAR<br />
EQUIPMENT<br />
www.jack-wolfskin.com
General:<br />
Please make sure you follow the instructions<br />
and note the care symbols<br />
sewn in by the manufacturers. If any<br />
symbols are unclear, simply go to FAQ/<br />
APPAREL at www.jack-wolfskin.com.<br />
Cleaning:<br />
Please use a mild detergent or a mild<br />
detergent specially designed for sports<br />
clothing. We recommend using a special<br />
detergent for functional outdoor<br />
clothing which does not leave any residues<br />
behind such as UNIVERSAL CLEAN-<br />
ER PLUS, APPAREL CLEAN & PROOF<br />
and UNIVERSAL DOWN CLEANER (<strong>JACK</strong><br />
<strong>WOLFSKIN</strong>).<br />
Remember: It‘s better to wash often<br />
with a little detergent than occasionally<br />
with lots of detergent. We recommend<br />
machine washing. Close all<br />
zips and Velcro fastenings and select<br />
the delicate cycle.<br />
Do not use standard stain removers to<br />
remove stains, since this will impair the<br />
function of the material.<br />
You may choose to treat exceptionally<br />
dirty areas such as the collar, sleeves or<br />
pockets with a soft brush and gall soap<br />
before washing.<br />
For stubborn stains, we recommend that<br />
you consult only dry cleaners who are<br />
obviously experienced and experts in<br />
the field of functional textiles.<br />
In general, we do not recommend having<br />
garments dry cleaned.<br />
Afterwards, the garment should be<br />
thor oughly rinsed again.<br />
Important: Do not use fabric softeners<br />
under any circumstances. Caution! Some<br />
General:<br />
Please read the care instructions for<br />
the product before washing and drying.<br />
The DOWN CLEANER by <strong>JACK</strong> <strong>WOLFSKIN</strong><br />
offers the ideal washing detergent for<br />
products filled with down because<br />
down, as an insulating filling, is extreme<br />
ly delicate. Using the incorrect<br />
detergent (including standard liquid<br />
or wool detergent) can ruin the loft of<br />
the insulation and render a down<br />
product unusable.<br />
Machine washing:<br />
The machine must contain a large drum<br />
with a capacity of at least 7 kg and hold<br />
the down product without compressing<br />
it. Launderettes offer the ideal opportunities.<br />
Close all zips and Velcro fasten-<br />
<strong>CARE</strong> OF WATERPROOF, bREAThAbLE APPAREL<br />
<strong>CARE</strong> OF dOWN APPAREL<br />
liquid detergents also contain softeners.<br />
Waterproofing:<br />
By waterproofing the outer fabric you<br />
can improve the water and dirt-repellent<br />
properties of your apparel. If moisture<br />
can roll off, this improves the<br />
breathability of the fabric in addition to<br />
making the garment more comfort able<br />
to wear. Suitable waterproofing pro ducts<br />
(APPAREL RESTORER, APPAR EL<br />
WATERPROOF WASH IN, APPAREL<br />
CLEAN & PROOF) are available from your<br />
<strong>JACK</strong> <strong>WOLFSKIN</strong> STORE.<br />
A similar effect can be achieved by drying<br />
the garment in a tumble dryer or<br />
ironing (without steam) on a low heat.<br />
The heat reactivates the existing waterproofing.<br />
Make sure you follow the care<br />
instructions on the sewn-in label.<br />
The best effect is achieved through a<br />
combination of waterproofing and heat<br />
treatment: Apply the waterproofing to<br />
the garment whilst still damp after washing.<br />
Leave to dry naturally, and then activate<br />
the waterproofing in the dryer<br />
or by ironing (on the lowest temperature<br />
setting in each case).<br />
Repairs:<br />
An expert repair which is practically invisible<br />
using the original materials can<br />
only be carried out by our Repairs Department.<br />
In such cases, please contact<br />
your <strong>JACK</strong> <strong>WOLFSKIN</strong> STORE.<br />
Important: Items of clothing that are<br />
to be repaired or returned with a complaint<br />
must always be freshly washed<br />
first. Thank you.<br />
ings and remove all residue from the<br />
detergent slot in the washing machine.<br />
Add DOWN CLEANER (one capful) to<br />
the detergent slot. Do not use fabric<br />
conditioner. Select the delicate or wool<br />
cycle at 30 °C and, if possible, an addi<br />
tional rinse cycle. Reduce the spin speed.<br />
We recommend adding a few clean<br />
tennis balls to the load so that the<br />
down stays in constant motion.<br />
Drying:<br />
Carefully take out the down product<br />
from the washing machine. It will weigh<br />
much more when wet than when dry<br />
and the weight may cause seams to rip<br />
if not treated with care.<br />
It should take between two and four<br />
hours to dry in a tumble dryer. It must<br />
fit in the drum without being compressed<br />
and the drum capacity should<br />
be at least 7 kg. Select a medium setting<br />
for the dryer (regular cycle), max.<br />
40 °C. Do not use the cotton cycle. The<br />
clothing should be fluffed by hand and<br />
shaken regularly/several times throughout<br />
the drying process. Clumps of down<br />
General:<br />
During wear, the moisture produced by<br />
the foot is an extremely important factor.<br />
All shoes whether lined with leath<br />
er or synthetic fabric, should be well<br />
aired each evening so that any moisture<br />
that has been absorbed can escape.<br />
To do this, open shoes wide, remove<br />
insole and air separately.<br />
There are three aims behind caring for<br />
your footwear:<br />
1. The materials from which our waterproof<br />
shoes are made are coated with<br />
a water-repellent finish. This coating<br />
becomes less effective over time and<br />
has to be renewed.<br />
2. Modern shoes are permeable to wa ter<br />
vapour in order to keep feet well aired.<br />
This function has to be maintain ed,<br />
too.<br />
3. Shoes are made mainly from leather<br />
that regularly needs “feeding” so that<br />
it lasts a long time and stays in shape.<br />
Shoes last longer if they are properly<br />
cared for.<br />
How to care for your shoes properly:<br />
Preparation: Remove the insole so that<br />
it can dry and be aired. If you intend to<br />
wax your boots, remove the laces too.<br />
Basic mechanical cleaning: Loosen and remove<br />
large areas of dirt using a brush<br />
and water; remove dirt and stones from<br />
shoes.<br />
Hygiene: You can also clean your shoes<br />
inside with luke-warm water and a brush.<br />
If linings do not contain TEXAPORE,<br />
you can use curd soap; with linings con-<br />
When travelling:<br />
Packing bags properly makes them<br />
eas i er to carry: Heavy objects should<br />
be placed in the upper section of the<br />
rucksack, as close to your back as possible.<br />
Only in alpine terrain is it better<br />
to position the centre of gravity lower<br />
down.<br />
Although the rucksack materials are<br />
coat ed, moisture may penetrate<br />
<strong>CARE</strong> OF WALkINg ANd MOUNTAIN bOOTS<br />
<strong>CARE</strong> ANd TREATMENT OF RUCkSACkS ANd bAgS<br />
must be shaken free and distributed<br />
evenly among the cham bers inside.<br />
Adding three to four clean tennis balls<br />
to the dryer has the same effect as<br />
shaking the clothing thoroughly. Your<br />
down product is only dry once you can<br />
no longer feel any clumps inside.<br />
taining TEXAPORE, just use water. The<br />
footbed can be washed with lukewarm<br />
water and soap.<br />
Drying: Never dry shoes in direct sunlight<br />
or on heat sources such as radiators<br />
or stoves. Wet leather is very sensitive<br />
to heat and easily “burns” (i.e.<br />
it becomes brittle, hard and likely to<br />
crack). Shoes with a wet lining can be<br />
stuffed with newspaper. Wooden shoe<br />
trees will help dry shoes to keep their<br />
shape.<br />
Care: Shoes should be completely dry before<br />
waterproofing. All shoe ma te rials<br />
can be waterproofed using FOOT WEAR<br />
PROTECTOR PLUS (<strong>JACK</strong> <strong>WOLFSKIN</strong>).<br />
Leather shoes must be cared for regularly:<br />
The FOOTWEAR PASTE WAX (<strong>JACK</strong><br />
<strong>WOLFSKIN</strong>) penetrates deep into leath<br />
er to effectively treat and weatherproof<br />
smooth leather and high-gloss,<br />
non-brushed, full-grain leather.<br />
Hooks and eyes should be protected<br />
a gainst corrosion with a coating of wax.<br />
Soles: Silicone residues from the waterproofing<br />
product can cause the soles of<br />
newly purchased shoes to be slippery.<br />
Roughen the soles up a little (e.g. with<br />
sandpaper, or on gravel or asphalt). Good<br />
rubber becomes hard on the surface<br />
after a while, so you should repeat this<br />
procedure occasionally.<br />
Important: If ever you need to return<br />
your shoes to the <strong>JACK</strong> <strong>WOLFSKIN</strong> STORE<br />
for repair or due to a complaint, please<br />
clean them thoroughly first. Thank you.<br />
through seams or zips. If rain persists,<br />
you should use a rucksack protector or<br />
water proof inner bag.<br />
If your rucksack suddenly starts to feel<br />
uncomfortable as you carry it, it may<br />
be that the aluminium struts of the<br />
inner frame are bent (e.g. after transport<br />
in aeroplanes). Empty the rucksack,<br />
pull the struts out of their pockets<br />
and bend them back into shape to<br />
follow the line of your spine (e.g.<br />
across your knee or using the edge of<br />
a table).<br />
Cleaning:<br />
Clean the fabric of your rucksack/bag<br />
using a soft sponge and UNIVERSAL<br />
CLEANER PLUS (<strong>JACK</strong> <strong>WOLFSKIN</strong>) or a<br />
mild soap solution. Do not use stain removers<br />
(they will damage the finish!)<br />
and never wash your item of luggage<br />
in a washing machine.<br />
It is very important to leave the rucksack<br />
to dry thoroughly and completely<br />
after cleaning before packing it away<br />
and storing it, as mould and mildew<br />
could otherwise occur.<br />
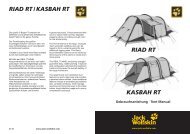
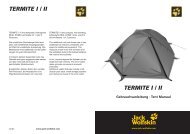
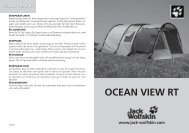
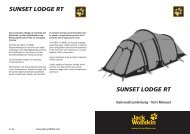
General:<br />
Always use a ground sheet to protect<br />
the base of your tent from damage.<br />
A shadowy position protects the tent<br />
material from UV rays which are the<br />
most significant wear factor for all<br />
tent fabrics.<br />
Follow the steps in the instructions<br />
for erecting the tent and always brace<br />
your tent as firmly as possible. It will<br />
then be more stable and quieter in<br />
the wind.<br />
Your tent should always be dry when<br />
packed away. If this is not possible because<br />
of the weather or due to time<br />
factors, dry it off as soon as possible.<br />
Storage:<br />
Make sure your tent is dry when you<br />
store it. Mould and mildew can only<br />
be avoided if the tent and the packing<br />
bag are completely dry; even a<br />
small amount of moisture can have a<br />
disastrous effect.<br />
Cleaning:<br />
Remove dirt with a soft sponge and<br />
a lukewarm mild soap solution (UNI-<br />
VERSAL CLEANER PLUS). Never wash<br />
your tent in the washing machine or<br />
have it dry cleaned, and never use aggressive<br />
stain removers. This can ruin<br />
the coating on the tent.<br />
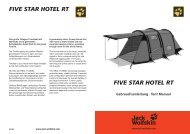
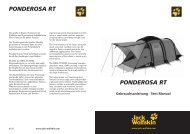
<strong>CARE</strong> ANd TREATMENT OF TENTS ANd TARPS<br />
The roller bearings in the rollers of<br />
your TRAVEL EQUIPMENT will benefit<br />
from a drop of oil now and again to<br />
help them run freely.<br />
Repair:<br />
If any of the straps that are part of<br />
your rucksack‘s carrying system tear<br />
off, tension belts can be used to repair<br />
the join. Take replacement buckles<br />
with you that can be attached to the<br />
belts without sewing.<br />
Fabric tape can be used to repair tears<br />
in the rucksack.<br />
Zips can be closed again reliably if the<br />
slide is gently pulled together with<br />
pliers.<br />
Repairs:<br />
Check zips regularly to see that they<br />
are still working properly.<br />
Zips that are difficult to move can be<br />
loosened with a silicone spray.<br />
Zips can be closed again reliably if<br />
the slide is gently pulled together<br />
with pliers.<br />
Broken poles can be “splinted” using<br />
repair sleeves whilst you are on the<br />
road. Broken tent poles can be replaced<br />
at <strong>JACK</strong> <strong>WOLFSKIN</strong> STORES.<br />
Before storing the tent, check all<br />
seams and their seals for leak-tightness.<br />
You may need to treat these<br />
with a seam sealer; please use the<br />
right one for the type of tent material<br />
(the right sealing product for sili cone<br />
or PU coating).<br />
To treat your tent, it must be fully<br />
erected; when you have applied the<br />
paste, leave it to dry for about 10<br />
hours (follow the instructions for use).<br />
You can sew up tears in the fabric, or<br />
stick them together using fabric tape<br />
on the inside and outside. In the out er<br />
tent, seams must then be sealed with<br />
seam sealer. If you use self-adhesive<br />
repair kits, you should also seal the<br />
edges with seam sealer.<br />
If, after long periods of use, one or<br />
two of the seam tapes become loose,<br />
remove the loose part with scissors<br />
and replace it with seam sealer.<br />
1011