Instruction Manual and Maintenance Tips for your dwt ... - dwt-Zelte
Instruction Manual and Maintenance Tips for your dwt ... - dwt-Zelte
Instruction Manual and Maintenance Tips for your dwt ... - dwt-Zelte

Create successful ePaper yourself
Turn your PDF publications into a flip-book with our unique Google optimized e-Paper software.
050139_<strong>dwt</strong>_Au bau_GB 10.10.2005 08:50 Uhr Seite 1<br />
GB<br />
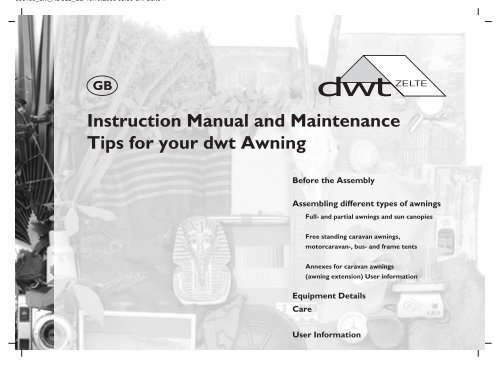
<strong>Instruction</strong> <strong>Manual</strong> <strong>and</strong> <strong>Maintenance</strong><br />
<strong>Tips</strong> <strong>for</strong> <strong>your</strong> <strong>dwt</strong> Awning<br />
Be<strong>for</strong>e the Assembly<br />
Assembling different types of awnings<br />
Full- <strong>and</strong> partial awnings <strong>and</strong> sun canopies<br />
Free st<strong>and</strong>ing caravan awnings,<br />
motorcaravan-, bus- <strong>and</strong> frame tents<br />
Annexes <strong>for</strong> caravan awnings<br />
(awning extension) User in<strong>for</strong>mation<br />
Equipment Details<br />
Care<br />
User In<strong>for</strong>mation
050139_<strong>dwt</strong>_Au bau_GB 10.10.2005 08:50 Uhr Seite 2<br />
Dear <strong>dwt</strong>-customer,<br />
thank you <strong>for</strong> <strong>your</strong> trust!<br />
This leaflet explains step by step the assembly of <strong>your</strong> awning <strong>and</strong> offers important care tips to maintain its quality. Please keep it in a safe place!<br />
Competent specialist production <strong>and</strong> quality control staff, together with the selected materials, of which some are especially made <strong>for</strong> <strong>dwt</strong>, guarantee<br />
a constant high quality. If you follow our advice, you can enjoy <strong>your</strong> <strong>dwt</strong> awning <strong>for</strong> many years.<br />
We would like to wish you many relaxing <strong>and</strong> exciting holidays with <strong>your</strong> new awning!<br />
Please make sure that you have ordered the right size<br />
awning!<br />
When ordering an awning or sun canopy, you must check<br />
the awning size of <strong>your</strong> caravan. Compare <strong>your</strong> awning<br />
size with the sizes stated in the prospect <strong>and</strong> compare<br />
with the size of the delivered awning.<br />
Important note!<br />
Please keep the invoice, guarantee- <strong>and</strong> service card, pole<br />
plan <strong>and</strong> this instruction manual in a safe place.<br />
These documents identify <strong>your</strong> awning <strong>and</strong> are needed<br />
<strong>for</strong> inquiries, ordering spare parts or changes.
050139_<strong>dwt</strong>_Au bau_GB 10.10.2005 08:50 Uhr Seite 3<br />
Be<strong>for</strong>e the Assembly<br />
Good planning is half the battle!<br />
Please read the instruction manual thoroughly <strong>and</strong> check that all accessories<br />
are there.<br />
� The delivered accessories are designed <strong>for</strong> normal weather conditions.<br />
In the case of storm, heavy rain, hail or snow you should use extra<br />
poles <strong>and</strong> additional guide lines. For some types of ground you may<br />
also need special fixing materials like special pegs, ground nails or lines.<br />
Please ask <strong>your</strong> specialist supplier, he will be happy to give you advice!<br />
With the right tools it works!<br />
Screw driver to fasten the wall-eyelets to the caravan<br />
Sealing material <strong>for</strong> the eyelet drilling holes<br />
Rubber hammer <strong>for</strong> the pegs<br />
S<strong>and</strong> paper <strong>for</strong> smoothing the edge of the piping profile<br />
Piping brush to clean the edge of the piping profile<br />
Small ladder/stool makes it easier to put the awning on / stretching<br />
the roof<br />
Small range of tools (pliers etc.)<br />
Tape measure or measuring stick<br />
Trying is better than studying!<br />
Be<strong>for</strong>e you take the first trip with <strong>your</strong> new awning, we would strongly<br />
advice that you conduct a trial assembly, so you can get to know the<br />
technical details <strong>and</strong> accessories.<br />
This is how you measure correctly:<br />
Use a tight cable or string (non flexible!) <strong>and</strong> make sure that <strong>your</strong> caravan<br />
is on a horizontal surface.<br />
� When you use a raised awning floor <strong>and</strong> the caravan is on the level of<br />
the awning floor, you must measure – as described overleaf – from<br />
the top side of the awning floor surface.<br />
If the caravan is lower than the upper surface of the awning floor, you<br />
must measure from the ground.<br />
Here <strong>your</strong> awning is in the right place!<br />
A flat surface, free of stones <strong>and</strong> sharp objects is ideal. Avoid resin secreting<br />
or flowering trees – this may damage the awning material. Position the<br />
entrance on the off weather side <strong>and</strong> protect <strong>your</strong> awning from dirt on wet<br />
ground by using a floor underlay (tarpaulin).<br />
MEIN ZELT ! 2–3<br />
GB
050139_<strong>dwt</strong>_Au bau_GB 10.10.2005 08:50 Uhr Seite 4<br />
Complete Awnings <strong>and</strong> Sun Canopies<br />
Determine the awning size<br />
� Measure, through the caravan edge piping profile, from point A to point B – this is the awning<br />
size; A <strong>and</strong> B are the awning tensioning points.<br />
Fixing the wall eyelets to the caravan<br />
� BStarting at the front of the vehicle, pull the awning roof in the piping profile until both sides of<br />
the roof have the same distance from the ground (measured vertically down).<br />
Approx. 10 cm above the horizontal zip in the side walls left <strong>and</strong> right, are the points C <strong>and</strong> D <strong>for</strong><br />
fixing the wall eyelets to the caravan. Now pull the awning roof out of the profile <strong>and</strong> fix the wall<br />
eyelets to the caravan.<br />
Now determine the middle position between C <strong>and</strong> D (=E). Fix the middle eyelet (F) horizontally<br />
approx. 2 cm underneath the piping profile<br />
Partial Awnings<br />
Determine the awning position<br />
� Measure, through the caravan edge piping profile, from point A until the point on the vehicle<br />
� where the awning ends (B). Here is the position of the vertical wall.<br />
Fix the wall eyelets <strong>for</strong> a partial awning<br />
positioned in the middle.<br />
� Starting at the front of the vehicle, pull the awning roof in the piping profile. The wall eyelets<br />
(C <strong>and</strong> D) are fixed approx. 2 cm underneath the piping profile on the side wall, at the rear of<br />
the pole pocket openings.<br />
Now pull the roof out, measure the exact middle between C <strong>and</strong> D <strong>and</strong> fix the middle eyelet,<br />
also 2 cm underneath the piping profile (point F)<br />
�<br />
�<br />
�<br />
�<br />
�<br />
A B<br />
h<br />
C<br />
F<br />
C/D<br />
= E<br />
2<br />
D<br />
h<br />
A<br />
B<br />
h h<br />
B<br />
C F D<br />
A
050139_<strong>dwt</strong>_Au bau_GB 10.10.2005 08:50 Uhr Seite 5<br />
Left or right partial awnings<br />
� Pull the awning roof in the piping profile <strong>and</strong> start<br />
at the rear with a left partial awning at the front with a right partial awning<br />
The wall eyelet fixing point <strong>for</strong> a partial awning is on the awning side (C), 10 cm above the side roof<br />
seam. The vertical wall has a pole pocket. Here you can fix a wall eyelet at position (D) on the<br />
caravan, 2 cm underneath the piping profile.<br />
� Now measure from eyelet C on the awning side, horizontal as described, to the wall<br />
eyelet D. fix the middle eyelet exactly in the middle between these points, 2 cm<br />
underneath the piping profile F.<br />
from the left <strong>for</strong> a left partial awning from the right <strong>for</strong> a right partial awning.<br />
Our Tip:<br />
� Seal the drilled holes to keep moisture out. Your specialist supplier will be glad to advice you!<br />
� A very practical alternative to wall eyelets are the vario-clip elements, that you<br />
can easily click on to the second roof profile <strong>and</strong> save you a lot of assembly work.<br />
The vario-clip elements are 100% stable <strong>and</strong> reusable. Ask <strong>your</strong> specialist<br />
supplier!<br />
�<br />
�<br />
�<br />
C<br />
C<br />
F<br />
D<br />
F<br />
D<br />
D<br />
C<br />
MEIN ZELT ! 4–5<br />
GB
050139_<strong>dwt</strong>_Au bau_GB 10.10.2005 08:50 Uhr Seite 6<br />
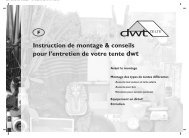
This is How You Assemble Your Awning<br />
(Complete- <strong>and</strong> Partial Awnings <strong>and</strong> Sun Canopies)<br />
Preparing everything<br />
� Check that the poles set is complete <strong>and</strong> lay out all the poles in front of the caravan, as described<br />
in the pole plan. Fix the screws <strong>and</strong> pole clamps to the poles; put the vertical poles in the corner<br />
pieces. Ridge- <strong>and</strong> gable poles can be pre-assembled, but do not assemble them to the corner<br />
pieces yet. De-bur the caravan piping profile so that the awning roof can not be damaged. If<br />
necessary, you can bend open the piping profile a little at the beginning.<br />
� Lay out the roof, side walls <strong>and</strong> front wall parts of the awning. Now pull the roof in the piping<br />
profile, starting at the rear. With awnings that have several parts, the front wall <strong>and</strong> the side walls<br />
are pulled in later.<br />
� Hook the middle ridge pole in the wall eyelet <strong>and</strong> pass the middle angle piece through the roof<br />
pole pocket. Connect the middle angle piece <strong>and</strong> ridge pole <strong>and</strong> slide the bottom part of the<br />
middle angle piece out. Now you can easily assembly the rest.<br />
� Repeat the same procedure with one of the corners <strong>and</strong> connect to the middle angle piece. This<br />
way the awning is more stable.<br />
� Fit the other corner <strong>and</strong> connect this also to the middle angle piece.<br />
� Pull in the front wall first <strong>and</strong> then the side walls. The roof can be tensioned later in order to<br />
keep the zips from being over tightened.<br />
�<br />
�<br />
�<br />
�<br />
�
050139_<strong>dwt</strong>_Au bau_GB 10.10.2005 08:50 Uhr Seite 7<br />
Now you can tension the awning roof<br />
� Close all the zips <strong>and</strong> adjust the height of the side- <strong>and</strong> the front walls so that the zips are horizontal <strong>and</strong><br />
vertical – the telescopic poles can be adjusted to suit all uneven surfaces. Now tension the ridge poles<br />
slightly, starting in the middle. Then put in the roof front supports.<br />
� Most of the awning models are equipped with hollow seams in the roof front. Here you can push in the<br />
front roof tensioning poles (when ordered). Attention: the place where the screw is, is not to be pushed<br />
through the hollow seam!<br />
Tension the front roof supports so that the gable seam is in front of the gable pole – not on the gable<br />
pole!<br />
� Observe when tensioning the gable poles that the middle angle piece is in the middle of the pole<br />
passage. When you follow the right procedures, the roof front pelmet should be tight <strong>and</strong> straight.<br />
Now you can re-tension the ridge poles.<br />
� Now you can assembly the eventual extra poles (i.e. ridge- hurricane- or ver<strong>and</strong>a poles) <strong>and</strong> connect<br />
the protective skirting to the clamps to protect the awning from being damaged!<br />
The last part is the ground tensioning<br />
� Hook all the tensioning elements that are not sewn in, to the ground skirt. Adjust the poles so that the<br />
vertical seams are exactly over the vertical poles. Awning corners <strong>and</strong> guide lines are to be tensioned<br />
with pegs, the zip ends <strong>and</strong> other fixing points with ground nails. Start by tensioning the rear corners by<br />
the caravan.<br />
� Pull the corner poles outward <strong>and</strong> tension the front- <strong>and</strong> the side walls. First secure the front awning<br />
corners to the ground, then fix the zips ends crosswise to relieve the zips <strong>and</strong> then secure the other<br />
fixing elements to the ground.<br />
�<br />
�<br />
�<br />
�<br />
1<br />
3<br />
4<br />
1<br />
3<br />
2<br />
2<br />
5<br />
MEIN ZELT ! 6–7<br />
4<br />
GB
050139_<strong>dwt</strong>_Au bau_GB 10.10.2005 08:50 Uhr Seite 8<br />
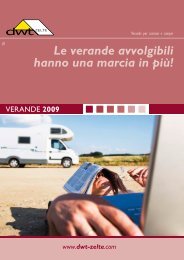
Free St<strong>and</strong>ing Caravan Awnings, Motorcaravan-, Bus- <strong>and</strong><br />
Frame Tents<br />
Prepare everything<br />
� Check that the poles set is complete <strong>and</strong> according to the plan. Fix the screws <strong>and</strong> the pole clamps<br />
to the poles.<br />
Lay out the poles <strong>and</strong> corner pieces according to the plan on the ground <strong>and</strong> assembly the roof<br />
ring (corner, ridge- <strong>and</strong> gable poles). Roof front supports are not to be assembled yet.<br />
� Now put the upper vertical poles in the corner poles to make the further assembly easier. The<br />
lower vertical poles are fitted when the tent lies over the pole frame. Screws must always be<br />
directed downwards or inward.<br />
Now the erecting starts<br />
� If you have an awning with removable side walls, the walls should be taken out first.<br />
� Put the awning roof over the pole frame. Be careful with the corners <strong>and</strong> parts that stick out; they<br />
may damage the awning material <strong>and</strong> the windows!<br />
With frame tents the sun pelmet is assembled last.<br />
� Tents with a sun pelmet have pelmet supports that fit in the corner pieces. Tension the pelmet so<br />
that the gable seam is in front of the gable poles – not on the gable poles!<br />
� Now put the walls in <strong>and</strong> close all the zips. If there are telescopic poles you can now tension the<br />
roof.<br />
� Now fit the lower vertical poles in the upper vertical poles. If the poles are telescopic, you can<br />
adjust them to the desired height. With frame tents you fit the lower poles in the upper poles.<br />
�<br />
�<br />
�<br />
�
050139_<strong>dwt</strong>_Au bau_GB 10.10.2005 08:50 Uhr Seite 9<br />
The last part is the ground tensioning<br />
� Hook all the tensioning elements that are not sewn in to the ground skirt. Adjust the poles so that<br />
the vertical seams are over the vertical poles. Tent corners <strong>and</strong> zip ends are to be tensioned by<br />
using the pegs <strong>and</strong> the other fixing points with ground nails. You can tension the walls by pulling<br />
the corner poles outward <strong>and</strong> securing the corners to the ground. Then tension the vertical zips<br />
crossways to the ground to relieve them. Then secure the other fixing elements to the ground.<br />
� With frame tents the sun pelmet can now be assembled <strong>and</strong> the inner cabins (depending on the<br />
parts delivered) can be hung inside.<br />
Our tip:<br />
� Check the tension on a regular basis, <strong>for</strong> material flexibility, temperature changes <strong>and</strong> other<br />
influences can lead to less tension.<br />
� Fixing materials <strong>for</strong> ground skirts are not st<strong>and</strong>ard; though some types of ground need special<br />
pegs, ground nails <strong>and</strong> lines.<br />
Ask <strong>your</strong> specialist supplier.<br />
MEIN ZELT ! 8–9<br />
GB
050139_<strong>dwt</strong>_Au bau_GB 10.10.2005 08:50 Uhr Seite 10<br />
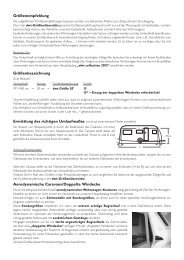
Annex <strong>for</strong> Caravan Awnings (Awning Extension)<br />
Prepare everything <strong>for</strong> the extension<br />
� Be<strong>for</strong>e the assembly of the annex, the awning must be completely tensioned! Open the side wall of<br />
the awning on the annex side – you will find it much easier.<br />
� Check that the pole set is complete <strong>and</strong> lay out the poles on the ground according to the plan.<br />
Assemble the screws <strong>and</strong> pole clamps to the poles, fix the bottom parts in the corner pieces <strong>and</strong><br />
connect them with the poles <strong>for</strong> the width <strong>and</strong> the depth of the roof. Lay the poles next to the side<br />
wall to which the annex is going to be fixed.<br />
� Assembly of an annex with double piping profile<br />
Connect the awning side wall piping <strong>and</strong> the annex roof piping with double piping profile. Slide the<br />
double piping profile on both the horizontal <strong>and</strong> vertical piping on the awning side wall. Push the<br />
annex piping in the double piping profile of the awning, starting at the roof.<br />
Then the front wall <strong>and</strong> back wall piping are to follow; now annex <strong>and</strong> awning are connected<br />
together. Now put the annex poles under the tent.<br />
� When tensioning, please ensure that the seams of the annex roof corners are over the pole<br />
corners. Now you can fix the tapes to the poles.<br />
�<br />
�
050139_<strong>dwt</strong>_Au bau_GB 10.10.2005 08:50 Uhr Seite 11<br />
� Assembly of an annex with a zip<br />
Take out the right awning side wall, connect the annex zip to the awning zip ends <strong>and</strong> close the zip.<br />
Now the awning <strong>and</strong> annex are connected.<br />
� Put up the annex poles under the tent <strong>and</strong> fix to the outer ridge poles of the awning.<br />
� When tensioning, please ensure that the seams of the annex roof corners are over the pole corners.<br />
Now you can fix the tapes to the poles.<br />
The last part is the ground tensioning<br />
� First assemble the extra poles. Hook all the tensioning elements, which are not sewn in, to the ground<br />
skirt. Adjust the poles so that the vertical seams are over the vertical poles. Tent corners <strong>and</strong> zip<br />
ends are to be tensioned by using pegs <strong>and</strong> the other fixing points with ground nails.<br />
� Adjust the poles so that the vertical seams are over the vertical poles. First tension the corners of<br />
the awning, then pull out the corner poles <strong>and</strong> tension the front-, back- <strong>and</strong> side walls. Now secure<br />
the remaining corners to the ground <strong>and</strong> tension the zip ends crossways to relieve the zip. Then<br />
secure the remaining tensioning elements to the ground.<br />
Our tip:<br />
� Check the tension on a regular basis, <strong>for</strong> material flexibility, temperature changes <strong>and</strong> other<br />
influences can lead to less tension.<br />
� Fixing materials <strong>for</strong> ground skirts are not st<strong>and</strong>ard; though some types of ground need special<br />
pegs, ground nails <strong>and</strong> lines. Ask <strong>your</strong> specialist supplier.<br />
�<br />
�<br />
2<br />
4<br />
1<br />
3<br />
MEIN ZELT ! 10–11<br />
GB
050139_<strong>dwt</strong>_Au bau_GB 10.10.2005 08:50 Uhr Seite 12<br />
<strong>Tips</strong> <strong>for</strong> dealing with the different equipment details<br />
(are different depending on the awning model!)<br />
Curtains…<br />
… are attached with curtain runners, fixed in the curtain b<strong>and</strong> loops,<br />
to the curtain rail over the window. The curtains are pulled on to the<br />
sewn-in curtain rail.<br />
Hollow seams…<br />
… are used <strong>for</strong> extra poles, that we recommend <strong>for</strong> more stability.<br />
The vertical hollow seams inside the awning are <strong>for</strong> storm- <strong>and</strong><br />
hurricane poles, the horizontal seams in the side walls <strong>and</strong> front wall<br />
are <strong>for</strong> ver<strong>and</strong>a poles, the seams in the roof front are <strong>for</strong> the roof front<br />
tensioning poles.<br />
Tightening of storm elements/storm poles…<br />
… are on the outside underneath the windows in the front- <strong>and</strong> side<br />
walls <strong>and</strong> minimise the „pounding“ of the walls in severe storms.<br />
Tighten these elements/poles with a pole tensioning tool (steel hooks<br />
with rubber rings). Your specialist supplier will be happy to advise you.<br />
Side wall clasps…<br />
… are sewn in on the left <strong>and</strong> right h<strong>and</strong> side at the rear inside of the<br />
roof. Relieve the zips by fastening the clasps.<br />
Rain gutter piping…<br />
… is sewn on the outside of the roof. Assemble a rain gutter to protect<br />
the side walls against running water.<br />
PVC rein<strong>for</strong>ced parts (chafe protection)<br />
… are sewn in the roof or are in the accessory bag. The PVC parts are<br />
fixed to the pole clamps <strong>and</strong> prevent the tent material from being<br />
damaged due to chafing.<br />
Triangular eyelets…<br />
… are fixed to the side wall corners, where the corner pieces go<br />
through the tent, <strong>and</strong> can be used to fix the tension lines to.
050139_<strong>dwt</strong>_Au bau_GB 10.10.2005 08:50 Uhr Seite 13<br />
Soft care keeps the beauty!<br />
Always pack away <strong>your</strong> tent dry! If this is not possible, please lay it out to dry after a maximum period of 12 hours.<br />
Your tent does not tolerate strong washing detergents!<br />
PVC coated material <strong>and</strong> trailtex can be rinsed with clean water.<br />
Uncoated materials – leacryl or cotton – can be brushed dry when<br />
not very dirty, or can be cleaned with an erasing rubber. When the<br />
material is very dirty you can use a brush, lukewarm water <strong>and</strong> a<br />
ph-neutral washing detergent (i.e. washing soap).<br />
Rinse thoroughly with clean water <strong>and</strong> impregnate – if necessary – again<br />
with a tent impregnating spray.<br />
� Please note: when it rains, do not touch impregnated, water resistant<br />
material (i.e. cotton) on the inside as this may lead to leakage.<br />
Windows can be cleaned with clean water <strong>and</strong> a soft cloth.<br />
Cleaners that contain alcohol can harden the windows!<br />
Cotton curtains can – if necessary – be washed at 30°C.<br />
Zips are easier to use if treated now <strong>and</strong> then with zip-spray from<br />
the specialist supplier.<br />
� Our tents are generally packed in a foil bag, to protect the tent material<br />
<strong>and</strong> especially the coated roof. Keep the bag to pack <strong>your</strong> tent away<br />
after use.<br />
The seams are sewn with a special cotton sheathed polyester thread.<br />
This extremely durable thread is water resistant: when moist, the cotton<br />
exp<strong>and</strong>s <strong>and</strong> closes the sewing hole <strong>and</strong> the polyester core makes the<br />
thread tear-proof. If a seam may leak, a seam sealer will help (<strong>for</strong> sale at<br />
<strong>your</strong> specialist supplier)<br />
Never pack the tent poles when they are wet! Remove all dirt with a<br />
neutral cleaner <strong>and</strong> pack away the dry poles in a constant temperature<br />
– large temperature changes may cause condensation <strong>and</strong> corrosion.<br />
MEIN ZELT ! 12–13<br />
GB
050139_<strong>dwt</strong>_Au bau_GB 10.10.2005 08:50 Uhr Seite 14<br />
User In<strong>for</strong>mation<br />
<strong>dwt</strong> awnings are produced to the highest quality. Certain material characteristics, which may be interpreted as defects, are inherent to the materials <strong>and</strong> may occur, despite the<br />
experienced production- <strong>and</strong> technical processes.<br />
We want to in<strong>for</strong>m you about these facts – the following characteristics are no cause <strong>for</strong> complaint…<br />
Material irregularities like knots or thicker parts are nothing to be<br />
worried about; they do not influence the quality <strong>and</strong> the use of<br />
the awning in any way. These are just quality tolerances that can<br />
not be changed.<br />
Weather- <strong>and</strong> environmental influences may, in the course of<br />
time, lead to colour changes.<br />
Condensation is <strong>for</strong>med when larger outside temperature<br />
changes occur <strong>and</strong> can not be helped.<br />
With the manufacturing of non-coated materials, i.e. leacryl,<br />
creases may occur that look darker in bright light. Also light<br />
stripes (“whitening”) are difficult to avoid.<br />
Light points are technically unavoidable material irregularities –<br />
they do not influence the water tightness.<br />
Zips are parts that are subject to wear <strong>and</strong> tear, exposed to<br />
constant use. Please open <strong>and</strong> close them with care. You can<br />
avoid too much tension by tensioning the ends crossways.<br />
Tensioning accessories, storm loops, hooks <strong>and</strong> eyelets are<br />
subject to wear <strong>and</strong> tear <strong>and</strong> sometimes to very heavy loads.<br />
Important note: If you discover, during the assembly, that you ordered<br />
the wrong size awning, an additional charge must be imposed<br />
depending on the amount of work involved.
050139_<strong>dwt</strong>_Au bau_GB 10.10.2005 08:50 Uhr Seite 15<br />
Complaints/Return Changes / repairs / ordering spare parts<br />
When there is a reason to complain or to return the goods, please<br />
contact <strong>your</strong> specialist supplier – they will take care of things <strong>for</strong> you.<br />
If we recommend that the specialist supplier sends back goods to us<br />
<strong>for</strong> improvements or changes, please pack the parts so that no damage<br />
can occur during transport. Our machines can only accommodate dry<br />
<strong>and</strong> clean materials. When the material is dirty, <strong>your</strong> order can not be<br />
carried out.<br />
� To be able to carry out <strong>your</strong> order we need the receipt you<br />
received at the time of purchase of <strong>your</strong> awning.<br />
To be able to carry out <strong>your</strong> order, <strong>your</strong> specialist supplier needs<br />
The filled out receipt<br />
Your invoice<br />
A detailed description of <strong>your</strong> wishes – we can not carry out <strong>your</strong><br />
order without this description – <strong>and</strong> when ordering additional<br />
poles please enclose a copy of the pole plan, on which you have<br />
marked the required parts.<br />
Please note: guarantee claims can only be made with the original<br />
invoice <strong>and</strong> the guarantee card within the legal guarantee period.<br />
MEIN ZELT ! 14–15<br />
GB
050139_<strong>dwt</strong>_Au bau_GB 10.10.2005 08:50 Uhr Seite 16<br />
<strong>dwt</strong>-<strong>Zelte</strong> • Dieter Winneknecht GmbH • Harzweg 11 • 34225 Baunatal