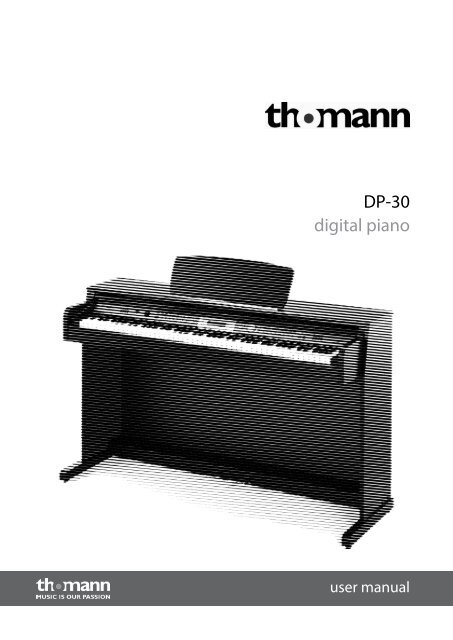
DP-30 digital piano
DP-30 digital piano
DP-30 digital piano

Create successful ePaper yourself
Turn your PDF publications into a flip-book with our unique Google optimized e-Paper software.
<strong>DP</strong>-<strong>30</strong><br />
<strong>digital</strong> <strong>piano</strong><br />
user manual
Musikhaus Thomann e.K.<br />
Treppendorf <strong>30</strong><br />
96138 Burgebrach<br />
Germany<br />
Telephone: +49 (0) 9546 9223-0<br />
E-mail: info@thomann.de<br />
Internet: www.thomann.de<br />
17.08.2012
Table of contents<br />
Table of contents<br />
1 General notes............................................................................................................................ 5<br />
2 Safety notes............................................................................................................................... 6<br />
3 Features....................................................................................................................................... 8<br />
4 Setup guide................................................................................................................................ 9<br />
5 Operating panel and connections............................................................................... 15<br />
6 Connection options............................................................................................................. 17<br />
7 Switching on / off and basic operation...................................................................... 18<br />
7.1 Switching the <strong>digital</strong> <strong>piano</strong> on................................................................................. 18<br />
7.1.1 Switching on, volume control............................................................................... 18<br />
7.2 Song selecting................................................................................................................ 18<br />
8 Functions.................................................................................................................................. 19<br />
8.1 Voices and effects......................................................................................................... 19<br />
8.1.1 Selecting voices.......................................................................................................... 19<br />
8.1.2 Dual mode.................................................................................................................... 19<br />
8.1.3 Split mode.................................................................................................................... 20<br />
8.2 Style operation............................................................................................................... 20<br />
8.2.1 Selecting a style......................................................................................................... 20<br />
8.2.2 Accompaniment function...................................................................................... 21<br />
8.2.3 Starting a style............................................................................................................ 22<br />
8.2.4 Fill A/B............................................................................................................................ 23<br />
8.2.5 Ending a style.............................................................................................................. 23<br />
8.2.6 Accompaniment volume........................................................................................ 24<br />
8.2.7 Tempo............................................................................................................................ 24<br />
8.2.8 Chord detection......................................................................................................... 24<br />
8.2.9 Metronome.................................................................................................................. 27<br />
8.3 Function menu............................................................................................................... 27<br />
8.3.1 Transposing................................................................................................................. 28<br />
8.3.2 Fine tuning................................................................................................................... 29<br />
8.3.3 Beat................................................................................................................................. 29<br />
8.3.4 Touch sensitivity........................................................................................................ 29<br />
8.3.5 Split point..................................................................................................................... <strong>30</strong><br />
8.3.6 DSP effect level........................................................................................................... <strong>30</strong><br />
8.3.7 MIDI receive channel (Midi In).............................................................................. <strong>30</strong><br />
8.3.8 MIDI send channel (Midi Out)............................................................................... 31<br />
8.4 Mixer menu..................................................................................................................... 31<br />
8.5 Memory............................................................................................................................ 32<br />
8.5.1 Memory banks............................................................................................................ 32<br />
8.5.2 Memory data............................................................................................................... 32<br />
8.5.3 Storing & loading parameters............................................................................... 33<br />
8.5.4 Deleting memory data............................................................................................ 33<br />
8.6 One Touch Setting........................................................................................................ 33<br />
<strong>DP</strong>-<strong>30</strong><br />
3
Table of contents<br />
4<br />
8.7 Recording and playback............................................................................................. 34<br />
8.7.1 Recording standby.................................................................................................... 34<br />
8.7.2 Start recording............................................................................................................ 34<br />
8.7.3 Stop recording............................................................................................................ 35<br />
8.7.4 Recording playback.................................................................................................. 35<br />
8.8 Songs for practising..................................................................................................... 36<br />
9 Voice list.................................................................................................................................... 37<br />
10 Styles list................................................................................................................................... 40<br />
11 Practice and demo songs.................................................................................................. 42<br />
12 Chord list.................................................................................................................................. 44<br />
13 MIDI implementation chart............................................................................................. 46<br />
14 Technical specifications.................................................................................................... 48<br />
15 Protecting the environment........................................................................................... 49<br />
<strong>digital</strong> <strong>piano</strong>
1 General notes<br />
Symbols and signal words<br />
This user manual contains important information on safe operation of the device.<br />
Read and follow all safety notes and all instructions. Save this manual for future refer‐<br />
ence. Make sure that it is available to all persons using this device. If you sell the<br />
device, include the manual for the next owner.<br />
Our products are subject to a process of continuous development. We therefore<br />
reserve the right to make changes without notice.<br />
This section provides an overview of the symbols and signal words used in this user<br />
manual.<br />
Signal word Meaning<br />
DANGER! This combination of symbol and signal<br />
word indicates an immediate dangerous<br />
situation that will result in death or<br />
serious injury if it is not avoided.<br />
CAUTION! This combination of symbol and signal<br />
word indicates a possible dangerous sit‐<br />
uation that can result in minor injury if it<br />
is not avoided.<br />
NOTICE! This combination of symbol and signal<br />
word indicates a possible dangerous sit‐<br />
uation that can result in material and<br />
environmental damage if it is not<br />
avoided.<br />
Warning signs Type of danger<br />
<strong>DP</strong>-<strong>30</strong><br />
Warning – high-voltage.<br />
Warning – danger zone.<br />
General notes<br />
5
Safety notes<br />
2 Safety notes<br />
Intended use<br />
Safety<br />
6<br />
This device is intended to be used for electronic sound generation using a <strong>piano</strong> key‐<br />
board. Use the device only as described in this user manual. Any other use or use<br />
under other operating conditions is considered to be improper and may result in per‐<br />
sonal injury or property damage. No liability will be assumed for damages resulting<br />
from improper use.<br />
This device may be used only by persons with sufficient physical, sensorial, and intel‐<br />
lectual abilities and having corresponding knowledge and experience. Other persons<br />
may use this device only if they are supervised or instructed by a person who is<br />
responsible for their safety.<br />
DANGER!<br />
Danger for children<br />
Ensure that plastic bags, packaging, etc. are disposed of properly and<br />
are not within reach of babies and young children. Choking hazard!<br />
Ensure that children do not detach any small parts (e.g. knobs or the<br />
like) from the unit. They could swallow the pieces and choke!<br />
Never let children unattended use electrical devices.<br />
DANGER!<br />
Electric shock caused by short-circuit<br />
Always use proper ready-made insulated two-wire mains cabling<br />
(power cord). Do not modify the mains cable or the plug. Failure to do<br />
so could result in electric shock/death or fire. If in doubt, seek advice<br />
from a registered electrician.<br />
DANGER!<br />
Electric shock caused by high voltages inside<br />
Within the device there are areas where high voltages may be present.<br />
Never remove any covers.<br />
There are no user-serviceable parts inside.<br />
CAUTION!<br />
Possible hearing damage<br />
With loudspeakers or headphones connected, the device can produce<br />
volume levels that may cause temporary or permanent hearing impair‐<br />
ment.<br />
Do not operate the device permanently at a high volume level.<br />
Decrease the volume level immediately if you experience ringing in<br />
your ears or hearing impairment.<br />
<strong>digital</strong> <strong>piano</strong>
Safety notes<br />
CAUTION!<br />
Risk of injury due to heavy weight<br />
Due to the heavy weight of the device, at least two persons are required<br />
for transport and installation.<br />
NOTICE!<br />
Operating conditions<br />
This device has been designed for indoor use only. To prevent damage,<br />
never expose the device to any liquid or moisture. Avoid direct sunlight,<br />
heavy dirt, and strong vibrations.<br />
NOTICE!<br />
Power supply<br />
Before connecting the device, ensure that the input voltage (AC outlet)<br />
matches the voltage rating of the device and that the AC outlet is pro‐<br />
tected by a residual current circuit breaker. Failure to do so could result<br />
in damage to the device and possibly injure the user.<br />
Unplug the device before electrical storms occur and when it is unused<br />
for long periods of time to reduce the risk of electric shock or fire.<br />
<strong>DP</strong>-<strong>30</strong><br />
7
Features<br />
3 Features<br />
8<br />
Special features of the <strong>digital</strong> <strong>piano</strong>:<br />
n Keyboard: 88 weighted keys with hammer action, touch velocity in three steps.<br />
n Multifunctional LCD.<br />
n User friendly controls or [+/–] buttons to select styles, practise songs and voices.<br />
n 210 voices. 16 voices can be selected directly.<br />
n 120 styles. 12 Styles can be selected directly.<br />
n 60 practise songs.<br />
n Three demo songs.<br />
n Single chord and fingered chord detection.<br />
n Recording function.<br />
n Four memory banks with four slots each.<br />
n Style control buttons: [SYNC], [START/STOP], [FILL A], [FILL B/], [INTRO/ENDING].<br />
n Mixer for volume control of drums, bass, orchestra, first right hand voice, second<br />
right hand voice, left hand voice.<br />
n Further operation and display elements: DUAL, SPLIT, [O.T.S.], [METRONOME],<br />
TRANSPOSE, TUNE, BEAT, TOUCH, SPLIT, DSP LEVEL, USB.<br />
n Connections: USB port, headphones, audio output, pedals (sustain, soft, soste‐<br />
nuto).<br />
<strong>digital</strong> <strong>piano</strong>
4 Setup guide<br />
You need a Phillips screwdriver (not supplied) to assemble the stand. Open the pack‐<br />
aging and please make sure prior to assembly that you have the full scope of delivery<br />
available as listed below.<br />
1. Digital <strong>piano</strong> housing with music stand 8. Screws 4 ´ 15 (5 pcs.)<br />
2. Right side panel 9. Cable holder<br />
3. Left side panel 10. Screw 6 ´ 12 (2 pcs.)<br />
4. Rear wall 11. Mains cable<br />
5. Pedal box 12. Pedal cable<br />
6. Handscrew (4 pcs.) 13. Plastic cap (4 pcs.)<br />
7. Screws 6 ´ <strong>30</strong> (4 pcs.)<br />
<strong>DP</strong>-<strong>30</strong><br />
Setup guide<br />
9
Setup guide<br />
Mechanical setup<br />
10<br />
1. Assemble the <strong>piano</strong> near a wall power outlet.<br />
2. Proceed according to the illustrations and exclusively use the supplied screws.<br />
Using other screws could damage the housing of the <strong>digital</strong> <strong>piano</strong> or result in a<br />
reduced stability of the <strong>digital</strong> <strong>piano</strong>.<br />
n (6) Handscrews (4 pcs.),<br />
n (7) Screws 6 ´ <strong>30</strong> (4 pcs.)<br />
n (8) Screws 4 ´ 15 (5 pcs.) and<br />
n (10) Screws 6 ´ 12 (2 pcs.) for rear wall mounting.<br />
3. Set the pedal box (5) between the left and right side panel ((2) and (3)) and use<br />
2 screws M 6 ´ <strong>30</strong> (7) on each side to affix both side panels to the pedal box.<br />
Insert the four plastic caps (13) into the screw holes.<br />
4. Attach the rear wall with 5 screws 4 ´ 15 (8) to the pedal box (5) and with two<br />
screws 6 ´ 12 (11) to the rear sides of the side panels ((2) and (3).<br />
5. Put the housing of the <strong>digital</strong> <strong>piano</strong> on the stand and affix it using the four<br />
hand screws (6).<br />
<strong>digital</strong> <strong>piano</strong>
Mains connection<br />
6. Attach the two adhesive cable holder as shown here on the base. Connect the<br />
DIN plug of the pedal cable to the PEDAL jack on the underside of <strong>digital</strong><br />
<strong>piano</strong>. Attach the cable to the cable holder. Move the <strong>digital</strong> <strong>piano</strong> to its desig‐<br />
nated location.<br />
1. Make sure the unit is switched off before connecting it to the power supply or<br />
disconnecting it.<br />
2. Turn the volume control down to the left stop.<br />
<strong>DP</strong>-<strong>30</strong><br />
Setup guide<br />
11
Setup guide<br />
12<br />
3. Connect the AC power cord to a properly wired AC 2<strong>30</strong> V mains wall outlet.<br />
4. Now you're ready to turn the device on.<br />
If the <strong>piano</strong> is not in use or when a thunder-storm threatens, disconnect the<br />
unit from the mains to ensure safety.<br />
<strong>digital</strong> <strong>piano</strong>
Views<br />
From above<br />
1. Control panel 3. Music stand<br />
2. Headphones socket 4. Piano keyboard<br />
Rear side<br />
5. Connection for the pedal cable 7. USB port<br />
6. Mains cable 8. AUX stereo output<br />
<strong>DP</strong>-<strong>30</strong><br />
Setup guide<br />
13
Setup guide<br />
14<br />
Pedals<br />
9. Soft pedal 11. Sustain pedal<br />
10. Sostenuto pedal<br />
<strong>digital</strong> <strong>piano</strong>
5 Operating panel and connections<br />
Operating panel<br />
1 On / off switch<br />
2 Volume control<br />
3 Direct selection buttons [STYLES]<br />
4 Buttons to operate the STYLES mode<br />
n START/STOP<br />
n SYNC<br />
n INTRO/ENDING<br />
n FILL A<br />
n FILL B<br />
n A.B.C.<br />
5 [ACC. VOL +]/[ACC. VOL –] buttons for accompaniment volume control.<br />
6 [TEMPO +]/[TEMPO –] buttons to increase / decrease the tempo.<br />
7 [MIXER] button to adjust the volume of the various tracks.<br />
8 [FUNCTION] button to call the function menu.<br />
9 [METRO] button: metronome.<br />
10 Display.<br />
11 [STYLE] button.<br />
12 [VOICE] buttons to select the instrument voice.<br />
Buttons to operate the SONG mode<br />
n MELODY OFF<br />
Press the buttons ([STYLE] + [VOICE] simultaneously to activate the DEMO mode.<br />
<strong>DP</strong>-<strong>30</strong><br />
Operating panel and connections<br />
15
Operating panel and connections<br />
Display<br />
16<br />
13 [SONG] button to select the practise songs.<br />
14 Selection field with jog dial and [+] and [– ] buttons.<br />
15 Direct selection buttons [VOICE] to select the instrument voice.<br />
16 [BANK] buttons to select the memory bank.<br />
17 [STORE] button.<br />
18 Memory slot buttons [M1] to [M4] in ‘One Touch Setting’ area.<br />
19 [O.T.S] button - One Touch Setting.<br />
20 [DUAL] button to call the dual mode (two voices simultaneously).<br />
21 [SPLIT] button to call the split mode (two different voices in different keyboard areas).<br />
22 [REC] button to call the recording mode.<br />
23 [PLAY/STOP] button for playback and pausing the recording.<br />
1 A.B.C. (automatic chord detection and bass accom‐<br />
paniment)<br />
2 FILL A (fill bar A) 10 CHORD<br />
3 FILL B (fill bar B) 11 TEMPO<br />
4 MELODY OFF (to mute the right hand) 12 MEASURE<br />
5 DUAL (dual mode) 13 BEAT<br />
9 VOICE / STYLE / SONG / DIR (directory) /FILE<br />
6 SPLIT (split mode) 14 MEMORY / TICK (metronome) / O.T.S.<br />
7 TOUCH (touch sensitivity) 15 DSP<br />
8 RECORD<br />
<strong>digital</strong> <strong>piano</strong>
6 Connection options<br />
Headphones<br />
AUX output<br />
USB port<br />
To the left beneath the keyboard you find the headphones outlets.<br />
1. Connecting headphones (not supplied) to outlet 2 mutes the speakers.<br />
2. Using outlet 1 maintains the sound output through the speakers.<br />
– Never operate headphones at high volume as this can permanently<br />
damage your hearing.<br />
– Before connecting the mains voltage or other devices to the <strong>piano</strong>, turn<br />
the volume to 'minimum' to avoid damage to the speakers.<br />
You can connect powered speakers, your stereo device or other amplifiers to the rear<br />
AUX outlet.<br />
Connect both channels (L and R) for stereo sound. Connect only one of the<br />
two channels of mono sound.<br />
1. Connect a computer or other device with USB support.<br />
Connection options<br />
2. The USB port is an integrated MIDI-USB adapter. For devices with USB cable,<br />
you can simply connect the MIDI / USB converter to the USB port and connect<br />
the MIDI IN or MIDI OUT cable to the <strong>digital</strong> <strong>piano</strong>. After the driver has been<br />
installed and the installation is complete, you can select the USB audio device<br />
in Device menu of the software to transfer the MIDI data.<br />
<strong>DP</strong>-<strong>30</strong><br />
17
Switching on / off and basic operation<br />
7 Switching on / off and basic operation<br />
7.1 Switching the <strong>digital</strong> <strong>piano</strong> on<br />
7.1.1 Switching on, volume control<br />
7.2 Song selecting<br />
18<br />
1. Please check that the device is connected properly.<br />
2. Press the [POWER] button to switch the device on. The display is illuminated.<br />
3. Turn the volume control [VOLUME] to set the desired volume.<br />
– If the display does not light up after switching the <strong>piano</strong> on, check the<br />
power supply.<br />
– If you hear nothing from the speakers, the volume may be set to ‘min‐<br />
imum’.<br />
The <strong>piano</strong> offers 3 demo songs in total (see appendix).<br />
1. Press the buttons [VOICE] and [STYLE] simultaneously to play demo songs.<br />
2. Press the [+] or [–] button or turn the jog dial to select the number of the<br />
desired demo song.<br />
3. Press the buttons [VOICE] and [STYLE] simultaneously again or press the<br />
[START/STOP] button to stop the playback.<br />
<strong>digital</strong> <strong>piano</strong>
8 Functions<br />
8.1 Voices and effects<br />
8.1.1 Selecting voices<br />
8.1.2 Dual mode<br />
The <strong>digital</strong> <strong>piano</strong> offers 210 voices in total.<br />
Functions<br />
1. 16 voices can be called via the direct selection button. Each direct selection<br />
button hosts 2 voices. Press once to activate the voice labelled above the<br />
button. Press twice to activate the voice labelled below the button.<br />
On switching on, ‘VOICE R1’ lights up in the display and the name of voice 001<br />
is displayed.<br />
2. To select other voices press the direct selection keys, the [+] / [–] buttons or<br />
turn the jog dial.<br />
If you activate the VOICE mode for the first time by pressing the [VOICE]<br />
button the display shows ‘VOICE R1’ (right hand voice). Press the [VOICE]<br />
button repeatedly to sequentially activate the following additional modes<br />
=> ‘VOICE R2’ (second right hand voice in Dual Mode) => ‘VOICE L’ (left<br />
hand voice) => ‘VOICE R1’ (right hand voice).<br />
In Dual mode, you can play two voices simultaneously. When Dual mode is off,<br />
‘VOICE R1’ is displayed. When Dual mode is on, ‘VOICE R2’ is displayed.<br />
1. Press the buttons [+] or [–] or turn the jog dial to select the desired voice. The<br />
default preset voice in Dual mode is No. ‘050 Strings2’ .<br />
2. Press the [DUAL] button again to quit the Dual mode. ‘VOICE R2’ is disabled<br />
and you only hear the ‘VOICE R1’ voice.<br />
When the keyboard is split, the Dual mode affects only keys to the right of<br />
the keyboard split point. The area to the left of the split point is then meant<br />
for chord playing.<br />
<strong>DP</strong>-<strong>30</strong><br />
19
Functions<br />
8.1.3 Split mode<br />
8.2 Style operation<br />
8.2.1 Selecting a style<br />
20<br />
With this function, you can assign different voices to separate keyboard areas.<br />
1. Press the button [SPLIT] to activate the Split mode and thus the left hand voice.<br />
The indicators ‘VOICE L’ and ‘SPLIT’ then appear simultaneously in the display.<br />
2. Press the buttons [+] or [–] or turn the jog dial to select the desired voice. The<br />
default preset left hand voice in Split mode is No. ‘049 Strings1’ .<br />
3. Press the [SPLIT] button again to quit the Split mode. The ‘SPLIT’ display turns<br />
off.<br />
The <strong>digital</strong> <strong>piano</strong> offers 120 styles (001 to 120). Style ‘001’ is preset by default.<br />
1. Press the button [STYLE] to select the Style mode. The display shows ‘STYLE’<br />
and the selected number and description.<br />
2. Press the [+] / [–] buttons or use the jog dial to select the desired style.<br />
3. Direct selection buttons:<br />
You can also select the desired style using the direct select buttons. Two styles<br />
are assigned to each direct select button, specified above and below each<br />
button.<br />
– Press the same button twice to toggle between upper and lower<br />
style.<br />
– If you press another direct select button, the style is activated<br />
depending on whether an upper or lower style was selected<br />
before.<br />
<strong>digital</strong> <strong>piano</strong>
8.2.2 Accompaniment function<br />
The accompaniment function is controlled via five parameters: INTRO, NORMAL, VAR‐<br />
IATION, FILL (A-A, A-B, B-A, B-B) and ENDING.<br />
1. INTRO<br />
To add an intro, press the [INTRO/ENDING] button before starting to play.<br />
Depending on the selected style, the rhythm starts with two to four bars, fol‐<br />
lowed by the main section.<br />
2. NORMAL and VARIATION<br />
3. FILL<br />
There are two main sections: normal and variation. Depending on the style,<br />
each section consists of two to four bars.<br />
With activated accompaniment, you can press the button [FILL A] or [FILL B] to<br />
insert a rhythm and accompaniment part.<br />
4. ENDING<br />
Functions<br />
If you press the button [INTRO/ENDING] while accompaniment is activated, an<br />
ending section appropriate for the accompaniment is inserted that ends the<br />
performance.<br />
<strong>DP</strong>-<strong>30</strong><br />
21
Functions<br />
8.2.3 Starting a style<br />
22<br />
1. Instant start<br />
Press the [START/STOP] button to start the style.<br />
2. Chord mode (A.B.C.)<br />
Press the [A.B.C./MELODY OFF] button once to activate the Chord mode. The<br />
A.B.C. symbol appears in the display. The area to the left of the split point is<br />
now considered to be the chord area. When you play a chord with one or more<br />
fingers, both the bass and the chord will sound simultaneously.<br />
There are two ways to detect the chord: single finger and multi finger detec‐<br />
tion. If the chord is played according to the chord dictionary (see<br />
Ä Chapter 8.2.8 ‘Chord detection’ on page 24) the chord is considered as recog‐<br />
nized and is output accordingly. If not, the single finger chord will be recog‐<br />
nized.<br />
3. SYNC START<br />
Press the [SYNC] button.<br />
ð ‘BEAT 1’ to ‘BEAT 4’ are flashing in the display according to the current<br />
tempo. If you play the <strong>piano</strong> in this mode the style is automatically started.<br />
4. INTRO/ENDING<br />
– If the Chord mode is deactivated press any key on the key‐<br />
board. Then, only the percussion rhythm is played.<br />
– If the Chord mode is activated press any key of the chord<br />
area to start the style with automatic bass and chord accom‐<br />
paniment.<br />
Press the [INTRO/ENDING] button to insert an intro before ths style is playing.<br />
Press the [START/STOP] button to start the intro, followed by the main section.<br />
If you press the [INTRO/ENDING] button in style playing the style ends after<br />
playing.<br />
<strong>digital</strong> <strong>piano</strong>
8.2.4 Fill A/B<br />
8.2.5 Ending a style<br />
Use this function to add fill bars.<br />
1. In NORMAL mode, press the [FILL A] button to insert one fill bar. ‘FILL A’ is<br />
flashing in the display. When the bar has ended the <strong>piano</strong> returns to NORMAL<br />
mode.<br />
2. In NORMAL mode, press the [FILL B] button to insert one fill bar. ‘FILL B’ is<br />
flashing in the display. When the bar has ended the <strong>piano</strong> changes to the VAR‐<br />
IATION mode.<br />
3. In VARIATION mode, press the [FILL A] button to insert one fill bar. ‘FILL A’ is<br />
flashing in the display. When the bar has ended the <strong>piano</strong> changes to the<br />
NORMAL mode.<br />
4. In VARIATION mode, press the [FILL B] button to insert one fill bar. ‘FILL B’ is<br />
flashing in the display. When the bar has ended the <strong>piano</strong> returns to VARIA‐<br />
TION mode.<br />
1. Instant ending<br />
– If you keep the button [FILL A] or [FILL B] pressed while a style is playing,<br />
the selected fill pattern is played until you release the button.<br />
– Press the [FILL A] button after style playing has ended. Then the change<br />
to the NORMAL section takes place and ‘FILL A’ lights up in the display.<br />
– Press the [FILL B] button after style playing has ended. Then the change<br />
to the VARIATION section takes place and ‘FILL B’ lights up in the dis‐<br />
play.<br />
You can exit the accompaniment function any time by pressing the<br />
[START/STOP] button.<br />
2. Ending<br />
Press the [INTRO/ENDING] button to finish the performance with an ending.<br />
The style stops after the ending.<br />
3. SYNC<br />
Functions<br />
Press the [SYNC] button to stop the style. The synchronised start mode is acti‐<br />
vated.<br />
<strong>DP</strong>-<strong>30</strong><br />
23
Functions<br />
8.2.6 Accompaniment volume<br />
8.2.7 Tempo<br />
8.2.8 Chord detection<br />
24<br />
1. You can adjust the volume of the styles via the volume of the accompaniment.<br />
2. Press the button [ACC. VOL +] or [ACC. VOL –] to set the volume.<br />
3. When pressing the [ACC. VOL +] and [ACC. VOL –] buttons simultaneously, the<br />
accompaniment track is muted.<br />
1. Press the buttons [TEMPO +] or [TEMPO –]. The set value flashes for about 2 sec‐<br />
onds in the display.<br />
2. Within this time you can adjust the tempo in a range of <strong>30</strong> to 280 using the jog<br />
dial.<br />
3. Keep the [TEMPO +] or [TEMPO –] button pressed to change the value quickly.<br />
4. Press the buttons [TEMPO +] and [TEMPO –] simultaneously to reset the tempo<br />
to the preset default value.<br />
– When Style is not active, the tempo will be set automatically to the<br />
default value along with the style.<br />
– When Style is active, the tempo will not change with the style you select.<br />
The 'Auto Bass Chord' function (A.B.C.) is turned off by default. Press the<br />
[A.B.C./MELODY OFF] button to turn 'A.B.C.' on. The keyboard area to the left of the<br />
split point is already known as the chord area. When you now play a chord, bass and<br />
chord voices will sound together.<br />
As the A.B.C. chord detection is based on the root note of the chord, some<br />
chords that could be played according to the chord dictionary can not be<br />
recognised by A.B.C., such as B6, B b6, B b6(9), B6(9), Baug, B baug, B bm6, Bm6,<br />
Adim7, B bdim7, Bdim.<br />
<strong>digital</strong> <strong>piano</strong>
Two ways to detect the chord: 'single<br />
finger detect' and 'multi-finger detect'<br />
Functions<br />
If the chord is played on base of the illustration for multi-finger chords below, it will<br />
be detected as a 'multi-fingered' chord. If not, it will be detected as a 'single-finger'<br />
chord.<br />
n 'Single-finger' chords<br />
Using this method, you can play chords with just one, two or three fingers within<br />
the possibilities of the accompaniment function. In the following, we list some<br />
examples for single-finger chords (C, Cm, C7 und Cm7).<br />
Press the keys to the left of the split point with the A.B.C. function activated.<br />
The chords are recognized as single-finger chords.<br />
n 'Multi-fingered' chords<br />
Using this method, you can play chords with normal fingering within the possi‐<br />
bilities of the accompaniment function. In the following we list 32 chords using<br />
C-chords as example.<br />
<strong>DP</strong>-<strong>30</strong><br />
25
Functions<br />
26<br />
n Chord basics<br />
A chord consists of three or more notes played together. The most common<br />
chord is the triad consisting of three notes: root, third and fifth of the corre‐<br />
sponding scale. The C-major chord, for example, is formed from the notes C<br />
(root), E (the third note of the C major scale) and G (the fifth note of the C major<br />
scale). In the shown chord C major, the lowest note is the root note (this is the<br />
basic form of the chord - if you play other notes of the chord as the lowest note,<br />
this is called 'chord inversion'). The root note is the central tone of the chord on<br />
which the other chord notes are based. The distance (interval) between adjacent<br />
notes and the root note determines whether the result will be a third major or<br />
minor.<br />
n Chordal structure<br />
The lower interval in our triad (between the root and third) determines whether<br />
the result will be a major or minor triad. In addition, we can get the highest note<br />
by a half step up or down to create two additional chords.<br />
The basic characteristic of the triad is obtained, even if we change the order of<br />
notes to create different inversions. Successive chords can be linked together in a<br />
soft chord progression, e.g. by selecting appropriate chord inversions (also called<br />
'voicings').<br />
<strong>digital</strong> <strong>piano</strong>
8.2.9 Metronome<br />
8.3 Function menu<br />
n Chord names<br />
Chord names tell you just about everything you need to know about a chord.<br />
The chord name tells you the root note, whether it is major, minor or diminished<br />
chord, whether it requires a major or flatted seventh and what alterations or ten‐<br />
sion are used – everything at a glance.<br />
n Some chord types<br />
1. Press the [METRO] button to activate the metronome. You can select the beat<br />
in the Function menu.<br />
2. Press the [METRO] button again to turn the metronome off.<br />
Functions<br />
3. If the style mode is deactivated the beat follows the selection in the functions<br />
menu after turning on the metronome. If style mode is activated the beat set‐<br />
ting follows the current style.<br />
4. The metronome can be activated together with the style. If the style plays at<br />
first, the metronome will be enabled with the next bar. On the other hand, the<br />
metronome responds at once to the first beat of the style.<br />
Press the [FUNCTION] button to call the function menu. The first function shown after<br />
starting the menu is always ‘Transpos’ . Press the button [FUNCTION] repeatedly to<br />
select the desired option. Then change the parameter using the jog dial or the but‐<br />
tons [ +] or [–]:<br />
<strong>DP</strong>-<strong>30</strong><br />
27
Functions<br />
8.3.1 Transposing<br />
28<br />
Option Display Value range Default value<br />
Transpose Transpos –12 to +12 0<br />
Fine tuning Tune –50 to 50 0<br />
Beat Beat 0, 2 to 9 4<br />
Touch sensitivity Touch OFF, 1, 2, 3 2<br />
Split point Split pt 1 to 88 34 (F3 # )<br />
Reverb level DSPlevel OFF, 1 to 7 2<br />
MIDI receive<br />
channel<br />
Midi In 01 to 16, ALL ALL<br />
MIDI send channel Midi Out 01 to 16 01<br />
If you don't press a key within five seconds after you enter the function<br />
menu, the menu will close automatically.<br />
This function lets you adjust the keyboard pitch in 12 semitone steps up or down.<br />
1. First, press the [FUNCTION] button to open the TRANSPOSE menu. The display<br />
shows the current setting.<br />
2. Press the [+] / [–] buttons or turn the jog dial to shift the pitch up or down. The<br />
default value is ‘000’ .<br />
3. Press the buttons [+] and [–] simultaneously to restore the preset ‘000’ no<br />
transposing).<br />
If you don't press a button for five seconds after opening the TRANSPOSE<br />
menu, it will be automatically cancelled.<br />
<strong>digital</strong> <strong>piano</strong>
8.3.2 Fine tuning<br />
8.3.3 Beat<br />
8.3.4 Touch sensitivity<br />
Use this function to fine tune the entire keyboard in cent increments.<br />
The display shows the current setting. Use the jog dial or the buttons [ +] or [–]<br />
to change the tuning within a range of –50 to +50 cents. Each keystroke<br />
changes the value by 1 cent. Press the buttons [ +] and [–] simultaneously to<br />
reset the tuning to the preset value.<br />
This function sets the beat value in a range of 0 to 9.<br />
The display shows the current setting. Use the jog wheel or the buttons [ +] or<br />
[–] to change the beat.<br />
This function lets you adjust the touch response of the keyboard in four steps.<br />
Parameter Description<br />
‘OFF’ Touch sensitivity is off, very recommendable when playing the<br />
organ voice.<br />
‘001’ Soft<br />
‘002’ Normal<br />
‘003’ Hard<br />
Functions<br />
In this setting, the volume is higher than usual even when playing<br />
with a soft touch.<br />
This setting corresponds to the usual touch response of a key‐<br />
board.<br />
In this setting, the volume is lower than usual even when playing<br />
with a hard touch.<br />
1. The display shows the current setting. Use the jog wheel or the buttons [ +] or<br />
[–] to change the touch sensitivity.<br />
2. When selecting ‘OFF’ , the ‘TOUCH’ indicator turns off and the function is deac‐<br />
tivated.<br />
<strong>DP</strong>-<strong>30</strong><br />
29
Functions<br />
8.3.5 Split point<br />
8.3.6 DSP effect level<br />
8.3.7 MIDI receive channel (Midi In)<br />
<strong>30</strong><br />
This function lets you set the point that separates the entire keyboard into two sec‐<br />
tions.<br />
1. The display shows the current setting.<br />
2. Use the jog dial or the [+] / [–] buttons to change the split point. You can also<br />
just press the key you would like to set as split point. The keys to the right of<br />
the split point are considered to be the right hand area, the opposite side is the<br />
left hand area (chord area).<br />
Parameter range: 1 to 88. Default setting: 34 (F3 # ).<br />
In the ‘DSP Level’ function menu, set the desired value using the jog dial or the<br />
[+] / [–] buttons.<br />
Parameter range: OFF, 1 to 7. Default setting: ‘2’ .<br />
In the ‘Midi In’ function menu, you can set the channel on which the <strong>digital</strong><br />
<strong>piano</strong> receives MIDI data from other devices. Use the jog dial or the [+] / [–]<br />
buttons to select the MIDI receive channel(s).<br />
Parameter range: channels 1 to 16 or ‘ALL’ for all channels. Default setting:<br />
‘ALL’ .<br />
<strong>digital</strong> <strong>piano</strong>
8.3.8 MIDI send channel (Midi Out)<br />
8.4 Mixer menu<br />
Adjustable options and parameter<br />
In the ‘Midi Out’ function menu, you can set the channel on which the <strong>digital</strong><br />
<strong>piano</strong> sends MIDI data to other devices. Use the jog dial or the [ +] / [–] buttons<br />
to select the MIDI send channel.<br />
Parameter range: channels 1 to 16. Default setting: ‘001’ .<br />
Use this menu to set the volume for the various style elements and instrument<br />
voices.<br />
1. Press the [MIXER] button to call the mixer menu. By default, the first option<br />
after opening this menu is ‘Drum Vol’ .<br />
2. Press the [MIXER] button repeatedly to select the desired option. Subsequently,<br />
you can set the selected parameter using the jog dial or the [ +] / [–] buttons.<br />
If you don't press a key within five seconds after you've entered the mixer<br />
menu, it will close automatically.<br />
Option Display Value range Standard Description<br />
DRUM volume Drum Vol 000 to 031 020 Percussion accompaniment<br />
Bass volume Bass Vol 000 to 031 018 Bass accompaniment<br />
ORCHESTRA Oc Vol 000 to 031 021 Orchestra accompaniment<br />
UPPER1 volume Voice R1 000 to 031 024 Right hand voice<br />
UPPER2 volume Voice R2 000 to 031 012 Second right hand voice in<br />
dual mode<br />
LOWER volume Voice L 000 to 031 012 Left hand voice<br />
<strong>DP</strong>-<strong>30</strong><br />
Functions<br />
31
Functions<br />
8.5 Memory<br />
8.5.1 Memory banks<br />
8.5.2 Memory data<br />
32<br />
You can store up to 16 complete control panel setups that you can recall whenever<br />
needed.<br />
There are four memory banks in total. Each bank contains four memory slots (M1 to<br />
M4).<br />
1. Press the [BANK] button repeatedly to select the desired memory bank. The dis‐<br />
play shows ‘MEMORY 0X’ .<br />
2. Press one of the buttons [M1] to [M4] to select one of the four memory slots.<br />
The display shows ‘MEMORY 0X–X’<br />
You can store the settings for the following functions as data in the memory:<br />
n Right hand voice R1<br />
n Second right hand voice R2<br />
n Left hand voice L<br />
n Style<br />
n Tempo<br />
n Function<br />
n Mixer<br />
n Accompaniment volume.<br />
If the current memory data are changed, the corresponding memory indi‐<br />
cator in the display turns off.<br />
<strong>digital</strong> <strong>piano</strong>
8.5.3 Storing & loading parameters<br />
8.5.4 Deleting memory data<br />
8.6 One Touch Setting<br />
1. Keep the [STORE] button pressed and press one of the buttons [M1] to [M4]<br />
simultaneously. Then the data will be stored in the respective memory slot (M1<br />
to M4). Please note that any previously stored data will be overwritten.<br />
2. Press one of the buttons [M1] to [M4]. The data is then loaded from the corre‐<br />
sponding memory slot replacing the current settings. The respective memory<br />
slot number appears in the display.<br />
When you turn off the <strong>digital</strong> <strong>piano</strong>, the stored data is retained.<br />
1. If you keep the buttons [STORE] and [M1] pressed while powering the <strong>digital</strong><br />
<strong>piano</strong> up, the current memory data will be saved as the default values.<br />
2. If you keep the buttons [+] and [–] pressed while powering the <strong>digital</strong> <strong>piano</strong><br />
up, the factory default values are loaded and stored songs are deleted.<br />
One Touch Setting (O.T.S.) is a convenient feature that allows you to immediately<br />
reconfigure all the settings with just one single keystroke. These are rhythm-based<br />
combinations of instrument voices. With this function, four types of parameters can<br />
be loaded (M1 to M4).<br />
The standard parameter saved in the O.T.S. are:<br />
n Right hand voice R1<br />
n Second right hand voice in dual mode R2<br />
n Left hand voice L<br />
n R1 volume<br />
n R2 volume<br />
<strong>DP</strong>-<strong>30</strong><br />
Functions<br />
33
Functions<br />
8.7 Recording and playback<br />
8.7.1 Recording standby<br />
8.7.2 Start recording<br />
34<br />
n Orchestra accompaniment for R1<br />
n Orchestra accompaniment for R2.<br />
1. Select a style.<br />
2. Press the [O.T.S.] button to start this mode. ‘O.T.S.’ appears in the display. Press<br />
one of the buttons [M1] to [M4]. Then the device loads the respective param‐<br />
eter types that suit to the current style. Thereby, the A.B.C. mode is turned on<br />
automatically.<br />
3. Press one of the buttons [M1] to [M4] that provide the desired settings.<br />
4. Press the [O.T.S.] button again to quit the O.T.S. mode. The display shows<br />
‘MEMORY’ .<br />
If you press one of the [M1] to [M4] buttons while recording a song or<br />
playing a recorded song, no ‘FILL IN’ will be inserted.<br />
1. Press the [RECORD] button to activate the Recording mode. ‘RECORD’ lights up<br />
in the display. ‘BEAT 1’ to ‘BEAT 4’ start flashing synchronously and thus indi‐<br />
cate Recording standby.<br />
2. Now you can select the instrument voices and the style number, and set the<br />
tempo and mixer parameters.<br />
1. When ‘BEAT 1’ to ‘BEAT 4’ are flashing in the display, press the [START/STOP]<br />
button or one of the <strong>piano</strong> keys to start recording.<br />
<strong>digital</strong> <strong>piano</strong>
8.7.3 Stop recording<br />
8.7.4 Recording playback<br />
2. ‘BEAT 1’ to ‘BEAT 4’ light up according to the current tempo.<br />
– When you turn off the <strong>digital</strong> <strong>piano</strong>, the stored data is retained.<br />
– If you keep the buttons [+] and [–] pressed while powering the <strong>digital</strong><br />
<strong>piano</strong> up, the factory default values are loaded and stored songs are<br />
deleted.<br />
– If you keep the buttons [RECORD] and [PLAY/STOP] pressed while pow‐<br />
ering the <strong>digital</strong> <strong>piano</strong> up, the recorded data is deleted.<br />
Press the [RECORD] button a third time to stop the recording. If you're<br />
recording an accompaniment track press the [INTRO/ENDING] button to finish<br />
the recording after the ending section. The recording stops automatically<br />
when the memory is full. In this case, ‘Full’ appears in the display.<br />
1. Press the [PLAY/STOP] button to play the recorded data.<br />
2. Press the [PLAY/STOP] button again to stop playback.<br />
Functions<br />
If you press the [PLAY/STOP] button, but no recording exists, ‘Empty’ briefly<br />
appears in the display.<br />
<strong>DP</strong>-<strong>30</strong><br />
35
Functions<br />
8.8 Songs for practising<br />
36<br />
The <strong>digital</strong> <strong>piano</strong> offers 60 songs for practising in total, where you mute the right<br />
hand voice and play this part yourself.<br />
1. Playing and ending practising songs<br />
Press the [SONG] button to enter the playback mode for practising songs.<br />
‘SONG’ appears in the display. If you press the [SONG] button again all prac‐<br />
tising songs are played in an endless loop. If you press the [START/STOP] button<br />
the currently displayed practising song is played in an endless loop.<br />
Press the [START/STOP] button again to end the currently played practising<br />
song. This will not quit the mode for practising song playback ‘SONG’ .<br />
2. Selecting practising song<br />
Use the jog wheel or the [+] / [–] buttons to select the desired practising song.<br />
When choosing a new practising song, the display shows the title.<br />
3. Playback control<br />
Prior to playback start, one beat is pre-counted. The beat display starts with a<br />
negative value. The practising song begins with beat 1.<br />
4. Press the [START/STOP] button followed by one of the [STYLE], [VOICE], [DUAL]<br />
or [LOWER] buttons to stop playback and quit the mode for practising songs.<br />
5. Press the [MELODY OFF] button to mute the right hand voice. ‘MELODY OFF’<br />
lights up in the display and you only hear the left hand voice. Press the<br />
[MELODY OFF] button again to unmute the track.<br />
<strong>digital</strong> <strong>piano</strong>
9 Voice list<br />
No. Voice No. Voice No. Voice<br />
001 Acoustic Grand Piano 031 Distortion Guitar 061 French Horn<br />
002 Bright Acoustic Piano 032 Guitar Harmonics 062 Brass Section<br />
003 Electric Grand Piano 033 Acoustic Bass 063 Synth Brass 1<br />
004 Honky-Tonk Piano 034 Finger Bass 064 Synth Brass 2<br />
005 Electric Piano 1 035 Pick Bass 065 Soprano Sax<br />
006 Electric Piano 2 036 Fretless Bass 066 Alto Sax<br />
007 Harpsichord 037 Slap Bass 1 067 Tenor Sax<br />
008 Clavi 038 Slap Bass 2 068 Baritone Sax<br />
009 Celesta 039 Synth Bass 1 069 Oboe<br />
010 Glockenspiel 040 Synth Bass 2 070 English Horn<br />
011 Music Box 041 Violin 071 Bassoon<br />
012 Vibraphone 042 Viola 072 Clarinet<br />
013 Marimba 043 Cello 073 Piccolo<br />
014 Xylophone 044 Contrabass 074 Flute<br />
015 Tubular Bells 045 Tremolo Strings 075 Recorder<br />
016 Dulcimer 046 Pizzicato Strings 076 Pan Flute<br />
017 Drawbar Organ 047 Orchestral Harp 077 Blown Bottle<br />
018 Jazz Organ 048 Timpani 078 Shakuhachi<br />
019 Rock Organ 049 StringsEnsemble 1 079 Whistle<br />
020 Church Organ 050 StringsEnsemble 080 Ocarina<br />
021 Reed Organ 051 Synth Strings 1 081 Square<br />
022 Accordion 052 Synth Strings 2 082 Sawtooth<br />
023 Harmonica 053 Choir Aahs 083 Calliope<br />
024 Tango Accordion 054 Voice Oohs 084 Chiff<br />
025 Nylon Guitar 055 Synth Voice 085 Charang<br />
026 Steel Guitar 056 Orchestra Hit 086 Voice<br />
027 Jazz Guitar 057 Trumpet 087 Fifths<br />
028 Clean Guitar 058 Trombone 088 Bass Lead<br />
029 Muted Guitar 059 Tuba 089 Fantasia<br />
0<strong>30</strong> Overdriven Guitar 060 Muted Trumpet 090 Warm<br />
<strong>DP</strong>-<strong>30</strong><br />
Voice list<br />
37
Voice list<br />
No. Voice No. Voice No. Voice<br />
091 Poly Synth 122 Breath Noise 150 Soft Accordion<br />
092 Choir 123 Seashore 151 Soft Accordion 2<br />
093 Bowed 124 Bird Tweet 152 Harmonic<br />
094 Metallic 125 Telephone Ring GIT & BASS<br />
095 Halo 126 Helicopter 153 N-Gthamm<br />
096 Sweep 127 Applause 154 12Str Guitar<br />
097 Fx1 (rain) 128 Gunshot 155 Clean Guitar 2<br />
098 Fx2 (soundtrack) KEYBOARD 156 Solidwa<br />
099 Fx3 (crystal) 129 Pianostr 157 Overdriven Guitar 2<br />
100 Fx4 (atmosphere) 1<strong>30</strong> Modern Electric Piano 158 Tremolo Guitar<br />
101 Fx5 (brightness) 131 Solo Piano 159 Funk Guitar<br />
102 Fx6 (goblins) 132 Polar 160 Bass Cymbal<br />
103 Fx7 (echoes) 133 Grand Harpsi 161 Synth Bass 3<br />
104 Fx8 (sci-fi) 134 Clavi 2 162 Synth Bass 4<br />
105 Sitar 135 Bell STRINGS<br />
106 Banjo 136 Bell 2 163 Viola 2<br />
107 Shamisen 137 Vibes 2 164 Cello 2<br />
108 Koto 138 Vibesma 165 Cello 3<br />
109 Kalimba 139 Marimba 2 166 Strings Ensemble 3<br />
110 Bag Pipe ORGAN 167 Strings Ensemble 4<br />
111 Fiddle 140 Electric Organ 168 Synth Strings 3<br />
112 Shanai 141 Jazz Organ 2 169 Dream Strings<br />
113 Tinkle Bell 142 Jazz Organ 3 BRASS & PIPE<br />
114 Agogo 143 Clik Organ 170 Trombone 2<br />
115 Steel Drums 144 Pop Organ 171 FM Horn<br />
116 Wood Block 145 Church Organ 2 172 Bbbrass<br />
117 Taiko Drum 146 Electric Organ 2 173 Hibrass<br />
118 Melodic Tom 147 Tremolo Organ 174 Tenosax 2<br />
119 Synth Drum 148 Q-Organ 175 Basso 2<br />
120 Reverse Cymbal ACCORDION LEAD<br />
121 Guitar Fret Noise 149 Accordion 2 176 Whistle 2<br />
38<br />
<strong>digital</strong> <strong>piano</strong>
No. Voice No. Voice No. Voice<br />
177 Pan Flute 2 CHINESE INSTRUMENTS 199 XIAO<br />
178 Lead 1 188 Pi PA DRUM KIT<br />
179 Lead 3 189 YUE QIN 200 Standard Drum 1<br />
180 Warplead 190 MID RUAN 201 Standard Drum 2<br />
PAD 191 GU ZHEN 202 Room Drum<br />
181 Sinepad 192 YANG QIN 203 Rock Drum<br />
182 Softpad 193 ER HU 204 Electric Drum<br />
183 Bellpad 194 GAO HU 205 Analog Drumset<br />
184 Synpad 195 SUO NA 206 Dance Drumset<br />
185 Hornpad 196 LU SHEN 207 Jazz Drum<br />
186 Newagpad 197 QU DI 208 Brush Drumset<br />
187 Bagpipe 198 BANG DI 209 Standard Drumset<br />
<strong>DP</strong>-<strong>30</strong><br />
210 Chinese Percussion<br />
Voice list<br />
39
Styles list<br />
10 Styles list<br />
No. Style No. Style No. Style<br />
8 BEAT & 16 BEAT 028 Easy Ballad 055 Samba Funk<br />
001 8 Beat 029 Love Ballad 056 Soul<br />
002 Guitar Pop 1 0<strong>30</strong> Natural Ballad 057 Soul Beat<br />
003 8 Beat Disco 031 Piano Ballad 058 Hip Hop Soul<br />
004 8 Beat Dance 032 EP Ballad 059 British Soul Pop<br />
005 60s 8 Beat 033 New R&B Ballad 060 Hip Hop Beat<br />
006 Pop Funk ROCK 061 R & B Ballad<br />
007 16 Beat Ballad 034 Rock JAZZ<br />
008 Pop 16 Beat 1 035 Folk Rock 062 Swing<br />
009 Pop 16 Beat 2 036 Slow Rock 1 063 Jazz Brush<br />
010 16 Beat Modern 037 Hard Rock 064 Cool Jazz Ballad<br />
011 Modern 16 Beat 038 6/8 Rock 065 Acid Jazz 1<br />
012 16 Beat Bossa Nova 039 Rock & Roll 066 Acid Jazz 2<br />
013 16 Beat Funk 040 70's Rock & Roll 067 Big Band Medium<br />
014 Cool Beat 041 Rock Shuffle 068 Big Band Ballad<br />
POP 042 4/4 Blues 069 Swing Shuffle<br />
015 Guitar Pop 2 DANCE 070 Fusion<br />
016 Pop beat 043 Club Dance 071 Jazz Fusion<br />
017 Soft beat 044 Disco COUNTRY<br />
018 Sting Latin 045 70's Disco Funk 072 Country 8 Beat<br />
019 Brit Pop 1 046 Garage 073 Country Pop 1<br />
020 Brit Pop 2 047 Rap 1 074 Country Ballad<br />
021 New Age 048 Rap 2 075 Modern Country<br />
022 Pop Hit 049 House 076 Country Folk<br />
023 Fusion Shuffle 050 Euro Dance 077 2/4 Country<br />
BALLAD 051 Techno 078 Country Pop 2<br />
024 Folk Ballad SOUL & FUNK 079 Country Shuffle<br />
025 Pop Ballad 1 052 Jazz Funk 080 Country Quick Steps<br />
026 Pop Ballad 2 053 Cool Funky 081 Bluegrass<br />
027 Rock Ballad 054 Groove<br />
40<br />
<strong>digital</strong> <strong>piano</strong>
No. Style No. Style No. Style<br />
LATIN/BALLROOM TRADITIONAL 108 Slow Rock 2<br />
082 Bossa Nova 1 096 March 109 Bossa Nova 2<br />
083 Rhumba 097 German March 110 Twist<br />
084 Cha Cha Cha 098 6/8 March INDONESIA<br />
085 Pop Cha Cha 099 Polka 111 Dandut 1<br />
086 Beguine 100 Polka Pop 1 112 Dandut 2<br />
087 Tango 101 Polka Pop 2 113 Dangdu<br />
088 Swing Fox 102 Slow Waltz 114 Dangdut 1<br />
089 Mambo 103 Country Waltz 115 Dangdut 2<br />
090 Salsa 104 Jazz Waltz 116 Dangdut 3<br />
091 Samba 105 Musette 117 Kercong 1<br />
092 Pasodoble PIANO 118 Kercong 2<br />
093 Slow Bolero 106 Pianist 119 PopKcong<br />
094 Habanera 107 Ballad 120 Sdangdut<br />
095 Latin Rock<br />
<strong>DP</strong>-<strong>30</strong><br />
Styles list<br />
41
Practice and demo songs<br />
11 Practice and demo songs<br />
No. Title No. Title<br />
PIANO 027 Edelweiss<br />
001 For Alice 028 O Sole Mio<br />
002 Habanera 029 Silent Night<br />
003 Four Little Swans 0<strong>30</strong> Ave Maria<br />
004 Moseta Dance 031 Five Hundred Miles<br />
005 Germanic Dance 032 Happy New Year<br />
006 Turkish March 033 It's Beginning To Look A Lot Like Christmas<br />
007 March 034 Jeanie With The Light Brown Hair<br />
008 Away In A Manger 035 My Bonnie<br />
009 Chopsticks 036 Song Of The Pearlfisher<br />
010 2-Part Invention # 13 In A Minor. BWV 784 037 The Stage Coach<br />
FOLK & COUNTRY 038 Entertainer<br />
011 Country 039 Annie Laurie<br />
012 Jambalaya 040 Kiling Me Softly With His Song<br />
013 Susanna 041 Last Rose Of Summer<br />
014 Bridge 042 The Old King Cole<br />
015 Battle Hymne Of The Republic JAZZ & FUSION<br />
016 The Old Gray Mare 043 Maple Leaf Rag<br />
017 American Patrol 044 June Samba<br />
018 In The Rain 045 Funk<br />
019 Sippin' Cider Through A Straw 046 I Can....<br />
GOLDEN & POP 047 Sea Shore<br />
020 Are You Lonesome Tonight 048 Guitar & Saxophone<br />
021 Only You 049 The Hip Hop's Night<br />
022 End Of The World 050 Blue Lunch<br />
023 House Of Rising Sun 051 Cobweb<br />
024 The Blues-Bells Of Scotland 052 Wine<br />
025 Over The Rainbow 053 Jazz Old Man<br />
026 Beautiful Dreamer 054 Dark Eyes<br />
42<br />
<strong>digital</strong> <strong>piano</strong>
No. Title No. Title<br />
055 Carlos CHINESE<br />
056 Sad 058 South Mud Bay<br />
057 The Jazz 059 Give You A Rose<br />
Demo songs<br />
No. Name<br />
001 DEMO 1<br />
002 DEMO 2<br />
003 DEMO 3<br />
<strong>DP</strong>-<strong>30</strong><br />
060 Flowing Rill<br />
Practice and demo songs<br />
43
Chord list<br />
12 Chord list<br />
Chord description Normal chord construction Chord<br />
symbol<br />
0 Major [M] 1–3–5 C C<br />
1 Major sixth [6] 1–(3)–5–6 C6 C6<br />
2 Major seventh [M7] 1–3–(5)–7 CM7 CM7<br />
Display<br />
3 Major seventh with augmented eleventh [M7#11] 1–(2)–3–#4–(5)–7 CM7#11 CM7(#11)<br />
4 Major add ninth [Madd9] 1–2–3–5 CMadd9 CM(9)<br />
5 Major ninth [M9] 1–2–3–(5)–7 CM9 CM7(9)<br />
6 Major sixth and ninth [6 9] 1–2–3–(5)–6 C6 9 C6(9)<br />
7 Augmented [aug] 1–3–#5 Caug Caug<br />
8 Minor [m] 1–b3–5 Cm Cm<br />
9 Minor sixth [m6] 1–b3–5–6 Cm6 Cm6<br />
10 Minor seventh [m7] 1–b3–(5)–b7 Cm7 Cm7<br />
11 Minor seventh flatted fifth [m7b5] 1–b3–b5–b7 Cm7b5 Cm7(b5)<br />
12 Minor add ninth [madd9] 1–2–b3–5 Cmadd9 Cm(9)<br />
13 Minor ninth [m9] 1–2–b3–(5)–b7 Cm9 Cm7(9)<br />
14 Minor eleventh [m11] 1–(2)–b3–4–5–(b7) Cm11 Cm7(11)<br />
15 Minor major ninth [mM7] 1–b3–(5)–7 CmM7 CmM7<br />
16 Minor major ninth [mM9] 1–2–b3–(5)–7 CmM9 CmM7(9)<br />
17 Diminished [dim] 1–b3–b5 Cdim Cdim<br />
18 Diminished seventh [dim7] 1–b3–b5–6 Cdim7 Cdim7<br />
19 Seventh [7] 1–3–(5)–b7 C7 C7<br />
20 Seventh suspended [7sus4] 1–4–5–b7 C7sus4 C7sus4<br />
21 Seventh flatted fifth [7b5] 1–3–b5–b7 C7b5 C7(b5)<br />
22 Seventh ninth [79] 1–2–3–(5)–b7 C7 9 C7(9)<br />
23 Seventh sharp eleventh [7#11] 1–2–3–#4–(5)–b7 or 1–(2)–3–#4–5–b7 C7#11 C7(#11)<br />
24 Seventh thirteenth [7 13] 1–3–(5)–6–b7 or 2–3–5–6–b7 C7 13 C7(13)<br />
25 Seventh flatted ninth [7b9] 1–b2–3–(5)–b7 C7b9 C7(b9)<br />
26 Seventh flatted thirteenth [7b13] 1–3–5–b6–b7 C7b13 C7(b13)<br />
27 Seventh sharp ninth [7#9] (1)–#2–3–(5)–b7 C7#9 C7(#9)<br />
28 Major seventh augmented [M7aug] 1–3–#5–7 CM7aug CM7aug<br />
29 Seventh augmented [7aug] (1)–3–#5–b7 C7aug C7aug<br />
44<br />
<strong>digital</strong> <strong>piano</strong>
Chord description Normal chord construction Chord<br />
symbol<br />
<strong>30</strong> Suspended fourth [sus4] 1–4–5 Csus4 Csus4<br />
31 Suspended second [1+2+5] 1–2–5 C1+2+5 C<br />
<strong>DP</strong>-<strong>30</strong><br />
Chord list<br />
Display<br />
45
MIDI implementation chart<br />
13 MIDI implementation chart<br />
Function Transmitted Received Remarks<br />
Basic channel Default 1 1-16<br />
Changed 1-16 1-16<br />
Mode Default No Mode 3<br />
Messages No No<br />
Altered *********** No<br />
Note number 9 – 120 0 – 127<br />
True voice *********** 0 – 127<br />
Velocity note Note ON Yes, 9nH,<br />
v = 1 127<br />
Note OFF No, 9nH,<br />
v = 0<br />
After touch Keys No No<br />
Yes, 9nH,<br />
v = 1 127<br />
No, 9nH,<br />
v = 0<br />
Channels No No<br />
Pitch bend Yes Yes<br />
Control change 0<br />
46<br />
1<br />
5<br />
6<br />
7<br />
10<br />
11<br />
64<br />
65<br />
66<br />
67<br />
80<br />
81<br />
91<br />
93<br />
120<br />
121<br />
123<br />
Yes<br />
Yes<br />
No<br />
Yes<br />
Yes<br />
No<br />
No<br />
Yes<br />
No<br />
No<br />
Yes<br />
Yes<br />
Yes<br />
Yes<br />
Yes<br />
No<br />
No<br />
Yes<br />
<strong>digital</strong> <strong>piano</strong><br />
Yes<br />
Yes<br />
Yes<br />
Yes<br />
Yes<br />
Yes<br />
Yes<br />
Yes<br />
Yes<br />
Yes<br />
Yes<br />
Yes<br />
Yes<br />
Yes<br />
Yes<br />
Yes<br />
Yes<br />
Yes<br />
Bank select<br />
Modulation<br />
Portamento time<br />
Data entry<br />
Volume<br />
Pan<br />
Expression<br />
Sustain pedal<br />
Portamento ON/OFF<br />
Sostenuto pedal<br />
Soft pedal<br />
Reverb program<br />
Chorus program<br />
Reverb level<br />
Chorus level<br />
All sound off<br />
Reset all controllers<br />
All notes off
Function Transmitted Received Remarks<br />
Program change True # Yes<br />
***********<br />
System exclusive No Yes<br />
System common Song position pointer No No<br />
Yes<br />
Song select No No<br />
Tune request No No<br />
System real time Clock No No<br />
Commands No No<br />
Aux messages Local ON/OFF No No<br />
Notes: *1<br />
MIDI channel mode<br />
ALL notes OFF Yes Yes<br />
Active sensing No Yes<br />
System reset No Yes<br />
0 – 127<br />
When the accompaniment starts, an FAH message is transmitted.<br />
When the accompaniment stops, an FCH message is transmitted.<br />
When an FAH message is received, the accompaniment starts.<br />
When an FCH message is received, the accompaniment stops.<br />
MIDI implementation chart<br />
POLY MONO ON<br />
OMNI ON Mode 1 Mode 2<br />
OMNI OFF Mode 3 Mode 4<br />
<strong>DP</strong>-<strong>30</strong><br />
47
Technical specifications<br />
14 Technical specifications<br />
Keyboard 88 weighted keys with hammer action and adjustable touch velocity<br />
Instrument voices 210<br />
Styles 120<br />
Demo and practise songs 3 demo and 60 practise songs<br />
Polyphony 64-voiced (without DSP effect), 38-voiced (with DSP effect)<br />
Display Mulitfunctional LCD with blue backlight<br />
Switches and buttons [POWER], [VOLUME], [AUTO BASS CHORD], [MELODY OFF], [ACC. VOL +/–],<br />
[TEMPO +/–], [FUNCTION], [MIXER], [METRONOME], [DEMO], [SONG], [VOICE],<br />
[STYLE], [+/–], [BANK], [STORE (M1-M4)], [ONE TOUCH SETTING], [DUAL],<br />
[SPLIT], [RECORD], [PLAY/STOP]<br />
Accompaniment [START/STOP], [SYNC START], [INTRO/ENDING], [FILL A], [FILL B]<br />
Recording [RECORD], [PLAY/STOP]<br />
Memory 4 banks with 4 memory slots each<br />
MIDI Receive / send<br />
Connections Supply voltage AC 2<strong>30</strong> V , 2 × headphones (1/4" phone sockets),<br />
AUX OUT (L/R), USB, MIDI IN, MIDI OUT, three pedals (soft, sostenuto and<br />
sustain)<br />
Speakers 8 Ω, 2 × 25 W<br />
Dimensions (W × D × H) 1419 mm × 473 mm × 855 mm<br />
Weight 47 kg<br />
48<br />
<strong>digital</strong> <strong>piano</strong>
15 Protecting the environment<br />
Disposal of the packaging material<br />
Disposal of your old device<br />
For the transport and protective packaging, environmentally friendly materials have<br />
been chosen that can be supplied to normal recycling.<br />
Ensure that plastic bags, packaging, etc. are properly disposed of.<br />
Do not just dispose of these materials with your normal household waste, but make<br />
sure that they are collected for recycling. Please follow the notes and markings on<br />
the packaging.<br />
This device is subject to the European directive 2002/96/EC.<br />
Protecting the environment<br />
Do not dispose of the device with your normal household waste.<br />
Dispose of this device through an approved waste disposal firm or through your local<br />
waste facility. When discarding the device, comply with the rules and regulations<br />
that apply in your country. If in doubt, consult your local waste disposal facility.<br />
<strong>DP</strong>-<strong>30</strong><br />
49
Notes<br />
50<br />
<strong>digital</strong> <strong>piano</strong>
Musikhaus Thomann e.K. · Treppendorf <strong>30</strong> · 96138 Burgebrach · Germany · www.thomann.de