The XRB SR Lama Sky Robo From Hirobo by Francis ... - Sport Aviator
The XRB SR Lama Sky Robo From Hirobo by Francis ... - Sport Aviator
The XRB SR Lama Sky Robo From Hirobo by Francis ... - Sport Aviator

You also want an ePaper? Increase the reach of your titles
YUMPU automatically turns print PDFs into web optimized ePapers that Google loves.
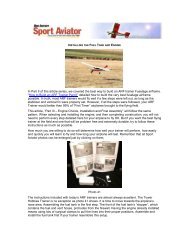
<strong>The</strong> <strong>XRB</strong> <strong>SR</strong> <strong>Lama</strong> <strong>Sky</strong> <strong>Robo</strong><br />
<strong>From</strong> <strong>Hirobo</strong><br />
<strong>by</strong> <strong>Francis</strong> DeNovio<br />
Helicopter flying is very different and looks like a lot of fun. I am far from the only RC airplane<br />
driver who thinks so; there are thousands. However, flying a model Helicopter is far different than<br />
flying an RC aircraft. <strong>The</strong>refore, many fixed-wing pilots think of a helicopter as a victory of<br />
lubrication oil and horsepower over common sense.<br />
So much is different between the two disciplines. <strong>The</strong> pilot’s perspective is different, especially<br />
from the rear. Unlike aircraft, the helicopter requires continuous pilot input to remain airborne and<br />
this particularly applies to the left, or “rudder”, hand. Every time I try to fly a helicopter on any RC<br />
Flight Simulator, I learned that I would only be buying some owner of a helicopter parts store a<br />
new Mercedes every year.<br />
While helicopter parts are easy to obtain, they are not cheap and most beginning helicopter pilots<br />
would need a lot of them: Probably a whole of them. This single fact limits the number of new<br />
model helicopter pilots. That is until now. A recent advance in helicopter design has opened up<br />
the realm of vertical indoor flight to everyone with some fixed wing RC piloting experience.<br />
Photo 1<br />
<strong>The</strong> development of indoor, twin-rotor electric helicopters (photo 1) has made it possible to<br />
transition from fixed wing flying to whirly wings. <strong>The</strong>se helicopters are extremely stable and easy<br />
to fly. Most any experienced RC pilot can keep one airborne without scaring everyone else in the<br />
same room. Well, with terrifying them anyway.<br />
Despite being easy to fly and not needing a tail rotor for direction, a twin-rotor helicopter does<br />
keep that left hand busy. In fact, the <strong>XRB</strong> helicopter teaches the same skills that will be required
to fly the more advanced single-rotor designs that might lay in the new helicopter pilot’s future. It<br />
also teaches that helicopters require a very gentle hand on the transmitter sticks. Helicopters<br />
respond quickly and decisively to every control input. This is another difference from fixed wing<br />
piloting.<br />
Photo 2<br />
<strong>Hirobo</strong>’s <strong>XRB</strong> <strong>SR</strong> <strong>Lama</strong> <strong>Sky</strong> <strong>Robo</strong> is marketed in the United States <strong>by</strong> Altech Marketing in<br />
Edison, New Jersey. Altech did a very good job packaging the helicopter both for protection and<br />
for sales appeal. Nothing was damaged in shipment and everything arrived safely.<br />
Photo 3<br />
When I say everything, I do mean everything. Photo 3 shows that attractive box’s contents. <strong>The</strong>re<br />
are twelve, yes twelve, extra rotor blades. Three complete sets of the foam blades are included<br />
just in case the new helicopter pilot has a few misunderstandings with hard objects while learning<br />
to fly. Of course, the expected 7.4-volt, 720 mAh Lithium Polymer (Li-Poly) battery and its 120volt<br />
wall charger are inside as are all the tools necessary to assemble and tune the helicopter.
Photo 4 Photo 5<br />
But there are some extras that are unexpected. While the regular landing skids are fine for flying,<br />
new pilots sometimes land harder than they should. <strong>The</strong> <strong>XRB</strong> has special landing skid braces that<br />
are easy to install (photo 4). <strong>The</strong>re is even a “trainer” landing gear (photo 5) in the package.<br />
Another unexpected item, but a welcome one, is the small black balancing stand used to confirm,<br />
or adjust, the balance of each rotor blade.<br />
Photo 6 Photo 7<br />
One more unexpected item is a set of lighter weight “fly bar” weights. <strong>The</strong> fly bar, stabilizer bar, is<br />
the metal rod with the two weights attached in photo 7. Its function is to stabilize and adjust the<br />
angle of the top rotor blade‘s disk, there<strong>by</strong> keeping the helicopter stable. Using the lighter weights<br />
on the fly bar makes the helicopter more maneuverable but also more sensitive and difficult to fly.<br />
For now, it might be a good idea to keep to the factory installed heavier weights.<br />
Photo 8<br />
<strong>The</strong> transmitter is the <strong>Hirobo</strong> model CHO3-F four-channel analog transmitter. <strong>The</strong> transmitter<br />
broadcasts on the standard RC aircraft frequencies, in this case 72.630, and is useable in any<br />
aircraft. <strong>The</strong> transmitter features servo reversing and trim on all four channels. It is powered <strong>by</strong> 8<br />
“AA” Alkaline (non-rechargeable) batteries. <strong>The</strong> batteries are not included.
Even though there is far more in this “kit” then would ever be expected, there is one notable<br />
exception. <strong>The</strong> battery charger included for the Lithium Polymer (Li-Poly) can only be used with<br />
120 VAC current. <strong>The</strong>re is no 12-volt DC powered charger included. But since this is not an<br />
outdoor machine, that isn’t a real problem.<br />
Assembly<br />
Photo 9 Photo 10<br />
Although the <strong>XRB</strong> is supplied ready to fly, it is a good idea to install the landing skid braces and<br />
the trainer landing gear. Photo 9 shows both these systems. <strong>The</strong> gray plastic legs reinforce the<br />
landing skid while the white pieces comprise the training gear. Install the braces first to help<br />
protect the landing skid during installation of the training gear.<br />
<strong>The</strong> shorter braces go on the rear of the helicopter as shown in photo 10. Snap the brace onto<br />
the skid cross bar above the rear vertical strut as shown. <strong>The</strong> top piece is held in place <strong>by</strong> the<br />
same screw that holds the tail boom in position (photo 10). Remove one screw at a time to keep<br />
the boom in place, position the brace end and install the screw. Do not over tighten the screws as<br />
they are very tiny and are seated into plastic. You do not want to strip the treads in the plastic<br />
mounts. Use the small screwdriver provided.<br />
Photo 11 Photo 12<br />
<strong>The</strong> longer, front braces attach on the top to the small top screws just outboard of the front<br />
coreless motor as shown in photo 11. Again, be careful not to strip the screw threads. <strong>The</strong> front<br />
braces clip to the front vertical strut just above the landing skid. Photo 12 shows the completed<br />
landing skid braces on one side. This side also shows the receiver crystal, in this case on<br />
Channel 42. If necessary, you can change the Channel just <strong>by</strong> changing both this and the<br />
transmitter crystal.
Photo 13 Photo 14<br />
Photo 13 shows the mounting “hardware” for the training gear. Using this gear helps to prevent<br />
the <strong>XRB</strong> <strong>SR</strong> from falling over on its side during a “sideways” landing. We new helicopter pilots<br />
have a difficult time landing while the helicopter is in a true, motionless hover. <strong>The</strong> machine<br />
always seems to be moving one way or the other when it finally touches down. If it is moving fast<br />
enough when it lands, it can fall over on its side, wiping out one or more blades. <strong>The</strong> training gear<br />
ends this hassle and keeps the helicopter upright during “dynamic” landings.<br />
Photo 15 Photo 16<br />
Photo 14 shows the training gear itself. <strong>The</strong> four “legs” of the gear and the ball ends are cut from<br />
the white plastic “tree.” <strong>The</strong> ball ends are just slid on the rod to the stop on the far end. <strong>The</strong>re are<br />
two types of soft skid mounts (photo 13). Align them as shown in photo 15 and slide a rod into<br />
each with the ball end outwards. But do not mount the rods into the center 4-cornered hub yet.<br />
Position each rod towards the center as shown in photo 16. Once they all meet, then install the<br />
center hub.<br />
Photo 17
After about 20 minutes of assembly time, the <strong>XRB</strong> <strong>SR</strong> looked like photo 17. <strong>The</strong> braced landing<br />
skid system is very strong and the light-weight training gear keeps the machine upright even<br />
during a rather harsh landing; and I had plenty of those at the start but there was never even a<br />
hint of damage. When fully assembled, the <strong>XRB</strong> <strong>SR</strong> <strong>Sky</strong> <strong>Robo</strong> is a very attractive looking<br />
helicopter.<br />
In photos 13 and 15, you can see a few of the many illustrated directions that are included with<br />
this aircraft. <strong>The</strong> instruction book is very detailed and complete. It includes three pages with<br />
fourteen illustrations just on pre-flighting the helicopter. <strong>The</strong>re is a six page flight instruction<br />
manual and six pages with 36 illustrations on making post-flight adjustments.<br />
Another four pages show how to adapt the <strong>XRB</strong> helicopter and its receiver to a different<br />
transmitter than the one supplied. As they gain experience, some helicopter pilots may wish to<br />
use a computer transmitter instead on the analog one supplied. This is done to increase mixing<br />
options such as rudder trim to throttle to adjust trim as the motors heat up during operation. <strong>The</strong><br />
receiver and its integral gyroscope, used to stabilize the helicopter, are compatible with all brands<br />
of transmitters.<br />
Battery Charging<br />
Before flying, charge the battery using the included wall charging unit. It is important to always<br />
use this charger when flying the <strong>XRB</strong>. Li-Poly batteries are a great technological advance over<br />
older Nickel Metal Hydride or Nickel Cadmium batteries. In fact, small electric powered<br />
helicopters like the <strong>XRB</strong> <strong>SR</strong> would not be possible without Li-Poly batteries. But with increased<br />
capacity and light weight, Li-Poly batteries also have increased risk factors.<br />
Using a non-Lithium charger will cause the batteries to explode. Burning or damaging them will<br />
also cause the battery to burn. Lithium Polymer batteries burn with a temperature around 2,000<br />
degrees F. That is very hot and will certainly ignite any burnable items, including aluminum cans,<br />
within reach. Lithium is an extremely reactive metal and combines explosively with the oxygen in<br />
the air. No other ignition source is required. If the battery pack is ever physically damaged or<br />
shows any signs of expansion or swelling, do not use it. Discard it at an approved recycling<br />
center.<br />
<strong>The</strong> battery charger puts out 0.65 Amps. That means that it will fully charge the .72 Ah (720 mAh)<br />
battery in about one hour. Is practice, the battery is never fully discharged so plan on about 40<br />
minutes to recharge after each flight. An extra battery, <strong>Hirobo</strong> part number 0301-032, would be a<br />
good idea for more flying time. Just be sure to allow a ten minute cooling period for the motors<br />
between flights.<br />
<strong>The</strong> charger appears to be a “balancing” charger. This means that the charger individually senses<br />
each of the two 3.2 volt cells in the pack. As one cell reaches full charge, current to it is reduced<br />
while the other cell completes its charging cycle. This is an important safety feature and is fast<br />
becoming the norm with Li-Poly chargers. Without balancing during the charge cycle, one cell<br />
may reach capacity before the other. <strong>The</strong> non-balanced charger would continue supplying full<br />
current to the fully-charged cell and it could rupture or explode.<br />
Never charge the battery inside the helicopter; always remove it. It would be safest to place the<br />
battery and charger on a non-flammable surface such as a concrete block or steel, not aluminum,<br />
plate. Make sure nothing is within five feet of the area above the battery or within two feet on any<br />
side.<br />
<strong>The</strong>se safety precautions apply to ALL Lithium Polymer batteries, not just the one supplied with<br />
this helicopter.<br />
First Flights
Photo 18<br />
<strong>The</strong> entire assembly process took about 30 minutes. All the control movements were checked<br />
and they all wiggled in the right directions. <strong>The</strong> battery was inserted with the connector under the<br />
front cross member as shown in the instructions. This makes it easy to snap the cockpit on and<br />
off. Connect the battery to the receiver and everything is ready to go.<br />
Remember this is an indoor helicopter. So the first flights were done in a school cafeteria with ten<br />
foot high ceilings. <strong>The</strong> <strong>XRB</strong> <strong>SR</strong> has a convenient on-off switch so it is possible to safely connect<br />
the battery before turning on the transmitter. For flight however, the transmitter must be turned on<br />
first.<br />
<strong>The</strong>n hold the helicopter still with on finger on the landing skid and gently turn the receiver on. Do<br />
not let the helicopter move until the LED on the side is lit. <strong>The</strong> short, about three seconds, startup<br />
period sets the gyro for straight flight so it is important to make sure the helicopter is motionless<br />
during this period.<br />
<strong>The</strong>n just lower the throttle switch all the way to arm the motors. <strong>The</strong>re is an extra safety that<br />
prevents the motors from turning until the transmitter throttle is reduced all the way. Once the<br />
safety is disarmed, the red and green LEDs should be lit, warning that the gyro is initialized and<br />
the motors are ready to be armed. Carefully press the motor arming switch, called the start<br />
switch, and the <strong>XRB</strong> <strong>SR</strong> is ready to fly.<br />
I like it that this helicopter has three separate safeties to protect my fingers from the blades. But in<br />
reality, these safeties actually protect the foam blades from my fingers. While the coreless motors<br />
are powerful for their “180” size, these are not four-horsepower units from a 30% Extra and<br />
cannot cause much physical damage to people or furniture. <strong>The</strong> foam blades resist scratching<br />
tables or skin, but it is always good to be on the safe side.<br />
Photo 19<br />
Photo 18 shows the <strong>XRB</strong> <strong>SR</strong> <strong>Sky</strong> <strong>Robo</strong> just before its first liftoff. Remember that I do not fly<br />
helicopters, only fixed-wing models, and that this was a new experience for me. <strong>The</strong> helicopter<br />
lifted off and hovered with a slight backwards motion (photo 19). I held the right transmitter stick<br />
forward just a small amount and added some “down” trim.
Photo 20<br />
<strong>The</strong> machine moved forward during this process and rotated its nose to the right. One thing a<br />
new RC helicopter pilot learns quickly is to watch the nose direction, not the tail motion. With the<br />
helicopter pointed away from the pilot, moving the left-hand “rudder stick” to the right moves the<br />
helicopter’s nose to the right while the tail boom swings leftwards. However, when the helicopter<br />
is pointed at the pilot, moving the transmitter stick to the right swings the tail boom to the right<br />
while the nose seems to travel to the left. This is similar to the aileron control reversal a fixedwing<br />
pilot experiences when the airplane heads back to the pilot.<br />
Photo 21 Photo 22<br />
I was very surprised <strong>by</strong> just how easy this helicopter is to fly. It is extremely stable and goes just<br />
where it is pointed. <strong>The</strong>re is plenty of reserve power; liftoff needed only about half throttle. After<br />
about 5 minutes of hover and landing practice, I was getting to feel just a little bit of confidence<br />
that “hey, I can do this!” and brought the helicopter up to eye level and hovered around. This is a<br />
very easy machine to fly.<br />
I tried left and right side movements using the “aileron stick” and these also were predicable and<br />
stable. Intentional backward flight, not the accidental one on liftoff, proved possible but needed<br />
some more pilot orientation to keep the tail boom pointed “straight ahead”. Still, there were no<br />
stability problems but the rearward motion was very slow.<br />
Photo 23 Photo 24
Now over-confident <strong>by</strong> just how easy this machine is to fly, and fun too, I lifted off and went to<br />
“high altitude” to set out on a cross country flight (photo 23). After flying about five minutes and<br />
now recklessly over-confident, I decided to land at the far away “Table Top Mesa” airport as<br />
shown in photo 24. You know, the darn thing landed like it was being guided in <strong>by</strong> a Tractor<br />
Beam.”<br />
Photo 25 Photo 26<br />
Liftoff from Table Top airport was uneventful as was the return trip (photo 25). However,<br />
remember that the <strong>XRB</strong> <strong>SR</strong> is designed primarily for indoor flight. As such it does not cover<br />
ground quickly. Maximum controllable forward motion is 3-5 mph. Trying to fly faster than 5 mph<br />
causes some instability and rocking motion. But 5 mph indoors is 7.5 ft. / second and that seems<br />
pretty fast when the wall and ceiling start to approach the helicopter. While attempting some high<br />
altitude flights, I bounced the <strong>XRB</strong> <strong>SR</strong> off the ten-foot high ceiling (photo 26). <strong>The</strong> rugged<br />
construction survived with no damage and the foam blades never scratched the fragile ceiling<br />
tiles.<br />
Photo 27 Photo 28<br />
Returning from the cross country flight, and after having determined the aircraft’s service ceiling,<br />
it was time to land. Still not quite believing how easy this helicopter is to fly, I made the landing<br />
approach (photo 27), hovered a bit and landed (photo 28) with just the slightest side motion. Not<br />
bad for a first helicopter flight.<br />
How It Works
Photo 29<br />
Twin rotor helicopters simplify rotary flight because they sacrifice, up to a certain point, forward<br />
motion for stability and easy control. <strong>The</strong> twin rotors shown in photo 29 rotate in opposite<br />
directions to eliminate the torque effects caused <strong>by</strong> a single large rotor blade. This means that a<br />
tail rotor is not required.<br />
Photo 30<br />
Having the twin rotor blades counter-rotate around a single shaft reduces the mechanical<br />
complexity usually found in twin rotor systems. <strong>The</strong> upper blade and moveable head are not<br />
connected to a servo. Instead, the stabilizer bar, fly bar, senses the helicopter’s body movements<br />
and automatically adjusts the cyclic operation of the top blade to control “rudder” direction<br />
opposite to body motion. This stabilizes the machine in directional flight.<br />
Photo 31<br />
<strong>The</strong> angle between the stabilizer bar and the top rotor blade is important and should be about 90<br />
degrees. However it is adjustable should that be required for trim. Our <strong>XRB</strong> <strong>SR</strong> did not need<br />
adjustment.<br />
<strong>The</strong> lower rotor blades and head are not stabilized. Instead they are controlled <strong>by</strong> the servos. <strong>The</strong><br />
servos control the rotor through a swash plate for “aileron” and “elevator” control. By angling the<br />
lower rotor disk downwards or upwards, an elevator effect is induced. By pitching the disk angle<br />
left or right, there is an aileron effect.
Photo 32<br />
“Rudder” control is determined <strong>by</strong> the twin coreless “180 series” motors. Depending on the<br />
transmitter inputs, one rotor is made to turn faster than the other and creates a torque that<br />
controls the yaw axis.<br />
How is forward flight limited? Inputting “down” elevator tilts the bottom rotor disk downwards<br />
toward the front. Pointed in this direction, the bottom rotor disk provides some forward thrust. But<br />
the top rotor is stabilized <strong>by</strong> the fly bar and remains rotating in a plane horizontal to the air. Its<br />
disk is not pointed downwards at the front as is the bottom rotor disk. Increasing the angle<br />
between the top and bottom rotor disks too much, <strong>by</strong> asking the helicopter to fly forward quickly,<br />
begins to result in an instability caused <strong>by</strong> the widely divergent disk thrust angles.<br />
But the twin rotors sure make the <strong>XRB</strong> <strong>SR</strong> easy to fly for a novice helicopter pilot! And indoor<br />
flight is measured in feet, not miles, so fast forward speeds are not useful nor desired. This is a<br />
very sophisticated machine. Tiny control inputs have big results. While not overly sensitive, the<br />
<strong>XRB</strong> <strong>SR</strong> responds quickly to inputs. You will find that stick movements are almost imperceptible,<br />
even to the pilot. Fortunately, the helicopter flies itself, right from the start.<br />
Everything needed for a beginning helicopter pilot is included and then some. <strong>The</strong> list price for a<br />
painless introduction to rotary flight is $350.00. But the street price is usually $300 or less. For<br />
more information about this very complete package, please go to:<br />
http://www.modelrectifier.com/products/rcHelicopters/xrb_<strong>Sky</strong>_<strong>Robo</strong>.asp