Sternal Talon - Sternal Closure System
Sternal Talon - Sternal Closure System
Sternal Talon - Sternal Closure System

You also want an ePaper? Increase the reach of your titles
YUMPU automatically turns print PDFs into web optimized ePapers that Google loves.
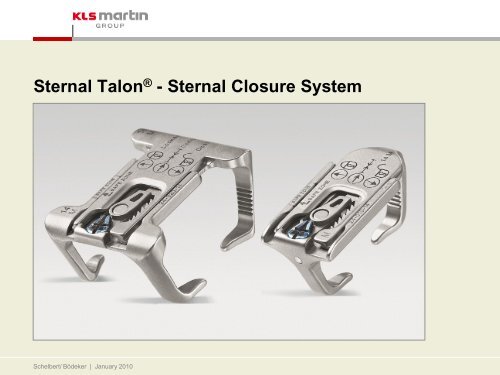
<strong>Sternal</strong> <strong>Talon</strong> ® - <strong>Sternal</strong> <strong>Closure</strong> <strong>System</strong><br />
Schelbert/ Bödeker | January 2010
Indication <strong>Sternal</strong> <strong>Talon</strong> ®<br />
The system can be used for cardiothoracic patients<br />
but is especially suitable for those at high risk<br />
resulting from:<br />
� Morbid obesity<br />
� Diabetes<br />
� Chronic obstructive pulmonary disease<br />
� …<br />
More over the <strong>Sternal</strong> <strong>Talon</strong> ® is effective for<br />
reconstruction procedures.<br />
Schelbert/ Bödeker | January 2010
<strong>Sternal</strong> <strong>Talon</strong> ® <strong>System</strong> Components<br />
� The <strong>Sternal</strong> <strong>Talon</strong> Implant is available in two basic versions.<br />
� All Implants consist of two parts.<br />
Single <strong>Talon</strong> Double <strong>Talon</strong><br />
„female“<br />
Schelbert/ Bödeker | January 2010<br />
„male“ „male“<br />
„female“
<strong>Sternal</strong> <strong>Talon</strong> ® <strong>System</strong> Components<br />
Function of screw:<br />
The front side of the implant features a blue<br />
screw offering three different setting options.<br />
7 o‘ clock Pos.<br />
„OPEN“<br />
3 o‘ clock Pos.<br />
„CLOSE“<br />
11 o‘ clock Pos.<br />
„LCOKED“<br />
Schelbert/ Bödeker | January 2010
Single <strong>Sternal</strong> <strong>Talon</strong> ®<br />
The Single <strong>Talon</strong> has two legs and is available in the five widths – XS, S, M, L, XL – and<br />
four foot plate depths: 11 mm, 14 mm, 17 mm, 20 mm.<br />
Schelbert/ Bödeker | January 2010
Double <strong>Sternal</strong> <strong>Talon</strong> ®<br />
The Double <strong>Talon</strong> has for legs and is available in four widths – S, M, L, XL –<br />
and four foot plate depths: 11 mm, 14 mm, 17 mm, 20 mm.<br />
Schelbert/ Bödeker | January 2010
<strong>Sternal</strong> <strong>Talon</strong> � Set<br />
� Each <strong>Sternal</strong> <strong>Talon</strong> � Set consists of two trays; a Single <strong>Talon</strong> and instrument tray and<br />
a Double <strong>Talon</strong> tray<br />
� The complete set contains all necessary instruments and 57 implants (43 Single and<br />
14 Double) in different measurements.<br />
Schelbert/ Bödeker | January 2010
Indication Video<br />
Schelbert/ Bödeker | January 2010
Measuring of the Sternum<br />
Measure sternal width<br />
Measuring of the total sternum width at the<br />
application points (ICS 1-5) by using the caliper.<br />
Both sternum halves have to be measured<br />
separately.<br />
Schelbert/ Bödeker | January 2010<br />
Measure sternal thickness<br />
After measurement of the sternum width the<br />
sternum thickness has to be measured at the<br />
placement points (ICS 1-5)
Measurement Chart<br />
All measurement results have to be entered into the measurement chart.<br />
The correct implant size has to be evaluated.<br />
Schelbert/ Bödeker | January 2010
Preparing Site for Insertion of <strong>Sternal</strong> <strong>Talon</strong> ®<br />
� Retract the skin and soft tissue to expose the articulations of the ribs to sternum.<br />
� Utilize blunt dissection or use an electro cautery to create a track.<br />
� This allows for the footplates of the <strong>Sternal</strong> <strong>Talon</strong> ® to pass in the intercostal space.<br />
Schelbert/ Bödeker | January 2010
Placing the <strong>Sternal</strong> <strong>Talon</strong> ®<br />
� Three position screw must be turned to the<br />
3 o´clock “Closing” position.<br />
� Hold the <strong>Sternal</strong> <strong>Talon</strong> ® at a 45 degree angle to<br />
the sternum.<br />
� Guide the legs into the tracks in the intercostal<br />
space and push the plate downwards.<br />
� Repeat these steps until all Implants are placed.<br />
Schelbert/ Bödeker | January 2010
Placing and aligning the <strong>Sternal</strong> <strong>Talon</strong> ®<br />
� Placing the <strong>Talon</strong> with the <strong>Talon</strong><br />
Introduction Forceps<br />
Schelbert/ Bödeker | January 2010<br />
� Aligning the <strong>Talon</strong> with the <strong>Talon</strong><br />
Introduction Forceps
Closing the <strong>Sternal</strong> <strong>Talon</strong> ®<br />
� Once all implant halves have been engaged, move<br />
the reduction clamp to the designated points and<br />
firmly lock the implants step by step<br />
Schelbert/ Bödeker | January 2010
Closing the <strong>Sternal</strong> <strong>Talon</strong> ®<br />
� All implants are etched with a “SAFE<br />
ZONE” to indicate proper closure position.<br />
� If after closing the device the “safe zone<br />
arrow” is not within the “safe zone”, the<br />
device should be removed and a more<br />
appropriate size placed.<br />
| SAFE ZONE |<br />
Schelbert/ Bödeker | January 2010<br />
SAFE ZONE
Closing the <strong>Sternal</strong> <strong>Talon</strong> ®<br />
� Once the <strong>Sternal</strong> <strong>Talon</strong> ® has been firmly<br />
closed, turn the screw counterclockwise<br />
to the 11 o’clock (LOCKED) position.<br />
� This will lock the device and prevent<br />
it from disengaging.<br />
Schelbert/ Bödeker | January 2010
<strong>Sternal</strong> <strong>Talon</strong> ® Placement<br />
� Usually three <strong>Sternal</strong> <strong>Talon</strong> Implants are used for<br />
the sternal closure.<br />
� Different configurations are possible.<br />
� To obtain additional stability, wires can be used.<br />
Schelbert/ Bödeker | January 2010
Removal and Emergency Re-entry<br />
� Removal of the <strong>Sternal</strong> <strong>Talon</strong> ® is accomplished by rotating<br />
the screw clockwise to the 7 o'clock “Open” position.<br />
� This will unlock the device and allow the two sides to<br />
be separated and removed.<br />
Schelbert/ Bödeker | January 2010
Removal and Emergency Re-entry<br />
� A second re-entry method can be accomplished by<br />
cutting the device at the cut points.<br />
� A third re-entry method is to insert a flat screwdriver in<br />
the lock mechanism and rotate superiorly to disengage<br />
teeth.<br />
Schelbert/ Bödeker | January 2010<br />
cut point<br />
cut point
Important warning<br />
� Do not use round perforated drains in conjunction<br />
with the <strong>Sternal</strong> <strong>Talon</strong> ® .<br />
� The drain holes could engage the footplates of the<br />
device.<br />
Schelbert/ Bödeker | January 2010<br />
� Only use linear fluted drains with the <strong>Sternal</strong> <strong>Talon</strong> ®
Instruments<br />
24-008-01<br />
Screwdriver<br />
Schelbert/ Bödeker | January 2010<br />
24-003-01<br />
Introdution Clamp<br />
24-004-01<br />
Tenaculum Clamp<br />
24-006-01<br />
Caliper
Instruments<br />
24-005-01<br />
Reduction Clamp<br />
Schelbert/ Bödeker | January 2010<br />
24-003-02<br />
Removal Clamp<br />
24-007-01<br />
Cutter
Emergency Release<br />
� In order to ensure a fast re-entry in case of emergency each patient has to be equipped with<br />
a <strong>Sternal</strong> <strong>Talon</strong> “Hospital Kit”.<br />
� This includes a sterile screw driver as well as a laminated wallet card showing removal<br />
instructions.<br />
Schelbert/ Bödeker | January 2010
Patient information<br />
� Every patient must be provided with a implant<br />
passport including important information<br />
concerning the implanted <strong>Sternal</strong> <strong>Talon</strong> ®<br />
devices.<br />
� Additionally the patient has to be given a<br />
patient ID Tag<br />
Schelbert/ Bödeker | January 2010
Advantages <strong>Sternal</strong> <strong>Talon</strong> ®<br />
� Advanced system with high stability and high safety<br />
� Forces get distributed over a wider area; lower force per mm;<br />
much less likely to cut into the bone<br />
� Improves sternal stability which likely translates to a decrease in<br />
non-union, dehiscence and mediastinitis<br />
� Easy handling and fast application<br />
� Fast and easy re-entry in case of emergency immediately after<br />
operation<br />
� No sharp edges that could harm the patient or surgeon<br />
� No penetration of bone<br />
� Stability much less depends on the quality of bone<br />
Schelbert/ Bödeker | January 2010
Thank you<br />
for your attention