Ensite Pro Office Furniture Job Costing - DDMS
Ensite Pro Office Furniture Job Costing - DDMS
Ensite Pro Office Furniture Job Costing - DDMS

You also want an ePaper? Increase the reach of your titles
YUMPU automatically turns print PDFs into web optimized ePapers that Google loves.
<strong>Ensite</strong> <strong>Pro</strong> <strong>Office</strong><br />
<strong>Furniture</strong> Edition<br />
<strong>Job</strong> <strong>Costing</strong><br />
April 2007 Item # H-FURNJC
<strong>Ensite</strong> <strong>Pro</strong> <strong>Office</strong> <strong>Furniture</strong> Edition <strong>Job</strong> <strong>Costing</strong><br />
Contents<br />
2<br />
<strong>Job</strong> <strong>Costing</strong> ............................................................................................................................... 3<br />
<strong>Furniture</strong> <strong>Job</strong> Cost Types Parameters .......................................................................................... 3<br />
Adding Post Hour Costs ................................................................................................................ 5<br />
Adding Post Items .......................................................................................................................... 7<br />
Posting <strong>Furniture</strong> Item and Hour Costs to a <strong>Pro</strong>ject ................................................................. 8<br />
ECI² CONFIDENTIAL & PROPRIETARY
The <strong>Job</strong> <strong>Costing</strong><br />
feature is not<br />
included in all<br />
software packages<br />
and may require<br />
authorization. For<br />
more information,<br />
contact ECI² sales.<br />
ECI² CONFIDENTIAL & PROPRIETARY<br />
<strong>Ensite</strong> <strong>Pro</strong> <strong>Office</strong> <strong>Furniture</strong> Edition <strong>Job</strong> <strong>Costing</strong><br />
<strong>Job</strong> <strong>Costing</strong><br />
You can enter job costing items or hours for employees to a project. This lets<br />
you keep details for audit purposes. You can create a table of hourly, regular<br />
and overtime rates for an employee and ten categories in which to assign the<br />
hours. For example, you can use this table to track the time a designer worked<br />
on the project during a given time period.<br />
You can post cost-only items as well. For example, you can track the cost of<br />
additional hardware purchased for the project.<br />
Using the <strong>Job</strong> Cost Approval window you can approve, change, or delete the<br />
hours and/or cost-only items charged to a project. When you delete an item,<br />
its status changes, but the item itself remains in the file for audit purposes.<br />
However, deleted items do not move to the ticket.<br />
Once approved, all hours and/or cost-only items flow to the ticket. Approved<br />
items and/or hours are charged against commission. Unapproved items are<br />
not.<br />
<strong>Job</strong> Cost Types are set up in the Parameter Editor window.<br />
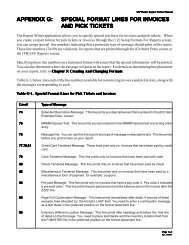
<strong>Furniture</strong> <strong>Job</strong> Cost Types Parameters<br />
When creating furniture projects, you can determine how much a particular<br />
job costs. The <strong>Job</strong> <strong>Costing</strong> feature lets you estimate how much labor cost needs<br />
to be added to a project. Use this box to set up parameters for job cost types.<br />
You can assign job cost types to a salesperson in the Salesperson database.<br />
You can set up job cost types to bill in intervals of a tenth of an hour, quarter<br />
hour, half hour, or an hour.<br />
1 From the Master Menu, double-click .<br />
2 Double-click .<br />
3 From the Parameter Editor window, double-click <strong>Furniture</strong>.<br />
3
<strong>Ensite</strong> <strong>Pro</strong> <strong>Office</strong> <strong>Furniture</strong> Edition <strong>Job</strong> <strong>Costing</strong><br />
4<br />
Figure 1: The<br />
<strong>Job</strong> Cost Types<br />
Window<br />
4 Double-click <strong>Job</strong> Cost Types. The <strong>Job</strong> Cost Types window opens. See<br />
Figure 1.<br />
5 To add a job cost type, press the Spacebar or click<br />
tion for this job cost type.<br />
. Enter the informa-<br />
5.1 Click the down arrow in the Location box and select the location.<br />
This box defaults to location 1.<br />
5.2 Select an item for this job cost type.<br />
To enter the item number, click the Item Key box and enter the<br />
number.<br />
To use the query feature, click to open the Item Query dialog<br />
box. Select the item and click OK.<br />
To select an uncataloged item, click . Click each box to enter<br />
the information for this uncataloged item. When you finish, click<br />
OK.<br />
To use the catalog feature, click the Edit menu and select Catalog.<br />
When the Catalog Explorer window opens, choose the item. Click<br />
Select.<br />
ECI² CONFIDENTIAL & PROPRIETARY
ECI² CONFIDENTIAL & PROPRIETARY<br />
<strong>Ensite</strong> <strong>Pro</strong> <strong>Office</strong> <strong>Furniture</strong> Edition <strong>Job</strong> <strong>Costing</strong><br />
5.3 The system automatically completes the Item Description box. To<br />
change the description, click the Item Description box and enter<br />
the new item description over the existing description.<br />
5.4 Click the down arrow in the Time Billing Interval box to select<br />
how to bill the time for this job cost type. You can select Tenth<br />
hour, Quarter hour, Half hour and Hour.<br />
5.5 Click the Dept box and enter a department to post this job cost.<br />
5.6 Click the Comm Code box and enter the commission code. You<br />
use these parameters to assign two commission codes for each job<br />
cost type: one for commissionable items and the other for noncommissionable<br />
items. When you do, you must specify different<br />
codes so the commissionable and non-commissionable costs go<br />
onto separate lines or onto separate tickets. If you assign different<br />
codes, they are reported separately in the <strong>Furniture</strong> <strong>Pro</strong>ject Management<br />
window. This allows you to easily track the information.<br />
5.7 Click the Non Comm Code box and enter the non-commission<br />
code for this job cost type.<br />
6 Click to close the <strong>Job</strong> Cost Types dialog box.<br />
7 <strong>Job</strong> Cost Types now appears in bold in the Parameter Editor window.<br />
Click to save your changes.<br />
Adding Post Hour Costs<br />
1 Double-click .<br />
2 Double-click . The Post Hour Cost window opens. See Figure 2.<br />
3 To add a new hours, click .<br />
4 Retrieve the individual for whom you are posting hours. To do so, click<br />
the Salesperson box and enter the salesperson number. If you do not remember<br />
the salesperson number, you can click to open the Salesper-<br />
son Query dialog box.<br />
5
<strong>Ensite</strong> <strong>Pro</strong> <strong>Office</strong> <strong>Furniture</strong> Edition <strong>Job</strong> <strong>Costing</strong><br />
6<br />
Figure 2: The<br />
Post Hour Cost<br />
Window<br />
5 Retrieve the project for which you are posting hours. To do so, click the<br />
<strong>Pro</strong>ject Number box and enter the project number. If you do not remember<br />
the project number, you can click to open the <strong>Pro</strong>ject Query dia-<br />
log box.<br />
6 To apply the hours to a specific ticket within the project, click the Ticket<br />
box and enter the pick ticket number. If you do not remember the pick<br />
ticket number, click to open the Order Browse dialog box.<br />
7 After you select the project, click the <strong>Job</strong> Cost Type box and enter the<br />
type of labor you are posting, Installation Hours, for example.<br />
8 Click the Regular Time or Overtime boxes and enter the number of<br />
hours this individual works on this project.<br />
9 Click the Ticket box. When the down arrow appears, you can apply this<br />
labor toward a specific pick ticket within this project. To do so, click the<br />
down arrow and select the ticket.<br />
10 In the Notes box, enter any text that helps you identify this hourly cost.<br />
11 When you finish entering information for this line, press Enter. The cursor<br />
moves down one line and returns to the <strong>Job</strong> Cost Type box.<br />
12 You can continue to enter as many hours as necessary. When you're<br />
ready to post the hour information you specified, click Post.<br />
ECI² CONFIDENTIAL & PROPRIETARY
Adding Post Items<br />
1 Double-click . The <strong>Furniture</strong> Menu opens.<br />
ECI² CONFIDENTIAL & PROPRIETARY<br />
<strong>Ensite</strong> <strong>Pro</strong> <strong>Office</strong> <strong>Furniture</strong> Edition <strong>Job</strong> <strong>Costing</strong><br />
2 Double-click . The Post Item Cost window opens.<br />
3 To add a new item, click .<br />
4 Retrieve the project for which you are posting items. To do so, click the<br />
<strong>Pro</strong>ject Number box and enter the project number. If you do not remember<br />
the project number, you can click to open the <strong>Pro</strong>ject Query dialog box.<br />
5 To apply the hours to a specific ticket within the project, click the Ticket<br />
box and enter the pick ticket number. If you do not remember the pick<br />
ticket number, click to query.<br />
6 After you select the project, click the ItemKey box and enter the number<br />
of the item to post. If you don't know the item stock number, you can<br />
also click to open the Item Query dialog box. If this is an item that<br />
you don't stock, click .<br />
7 In the Uncataloged Item Information dialog box, enter the item number,<br />
the name or abbreviation of the manufacturer, a description, the general<br />
ledger department the item is assigned to, a selling unit of measure, the<br />
list price, and the cost. Click OK.<br />
8 The system retrieves the item that most closely matches the one you<br />
specified. At this point, you can change item information. To do so, click<br />
the Dept, Unit, Cost, Quantity, Ticket, and Notes boxes and enter the information<br />
for this item.<br />
9 When you finish entering information for this item, press Enter. The<br />
cursor moves down one line and returns to the ItemKey box.<br />
10 You can continue to enter as many items as necessary. When you're<br />
ready to post the item information you specified, click Post.<br />
7
<strong>Ensite</strong> <strong>Pro</strong> <strong>Office</strong> <strong>Furniture</strong> Edition <strong>Job</strong> <strong>Costing</strong><br />
8<br />
Figure 3: The<br />
<strong>Job</strong> Cost<br />
Approval<br />
Window<br />
Posting <strong>Furniture</strong> Item and Hour Costs to a <strong>Pro</strong>ject<br />
1 Double-click . The <strong>Furniture</strong> Menu opens.<br />
2 Double-click . The <strong>Job</strong> Cost Approval window opens.<br />
3 Retrieve the project to apply the item and hour cost information. To do<br />
so, click the <strong>Pro</strong>ject Needing Approved box and enter the project number.<br />
If you do not remember the project number, you can click to<br />
open the <strong>Pro</strong>ject Query dialog box.<br />
4 In the Hour Postings section of the window, the system displays the<br />
hour information that has been specified for this project in the Post<br />
Hour Cost window. At this point, you can click the Non Commission<br />
Hours Regular and Overtime boxes and enter the number of hours for<br />
this project. As you enter hours, the system subtracts the hours you<br />
specify from the Commission Hours Regular and OverTime boxes.<br />
5 When finished specifying hour information, click the Approved box for<br />
each line to post to this project. See Figure 3. To approve all the hours,<br />
click Check All.<br />
ECI² CONFIDENTIAL & PROPRIETARY
ECI² CONFIDENTIAL & PROPRIETARY<br />
<strong>Ensite</strong> <strong>Pro</strong> <strong>Office</strong> <strong>Furniture</strong> Edition <strong>Job</strong> <strong>Costing</strong><br />
6 In the Item Postings section of the dialog box, the system displays the<br />
item information that has been specified for this project in the Post Item<br />
Cost window. At this point, you can change the information in the<br />
Dept, Comm Code, Quantity, and Cost boxes for each line item.<br />
7 When finished specifying item information, click the Approved box for<br />
each line item to post to this project. To approve all the items, click<br />
Check All.<br />
8 To post the hour information to the project, click Approve Hours. To<br />
post item information to the project, click Approve Items.<br />
9 Click or click the View menu and select the Post to Ticket option.<br />
10 The system displays the <strong>Furniture</strong> Create Tickets dialog box. Click the<br />
down arrow in the Ticket box to select a ticket to apply the item or hour<br />
information. If you do not specify a ticket, the system creates a new<br />
pick ticket number.<br />
11 Click Create Lines.<br />
9