STEVE CONTROL SYSTEMS MAG2000 - Stengg
STEVE CONTROL SYSTEMS MAG2000 - Stengg
STEVE CONTROL SYSTEMS MAG2000 - Stengg

Create successful ePaper yourself
Turn your PDF publications into a flip-book with our unique Google optimized e-Paper software.
<strong>STEVE</strong> <strong>CONTROL</strong> <strong>SYSTEMS</strong> <strong>MAG2000</strong><br />
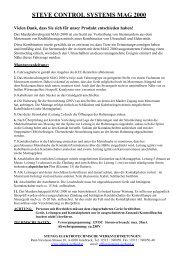
Thank you, that you decided in favor of our product!<br />
The <strong>MAG2000</strong> is a system to frighten away martens from the engine bay, by using ultrasonic and electric<br />
shock.<br />
This combination was chosen, since it is proved that martens are highly adaptive and have got memory. Has a<br />
marten ever got an electric shock from a <strong>MAG2000</strong>, it will remember that unpleasant incident by the<br />
ultrasonic sound. So it will avoid the car with built in <strong>MAG2000</strong>.<br />
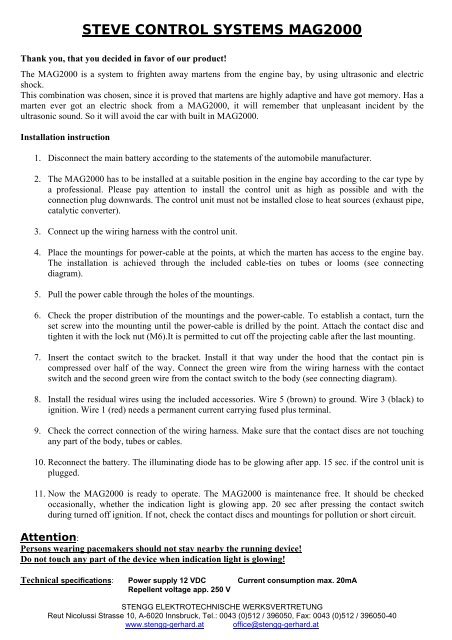
Installation instruction<br />
1. Disconnect the main battery according to the statements of the automobile manufacturer.<br />
2. The <strong>MAG2000</strong> has to be installed at a suitable position in the engine bay according to the car type by<br />
a professional. Please pay attention to install the control unit as high as possible and with the<br />
connection plug downwards. The control unit must not be installed close to heat sources (exhaust pipe,<br />
catalytic converter).<br />
3. Connect up the wiring harness with the control unit.<br />
4. Place the mountings for power-cable at the points, at which the marten has access to the engine bay.<br />
The installation is achieved through the included cable-ties on tubes or looms (see connecting<br />
diagram).<br />
5. Pull the power cable through the holes of the mountings.<br />
6. Check the proper distribution of the mountings and the power-cable. To establish a contact, turn the<br />
set screw into the mounting until the power-cable is drilled by the point. Attach the contact disc and<br />
tighten it with the lock nut (M6).It is permitted to cut off the projecting cable after the last mounting.<br />
7. Insert the contact switch to the bracket. Install it that way under the hood that the contact pin is<br />
compressed over half of the way. Connect the green wire from the wiring harness with the contact<br />
switch and the second green wire from the contact switch to the body (see connecting diagram).<br />
8. Install the residual wires using the included accessories. Wire 5 (brown) to ground. Wire 3 (black) to<br />
ignition. Wire 1 (red) needs a permanent current carrying fused plus terminal.<br />
9. Check the correct connection of the wiring harness. Make sure that the contact discs are not touching<br />
any part of the body, tubes or cables.<br />
10. Reconnect the battery. The illuminating diode has to be glowing after app. 15 sec. if the control unit is<br />
plugged.<br />
11. Now the <strong>MAG2000</strong> is ready to operate. The <strong>MAG2000</strong> is maintenance free. It should be checked<br />
occasionally, whether the indication light is glowing app. 20 sec after pressing the contact switch<br />
during turned off ignition. If not, check the contact discs and mountings for pollution or short circuit.<br />
Attention:<br />
Persons wearing pacemakers should not stay nearby the running device!<br />
Do not touch any part of the device when indication light is glowing!<br />
Technical specifications: Power supply 12 VDC Current consumption max. 20mA<br />
Repellent voltage app. 250 V<br />
STENGG ELEKTROTECHNISCHE WERKSVERTRETUNG<br />
Reut Nicolussi Strasse 10, A-6020 Innsbruck, Tel.: 0043 (0)512 / 396050, Fax: 0043 (0)512 / 396050-40<br />
www.stengg-gerhard.at office@stengg-gerhard.at
www.stengg-gerhard.at<br />
Power cable<br />
Ignition<br />
Contact switch<br />
Battery<br />
(+ Fused )<br />
Ground<br />
1 2 3 4 5<br />
5 Ground Brown<br />
4 Contact switch Green<br />
MOUNTING<br />
for power cable<br />
3 Ignition Black<br />
WIRING<br />
HARNESS<br />
2 Power cable Black (thick)<br />
1 Battery (+) Red<br />
Ground<br />
1 2 3 4 5<br />
Illuminating diode<br />
Closed hood<br />
CONTACT SWITCH<br />
Contact switch<br />
<strong>CONTROL</strong> UNIT<br />
Marten repellent system M A G 2 0 0 0