Expedite™ 8900 Nucleic Acid Synthesis - Applied Biosystems
Expedite™ 8900 Nucleic Acid Synthesis - Applied Biosystems
Expedite™ 8900 Nucleic Acid Synthesis - Applied Biosystems

Create successful ePaper yourself
Turn your PDF publications into a flip-book with our unique Google optimized e-Paper software.
Expedite<br />
User’s Guide<br />
<strong>8900</strong><br />
<strong>Nucleic</strong> <strong>Acid</strong> <strong>Synthesis</strong> System<br />
PerSeptive <strong>Biosystems</strong>, Inc.<br />
500 Old Connecticut Path<br />
Framingham, MA 01701 USA<br />
Part Number 601306, Rev. 1<br />
March 1997
NOTICE<br />
Information in this document is subject to change without notice and does not represent a<br />
commitment by PerSeptive <strong>Biosystems</strong>, Inc. PerSeptive <strong>Biosystems</strong> assumes no responsibility<br />
for any errors that may appear in this document. This manual is believed to be complete and<br />
accurate at the time of publication. In no event shall PerSeptive <strong>Biosystems</strong> be liable for<br />
incidental or consequential damages in connection with or arising from the use of this manual.<br />
©1997 PerSeptive <strong>Biosystems</strong>, Inc. Printed in the United States of America. All rights reserved.<br />
This book or parts thereof may not be reproduced in any form without the written permission of<br />
the publishers.<br />
<strong>Nucleic</strong> acid synthesis reagents sold by PerSeptive <strong>Biosystems</strong>, Inc. are covered by<br />
U.S. patent RE34,069 and patents in Austria, Belgium, Canada, France, Germany,<br />
Japan, Luxembourg, Netherlands, Sweden, Switzerland, and U.K.<br />
PerSeptive <strong>Biosystems</strong>, the PerSeptive <strong>Biosystems</strong> logo, and the fractal icon are<br />
registered trademarks of PerSeptive <strong>Biosystems</strong>, Inc. Expedite is a trademark of<br />
PerSeptive <strong>Biosystems</strong>, Inc.<br />
Microsoft, MS, Windows, and MS-DOS are registered trademarks of Microsoft<br />
Corporation.<br />
Printed on recycled paper.
WARNING<br />
For continued protection against fire hazard, replace fuses with those of the same<br />
type and rating.<br />
AVERTISSEMENT<br />
Remplacez les fusibles par ceux de même type et puissance pour éviter les risques<br />
d’incendie.<br />
WARNING<br />
Most of the reagents and solvents used in nucleic acid synthesis are hazardous.<br />
Wear a lab coat, gloves and eye protection when handling reagents. Adequate<br />
ventilation is essential and working under a fume hood is recommended. Consult<br />
Appendix B, Reagent Safety, for reagent safety considerations.<br />
AVERTISSEMENT<br />
La plupart des réactifs et solvants employés en synthèse d'acides nucléiques sont<br />
dangereux. Portez une blouse, des gants et des lunettes de protection lorsque<br />
vous manipulez des réactifs. Une ventilation adéquate est nécessaire et il est<br />
recommandé de travailler sous une hotte. Consultez la partie “Appendix B,<br />
Reagent Safety”, de ce manuel.
US Safety and EMC (Electromagnetic Compliance) Standards<br />
Safety<br />
This instrument has been tested to and complies with standard ANSI/UL 1262, “Electrical<br />
Equipment for Laboratory Use; Part 1: General Requirements”, 1st Edition. It is an ETL Testing<br />
Laboratories listed product.<br />
EMC<br />
This device complies with Part 15 of the FCC Rules. Operation is subject to the following two<br />
conditions: (1) This device may not cause harmful interference, and (2) this device must accept<br />
any interference received, including interference that may cause undesired operation.<br />
Warning: Changes or modifications to this unit not expressly approved by the party responsible for<br />
compliance could void the user’s authority to operate the equipment.<br />
Note: This equipment has been tested and found to comply with the limits for a Class A digital<br />
device, pursuant to Part 15 of the FCC Rules. These limits are designed to provide reasonable<br />
protection against harmful interference when the equipment is operated in a commercial<br />
environment. This equipment generates, uses, and can radiate radio frequency energy and, if not<br />
installed and used in accordance with the instruction manual, may cause harmful interference to<br />
radio communications. Operation of this equipment in a residential area is likely to cause harmful<br />
interference in which case the user will be required to correct the interference at his own expense.<br />
Note: Shielded cables must be used with this unit to ensure compliance with the Class A FCC<br />
limits.
Canadian Safety and EMC (Electromagnetic Compliance) Standards<br />
Safety<br />
This instrument has been tested to and complies with standard C22.2 No. 151, “Safety<br />
Requirements for Electrical Equipment for Measurement, Control, and Laboratory Use; Part 1:<br />
General Requirements”. It is an ETL Testing Laboratories listed product.<br />
Sécurité<br />
Cet instrument a été vérifié avec la norme C22.2 No. 151, «Spécifications de sécurité du matériel<br />
électrique utilisé pour les mesures, les contrôles et dans les laboratoires ; Partie 1 : Spécifications<br />
générales», et il est conforme à cette norme. C’est un produit homologué par les ETL Testing<br />
Laboratories.<br />
EMC<br />
This Class A digital apparatus meets all requirements of the Canadian Interference-Causing<br />
Equipment Regulations.<br />
Cet appareil numérique de la classe A respecte toutes les exigences du Règlement sur le<br />
materiel brouilleur du Canada.
European Safety and EMC (Electromagnetic Compliance) Standards<br />
Declaration of Conformity<br />
Application of Council Directive(s): 73/23/EEC “Low Voltage”<br />
Standard(s) to which conformity is<br />
declared:<br />
89/336/EEC “Electromagnetic Compatibility”<br />
IEC 1010-1 “Safety Requirements for Electrical Equipment for Measurement,<br />
Control and Laboratory Use”<br />
EN55011:1991, Group 1, Class A “Radiated Emissions”<br />
EN50082-1:1991 “Generic Immunity”<br />
Manufacturer’s Name: PerSeptive <strong>Biosystems</strong>, Inc.<br />
Manufacturer’s Address: 500 Old Connecticut Path<br />
Framingham, Massachusetts 01701 USA<br />
Type of Equipment: Laboratory Instrumentation<br />
Model Name & Number: Expedite <strong>Nucleic</strong> <strong>Acid</strong> <strong>Synthesis</strong> System, Models 8905 and 8909<br />
Part Number: GEN600041 or GEN600042<br />
Serial Number: FX???8200? and later<br />
Question marks represent date and manufacturing codes that are<br />
part of the serial number.<br />
Year of Manufacture: 1995 and later
Table of Contents<br />
Table of Contents<br />
How to Use This Guide ............................................................................ xi<br />
Chapter 1 The Expedite <strong>Nucleic</strong> <strong>Acid</strong> <strong>Synthesis</strong> System<br />
1.1 Introduction .......................................................................................... 1-2<br />
1.2 Accessories.......................................................................................... 1-5<br />
1.3 Instrument Description.......................................................................... 1-7<br />
1.3.1 Software Control System ....................................................... 1-7<br />
1.3.2 Reagent Delivery System ......................................................1-11<br />
1.3.3 Pneumatic Control System ....................................................1-20<br />
1.3.4 Power Control System ..........................................................1-22<br />
1.4 Safety Precautions .............................................................................. 1-23<br />
Chapter 2 Performing a <strong>Synthesis</strong><br />
2.1 Introduction .......................................................................................... 2-2<br />
2.1.1 Beta-Cyanoethyl Phosphoramidite <strong>Synthesis</strong> ......................... 2-3<br />
2.1.2 DNA <strong>Synthesis</strong> with Expedite Monomers ............................... 2-6<br />
2.1.3 RNA <strong>Synthesis</strong> ....................................................................... 2-8<br />
2.1.4 Phosphorothioated DNA <strong>Synthesis</strong> .......................................2-12<br />
2.1.5 Selecting the Chemistry ........................................................2-15<br />
2.2 Powering Up the System ..................................................................... 2-16<br />
2.3 Entering the Sequence ........................................................................ 2-22<br />
2.4 Preparing and Loading the Reagents .................................................. 2-26<br />
2.4.1 Reagents ..............................................................................2-27<br />
2.4.2 Installing the Reagents .........................................................2-28<br />
2.4.3 Priming the System ...............................................................2-37<br />
2.4.4 Running the Pneumatic Diagnostics ......................................2-40<br />
Expedite <strong>8900</strong> <strong>Nucleic</strong> <strong>Acid</strong> <strong>Synthesis</strong> System User’s Guide vii
Table of Contents<br />
2.5 Starting the <strong>Synthesis</strong> ......................................................................... 2-42<br />
2.5.1 Specifying the <strong>Synthesis</strong> Parameters ....................................2-42<br />
2.5.2 Checking Reagent Resources ...............................................2-45<br />
2.5.3 Installing the Column ............................................................2-46<br />
2.5.4 Starting the <strong>Synthesis</strong> ...........................................................2-48<br />
2.6 Running the <strong>Synthesis</strong>......................................................................... 2-49<br />
2.6.1 Replenishing Bottles During a <strong>Synthesis</strong> ...............................2-51<br />
2.6.2 Post-synthesis Column Removal ...........................................2-54<br />
2.7 Post-synthesis Procedures .................................................................. 2-55<br />
2.7.1 Standard Phosphoramidite Monomers ..................................2-56<br />
2.7.2 Expedite Phosphoramidite Monomers ...................................2-60<br />
Chapter 3 Software Reference<br />
3.1 Software Overview ............................................................................... 3-2<br />
3.2 Main Menu ........................................................................................... 3-4<br />
3.3 Sequence Menu ................................................................................... 3-6<br />
3.3.1 Using the Sequence Editor .................................................... 3-9<br />
3.3.2 Running a Sequence ............................................................3-25<br />
3.3.3 Aborting a <strong>Synthesis</strong> .............................................................3-27<br />
3.3.4 Printing a Sequence ..............................................................3-29<br />
3.3.5 Viewing a Sequence .............................................................3-30<br />
3.3.6 Copying a Sequence .............................................................3-32<br />
3.4 Status Menu ........................................................................................ 3-33<br />
3.4.1 Displaying System Information ..............................................3-34<br />
3.4.2 Interrupting a <strong>Synthesis</strong> ........................................................3-38<br />
3.5 Prime Menu ......................................................................................... 3-43<br />
3.5.1 Prime Individual ....................................................................3-49<br />
3.5.2 Prime All ...............................................................................3-53<br />
3.5.3 Prime Reagents ....................................................................3-55<br />
3.5.4 Prime Monomers ...................................................................3-57<br />
viii PerSeptive <strong>Biosystems</strong>
Table of Contents<br />
3.5.5 Final Deblock ........................................................................3-59<br />
3.5.6 Startup ..................................................................................3-60<br />
3.5.7 Shutdown ..............................................................................3-63<br />
3.6 Tools Menu.......................................................................................... 3-66<br />
3.6.1 Diagnostic Routines ..............................................................3-68<br />
3.6.2 Bottle Change Tool ...............................................................3-74<br />
3.6.3 Display Tool ..........................................................................3-78<br />
3.6.4 Log Tool ................................................................................3-79<br />
3.6.5 Configuration Tool .................................................................3-81<br />
3.6.6 Specifying a User Profile .......................................................3-87<br />
3.6.7 Changing the Chemistry ........................................................3-95<br />
Chapter 4 Maintenance and Troubleshooting<br />
4.1 Routine Maintenance............................................................................ 4-2<br />
4.1.1 Filter and O-ring Maintenance ................................................ 4-3<br />
4.1.2 Checking the Fuses ............................................................... 4-4<br />
4.1.3 Waste Disposal ...................................................................... 4-6<br />
4.1.4 Gas Cylinder Replacement .................................................... 4-7<br />
4.2 Gas Leak Diagnostics........................................................................... 4-9<br />
4.3 Flow and Volume Test ......................................................................... 4-12<br />
4.4 Troubleshooting................................................................................... 4-17<br />
4.4.1 Mechanical/Electronic Troubleshooting .................................4-17<br />
4.4.2 Chemical Troubleshooting .....................................................4-20<br />
4.5 Error Messages ................................................................................... 4-23<br />
Expedite <strong>8900</strong> <strong>Nucleic</strong> <strong>Acid</strong> <strong>Synthesis</strong> System User’s Guide ix
Table of Contents<br />
Appendix A Installation........................................................................ A-1<br />
Appendix B Reagent Safety .............................................................. B-1<br />
Appendix C Performance Specifications ................................. C-1<br />
Appendix D <strong>Nucleic</strong> <strong>Acid</strong> <strong>Synthesis</strong> Reagents..................... D-1<br />
Appendix E Accessories and Spare Parts............................... E-1<br />
Appendix F Trityl Monitor ................................................................... F-1<br />
F.1 Introduction .......................................................................................... F-2<br />
F.2 Safety Precautions ............................................................................... F-4<br />
F.3 Displaying Trityl Data............................................................................ F-6<br />
F.4 Interpreting Trityl Data ......................................................................... F-11<br />
F.5 Trityl Monitor Alarms........................................................................... F-15<br />
F.6 Troubleshooting.................................................................................. F-21<br />
Index<br />
x PerSeptive <strong>Biosystems</strong>
How to Use This Guide<br />
Purpose of this<br />
guide<br />
Structure of this<br />
guide<br />
Chapter 1,<br />
The Expedite <strong>Nucleic</strong><br />
<strong>Acid</strong> <strong>Synthesis</strong><br />
System<br />
Chapter 2,<br />
Performing a<br />
<strong>Synthesis</strong><br />
Chapter 3,<br />
Software Reference<br />
Chapter 4,<br />
Maintenance and<br />
Troubleshooting<br />
Appendix A,<br />
Installation<br />
Appendix B,<br />
Reagent Safety<br />
The PerSeptive <strong>Biosystems</strong>’ Expedite <strong>8900</strong> <strong>Nucleic</strong> <strong>Acid</strong><br />
<strong>Synthesis</strong> System User’s Guide describes the features and<br />
use of the Expedite <strong>Nucleic</strong> <strong>Acid</strong> <strong>Synthesis</strong> System. It also<br />
includes routine maintenance and troubleshooting<br />
procedures.<br />
PerSeptive <strong>Biosystems</strong>’ Expedite <strong>8900</strong> <strong>Nucleic</strong> <strong>Acid</strong> <strong>Synthesis</strong><br />
System User’s Guide is divided into chapters. Each chapter<br />
page is marked with a tab and a header to help you locate<br />
information within the chapter.<br />
The table below describes the material covered in each<br />
chapter.<br />
Describes the main components of the<br />
instrument.<br />
Describes how to set up and run a synthesis.<br />
Describes the structure and operation of the<br />
software.<br />
Contains routine maintenance procedures and<br />
some simple troubleshooting procedures.<br />
Contains installation procedures.<br />
Includes chemical handling precautions<br />
Expedite <strong>8900</strong> <strong>Nucleic</strong> <strong>Acid</strong> <strong>Synthesis</strong> System User’s Guide xi<br />
1
1<br />
How to Use This Guide<br />
Appendix C,<br />
Performance<br />
Specifications<br />
Appendix D,<br />
<strong>Nucleic</strong> <strong>Acid</strong><br />
<strong>Synthesis</strong> Reagents<br />
Appendix E,<br />
Accessories and<br />
Spare Parts<br />
Appendix F,<br />
Trityl Monitor<br />
Appendix G,<br />
Warranty/Service<br />
Symbols used on<br />
the instrument<br />
xii PerSeptive <strong>Biosystems</strong><br />
Lists performance specifications.<br />
Lists part numbers and descriptions for<br />
reagents you need to run the system.<br />
Lists part numbers you need to order parts and<br />
accessories from PerSeptive <strong>Biosystems</strong>.<br />
Describes using the trityl monitor.<br />
Contains warranty, service, return, and spare<br />
parts information.<br />
The following symbol is used on the Expedite <strong>Nucleic</strong> <strong>Acid</strong><br />
<strong>Synthesis</strong> System to instruct you to refer to the User’s Guide<br />
for more information.<br />
!<br />
The following symbol is used to show where gas pressure<br />
enters the instrument. The maximum inlet pressure is 25 psi.
Symboles<br />
Utilisés sur cet<br />
Appareil<br />
The following symbol is used to show the values of the fuses<br />
required by the instrument.<br />
Sur le synthétiseur d'acides nucléiques Expedite, lorsque vous<br />
rencontrez le symbole suivant, reportez-vous au Guide de<br />
l'utilisateur pour de plus amples informations.<br />
Le symbole suivant indique l'endroit où le gaz sous pression<br />
entre dans l'appareil. La pression d'entrée maximale est de 25<br />
psi (1,7 bar).<br />
Le symbole suivant indique le type de fusibles nécessaires au<br />
fonctionnement de cet appareil.<br />
Conventions This guide uses the following conventions to make text easier<br />
to understand.<br />
General<br />
conventions<br />
!<br />
• Bold indicates user action:<br />
“Type 0 and press Enter for the remaining<br />
fields.”<br />
• Italic text denotes new or important words, and is also<br />
used for emphasis:<br />
“Before analyzing, always prepare fresh matrix.”<br />
Expedite <strong>8900</strong> <strong>Nucleic</strong> <strong>Acid</strong> <strong>Synthesis</strong> System User’s Guide xiii<br />
1
How to Use This Guide<br />
1<br />
Notes, Cautions,<br />
and Warnings<br />
xiv PerSeptive <strong>Biosystems</strong><br />
A note calling out important information to the operator<br />
appears as:<br />
NOTE: Record your result before proceeding with the next<br />
step.<br />
A caution calling out information to avoid damage to the<br />
system or equipment appears as:<br />
CAUTION<br />
Changing reagent bottles during a synthesis is not<br />
recommended. Check the reagent resources prior to<br />
initiating a synthesis to make sure that there is a sufficient<br />
supply.<br />
A warning calling out information essential to the safety of the<br />
operator appears as:<br />
WARNING<br />
The Expedite Cabinet weighs 102 pounds (46 kg). Two<br />
people are required to safely lift the instrument cabinet.
1 The Expedite <br />
<strong>Nucleic</strong> <strong>Acid</strong><br />
<strong>Synthesis</strong> System<br />
Chapter<br />
1<br />
This chapter contains the following sections:<br />
1.1 Introduction ................................................ 1-2<br />
1.2 Accessories................................................ 1-5<br />
1.3 Instrument Description ............................... 1-7<br />
1.4 Safety Precautions ................................... 1-23<br />
Expedite <strong>8900</strong> <strong>Nucleic</strong> <strong>Acid</strong> <strong>Synthesis</strong> System User’s Guide 1-1
1<br />
Chapter 1 The Expedite <strong>Nucleic</strong> <strong>Acid</strong> <strong>Synthesis</strong> System<br />
1.1 Introduction<br />
1-2 PerSeptive <strong>Biosystems</strong><br />
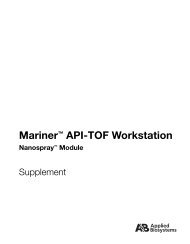
The Expedite <strong>Nucleic</strong> <strong>Acid</strong> <strong>Synthesis</strong> System, shown in<br />
Figure 1-1, is a dual column instrument that is versatile and<br />
easy to operate.<br />
Figure 1-1 Expedite Model 8909 <strong>Nucleic</strong> <strong>Acid</strong><br />
<strong>Synthesis</strong> System<br />
The Expedite <strong>Nucleic</strong> <strong>Acid</strong> <strong>Synthesis</strong> System features:<br />
• Alternating phase dual column synthesis<br />
• Low reagent consumption<br />
• A full range of DNA and RNA synthesis protocols<br />
• Wide range of synthesis scales<br />
• A choice of vessel configurations<br />
• Microfluidic delivery system<br />
• Trityl monitor<br />
• Optional accessories
Dual Column<br />
<strong>Synthesis</strong><br />
Low Reagent<br />
Consumption<br />
Introduction<br />
The two columns can operate independently allowing the<br />
simultaneous synthesis of two different sequences at different<br />
scales. At any time, a second synthesis may be started or an<br />
individual synthesis may be paused or aborted without<br />
affecting concurrent operations on the other column.<br />
The total reagent consumption is less than 4.5 mL per<br />
coupling cycle for scales up to 1 μmole. The phosphoramidite<br />
consumption is less than 3 mg (~50 μL) per coupling cycle at<br />
the 0.05 μmole scale.<br />
The Model 8909 can perform 800 coupling cycles (0.2 μmole<br />
scale) without replenishing the reagents and the Model 8905<br />
can perform 150 coupling cycles at the same scale without<br />
replenishing the reagents.<br />
Protocols The following protocols are available on the Expedite <strong>Nucleic</strong><br />
<strong>Acid</strong> <strong>Synthesis</strong> System:<br />
• β-Cyanoethyl phosphoramidite DNA synthesis at<br />
0.05 μmole, 0.2 μmole, 1 μmole, and 15 μmole scales<br />
• β-Cyanoethyl phosphoramidite RNA synthesis at<br />
1 μmole scale<br />
• β-Cyanoethyl phosphoramidite synthesis of<br />
phosphorothioated DNA at 1 μmole and 15 μmole<br />
scales<br />
NOTE: You can synthesize phosphorothioated DNA<br />
in other scales by using a DNA synthesis protocol<br />
and changing the upper case base designations to<br />
lower case base designations.<br />
Expedite <strong>8900</strong> <strong>Nucleic</strong> <strong>Acid</strong> <strong>Synthesis</strong> System User’s Guide 1-3<br />
1
1<br />
Chapter 1 The Expedite <strong>Nucleic</strong> <strong>Acid</strong> <strong>Synthesis</strong> System<br />
The <strong>8900</strong> Series The PerSeptive <strong>Biosystems</strong> Expedite <strong>Nucleic</strong> <strong>Acid</strong> <strong>Synthesis</strong><br />
System provides a choice of two models:<br />
• Model 8905<br />
• Model 8909<br />
1-4 PerSeptive <strong>Biosystems</strong><br />
The Model 8905 has five nucleotide monomer reservoirs and<br />
six ancillary reagent reservoirs with a total capacity of<br />
150 cycles at 0.2 µmole scale.<br />
The Model 8909 offers greater flexibility and increased<br />
reagent capacity with nine nucleotide monomer reservoirs and<br />
eight ancillary reagent reservoirs with a total capacity of<br />
800 cycles at 0.2 µmole scale. The additional reservoirs may<br />
be used for a variety applications such as:<br />
• Phosphorothioated nucleic acid fragments and<br />
applications using nonstandard monomers<br />
• Multiple fluorescent labels for probes and sequencing<br />
• Mixed hybridization probes<br />
• Linkers (3' and 5')<br />
• RNA and DNA Hybrids<br />
Trityl Monitor The trityl monitor detects the DMT (dimethoxytrityl) group as it<br />
is removed during the deblocking step. During synthesis, the<br />
trityl information is displayed as a histogram on the instrument<br />
display or workstation and can be sent later to a printer. In the<br />
event of a failure in the coupling chemistry, the trityl monitor<br />
can also be set to suspend a synthesis.<br />
The trityl monitor includes a waste diversion system that<br />
separates the non-chlorinated waste from the chlorinated<br />
waste for safe and economical disposal of the chlorinated<br />
waste.<br />
Interface cables are available for automatic advance of an<br />
Isco brand fraction collector.
1.2 Accessories<br />
Expedite<br />
Workstation<br />
Software<br />
Accessories<br />
The following accessories are available for purchase with the<br />
basic Expedite <strong>Nucleic</strong> <strong>Acid</strong> <strong>Synthesis</strong> System:<br />
• Expedite Workstation software<br />
• Multiple Oligonucleotide <strong>Synthesis</strong> System (MOSS)<br />
option (8909 systems only)<br />
• Expedite PNA Instrument option<br />
• Uninterruptable Power Supply (UPS)<br />
Refer to Appendix E, Accessories and Spare Parts, for part<br />
numbers.<br />
The Expedite Workstation software provides an external user<br />
interface to one or more instruments. The Microsoft ®<br />
Windows ® -based package is a complete multiple instrument<br />
management system that includes:<br />
• <strong>Synthesis</strong> monitoring and system control<br />
• A sequence editor with the capability to import data<br />
from third party DNA software<br />
• A synthesis protocol editor<br />
• A report generation facility<br />
• An internal database for managing sequences,<br />
protocols, and reports<br />
The Expedite Workstation software requires a minimum<br />
system configuration of:<br />
• PC compatible 386SX 16MHz computer<br />
• 4 MB RAM minimum, 8 MB RAM recommended<br />
• 60MBHardDrive<br />
• 3.5” Floppy Disk Drive<br />
• VGA color graphics monitor<br />
• MS-DOS ® Version 5.0<br />
• Microsoft Windows Version 3.1<br />
• RS-422 Serial Interface Card<br />
Expedite <strong>8900</strong> <strong>Nucleic</strong> <strong>Acid</strong> <strong>Synthesis</strong> System User’s Guide 1-5<br />
1
1<br />
Chapter 1 The Expedite <strong>Nucleic</strong> <strong>Acid</strong> <strong>Synthesis</strong> System<br />
MOSS option<br />
(8909 systems<br />
only)<br />
PNA instrument<br />
option<br />
UPS Power<br />
Supply<br />
1-6 PerSeptive <strong>Biosystems</strong><br />
The Multiple Oligonucleotide <strong>Synthesis</strong> System (MOSS)<br />
option expands the capabilities of 8909 Expedite systems to<br />
allow unattended synthesis of 16 oligonucleotides. Expedite<br />
systems configured with the MOSS option allow interactive<br />
trityl monitoring for all 16 column positions. The MOSS unit<br />
sits on top of the Expedite system. It does not require<br />
additional bench space.<br />
The PNA instrument option includes the software upgrade and<br />
reagents you need to synthesize PNA (peptide nucleic acid)<br />
oligonucleotides. The option kit includes reagents for<br />
150 cycles. This option does not require any changes to the<br />
hardware.<br />
A UPS (uninterruptable power supply) is a high-performance<br />
standby that protects the instrument from utility line failures<br />
that could result in loss of syntheses.<br />
If a utility failure occurs, such as a blackout, brownout, or sag,<br />
the UPS rapidly transfers the instrument that is plugged in at<br />
its output to an alternative power source. The alternative<br />
power source is derived from a rechargeable battery within the<br />
UPS and provides you with up to 30 minutes to continue the<br />
synthesis to a chemically safe stopping point. You can<br />
configure the stopping point in a user profile.<br />
Two UPS options are available from PerSeptive <strong>Biosystems</strong>:<br />
• 115 Vac<br />
• 220 Vac
1.3 Instrument Description<br />
Instrument Description<br />
The Expedite <strong>Nucleic</strong> <strong>Acid</strong> <strong>Synthesis</strong> System is a fast, flexible<br />
instrument with a small footprint. The Series <strong>8900</strong> instruments<br />
have the following components:<br />
• Software Control System<br />
• Reagent Delivery System<br />
• Pneumatic Control System<br />
• Power Supply<br />
1.3.1 Software Control System<br />
The Expedite <strong>Nucleic</strong> <strong>Acid</strong> <strong>Synthesis</strong> System is controlled by<br />
menu driven software which:<br />
• Allows independent single or dual column operation.<br />
• Provides full sequence editing and storage facilities.<br />
The system can store 504 sequences of up to 250<br />
bases in length.<br />
• Enables the synthesis of mixed sites.<br />
• Calculates reagent requirements and monitors<br />
reagent consumption for the synthesis.<br />
• Monitors the synthesis and displays the current status<br />
and estimated time of completion.<br />
• Provides extended diagnostics for troubleshooting.<br />
• Provides software tools for priming the instrument and<br />
various manual functions.<br />
• Monitors the system for error conditions.<br />
Expedite <strong>8900</strong> <strong>Nucleic</strong> <strong>Acid</strong> <strong>Synthesis</strong> System User’s Guide 1-7<br />
1
1<br />
Chapter 1 The Expedite <strong>Nucleic</strong> <strong>Acid</strong> <strong>Synthesis</strong> System<br />
1-8 PerSeptive <strong>Biosystems</strong><br />
• Allows multiple user profiles for individualized<br />
operation.<br />
• Generates a log of all activities.<br />
• Can generate a hard copy of synthesis information.<br />
• Reminds you, after an idle period, to prime the<br />
reagent passages before you start a synthesis.<br />
User Interface The user interface consists of an electroluminescent<br />
backlighted LCD display with a membrane keypad. The<br />
membrane keypad, which is located below the display, has<br />
eight soft (software defined) keys and a dedicated Stop key<br />
(see Figure 1-2).<br />
Soft Keys<br />
Green LED<br />
Dedicated Stop Key<br />
Figure 1-2 LCD Display<br />
Stop<br />
Different functions are assigned to the soft keys in each menu.<br />
The soft key assignment is displayed at the bottom of each<br />
screen. Menu selections are made by pressing the soft key<br />
directly below the desired selection.<br />
In the <strong>8900</strong> Series, the menu structure is hierarchical and is<br />
optimized to minimize keyboard interaction.
Instrument Description<br />
Screen Saver The automatic screen saver blanks the screen after the<br />
instrument has had no keypad interaction for two hours. The<br />
green LED at the left side of the keypad flashes while the<br />
screen is blanked. The screen display is restored whenever<br />
you press a key on the keypad.<br />
Sequence Entry You may enter sequences in the Sequence mode. Sequences<br />
are stored in user profiles. Each profile can store 63<br />
sequences of up to 250 bases in length.<br />
NOTE: Sequence entry is case-sensitive:<br />
DNA protocol: uppercase=DNA, lowercase=Thio<br />
Thio protocol: uppercase=Thio, lowercase=DNA<br />
RNA protocol: uppercase=RNA, lowercase=DNA<br />
Sequence entry is described in Section 3.3.1, Using the<br />
Sequence Editor.<br />
Mixed Sites You may incorporate mixed sites into a sequence (see “Mixed<br />
Site Entry” on page 3-16). According to the mixture you<br />
enter, an equal volume of each monomer solution is delivered<br />
to the reaction column from the nucleotide reservoirs.<br />
Reagent<br />
Requirements<br />
<strong>Synthesis</strong><br />
Monitoring<br />
The software automatically calculates the reagent<br />
requirements for a selected synthesis and monitors reagent<br />
consumption during the synthesis.<br />
You may use the Status Resources display, at any time during<br />
a synthesis, to see how much reagent is currently estimated to<br />
be left in the reagent reservoir. See Section 3.4.1, Displaying<br />
System Information.<br />
NOTE: If you rely on the instrument to report reagent<br />
consumption, you must use the bottle tool to reset the<br />
reagent volumes whenever you replenish the reagent<br />
reservoirs. See Section 3.6.2, Bottle Change Tool.<br />
The software monitors the instrument during a synthesis and<br />
keeps track of the steps in the synthesis and the status of the<br />
instrument. See Section 3.4, Status Menu.<br />
Expedite <strong>8900</strong> <strong>Nucleic</strong> <strong>Acid</strong> <strong>Synthesis</strong> System User’s Guide 1-9<br />
1
Chapter 1 The Expedite <strong>Nucleic</strong> <strong>Acid</strong> <strong>Synthesis</strong> System<br />
1 Priming Tools The priming tools provide options for manually priming the<br />
instrument and performing post synthesis operations. See<br />
Section 3.5, Prime Menu.<br />
Diagnostic Tools The software provides extended diagnostics for<br />
troubleshooting. See Section 3.6.1, Diagnostic Routines.<br />
User Profiles The software allows you to set up eight user profiles for<br />
individualized operation. In a user profile, you may specify<br />
default running parameters and protocols that are in effect for<br />
every synthesis that is run when that user profile is selected.<br />
Instrument Log The software keeps track of all information about a synthesis<br />
and automatically stores it in the instrument log on the floppy<br />
disk. If a printer is attached you may generate a hard copy of<br />
the log.<br />
Power Failure<br />
Recovery<br />
1-10 PerSeptive <strong>Biosystems</strong><br />
In the event of a power failure, the system knows where the<br />
synthesis was interrupted and, if Auto Restart is activated in<br />
the User Profile, can continue the synthesis at that point when<br />
the power is restored.<br />
If the instrument is equipped with an uninterruptable power<br />
supply, you may specify defaults in the User Profile that<br />
minimize the damage to a synthesis if there is a problem with<br />
the electrical power (see Section 3.6.6, Specifying a User<br />
Profile). In the event of a power failure, the UPS can provide<br />
power to the instrument until the next chemically safe stopping<br />
point (end of current cycle) in the synthesis.<br />
Printer A dot matrix printer may be attached to the instrument through<br />
the parallel port on the back panel of the instrument. You may<br />
print:<br />
• Sequence information<br />
• The resources calculation<br />
• The software configuration<br />
• The instrument log<br />
• Trityl data
1.3.2 Reagent Delivery System<br />
Fluid Transport<br />
System<br />
WARNING<br />
Instrument Description<br />
Most of the reagents and solvents used in nucleic acid<br />
synthesis are hazardous. Wear a lab coat, gloves and eye<br />
protection when handling reagents. Adequate ventilation is<br />
essential and working under a fume hood is recommended.<br />
Consult Appendix B, Reagent Safety for reagent safety<br />
considerations.<br />
AVERTISSEMENT<br />
La plupart des réactifs et solvants employés en synthèse<br />
d'acides nucléiques sont dangereux. Portez une blouse,<br />
des gants et des lunettes de protection lorsque vous<br />
manipulez des réactifs. Une ventilation adéquate est<br />
nécessaire et il est recommandé de travailler sous une<br />
hotte. Consultez la partie “Appendix B, Reagent Safety”, de<br />
ce manuel.<br />
The reagent delivery system is composed of:<br />
• Fluid Transport System<br />
• Reagent Reservoirs<br />
• Reaction Columns<br />
• Waste System<br />
• Drip Trays<br />
The fluid transport system consists of a microfluidic plate with<br />
fluid passages, valve actuators, and fluid injectors. The fluid<br />
injectors are driven by the pneumatic system. Flow paths are<br />
created within the plate by the activation of specific valves.<br />
Expedite <strong>8900</strong> <strong>Nucleic</strong> <strong>Acid</strong> <strong>Synthesis</strong> System User’s Guide 1-11<br />
1
1<br />
Chapter 1 The Expedite <strong>Nucleic</strong> <strong>Acid</strong> <strong>Synthesis</strong> System<br />
WSH ACT<br />
1-12 PerSeptive <strong>Biosystems</strong><br />
Each reagent is delivered as fixed volume pulses by individual<br />
fluid injectors. Therefore, consistent reagent volumes are<br />
delivered to the reaction columns. This enables accurate<br />
monitoring of reagent usage without calibrating the flow rates<br />
for each reagent.<br />
There are two valve trains (see Figure 1-3) that deliver<br />
reagents to the reaction columns.<br />
• The A-train delivers the deblocking, washing, capping<br />
and oxidation reagents.<br />
• The B-train delivers the activation and coupling<br />
reagents.<br />
OX AUX CAPA<br />
CAPB<br />
Reagent<br />
Tray<br />
Caddy<br />
Figure 1-3 Fluidics Diagram for Model 8909
Reagent<br />
Reservoirs<br />
Réservoirs à<br />
Réactifs<br />
Instrument Description<br />
In dual column mode, the A-train delivers reagents to one<br />
reaction column at the same time that the B-train is delivering<br />
reagents to the other reaction column. Thus, two different<br />
protocols can be performed simultaneously.<br />
The reagent reservoirs screw into the positions within the<br />
instrument cabinet (see Figure 1-4). The reservoir positions<br />
are labeled to correspond to the labels of the bottles in the<br />
reagent kit. The bottles have transparent labels that display<br />
both the reservoir position on the instrument and the reagent<br />
name as it appears in the software. For a successful<br />
synthesis, the reagents must be loaded in the correct<br />
positions.<br />
Les réservoirs à réactifs doivent être positionnés en les<br />
vissant à certains endroits à l'intérieur de l'appareil<br />
(voir Figure 1-4). Les différents emplacements sont étiquetés<br />
de la même manière que les différents flacons du kit de<br />
réactifs. Les flacons sont munis d'étiquettes transparentes<br />
indiquant à la fois la position du réservoir dans l'appareil et le<br />
nom du réactif tel qu'il apparaît dans le logiciel. Pour réussir la<br />
synthèse, il convient de charger correctement ces réactifs.<br />
Expedite <strong>8900</strong> <strong>Nucleic</strong> <strong>Acid</strong> <strong>Synthesis</strong> System User’s Guide 1-13<br />
1
1<br />
Chapter 1 The Expedite <strong>Nucleic</strong> <strong>Acid</strong> <strong>Synthesis</strong> System<br />
Model 8905<br />
Reagent<br />
Reservoirs<br />
1-14 PerSeptive <strong>Biosystems</strong><br />
Figure 1-4 Model 8909 Instrument Cabinet with<br />
Reagent Bottles<br />
The Model 8905 (see Figure 1-5) has internal reservoir<br />
positions, labeled to correspond to the reagent bottles, for:<br />
• One wash solvent (A-train and B-train)<br />
• Five ancillary reagents<br />
Drip Tray<br />
Waste Lines<br />
Reagent<br />
Lines<br />
Reagent tray<br />
• Five nucleotide monomer solutions (four for the<br />
standard nucleotides and one for special nucleotides<br />
or reagents).
Model 8905<br />
Model 8909<br />
DBLK<br />
8<br />
WSH A<br />
7<br />
Instrument Description<br />
A C G T/U 5<br />
A<br />
WSH OX DBLK<br />
1 2 3<br />
ACT CAP A CAP B<br />
4 5 6<br />
C G T/U 5<br />
6 7 8 9<br />
WSH OX AUX<br />
1 2 3<br />
ACT CAP A CAP B<br />
4 5 6<br />
Figure 1-5 Reagent Reservoir Positions<br />
Expedite <strong>8900</strong> <strong>Nucleic</strong> <strong>Acid</strong> <strong>Synthesis</strong> System User’s Guide 1-15<br />
1
1<br />
Chapter 1 The Expedite <strong>Nucleic</strong> <strong>Acid</strong> <strong>Synthesis</strong> System<br />
Réservoirs à<br />
Réactifs Modèle<br />
8905<br />
Model 8909<br />
Reagent<br />
Reservoirs<br />
Réservoirs à<br />
Réactifs Modèle<br />
8909<br />
!<br />
1-16 PerSeptive <strong>Biosystems</strong><br />
Dans l'Expedite 8905 (voir Figure 1-5), les emplacements des<br />
réservoirs à réactifs se trouvent tous à l'intérieur de l'appareil ;<br />
ils sont étiquetés et correspondent aux réactifs suivants :<br />
• Un pour le solvant de lavage (circuit-A et circuit-B)<br />
• Cinq pour les réactifs auxiliaires<br />
• Cinq pour les solutions de monomères (quatre pour<br />
les solutions standard de nucléotides et une pour les<br />
nucléotides ou les réactifs spéciaux).<br />
The Model 8909 (see Figure 1-5) has internal reservoir<br />
positions, labeled to correspond to the reagent bottles, for:<br />
• One wash solvent (B-train)<br />
• Five ancillary reagents<br />
• Nine nucleotide monomer solutions<br />
Dans l'Expedite 8909 (voir Figure 1-5), une partie des<br />
réservoirs doit se placer à l'intérieur de l'appareil. Leurs<br />
emplacements sont étiquetés ; ils correspondent aux réactifs<br />
suivants :<br />
• Un pour le solvant de lavage (circuit B)<br />
• Cinq pour les réactifs auxiliaires<br />
• Neuf pour les solutions de monomères<br />
In addition, the Model 8909 has an external reagent tray that<br />
holds:<br />
• Deblock solution<br />
• External Wash solvent (A-train)<br />
WARNING<br />
Use only plastic-coated bottles in the external reagent tray.<br />
NOTE: All the bottles are pressurized at the same time.<br />
Therefore a bottle (even if it is empty) must be attached to<br />
each position before a synthesis is started.
!<br />
Instrument Description<br />
Les autres réservoirs se placent sur le support extérieur à<br />
savoir:<br />
• La solution de détritylation ("Deblock")<br />
• Le solvant de lavage externe (circuit A)<br />
AVERTISSEMENT<br />
Utilisez seulement les flacons revêtus de plastique sur le<br />
plateau extèrieur de rèactif.<br />
Tous ces flacons sont mis sous pression en même temps.<br />
Par conséquent, un flacon (même vide) doit être positionné<br />
sur chaque emplacement avant le démarrage de la<br />
synthèse.<br />
Reagent Kits The Model 8905 Reagent Kit contains enough ancillary<br />
reagents for approximately 150 coupling cycles at the<br />
0.2 μmole scale.<br />
The Model 8909 Reagent Kit contains enough ancillary<br />
reagents for approximately 800 coupling cycles at the<br />
0.2 μmole scale.<br />
The amidites can be obtained in 0.25 g, 0.5 g, and 1.0 g<br />
amounts which is enough for approximately 150, 400, or 800<br />
coupling cycles respectively.<br />
Each reagent line has a 20 micron filter that prevents particles<br />
from entering the fluidic passages.<br />
Reaction columns Disposable columns prepacked with a controlled pore glass<br />
(CPG) with the 3'-nucleoside attached are available for the<br />
following:<br />
• 0.05 μmole DNA synthesis<br />
• 0.2 μmole DNA synthesis<br />
• 1 μmole DNA synthesis<br />
• 15 μmole DNA synthesis<br />
• 1 μmole RNA synthesis<br />
Expedite <strong>8900</strong> <strong>Nucleic</strong> <strong>Acid</strong> <strong>Synthesis</strong> System User’s Guide 1-17<br />
1
1<br />
Chapter 1 The Expedite <strong>Nucleic</strong> <strong>Acid</strong> <strong>Synthesis</strong> System<br />
Reaction devices<br />
with membrane<br />
solid-support<br />
1-18 PerSeptive <strong>Biosystems</strong><br />
CPG columns do not have a specific orientation so they can<br />
be connected in either direction.<br />
Columns are packed with CPG with pore sizes of<br />
either 1000 Å or 500 Å. Columns with1000 Å CPG are<br />
recommended for long oligomers (≥50 mers) and columns with<br />
500 Å CPG are recommended for shorter sequences.<br />
Disposable MemSyn devices containing a membrane solidsupport<br />
with the 3'-nucleoside attached are available for the<br />
following:<br />
• 0.05 μmole DNA synthesis<br />
• 0.2 μmole DNA synthesis<br />
Place MemSyn devices on the synthesizer with the printed<br />
side of the label facing up.<br />
MemSyn devices are suitable for synthesis of long and short<br />
oligomers.<br />
Waste System Two waste reservoirs are located beside the instrument<br />
(Figure 1-6). Four waste lines (two for each column) exit the<br />
instrument cabinet directly behind the reaction columns (at the<br />
right rear). ORG1 and ORG2 waste lines are connected to the<br />
organic waste bottle cap. TRT1 and TRT2 waste lines are<br />
connected to the chlorinated waste bottle cap.<br />
Waste<br />
lines Waste<br />
lines<br />
Organic<br />
waste<br />
Vent<br />
lines<br />
Figure 1-6 Waste Bottle and Connections<br />
Keep waste reservoirs in the spill tray provided.<br />
Chlorinated<br />
waste
Instrument Description<br />
Drip Trays The instrument contains three drip trays:<br />
• Trityl monitor drip tray (inside the instrument cabinet)<br />
• Column drip tray (not removable)<br />
• Instrument cabinet drip tray (removable)<br />
Tiroirs<br />
d'Écoulement<br />
The trityl monitor drains into the column drip tray which then<br />
drains into the instrument cabinet drip tray. The instrument<br />
cabinet drip tray is removed easily (see Figure 1-4) by sliding it<br />
out of the instrument cabinet. In the event of a spill, the cabinet<br />
drip tray can hold the contents of the largest reagent bottle<br />
(1800 mL) without overflowing.<br />
In the event of a leak all fluids are routed to the drip tray and<br />
flow toward the front of the instrument.<br />
NOTE: If reagents accumulate in the drip tray or the waste<br />
spill tray, use a spill pillow to absorb any liquid and dispose<br />
of the pillow safely (see Appendix B, Reagent Safety).<br />
L'appareil possède trois tiroirs d'écoulement :<br />
• Un tiroir d'écoulement du détecteur de trityl (à<br />
l'intérieur du cabinet)<br />
• Un tiroir d'écoulement des colonnes (inamovible)<br />
• Un tiroir d'écoulement du cabinet de l'appareil<br />
(amovible).<br />
Le tiroir d'écoulement du détecteur de trityl s'écoule dans le<br />
tiroir d'écoulement des colonnes, qui lui-même s'écoule dans<br />
le tiroir d'écoulement du cabinet. Celui-ci se retire facilement<br />
en le faisant glisser hors du cabinet (voir Figure 1-4). En cas<br />
de fuite, le tiroir d'écoulement du cabinet peut recevoir le<br />
contenu du plus grand flacon de réactif (1800 ml) sans<br />
déborder.<br />
En cas de fuite, tous les fluides sont dirigés vers le tiroir<br />
d'écoulement et s'écoulent vers l'avant de l'appareil.<br />
Expedite <strong>8900</strong> <strong>Nucleic</strong> <strong>Acid</strong> <strong>Synthesis</strong> System User’s Guide 1-19<br />
1
Chapter 1 The Expedite <strong>Nucleic</strong> <strong>Acid</strong> <strong>Synthesis</strong> System<br />
1 Si des réactifs s'écoulent dans le tiroir d'écoulement de<br />
l'appareil ou dans celui des rejets, épongez-les et jetez<br />
l'éponge selon les consignes de sécurité (voir “Appendix B,<br />
Reagent Safety”, de ce manuel).<br />
1.3.3 Pneumatic Control System<br />
1-20 PerSeptive <strong>Biosystems</strong><br />
The pneumatic control system branches into high and low<br />
pressure systems within the cabinet:<br />
• Low pressure system (6–7 psi, adjusted through an<br />
internal pressure regulator during installation)—<br />
Blankets the reagent bottles.<br />
• High pressure system (20 psi, equal to inlet<br />
pressure)—Controls the pumping of reagents through<br />
the injectors by cycling gas pressure on a diaphragm.<br />
Gas Supply Use a dry helium gas supply for best performance. Dry helium<br />
is less soluble in the reagents and ensures a longer life for the<br />
chemicals, especially the monomers.<br />
Connect a 2-stage regulator to the helium gas supply and<br />
adjust to 20 psi (±5 psi).<br />
NOTE: If helium is not available, you can use argon or<br />
nitrogen (high purity, 99.995%). However, bubbles<br />
introduced by these gases may cause trityl failures.<br />
Relief Valves The system includes two relief valves:<br />
• High pressure relief valve—Prevents inlet gas from<br />
overpressuring the fluidic injectors. This relief valve is<br />
activated at 30 psi (±5 psi).
Gas Pressure<br />
Sensors<br />
Gas Leak<br />
Detection<br />
Instrument Description<br />
NOTE: Do not set inlet pressure above 20 psi.<br />
Higher inlet pressures can exceed the high<br />
pressure relief valve limit, and result in your gas<br />
supply bleeding through the relief valve.<br />
• Low pressure relief valve—Prevents the<br />
low-pressure blanket gas from over-pressurizing the<br />
reservoirs. If the pressure rises above the maximum<br />
of 15 psi, the relief valve automatically opens to<br />
reduce the pressure.<br />
The instrument is equipped with two gas pressure sensor<br />
switches that monitor the gas pressure entering the instrument<br />
(high pressure sensor) and the blanket gas pressure (low<br />
pressure sensor). These alarms are activated by default in the<br />
User Profile (see Section 3.6.6, Specifying a User Profile).<br />
If the high pressure falls below a specified level (10 psi), the<br />
“High pressure system failure” message is displayed on the<br />
screen and recorded in the Instrument Log. If the blanket<br />
pressure drops below 4.0 psi, the “Low pressure system<br />
failure” message is displayed on the screen and recorded in<br />
the Instrument Log. This indicates that one or more bottles are<br />
leaking, or there is a problem in the low pressure regulator.<br />
If you acknowledge these messages immediately, the<br />
synthesis continues without interruption. If you fail to<br />
acknowledge the messages, the synthesis is halted at the end<br />
of the current cycle.<br />
Diagnostics tools are available for the diagnosis and isolation<br />
of leaks. The Diagnostics tools, which are accessed through<br />
the Tools menu, provide routines for independent leak testing<br />
of the High and Low pressure systems.<br />
Gas Saver The Gas Saver reduces overall gas consumption and<br />
automatically detects significant leaks. The Gas Saver is<br />
activated by default in the User Profile<br />
(see Section 3.6.6, Specifying a User Profile).<br />
Expedite <strong>8900</strong> <strong>Nucleic</strong> <strong>Acid</strong> <strong>Synthesis</strong> System User’s Guide 1-21<br />
1
1<br />
Chapter 1 The Expedite <strong>Nucleic</strong> <strong>Acid</strong> <strong>Synthesis</strong> System<br />
1-22 PerSeptive <strong>Biosystems</strong><br />
If the instrument has been idle for 5 minutes (no keyboard or<br />
pumping activity), the Gas Saver is activated and remains<br />
operational until the instrument is activated (a key is pressed).<br />
The Gas Saver shuts off the gas until the blanketing pressure<br />
falls below 4.0 psi when the pressure is restored. During<br />
periods of inactivity, the system periodically performs the leak<br />
test and shuts off the gas supply if a failure is detected.<br />
1.3.4 Power Control System<br />
The power control system, which is isolated at the rear of the<br />
instrument, accepts AC power and supplies DC regulated<br />
power to the microprocessor and the pneumatics system. The<br />
power entry cord and fuses are contained in this module (see<br />
Figure 1-7).<br />
90-260 VAG 47-63Hz<br />
FUSE 3AG 250V 1A SLOW<br />
100VA MAX<br />
WARNING<br />
FOR CONTINUED PROTECTION<br />
AGAINST RISK OF FIRE, REPLACE<br />
ONLY WITH FUSE OF SPECIFIED<br />
TYPE AND CURRENT RATING.<br />
AC<br />
INLET<br />
Figure 1-7 Power Entry and Fuses
Safety Precautions<br />
The power supply is shielded from reagent leaks by<br />
appropriate placement and isolation of electronic assemblies<br />
and instrument cables.<br />
No voltage selection is required. The Expedite <strong>Nucleic</strong> <strong>Acid</strong><br />
<strong>Synthesis</strong> System is equipped with a universal power supply<br />
that can be used for 100 V or 240 V operation. The use of a<br />
surge suppressor between the instrument and the electrical<br />
outlet is recommended.<br />
1.4 Safety Precautions<br />
The following information is provided to ensure safe operation<br />
of the Expedite <strong>Nucleic</strong> <strong>Acid</strong> <strong>Synthesis</strong> System. Please read it<br />
carefully before using the instrument and observe the<br />
following safety recommendations.<br />
Les informations suivantes vous sont communiquées afin de<br />
garantir votre sécurité lors de l'utilisation du synthétiseur<br />
d'acides nucléiques Expedite. Lisez-les attentivement avant<br />
de l'utiliser et respectez les consignes de sécurité.<br />
Electrical Two shielded AC cords are provided. Select and use the cord<br />
that is compatible with your main power supply.<br />
Unplug the main power cable before you service or repair the<br />
instrument.<br />
WARNING<br />
To prevent electric shock, do not remove the instrument<br />
cover. There are no user serviceable parts within the<br />
cabinet. Refer servicing to qualified personnel.<br />
Electricité Utilisez uniquement le fil électrique protégé fourni avec<br />
l'appareil. Débranchez impérativement le câble d'alimentation<br />
principal avant de procéder aux opérations d'entretien ou de<br />
réparation de l'appareil.<br />
Expedite <strong>8900</strong> <strong>Nucleic</strong> <strong>Acid</strong> <strong>Synthesis</strong> System User’s Guide 1-23<br />
1
Chapter 1 The Expedite <strong>Nucleic</strong> <strong>Acid</strong> <strong>Synthesis</strong> System<br />
1 AVERTISSEMENT<br />
Afin d'éviter les chocs électriques, ne retirez pas le<br />
couvercle de l'appareil. Il n'y a à l'intérieur de l'appareil<br />
aucune pièce que vous puissiez remplacer vous-même.<br />
Faites appel au service technique de PerSeptive<br />
<strong>Biosystems</strong>.<br />
Gas Supply Securely anchor the tank of pressurized gas.<br />
Use a 2-stage regulator to step the pressure down to 20 psi.<br />
Operating<br />
Temperature<br />
Température de<br />
Fonctionnement<br />
1-24 PerSeptive <strong>Biosystems</strong><br />
NOTE: Do not set inlet pressure above 20 psi (±5 psi).<br />
Higher inlet pressures can exceed the high pressure relief<br />
valve limit, and result in your gas supply bleeding through<br />
the relief valve.<br />
Gaz Fixez solidement le réservoir de gaz sous pression.<br />
Nous recommandons l'utilisation d'un régulateur de pression à<br />
deux étages permettant d'obtenir une pression de sortie de 20<br />
psi (1,3 bar).<br />
Ne pas régler la pression d’entrée au dessus de<br />
20 psi (1,3 bar) ±5 psi (0,3 bar). Des pressions d’entrée<br />
plus élevées peuvent dépasser la limite supérieure de<br />
pression du détendeur, et causer la fuite de l’alimentation<br />
de gaz dans le détendeur.<br />
The protocols are optimized for room temperature operation<br />
(20 to 30 o C).<br />
Les protocoles sont optimisés pour un fonctionnement à<br />
température ambiante (20 à 30 ° C).
Vent the<br />
Instrument<br />
Ventilation de<br />
l'appareil<br />
Safety Precautions<br />
The instrument cabinet is equipped with an exhaust fan that<br />
vents vapors to the rear of the instrument. Make sure that the<br />
vent tube on the back of the instrument is connected to a<br />
suitable exhaust duct.<br />
L'appareil est équipé d'un ventilateur qui évacue les vapeurs<br />
vers l'arrière de l'appareil. Assurez-vous que le tube évent à<br />
l'arrière de l'appareil est bien raccordé à un conduit<br />
d'échappement.<br />
Reagent Handling Most of the reagents and solvents used in nucleic acid<br />
synthesis are hazardous. Wear a lab coat, gloves and eye<br />
protection when handling reagents. Adequate ventilation is<br />
essential and working under a fume hood is recommended.<br />
Flammable reagents should be kept in an appropriate<br />
flameproof cabinet. Oxidizers should be isolated. Consult<br />
Appendix B, Reagent Safety, for information on the handling<br />
of specific chemicals.<br />
Make sure that you put the reagent bottles on the instrument<br />
in the correct position. Mixing up the bottles will contaminate<br />
the instrument. The reagent bottles on the instrument are<br />
pressurized. Take care when removing the bottles from the<br />
instrument.<br />
Manipulation des<br />
Réactifs<br />
La plupart des réactifs et des solvants employés en synthèse<br />
d'acides nucléiques sont dangereux. Portez une blouse, des<br />
gants et des lunettes de protection lorsque vous les<br />
manipulez. Une ventilation adéquate est nécessaire et il est<br />
recommandé de travailler sous une hotte.<br />
Les réactifs inflammables doivent être stockés dans des<br />
armoires métalliques. Les oxydants doivent être stockés<br />
séparément. Reportez-vous à la partie “Appendix B, Reagent<br />
Safety”, de ce manuel, pour de plus amples informations sur<br />
les manipulations de produits chimiques particuliers.<br />
Faites en sorte de positionner les flacons de réactifs à leur<br />
place dans l'appareil. Intervertir les bouteilles contaminerait<br />
l'appareil. Les bouteilles de réactifs sont sous pression<br />
lorsque l'appareil fonctionne. Prenez garde lorsque vous les<br />
retirez de l'appareil.<br />
Expedite <strong>8900</strong> <strong>Nucleic</strong> <strong>Acid</strong> <strong>Synthesis</strong> System User’s Guide 1-25<br />
1
Chapter 1 The Expedite <strong>Nucleic</strong> <strong>Acid</strong> <strong>Synthesis</strong> System<br />
1 Waste Disposal Collect the waste generated from DNA synthesis and dispose<br />
of it in accordance with local, state, and federal regulations<br />
pertaining to toxic waste removal.<br />
Elimination des<br />
Solvants et<br />
Réactifs Usagés<br />
Boot diskette<br />
removal<br />
1-26 PerSeptive <strong>Biosystems</strong><br />
Récupérez les rejets issus de la synthèse d'ADN et détruisezles<br />
en suivant les directives en vigueur sur l'élimination des<br />
déchets toxiques.<br />
Do not remove the boot diskette from the disk drive when the<br />
system is powered up. The system continuously accesses the<br />
boot diskette. Power down the system before removing the<br />
diskette to avoid damaging the diskette or diskette drive.
2 Performing a<br />
<strong>Synthesis</strong><br />
Chapter<br />
2<br />
This chapter contains the following sections:<br />
2.1 Introduction ....................................................2-2<br />
2.2 Powering Up the System.............................2-16<br />
2.3 Entering the Sequence................................2-22<br />
2.4 Preparing and Loading the Reagents.........2-26<br />
2.5 Starting the <strong>Synthesis</strong> .................................2-42<br />
2.6 Running the <strong>Synthesis</strong> ................................2-49<br />
2.7 Post-synthesis Procedures .........................2-55<br />
Expedite <strong>8900</strong> <strong>Nucleic</strong> <strong>Acid</strong> <strong>Synthesis</strong> System User’s Guide 2-1
2<br />
Chapter 2 Performing a <strong>Synthesis</strong><br />
2.1 Introduction<br />
Key Steps in a<br />
<strong>Synthesis</strong><br />
2-2 PerSeptive <strong>Biosystems</strong><br />
This chapter describes the step-by-step procedure for<br />
performing a synthesis on the Expedite <strong>Nucleic</strong> <strong>Acid</strong> <strong>Synthesis</strong><br />
System. You can perform the following chemistries on this<br />
instrument:<br />
• β-Cyanoethyl Phosphoramidite DNA <strong>Synthesis</strong><br />
• β-Cyanoethyl Phosphoramidite DNA <strong>Synthesis</strong> with<br />
Expedite Monomers<br />
• β-Cyanoethyl Phosphoramidite RNA <strong>Synthesis</strong><br />
• β-Cyanoethyl Phosphoramidite RNA <strong>Synthesis</strong> with<br />
Expedite Monomers<br />
• Phosphorothioated DNA synthesis<br />
In this tutorial, operation of the software is discussed as<br />
needed. A detailed description of the software is provided in<br />
Chapter 3, Software Reference.<br />
The key steps to perform a synthesis are:<br />
1. Turn on the instrument.<br />
2. Specify the chemistry to be used.<br />
3. Create the sequence.<br />
4. Install or replenish the reagents.<br />
5. Prime the fluidic system.<br />
6. Install the reaction column(s).<br />
7. Perform the <strong>Synthesis</strong>.<br />
8. Cleave the product from the reactor support.<br />
9. Perform post-synthesis base deprotection of the product.<br />
10. Optionally, analyze and purify the product.
2.1.1 Beta-Cyanoethyl<br />
Phosphoramidite <strong>Synthesis</strong><br />
Introduction<br />
The patented β-cyanoethyl phosphoramidite chemistry is the<br />
method of choice in DNA synthesis. This method provides:<br />
• High coupling efficiency<br />
• Reduced side reactions which maintain high biological<br />
activity<br />
Each cycle (see Figure 2-1) is composed of the following steps<br />
with intervening wash steps to remove excess reactants and<br />
reaction by-products:<br />
• Deblocking<br />
• Coupling<br />
• Capping<br />
• Oxidation<br />
• Capping<br />
Following the final capping step, the cycle of reactions is<br />
repeated again, beginning with deblocking, until chain<br />
elongation is complete. The oligomer is then cleaved from the<br />
support and deprotected. If desired you may then purify the<br />
product.<br />
Expedite <strong>8900</strong> <strong>Nucleic</strong> <strong>Acid</strong> <strong>Synthesis</strong> System User’s Guide 2-3<br />
2
2<br />
CH 3<br />
DMT<br />
Chapter 2 Performing a <strong>Synthesis</strong><br />
O<br />
C<br />
CH 3<br />
O<br />
O<br />
B 2 '<br />
B 1 '<br />
O<br />
Phosphoramidite<br />
Monomers<br />
O<br />
Step 3. Capping<br />
O<br />
C<br />
O<br />
P<br />
OR<br />
Step 4. Oxidation<br />
O<br />
B 1 '<br />
2-4 PerSeptive <strong>Biosystems</strong><br />
O<br />
O<br />
Step 3. Capping<br />
HO<br />
B 1 '<br />
B n<br />
O<br />
O<br />
O<br />
P<br />
DMT<br />
O -<br />
O<br />
O<br />
B 2<br />
B 2 '<br />
O<br />
O<br />
O<br />
P<br />
O -<br />
P O O<br />
OR<br />
O<br />
Cleavage/Deprotection<br />
Step 2. Coupling<br />
B 1<br />
B 1 '<br />
DMT<br />
DMT<br />
Activation<br />
B ' 2<br />
Figure 2-1 Phosphoramidite <strong>Synthesis</strong> Cycle<br />
The phosphoramidite monomers, shown in Figure 2-2, are<br />
protected as follows:<br />
• The 5'-hydroxyl positions are protected with DMT<br />
(dimethoxytrityl) groups.<br />
• Phosphorus is protected with diisopropyl amine<br />
groups and a β-cyanoethyl group.<br />
OH<br />
HO<br />
O<br />
B 1<br />
`<br />
O<br />
O<br />
B 1 '<br />
O<br />
Step1. Deblocking<br />
O<br />
P<br />
+ Tetrazole OR<br />
N(iPr) 2
DMT<br />
NCCH 2 CH 2 O<br />
DMT<br />
NCCH 2CH 2O<br />
O<br />
O<br />
P<br />
P<br />
O<br />
5'-DMT-dAdenosine (N 6 -Benzoyl)<br />
β-Cyanoethyl Phosphoramidite<br />
O<br />
Introduction<br />
The exocyclic amines are protected as follows:<br />
• Adenosine and cytidine are protected with benzoyl<br />
groups (Bz).<br />
O<br />
N(iPr) 2<br />
• Guanosine is protected with isobutyryl (iBu).<br />
• Thymidine does not need to be protected.<br />
N<br />
N<br />
O<br />
N<br />
NH<br />
NH<br />
5'-DMT-dGuanosine (N 2- Isobutyryl)<br />
β-Cyanoethyl Phosphoramidite<br />
O<br />
N(iPr) 2<br />
N<br />
N<br />
NH<br />
N<br />
N<br />
O<br />
O<br />
DMT<br />
O<br />
NCCH 2CH 2O<br />
5'-DMT-dCytidine (N 4 -Benzoyl)<br />
β-Cyanoethyl Phosphoramidite<br />
DMT<br />
NCCH 2CH 2O<br />
O O<br />
CH 3<br />
Figure 2-2 Phosphoramidite Monomers<br />
Expedite <strong>8900</strong> <strong>Nucleic</strong> <strong>Acid</strong> <strong>Synthesis</strong> System User’s Guide 2-5<br />
P<br />
O<br />
P<br />
O<br />
O<br />
N(iPr) 2<br />
O<br />
O<br />
N(iPr) 2<br />
HN<br />
5'-DMT-Thymidine β-Cyanoethyl<br />
Phosphoramidite<br />
N<br />
NH<br />
N<br />
O<br />
O<br />
N<br />
2
2<br />
Chapter 2 Performing a <strong>Synthesis</strong><br />
2.1.2 DNA <strong>Synthesis</strong> with<br />
Expedite Monomers<br />
Expedite<br />
Monomers<br />
2-6 PerSeptive <strong>Biosystems</strong><br />
The β-Cyanoethyl Phosphoramidite synthesis of DNA<br />
oligomers using Expedite monomers 1 :<br />
• Decreases deprotection time<br />
• Enables milder deprotection conditions<br />
• Is compatible with multiple synthesis chemistries<br />
You can directly substitute Expedite monomers for standard<br />
monomers without changing the synthesis protocols. All<br />
solutions are the same except for the Cap A reagent which is<br />
tert-butylphenoxyacetic anhydride in THF.<br />
The Expedite phosphoramidite monomers<br />
(see Figure 2-3) are protected as follows:<br />
• The 5'-hydroxyl positions are protected with DMT<br />
groups.<br />
• Phosphorus is protected with diisopropyl amine<br />
groups and a β-cyanoethyl group.<br />
• The exocyclic amines of adenosine, guanosine and<br />
cytidine are protected with a new, stable baseprotecting<br />
group, tert-butylphenoxyacetyl (tBPA).<br />
• Thymidine does not need to be protected.<br />
1. Sinha, N. D., Davis, P., Usman, N., Perez, J.,<br />
Hodge, R., Kremsky, J. and Casale, R. (1993) Biochimie<br />
Vol. 75 p 13-23. “Labile exocyclic amine<br />
protection of nucleosides in DNA, RNA, and oligonucleotide<br />
analog synthesis facilitating N-deacylation,<br />
minimizing depurination and chain<br />
degradation.”
DMT<br />
O<br />
NCCH 2 CH 2 O P<br />
DMT<br />
O<br />
NCCH 2 CH 2 O P<br />
5'-DMT-dAdenosine (N6-tBPA) β-Cyanoethyl Phosphoramidite<br />
O<br />
O<br />
O<br />
N(iPr) 2<br />
5'-DMT-dGuanosine (N2-tBPA) β-Cyanoethyl Phosphoramidite<br />
O<br />
N(iPr) 2<br />
N<br />
N<br />
N<br />
N<br />
O<br />
N<br />
NH<br />
N<br />
O<br />
N<br />
NH<br />
NH<br />
O<br />
O<br />
O<br />
DMT<br />
O<br />
NCCH 2 CH 2 O P<br />
5'-DMT-dCytidine (N4-tBPA β-Cyanoethyl Phosphoramidite<br />
DMT<br />
5'-DMT-Thymidine<br />
β-Cyanoethyl Phosphoramidite<br />
Figure 2-3 Expedite Monomers<br />
Introduction<br />
Expedite <strong>8900</strong> <strong>Nucleic</strong> <strong>Acid</strong> <strong>Synthesis</strong> System User’s Guide 2-7<br />
O<br />
O<br />
O<br />
N(iPr) 2<br />
N<br />
O<br />
NH<br />
N<br />
NCCH 2 CH 2 O P<br />
O<br />
O<br />
O<br />
O<br />
O<br />
N(iPr) 2<br />
HN<br />
O<br />
N<br />
CH 3<br />
2
2<br />
Chapter 2 Performing a <strong>Synthesis</strong><br />
2.1.3 RNA <strong>Synthesis</strong><br />
Standard RNA<br />
Monomers<br />
2-8 PerSeptive <strong>Biosystems</strong><br />
The RNA synthesis cycle is the same as the β-cyanoethyl<br />
phosphoramidite DNA synthesis cycle (see Figure 2-1) except<br />
that RNA synthesis uses different nucleoside monomers and<br />
longer coupling times are required. The same ancillary<br />
reagents are used and the sequence of the synthesis steps is<br />
the same, so it is easy to switch between RNA and DNA<br />
synthesis.<br />
The difference between the β-cyanoethyl phosphoramidite<br />
monomers that are used in RNA synthesis and those that are<br />
used in DNA synthesis is the presence of an additional<br />
protecting group at the 2'-hydroxyl position of the ribose ring.<br />
The RNA phosphoramidite monomers, shown in<br />
Figure 2-4, are protected as follows:<br />
• The 5'-hydroxyl positions are protected with DMT<br />
groups.<br />
• The 2'-hydroxyl positions are protected with<br />
t-butyldimethylsilyl (t-BDMS) groups. The t-BDMS<br />
groups are stable in the acidic conditions used to<br />
remove the DMT group and are readily removed after<br />
cleavage/deprotection to produce natural RNA.<br />
• Phosphorus is protected with diisopropyl amine<br />
groups and a β-cyanoethyl group.<br />
The exocyclic amines are protected as follows.<br />
• Adenosine and cytidine are protected with benzoyl<br />
groups (Bz).<br />
• Guanosine is protected with isobutyryl (iBu).<br />
• Thymidine is replaced with Uridine which does not<br />
need to be protected.
DMT<br />
O<br />
NCCH 2 CH 2 O P<br />
5'-DMT-Adenosine (Benzoyl)<br />
β-Cyanoethyl Phosphoramidite<br />
DMT<br />
O<br />
NCCH 2 CH 2 O P<br />
O<br />
NR 2<br />
O<br />
O<br />
NR 2<br />
O<br />
O<br />
Expedite RNA<br />
Monomers<br />
N<br />
N<br />
t-Butyldimethylsilyl (t-BDMS)<br />
CH 3<br />
NH<br />
N<br />
Si C(CH3 ) 3<br />
CH 3<br />
N<br />
N<br />
O tBDMS<br />
O<br />
N<br />
O<br />
N<br />
NH<br />
NH<br />
O<br />
Figure 2-4 Standard RNA Monomers<br />
Introduction<br />
5'-DMT-Cytidine (Benzoyl)<br />
β-Cyanoethyl Phosphoramidite<br />
5'-DMT-Guanosine (Isobutyryl) 5'-DMT-Uridine<br />
β-Cyanoethyl Phosphoramidite β-Cyanoethyl Phosphoramidite<br />
DMT<br />
Expedite RNA phosphoramidite monomers use a new, stable<br />
exocyclic amine protecting group tert-butylphenoxyacetyl<br />
(tBPA) that dramatically decreases deprotection time. The<br />
shorter exposure time to ammonia reduces the hydrolysis of<br />
the silyl groups resulting in less chain degradation.<br />
Expedite <strong>8900</strong> <strong>Nucleic</strong> <strong>Acid</strong> <strong>Synthesis</strong> System User’s Guide 2-9<br />
O<br />
NCCH 2 CH 2 O P<br />
DMT<br />
O<br />
NR 2<br />
O<br />
NCCH 2 CH 2 O P<br />
O<br />
O<br />
N<br />
O<br />
NR 2<br />
NH<br />
N<br />
O<br />
O tBDMS<br />
O<br />
O<br />
HN<br />
O<br />
N<br />
O tBDMS<br />
2
2<br />
Chapter 2 Performing a <strong>Synthesis</strong><br />
2-10 PerSeptive <strong>Biosystems</strong><br />
Expedite Chemistry Standard RNA Chemistry<br />
Heat the sealed tube at 55°C<br />
for 15 minutes<br />
or<br />
Let the reaction proceed at<br />
room temperature for<br />
2 hours.<br />
DMT<br />
O<br />
NCCH 2 CH 2 O P<br />
O<br />
O<br />
N(iPr) 2<br />
O<br />
N<br />
N<br />
CH 3<br />
Heat the sealed tube at 55°C<br />
for 6 to 16 minutes<br />
or<br />
Let the reaction proceed at<br />
room temperature for<br />
24 hours.<br />
5'-DMT-Adenosine (Tert-butylphenoxyacetyl)<br />
β-Cyanoethyl Phosphoramidite<br />
HN<br />
N<br />
Si C(CH ) 3 3<br />
CH 3<br />
t-BDMS<br />
O<br />
N<br />
Figure 2-5 Structure of an Expedite RNA Monomer<br />
O
DMT<br />
2'-O-Methyl RNA<br />
Monomers<br />
O<br />
NCCH 2 CH 2 O P<br />
O<br />
N 6 -Benzoyl-5'-O-DMT-<br />
2'-O-Methyl-Adenosine-3'-<br />
(β-Cyanoethyl) Phosphoramidite<br />
Introduction<br />
Research requiring RNA has increased dramatically, resulting<br />
in greater need for oligonucleotides. In research where<br />
specific RNA linkages are not required, there are considerable<br />
practical benefits for the use of 2'-O-Methyl phosphoramidite<br />
monomers:<br />
• Ease of handling that is more like that of DNA and<br />
RNA<br />
• Higher coupling efficiency<br />
• Greater nuclease resistance<br />
• Use in applications that require the higher binding of<br />
RNA-RNA relative to DNA-DNA<br />
2'-O-Methyl phosphoramidite monomers are available in<br />
standard and Expedite chemistries.<br />
Standard Expedite<br />
O<br />
N(iPr) 2<br />
N<br />
N<br />
OCH 3<br />
HN<br />
N<br />
O<br />
N<br />
DMT<br />
O<br />
NCCH 2 CH 2 O P<br />
N 6 -Tert-butylphenoxyacetyl-5'-O-DMT-<br />
2'-O-Methyl-Adenosine-3'-<br />
(β-Cyanoethyl) Phosphoramidite<br />
Figure 2-6 Structures for 2'-O-Methyl<br />
Phosphoramidite A Monomers<br />
Expedite <strong>8900</strong> <strong>Nucleic</strong> <strong>Acid</strong> <strong>Synthesis</strong> System User’s Guide 2-11<br />
O<br />
O<br />
N(iPr) 2<br />
N<br />
N<br />
OCH 3<br />
HN<br />
N<br />
O<br />
N<br />
O<br />
2
2<br />
Chapter 2 Performing a <strong>Synthesis</strong><br />
2.1.4 Phosphorothioated DNA <strong>Synthesis</strong><br />
2-12 PerSeptive <strong>Biosystems</strong><br />
The Expedite <strong>Nucleic</strong> <strong>Acid</strong> <strong>Synthesis</strong> System also provides<br />
protocols that allow you to synthesize DNA oligomers<br />
containing sulfur. These protocols use β-cyanoethyl<br />
phosphoramidite chemistry and a sulfurizing reagent such as<br />
3 H-1,2-benzodithiol-3-one 1,1-dioxide (Beaucage reagent)<br />
instead of the normal oxidizing reagent. The mechanism for<br />
the reaction is shown in Figure 2-7.
O<br />
Figure 2-7 Sulfurizing Mechanism<br />
Introduction<br />
Expedite <strong>8900</strong> <strong>Nucleic</strong> <strong>Acid</strong> <strong>Synthesis</strong> System User’s Guide 2-13<br />
2
2<br />
Chapter 2 Performing a <strong>Synthesis</strong><br />
Silanized<br />
reservoir<br />
requirement<br />
2-14 PerSeptive <strong>Biosystems</strong><br />
Use a silanized reservoir for the sulfurizing agent to ensure<br />
reagent stability.<br />
You can purchase silanized bottles (from Glen Research, for<br />
example), or you can silanize the reservoir yourself.<br />
NOTE: On a 8905 system, the sulfurizing agent is placed in<br />
the Oxidizer bottle. Thoroughly clean the Oxidizer bottle,<br />
cap, and lines before silanizing the bottle and installing the<br />
sulfurizing agent. Oxidizing agent will cause the sulfurizing<br />
agent to precipitate.<br />
WARNING<br />
The reagents and solvents used in this procedure are<br />
hazardous. Wear a lab coat, gloves and eye protection.<br />
Adequate ventilation is essential and working under a fume<br />
hood is recommended.<br />
AVERTISSEMENT<br />
Les réactifs et solvants employés dans cette procédure<br />
sont dangereux. Portez une blouse, des gants et des<br />
lunettes de protection. Une ventilation adéquate est<br />
indispensable et il est recommandé de travailler sous une<br />
hotte.<br />
To clean the vessel with concentrated sulfuric acid and<br />
silanize it:<br />
1. Immerse the vessel in concentrated sulfuric acid for<br />
approximately 15 hours.<br />
2. Wash the vessel with water and dry it in an oven to<br />
remove all moisture.
Introduction<br />
3. Immerse the vessel in a 10% solution of<br />
dichlorodimethylsilane (DCMS) in dichloromethane (DCM)<br />
for 3 to 5 minutes.<br />
4. Rinse the vessel thoroughly with methanol to quench the<br />
reaction.<br />
5. Place the vessel in a 100 ο C oven for 1 hour to dry out the<br />
methanol.<br />
6. Cool the reservoir then fill it with the sulfurizing reagent<br />
(see Section 2.4.2, Installing the Reagents).<br />
2.1.5 Selecting the Chemistry<br />
The default chemistry used on the Expedite <strong>Nucleic</strong> <strong>Acid</strong><br />
<strong>Synthesis</strong> System is the β-cyanoethyl phosphoramidite DNA<br />
method. This chemistry is specified in the standard User<br />
Profile.<br />
You can change the type of chemistry that the system<br />
performs in two ways:<br />
• Change the chemistry in the User Profile. See<br />
Section 3.6.7, Changing the Chemistry, to modify<br />
the User Profile.<br />
• Change the case of the base designators in the<br />
sequence:<br />
Chemistry Uppercase Lowercase<br />
DNA DNA Thio<br />
Thio Thio DNA<br />
RNA RNA DNA<br />
Expedite <strong>8900</strong> <strong>Nucleic</strong> <strong>Acid</strong> <strong>Synthesis</strong> System User’s Guide 2-15<br />
2
2<br />
Chapter 2 Performing a <strong>Synthesis</strong><br />
2.2 Powering Up the System<br />
2-16 PerSeptive <strong>Biosystems</strong><br />
To power up the instrument:<br />
1. Make sure that there is a bottle firmly attached to each<br />
reservoir position (see Figure 2-8).<br />
The bottles should be “finger tight.” Do not overtighten<br />
the bottles because this deforms the sealing O-rings<br />
and may cause gas leakage.<br />
Figure 2-8 Install Bottles Before Powering up the<br />
Instrument<br />
2. Turn the instrument on (the on/off switch is located at the<br />
left rear of the unit, Figure 2-9).<br />
If the boot diskette is not inserted in the drive, you are<br />
prompted to do so. Turn off the power and insert the<br />
diskette in the drive (see Figure 2-9). Turn the<br />
instrument on.
Powering Up the System<br />
NOTE: Remove the diskette only to install software<br />
upgrades. Power down before removing the diskette. Insert<br />
the new diskette before powering up.<br />
INLET PRESSURE<br />
25 PSI MAX<br />
(1.7 kg/cm 2 )<br />
AC<br />
90-260 VAG 47-63Hz<br />
INLET<br />
FUSE 3 AG 250V 1A SLOW<br />
100VA MAX<br />
WARNING On/Off<br />
FOR CONTINUED PROTECTION<br />
AGAINST RISK OF FIRE, REPLACE<br />
ONLY WITH FUSE OF SPECIFIED<br />
TYPE AND CURRENT RATING.<br />
Figure 2-9 Instrument Cabinet Showing On/Off Switch<br />
The software is loaded and the system is initialized. The<br />
instrument then runs a series of self-diagnostic routines.<br />
During the initialization procedure, the screen shown in<br />
Figure 2-10 is displayed.<br />
2.0<br />
Diskette Drive<br />
Switch<br />
Figure 2-10 System Initialization Display<br />
Expedite <strong>8900</strong> <strong>Nucleic</strong> <strong>Acid</strong> <strong>Synthesis</strong> System User’s Guide 2-17<br />
2
2<br />
Chapter 2 Performing a <strong>Synthesis</strong><br />
Software<br />
Defined Keys<br />
Selecting Menu<br />
Options<br />
2-18 PerSeptive <strong>Biosystems</strong><br />
CAUTION<br />
The boot diskette contains instrument operating instructions<br />
and the current operational parameters. Do not remove the<br />
diskette while the instrument is operating. Power down<br />
before removing the diskette to avoid damaging diskette or<br />
diskette drive.<br />
When the instrument passes all diagnostics, the Main menu,<br />
shown in Figure 2-11, is displayed.<br />
Instrument<br />
Stop Button<br />
Figure 2-11 Main Menu and Soft Keys<br />
Stop<br />
If the instrument is unable to complete the diagnostic routines<br />
a continuous beep will sound and the Main menu may not<br />
appear.<br />
Different functions are assigned to the soft keys in each<br />
screen. The key assignment is displayed at the bottom of each<br />
screen. To select a menu option, press the soft key directly<br />
below the desired option (see Figure 2-11).<br />
As a rule the furthest soft key to the right (eighth) is an Exit<br />
key that is used to go back to the previous menu screen.
Pressurizing the<br />
Instrument<br />
Powering Up the System<br />
Some menus have more than eight options. In this event, the<br />
seventh soft key is labeled More. When you select this key, an<br />
additional screen, in which new functions are assigned to the<br />
soft keys, is displayed.<br />
In operations that can be aborted, the seventh soft key is<br />
labeled cancel. Select this key to cancel the operation.<br />
The instrument is automatically pressurized when you:<br />
• Power up the system with gas attached at 20 psi.<br />
• Press any key on an idle instrument.<br />
NOTE: All bottles are pressurized together. You must attach<br />
an empty bottle to any unused instrument position.<br />
The Expedite <strong>Nucleic</strong> <strong>Acid</strong> <strong>Synthesis</strong> System is equipped with<br />
high and low gas pressure sensors.<br />
The high pressure sensor detects gas entering the system<br />
from the external tank and regulator. If the high pressure<br />
sensor fails to detect any pressure above 10 psi within<br />
5 seconds, a warning is issued on the display. If the instrument<br />
is running a synthesis, the synthesis is halted at the end of the<br />
current cycle. The instrument remains halted until you<br />
acknowledge this warning and restart the synthesis. Triggering<br />
of this alarm is usually a signal that the gas tank is depleted<br />
and needs to be replaced.<br />
The low pressure sensor, which has a threshold of 4 psi,<br />
monitors the reagent reservoirs. A failure of the low pressure<br />
system is usually an indication that a reagent reservoir is not<br />
sealed on the instrument.<br />
The high and low pressure sensors and the Gas Saver are<br />
activated when you first start the instrument. Whenever the<br />
instrument is automatically pressurized, a gas leak test is<br />
performed (see Section 3.6.1, Diagnostic Routines). If the<br />
leak test fails, a warning is issued. You must acknowledge the<br />
warning before you can continue with a synthesis.<br />
You can disable the gas sensors and the leak test by editing<br />
the User Profile (see Section 3.6.6, Specifying a User<br />
Profile). However, this is not recommended.<br />
Expedite <strong>8900</strong> <strong>Nucleic</strong> <strong>Acid</strong> <strong>Synthesis</strong> System User’s Guide 2-19<br />
2
2<br />
Chapter 2 Performing a <strong>Synthesis</strong><br />
Failure to Pass<br />
Startup Leak Test<br />
Gas Saver Leak<br />
Test<br />
2-20 PerSeptive <strong>Biosystems</strong><br />
If the instrument fails the startup leak test, a warning is<br />
displayed on the screen (see Figure 2-12). You must<br />
acknowledge the warning by pressing ok before you can<br />
continue.<br />
Figure 2-12 Leak Test Failure Warning<br />
If you acknowledge the warning but do not locate the leak, the<br />
synthesis will continue but the warning will be repeated each<br />
time the leak test is performed. Perform the tests described in<br />
Section 4.2, Gas Leak Diagnostics, to locate the leak and<br />
take corrective action before continuing with the synthesis.<br />
The gas saver leak test reduces overall gas consumption. The<br />
gas saver is activated when the instrument has been idle for<br />
5 minutes (no keyboard or valve pumping activity).<br />
During periods of inactivity, the Gas Saver periodically turns off<br />
both the high and low pressure inlet valves and measures the<br />
time taken for the blanketing pressure to fall below 4 psi. If this<br />
decay takes one minute or less, the instrument interprets this<br />
as a gross leak (for example, a bottle has been removed) and<br />
turns off the inlet valves until the instrument is activated and<br />
you acknowledge the gas saver test fail signal<br />
(Figure 2-13).
Powering Up the System<br />
Figure 2-13 Gas Saver Leak Test Failure Message<br />
If the decay period is greater than one minute, the Gas Saver<br />
shuts off the gas until the blanketing pressure falls below<br />
4.0 psi when the pressure is restored. The instrument<br />
continues to repressurize and time the period of decay until<br />
the instrument is activated.<br />
Expedite <strong>8900</strong> <strong>Nucleic</strong> <strong>Acid</strong> <strong>Synthesis</strong> System User’s Guide 2-21<br />
2
2<br />
Chapter 2 Performing a <strong>Synthesis</strong><br />
2.3 Entering the Sequence<br />
2-22 PerSeptive <strong>Biosystems</strong><br />
Use the Sequence Editor to enter a new sequence or edit an<br />
existing sequence for synthesis:<br />
NOTE: The Sequence Editor is described in detail in<br />
Section 3.3, Sequence Menu.<br />
1. If the Main menu is not displayed, press Exit until the<br />
Main menu is displayed (see Figure 2-14).<br />
Figure 2-14 Main Menu<br />
2. From the Main menu select Seq.<br />
The Sequence menu, shown in Figure 2-15, is<br />
displayed.<br />
3. Select Edit.<br />
Figure 2-15 Sequence Menu
Entering the Sequence<br />
The screen shown in Figure 2-16 is displayed.<br />
Figure 2-16 Sequence Selection Screen<br />
4. Select the sequence (1 to 63) you wish to edit. Press the<br />
More key to display additional sequences.<br />
• If you select a new sequence, a new screen is<br />
displayed (see Figure 2-17) to enable you to<br />
enter the sequence.<br />
• If you select an existing sequence, the selected<br />
sequence is displayed.<br />
5. Select Ins (insert).<br />
Figure 2-17 Sequence Screen<br />
6. Enter your sequence by pressing the entry mode keys<br />
(see Figure 2-18). Refer to Table 3-4 for a description of<br />
all entry mode keys. For mixed site entry, see “Mixed Site<br />
Entry” on page 3-16.<br />
Expedite <strong>8900</strong> <strong>Nucleic</strong> <strong>Acid</strong> <strong>Synthesis</strong> System User’s Guide 2-23<br />
2
2<br />
Chapter 2 Performing a <strong>Synthesis</strong><br />
2-24 PerSeptive <strong>Biosystems</strong><br />
NOTE: If you are entering an RNA sequence, U (Uridine)<br />
will be displayed instead of T (thymidine).<br />
The sequence is displayed on the screen (see<br />
Figure 2-18).<br />
Figure 2-18 Sequence Edit Screen (Model 8909)<br />
NOTE: Take note of the 5' - 3' orientation of the<br />
displayed sequence, listed in the upper right of the<br />
display. You can change the display orientation by<br />
modifying the user profile (see Section 3.6.6,<br />
Specifying a User Profile).<br />
You can use the Bksp key to correct mistakes or select<br />
Exit to back up one menu and gain access to the cursor<br />
keys ← and →.<br />
From this menu, you can move to any point in the<br />
sequence and insert or delete bases in the sequence.<br />
The procedures for entering sequences are described<br />
in detail in Section 3.3.1, Using the Sequence Editor.<br />
You can also name your sequence by selecting More<br />
followed by Name (see “Naming a Sequence” on<br />
page 3-23).<br />
7. When you have finished entering the sequence, select<br />
Exit repeatedly until the screen shown in Figure 2-19 is<br />
displayed.
Figure 2-19 Save the Sequence<br />
8. Press ok to save the sequence.<br />
Entering the Sequence<br />
9. The Sequence menu is displayed. Press Exit until the<br />
Main menu is displayed.<br />
Expedite <strong>8900</strong> <strong>Nucleic</strong> <strong>Acid</strong> <strong>Synthesis</strong> System User’s Guide 2-25<br />
2
2<br />
Chapter 2 Performing a <strong>Synthesis</strong><br />
2.4 Preparing and<br />
Loading the Reagents<br />
2-26 PerSeptive <strong>Biosystems</strong><br />
WARNING<br />
Most of the reagents and solvents used in nucleic acid<br />
synthesis are hazardous. Wear a lab coat, gloves and eye<br />
protection when handling reagents. Adequate ventilation is<br />
essential and working under a fume hood is recommended.<br />
AVERTISSEMENT<br />
La plupart des réactifs et solvants employés en synthèse<br />
d'acides nucléiques sont dangereux. Portez une blouse,<br />
des gants et des lunettes de protection lorsque vous<br />
manipulez des réactifs. Une ventilation adéquate est<br />
nécessaire et il est recommandé de travailler sous une<br />
hotte.<br />
The reagents used in nucleic acid synthesis are extremely<br />
hygroscopic. As it is essential that the reagents remain<br />
anhydrous, work quickly to minimize the exposure to air. Bring<br />
the monomer bottles to room temperature before opening.<br />
This will minimize any moisture contamination when the<br />
bottles are opened.<br />
CAUTION<br />
Whenever you change chemistry, you must rinse out the<br />
fluidics module with acetonitrile. See Section 3.5.7,<br />
Shutdown.
2.4.1 Reagents<br />
Reagent<br />
β-Cyanoethyl<br />
Phosphoramidite<br />
DNA <strong>Synthesis</strong><br />
and<br />
RNA <strong>Synthesis</strong><br />
Preparing and Loading the Reagents<br />
The reagents that are used with the chemical protocols on the<br />
Expedite <strong>Nucleic</strong> <strong>Acid</strong> <strong>Synthesis</strong> System are listed in<br />
Table 2-1.<br />
Table 2-1 Reagents Used in <strong>Nucleic</strong> <strong>Acid</strong> <strong>Synthesis</strong><br />
WSH Dry Acetonitrile (less than 0.005% H 2O)<br />
WSH A Acetonitrile<br />
Expedite Monomers Sulfur Containing DNA<br />
DBLK Trichloroacetic acid (TCA) in dichloromethane (DCM)<br />
ACT Tetrazole in acetonitrile<br />
CAP A Acetic<br />
anhydride in<br />
pyridine/THF<br />
t-Butylphenoxy acetic<br />
anhydride in THF<br />
CAP B N-Methylimidazole in pyridine/THF<br />
Acetic anhydride in<br />
pyridine/THF<br />
OX Iodine solution in THF/H 2O/pyridine 3 H-1,2-Benzodithiol-3one<br />
1,1-dioxide in<br />
Acetonitrile (8905)<br />
AUX Empty Empty 3 H-1,2-Benzodithiol-3one<br />
1,1-dioxide in<br />
Acetonitrile (8909)<br />
Expedite <strong>8900</strong> <strong>Nucleic</strong> <strong>Acid</strong> <strong>Synthesis</strong> System User’s Guide 2-27<br />
2
2<br />
Chapter 2 Performing a <strong>Synthesis</strong><br />
2.4.2 Installing the Reagents<br />
!<br />
2-28 PerSeptive <strong>Biosystems</strong><br />
Before you unscrew a bottle, select Tools, Bottle and select<br />
the bottle. Doing so sets the Automatic Deblanket gas to a<br />
state appropriate for the selected bottle:<br />
• Amidites, Activator and Wash (B-train) reagents—<br />
Blanketing gas pressure is retained to ensure an inert<br />
atmosphere near the open reagent position and to<br />
flush the new reagent bottle with inert gas as it is<br />
installed.<br />
When you remove the reagent bottles on which the<br />
blanketing gas pressure is retained, the blanket gas<br />
escapes and you hear a hissing noise.<br />
• A-train reagents (Oxidizer, Deblock, Aux, Wsh A,<br />
Cap A and Cap B)—Blanketing gas pressure is<br />
suspended to minimize odors. During blanket<br />
suspension, the Gas Saver and all pressure alarms<br />
are disabled.<br />
WARNING<br />
When you remove a bottle on which the blanketing gas<br />
pressure is retained, the blanket pressure in the bottle will<br />
cause reagent vapor to escape into the atmosphere. The<br />
exhaust fan within the instrument directs this vapor out the<br />
rear of the cabinet.<br />
Certain reagents emit a noxious odor that cannot be<br />
exhausted fast enough by the fan. Make sure that the<br />
exhaust duct in the rear of the instrument is connected to a<br />
fume hood to vent these odors.
Automatic<br />
Deblanket<br />
Loading the<br />
Reagents<br />
Preparing and Loading the Reagents<br />
AVERTISSEMENT<br />
Lorsque vous retirez un flacon de l'appareil, la pression<br />
résiduelle entraîne l'émission de vapeurs de réactifs. Le<br />
ventilateur placé à l'intérieur de l'appareil dirige cette<br />
vapeur vers l'arrière du cabinet.<br />
Certains réactifs émettent une odeur nauséabonde qui n'est<br />
pas éliminée suffisamment rapidement par le ventilateur.<br />
Assurez-vous que le conduit d'échappement à l'arrière de<br />
l'appareil est bien connecté à une hotte pour éliminer ces<br />
odeurs.<br />
Install one reagent at a time. Replace the bottles on the<br />
instrument as soon as possible. If a reagent bottle is not<br />
installed in an open position within a few minutes, the system<br />
will assume that the bottle change routine has been<br />
interrupted and will discontinue reagent blanketing.<br />
The default mode for the Bottle Change Tool is for the<br />
Automatic Deblanket to be turned on. By default, when the<br />
Bottle Change Tool is selected, the blanketing gas pressure is<br />
retained while the Amidites, Activator and Wash (B-train)<br />
reagents, which must be kept moisture free, are being<br />
installed. To minimize odors, the blanket gas is automatically<br />
suspended while the A-train reagents (Oxidizer, Deblock, Cap<br />
A and Cap B) are being installed. During blanket suspension,<br />
the Gas Saver and all pressure alarms are disabled.<br />
If desired, you can disable this automatic shutoff by turning off<br />
the Automatic Deblanket option in the User Profile (see<br />
Section 3.6.6, Specifying a User Profile).<br />
Select the appropriate reagent kit for the chemistry to be<br />
performed and unpack the reagents and place them in the<br />
vicinity of the instrument. Make sure the appropriate Reagent<br />
Kit and Chemistry are selected in the User Profile (see<br />
Section 3.6.6, Specifying a User Profile).<br />
Expedite <strong>8900</strong> <strong>Nucleic</strong> <strong>Acid</strong> <strong>Synthesis</strong> System User’s Guide 2-29<br />
2
2<br />
Chapter 2 Performing a <strong>Synthesis</strong><br />
2-30 PerSeptive <strong>Biosystems</strong><br />
The contents of the Reagent Kits for the Models 8905 and<br />
8909 are listed in Table 2-1. The positions of the reagent<br />
reservoirs in the Models 8905 and 8909 are shown in<br />
Figure 2-20.<br />
Reagent<br />
Table 2-1 Expedite Reagent Kits<br />
Position #<br />
8905 8909<br />
Model<br />
8905<br />
Model 8909<br />
Wash (WSH) 1 450 mL 300 mL<br />
Wash (WSH A) N/A 7 N/A 2000 mL<br />
Oxidizer (OX) 2 60 mL 200 mL<br />
Deblock (DBLK) 3 8 180 mL 900 mL<br />
Activator (ACT) 4 60 mL 200 mL<br />
Cap A (CAP A) 5 60 mL 200 mL<br />
Cap B (CAP B) 6 60 mL 200 mL<br />
Amidite Vials A—5 A—9 0.25 mg<br />
(150<br />
cycles)<br />
Amidite Diluent<br />
(septum sealed)<br />
0.5 g<br />
(400 cycles)<br />
1.0 g<br />
(800 cycles)<br />
NA 50 mL 100 mL
Model 8905<br />
Model 8909<br />
DBLK<br />
8<br />
WSH A<br />
7<br />
Preparing and Loading the Reagents<br />
Figure 2-20 Models 8905 and 8909 Reagent Reservoir Positions<br />
Install one reagent at a time in the following order:<br />
1. Wash A (WSH A—Model 8909 only)<br />
2. Deblock (DBLK)<br />
3. Oxidizer (OX)<br />
4. Capping reagents (CAP A, CAP B)<br />
5. Wash reagent (WSH)<br />
6. Activator (ACT)<br />
7. Amidites<br />
A C G T/U 5<br />
A<br />
WSH OX DBLK<br />
1 2 3<br />
ACT CAP A CAP B<br />
4 5 6<br />
C G T/U 5<br />
6 7 8 9<br />
WSH OX AUX<br />
1 2 3<br />
ACT CAP A CAP B<br />
4 5 6<br />
Expedite <strong>8900</strong> <strong>Nucleic</strong> <strong>Acid</strong> <strong>Synthesis</strong> System User’s Guide 2-31<br />
2
2<br />
Chapter 2 Performing a <strong>Synthesis</strong><br />
Model 8909<br />
Install Wash A<br />
Reagent<br />
2-32 PerSeptive <strong>Biosystems</strong><br />
To install the Wash A reagent on the Model 8909:<br />
1. From the Main Menu select Tools.<br />
The screen shown in Figure 2-21 is displayed.<br />
2. Select Bottle.<br />
Figure 2-21 Tools Menu<br />
The Bottle Change Tool is displayed (see<br />
Figure 2-22).<br />
Figure 2-22 B-train Reagent Consumption Reset<br />
3. Select More.<br />
The screen shown in Figure 2-23 is displayed.
Install Deblock,<br />
Oxidizer, and<br />
Capping<br />
Reagents<br />
Preparing and Loading the Reagents<br />
Figure 2-23 A-train Reagent Consumption Reset<br />
NOTE: The blanket pressure is turned off when this<br />
screen is displayed. Do not display this screen any<br />
longer than is necessary.<br />
4. Remove the bottle seal and cap from the WSH A bottle.<br />
Transfer the contents to the 2000 mL plastic-coated bottle<br />
provided. Place it in the number 7 position in the reagent<br />
tray. Screw on the cap (line is labeled WA7).<br />
5. Press the WSH A key on the instrument display to Reset<br />
the level of the Wsh A reservoir.<br />
To install the Deblock, Oxidizer, and Capping reagents:<br />
1. Remove the bottle seal and cap from the DBLK bottle.<br />
• Model 8905 —Screw the DBLK bottle into the<br />
number 3 position in the front row of the lower<br />
reagent rack.<br />
• Model 8909 —Transfer the contents of the<br />
DBLK bottle to a 1000 ml plastic-coated bottle<br />
provided. Place it in the number 8 position in<br />
the reagent tray. Screw on the cap (line is<br />
labeled DB8).<br />
2. Remove the bottle seal and cap from the OX bottle and<br />
screw it into the number 2 position in the front row of the<br />
lower reagent rack in the reagent compartment (see<br />
Figure 2-20).<br />
Expedite <strong>8900</strong> <strong>Nucleic</strong> <strong>Acid</strong> <strong>Synthesis</strong> System User’s Guide 2-33<br />
2
2<br />
Chapter 2 Performing a <strong>Synthesis</strong><br />
Install Activator<br />
and Wash<br />
Reagent<br />
2-34 PerSeptive <strong>Biosystems</strong><br />
3. Remove the bottle seal and cap from the CAP A bottle<br />
and screw it into the number 5 position in the lower row of<br />
the reagent rack.<br />
4. Remove the bottle seal and cap from the CAP B bottle<br />
and screw it into the number 6 position in the lower row of<br />
the reagent rack.<br />
5. If the number 3 position is not to be used for a reagent,<br />
screw an empty bottle into the instrument cap.<br />
Make sure the bottles are firmly attached to the<br />
instrument cap. The bottles should be “finger tight.” Do<br />
not overtighten the bottles because this deforms the<br />
sealing O-rings and may cause gas pressure leakage.<br />
6. Press the appropriate keys on the instrument display (see<br />
Figure 2-23) to Reset the level of the Deblock, Oxidizer<br />
and Capping reagent reservoirs.<br />
To install the Activator and Wash reagents:<br />
1. Press More until the screen shown in Figure 2-22 is<br />
displayed.<br />
NOTE: The blanket pressure is turned on and remains<br />
on while you are installing the amidites, wash and<br />
activator.<br />
2. Remove the bottle seal and cap from the ACT bottle and<br />
screw it into the number 4 position in the lower row of the<br />
reagent rack (see Figure 2-20).<br />
3. Remove the bottle seal and cap from the WSH bottle and<br />
screw it into the number 1 position in the front row of the<br />
lower reagent rack.<br />
Make sure the bottles are firmly attached to the<br />
instrument cap. The bottles should be “finger tight.” Do<br />
not overtighten the bottles because this deforms the<br />
sealing O-rings and may cause gas pressure leakage.
Install the<br />
Amidites<br />
Preparing and Loading the Reagents<br />
4. Press the appropriate keys on the instrument display<br />
shown in Figure 2-22 to Reset the level of the Activator<br />
and Wash reagent reservoirs.<br />
To install the amidites:<br />
1. Dissolve the amidites as described below.<br />
Use the disposable syringes, needles, and the amidite<br />
diluent provided with the reagent kit, to reconstitute<br />
each amidite.<br />
• Fill a syringe with argon or nitrogen.<br />
• Pierce the septum on the amidite diluent bottle<br />
and push the gas into the bottle.<br />
• Withdraw enough diluent, as specified in<br />
Table 2-2, to make a 50 mg/mL solution.<br />
• Remove the needle from the syringe.<br />
• Expel the amidite diluent down the inside wall of<br />
the amidite bottle. Take care not to atomize the<br />
diluent.<br />
• Replace the cap on the amidite bottle.<br />
Table 2-2 Amidite Diluent Volumes for 50 mg/mL<br />
Solution<br />
Model<br />
Number of Cycles<br />
at 0.2 μmole Scale<br />
Amidite (g)<br />
• Agitate the solution thoroughly until all the<br />
amidite is completely dissolved.<br />
• Remove the cap from the amidite bottle.<br />
Diluent<br />
(ml)<br />
8905 150 0.25 5.0<br />
8909 400 0.5 10.0<br />
800 1.0 20.0<br />
Expedite <strong>8900</strong> <strong>Nucleic</strong> <strong>Acid</strong> <strong>Synthesis</strong> System User’s Guide 2-35<br />
2
2<br />
Chapter 2 Performing a <strong>Synthesis</strong><br />
2-36 PerSeptive <strong>Biosystems</strong><br />
2. Screw the amidite bottles into their respective (A, C, G,<br />
T/U) positions in the front row of the reagent rack (see<br />
Figure 2-20).<br />
Make sure the bottles are firmly attached to the<br />
instrument cap. The bottles should be “finger tight.” Do<br />
not overtighten the bottles because this deforms the<br />
sealing O-rings and may cause gas pressure leakage.<br />
3. Press the appropriate keys on the instrument display<br />
shown in Figure 2-22 to Reset the levels of the Amidite<br />
reservoirs.<br />
4. If you are installing amidites in the 5 though 9 reservoirs,<br />
press More until the screen shown in Figure 2-24 is<br />
displayed.<br />
Figure 2-24 Model 8909 Amidite Consumption Reset<br />
5. Screw the amidites into their respective (5, 6, 7, 8, 9)<br />
positions in the second row of the reagent rack (see<br />
Figure 2-20).<br />
Make sure the bottles are firmly attached to the<br />
instrument cap. The bottles should be “finger tight.” Do<br />
not overtighten the bottles because this deforms the<br />
sealing O-rings and may cause gas pressure leakage.<br />
6. Reset the level of the reagent reservoirs that have been<br />
filled.<br />
7. Install empty amidite bottles in any positions that are not<br />
being used.
2.4.3 Priming the System<br />
Preparing and Loading the Reagents<br />
NOTE: All bottles are pressurized together. You must attach<br />
an empty bottle to any unused instrument position.<br />
When to prime Prime the fluidics system three times for each column<br />
position after installing new reagents or after the instrument<br />
has been idle for more than 12 hours.<br />
Priming NOTE: During the priming procedure, watch the waste line<br />
to ensure that every injector is delivering liquid.<br />
1. Install a union in place of the reaction columns (see<br />
Figure 2-25).<br />
CAUTION<br />
Do not install the column before you prime the reagent<br />
passages. The priming procedure pumps all the<br />
reagents through the column to waste, and would<br />
damage the column.<br />
Expedite <strong>8900</strong> <strong>Nucleic</strong> <strong>Acid</strong> <strong>Synthesis</strong> System User’s Guide 2-37<br />
2
2<br />
Chapter 2 Performing a <strong>Synthesis</strong><br />
Union<br />
2-38 PerSeptive <strong>Biosystems</strong><br />
Figure 2-25 Install a Union in Place of the Reaction<br />
Column<br />
2. In the Main menu, shown in Figure 2-11, select Prime.<br />
The Prime menu, shown in Figure 2-26, is displayed.<br />
Figure 2-26 Prime Menu
3. Select 2 - Prime all.<br />
Preparing and Loading the Reagents<br />
NOTE: The use of the various options in the Prime<br />
menu is described in Section 3.5, Prime Menu.<br />
4. Select Column 1.<br />
A message is displayed instructing you to replace the<br />
column with a union.<br />
5. Press OK to continue after you install the union.<br />
All the reagent passages are primed sequentially (see<br />
Figure 2-27). During the automatic prime procedure,<br />
the current action is displayed on the screen and you<br />
may use the Stop key to abort the priming procedure.<br />
Figure 2-27 LCD Display During Priming<br />
6. When the priming routine is complete, press Cycle to<br />
prime a second time.<br />
7. When the priming routine is complete, press Cycle to<br />
prime a third time.<br />
8. Press cancel to return to the Prime menu.<br />
The Prime menu, shown in Figure 2-26, is displayed.<br />
9. If you are running a synthesis on both columns, select<br />
2 - Prime all.<br />
10. Select Column 2 and prime three times.<br />
11. Select Exit to return to the Main menu.<br />
Expedite <strong>8900</strong> <strong>Nucleic</strong> <strong>Acid</strong> <strong>Synthesis</strong> System User’s Guide 2-39<br />
2
2<br />
Chapter 2 Performing a <strong>Synthesis</strong><br />
2.4.4 Running the Pneumatic Diagnostics<br />
2-40 PerSeptive <strong>Biosystems</strong><br />
Periodically, before starting a synthesis, you should run the<br />
Diagnostics routines to check the pneumatic system for<br />
leaks.<br />
To run the Leak Test:<br />
1. Select Tools in the Main menu.<br />
The Tools menu (see Figure 2-21) is displayed.<br />
2. Select Diag (Diagnostic utilities).<br />
The diagnostics menu shown in Figure 2-28 is<br />
displayed.<br />
3. Select Leak.<br />
4. Select Start.<br />
Figure 2-28 Diagnostics Menu<br />
The system performs an automatic test of the High and<br />
Low pressure systems (see Section 3.6.1, Diagnostic<br />
Routines, for more information). On completion of the<br />
test, the result is shown on the screen (see<br />
Figure 2-29).
Preparing and Loading the Reagents<br />
Figure 2-29 Screen at End of Successful Leak Test<br />
The test is completed in 3 minutes but it continues to<br />
run until you exit the screen.<br />
5. Press Exit to return to the Main menu.<br />
Expedite <strong>8900</strong> <strong>Nucleic</strong> <strong>Acid</strong> <strong>Synthesis</strong> System User’s Guide 2-41<br />
2
2<br />
Chapter 2 Performing a <strong>Synthesis</strong><br />
2.5 Starting the <strong>Synthesis</strong><br />
2-42 PerSeptive <strong>Biosystems</strong><br />
Once the sequence has been entered and the reagents have<br />
been loaded, the next steps are to:<br />
• Specify the synthesis parameters<br />
• Install the column<br />
• Start the synthesis<br />
2.5.1 Specifying the <strong>Synthesis</strong> Parameters<br />
To specify the synthesis parameters:<br />
1. Select Seq from the Main menu.<br />
2. Select Run from the Sequence menu (see<br />
Figure 2-15).<br />
3. Select the sequence to be used (see Figure 2-16).<br />
The screen shown in Figure 2-30 is displayed.<br />
Figure 2-30 Column Selection<br />
4. Select the column or columns on which to run the<br />
sequence.<br />
NOTE: You may start the same synthesis on both columns.<br />
However, if you wish to run different syntheses on column<br />
one and column two, you must repeat this procedure to<br />
select and start the second synthesis.
Starting the <strong>Synthesis</strong><br />
If you select column 1, the screen shown in Figure 2-31<br />
is displayed.<br />
Figure 2-31 <strong>Synthesis</strong> Parameters Screen<br />
5. Make sure that the synthesis parameters are correct for<br />
the synthesis. The available parameters are described in<br />
Table 2-3.<br />
Table 2-3 <strong>Synthesis</strong> Parameters<br />
Parameter Description<br />
Col The column (1 or 2) to be used.<br />
DMT Remove or retain the 5' DMT protecting group.<br />
NOTE: You may wish to retain the 5' DMT to observe<br />
the final trityl color. In this event, use the Final Deblock<br />
option in the Prime menu to manually remove the<br />
5' DMT at the end of the synthesis (see Section 3.5.5,<br />
Final Deblock).<br />
Sequence The name of the sequence to be run.<br />
Protocol The protocol to be used.<br />
The options for DNA are:<br />
0.05 μmole<br />
0.2 μmole<br />
1.0 μmole<br />
15.0 μmole<br />
Expedite <strong>8900</strong> <strong>Nucleic</strong> <strong>Acid</strong> <strong>Synthesis</strong> System User’s Guide 2-43<br />
2
2<br />
Chapter 2 Performing a <strong>Synthesis</strong><br />
2-44 PerSeptive <strong>Biosystems</strong><br />
6. If the running parameters are incorrect, select mod.<br />
The screen shown in Figure 2-32 is displayed.<br />
7. At this time, you may:<br />
Figure 2-32 Modify Parameters<br />
• Press DMT to toggle between retaining or<br />
removing the 5' DMT protecting group.<br />
• Press Proto to cycle through the list of protocols<br />
available for the selected chemistry.<br />
NOTE: You may change the default chemistry for the<br />
current profile by modifying the User Profile (see<br />
Section 3.6.6, Specifying a User Profile).<br />
8. Press ok to accept the running parameters.<br />
9. You are prompted to install the column.<br />
CAUTION<br />
Changing reagent bottles during a synthesis is not<br />
recommended. Check the reagent resources prior to<br />
initiating a synthesis to make sure that there is a<br />
sufficient supply.
2.5.2 Checking Reagent Resources<br />
Starting the <strong>Synthesis</strong><br />
Check your reagent resources before installing the column<br />
and starting the synthesis.<br />
1. Press ok until the Main menu is displayed.<br />
2. Press Stat. The status screen shown in Figure 2-33 is<br />
displayed.<br />
Figure 2-33 Combined Column Status<br />
3. Press Rsrc. The screen shown in Figure 2-34 is<br />
displayed. The volumes of reagents required (req) for the<br />
synthesis and the volumes currently in the reservoirs (cur)<br />
are displayed.<br />
Figure 2-34 Reagent Resources<br />
Expedite <strong>8900</strong> <strong>Nucleic</strong> <strong>Acid</strong> <strong>Synthesis</strong> System User’s Guide 2-45<br />
2
2<br />
Chapter 2 Performing a <strong>Synthesis</strong><br />
2.5.3 Installing the Column<br />
2-46 PerSeptive <strong>Biosystems</strong><br />
• If you have sufficient reagents in the reservoirs,<br />
install the column (see Section 2.5.3, Installing<br />
the Column) and proceed with the synthesis.<br />
• If you do not have sufficient reagents, replenish<br />
the required bottles (see Section 2.4.2,<br />
Installing the Reagents) and prime the reagent<br />
passages (see Section 2.4.3, Priming the<br />
System) before you install the column.<br />
CAUTION<br />
Do not install the reaction column before you run the prime<br />
routine. The column may be damaged irreversibly.<br />
When you specify the synthesis parameters, you are<br />
prompted to install the appropriate column (see<br />
Figure 2-35).<br />
Figure 2-35 Install a Column Prompt<br />
NOTE: If the system has been idle for 12 hours or more or<br />
has been shut off, you are prompted to prime the system.<br />
Install a union in place of the column and prime each<br />
column position three times.<br />
The columns are bidirectional and can be attached in any<br />
direction.
Starting the <strong>Synthesis</strong><br />
If you are using a MemSyn device, place it on the instrument<br />
with the printed side of the label facing up.<br />
To install the reaction column (see Figure 2-36):<br />
Figure 2-36 Installing the Column<br />
Outlet<br />
Tube<br />
1. Firmly insert the column onto the male Luer fitting in the<br />
reaction chamber. Use a slight twisting motion—about<br />
one quarter turn.<br />
2. Insert the upper column fitting into the top of the column.<br />
Use a slight twisting motion—about one quarter turn.<br />
NOTE: If you are running a synthesis on only one<br />
column, install a union in place of the second column to<br />
prevent leakage from inlet and outlet tubes.<br />
Expedite <strong>8900</strong> <strong>Nucleic</strong> <strong>Acid</strong> <strong>Synthesis</strong> System User’s Guide 2-47<br />
2
2<br />
Chapter 2 Performing a <strong>Synthesis</strong><br />
2.5.4 Starting the <strong>Synthesis</strong><br />
2-48 PerSeptive <strong>Biosystems</strong><br />
To start the synthesis:<br />
1. Select Exit until the Main menu, shown in<br />
Figure 2-37, is displayed. The Start option is now<br />
available.<br />
Figure 2-37 Main Menu—Ready to Begin a <strong>Synthesis</strong><br />
2. Press Start to begin the synthesis on Column 1.<br />
NOTE: If a synthesis is already running, the screen<br />
shown in Figure 2-38 is displayed. In this event, press<br />
ok to start the synthesis.<br />
Figure 2-38 Starting a Second <strong>Synthesis</strong>
2.6 Running the <strong>Synthesis</strong><br />
Running the <strong>Synthesis</strong><br />
During a synthesis run, the software monitors the progress<br />
(see Figure 2-39) and displays the time left until the synthesis<br />
is completed.<br />
Figure 2-39 Screen During a Run<br />
Stop Key You may press the Instrument Stop key, shown in Figure 2-39,<br />
at any time. When you press this key, all pumping operations<br />
are halted immediately and remain halted until you press the<br />
Start key in the Main menu.<br />
Monitoring the<br />
<strong>Synthesis</strong><br />
Instrument Stop Button<br />
Stop<br />
NOTE: Pausing a synthesis for extended periods in the<br />
middle of a cycle may be detrimental to the synthesis. If you<br />
use the Stop key, restart the synthesis as soon as possible.<br />
If you wish to pause a synthesis to replenish reagents, use<br />
the Hold option (see “Interrupting the <strong>Synthesis</strong>” on<br />
page 2-50).<br />
During the synthesis, the Main menu displays the status of<br />
both columns and the estimated time<br />
(hours:minutes:seconds), until completion of the synthesis.<br />
Expedite <strong>8900</strong> <strong>Nucleic</strong> <strong>Acid</strong> <strong>Synthesis</strong> System User’s Guide 2-49<br />
2
2<br />
Chapter 2 Performing a <strong>Synthesis</strong><br />
Interrupting the<br />
<strong>Synthesis</strong><br />
2-50 PerSeptive <strong>Biosystems</strong><br />
The Stat option on the Main menu displays more detailed<br />
information on the synthesis. When you select Stat, the<br />
screen shown in Figure 2-40 is displayed.<br />
Figure 2-40 <strong>Synthesis</strong> Status Screen<br />
The Col1 and Col2 options provide more detailed information<br />
(see Section 3.4.1, Displaying System Information).<br />
On occasion, you may want to interrupt the synthesis. In this<br />
event, select Hold on the Status: Combined menu<br />
(Figure 2-40). The instrument halts the synthesis on each<br />
column at the end of the current cycle (usually within<br />
5 minutes). This is the safest point to interrupt the synthesis.<br />
The column is washed with acetonitrile before the instrument<br />
halts. The synthesis remains halted until you press No Hold to<br />
restart the synthesis (see Section 3.4.2, Interrupting a<br />
<strong>Synthesis</strong>).
2.6.1 Replenishing Bottles<br />
During a <strong>Synthesis</strong><br />
CAUTION<br />
Running the <strong>Synthesis</strong><br />
Changing reagent bottles during a synthesis is not<br />
recommended. Check the reagent resources prior to<br />
initiating a synthesis to make sure that there is a sufficient<br />
supply.<br />
If a reagent must be changed during a synthesis, use the<br />
following procedure to install one reagent at a time.<br />
1. Select Hold on the Status: Combined menu<br />
(Figure 2-40) to stop the instrument. The instrument halts<br />
the synthesis on each column at the end of the current<br />
cycle (usually within 5 minutes). This is the safest point to<br />
interrupt the synthesis.<br />
CAUTION<br />
Make sure the synthesis has halted on both columns<br />
before proceeding.<br />
2. Remove the column or columns and replace them with a<br />
union. Remember to attach the outlet tube.<br />
3. In the Main menu, select Tools.<br />
Expedite <strong>8900</strong> <strong>Nucleic</strong> <strong>Acid</strong> <strong>Synthesis</strong> System User’s Guide 2-51<br />
2
2<br />
Chapter 2 Performing a <strong>Synthesis</strong><br />
Prime the<br />
Reagent<br />
Passages<br />
2-52 PerSeptive <strong>Biosystems</strong><br />
4. In the Tools menu, select Bottle. The Bottle Change Tool,<br />
shown in Figure 2-41 is displayed.<br />
Figure 2-41 Bottle Change Tool<br />
5. Collect the required reagents and place them in the<br />
vicinity of the instrument.<br />
6. Remove the empty reagent bottle to be changed from the<br />
instrument.<br />
7. Remove the bottle seal and cap from the new reagent<br />
bottle and screw the bottle into the appropriate position in<br />
the instrument.<br />
Make sure the bottles are firmly attached to the<br />
instrument cap. The bottles should be “finger tight.” Do<br />
not overtighten the bottles because this deforms the<br />
sealing O-rings and may cause gas pressure leakage.<br />
8. On the instrument display (see Figure 2-41), locate the<br />
reagent that has just been replenished and reset its level.<br />
9. Repeat steps 6 through 8 for the remaining reagents.<br />
Remember to reset the level of each reagent bottle.<br />
To prime the individual reagent passages:<br />
1. From the Main menu select Prime.<br />
2. Select Prime individual from the Prime menu.<br />
NOTE: To prime multiple reagent passages, you can<br />
select Prime all.
3. Select Column 1.<br />
Running the <strong>Synthesis</strong><br />
The screen shown in Figure 2-42 is displayed.<br />
Figure 2-42 Prime Individual Menu<br />
4. Select the reservoir to prime.<br />
If the reagent is not displayed, press more to display<br />
additional reagents.<br />
5. Press Cycle until you have primed three times.<br />
6. Press Cancel and select another reagent if necessary.<br />
7. Repeat step 4 through step 6 to prime all reagents that<br />
you change.<br />
8. Select Wsh A to rinse the A reagent train.<br />
NOTE: 8905 systems have only Wsh.<br />
9. Press Cancel, then press More. Press Wsh to rinse the B<br />
reagent train.<br />
10. Press Cancel, then press Exit until the Prime menu is<br />
displayed.<br />
11. Repeat step 4 through step 10 for Column 2.<br />
12. Press Exit to return to the main menu.<br />
13. Remove the union and replace the column or columns<br />
in the position from which they were removed and<br />
attach the outlet tube.<br />
14. Press Start to resume the synthesis.<br />
Expedite <strong>8900</strong> <strong>Nucleic</strong> <strong>Acid</strong> <strong>Synthesis</strong> System User’s Guide 2-53<br />
2
2<br />
Chapter 2 Performing a <strong>Synthesis</strong><br />
2.6.2 Post-synthesis Column Removal<br />
2-54 PerSeptive <strong>Biosystems</strong><br />
When the synthesis is complete, use the following procedure<br />
to remove the column from the instrument:<br />
1. Remove the outlet tube from the top of the column by<br />
pulling the fitting with a slight twist.<br />
2. Remove the column from the bottom fitting by pulling it<br />
with a slight twist.<br />
3. Insert a union in place of the column.<br />
NOTE: Whenever the column is removed from the<br />
instrument, install a union to ensure that any leakage or<br />
priming is directed to the waste.
Post-synthesis Procedures<br />
2.7 Post-synthesis Procedures<br />
Cleavage and<br />
Deprotection<br />
Reagent<br />
Once the synthesis is complete, the oligomer must be cleaved<br />
from the support and fully deprotected.<br />
You may use either the Syringe Column or the Sealed Tube<br />
method to isolate the product from the support and deprotect<br />
it. The time required to perform cleavage and deprotection<br />
depends on the monomers used in the synthesis. Cleavage<br />
and deprotection procedures for Expedite monomers are<br />
faster and use milder conditions than the procedures for<br />
standard monomers.<br />
WARNING<br />
Wear a lab coat, gloves and eye protection when<br />
performing the procedures described in this section.<br />
Adequate ventilation is essential and working under a fume<br />
hood is recommended.<br />
AVERTISSEMENT<br />
Portez une blouse, des gants et des lunettes de protection<br />
lorsque vous suivez les protocoles décrits dans cette<br />
section. Une ventilation adéquate est indispensable et il est<br />
recommandé de travailler sous une hotte.<br />
Concentrated ammonium hydroxide (30% aqueous NH 4 OH) is<br />
required for cleavage and deprotection.<br />
NOTE: Use fresh ammonium hydroxide (open less than<br />
2 months). To ensure a concentrated solution after opening,<br />
aliquot the ammonium hydroxide in small volumes, cap<br />
tightly, and store in a freezer.<br />
Expedite <strong>8900</strong> <strong>Nucleic</strong> <strong>Acid</strong> <strong>Synthesis</strong> System User’s Guide 2-55<br />
2
2<br />
Chapter 2 Performing a <strong>Synthesis</strong><br />
2.7.1 Standard<br />
Phosphoramidite Monomers<br />
Syringe Column<br />
Cleavage and<br />
Deprotection<br />
2-56 PerSeptive <strong>Biosystems</strong><br />
To perform syringe column cleavage and deprotection of<br />
oligomers synthesized with standard monomers:<br />
1. Remove the column or MemSyn device from the<br />
instrument (see Section 2.6.2, Post-synthesis Column<br />
Removal).<br />
2. With the plunger fully depressed into the barrel, attach a<br />
slip-tip Luer syringe to one end of the column or MemSyn<br />
device (see Figure 2-43).<br />
• Use a 1, 3, or 5 mL syringe for 0.05, 0.2 or<br />
1.0 μmol scales.<br />
• Use 5 mL syringes for 15 μmol scale.<br />
Reaction Column<br />
Ammonium Hydroxide Solution<br />
Figure 2-43 Syringe Column Cleavage and<br />
Deprotection<br />
3. Draw 1 mL of fresh NH 4OH (5 mL for 15 μmol scale) into<br />
a second Luer tip syringe.<br />
4. Attach the syringe to the other end of the column or<br />
MemSyn device.<br />
5. Depress the syringe plunger to force the solution back<br />
and forth over the support in the column or MemSyn<br />
device. Repeat three or four times to ensure that the<br />
support in the column or MemSyn device is fully<br />
saturated.
Post-synthesis Procedures<br />
6. Let the column or MemSyn device/syringe assembly rest<br />
at room temperature for 45 minutes.<br />
7. Push the solution back and forth three or four times.<br />
8. Let the assembly rest for another 45 minutes.<br />
9. Draw all the solution into one of the syringes.<br />
This solution contains:<br />
• Product oligomer<br />
• Shorter failure sequences<br />
• By-products of phosphorus deprotection<br />
10. Carefully remove the syringe from the column or<br />
MemSyn device (ammonium hydroxide is very volatile).<br />
11. Deposit the solution into a screw-cap tube or vial.<br />
12. Securely cap the tube.<br />
13. Perform one of the following:<br />
• Heat the tube at 55 o C for 6 to 8 hours or<br />
overnight. (Overnight is recommended for<br />
sequences with > 25% G monomers.)<br />
• Let the reaction proceed at room temperature<br />
for 24 to 48 hours. (Forty-eight hours is<br />
recommended for sequences with<br />
> 25% G monomers.)<br />
WARNING<br />
Cool the tube before opening. Heated NH 4OH is caustic<br />
and will spray if you open the tube before it is cool.<br />
Expedite <strong>8900</strong> <strong>Nucleic</strong> <strong>Acid</strong> <strong>Synthesis</strong> System User’s Guide 2-57<br />
2
2<br />
Chapter 2 Performing a <strong>Synthesis</strong><br />
Sealed Tube<br />
Cleavage and<br />
Deprotection<br />
2-58 PerSeptive <strong>Biosystems</strong><br />
AVERTISSEMENT<br />
Laissez refroidir le tube avant de l'ouvrir. L'ammo-niaque<br />
chauffée est caustique et risque de jaillir si vous ouvrez le<br />
tube avant qu'il n'ait refroidi.<br />
14. Cool the tube to room temperature.<br />
15. If necessary, decant the DNA containing supernatant<br />
into a tube suitable for evaporation.<br />
Perform the following steps when using the sealed tube<br />
cleavage and deprotection method.<br />
1. Remove the column or MemSyn device from the<br />
instrument (see Section 2.6.2, Post-synthesis Column<br />
Removal).<br />
2. If you are using a column:<br />
Pry the end crimp off one end of the column and<br />
remove the cap and filter.<br />
Pour the CPG support from the column into a small<br />
screw cap container.<br />
• A small screw cap vial is suitable for 0.05, 0.2 or<br />
1.0 μmole syntheses.<br />
• A 15 mm x 125 mm screw cap vial is suitable for<br />
15 μmole syntheses.<br />
If you are using a MemSyn device, remove the<br />
MemSyn and place it in a small screw cap container as<br />
described above.
3. Add NH 4 OH.<br />
Post-synthesis Procedures<br />
• For 0.05, 0.2 or 1.0 μmole syntheses, add<br />
1to2mL.<br />
• For 15 μmole syntheses, add 6 mL.<br />
4. Agitate the tube to suspend the CPG or MemSyn.<br />
5. Let the tube stand for 90 minutes at room temperature.<br />
6. If you are using CPG support, separate the NH 4OH<br />
solution containing the cleaved CPG from the support:<br />
• Centrifuge the tube.<br />
• Decant the NH 4OH solution containing the<br />
cleaved DNA product and place it in another<br />
tube.<br />
• Add 0.5 mL NH 4 OH to wash the solid support in<br />
the original tube.<br />
• Mix the support and NH 4OH and centrifuge.<br />
• Decant the NH 4OH solution containing the DNA<br />
product into the tube containing the first decant.<br />
• Securely cap the tube.<br />
If you are using a MemSyn device, you can remove the<br />
membrane from or leave the membrane in the<br />
container. The membrane has no affect on the<br />
deprotection.<br />
7. Perform one of the following:<br />
• Heat the tube at 55 o C for 6 to 8 hours or<br />
overnight. (Overnight is recommended for<br />
sequences with > 25% G monomers.)<br />
• Let the reaction proceed at room temperature<br />
for 24 to 48 hours. (Forty-eight hours is<br />
recommended for sequences with > 25%<br />
G monomers.)<br />
Expedite <strong>8900</strong> <strong>Nucleic</strong> <strong>Acid</strong> <strong>Synthesis</strong> System User’s Guide 2-59<br />
2
2<br />
Chapter 2 Performing a <strong>Synthesis</strong><br />
2-60 PerSeptive <strong>Biosystems</strong><br />
WARNING<br />
Cool the tube before opening. Heated NH 4 OH is caustic<br />
and will spray if you open the tube before it is cool.<br />
AVERTISSEMENT<br />
Laissez refroidir le tube avant de l'ouvrir. L'ammo-niaque<br />
chauffée est caustique et risque de jaillir si vous ouvrez le<br />
tube avant qu'il n'ait refroidi.<br />
8. Cool the tube to room temperature.<br />
9. If necessary, decant the DNA containing supernatant into<br />
a tube suitable for evaporation.<br />
2.7.2 Expedite Phosphoramidite Monomers<br />
Sealed Tube<br />
Cleavage and<br />
Deprotection<br />
The sealed tube method of cleavage and deprotection for<br />
oligomers synthesized with the Expedite phosphoramidite<br />
monomers requires a minimum of 15 minutes. The syringe<br />
column method requires 2 hours.<br />
Perform the following steps when using the tube cleavage and<br />
deprotection method:<br />
NOTE: You can also perform sealed tube cleavage and<br />
deprotection using MemSyn <strong>Nucleic</strong> <strong>Acid</strong> <strong>Synthesis</strong><br />
Devices. Refer to the MemSyn Operating Instructions for<br />
information on removing and opening the device.<br />
1. Remove the column from the instrument (see Section<br />
2.6.2, Post-synthesis Column Removal).<br />
2. Pry the end crimp off one end of the column and remove<br />
the cap and filter.
Post-synthesis Procedures<br />
3. Pour the CPG support into a small screw cap container.<br />
• A small screw cap vial is suitable for 0.05, 0.2 or<br />
1.0 μmole syntheses.<br />
• A 15 mm x 125 mm screw cap vial is suitable for<br />
15 μmole syntheses.<br />
4. Add NH 4 OH.<br />
• For 0.05, 0.2 or 1.0 μmole syntheses, add<br />
1to2mL.<br />
• For 15 μmole syntheses, add 5 mL.<br />
5. Agitate the tube to suspend the CPG.<br />
6. Perform one of the following:<br />
• Heat the tube at 55 o C for 15 minutes.<br />
• Let the reaction proceed at room temperature<br />
for 2 hours.<br />
WARNING<br />
Cool the tube before opening. Heated NH 4OH is caustic<br />
and will spray if you open the tube before it is cool.<br />
AVERTISSEMENT<br />
Laissez refroidir le tube avant de l'ouvrir. L'ammo-niaque<br />
chauffée est caustique et risque de jaillir si vous ouvrez le<br />
tube avant qu'il n'ait refroidi.<br />
7. Cool the tube to room temperature.<br />
8. Centrifuge the tube and decant the DNA containing<br />
supernatant into a tube suitable for evaporation.<br />
Expedite <strong>8900</strong> <strong>Nucleic</strong> <strong>Acid</strong> <strong>Synthesis</strong> System User’s Guide 2-61<br />
2
2<br />
Chapter 2 Performing a <strong>Synthesis</strong><br />
Syringe Column<br />
Cleavage and<br />
Deprotection<br />
2-62 PerSeptive <strong>Biosystems</strong><br />
9. Add 0.5 mL NH 4 OH to wash the solid support in the<br />
original tube.<br />
10. Mix the support with NH 4OH and centrifuge.<br />
11. Decant the NH 4 OH solution containing the DNA product<br />
into the tube containing the first decant.<br />
To perform syringe column cleavage and deprotection of<br />
oligomers synthesized with Expedite monomers:<br />
1. Remove the column from the instrument (see Section<br />
2.6.2, Post-synthesis Column Removal).<br />
2. With the plunger fully depressed into the barrel, attach a<br />
slip-tip Luer syringe to one end of the column<br />
(Figure 2-43).<br />
• Use a 1, 3, or 5 mL syringe for 0.05, 0.2 or<br />
1.0 μmol scales.<br />
• Use a 5 mL syringe for 15 μmol scale.<br />
3. Draw 1 mL of fresh NH 4OH (5 mL for 15 μmol scale) into<br />
a second Luer tip syringe.<br />
4. Attach the syringe to the other end of the column.<br />
5. Depress the syringe plunger to force the solution back<br />
and forth over the support in the column. Repeat three or<br />
four times to ensure that the support in the column is fully<br />
saturated.<br />
6. Let the column/syringe assembly rest at room<br />
temperature for 60 minutes.<br />
7. Push the solution back and forth three or four times.<br />
8. Let the assembly rest for 60 minutes.<br />
9. Draw all the solution into one of the syringes.<br />
10. Remove the syringe from the column.<br />
11. Deposit the solution into a screw-cap tube or vial<br />
suitable for evaporation.
Purification and<br />
Analysis<br />
Post-synthesis Procedures<br />
The required purity of the final product, and therefore the<br />
procedures used to separate out the desired product, depend<br />
on the intended use for the oligomer.<br />
Expedite <strong>8900</strong> <strong>Nucleic</strong> <strong>Acid</strong> <strong>Synthesis</strong> System User’s Guide 2-63<br />
2
2<br />
Chapter 2 Performing a <strong>Synthesis</strong><br />
2-64 PerSeptive <strong>Biosystems</strong>
3 Software Reference<br />
Chapter<br />
3<br />
This chapter contains the following sections:<br />
3.1 Software Overview .......................................3-2<br />
3.2 Main Menu ....................................................3-4<br />
3.3 Sequence Menu ...........................................3-6<br />
3.4 Status Menu ...............................................3-33<br />
3.5 Prime Menu ................................................3-43<br />
3.6 Tools Menu .................................................3-66<br />
Expedite <strong>8900</strong> <strong>Nucleic</strong> <strong>Acid</strong> <strong>Synthesis</strong> System User’s Guide 3-1
3<br />
Chapter 3 Software Reference<br />
3.1 Software Overview<br />
3-2 PerSeptive <strong>Biosystems</strong><br />
The Expedite <strong>Nucleic</strong> <strong>Acid</strong> <strong>Synthesis</strong> System is controlled by<br />
menu-driven software which:<br />
• Allows independent single or dual column operation.<br />
• Provides full sequence editing facilities.<br />
• Stores 63 sequences up to 250 bases in length in<br />
each of eight user profiles, for a total of<br />
504 sequences.<br />
• Calculates and monitors reagent resources for the<br />
synthesis.<br />
• Monitors the synthesis and displays the current status<br />
and estimated time of completion.<br />
• Provides extended diagnostics for troubleshooting.<br />
• Provides tools for priming the instrument and various<br />
manual functions.<br />
• Monitors for error conditions.<br />
• Generates a log of all activities.<br />
• Notifies you, after an idle period, of recommended<br />
procedures that should be performed before a new<br />
synthesis is started.<br />
A flow diagram of the hierarchical menu structure is shown in<br />
Figure 3-1. Different functions are assigned to the soft keys<br />
displayed at the bottom of each screen. To select a menu<br />
option, press the soft key directly below the desired option.
Main Menu<br />
Start/ Stop<br />
Sequence<br />
Status<br />
Prime<br />
Tools<br />
Edit<br />
Run<br />
Abort<br />
Print<br />
View<br />
Copy<br />
Column 1<br />
Column 2<br />
Set Hold<br />
Trityl<br />
Resources<br />
Hold<br />
Prime Individual<br />
Prime All<br />
Prime Reagents<br />
Prime Monomers<br />
Final Deblock<br />
STARTUP<br />
SHUTDOWN<br />
Diagnostic<br />
Bottle<br />
Display<br />
Figure 3-1 Overview of the Menus<br />
Software Overview<br />
Expedite <strong>8900</strong> <strong>Nucleic</strong> <strong>Acid</strong> <strong>Synthesis</strong> System User’s Guide 3-3<br />
Log<br />
Config<br />
Insert<br />
Delete<br />
Modify<br />
Clear<br />
Replace<br />
Name<br />
Info<br />
Compl<br />
Leak<br />
I/O<br />
Valve<br />
LEDs<br />
Trityl<br />
Fluid<br />
Time<br />
Host<br />
Profile<br />
Ver<br />
Name<br />
Print<br />
3
3<br />
Chapter 3 Software Reference<br />
3.2 Main Menu<br />
Soft Key<br />
Functions<br />
3-4 PerSeptive <strong>Biosystems</strong><br />
When the system is initialized (see Section 2.2, Powering Up<br />
the System), the Main menu is displayed. The Main menu,<br />
shown in Figure 3-2, provides access to all the utilities used to<br />
set up a synthesis and operate the instrument. The Main menu<br />
displays the following:<br />
• The current sequence name<br />
• The column status (Idle, Running, Done, Halted)<br />
• The instrument address (used to distinguish multiple<br />
instruments connected to a remote host)<br />
• Profile name<br />
• Instrument name<br />
• The current time<br />
• The time left to complete the synthesis (synthesis<br />
countdown times)<br />
• The functions defined for the soft keys<br />
Instrument Address Profile Name Instrument Name<br />
Current Time<br />
Current Sequence<br />
Column Status<br />
Time Left to<br />
Complete <strong>Synthesis</strong><br />
Figure 3-2 Main Menu
Main Menu<br />
NOTE: An asterisk (*) beside the Instrument Address<br />
indicates that the instrument is communicating with the host<br />
workstation.<br />
Main Menu Keys The functions that are assigned to the soft keys in the Main<br />
menu are described in Table 3-1.<br />
Table 3-1 Main Menu Keys<br />
Key # Label Function<br />
1 Start Starts the instrument. When you select Start, all active syntheses<br />
will proceed.<br />
NOTE: This key is not displayed until a sequence is selected to be<br />
run.<br />
Stop Halts the instrument immediately.<br />
NOTE: This key is available as soon as the synthesis is started.<br />
2 Seq Create, edit, and run sequences. See Section 3.3, Sequence<br />
Menu for details.<br />
3 Stat Monitors the current syntheses. See Section 3.4, Status Menu, for<br />
details.<br />
4 Prime Manually prime the fluidics system.<br />
Perform final deblock (manually remove 5' DMT).<br />
Wash out the instrument.<br />
See Section 3.5, Prime Menu, for details.<br />
5 Tools Provides access to the maintenance log and the various tools that<br />
facilitate operation and troubleshooting of the instrument. See<br />
Section 3.6, Tools Menu, for details.<br />
Expedite <strong>8900</strong> <strong>Nucleic</strong> <strong>Acid</strong> <strong>Synthesis</strong> System User’s Guide 3-5<br />
3
3<br />
Chapter 3 Software Reference<br />
3.3 Sequence Menu<br />
3-6 PerSeptive <strong>Biosystems</strong><br />
Use the Sequence menu to:<br />
• Create or edit a sequence<br />
• Run a synthesis<br />
• Abort a synthesis<br />
• Print a sequence<br />
• View stored sequences<br />
• Copy an existing sequence for further editing<br />
When you select Seq from the Main menu, the screen shown<br />
in Figure 3-3 is displayed.<br />
Figure 3-3 Sequence Menu
Sequence Menu<br />
Keys<br />
Sequence<br />
Selection<br />
The functions that are assigned to the soft keys in the<br />
Sequence menu are described in Table 3-2.<br />
Table 3-2 Sequence Menu Keys<br />
Key # Label Function<br />
Sequence Menu<br />
1 Edit Provides access to the Sequence Editor which is used to create or<br />
edit a sequence. See Section 3.3.1, Using the Sequence Editor.<br />
2 Run To start the synthesis of a sequence that has been created with<br />
the sequence editor. See Section 3.3.2, Running a Sequence.<br />
3 Abort To abort a synthesis after the instrument has been halted. See<br />
Section 3.3.3, Aborting a <strong>Synthesis</strong>.<br />
4 Print To print a sequence and its summary information. See Section<br />
3.3.4, Printing a Sequence.<br />
5 View To view stored sequences. This is a read-only mode for viewing<br />
the currently stored synthesis data. See Section 3.3.5, Viewing a<br />
Sequence.<br />
6 Copy To copy an existing sequence to another slot for further editing.<br />
See Section 3.3.6, Copying a Sequence.<br />
8 Exit To return to the Main menu.<br />
The Sequence-Select menu, shown in Figure 3-4, is displayed<br />
when you select any option on the Sequence menu (except<br />
Abort or Exit).<br />
Expedite <strong>8900</strong> <strong>Nucleic</strong> <strong>Acid</strong> <strong>Synthesis</strong> System User’s Guide 3-7<br />
3
3<br />
Chapter 3 Software Reference<br />
3-8 PerSeptive <strong>Biosystems</strong><br />
Figure 3-4 Sequence Select Menu<br />
Press the appropriately numbered key at the bottom of the<br />
screen to select the desired sequence. Selecting More allows<br />
you to view more sequences if present.<br />
NOTE: The asterisk (*) beside Sequence 6: Oban6<br />
indicates that this was the last sequence to have been<br />
edited.<br />
Sequence Names As many as sixty-three sequences may be stored with an<br />
instrument generated or a user supplied name. In the<br />
sequence selection screen, instrument generated names are<br />
displayed in upper and lower case and user generated names<br />
are displayed in upper and lower case as specified by the user<br />
(see “Naming a Sequence” on page 3-23).
3.3.1 Using the Sequence Editor<br />
Sequence Editor<br />
Keys<br />
Sequence Menu<br />
Use the Sequence Editor, shown in Figure 3-5, to create and<br />
modify sequences.<br />
Figure 3-5 Sequence Editor—First Screen<br />
When you are editing a sequence, the following information is<br />
displayed on the top line of the screen:<br />
• Cursor location (Pos: #)<br />
• Mode of entry (Ins/Repl/Mix) (see Figure 3-6)<br />
• Sequence name<br />
• Direction of sequence entry (5'-3' or 3'-5')<br />
• The length of the sequence (Len: #)<br />
Sequences are displayed in the center of the screen with the<br />
character groupings specified in the User Profile facility (see<br />
Section 3.6.6, Specifying a User Profile).<br />
In the Sequence Editor, the first two screens contain the<br />
editing options that are described in Table 3-3. The remaining<br />
screens contain entry mode options that are described in<br />
Table 3-4.<br />
Expedite <strong>8900</strong> <strong>Nucleic</strong> <strong>Acid</strong> <strong>Synthesis</strong> System User’s Guide 3-9<br />
3
3<br />
Chapter 3 Software Reference<br />
Entering a<br />
Sequence<br />
Upper case and<br />
lowercase base<br />
designators<br />
3-10 PerSeptive <strong>Biosystems</strong><br />
When you select Insert or Replace, the sequence entry mode<br />
screen is displayed (Figure 3-6).<br />
Figure 3-6 Sequence Editor—Entry Mode<br />
The function keys are re-assigned (see Table 3-4) to allow<br />
you to enter bases into the displayed sequence.<br />
The default entry mode is the 5' to 3' direction. To enter<br />
sequences in the 3' to 5' direction, modify the User Profile (see<br />
Section 3.6.6, Specifying a User Profile).<br />
Sequences are case-sensitive. Uppercase designators<br />
represent different residues than lowercase designators.<br />
Chemistry Uppercase Lowercase<br />
DNA DNA Thio*<br />
Thio Thio* DNA<br />
RNA RNA DNA<br />
* Uses the auxiliary bottle for thioating.<br />
Changing case To change the case of a base designator, enter the sequence<br />
(uppercase by default), use the arrow keys to select the<br />
designators to change, then press Mod.
Table 3-3 Sequence Editor Keys<br />
Key # Label Function<br />
First Screen<br />
Keys<br />
Sequence Menu<br />
Figure 3-7 Sequence Editor—First Screen<br />
1 Ins Selects the Insert mode of sequence entry.<br />
When you select Insert, the screen shown in Figure 3-6 is<br />
displayed and you can enter bases into the sequence.<br />
2 ← Moves the cursor one place to the left.<br />
3 → Moves the cursor one place to the right.<br />
4 Del Deletes the character at the cursor.<br />
5 Mod Depending on the selected Chemistry, enables you to<br />
specify a modified cycle. See “Modifying a Sequence” on<br />
page 3-19.<br />
6 Clear Deletes the entire sequence.<br />
When you select Clear a second screen is displayed and you<br />
must select one of the following:<br />
• Yes—delete the sequence<br />
• Cancel—do not delete the sequence<br />
This protects against accidental deletion of a sequence.<br />
7 More Displays the second sequence editor screen with additional<br />
menu choices.<br />
Expedite <strong>8900</strong> <strong>Nucleic</strong> <strong>Acid</strong> <strong>Synthesis</strong> System User’s Guide 3-11<br />
3
3<br />
Chapter 3 Software Reference<br />
8 Exit Returns you to the Sequence Editor menu.<br />
When you select this option to exit the Sequence Editor, a<br />
new screen is displayed and you are given the opportunity to<br />
select one of the following:<br />
• Yes—Save the sequence<br />
• No—Abandon changes made during the edit session<br />
• Cancel—Return to the Sequence Editor<br />
Second Screen<br />
Keys<br />
3-12 PerSeptive <strong>Biosystems</strong><br />
Table 3-3 Sequence Editor Keys (Continued)<br />
Key # Label Function<br />
Figure 3-8 Sequence Editor—Second Screen<br />
1 Replace Selects the replace mode of sequence entry.<br />
2 ↑ Moves the cursor up one row, scrolling the display if<br />
appropriate.<br />
3 ↓ Moves the cursor down one row, scrolling the display if<br />
appropriate.<br />
4 Name Allows you to give the sequence a name. The procedure for<br />
naming a sequence is described in “Naming a Sequence”<br />
on page 3-23.
Table 3-3 Sequence Editor Keys (Continued)<br />
Key # Label Function<br />
5 Info Displays the screen shown in Figure 3-9.<br />
Sequence Menu<br />
Figure 3-9 Sequence Information Screen<br />
This screen provides the following information about the<br />
displayed sequence:<br />
• Sequence number and name<br />
• Sequence length<br />
• Molecular weight and OD (see “Molecular Weight and<br />
OD Calculation” on page 3-24)<br />
• Purine to pyrimidine ratio<br />
• Melting temperature (see “Melting Point Calculation” on<br />
page 3-24)<br />
• Date and time of last save<br />
6 Compl Displays the complement of the displayed sequence.<br />
7 More Displays the first sequence editor screen.<br />
8 Exit Returns you to the Sequence Editor menu.<br />
Expedite <strong>8900</strong> <strong>Nucleic</strong> <strong>Acid</strong> <strong>Synthesis</strong> System User’s Guide 3-13<br />
3
3<br />
Chapter 3 Software Reference<br />
Entry Mode Keys The functions that are assigned to the soft keys in Entry Mode<br />
are described in Table 3-4.<br />
3-14 PerSeptive <strong>Biosystems</strong><br />
Table 3-4 Entry Mode Keys<br />
Key # Label Function<br />
1 A Selects the reagent in the Adenosine monomer<br />
reservoir position.<br />
2 C Selects the reagent in the Cytidine monomer reservoir<br />
position.<br />
3 G Selects the reagent in the Guanosine monomer<br />
reservoir position.<br />
4 T (DNA) Selects the reagent in the Thymidine monomer<br />
reservoir position (DNA, THIO, and USER chemistry).<br />
5 5-9<br />
8909<br />
U (RNA) Selects the reagent in the Uridine monomer reservoir<br />
position (RNA chemistry only).<br />
5<br />
8905<br />
Displays the second base selection screen.<br />
Selects the reagent in the #5 monomer reservoir<br />
position.<br />
6 Bksp Deletes the base at the left of the cursor.<br />
7 Mix Provides entry to Mixed Site Mode.<br />
The procedure for entering mixed sites is described in<br />
“Modifying a Sequence” on page 3-19.<br />
8 Exit Returns you to the previous menu.<br />
Second Screen Keys (Model 8909 only)<br />
1 5 Selects the reagent in the #5 monomer reservoir<br />
position.
Table 3-4 Entry Mode Keys (Continued)<br />
Key # Label Function<br />
2 6 Selects the reagent in the #6 monomer reservoir<br />
position.<br />
3 7 Selects the reagent in the #7 monomer reservoir<br />
position.<br />
4 8 Selects the reagent in the #8 monomer reservoir<br />
position.<br />
5 9 Selects the reagent in the #9 monomer reservoir<br />
position.<br />
Sequence Menu<br />
Entry Modes There are two modes of base entry, Insert and Replace<br />
(overstrike).<br />
Insert Mode<br />
Ins<br />
Replace<br />
Mode<br />
Repl<br />
Insert mode is available when you enter the Sequence<br />
Editor.<br />
In Insert mode, all entered bases are inserted into the<br />
sequence to the left of the cursor.<br />
Insert mode is suitable for entering new sequences and<br />
adding bases to an existing sequence.<br />
Replace mode is available when you select More to<br />
show additional Sequence Editor options.<br />
In Replace mode, all entered bases are placed into the<br />
sequence at the current location of the cursor<br />
over-striking any existing character.<br />
Replace mode is useful for editing an existing<br />
sequence.<br />
Expedite <strong>8900</strong> <strong>Nucleic</strong> <strong>Acid</strong> <strong>Synthesis</strong> System User’s Guide 3-15<br />
3
3<br />
Chapter 3 Software Reference<br />
Mixed Site Entry Dependent on the mixture you select, equal volumes are<br />
drawn from the nucleotide reservoirs and delivered to the<br />
column. When you select Mix, the screen shown in<br />
Figure 3-10 is displayed.<br />
3-16 PerSeptive <strong>Biosystems</strong><br />
Figure 3-10 Sequence Editor—Mixed Base Entry Mode
Sequence Menu<br />
The functions that are assigned to the soft keys to enable you<br />
to build a composite site are described in Table 3-5.<br />
Table 3-5 Mixed Site Entry—Key Assignments<br />
Key # Label Function<br />
1 A Inserts Adenosine in the mixed site.<br />
2 C Inserts Cytidine in the mixed site.<br />
3 G Inserts Guanosine in the mixed site.<br />
4 T (DNA) Inserts Thymidine in the mixed site if DNA, THIO, or USER<br />
chemistry is selected in the user profile.<br />
U (RNA) Inserts Uridine in the mixed site if RNA chemistry is selected<br />
in the user profile.<br />
5 Bksp Deletes the character immediately preceding the cursor.<br />
6 IUB Causes the display of additional soft key functions that<br />
enables you to enter the appropriate IUB code directly. The<br />
IUB codes are listed in Table 3-6.<br />
7 OK Returns you to the previous screen and inserts the mixed site<br />
in the sequence.<br />
8 Cancel Returns you to the previous screen without inserting the<br />
mixed site in the sequence.<br />
NOTE: If you select mixed sites, the system uses equal<br />
percentages of each monomer. For example, if you select<br />
AC, the system uses 50% A and 50% G. If you select ACG,<br />
the system uses 33% A, 33% C, and 33% G. You cannot<br />
enter lowercase letters for mixed sites.<br />
Expedite <strong>8900</strong> <strong>Nucleic</strong> <strong>Acid</strong> <strong>Synthesis</strong> System User’s Guide 3-17<br />
3
3<br />
Chapter 3 Software Reference<br />
IUB Codes The IUB (International Union of Biochemistry) codes for bases<br />
and mixed bases are listed in Table 3-6.<br />
3-18 PerSeptive <strong>Biosystems</strong><br />
Table 3-6 IUB Group Codes for Incompletely Specified Bases<br />
Code Bases Coded Complement Comment<br />
A A T Adenine<br />
C C G Cytosine<br />
G G C Guanine<br />
T T A Thymine (DNA only)<br />
U U A Uracil (RNA only)<br />
R A, G Y puRines<br />
Y C, T/U R pYrimidines<br />
M A, C K aMino<br />
K G, T/U M Keto<br />
S G, C S Strong (3H-bonds)<br />
W A, T/U W Weak (2H-bonds)<br />
H A, T/U, C D not G<br />
B G, T/U, C V not A<br />
V G, A, C B not T/U<br />
D G, A, T/U H not C<br />
N G, A, T/U, C N aNy<br />
NOTE: You cannot enter lowercase letters when using IUB<br />
codes.
Modifying a<br />
Sequence<br />
Sequence Menu<br />
Use the mod key to change the designation of the selected<br />
base to perform more complex synthetic tasks.<br />
Modified cycles in the standard protocols allow you to:<br />
• Use extended coupling times for monomer 5 by<br />
entering an X in the sequence<br />
• Perform base-specific thioation of DNA (8909 only) by<br />
entering lowercase base designators in a DNA<br />
protocol<br />
• Synthesize DNA/RNA hybrids (8909 only) by entering<br />
lowercase base designators in an RNA protocol<br />
More complex modifications require a Workstation to perform<br />
protocol editing.<br />
To modify a sequence position, use the arrows to select the<br />
base and press the mod key (see Figure 3-7). Pressing the<br />
mod key again will return it to the unmodified designation.<br />
Table 3-7 indicates the modified and unmodified base<br />
designations.<br />
NOTE: Lowercase base designators synthesize different<br />
residues and may draw reagent from different reservoirs<br />
than uppercase base designators. See “Upper case and<br />
lowercase base designators” on page 3-10.<br />
Expedite <strong>8900</strong> <strong>Nucleic</strong> <strong>Acid</strong> <strong>Synthesis</strong> System User’s Guide 3-19<br />
3
3<br />
Chapter 3 Software Reference<br />
Extended<br />
Coupling Cycles<br />
3-20 PerSeptive <strong>Biosystems</strong><br />
Table 3-7 Modified and Unmodified Base Positions<br />
Unmodified Modified<br />
A a<br />
C c<br />
G g<br />
T t<br />
U t<br />
5 X<br />
6-9 No change<br />
Mixed sites No change<br />
All the standard protocols have extended coupling cycles<br />
which are accessed by modifying the monomer 5 designation<br />
to X. This cycle is useful for adding biotin, linkers, or markers<br />
which may require longer coupling times. The X cycle will<br />
deliver from reservoir 5 with a coupling time which depends on<br />
the selected chemistry (see Table 3-8).<br />
Table 3-8 Chemistry Specific Coupling Times<br />
Chemistry<br />
Standard Coupling<br />
Time (min)<br />
DNA 1.6 15<br />
RNA 13 30<br />
THIO 1.6 15<br />
Extended Coupling<br />
Time (min)
Base Specific<br />
Thioation<br />
of DNA<br />
Sequence Menu<br />
You can synthesize DNA with a mixed phosphate and<br />
phosphorothioate backbone using the modified (lowercase)<br />
base designations.<br />
This option is available only on the 8909 because the Auxiliary<br />
bottle is required for the thioating reagent. The standard<br />
oxidizer is placed in the Ox position.<br />
Modified (lowercase) bases in DNA protocols yield a<br />
phosphorothioated position. Modified (lowercase) bases in the<br />
THIO protocols yield the standard phosphate backbone (see<br />
Table 3-9.)<br />
Select the chemistry and protocol that represents the majority<br />
of your sequence (thioated or standard DNA).<br />
Table 3-9 Modified Bases for Base Specific Thioation<br />
Reservoir<br />
Base<br />
Designation<br />
Chemistry<br />
DNA Thioate<br />
A A DNA cycle THIO cycle<br />
C C DNA cycle THIO cycle<br />
G G DNA cycle THIO cycle<br />
T T DNA cycle THIO cycle<br />
A a THIO cycle DNA cycle<br />
C c THIO cycle DNA cycle<br />
G g THIO cycle DNA cycle<br />
T t THIO cycle DNA cycle<br />
5–9 5–9 DNA cycle THIO cycle<br />
N/A Mixed Sites DNA cycle THIO cycle<br />
5 X Extended<br />
DNA cycle<br />
Extended<br />
THIO cycle<br />
Expedite <strong>8900</strong> <strong>Nucleic</strong> <strong>Acid</strong> <strong>Synthesis</strong> System User’s Guide 3-21<br />
3
3<br />
Chapter 3 Software Reference<br />
DNA/RNA Hybrids You can synthesize DNA/RNA hybrids using the modified<br />
using the modified (lowercase) base designations.<br />
This option is only available on the 8909 because the<br />
6 to 9 monomer positions are required for the DNA monomers.<br />
To synthesize hybrids, select RNA chemistry in the profile.<br />
The modified (lowercase) cycles deliver DNA monomer from<br />
the appropriate reservoir (see Table 3-10) and perform a DNA<br />
coupling cycle.<br />
3-22 PerSeptive <strong>Biosystems</strong><br />
Table 3-10 Monomer Reservoir Locations for RNA/DNA<br />
Hybrids<br />
Reservoir<br />
Base<br />
Designator<br />
A A RNA A<br />
C C RNA C<br />
G G RNA G<br />
T/U U RNA U<br />
Monomer Content<br />
5 5 User-determined<br />
6 a DNA A<br />
7 c DNA C<br />
8 g DNA G<br />
9 t DNA T
Naming a<br />
Sequence<br />
Sequence Menu<br />
When you select Name in the Sequence Editor menu, the<br />
screen shown in Figure 3-11 is displayed.<br />
Figure 3-11 Naming a Sequence<br />
The functions that are assigned to the soft keys to enable you<br />
to name a sequence are described in Table 3-11.<br />
NOTE: User-generated names may be displayed in upper<br />
and lower case and may contain a maximum of eleven<br />
characters.<br />
Table 3-11 Sequence Naming Keys<br />
Key # Label Function<br />
1 ↑ Increments (A to Z followed by 1 to 9 and space) the value of the<br />
character at the cursor.<br />
2 ↓ Decrements (9 to 0 followed by Z to A) the value of the character<br />
at the cursor.<br />
3 ← Moves the cursor one position to the left.<br />
4 → Moves the cursor one position to the right.<br />
5 Case Toggles the current character between upper and lower case.<br />
6 Clear Erases the entire sequence name.<br />
7 Cancel Returns you to the previous screen without saving the new name.<br />
8 OK Saves the new name and returns you to the previous screen.<br />
Expedite <strong>8900</strong> <strong>Nucleic</strong> <strong>Acid</strong> <strong>Synthesis</strong> System User’s Guide 3-23<br />
3
3<br />
Chapter 3 Software Reference<br />
Molecular Weight<br />
and OD<br />
Calculation<br />
Melting Point<br />
Calculation<br />
3-24 PerSeptive <strong>Biosystems</strong><br />
Because there is no molecular weight assigned to the<br />
numbered monomer reservoirs, these reservoirs are ignored<br />
when estimating the molecular weight.<br />
The OD (optical density unit) calculation which is based on a<br />
1 μmol scale assumes:<br />
• 1 OD per 33 mg of product<br />
• 98% coupling efficiency at each synthesis cycle<br />
The OD is calculated as follows:<br />
For a number of applications using synthetic DNA, it is useful<br />
to know the melting temperature (TM) of the DNA fragment.<br />
For example, in order to maximize the specificity of a<br />
polymerase chain reaction (PCR), it is necessary to perform<br />
the reaction at an optimum annealing temperature. (An<br />
approximation of the annealing temperature is 5 to 10 ° OD =<br />
33<br />
Where n = sequence length<br />
C<br />
below the melting temperature of a primer).<br />
Depending upon the sequence length and type, one of the<br />
following calculations is used to determine an approximate<br />
melting point for the oligomer.<br />
• Sequences less than 18 bases in length:<br />
MW *<br />
T m = (4 x N GC) + (2 x N AT)<br />
Where:N GC is the total number of C or G bases<br />
N AT is the total number of A or T bases<br />
• Longer DNA sequences:<br />
T m = 81.5 +16.6 x Log 10 [Na+] + 0.41 x P GC - 600/N<br />
Where:P GC is the total percentage of C or G bases<br />
N is the sequence length<br />
[Na + ] is 0.1 M<br />
(0.98) n-1<br />
NOTE: The above calculation may not be reliable for<br />
sequences longer than 70 bases, thioated DNA or RNA.
3.3.2 Running a Sequence<br />
Sequence Menu<br />
Use the Run option in the Sequence menu to start a synthesis.<br />
To start a synthesis:<br />
1. In the Sequence menu, Select Run.<br />
The Sequence selection screen is displayed (see<br />
Figure 3-4).<br />
2. Select the Sequence (1 to 63) to be run.<br />
The column selection screen is displayed (see<br />
Figure 3-12).<br />
NOTE: If you are currently running a synthesis, the column<br />
selection screen is not displayed. The available column is<br />
selected automatically.<br />
3. Select the Column to be used.<br />
Figure 3-12 Column Selection<br />
NOTE: You may start the same synthesis on both columns.<br />
However, if you wish to run different synthesis protocols on<br />
column one and column two, you must repeat this<br />
procedure to select and start the second synthesis.<br />
The run parameters are displayed (see Figure 3-13).<br />
Expedite <strong>8900</strong> <strong>Nucleic</strong> <strong>Acid</strong> <strong>Synthesis</strong> System User’s Guide 3-25<br />
3
3<br />
Chapter 3 Software Reference<br />
Modifying Run<br />
Parameters<br />
3-26 PerSeptive <strong>Biosystems</strong><br />
Figure 3-13 Run Parameters<br />
4. To change the parameters, select Mod.<br />
5. Press ok to save the new parameters and continue.<br />
6. When prompted, load the appropriate column and press<br />
ok to continue.<br />
7. The Main menu is displayed.<br />
Press Start to begin the synthesis.<br />
When you select Mod, the screen shown in Figure 3-14 is<br />
displayed.<br />
Figure 3-14 Modifying the Run Parameters<br />
The functions described in Table 3-12 are assigned to the soft<br />
keys to enable you to modify the run parameters for the<br />
current synthesis.
Key #<br />
Key<br />
Label<br />
Table 3-12 Modify Run Parameter Keys<br />
Function<br />
3.3.3 Aborting a <strong>Synthesis</strong><br />
Sequence Menu<br />
2 DMT Specifies removal or retention of the 5' DMT protecting group.<br />
7 Proto Displays the available protocols so that you can select the desired<br />
synthesis protocol for the selected chemistry.<br />
NOTE: Select your chemistry in the User Profile. See Section 3.6.6,<br />
Specifying a User Profile for more details.<br />
8 ok Saves the new parameters and returns you to the previous screen.<br />
If, for any reason, you need to abandon a synthesis, use the<br />
Abort option to terminate the synthesis after the instrument<br />
has been halted. To abort a synthesis:<br />
NOTE: It is preferable to use the Hold facility to stop the<br />
synthesis at the end of a cycle before aborting. Holding will<br />
leave the system in a washed condition.<br />
1. Halt the instrument (see “Holding a <strong>Synthesis</strong> At End Of<br />
Cycle” on page 3-40).<br />
2. Press Exit until the Main menu is displayed.<br />
3. Select Seq on the Main menu.<br />
Expedite <strong>8900</strong> <strong>Nucleic</strong> <strong>Acid</strong> <strong>Synthesis</strong> System User’s Guide 3-27<br />
3
3<br />
Chapter 3 Software Reference<br />
3-28 PerSeptive <strong>Biosystems</strong><br />
4. Select Abort on the Sequence menu. The screen shown<br />
in Figure 3-15 is displayed.<br />
Figure 3-15 Aborting a <strong>Synthesis</strong><br />
Dependent on the number of columns that were active,<br />
the functions described in Table 3-13 are assigned to<br />
the soft keys.<br />
Table 3-13 Keys for Aborting a Sequence<br />
Key # Label Function<br />
1 1 Abort the synthesis on Column 1.<br />
2 2 Abort the synthesis on Column 2.<br />
3 Both Abort both syntheses.<br />
7 Cancel Return to the Main menu without<br />
aborting the synthesis.<br />
5. Select the column number (1,2, or both) on which the<br />
synthesis is to be aborted.
3.3.4 Printing a Sequence<br />
Sequence Menu<br />
Use the Print option to print a copy of selected sequence<br />
along with some statistics.<br />
To Print a sequence:<br />
1. In the Sequence Menu, select Print.<br />
The sequence selection menu, shown in Figure 3-4, is<br />
displayed.<br />
2. Select the sequence (1 to 63) to be printed.<br />
A typical sequence printout for a Model 8909<br />
instrument is shown in Figure 3-16.<br />
Biosearch<br />
PerSeptive <strong>Biosystems</strong><br />
8909 Expedite(TM) <strong>Nucleic</strong> <strong>Acid</strong> <strong>Synthesis</strong> System<br />
Sequence Report<br />
October 13, 1994 02:00:37 PM Instrument: Expedite<br />
_________________________________________________<br />
SEQUENCE 1, Name = ‘AT 28’<br />
5'-AGC-G5G-T8C-G77-AAG-TTC-CAA-TGc-ggt-T-3'-<br />
Base<br />
Frequency<br />
Adenine 5<br />
Cytosine 4<br />
Guanine 6<br />
Thymine 5<br />
Other 8<br />
____<br />
Total= 28<br />
Molecular Weight = 6157.092 g/mole<br />
Purine : Pyrimidine = 11:9 = 1.22<br />
Estimated Optical Density = 108.1 OD‘s for 1 umole scale<br />
Estimated Melting Temperature = 88.6 C (.1M [Na+])<br />
Figure 3-16 Typical Sequence Printout<br />
Expedite <strong>8900</strong> <strong>Nucleic</strong> <strong>Acid</strong> <strong>Synthesis</strong> System User’s Guide 3-29<br />
3
3<br />
Chapter 3 Software Reference<br />
3.3.5 Viewing a Sequence<br />
3-30 PerSeptive <strong>Biosystems</strong><br />
NOTE: Because there are no constants assigned to the<br />
numbered monomer or lower case positions, these<br />
positions are ignored when calculating the molecular<br />
weight, purine/pyrimide ratio, optical density and<br />
temperature. The optional Expedite <strong>8900</strong> workstation<br />
allows you to assign molecular weights to these positions.<br />
Use the View option to view the currently stored sequences.<br />
The View facility is a read-only tool that allows you to scan the<br />
sequence that is currently submitted for synthesis and stored<br />
sequences without running the risk of accidentally modifying a<br />
sequence.<br />
To view a sequence:<br />
1. In the Sequence menu, select View.<br />
The sequence selection menu (Figure 3-4) is displayed.<br />
2. Select the first sequence to be viewed.<br />
The selected sequence is then displayed (see<br />
Figure 3-17).<br />
Figure 3-17 Viewing a Sequence<br />
3. Use the keys described in Table 3-14 to view the stored<br />
sequences.
View Sequence<br />
Key Assignments<br />
Key #<br />
Key<br />
Label<br />
The functions that are assigned to the soft keys in the<br />
Sequence View facility are described in Table 3-14.<br />
Table 3-14 Sequence Viewing Keys<br />
Function<br />
1 Next Displays the next stored sequence.<br />
2 Prev Displays the previously stored sequence.<br />
Sequence Menu<br />
3 Info Displays the following summary information associated with the<br />
stored sequence.<br />
• Sequence number and name<br />
• Sequence length<br />
• Molecular weight and the calculated OD yield (1 μmol scale)<br />
• Purine and pyrimidine ratio<br />
• Date and time when the sequence was last saved<br />
• Melting temperature (estimated)<br />
In this screen, the first and second soft keys are active so that<br />
you can scroll through the information about all the stored<br />
sequences.<br />
Use the Exit key to return to the previous screen.<br />
4 Print Prints the currently displayed sequence including the associated<br />
summary information to an attached printer.<br />
5 ↑ If the sequence is not all displayed, scrolls the display up one<br />
line.<br />
6 ↓ If the sequence is not all displayed, scrolls the display down one<br />
line.<br />
8 Exit Return to the Sequence menu.<br />
Expedite <strong>8900</strong> <strong>Nucleic</strong> <strong>Acid</strong> <strong>Synthesis</strong> System User’s Guide 3-31<br />
3
3<br />
Chapter 3 Software Reference<br />
3.3.6 Copying a Sequence<br />
3-32 PerSeptive <strong>Biosystems</strong><br />
Use the Copy option to duplicate a stored sequence.<br />
To copy a sequence:<br />
1. In the Sequence menu, select Copy.<br />
The sequence selection menu is displayed.<br />
2. Select the sequence (1 to 63) you wish to copy.<br />
3. Select the location (sequence name) into which the<br />
sequence is to be copied.<br />
A message similar to the one shown in Figure 3-18 is<br />
displayed to allow you to confirm your selection.<br />
Figure 3-18 Copy Confirmation Screen<br />
4. Complete the procedure by:<br />
• Pressing ok to complete the copy procedure.<br />
• Pressing cancel to abort the process.<br />
5. If desired, rename the copied sequence (see “Naming a<br />
Sequence” on page 3-23).
3.4 Status Menu<br />
Status Menu<br />
Use the Status menu to monitor the instrument while a<br />
synthesis is in progress. You may use the status option to:<br />
• Get an overview of what is happening with the<br />
system.<br />
• Get information about the sequence running on a<br />
specific column.<br />
• View the current reagent resources.<br />
• View the reagents needed to complete the synthesis.<br />
• Hold a synthesis.<br />
• Interrupt the synthesis at the end of the current cycle.<br />
When you select Stat from the Main menu, the screen shown<br />
in Figure 3-19 is displayed. This is the combined display which<br />
gives you an overview of the instrument status.<br />
Figure 3-19 Status Mode—Combined Display<br />
Expedite <strong>8900</strong> <strong>Nucleic</strong> <strong>Acid</strong> <strong>Synthesis</strong> System User’s Guide 3-33<br />
3
3<br />
Chapter 3 Software Reference<br />
3.4.1 Displaying System Information<br />
Combined<br />
Display Mode<br />
Key Assignments<br />
3-34 PerSeptive <strong>Biosystems</strong><br />
The following information is displayed on the screen in<br />
combined display mode:<br />
• The time left in each synthesis<br />
• The position of the base currently being added in<br />
each synthesis<br />
• The length of each sequence<br />
• The current status of the synthesis<br />
The functions that are assigned to the soft keys in combined<br />
display mode are described in Table 3-15.<br />
Table 3-15 Combined System Status Key<br />
Key # Label Function<br />
2 Col 1 Displays detailed information about the<br />
synthesis running on Column 1.<br />
3 Col 2 Displays detailed information about the<br />
synthesis running on Column 2.<br />
4 Rsrc Displays the current reagent resources<br />
and requirements (see Figure 3-21) and<br />
allows you to set a hold point.<br />
7 Hold/<br />
No Hold<br />
A toggle switch that pauses the<br />
syntheses on both columns at the end of<br />
the current cycle.<br />
The syntheses pauses until you select<br />
No Hold to resume the syntheses.<br />
8 Exit To return to the Main menu.
Single Column<br />
Display Mode<br />
Status Menu<br />
To display the status for a single column:<br />
Select either the Column 1 or Column 2 soft key.<br />
If you select Column 1, the screen shown in Figure 3-20 is<br />
displayed.<br />
Figure 3-20 Status Mode—Column 1 Display<br />
The following information is displayed for the selected column:<br />
• The sequence name<br />
• The removal or retention of the final<br />
5' DMT (+DMT - retains the 5' DMT)<br />
• Time left in the synthesis<br />
• The protocol being used<br />
• The base currently being added<br />
• The current synthesis subcycle (Deblocking,<br />
Coupling, Capping, Oxidizing)<br />
• The length of the oligomer and the position of the<br />
current base<br />
Expedite <strong>8900</strong> <strong>Nucleic</strong> <strong>Acid</strong> <strong>Synthesis</strong> System User’s Guide 3-35<br />
3
3<br />
Chapter 3 Software Reference<br />
Single Column<br />
Display Mode<br />
Key Assignments<br />
Viewing the<br />
System<br />
Resources<br />
3-36 PerSeptive <strong>Biosystems</strong><br />
The functions that are assigned to the soft keys in the single<br />
column display screens are described in Table 3-16.<br />
Table 3-16 Single Column Display Mode Keys<br />
Key # Label Function<br />
1 Comb To display the Combined synthesis status screen.<br />
2 Col1 Only available if Column 2 is currently displayed.<br />
To display the single column display for Column 1.<br />
3 Col 2 Only available if Column1 is currently displayed.<br />
To display the single column display for Column 2.<br />
4 Rsrc To display the amount of reagents required for the<br />
current synthesis and amount currently available. This<br />
key has the same function in the combined display<br />
mode.<br />
5 Trityl To display the trityl data for the synthesis.<br />
7 Hold/<br />
No Hold<br />
A toggle switch that halts the synthesis on the<br />
selected column at the end of the current cycle.<br />
The synthesis is halted until you select No Hold to<br />
resume the synthesis.<br />
8 Exit To return to the Main menu.<br />
During a synthesis, the system monitors the reagent usage.<br />
The volume of reagents currently in the reservoirs and the<br />
volume required to complete the synthesis are displayed in the<br />
System Resources screen.
CAUTION<br />
Status Menu<br />
Changing reagent bottles during a synthesis is not<br />
recommended. Check the reagent resources prior to<br />
initiating a synthesis to make sure that there is a sufficient<br />
supply.<br />
If you must replenish reagents during a synthesis, the<br />
procedure is described in Section 2.6.1, Replenishing Bottles<br />
During a <strong>Synthesis</strong>.<br />
When you select Rsrc from the Status menu, the screen<br />
shown in Figure 3-21 is displayed.<br />
Figure 3-21 Viewing the System Resources<br />
The following information is displayed for each reagent<br />
reservoir:<br />
• The amount of reagent currently estimated to be left in<br />
the reservoir (cur)<br />
• The amount of reagent required to complete the<br />
current syntheses (req)<br />
CAUTION<br />
For an accurate estimate of the current reagent resources,<br />
you must reset the bottle configuration each time a reagent<br />
reservoir is replenished. See Section 3.6.2, Bottle Change<br />
Tool.<br />
Expedite <strong>8900</strong> <strong>Nucleic</strong> <strong>Acid</strong> <strong>Synthesis</strong> System User’s Guide 3-37<br />
3
3<br />
Chapter 3 Software Reference<br />
Resources Key<br />
Assignments<br />
3-38 PerSeptive <strong>Biosystems</strong><br />
The functions that are assigned to the soft keys in the<br />
Resources facility are described in Table 3-17.<br />
3.4.2 Interrupting a <strong>Synthesis</strong><br />
Instrument Stop<br />
Key<br />
Table 3-17 Resources Facility Keys<br />
Key # Label Function<br />
1 Print To print the resource information for the<br />
current synthesis including current<br />
system resources and requirements.<br />
2 Hold To set a point in the synthesis where the<br />
instrument is stopped temporarily to<br />
enable you to replenish the reagent<br />
reservoirs.<br />
7 More To view the next screen of reagent<br />
resources.<br />
8 Exit To return to the previous screen.<br />
You may use the following to interrupt a synthesis:<br />
• Instrument Stop Key<br />
• Stop key in the Main menu<br />
• Hold key in the Status menu<br />
You may press the instrument Stop key, (see Figure 3-22) at<br />
any time during a synthesis. When you press this button, all<br />
synthesis operations are halted immediately and remain<br />
halted until you press the Start key in the Main menu.
Main Menu Stop<br />
Option<br />
Stop Soft Key<br />
Instrument Stop Key<br />
Figure 3-22 Stopping a <strong>Synthesis</strong><br />
Status Menu<br />
In the event of an emergency shutdown, the Instrument Stop<br />
Key is always available. The software defined Stop key is only<br />
available when the Main menu is displayed.<br />
CAUTION<br />
Stop<br />
Pausing a synthesis for extended periods in the middle of a<br />
cycle may be detrimental to the synthesis. If you use the<br />
Stop key, resume the synthesis as soon as possible. To<br />
replenish reagents, use the Hold option to pause the<br />
synthesis at a safe point between cycles.<br />
You may use the software defined Stop key to halt the<br />
instrument during a synthesis. The function of this key is the<br />
same as the instrument Stop key. However, this key is only<br />
displayed on the Main menu when a synthesis has been<br />
started and is running.<br />
When you select Stop, synthesis on both columns is halted<br />
immediately and held until you press Start to resume the<br />
synthesis or use the Abort option in the Sequence menu to<br />
cancel the synthesis.<br />
Expedite <strong>8900</strong> <strong>Nucleic</strong> <strong>Acid</strong> <strong>Synthesis</strong> System User’s Guide 3-39<br />
3
3<br />
Chapter 3 Software Reference<br />
Holding a<br />
<strong>Synthesis</strong><br />
At End Of Cycle<br />
3-40 PerSeptive <strong>Biosystems</strong><br />
You may use the Hold option in the Status menu to pause a<br />
synthesis on one or both columns at the end of the current<br />
cycle.<br />
To hold a synthesis at the end of the current cycle:<br />
1. Select Status from the Main Menu.<br />
The combined column screen is displayed<br />
(Figure 3-19).<br />
2. Select one of the following options to halt a synthesis:<br />
To halt: Do the following:<br />
Both columns Press Hold in the combined<br />
display screen<br />
Column 1 1. Press Col 1.<br />
2. Press Hold.<br />
Column 2. 1. Press Col 2.<br />
2. Press Hold.<br />
When you select Hold, the soft key assignment changes<br />
to No Hold (see Figure 3-23) and the synthesis is halted<br />
at the end of the current cycle at a chemistry safe point.<br />
Figure 3-23 Holding a <strong>Synthesis</strong><br />
3. To resume the synthesis, select No Hold.<br />
The system recalculates the reagent requirements and<br />
resumes the synthesis.
Setting a Hold<br />
Point<br />
Status Menu<br />
You may use the Hold option to set a hold at a future point in<br />
the synthesis to replenish reagents.<br />
To set a hold point:<br />
1. Select Status from the Main menu.<br />
2. Select Rsrc from the combined status display screen.<br />
The system resources screen shown in Figure 3-24 is<br />
displayed.<br />
3. Select Hold.<br />
Figure 3-24 System Resources Screen<br />
The screen shown in Figure 3-25 is displayed.<br />
Figure 3-25 Setting a Hold Point<br />
4. Use the arrow keys under the desired column to specify<br />
the base addition cycle after which the synthesis is to be<br />
paused.<br />
5. Press ok to set the hold point.<br />
6. Press Exit in the resources screen to return to the<br />
combined status display screen.<br />
Expedite <strong>8900</strong> <strong>Nucleic</strong> <strong>Acid</strong> <strong>Synthesis</strong> System User’s Guide 3-41<br />
3
3<br />
Chapter 3 Software Reference<br />
3-42 PerSeptive <strong>Biosystems</strong><br />
The hold point is displayed on the screen (see<br />
Figure 3-26) and the synthesis continues until the<br />
beginning of the cycle at which the hold is set and then<br />
halts until you restart it.<br />
Figure 3-26 Combined Display with Hold Set<br />
7. To restart the synthesis, press No Hold on the status<br />
menu.
3.5 Prime Menu<br />
Use the Prime menu to:<br />
• Prepare the instrument for synthesis<br />
• Prepare the instrument for storage<br />
• Perform post-synthesis operations<br />
CAUTION<br />
Prime Menu<br />
Install a union in place of each reaction column before<br />
running any priming routine (except Final Deblock). The<br />
priming routines deliver all the reagents through the column<br />
to waste, and may cause irreversible damage to the<br />
column.<br />
When you select Prime from the Main menu, the screen<br />
shown in Figure 3-27 is displayed.<br />
Figure 3-27 Prime Menu<br />
Expedite <strong>8900</strong> <strong>Nucleic</strong> <strong>Acid</strong> <strong>Synthesis</strong> System User’s Guide 3-43<br />
3
3<br />
Chapter 3 Software Reference<br />
3-44 PerSeptive <strong>Biosystems</strong><br />
The functions that are assigned to the soft keys in the Prime<br />
menu are described in Table 3-18.<br />
Table 3-18 Prime Menu Keys<br />
Key # Label Function<br />
1 1 Prime individual reagent passages. See<br />
Section 3.5.1, Prime Individual.<br />
2 2 Prime all reagent passages. See Section<br />
3.5.2, Prime All.<br />
3 3 Prime ancillary reagent passages. See<br />
Section 3.5.3, Prime Reagents.<br />
4 4 Prime monomer passages. See Section<br />
3.5.4, Prime Monomers.<br />
5 5 Remove the 5' DMT group. See Section<br />
3.5.5, Final Deblock.<br />
6 6 Run the STARTUP routine. See Section<br />
3.5.6, Startup.<br />
7 7 Run the SHUTDOWN routine. Section<br />
3.5.7, Shutdown.<br />
8 Exit Return to the Main menu.
Prime Menu<br />
Column Selection The priming functions are column-specific. Thus when any<br />
option on the Prime menu is selected, the screen shown in<br />
Figure 3-28 is displayed to enable you to select the column to<br />
be primed.<br />
NOTE: Always prime both columns 3 times before<br />
beginning a synthesis.<br />
Figure 3-28 Column Selection<br />
The functions that are assigned to the soft keys are described<br />
in Table 3-19.<br />
Table 3-19 Column Selection for Priming<br />
Key # Label Function<br />
1 1 Select prime functions for Column 1.<br />
2 2 Select prime functions for Column 2.<br />
8 cancel Return to the Prime menu.<br />
Expedite <strong>8900</strong> <strong>Nucleic</strong> <strong>Acid</strong> <strong>Synthesis</strong> System User’s Guide 3-45<br />
3
3<br />
Chapter 3 Software Reference<br />
3-46 PerSeptive <strong>Biosystems</strong><br />
Table 3-20 Prime Menu Routines<br />
Button Routine Description<br />
1 Prime Individual Primes one reagent position.<br />
Pulses the specified reagent 20 times through<br />
selected column position.<br />
2 Prime All Primes all reagent positions:<br />
• Prompts user to remove column and replace with a<br />
union before starting routine.<br />
• Pulses Aux, Ox, Caps, Act 20 times each; Pulses<br />
monomers 10 times each; Pulses Dblk 120 times,<br />
Wsh A 150 times, and Wsh 30 times.<br />
• Dries the selected column position(s) for<br />
10 seconds.<br />
• Beeps 10 times at completion of routine.<br />
3 Prime Reagents Primes everything but monomer positions.<br />
Same as Prime All, except the monomer positions are<br />
not primed.<br />
4 Prime Monomers Primes only monomer positions.<br />
Same as Prime All, except Aux, Ox, Caps, Dblk, and<br />
Wsh A (A train reagents) are not primed.<br />
5 Final Deblock Performs final deblock and wash:<br />
• Performs a final deblock cycle for the scale of the<br />
completed synthesis, which is the same as in the<br />
standard 0.05, 0.2, and 1 µmole protocols. If the<br />
synthesis is aborted, a default final deblock cycle<br />
is performed.<br />
• Washes the column with 300 pulses of Wsh A.<br />
• Dries the selected column position for 60 seconds.<br />
• Beeps 10 times at the completion of routine.
Table 3-20 Prime Menu Routines (Continued)<br />
Button Routine Description<br />
Prime Menu<br />
6 STARTUP Prepares an instrument for synthesis from a shutdown<br />
state:<br />
• Prompts user to fill bottles with ACN and put a<br />
union in both column positions.<br />
• Performs a “prime all” on each position, 3 times on<br />
each column.<br />
• Prompts user to put fresh ACN in B train bottles<br />
(monomers, Act, and Wsh).<br />
• Performs a “prime all” on each position, 3 times on<br />
each column.<br />
• Prompts user to install reagents.<br />
• Performs a “prime all” on each position, 3 times on<br />
each column.<br />
• Dries the selected column position(s) for<br />
10 seconds.<br />
• Beeps 10 times at completion of routine.<br />
Expedite <strong>8900</strong> <strong>Nucleic</strong> <strong>Acid</strong> <strong>Synthesis</strong> System User’s Guide 3-47<br />
3
3<br />
Chapter 3 Software Reference<br />
7 SHUTDOWN Prepares an instrument for a short-or long-term<br />
shutdown:<br />
• Prompts user to put a union in both column<br />
positions.<br />
• Washes each train, column position, and waste line<br />
with 300 pulses of ACN (4.5 mL).<br />
• Dries each train, column position and waste line<br />
with gas for 60 seconds.<br />
• Prompts user to press cancel to end routine (i.e. if<br />
it is a short-term shutdown) or ok to continue with<br />
long-term shutdown.<br />
• If ok is chosen:<br />
• Prompts user to fill all bottles with ACN.<br />
• Flows ACN from each bottle through both column<br />
positions.<br />
• Pulses ACN from each bottle through both column<br />
positions.<br />
• Flows ACN from each bottle through both column<br />
positions.<br />
• Prompts user to put empty bottles on instrument.<br />
• Flows gas from each position through both column<br />
positions.<br />
• Pulses gas from each position through both<br />
column positions.<br />
• Flows gas from each position through both column<br />
positions.<br />
• Beeps 10 times at completion of routine.<br />
3-48 PerSeptive <strong>Biosystems</strong><br />
Table 3-20 Prime Menu Routines (Continued)<br />
Button Routine Description
3.5.1 Prime Individual<br />
NOTE: Always prime both columns 3 times before<br />
beginning a synthesis.<br />
Prime Menu<br />
Use the Prime Individual facility to manually prime each fluid<br />
passage. Prime individual is most commonly used when<br />
changing an individual reagent bottle. When you select Prime<br />
Individual and choose the column to prime, the screen shown<br />
in Figure 3-29 is displayed.<br />
Figure 3-29 Prime Individual—First Screen<br />
The individual reagents are displayed (press More to bring up<br />
a second and third screen with additional reagent selections).<br />
The functions assigned to the soft keys are described in<br />
Table 3-21.<br />
The procedure for priming an individual fluid passage is as<br />
follows:<br />
1. Press the soft key associated with the desired reagent<br />
to begin the flow of reagent from the reservoir.<br />
The reagent injector is activated for one priming cycle<br />
to supply 20 pulses (~320 μL) of reagent to the fluid<br />
passages. Key #3 is available to enable you to stop the<br />
process at any time (see Figure 3-30).<br />
Figure 3-30 Prime Individual Pulse/Cycle Screen<br />
Expedite <strong>8900</strong> <strong>Nucleic</strong> <strong>Acid</strong> <strong>Synthesis</strong> System User’s Guide 3-49<br />
3
3<br />
Chapter 3 Software Reference<br />
3-50 PerSeptive <strong>Biosystems</strong><br />
Table 3-21 Prime Individual Keys<br />
Key # Name Function<br />
First Screen Keys<br />
1 Gas A Blows gas through the A-train to the column.<br />
2 Wash A Delivers reagent from the external Wash A reservoir<br />
position (8909).<br />
3 Caps Delivers reagent from the Cap A and Cap B reservoir<br />
positions.<br />
4 Ox Delivers reagent from the Oxidizer reservoir position.<br />
5 Dblk Delivers reagent from the Deblock reservoir position and is<br />
diverted to chlorinated waste.<br />
6 Aux Delivers reagent from the Aux reservoir position (8909).<br />
7 More<br />
(All Screens)<br />
Displays the next screen with additional reagent reservoir<br />
positions.<br />
8 Exit (All Screens) Return to the Prime menu.<br />
Second Screen Keys<br />
1 Wash Delivers reagent from the Wash reservoir position.<br />
2 Act Delivers reagent from the Activator reservoir position.<br />
3 A Delivers reagent from Adenosine monomer reservoir<br />
position.
4 C Delivers reagent from the Cytidine monomer reservoir<br />
position.<br />
Prime Menu<br />
5 G Delivers reagent from the Guanosine monomer reservoir<br />
position.<br />
6 T/U Delivers reagent from the Thymidine (Uridine) monomer<br />
reservoir position.<br />
Third Screen Keys<br />
Table 3-21 Prime Individual Keys (Continued)<br />
Key # Name Function<br />
1 5 Delivers reagent from the monomer reservoir 5 position.<br />
2 6 Delivers reagent from the monomer reservoir 6 position<br />
(8909).<br />
3 7 Delivers reagent from the monomer reservoir 7 position<br />
(8909).<br />
4 8 Delivers reagent from the monomer reservoir 8 position<br />
(8909).<br />
5 9 Delivers reagent from the monomer reservoir 9 position<br />
(8909).<br />
6 Gas B Blows gas through the B-train to waste.<br />
Expedite <strong>8900</strong> <strong>Nucleic</strong> <strong>Acid</strong> <strong>Synthesis</strong> System User’s Guide 3-51<br />
3
3<br />
Chapter 3 Software Reference<br />
3-52 PerSeptive <strong>Biosystems</strong><br />
2. After one priming cycle, the functions described in<br />
Table 3-22 are assigned to the soft keys.<br />
3. Complete the priming procedure by selecting:<br />
• Wash A<br />
• Wash B<br />
• Gas A<br />
• Gas B<br />
Table 3-22 Priming Keys<br />
Key # Name Function<br />
1 Pulse Delivers a single pulse (~16 μL) of<br />
reagent.<br />
2 Cycle Delivers a single cycle<br />
(20 pulses or ~320 μL) of reagent).<br />
8 cancel Return to the Prime Individual menu.<br />
This flushes the common passages and prevents cross<br />
contamination with other reagents.<br />
NOTE: When using Prime Individual, it is possible to<br />
deliver a small amount of chlorinated waste to the nonchlorinated<br />
waste container. If this is a problem, use the<br />
pre-programmed priming routines (Prime All, Prime<br />
Reagents, Prime Monomers) which wash all the<br />
chlorinated waste to the appropriate waste container.
3.5.2 Prime All<br />
NOTE: Always prime both columns 3 times before<br />
beginning a synthesis.<br />
Prime Menu<br />
Use the Prime All (Monomers and Reagents) routine to<br />
automatically prime each reagent delivery passage. The<br />
procedure for priming all the reagent passages is as follows:<br />
1. Select Prime All, and select the column.<br />
The screen shown in Figure 3-31 is displayed. There is<br />
a programmed hold until you press ok.<br />
Figure 3-31 Prime All—First Screen<br />
2. Remove the column and replace it with a union.<br />
3. Press ok.<br />
The screen shown in Figure 3-32 is displayed.<br />
Figure 3-32 Prime All—Second Screen<br />
Expedite <strong>8900</strong> <strong>Nucleic</strong> <strong>Acid</strong> <strong>Synthesis</strong> System User’s Guide 3-53<br />
3
3<br />
Chapter 3 Software Reference<br />
3-54 PerSeptive <strong>Biosystems</strong><br />
Reagents are delivered through all the fluid passages<br />
sequentially from the following reservoir positions:<br />
• Wash A (30 pulses)<br />
• Cap A and Cap B (20 pulses)<br />
• Wash A (30 pulses)<br />
• Oxidizer (20 pulses)<br />
• Wash A (30 pulses)<br />
• Aux (8909 only—20 pulses)<br />
• Wash A (30 pulses)<br />
• Deblock [diverted to chlorinated waste<br />
(120 pulses)]<br />
• Wash A [diverted to chlorinated waste<br />
(30 pulses)]<br />
• Activator (20 pulses)<br />
• Each monomer reservoir (10 pulses)<br />
• Wash (30 pulses)<br />
During the priming routine, the Stop key is available<br />
and the current function is displayed on the screen.<br />
After all the reagent passages are primed, the common<br />
passages are blown out with gas for 10 seconds in<br />
preparation for synthesis.<br />
On completion of the priming cycle, the instrument<br />
beeps 10 times.<br />
After one priming cycle, the screen shown in<br />
Figure 3-33 is displayed and the functions described in<br />
Table 3-23 are assigned to the soft keys.
3.5.3 Prime Reagents<br />
Figure 3-33 Prime All—Third Screen<br />
Prime Menu<br />
Table 3-23 Priming Keys—Preprogrammed Routines<br />
Key # Name Function<br />
2 Cycle To repeat the priming routine.<br />
8 cancel To return to the Prime menu or<br />
stop the current priming routine.<br />
NOTE: Always prime both columns 3 times before<br />
beginning a synthesis.<br />
Use the Prime Reagents routine to automatically prime all<br />
reagent delivery passages from the ancillary reagent<br />
reservoirs. To prime all the reagent lines:<br />
1. Select Prime Reagents, and select the column.<br />
The screen shown in Figure 3-34 is displayed. There is<br />
a programmed hold until you press ok.<br />
Figure 3-34 Prime Reagents—First Screen<br />
Expedite <strong>8900</strong> <strong>Nucleic</strong> <strong>Acid</strong> <strong>Synthesis</strong> System User’s Guide 3-55<br />
3
3<br />
Chapter 3 Software Reference<br />
3-56 PerSeptive <strong>Biosystems</strong><br />
2. Remove the column and replace it with a union.<br />
3. Press ok.<br />
The screen shown in Figure 3-35 is displayed.<br />
Figure 3-35 Prime Reagents—Second Screen<br />
The reagent passages are primed sequentially from the<br />
following reservoir positions:<br />
• Wash A (30 pulses)<br />
• Cap A and Cap B (20 pulses)<br />
• Wash A (30 pulses)<br />
• Oxidizer (20 pulses)<br />
• Wash A (30 pulses)<br />
• Aux (8909 only—20 pulses)<br />
• Wash A (30 pulses)<br />
• Deblock [diverted to chlorinated waste<br />
(120 pulses)]<br />
• Wash A [diverted to chlorinated waste<br />
(30 pulses)]<br />
• Activator (20 pulses)<br />
• Wash (30 pulses)<br />
During this priming routine, the Stop key is available<br />
and the current function is displayed on the screen.
3.5.4 Prime Monomers<br />
Prime Menu<br />
After all the reagent passages are primed, the common<br />
passages are blown out with gas for 10 seconds in<br />
preparation for synthesis.<br />
On completion of the priming cycle, the instrument<br />
beeps 10 times and the functions described in<br />
Table 3-23 are assigned to the soft keys. You may<br />
press Cycle to repeat the priming routine or cancel to<br />
return to the Prime menu.<br />
NOTE: Always prime both columns 3 times before<br />
beginning a synthesis.<br />
Use the Prime Monomers routine to automatically prime the<br />
monomer solutions and the B-train ancillary reagents delivery<br />
passages. The procedure for priming the monomer passages<br />
is as follows:<br />
1. Select Prime Monomers, and select the column.<br />
The screen shown in Figure 3-36 is displayed. There is<br />
a programmed hold until you press Ok.<br />
Figure 3-36 Prime Monomers—First Screen<br />
2. Remove the column and replace it with a union.<br />
Expedite <strong>8900</strong> <strong>Nucleic</strong> <strong>Acid</strong> <strong>Synthesis</strong> System User’s Guide 3-57<br />
3
3<br />
Chapter 3 Software Reference<br />
3-58 PerSeptive <strong>Biosystems</strong><br />
3. Press Ok.<br />
The screen shown in Figure 3-37 is displayed.<br />
Figure 3-37 Prime Monomers—Second Screen<br />
The reagent passages are primed sequentially from the<br />
following reservoir positions:<br />
• Activator (20 pulses)<br />
• Each monomer reservoir (10 pulses)<br />
• Wash (30 pulses)<br />
During the priming routine, the Stop key is available<br />
and the current function is displayed on the screen.<br />
After all the reagent passages are primed, the common<br />
passages are blown out with gas for 10 seconds in<br />
preparation for synthesis.<br />
On completion of the priming cycle, the instrument<br />
beeps 10 times and the functions described in<br />
Table 3-23 are assigned to the soft keys. You may<br />
press Cycle to repeat the priming routine or cancel to<br />
return to the Prime menu.
3.5.5 Final Deblock<br />
Prime Menu<br />
Use the Final Deblock routine to remove the final DMT group<br />
manually. If you did not select automatic removal of the final<br />
DMT, you may use this option at the end of the synthesis.<br />
When you select Final Deblock and select the desired column,<br />
the screen shown in Figure 3-38 is displayed.<br />
Figure 3-38 Final Deblocking Routine<br />
The system performs a deblock cycle on the selected column.<br />
The final deblock routine will use the same deblock routine of<br />
the selected protocol on that column.<br />
If there is no synthesis on the column then the default final<br />
deblock routine is used (which is the same as that used with<br />
the standard 0.05, 0.2 and 1.0 μmole protocols).<br />
During the deblocking routine, the Stop key is available and<br />
the current function is displayed on the screen. After the<br />
routine has been performed, the functions described in<br />
Table 3-23 are assigned to the soft keys and you may press<br />
Cycle to repeat the deblocking routine or press cancel to<br />
return to the Prime menu.<br />
Expedite <strong>8900</strong> <strong>Nucleic</strong> <strong>Acid</strong> <strong>Synthesis</strong> System User’s Guide 3-59<br />
3
3<br />
Chapter 3 Software Reference<br />
3.5.6 Startup<br />
3-60 PerSeptive <strong>Biosystems</strong><br />
Use the Startup routine to prepare the instrument for synthesis<br />
after it has been shut down for a period of time. The procedure<br />
for running the Startup routine is as follows:<br />
1. Select Startup, and select the column.<br />
The screen shown in Figure 3-39 is displayed.<br />
Figure 3-39 Startup Routine—First Screen<br />
2. Fill the reagent reservoirs with acetonitrile (ACN) as<br />
follows:<br />
• Place approximately 5 mL of ACN in the<br />
monomer reservoirs.<br />
• Place 25 mL of ACN in all the remaining reagent<br />
reservoirs.<br />
3. Press Ok to continue. The screen shown in<br />
Figure 3-40 is displayed.<br />
Figure 3-40 Startup Routine—Second Screen
Prime Menu<br />
4. Place a union in both column positions and press Ok.<br />
The system primes all the reagent passages three<br />
times. During the priming routine, the Stop key is<br />
available and the current function is displayed on the<br />
screen.<br />
On completion of the first step of the startup routine, the<br />
screen shown in Figure 3-41 is displayed.<br />
Figure 3-41 Startup Routine—Third Screen<br />
5. Replace the acetonitrile (ACN) in the B-train reservoirs<br />
with fresh dry acetonitrile (
3<br />
Chapter 3 Software Reference<br />
3-62 PerSeptive <strong>Biosystems</strong><br />
On completion of this step of the priming routine, the<br />
screen shown in Figure 3-42 is displayed.<br />
Figure 3-42 Startup Routine—Fourth Screen<br />
6. Install new reagent bottles in all reservoir positions. See<br />
Section 2.4.2, Installing the Reagents.<br />
7. Press Ok.<br />
The system primes all the reagent passages three<br />
times. During the priming routine, the Stop key is<br />
available and the current function is displayed on the<br />
screen.<br />
After all the reagent passages are primed, the common<br />
passages are flushed with acetonitrile and passages<br />
are blown out with blanket gas for 10 seconds in<br />
preparation for synthesis.<br />
On completion of the routine, the instrument beeps ten<br />
times and you are prompted to press Ok to exit the<br />
routine.<br />
The functions described in Table 3-23 are assigned to<br />
the soft keys. You may press Cycle to repeat the<br />
priming routine or cancel to return to the Prime menu.
3.5.7 Shutdown<br />
Prime Menu<br />
Use the Shutdown routine to wash out all the fluid passages in<br />
preparation for short or long term storage. Short term<br />
shutdown is a period of less than two weeks. Any period of<br />
time greater than two weeks is long term shutdown.<br />
The Shutdown routine has two components.<br />
• Short term shutdown is run whenever the instrument<br />
is to be shutdown.<br />
• Long term shutdown is a continuation of the short<br />
term program which is selected after the short term<br />
shutdown routine has been run.<br />
The procedure for running the Shutdown routine is as follows:<br />
1. Select Shutdown, and select the column.<br />
The screen shown in Figure 3-43 is displayed.<br />
Figure 3-43 Shutdown Routine—First Screen<br />
2. Place a union in both column positions and press Ok.<br />
The system washes each reagent train with acetonitrile<br />
from the Wash reservoirs and gas is blown through the<br />
reagent passages for 60 seconds to dry them out. On<br />
completion of the short term shutdown, the screen<br />
shown in Figure 3-44 is displayed.<br />
Expedite <strong>8900</strong> <strong>Nucleic</strong> <strong>Acid</strong> <strong>Synthesis</strong> System User’s Guide 3-63<br />
3
3<br />
Chapter 3 Software Reference<br />
3-64 PerSeptive <strong>Biosystems</strong><br />
Figure 3-44 Shutdown Routine—Second Screen<br />
NOTE: If the instrument is to be shut down for less than<br />
two weeks, press cancel to exit the shutdown routine. If<br />
the instrument is to be shut down for longer than two<br />
weeks, press Ok to continue with the long term<br />
shutdown.<br />
The screen shown in Figure 3-45 is displayed.<br />
Figure 3-45 Shutdown Routine—Third Screen<br />
3. Fill the reagent reservoirs with acetonitrile (ACN) as<br />
follows:<br />
• Place approximately 10 mL of ACN in the<br />
monomer reservoirs.<br />
• Place approximately 25 mL of ACN in all the<br />
remaining reagent reservoirs.
Prime Menu<br />
4. Press Ok to continue. The system flows acetonitrile<br />
through the reagent passages from all the reservoir<br />
positions. On completion, the screen shown in Figure 3-46<br />
is displayed.<br />
Figure 3-46 Shutdown Routine—Fourth Screen<br />
5. Load a clean dry bottle onto each reservoir position and<br />
press Ok.<br />
The system flows gas through the system from each<br />
reservoir position to dry out all the reagent passages.<br />
On completion of the routine, the instrument beeps ten<br />
times and you are prompted to press Ok to exit the<br />
routine.<br />
The functions described in Table 3-23 are assigned to<br />
the soft keys. You may press Cycle to repeat the<br />
priming routine or cancel to return to the Prime menu.<br />
Expedite <strong>8900</strong> <strong>Nucleic</strong> <strong>Acid</strong> <strong>Synthesis</strong> System User’s Guide 3-65<br />
3
3<br />
Chapter 3 Software Reference<br />
3.6 Tools Menu<br />
3-66 PerSeptive <strong>Biosystems</strong><br />
Use the Tools menu to:<br />
• Run diagnostics<br />
• Reset the reagent bottle volumes<br />
• Adjust the display contrast<br />
• Clear or print the history log<br />
• Configure system parameters<br />
When you select Tools from the Main menu, the screen shown<br />
in Figure 3-47 is displayed:<br />
Figure 3-47 Tools Menu
Tools Menu Key<br />
Assignments<br />
Tools Menu<br />
The functions that are assigned to the soft keys in the Tools<br />
menu are described in Table 3-24.<br />
Table 3-24 Tools Menu Keys<br />
Key # Label Function<br />
1 Diag To access the various diagnostic routines which insure proper<br />
instrument functionality as well as provide automated trouble<br />
shooting. See Section 3.6.1, Diagnostic Routines.<br />
2 Bottle To reset the reagent bottle contents. See Section 3.6.2, Bottle<br />
Change Tool.<br />
3 Disp To adjust the front panel display (LCD) contrast. See Section<br />
3.6.3, Display Tool.<br />
4 Log To access the log file maintenance facility. Section 3.6.4, Log<br />
Tool.<br />
5 Config To access the facility for setting system parameters. See<br />
Section 3.6.5, Configuration Tool.<br />
8 Exit To return to the Main menu.<br />
Expedite <strong>8900</strong> <strong>Nucleic</strong> <strong>Acid</strong> <strong>Synthesis</strong> System User’s Guide 3-67<br />
3
3<br />
Chapter 3 Software Reference<br />
3.6.1 Diagnostic Routines<br />
3-68 PerSeptive <strong>Biosystems</strong><br />
Use the Diagnostic Routines tool to access various system<br />
diagnostic procedures. When you select Diagnostics from the<br />
Tools menu, the screen shown in Figure 3-48 is displayed.<br />
Figure 3-48 Diagnostics Menu<br />
The functions that are assigned to the soft keys in the<br />
Diagnostics menu are described in Table 3-25.<br />
Table 3-25 Diagnostic Routines Keys<br />
Key # Name Function<br />
1 Leak To perform the automated gas leak isolation<br />
tests.<br />
2 I/O To check the gas sensors and turn on or off<br />
input and output events.<br />
3 Valve To perform gas valve checkout routines.<br />
4 LEDs To test the reagent solenoid electronic<br />
control circuits.<br />
5 Trityl To access the Trityl Monitor diagnostic tool.<br />
6 Fluid To collect and measure the output of the<br />
fluidics module.<br />
8 Exit To return to the Tools menu.
Leak Diagnostics The Expedite instrument has two gas pressure sensors:<br />
• The high pressure sensor<br />
• The low pressure sensor<br />
Tools Menu<br />
The high pressure sensor continuously monitors the input gas<br />
pressure. If it detects a pressurization failure (
3<br />
Chapter 3 Software Reference<br />
3-70 PerSeptive <strong>Biosystems</strong><br />
The functions that are assigned to the soft keys are described<br />
in Table 3-26.<br />
Table 3-26 Leak Diagnostics Keys<br />
Key # Name Function<br />
1 Start To start the automatic leak test.<br />
The leak test may take about 5 minutes<br />
to run to completion.<br />
8 Exit To return to the diagnostics menu.<br />
The Gas Leak Test routine does the following:<br />
1. Opens the high and low pressure inlets for 20 seconds<br />
to pressurize the system.<br />
2. Turns off the high and low pressure inlets to isolate the<br />
systems from each other and the gas source.<br />
3. Measures the time it takes for the pressure to drop low<br />
enough to trigger the gas sensors.<br />
The system passes if the high pressure is maintained<br />
for >5 seconds and the low pressure is maintained for<br />
>3 minutes.<br />
4. If the time is less than the defined value, the system<br />
reports a failure.<br />
Gas Saver The Gas Saver, which is activated by default, reduces overall<br />
gas consumption. If desired, you may disable Gas Saver in the<br />
User Profile (see Section 3.6.6, Specifying a User Profile).<br />
When the gas saver is enabled, the system periodically<br />
performs the Gas Leak Test routine. If the system fails the test,<br />
a warning is issued and the gas is shut off until the instrument<br />
is activated and the gas saver test fail signal is acknowledged<br />
(see Figure 3-50).
Tools Menu<br />
The instrument is considered to be idle if there has been no<br />
keyboard or reagent delivery activity for 5 minutes. The Gas<br />
Saver is activated and remains operational until the instrument<br />
is activated (any key is pressed).<br />
Figure 3-50 Gas Saver Pressure Failure Warning<br />
The Startup Leak Test automatically runs a shortened version<br />
of the gas leak diagnostic test when you press Start to begin or<br />
continue a synthesis. If the test fails, a warning is issued and<br />
the instrument is halted at the end of the cycle. The Startup<br />
Leak Test may be enabled or disabled in the User Profile.<br />
Sensor Check The Sensor check option monitors the input sensors. When<br />
you select I/O, the system checks to see if the sensors are<br />
activated and reports the status in the screen shown in<br />
Figure 3-51.<br />
Figure 3-51 Gas Sensor Diagnostics<br />
In this screen, soft keys six and seven are active to enable you<br />
to turn on or off the external contact closures for testing<br />
purposes.<br />
Expedite <strong>8900</strong> <strong>Nucleic</strong> <strong>Acid</strong> <strong>Synthesis</strong> System User’s Guide 3-71<br />
3
3<br />
Chapter 3 Software Reference<br />
Valve test The Valve option allows you to toggle on and off the high and<br />
low pressure gas manifold valves and waste divert valves.<br />
This screen also displays the total number of pulses for the<br />
instrument. The number of pulses increments up to<br />
16,777,216, then resets to zero and begins incrementing<br />
again.<br />
When you select Valve, the screen shown in Figure 3-52 is<br />
displayed.<br />
3-72 PerSeptive <strong>Biosystems</strong><br />
Figure 3-52 Valves Diagnostics With Trityl Monitor<br />
Installed<br />
The functions that are assigned to the soft keys are described<br />
in Table 3-27.<br />
Table 3-27 Valve Test Keys<br />
Key # Name Function<br />
1 - Turn on or off the high pressure gas<br />
valve.<br />
2 - Turn on or off the low pressure gas valve.<br />
4 - Turn on or off the Col 1 waste divert<br />
valve.<br />
5 - Turn on or off the Col 2 waste divert<br />
valve.<br />
8 Exit To return to the Diagnostics menu.
Tools Menu<br />
LED Test Use the LED (Light Emitting Diode) test to exercise the fluid<br />
control solenoids.<br />
Figure 3-53 LED Test Facility<br />
When a solenoid is activated, you will hear a click and the<br />
appropriate LED on the driver board (inside the instrument<br />
cabinet) lights up. (The LEDs are only accessible to service<br />
personnel.)<br />
The LED test allows testing of the valves manually or<br />
automatically. The functions that are assigned to the soft keys<br />
are described in Table 3-28.<br />
Table 3-28 LED Test Keys<br />
Key # Name Function<br />
1 Auto Run the automated test to actuate each<br />
solenoid valve sequentially.<br />
2 Next Manually activate the next solenoid<br />
valve.<br />
3 Prev Manually activate the previous solenoid<br />
valve.<br />
4 Repeat Manually activate the current solenoid<br />
five times.<br />
8 Exit To return to the Diagnostics menu.<br />
Expedite <strong>8900</strong> <strong>Nucleic</strong> <strong>Acid</strong> <strong>Synthesis</strong> System User’s Guide 3-73<br />
3
3<br />
Chapter 3 Software Reference<br />
Trityl This screen displays the value of the output signal from the<br />
monitor for each column.<br />
Fluid Test The Fluid test allows you to assess the performance of the<br />
fluidic system by collecting and measuring the volumetric<br />
output from selected fluidic pathways.<br />
See Section 4.3, Flow and Volume Test, for the procedure to<br />
run this test.<br />
3.6.2 Bottle Change Tool<br />
3-74 PerSeptive <strong>Biosystems</strong><br />
When replenishing reagents, use the Bottle Change Tool to:<br />
• View the reagent resources<br />
• Reset the reagent bottle volume<br />
• Turn off the reservoir blanket gas<br />
1. In the Tools menu, select Bottle.<br />
The screen shown in Figure 3-54 is displayed.<br />
Figure 3-54 Bottle Change Tool—First Screen<br />
The reagents (B-train), the reagent kit size (800, 400, or<br />
150 cycles), and the current volume in each bottle are<br />
displayed on the screen. These reagents must be kept<br />
moisture free, therefore the blanket gas is not<br />
suspended.<br />
2. Change the reagent bottles (see Section 2.4.2, Installing<br />
the Reagents).
Tools Menu<br />
3. Press the appropriate keys to reset the volumes of the<br />
bottles that have been changed or refilled.<br />
NOTE: You may press the same key a second time to<br />
recall the volume the system believes is currently left in<br />
the bottle.<br />
4. Press More to view the next screen, shown in<br />
Figure 3-55.<br />
Figure 3-55 Bottle Change Tool—Second Screen<br />
5. To minimize the release of noxious vapors, the blanket<br />
gas is automatically suspended while the A-train reagents<br />
(Oxidizer, Deblock, Cap A and Cap B) are being installed.<br />
During blanket suspension, the Gas Saver and all alarms<br />
are also disabled. The monomer reservoirs are blanketed<br />
continuously.<br />
6. Change the reagent bottles.<br />
7. Press the appropriate keys to reset the bottles that have<br />
been changed or refilled.<br />
8. Press Exit to return to the Tools menu. Blanketing will be<br />
re-activated.<br />
NOTE: You cannot recall the previous value after you<br />
exit this screen and return to the Tools menu.<br />
Expedite <strong>8900</strong> <strong>Nucleic</strong> <strong>Acid</strong> <strong>Synthesis</strong> System User’s Guide 3-75<br />
3
3<br />
Chapter 3 Software Reference<br />
Key #<br />
Reservoir Name or<br />
Key Function<br />
First Screen Keys<br />
3-76 PerSeptive <strong>Biosystems</strong><br />
The functions that are assigned to soft keys in the bottle tool<br />
screens and the capacity of each reagent reservoir, according<br />
to reagent kit size, are listed in Table 3-29.<br />
Table 3-29 Bottle Change Tool Keys<br />
Reservoir Capacity<br />
Model 8909 # of Cycles Model 8905 # of Cycles<br />
800 400 150 800 400 150<br />
1 Wash 300 mL N/A N/A 450 mL<br />
2 Act 200 mL N/A N/A 60 mL<br />
3 A 20 mL 10 mL N/A N/A 5 mL<br />
4 C 20 mL 10 mL N/A N/A 5 mL<br />
5 G 20 mL 10 mL N/A N/A 5 mL<br />
6 T 20 mL 10 mL N/A N/A 5 mL<br />
7 More—Go to next<br />
screen<br />
N/A<br />
8 Exit to tools manu N/A<br />
Second Screen Keys<br />
1 Dblk 900 mL N/A N/A 180 mL<br />
2 Ox 200 mL N/A N/A 60 mL<br />
3 Caps 200 mL N/A N/A 60 mL<br />
4 Wash A 2000 mL N/A N/A<br />
5 Aux 200 mL N/A N/A N/A
Key #<br />
Third Screen Keys<br />
1 5 Monomer<br />
reservoir<br />
2 6 Monomer<br />
reservoir<br />
3 7 Monomer<br />
reservoir<br />
4 8 Monomer<br />
reservoir<br />
5 9 Monomer<br />
reservoir<br />
Table 3-29 Bottle Change Tool Keys (Continued)<br />
Reservoir Name or<br />
Key Function<br />
Automatic<br />
Deblanket<br />
Reservoir Capacity<br />
20 mL 10 mL N/A N/A<br />
20 mL 10 mL N/A N/A<br />
20 mL 10 mL N/A N/A<br />
20 mL 10 mL N/A N/A<br />
20 mL 10 mL N/A N/A<br />
Tools Menu<br />
Model 8909 # of Cycles Model 8905 # of Cycles<br />
800 400 150 800 400 150<br />
The automatic deblanket turns off the flow of gas blanketing<br />
the reagent bottles when the bottle change tool is used to<br />
replenish the A-train reagents (the screen shown in<br />
Figure 3-55 is displayed). This minimizes the release of<br />
noxious vapors during reagent replenishment.<br />
If desired, you can disable this automatic shutoff by turning off<br />
the Automatic Deblanket option in the User Profile (see<br />
Section 3.6.6, Specifying a User Profile).<br />
Expedite <strong>8900</strong> <strong>Nucleic</strong> <strong>Acid</strong> <strong>Synthesis</strong> System User’s Guide 3-77<br />
3
3<br />
Chapter 3 Software Reference<br />
3.6.3 Display Tool<br />
3-78 PerSeptive <strong>Biosystems</strong><br />
Use the Display Tool to adjust the LCD (Liquid Crystal Display)<br />
contrast setting for different viewing angles. When you select<br />
Display on the Tools menu, the screen shown in Figure 3-56 is<br />
displayed.<br />
Figure 3-56 Changing the Display Contrast<br />
The functions that are assigned to the soft keys are described<br />
in Table 3-30.<br />
Table 3-30 Keys for Changing the Display Contrast<br />
Key # Label Function<br />
1 ↑ Increase the contrast of the display.<br />
2 ↓ Decrease the contrast of the display.<br />
7 cancel To abort any changes to the display<br />
contrast.<br />
8 ok To save the modified contrast setting and<br />
return to the Tools menu.
3.6.4 Log Tool<br />
Tools Menu<br />
Use the Log tool to clear the log file or print the log file on an<br />
optional printer.<br />
The log file contains a chronological history of the activity of<br />
the instrument. The information in a log file includes:<br />
• A record of each synthesis<br />
• The alarms triggered<br />
• Trityl data<br />
• Manual functions activated<br />
A typical log file is shown in Figure 3-57.<br />
************************************************************<br />
************************************************************<br />
Expedite(TM) <strong>Nucleic</strong> <strong>Acid</strong> <strong>Synthesis</strong> System<br />
************************************************************<br />
************************************************************<br />
-( 7) 1 05/04/93, 03:09:44 PM -> Sequence Selected<br />
Instrument Name: ''<br />
Chemistry Type: 'DNA'<br />
Sequence Name: 'NESSI 10'<br />
Sequence: (3'-5')<br />
'TCC-ATT-GGC-CAA'<br />
Protocol: 'DNA .05umole'<br />
Operator: ''<br />
Remove DMT: 'No'<br />
Universal Support: 'No'<br />
-( 4) N 05/04/93, 03:09:52 PM -> Instrument Started<br />
-( 7) 2 05/04/93, 03:11:04 PM -> Sequence Selected<br />
Instrument Name: ''<br />
Chemistry Type: 'DNA'<br />
Sequence Name: 'Sequenc2'<br />
Sequence: (3'-5')<br />
'AAA-A'<br />
Protocol: 'DNA .05umole'<br />
Operator: ''<br />
Remove DMT: 'Yes'<br />
Universal Support: 'No'<br />
-( 10) N 05/04/93, 03:11:06 PM -> Low Pressure Gas Error<br />
Col: '1', Mer: '2', Step: '11', Func: '3'<br />
Col: '2', Mer: '2', Step: '1', Func: '1'<br />
-( 11) N 05/04/93, 03:11:06 PM -> High Pressure Gas Error<br />
Col: '1', Mer: '2', Step: '11', Func: '3'<br />
Col: '2', Mer: '2', Step: '1', Func: '1'<br />
-( 10) N 05/04/93, 03:11:31 PM -> Low Pressure Gas Error<br />
Col: '1', Mer: '2', Step: '11', Func: '3'<br />
Col: '2', Mer: '2', Step: '3', Func: '17'<br />
-( 11) N 05/04/93, 03:11:31 PM -> High Pressure Gas Error<br />
Col: '1', Mer: '2', Step: '11', Func: '3'<br />
Figure 3-57 Expedite History Log<br />
Expedite <strong>8900</strong> <strong>Nucleic</strong> <strong>Acid</strong> <strong>Synthesis</strong> System User’s Guide 3-79<br />
3
3<br />
Chapter 3 Software Reference<br />
3-80 PerSeptive <strong>Biosystems</strong><br />
When you select Log from the Tools menu, the screen shown<br />
in Figure 3-58 is displayed.<br />
Figure 3-58 The Log Tool<br />
The functions that are assigned to the soft keys are described<br />
in Table 3-31.<br />
Table 3-31 Log Tool Keys<br />
Key # Name Function<br />
1 Clear To clear the current system log<br />
file on the disk.<br />
2 Print To print out a hard copy of the<br />
current log. A typical log is shown<br />
in Figure 3-57.<br />
8 Exit To return to the Tools menu.<br />
NOTE: Use caution when clearing the log. You may remove<br />
vital information used to diagnose and service the<br />
instrument.
3.6.5 Configuration Tool<br />
Tools Menu<br />
The Configuration tool is used to set various system<br />
parameters. When you select Configure from the Tools menu,<br />
the screen shown in Figure 3-59 is displayed.<br />
Figure 3-59 Configuration Tool<br />
The functions assigned to the soft keys are described in<br />
Table 3-32.<br />
Table 3-32 Configuration Tool Keys<br />
Key # Name Function<br />
1 Time To set the instrument clock.<br />
2 Host To define the address of the instrument for<br />
communicating with an Expedite workstation.<br />
3 Profil To define user specific default parameters.<br />
See Section 3.6.6, Specifying a User Profile<br />
for details.<br />
4 Ver To display the current system software<br />
version.<br />
5 Name To enable you to specify a unique name for<br />
the instrument.<br />
6 Print To print the instrument configuration report.<br />
8 Exit To return to the Tools menu.<br />
Expedite <strong>8900</strong> <strong>Nucleic</strong> <strong>Acid</strong> <strong>Synthesis</strong> System User’s Guide 3-81<br />
3
3<br />
Chapter 3 Software Reference<br />
Setting the Clock When you select Time in the Configuration menu, the screen<br />
shown in Figure 3-60 is displayed.<br />
3-82 PerSeptive <strong>Biosystems</strong><br />
Figure 3-60 Setting the Instrument Clock<br />
The functions described in Table 3-33 are assigned to the soft<br />
keys to enable you to reset the instrument’s time clock.<br />
Table 3-33 Keys for Setting the Time Clock<br />
Key # Name Function<br />
1 Month To increment the month by one.<br />
2 Day To increment the day by one.<br />
3 Year To increment the year by one.<br />
4 Hour To increment the hour by one.<br />
5 10min To increment the minutes by ten.<br />
6 Min To increment the minutes by one.<br />
7 cancel To return to the Tools Configuration menu<br />
without saving changes to the time clock.<br />
8 ok To save changes to the time clock and<br />
return to the Tools Configuration menu.<br />
NOTE: If the instrument is connected to an Expedite<br />
Workstation, the instrument clock is automatically<br />
synchronized with the computer clock.
Setting Host<br />
Parameters<br />
Tools Menu<br />
Use the Host option to set the instrument address and display<br />
the mode of operation between the instrument and the<br />
Expedite Workstation. Instruments connected to an Expedite<br />
Workstation must have a unique address between 1 and 32.<br />
Instruments not connected to an Expedite Workstation have<br />
an address of 0, and the mode of operation is autonomous.<br />
When you select Host on the Configuration menu, the screen<br />
shown in Figure 3-61 is displayed. To set the instrument<br />
address press the key below the address. Each time you<br />
press the key, the address is incremented by one.<br />
Figure 3-61 Setting Host Parameters<br />
The mode of access is specified on the workstation. It cannot<br />
be changed on the instrument. The modes are:<br />
• Autonomous—Instrument is not connected to the<br />
workstation software (stand alone operation)<br />
• Remote—Instrument is controlled primarily from the<br />
workstation. You must start the instrument from the<br />
instrument keypad. You must prime the system, run<br />
diagnostics and select the type of chemistry from the<br />
instrument keypad.<br />
• Local—Instrument is controlled from the instrument<br />
keypad or the workstation. You can edit sequences<br />
and control the instrument from either the instrument<br />
or the workstation. You may start the instrument from<br />
either the instrument keypad or the workstation. As<br />
with Remote mode, you must prime the system, run<br />
diagnostics and select the type of chemistry from the<br />
instrument keypad.<br />
Expedite <strong>8900</strong> <strong>Nucleic</strong> <strong>Acid</strong> <strong>Synthesis</strong> System User’s Guide 3-83<br />
3
3<br />
Chapter 3 Software Reference<br />
Modes of<br />
Operation<br />
3-84 PerSeptive <strong>Biosystems</strong><br />
The host is also specified on the workstation. It cannot be<br />
changed on the instrument. The host may be a<br />
PC workstation.<br />
The capabilities of the modes of operation of the Expedite<br />
instrument and the workstation are described in Table 3-34.<br />
Table 3-34 Modes of Operation<br />
Feature Location<br />
Edit<br />
sequence<br />
Start<br />
instrument<br />
Stop<br />
instrument<br />
Run<br />
sequence<br />
Run<br />
diagnostics<br />
Mode<br />
Autonomous Remote Local<br />
Instrument Yes No Yes<br />
Workstation N/A Yes Yes<br />
Instrument Yes Yes Yes<br />
Workstation N/A No Yes<br />
Instrument Yes Yes Yes<br />
Workstation N/A Yes Yes<br />
Instrument Yes No Yes<br />
Workstation N/A Yes Yes<br />
Instrument Yes Yes Yes<br />
Workstation N/A No No<br />
Prime Instrument Yes Yes Yes<br />
Monitor<br />
status<br />
Set<br />
configuration<br />
Workstation N/A No No<br />
Instrument Yes Yes Yes<br />
Workstation N/A Yes Yes<br />
Instrument Yes No Yes<br />
Workstation N/A Yes Yes
System<br />
Information<br />
Naming the<br />
Instrument<br />
Tools Menu<br />
Use the Ver option to display information about the current<br />
version of the system. When you select Ver, the screen shown<br />
in Figure 3-62 is displayed.<br />
Figure 3-62 System Information Display<br />
The following information is listed:<br />
• Firmware version, date, and time<br />
• Software version, date, and time<br />
The only function assigned to the soft keys is Exit.<br />
The Name option allows you to specify a name for the<br />
instrument.<br />
NOTE: User-generated instrument names are displayed in<br />
upper and lower case and may contain up to eleven<br />
characters.<br />
When you select Name in the Tools Configuration menu, the<br />
screen shown in Figure 3-63 is displayed.<br />
Figure 3-63 Naming the Instrument<br />
Expedite <strong>8900</strong> <strong>Nucleic</strong> <strong>Acid</strong> <strong>Synthesis</strong> System User’s Guide 3-85<br />
3
3<br />
Chapter 3 Software Reference<br />
3-86 PerSeptive <strong>Biosystems</strong><br />
The functions that are assigned to the soft keys to enable you<br />
to name the instrument are described in Table 3-11.<br />
Table 3-35 Instrument Naming Keys<br />
Key # Label Function<br />
1 ↑ Increments (A to Z followed by 0 to<br />
9 and space) the value of the<br />
character at the cursor.<br />
2 ↓ Decrements (9 to 0 followed by<br />
Z to A) the value of the character at<br />
the cursor.<br />
3 ← Moves the cursor one position to<br />
the left.<br />
4 → Moves the cursor one position to<br />
the right.<br />
5 Case Toggles the current character<br />
between upper and lower case.<br />
6 Clear Erases the entire instrument name.<br />
7 Cancel Returns you to the previous screen<br />
without saving the new name.<br />
8 OK Saves the new name and returns<br />
you to the previous screen.
Instrument<br />
Configuration<br />
Report<br />
Tools Menu<br />
The Instrument Configuration lists various instrument<br />
parameters. Select Print on the Tools Configuration menu to<br />
print out the environment report. The following information is<br />
included in the report:<br />
• Instrument status<br />
• System version information<br />
• Current system resources<br />
• Protocols on the instrument<br />
• Current user profile<br />
• Sequences associated with current user profile<br />
3.6.6 Specifying a User Profile<br />
The instrument software allows you to set up eight user<br />
profiles that contain user preferences and sequences. Use the<br />
User Profile facility to specify default running parameters and<br />
protocols that will be in effect for every synthesis that is run<br />
when that Profile is selected.<br />
When you select Profile, the screen shown in Figure 3-64 is<br />
displayed.<br />
Figure 3-64 User Profile Options<br />
Expedite <strong>8900</strong> <strong>Nucleic</strong> <strong>Acid</strong> <strong>Synthesis</strong> System User’s Guide 3-87<br />
3
3<br />
Chapter 3 Software Reference<br />
Selecting a User<br />
Profile<br />
3-88 PerSeptive <strong>Biosystems</strong><br />
The functions that are assigned to the soft keys in this screen<br />
are described in Table 3-36.<br />
Table 3-36 User Profile Menu<br />
Key # Name Function<br />
1 Read To select a user profile from the disk.<br />
2 Edit To modify the currently selected profile.<br />
3 Def To reset the parameters in the current<br />
profile to the factory defaults.<br />
8 Exit To return to the Configuration menu.<br />
When you select Read from the User Profile menu, the screen<br />
shown in Figure 3-65 is displayed.<br />
Figure 3-65 Selecting a User Profile<br />
NOTE: The asterisk (*) beside Profile 1 indicates that it is<br />
the profile currently in use.<br />
Press the appropriate key to select the desired profile.
Editing the User<br />
Profile<br />
Tools Menu<br />
Use the Edit option to change the parameters in the currently<br />
selected User Profile. When you select Edit, the screen shown<br />
in Figure 3-66 is displayed. The functions that are assigned to<br />
the soft keys in profile editing are described in Table 3-37.<br />
Table 3-37 Editing the User Profile<br />
Key # Name Function<br />
First Screen Keys<br />
Figure 3-66 User Profile—First Screen<br />
1 High Pres. To enable or disable the High Pressure alarm (see Section 4.2,<br />
Gas Leak Diagnostics). The default is enabled (On).<br />
3 Low Pres. To enable or disable the Low Pressure alarm (see Section 4.2,<br />
Gas Leak Diagnostics). The default is enabled (On).<br />
5 Valve Fail To enable or disable the Valve Failure alarm. The default is<br />
enabled.<br />
7 More To provide access to additional options in the User Profile<br />
(see Figure 3-67).<br />
8 Exit<br />
(All Screens)<br />
To leave the user profile facility.<br />
When you select Exit you are given the following options:<br />
• no—Exit without saving the changes to the user profile<br />
• cancel—Continue editing the user profile<br />
• ok—Save the new profile and return to the Configuration<br />
menu<br />
Expedite <strong>8900</strong> <strong>Nucleic</strong> <strong>Acid</strong> <strong>Synthesis</strong> System User’s Guide 3-89<br />
3
3<br />
Chapter 3 Software Reference<br />
Second Screen<br />
Keys<br />
3-90 PerSeptive <strong>Biosystems</strong><br />
Figure 3-67 User Profile—Second Screen<br />
1 Gas Saver To enable or disable the automatic gas saver. The gas saver<br />
performs a leak test when the instrument is turned on and<br />
periodically repeats the test during operation (see “Gas Saver”<br />
on page 3-70). The default is enabled.<br />
3 Startup<br />
Leaktest<br />
Table 3-37 Editing the User Profile (Continued)<br />
Key # Name Function<br />
To enable or disable the automatic leak test when a synthesis is<br />
started (see “Startup Leak Test” on page 4-10). The default is<br />
enabled.<br />
5 Trityl Col1 To enable or disable the Trityl Fail Sensor on column 1. The<br />
default is enabled.<br />
6 Trityl Col2 To enable or disable the Trityl Fail Sensor on column 2. The<br />
default is enabled.<br />
7 More To provide access to additional options in the User Profile<br />
(see Figure 3-68).
Third Screen Keys<br />
1 Default<br />
Protocol<br />
4 Default<br />
Chemistry<br />
Table 3-37 Editing the User Profile (Continued)<br />
Key # Name Function<br />
Figure 3-68 User Profile Third Screen<br />
Tools Menu<br />
To select the default protocol. The available options are based<br />
on the selected chemistry. The following protocols are available<br />
for DNA chemistry:<br />
• 0.05 μmol (default)<br />
• 0.2 μmol<br />
• 1 μmol<br />
• 15 μmol<br />
• Use last—the last protocol that was run on the instrument<br />
NOTE: The Protocol can still be changed at run-time.<br />
To select the default chemistry. The following are currently<br />
available:<br />
• DNA (Default)<br />
• RNA (DNA/RNA hybrids)<br />
• THIOATE—Phosphorothioated DNA<br />
• USER—User defined<br />
Expedite <strong>8900</strong> <strong>Nucleic</strong> <strong>Acid</strong> <strong>Synthesis</strong> System User’s Guide 3-91<br />
3
3<br />
Chapter 3 Software Reference<br />
6 Chemical<br />
Kit Size<br />
3-92 PerSeptive <strong>Biosystems</strong><br />
To specify the size of the chemical kit. The following are<br />
available:<br />
• 150 Cycle—Model 8905<br />
• 400 Cycle—Model 8909<br />
• 800 Cycle—Model 8909<br />
NOTE: The 400 cycle kit allows you to use 0.5 gram quantities of<br />
monomers. The ancillary reagent volumes are the same as the<br />
800 cycle kit (see Table 3-29).<br />
7 More To provide access to additional options in the User Profile<br />
(see Figure 3-69).<br />
Fourth Screen<br />
Keys<br />
1 Remove<br />
DMT<br />
3 Auto<br />
Restart<br />
5 Reverse<br />
Video<br />
Table 3-37 Editing the User Profile (Continued)<br />
Key # Name Function<br />
Figure 3-69 User Profile—Fourth Screen<br />
To specify the default disposition of the 5' DMT. The options<br />
are:<br />
• Remove the final DMT group from the oligomer<br />
• Leave the final DMT group on the oligomer (default)<br />
NOTE: This can also be changed when you start a synthesis.<br />
To specify if the synthesis is to be automatically restarted after<br />
a power failure. The default is no.<br />
Toggles the display between reverse video and normal display.<br />
The default is normal display.
7 More To provide access to additional options in the User Profile<br />
(see Figure 3-70).<br />
Fifth Screen Keys<br />
1 Sequence<br />
Grouping<br />
3 Sequence<br />
Display<br />
5 Universal<br />
Support<br />
Table 3-37 Editing the User Profile (Continued)<br />
Key # Name Function<br />
Figure 3-70 User Profile—Fifth Screen<br />
Tools Menu<br />
To specify the number of nucleotides that are grouped together<br />
in the sequence editor. Each time you press this key the<br />
number of nucleotides to be grouped together is increased by<br />
one. The range is 0 to 10. The default value is 3.<br />
To specify the way the sequence is displayed in the sequence<br />
editor. The display toggles between:<br />
• 3'-5' direction<br />
• 5'-3' direction (Default)<br />
Select No to specify that the support has the first base<br />
attached.<br />
Select Yes to specify that the 3' base is coupled to the support<br />
on the instrument. The default is No.<br />
7 More To provide access to additional options in the User Profile<br />
(see Figure 3-71).<br />
Expedite <strong>8900</strong> <strong>Nucleic</strong> <strong>Acid</strong> <strong>Synthesis</strong> System User’s Guide 3-93<br />
3
3<br />
Chapter 3 Software Reference<br />
Sixth Screen Keys<br />
3-94 PerSeptive <strong>Biosystems</strong><br />
Figure 3-71 User Profile—Fifth Screen<br />
1 UPS Action To set parameters for the uninterruptible power supply option.<br />
Select UPS Action to specify the action to be taken if there is a<br />
power failure. The following options are available:<br />
• Yes—stop the synthesis at the end of the cycle (Default)<br />
• No—continue with the synthesis<br />
3 Auto<br />
Deblanket<br />
Name<br />
Profile<br />
Table 3-37 Editing the User Profile (Continued)<br />
Key # Name Function<br />
To enable or disable the automatic shut off of the blanket gas<br />
when the Bottle Change Tool for the A-train reagents is<br />
displayed. The default is enabled.<br />
Allows you to specify a unique name for the current profile. The<br />
procedure for specifying a profile name is the same as that for<br />
specifying an instrument (see “Naming the Instrument” on<br />
page 3-85) or sequence name. User generated instrument<br />
names are displayed in upper and lower case and may contain<br />
up to eleven characters.<br />
7 More To provide access to additional options in the User Profile<br />
(see Figure 3-66).
Naming the User<br />
Profile<br />
Resetting to the<br />
Factory Defaults<br />
Tools Menu<br />
Use the Name Profile option (located on sixth profile screen)<br />
to assign a name to a User Profile.<br />
The procedure for specifying a profile name is the same as<br />
that for specifying an instrument (see “Naming the<br />
Instrument” on page 3-85) or sequence name. User<br />
generated instrument names are displayed in upper and lower<br />
case and may contain up to eleven characters.<br />
Use the Default option to reset the parameters in the current<br />
User Profile to the factory default values specified. When you<br />
select this option, the screen shown in Figure 3-72 is<br />
displayed and you are requested to confirm your selection.<br />
Figure 3-72 Confirming the Reset to Factory Defaults<br />
At this time you may:<br />
• Press ok to save the profile with the factory defaults.<br />
• Press cancel to exit without saving the changes to the<br />
user profile.<br />
3.6.7 Changing the Chemistry<br />
The default chemistry on the Expedite <strong>Nucleic</strong> <strong>Acid</strong> <strong>Synthesis</strong><br />
System is the β-cyanoethyl DNA Phosphoramidite method.<br />
This chemistry is specified in the default User Profile. If you<br />
wish to perform a synthesis using either the Thioate or RNA<br />
synthesis methods, perform the following steps to select and<br />
modify the user profile:<br />
1. In the Main menu, select Tools.<br />
2. In the Tools menu, select Config.<br />
Expedite <strong>8900</strong> <strong>Nucleic</strong> <strong>Acid</strong> <strong>Synthesis</strong> System User’s Guide 3-95<br />
3
3<br />
Chapter 3 Software Reference<br />
3-96 PerSeptive <strong>Biosystems</strong><br />
3. In the Configuration menu, select Profil.<br />
4. In the Profile menu select Edit.<br />
The first User Profile screen is displayed.<br />
5. Select More.<br />
The screen shown in Figure 3-73 is displayed.<br />
Figure 3-73 Chemistry Selection Screen<br />
6. Press the soft key under the Default Chemistry option to<br />
cycle through the available options which are:<br />
• DNA<br />
• RNA<br />
• THIOATE<br />
• USER<br />
7. Select the desired chemistry then press Exit followed by<br />
ok to save the new profile.<br />
8. Press Exit repeatedly until the Main menu is displayed.<br />
The selected profile is the current profile. The<br />
parameters specified in this profile will be in effect for<br />
every synthesis that is run until a new profile is<br />
selected.
4 Maintenance and<br />
Troubleshooting<br />
Chapter<br />
4<br />
This chapter contains the following sections:<br />
4.1 Routine Maintenance ....................................4-2<br />
4.2 Gas Leak Diagnostics ...................................4-9<br />
4.3 Flow and Volume Test .................................4-12<br />
4.4 Troubleshooting ...........................................4-17<br />
4.5 Error Messages ...........................................4-23<br />
Expedite <strong>8900</strong> <strong>Nucleic</strong> <strong>Acid</strong> <strong>Synthesis</strong> System User’s Guide 4-1
4<br />
Chapter 4 Maintenance and Troubleshooting<br />
4.1 Routine Maintenance<br />
Change of<br />
Chemistry<br />
4-2 PerSeptive <strong>Biosystems</strong><br />
Proper attention to maintenance will result in increased<br />
instrument life and performance. Regular maintenance will<br />
help the Expedite <strong>Nucleic</strong> <strong>Acid</strong> <strong>Synthesis</strong> System to continue<br />
to run in top condition.<br />
The procedures listed in Table 4-1 should be performed when<br />
indicated.<br />
Table 4-1 Routine Maintenance<br />
Event Procedure<br />
Short Term<br />
Shutdown<br />
(less than 2 weeks)<br />
Long Term<br />
Shutdown<br />
(more than 2<br />
weeks)<br />
Gas Pressure<br />
4.1.1 Filter and O-ring Maintenance<br />
Routine Maintenance<br />
Filters and O-rings must be inspected regularly and replaced<br />
when necessary.<br />
End-line Filters Polyethylene filters are located in the reagent reservoirs at the<br />
end of each fluid line. Inspect these end line filters regularly<br />
and replace them every six months or when system<br />
performance is diminished (product yield is low, trityls drop off<br />
quickly).<br />
NOTE: If you suspect that your amidites contain moisture,<br />
replace the filters before you install new amidites on the<br />
system.<br />
O-rings O-rings are located in the caps of the ancillary reagent and<br />
amidite reservoirs. Inspect these O-rings regularly and replace<br />
them every six months or when necessary.<br />
To insert an O-ring:<br />
1. Remove the old O-ring by prying it from the groove in<br />
the cap.<br />
Hint: Use a dull probe or a paper clip to remove<br />
the O-ring.<br />
2. Discard the old O-ring.<br />
3. Slip the new O-ring over the dip tube.<br />
4. Insert the new O-ring completely into the groove of the<br />
cap. This can be facilitated by coating the O-ring with a<br />
very thin coating of silicon grease.<br />
Expedite <strong>8900</strong> <strong>Nucleic</strong> <strong>Acid</strong> <strong>Synthesis</strong> System User’s Guide 4-3<br />
4
4<br />
Chapter 4 Maintenance and Troubleshooting<br />
4.1.2 Checking the Fuses<br />
4-4 PerSeptive <strong>Biosystems</strong><br />
The fuses are located in the power entry module on the lower<br />
right portion of the rear panel (see Figure 4-1).<br />
Pry Open<br />
90-260 VAG 47-63Hz<br />
FUSE 3AG 250V 1A SLOW<br />
100VA MAX<br />
WARNING<br />
FOR CONTINUED PROTECTION<br />
AGAINST RISK OF FIRE, REPLACE<br />
ONLY WITH FUSE OF SPECIFIED<br />
TYPE AND CURRENT RATING.<br />
AC<br />
INLET<br />
Figure 4-1 Location of the Power Entry Module<br />
To remove the fuse carrier:<br />
1. Remove the power cord from the instrument.<br />
2. Pry the power entry module cover open and slide the two<br />
fuse carriers out of the instrument (see Figure 4-2).
90-260 VAG 47-63Hz<br />
FUSE 3AG 250V 1A SLOW<br />
100VA MAX<br />
WARNING<br />
FOR CONTINUED PROTECTION<br />
AGAINST RISK OF FIRE, REPLACE<br />
ONLY WITH FUSE OF SPECIFIED<br />
TYPE AND CURRENT RATING.<br />
AC<br />
INLET<br />
Figure 4-2 Checking the Fuses<br />
Routine Maintenance<br />
3. Check that the proper fuses are installed. The two fuses<br />
are 2A (5 x 20 mm).<br />
NOTE: No voltage selection is required. The Expedite<br />
<strong>Nucleic</strong> <strong>Acid</strong> <strong>Synthesis</strong> System is equipped with a<br />
universal power supply that can be used for<br />
100–240 VAC, 47–63 HZ operation. The use of a surge<br />
suppressor between the instrument and the electrical<br />
outlet is recommended.<br />
Expedite <strong>8900</strong> <strong>Nucleic</strong> <strong>Acid</strong> <strong>Synthesis</strong> System User’s Guide 4-5<br />
4
4<br />
Chapter 4 Maintenance and Troubleshooting<br />
4.1.3 Waste Disposal<br />
!<br />
4-6 PerSeptive <strong>Biosystems</strong><br />
WARNING<br />
Most of the reagents and solvents used in nucleic acid<br />
synthesis are hazardous. Wear a lab coat, gloves and eye<br />
protection when handling reagents.<br />
The waste generated by nucleic acid synthesis is very<br />
flammable. Adequate ventilation is essential. Working<br />
under a fume hood is recommended.<br />
AVERTISSEMENT<br />
La plupart des réactifs et des solvants employés en<br />
synthèse d'acides nucléiques sont dangereux. Portez une<br />
blouse, des gants et des lunettes de protection lorsque<br />
vous les manipulez.<br />
Les rejets produits par la synthèse d'acides nucléiques sont<br />
extrêmement inflammables. Une ventilation adéquate est<br />
indispensable. Il est recommandé de travailler sous une<br />
hotte.<br />
<strong>Nucleic</strong> acid synthesis waste contains chlorinated and very<br />
flammable organic solvents and acids.<br />
Les rejets provenant de la synthèse d'acides nucléiques<br />
contiennent des acides et des solvants organiques chlorés qui<br />
sont trés inflammables.<br />
The Expedite system includes two waste bottles:<br />
• 1 L bottle (TRT1 and TRT2 waste lines)—Chlorinated<br />
waste<br />
• 4 L bottle (ORG1 and ORG2 waste lines)—Organic<br />
waste
Routine Maintenance<br />
Keep waste bottles in the spill tray provided with the system.<br />
Dispose of all waste frequently and in accordance with federal,<br />
state and local regulations.<br />
Organic Waste The non-chlorinated waste (ACN, THF, and dissolved<br />
amidites) is contained in the 4 L waste bottle. Waste lines are<br />
labeled ORG1 and ORG2. Keep the flammable organic waste<br />
away from flame or sparks. Empty the organic waste after<br />
each synthesis to eliminate the danger of a reservoir overflow.<br />
Les rejets non chlorés (ACN, THF et amidites en solution), qui<br />
sont extrêmement inflammables sont contenus dans un flacon<br />
de 4 l. Ces rejets doivent être tenus à l'écart de toute flamme<br />
ou étincelle. Videz ce récipient aprés chaque synthèse pour<br />
éviter le risque de voir le réservoir déborder.<br />
Chlorinated<br />
Waste<br />
The chlorinated waste (DCM, TCA, hazardous organic<br />
solvents and organic acids) is contained in the 1 L waste<br />
bottle. Waste lines are labeled TRT1 and TRT2. Chlorinated<br />
waste can burn skin and eyes when concentrated. Dispose of<br />
chlorinated waste in accordance with federal, state and local<br />
regulations.<br />
Les rejets chlorés contiennent des solvants organiques<br />
dangereux et des acides (DCM et TCA) susceptibles de<br />
provoquer des brûlures de la peau et des yeux quand ils sont<br />
concentrés. Les déchets chlorés doivent être détruits<br />
conformément aux directives en vigueur dans ce domaine.<br />
4.1.4 Gas Cylinder Replacement<br />
Use a dry helium gas supply for best performance. Dry helium<br />
is less soluble in the reagents and ensures a longer life for the<br />
chemicals, especially the monomers.<br />
NOTE: If helium is not available, you can use argon or<br />
nitrogen (high purity, 99.995%). However, bubbles<br />
introduced by these gases may cause trityl failures.<br />
Expedite <strong>8900</strong> <strong>Nucleic</strong> <strong>Acid</strong> <strong>Synthesis</strong> System User’s Guide 4-7<br />
4
4<br />
Chapter 4 Maintenance and Troubleshooting<br />
4-8 PerSeptive <strong>Biosystems</strong><br />
To replace the cylinder:<br />
1. Decrease the gas pressure on the 2-stage cylinder<br />
regulator to zero (0).<br />
2. Turn the gas off at the cylinder.<br />
3. Disconnect the gas supply line from the rear of the<br />
instrument cabinet by pressing the quick release tab (see<br />
Figure 4-3).<br />
Gas Hookup<br />
INLET PRESSURE<br />
25 PSI MAX<br />
(1.7 kg/cm 2 )<br />
Figure 4-3 Rear of Instrument Cabinet<br />
4. Remove the regulator from the cylinder.<br />
5. Install the regulator on the new cylinder.<br />
AC<br />
90-260 VAG 47-63Hz<br />
INLET<br />
FUSE 3 AG 250V 1A SLOW<br />
100VA MAX<br />
WARNING<br />
FOR CONTINUED PROTECTION<br />
AGAINST RISK OF FIRE, REPLACE<br />
ONLY WITH FUSE OF SPECIFIED<br />
TYPE AND CURRENT RATING.<br />
6. Reconnect the gas line to the reagent instrument cabinet<br />
and increase the gas pressure slowly to 20 psi.<br />
CAUTION<br />
Increasing the pressure too quickly may damage the<br />
internal gas pressure system.
4.2 Gas Leak Diagnostics<br />
High Pressure<br />
Sensor<br />
Low Pressure<br />
Sensor<br />
Gas Leak Diagnostics<br />
The Expedite system has high and low gas pressure sensors.<br />
These sensors are activated by default. However, you may<br />
turn them off by editing the User Profile (see Section 3.6.6,<br />
Specifying a User Profile).<br />
The high pressure sensor continuously monitors the input gas<br />
pressure. If the gas pressure sensor is activated and the<br />
pressure falls below a specified level (10 psi), the “High<br />
pressure system failure” message (see Figure 4-4) appears.<br />
Figure 4-4 Gas Supply Failure<br />
You must respond to the warning before further operation is<br />
allowed. If you fail to acknowledge the warning by pressing the<br />
ok key, the synthesis is halted at the first “safe point.” The<br />
failure is also recorded in the Instrument History Log.<br />
The low pressure sensor measures the severity of gas leaks<br />
when the instrument is active or idle. These leaks are typically<br />
caused by removing bottles or attaching bottles to caps with a<br />
defective O-ring. If the gas pressure sensor has been<br />
activated in the User Profile (see Section 3.6.6, Specifying a<br />
User Profile), the low pressure switch is activated when the<br />
pressure drops below 4.0 psi. If the low pressure switch is<br />
activated during a synthesis, the “Low pressure system failure”<br />
message is displayed. If the low pressure switch is activated<br />
when the instrument is idle, the “Gas saver low pressure leak<br />
failure” message shown in Figure 4-5 is displayed.<br />
Expedite <strong>8900</strong> <strong>Nucleic</strong> <strong>Acid</strong> <strong>Synthesis</strong> System User’s Guide 4-9<br />
4
4<br />
Chapter 4 Maintenance and Troubleshooting<br />
Gas Leak<br />
Detection<br />
4-10 PerSeptive <strong>Biosystems</strong><br />
Figure 4-5 Low Pressure Failure—Instrument Idle<br />
You must respond to the warning before further operation is<br />
allowed. If you fail to acknowledge the warning by pressing the<br />
ok key, the synthesis is halted at the first “safe point.” The<br />
failure is also recorded in the Instrument History Log.<br />
The Diagnostics menu contains tools for the diagnosis and<br />
isolation of leaks. The Diagnostics tools include routines for<br />
independent leak testing of the High and Low pressure<br />
systems (see Section 3.6.1, Diagnostic Routines).<br />
Startup Leak Test The Startup Leak Test automatically runs a shortened version<br />
of the gas leak diagnostic test when you press Start to begin a<br />
synthesis. If the test fails, a warning is issued and the<br />
instrument is halted at the end of the next cycle. The Startup<br />
Leak Test may also be enabled or disabled by editing the User<br />
Profile (see Section 3.6.6, Specifying a User Profile).<br />
Gas Leak<br />
Isolation<br />
Gas leak warnings must be acknowledged and the leak<br />
located and repaired before you continue with a synthesis.<br />
Table 4-2 contains some suggestions that you should try<br />
before contacting PerSeptive <strong>Biosystems</strong> Technical Support or<br />
your PerSeptive <strong>Biosystems</strong> Service Representative.
Table 4-2 Gas Leak Isolation Tests<br />
Alarm Possible Cause Solution<br />
High<br />
Pressure<br />
Failure<br />
High<br />
Pressure<br />
and<br />
Low<br />
Pressure<br />
Failure<br />
Low<br />
Pressure<br />
Failure<br />
Gas Leak Diagnostics<br />
Gas tank empty Check tank regulator gauge.<br />
Replace the tank if necessary.<br />
Large leak at the inlet<br />
connections<br />
Defective high pressure<br />
isolation valve<br />
Missing reagent bottle or loose<br />
cap<br />
1. Check the tank regulator<br />
connections.<br />
2. Check the quick connect at the<br />
rear of the instrument.<br />
Call your PerSeptive <strong>Biosystems</strong><br />
Service Representative.<br />
Check all the bottles to make sure<br />
the connections are finger tight.<br />
Do not overtighten the bottles<br />
because this deforms the O-rings<br />
and may cause gas leakage.<br />
Missing O-ring Place the appropriately sized<br />
O-ring in the bottle cap assembly.<br />
Low pressure gauge pressure<br />
regulator adjusted incorrectly<br />
Defective low pressure isolation<br />
valve<br />
Defective connection between<br />
pneumatics and fluidics<br />
Leak in internal pneumatic<br />
tubing<br />
Call your PerSeptive <strong>Biosystems</strong><br />
Service Representative.<br />
Call your PerSeptive <strong>Biosystems</strong><br />
Service Representative.<br />
Call your PerSeptive <strong>Biosystems</strong><br />
Service Representative.<br />
Call your PerSeptive <strong>Biosystems</strong><br />
Service Representative.<br />
Expedite <strong>8900</strong> <strong>Nucleic</strong> <strong>Acid</strong> <strong>Synthesis</strong> System User’s Guide 4-11<br />
4
4<br />
Chapter 4 Maintenance and Troubleshooting<br />
4.3 Flow and Volume Test<br />
Overview The Flow and Volume test checks the fluidic pathways:<br />
• Volume test—Pulses the selected reagent injector<br />
approximately 125 times and measures the volume<br />
delivered.<br />
4-12 PerSeptive <strong>Biosystems</strong><br />
• Flow test—Opens inlet and outlet solenoids for<br />
approximately 10 seconds and allows blanket<br />
pressure (6 psi) to force fluid through the selected<br />
column fluidic path.<br />
When to perform Perform the Flow and Volume test if you are having<br />
performance problems such as trityl failures, low trityl intensity,<br />
or poor oligonucleotide quality.<br />
The Flow and Volume test can help you determine if<br />
decreased performance is due to mechanical problems.<br />
Equipment<br />
required<br />
Preparing the<br />
system<br />
To perform the Flow and Volume test, you need:<br />
• 10 ml graduated cylinder<br />
• Column unions<br />
• Gloves, safety glasses, and lab coat<br />
• 500 ml actetonitrile<br />
NOTE: If you do not have acetonitrile available, you can<br />
perform the Flow and Volume test with synthesis reagents.<br />
However, approximately 20 ml of each reagent is consumed<br />
during the test.<br />
To prepare the system for the Flow and Volume test:<br />
1. Remove the synthesis reagents from the system and<br />
replace with approximately 20 ml of acetonitrile in each<br />
reservoir.<br />
2. Replace columns with unions.<br />
3. Unscrew the four waste lines from the waste caps and<br />
place Pall lines in the 10 ml graduated cylinder.
Results<br />
worksheet<br />
Flow and Volume Test<br />
Make a copy of the worksheet below and use it to record the<br />
results of the Flow and Volume test.<br />
Table 4-3 Result Worksheet for Flow and Volume Test<br />
NOTE: Make a copy of this worksheet and record results on the copy.<br />
Reservoir<br />
Wash A<br />
Wash B<br />
Cap A<br />
Cap B<br />
Auxiliary<br />
Oxidizer<br />
Deblock<br />
Wash<br />
Activator<br />
Monomer 9<br />
Monomer 8<br />
Monomer 7<br />
Monomer 6<br />
Monomer 5<br />
Monomer T<br />
Monomer G<br />
Monomer C<br />
Monomer A<br />
Volume Test (ml) Flow Test (ml)<br />
Col1 Col2 Col1 Col2<br />
Expedite <strong>8900</strong> <strong>Nucleic</strong> <strong>Acid</strong> <strong>Synthesis</strong> System User’s Guide 4-13<br />
4
4<br />
Chapter 4 Maintenance and Troubleshooting<br />
Performing Flow<br />
and Volume test<br />
on Column 1<br />
4-14 PerSeptive <strong>Biosystems</strong><br />
To perform the Flow and Volume test:<br />
WARNING<br />
Wear gloves, safety glasses, and lab coat when you<br />
perform the Flow and Volume test. DBLK (Deblock solution<br />
containing trichloroacetic acid [TCA]) is delivered to the<br />
waste lines during this test. TCA is highly caustic.<br />
AVERTISSEMENT<br />
Portez des gants, des lunettes de protection, et une blouse<br />
de laboratoire, quand vous effectuez le test de Flux et<br />
Volume. Le DBLK (Solution de déblocage contenant de<br />
l’acide trichloracétique [TCA]) est distribué aux lignes<br />
d’écoulement pendant ce test. Le TCA est très caustique.<br />
1. Select Tools from the main menu, then select Diag.<br />
2. Select Fluid.<br />
3. Select Column 1. The Diagnostic Mode Prime Individual<br />
screen is displayed (Figure 4-6).<br />
Figure 4-6 Diagnostic Mode Prime Individual Screen
Flow and Volume Test<br />
4. Select the reagent to test. Press More if the reagent you<br />
are testing is not displayed. The Diag Mode Prime Status<br />
screen is displayed (Figure 4-7).<br />
Figure 4-7 Diag Mode Prime Individual Screen<br />
5. Press Volume. The Volume test runs.<br />
6. Record the volume of reagent collected. Empty the<br />
graduated cylinder.<br />
7. Repeat the Volume test and record the volume of reagent<br />
collected. If the volume is not within ±0.1 ml of the first<br />
measurement, repeat the Volume test a third time.<br />
8. Press Flow. The Flow test runs.<br />
9. Record the volume of reagent collected. Empty the<br />
graduated cylinder.<br />
10. Repeat the Flow test and record the volume of reagent<br />
collected. If the volume is not within ±0.1 ml, repeat the<br />
Flow test a third time.<br />
11. Repeat step 4 through step 10 for all reagents.<br />
12. Compare the volumes delivered to the volumes listed in<br />
“Results” on page 4-16.<br />
Expedite <strong>8900</strong> <strong>Nucleic</strong> <strong>Acid</strong> <strong>Synthesis</strong> System User’s Guide 4-15<br />
4
4<br />
Chapter 4 Maintenance and Troubleshooting<br />
Verifying<br />
Wash Volume on<br />
Column 2<br />
4-16 PerSeptive <strong>Biosystems</strong><br />
It is not necessary to perform the Flow and Volume test on all<br />
reagent positions for column 2. Acceptable results on column<br />
1 indicate that the system reagent injectors and solenoids are<br />
functioning properly.<br />
However, it is necessary to verify that the system is delivering<br />
the same volumes for column 1 and column 2. Do this by:<br />
• Performing the Flow and Volume test 2 times on the<br />
Wsh reagent position for column 2 (perform a third<br />
time if volumes are not within ±0.1 ml)<br />
• Comparing the volume delivered to the volume<br />
delivered for column 1<br />
If the volume delivered for column 2 is not within ±0.1 ml of the<br />
volume delivered for column 1, it may indicate a blockage in<br />
the fluidic system. Call PerSeptive <strong>Biosystems</strong> Technical<br />
Support.<br />
Results Table 4-4 lists the acceptable ranges for Flow and Volume<br />
tests. If your results are not within the ranges listed, call<br />
PerSeptive <strong>Biosystems</strong> Technical Support.<br />
Table 4-4 Acceptable Ranges for Flow and Volume Test<br />
Test Reagent Acceptable<br />
Range (ml)<br />
VOL All except<br />
Cap A and<br />
Cap B<br />
Cap A and<br />
Cap B<br />
1.6–2.4 _________<br />
Comments<br />
3.1–4.7 Volume delivered is double the volume for other<br />
reagents because Cap A and Cap B reagents are<br />
delivered simultaneously.<br />
FLOW All 1.0–2.0 Volume of reagent delivered may vary slightly<br />
from instrument-to-instrument because flow is<br />
affected by blanket pressure setting.
4.4 Troubleshooting<br />
Troubleshooting<br />
Diagnosis and isolation of a problem is initially based on the<br />
concept of a single point failure. Troubleshooting involves:<br />
• Identifying problems with the mechanical/electronic<br />
components of the system.<br />
• Determining the cause of inconsistencies in synthesis<br />
quality (chemical problems).<br />
After the problem has been identified, the possible causes can<br />
be reviewed, and corrective action taken.<br />
Some symptoms, possible causes, and solutions to help you<br />
troubleshoot are listed in this section. However in the event<br />
that you cannot identify the problem yourself, call your<br />
PerSeptive <strong>Biosystems</strong> Service Representative or Technical<br />
Support Department.<br />
4.4.1 Mechanical/Electronic<br />
Troubleshooting<br />
This section lists some possible symptoms and methods for<br />
identifying problems with the mechanical/electronic<br />
components of the Expedite <strong>Nucleic</strong> <strong>Acid</strong> <strong>Synthesis</strong> System.<br />
NOTE: With the exception of the fuses, the Expedite<br />
<strong>Nucleic</strong> <strong>Acid</strong> <strong>Synthesis</strong> System has no user-serviceable<br />
electronic components. The following information is<br />
provided to help determine the cause of the problem.<br />
If you have a problem with your system, perform the<br />
troubleshooting procedures listed in Table 4-5 before calling<br />
your PerSeptive <strong>Biosystems</strong> Service Representative. If you<br />
call PerSeptive <strong>Biosystems</strong> for assistance, please have a<br />
description of the problem and a list of the procedures that you<br />
tried prior to placing the call.<br />
Expedite <strong>8900</strong> <strong>Nucleic</strong> <strong>Acid</strong> <strong>Synthesis</strong> System User’s Guide 4-17<br />
4
4<br />
Chapter 4 Maintenance and Troubleshooting<br />
Table 4-5 Mechanical and Electronic Troubleshooting Symptoms and Solutions<br />
Symptom Possible Cause Solution<br />
No power to system Not connected to house<br />
voltage supply.<br />
Blank Display Internal electronic fault<br />
due to power supply<br />
irregularities.<br />
Anomalous software<br />
behavior<br />
Orange fluid in column drip<br />
tray and instrument<br />
cabinet drip tray<br />
Fluid in column drip tray<br />
and instrument cabinet<br />
drip tray<br />
4-18 PerSeptive <strong>Biosystems</strong><br />
Plug in main power cord.<br />
Blown fuse. Replace the fuses. See<br />
Section 4.1.2, Checking<br />
the Fuses.<br />
Faulty diskette or disk<br />
drive.<br />
Contact your PerSeptive<br />
<strong>Biosystems</strong> Service<br />
Representative.<br />
Insert the spare boot<br />
diskette provided in the<br />
startup kit. If the new<br />
diskette does not correct<br />
the problem, contact your<br />
PerSeptive <strong>Biosystems</strong><br />
Service Representative.<br />
Leak in the trityl monitor. Contact your PerSeptive<br />
<strong>Biosystems</strong> Service<br />
Representative.<br />
Column inserted<br />
incorrectly.<br />
Check the column<br />
connections.
Troubleshooting<br />
Table 4-5 Mechanical and Electronic Troubleshooting Symptoms and Solutions<br />
Symptom Possible Cause Solution<br />
Fluid in the instrument<br />
cabinet drip tray<br />
“High pressure system<br />
failure” message on the<br />
screen<br />
“Low pressure failure”<br />
message on the screen<br />
Improper delivery of<br />
reagents<br />
Cracked reagent bottle. Check all the reagent<br />
bottles for cracks.<br />
NOTE: Wear gloves when<br />
handling the reagent<br />
bottles.<br />
Leak in the fluidics plate. Contact your PerSeptive<br />
<strong>Biosystems</strong> Service<br />
Representative.<br />
Depleted gas supply. Replace gas tank. See<br />
Section 4.1.4, Gas<br />
Cylinder Replacement.<br />
Incomplete pressurization<br />
due to leaks at reservoirs<br />
or internal fittings.<br />
Reduced or no flow due to<br />
clogged endline filters or<br />
crimped lines.<br />
Reduced or no flow due to<br />
pressurization system<br />
fault.<br />
Reduced or no flow due to<br />
valve failure or fluid line<br />
blockage.<br />
See Table 4-2 Gas Leak<br />
Isolation Tests.<br />
Change filters and check<br />
lines in reagent bottles<br />
and waste bottles.<br />
See Table 4-2 Gas Leak<br />
Isolation Tests.<br />
Contact your PerSeptive<br />
<strong>Biosystems</strong> Service<br />
Representative.<br />
Expedite <strong>8900</strong> <strong>Nucleic</strong> <strong>Acid</strong> <strong>Synthesis</strong> System User’s Guide 4-19<br />
4
4<br />
Chapter 4 Maintenance and Troubleshooting<br />
4.4.2 Chemical Troubleshooting<br />
Inconsistencies in synthesis quality can result from a number<br />
of chemical or mechanical problems. In some situations, it<br />
may be difficult to determine whether the cause is actually<br />
chemical or mechanical in nature. The first step in diagnosing<br />
a problem is to define the symptom.<br />
Reagent Quality Chemical problems are usually associated with outdated<br />
reagents or reagents that have become water contaminated<br />
due to improper storage. The nucleotide monomers, activator,<br />
and acetonitrile are the reagents that most strongly affect<br />
stepwise coupling efficiencies.<br />
Reagent Delivery The most common mechanical problem is improper delivery of<br />
reagents due to leaks or blocks in the system.<br />
Coupling<br />
Efficiency<br />
4-20 PerSeptive <strong>Biosystems</strong><br />
Low coupling efficiencies can be quantitatively determined<br />
through spectrophotometric analysis of the trityl fractions, and<br />
qualitatively determined through simple visual inspection of<br />
collected trityl fractions. In a successful synthesis, the second<br />
trityl has the strongest orange color. Subsequent trityls have a<br />
consistently decreasing color. A problem with the synthesis,<br />
and the point in the synthesis at which it occurred, is<br />
frequently indicated by a sharp drop in trityl color.<br />
In the presence of water, bases, or alcohols the DMT groups<br />
will not be in the cationic state. Therefore, weakly colored trityl<br />
fractions may be the result of contaminated collection tubes. If<br />
this is the case, addition of 1 mL of Deblock Solution should<br />
bring back a strong color.<br />
Product Analysis Another symptom of a problematic synthesis, low overall<br />
product yield, can be determined by measuring the total<br />
Optical Density, at 260 nm, of an aqueous solution of the<br />
oligonucleotide after cleavage and deprotection. Other<br />
synthesis problems can be detected through interpretation of<br />
purification data (for example, unusual band patterns in gels or<br />
extra peaks in chromatograms).<br />
After taking corrective action, perform a trial 5'-ACGTT-3'<br />
synthesis using a fresh “T” column to confirm that the problem<br />
has been rectified.
Troubleshooting<br />
Table 4-6 lists some possible symptoms and causes of<br />
inconsistent synthesis quality and the appropriate remedy.<br />
Table 4-6 Chemical Troubleshooting<br />
Symptom Possible Cause Solution<br />
Full Sequence not<br />
synthesized (too few trityl<br />
fractions, short oligomer on<br />
gels, HPLC)<br />
Low coupling efficiencies due<br />
to mechanical problems<br />
(other symptoms include<br />
erratic or low volumes in trityl<br />
fractions, low overall yield,<br />
unusual band or peak<br />
patterns)<br />
Reagents depleted. Refill empty bottles.<br />
Empty gas tank. Check tank regulator<br />
gauge. Replace the tank<br />
if necessary.<br />
Clogged reagent or<br />
waste line or filter.<br />
Low flow rates or no flow<br />
rates due to low pressure<br />
blanket system fault.<br />
Low flow rates or no flow<br />
rate due to fluidic failure<br />
or fluid line blockage.<br />
Check waste and<br />
reagent lines for a block.<br />
Replace reagent line<br />
filter.<br />
Perform a Flow and<br />
Volume test, described in<br />
Section 4.3, Flow and<br />
Volume Test.<br />
Call PerSeptive<br />
<strong>Biosystems</strong> Technical<br />
Support if the test fails.<br />
Perform a Flow and<br />
Volume test, described in<br />
Section 4.3, Flow and<br />
Volume Test.<br />
Call PerSeptive<br />
<strong>Biosystems</strong> Technical<br />
Support if the test fails.<br />
Expedite <strong>8900</strong> <strong>Nucleic</strong> <strong>Acid</strong> <strong>Synthesis</strong> System User’s Guide 4-21<br />
4
4<br />
Chapter 4 Maintenance and Troubleshooting<br />
Low coupling efficiencies due<br />
to chemical problems (other<br />
symptoms include low overall<br />
yield, unusual band or peak<br />
patterns)<br />
4-22 PerSeptive <strong>Biosystems</strong><br />
Table 4-6 Chemical Troubleshooting (Continued)<br />
Symptom Possible Cause Solution<br />
Nucleotide monomers<br />
outdated or solution too<br />
old.<br />
Recently added reagent<br />
is at fault.<br />
Water contaminated<br />
reagent (from exposure<br />
to atmosphere during<br />
loading, reagent transfer,<br />
or improper storage).<br />
Water contaminated<br />
reagent (from a slow leak<br />
in the pressurization<br />
system).<br />
Replace any monomer<br />
which has been on the<br />
instrument for more than<br />
two weeks.<br />
Replace the most<br />
recently added reagent.<br />
Perform trial<br />
5'-ACGTT-3' syntheses,<br />
replacing the activator<br />
(tetrazole), wash<br />
(acetonitrile) and<br />
monomers one by one<br />
until the contaminated<br />
reagent is detected.<br />
Run the gas leak<br />
diagnostics routine to<br />
confirm the presence of<br />
a gas leak and contact<br />
your PerSeptive<br />
<strong>Biosystems</strong> Service<br />
Representative.
4.5 Error Messages<br />
Error Messages<br />
Table 4-7 describes the error messages that you may<br />
encounter when running the Expedite <strong>Nucleic</strong> <strong>Acid</strong> <strong>Synthesis</strong><br />
System:<br />
Table 4-7 Expedite System Error Messages and Corrective Action<br />
Error Message Corrective Action<br />
“Internal error—#XX, ret_code—<br />
XX”<br />
“High pressure system failure” See Table 4-2.<br />
“Low pressure system failure” See Table 4-2.<br />
“Gas saver low pressure leak<br />
failure”<br />
Call your PerSeptive <strong>Biosystems</strong> Service<br />
Representative.<br />
See Table 4-2.<br />
“Startup low pressure leak failure” See Table 4-2.<br />
“Valve driver fault” Indicates an electrical problem with the fluidic<br />
valve driver circuits. Run the LED test (see<br />
Section 3.6.1, Diagnostic Routines) then call<br />
your PerSeptive <strong>Biosystems</strong> Service<br />
Representative.<br />
“Trityl total yield failure on<br />
column 1”<br />
“Trityl total yield failure on<br />
column 2”<br />
The trityl monitor senses that the coupling has<br />
failed. Check the trityl color. If the trityl monitor<br />
is functioning correctly, abort the synthesis.<br />
“Power Failure” If a UPS is installed and the power fails, this<br />
message will appear in the log. The system will<br />
take the action specified in the user profile (see<br />
Section 3.6.6, Specifying a User Profile).<br />
Expedite <strong>8900</strong> <strong>Nucleic</strong> <strong>Acid</strong> <strong>Synthesis</strong> System User’s Guide 4-23<br />
4
4<br />
Chapter 4 Maintenance and Troubleshooting<br />
Table 4-7 Expedite System Error Messages and Corrective Action<br />
Error Message Corrective Action<br />
“General disk failure” Make sure that the boot diskette is inserted in<br />
the diskette drive.<br />
Reboot the instrument using the new system<br />
diskette provided in the startup kit.<br />
“Printer not available” Make sure that the printer is plugged in and<br />
turned on.<br />
Check the connection between the printer and<br />
the instrument.<br />
“Bad sequence for protocol” Sequence and chemistry or protocol are not<br />
compatible (for example, DNA sequence but<br />
RNA chemistry selected. Check the default<br />
chemistry (see Section 3.6.6, Specifying a User<br />
Profile) and the selected protocol (see Section<br />
3.3.2, Running a Sequence).<br />
4-24 PerSeptive <strong>Biosystems</strong>
A Installation<br />
Site<br />
Requirements<br />
Bench Space and<br />
Support<br />
Appendix<br />
A<br />
The <strong>8900</strong> Expedite <strong>Nucleic</strong> <strong>Acid</strong> <strong>Synthesis</strong> System must<br />
be installed by a qualified PerSeptive <strong>Biosystems</strong><br />
representative. Contact your local PerSeptive <strong>Biosystems</strong><br />
representative following delivery to make arrangements<br />
for installation of the unit.<br />
The instrument should be placed in a well lit room, out of<br />
direct sunlight. There should be an electrical outlet, space<br />
for a gas cylinder, and a fume hood or some suitable<br />
ventilation system close to the instrument.<br />
The room temperature should be in the range of<br />
20 to 30°C. Do not operate the instrument in a cold room.<br />
The protocols are optimized for room temperature<br />
operation and low temperatures may compromise<br />
synthesis results.<br />
Designed for bench-top use, the <strong>8900</strong> instrument cabinet<br />
requires 16 inches (40 cms) of linear bench space. The<br />
reagent tray for the Model 8909 requires 11.5 inches<br />
(29 cms). The space should be 20 inches (52 cms) deep<br />
with at least 24 inches (60 cms) of overhead clearance.<br />
The instrument cabinet weighs 102 pounds (46 kg).<br />
Allow a clearance of 9 inches (25 cm) at the back for<br />
proper connection of power cords and gas lines, as well as<br />
proper ventilation. Allow additional space nearby for the<br />
waste tray and a printer (if used).<br />
Expedite <strong>8900</strong> <strong>Nucleic</strong> <strong>Acid</strong> <strong>Synthesis</strong> System User’s Guide A-1
A<br />
Appendix A Installation<br />
Gas Supply You must provide a Helium tank (pre-purified grade 4.5) and a<br />
2-stage regulator capable of providing 20 psi pressure. Helium<br />
is the recommended gas because it degases the reagent<br />
solutions so that bubbles are not generated during synthesis<br />
which can cause channeling of the fluid around the CPG<br />
supports.<br />
If helium is unavailable, you may use dry Argon or dry<br />
Nitrogen.<br />
Power Supply The instrument contains a Universal Input power supply for<br />
voltages from 100–240 VAC 50/60 Hz. You are recommended<br />
to install a surge protected power strip between the instrument<br />
and the electrical outlet.<br />
Unpacking<br />
Instructions<br />
A-2 PerSeptive <strong>Biosystems</strong><br />
Examine the package for signs of damage before starting to<br />
unpack the instrument.<br />
WARNING<br />
The Expedite Cabinet weighs 102 pounds (46 kg). Two<br />
people are required to safely lift the instrument cabinet.<br />
AVERTISSEMENT<br />
L'appareil pèse 46 kg. Il est nécessaire d'être deux pour le<br />
soulever.<br />
Unpack the instrument carefully and inspect the components<br />
and accessories for signs of damage. Inform the carrier if<br />
there are any indications that the instrument has not arrived in<br />
good condition.<br />
Damage incurred during transit is the responsibility of the<br />
carrier, not the manufacturer, and must be reported to the<br />
carrier immediately. The original shipping containers must be<br />
available for inspection by the carrier if a claim for damage is<br />
to be filed. In any event, save the shipping containers, they<br />
provide excellent protection for the instrument in storage or in<br />
transit.
Shipping List The shipping cartons should contain the following items.<br />
• Expedite <strong>Nucleic</strong> <strong>Acid</strong> Synthesizer<br />
• Startup Kit<br />
• User’s Guide<br />
• Power cords<br />
• Fuses<br />
• Software disks (2)<br />
• Waste reservoir<br />
• Waste vent line assembly<br />
• Spare O-rings and filters<br />
• Column replacement fittings<br />
• Vent hose<br />
• Reagent reservoirs<br />
• RS422 Interconnection cable (for connection to<br />
the workstation)<br />
• Gas line assembly<br />
• External reagent tray assembly (Model 8909)<br />
Installation Perform the following steps to install the instrument:<br />
1. Place the instrument cabinet on the bench.<br />
!<br />
2. Make the electrical connections (see Figure A-1).<br />
• Make sure that the power cord has the correct<br />
plug for your voltage.<br />
• Attach the power cord to the rear of the<br />
instrument.<br />
• Plug the cord into the wall socket.<br />
3. Hook up the gas.<br />
• Use the compression fitting provided to attach<br />
the inlet gas line to the tank pressure regulator<br />
(20 psi).<br />
• Attach the male quick disconnect fitting to the<br />
gas inlet on the rear of the instrument cabinet<br />
(see Figure A-1).<br />
Expedite <strong>8900</strong> <strong>Nucleic</strong> <strong>Acid</strong> <strong>Synthesis</strong> System User’s Guide A-3<br />
A
A<br />
Appendix A Installation<br />
UPS<br />
Event Out<br />
Waste Lines<br />
and<br />
Reagent Tray Lines (8909)<br />
Vent Hose<br />
Connector<br />
Gas Hookup<br />
A-4 PerSeptive <strong>Biosystems</strong><br />
INLET PRESSURE<br />
25 PSI MAX<br />
(1.7 kg/cm 2 )<br />
Power Cord<br />
90-260 VAG 47-63Hz<br />
FUSE 3 AG 250V 1A SLOW<br />
100VA MAX<br />
WARNING<br />
FOR CONTINUED PROTECTION<br />
AGAINST RISK OF FIRE, REPLACE<br />
ONLY WITH FUSE OF SPECIFIED<br />
TYPE AND CURRENT RATING.<br />
Figure A-1 Electrical Hookup and Gas Lines<br />
4. Hook the vent hose to the connector on the rear of the<br />
system (Figure A-1). Connect the other end of the vent<br />
host to an exhaust hood.<br />
AC<br />
INLET<br />
Option<br />
RS-422<br />
Disk Drive<br />
Printer
!<br />
5. Check the waste bottles. The waste lines exit the<br />
instrument cabinet at the right rear of the instrument (see<br />
Figure A-1).<br />
• Check the O-ring inside the waste bottle caps. Screw<br />
the ORG1 and ORG2 cap/waste lines onto the 4 L<br />
waste bottle. Screw the TRT1 and TRT2 cap/waste<br />
lines onto the 1 L waste bottle.<br />
• Make sure that the waste tubes are draining into the<br />
bottle.<br />
Waste<br />
lines<br />
Organic<br />
waste<br />
Waste<br />
lines<br />
Chlorinated<br />
waste<br />
Figure A-2 Waste Bottle Cap Showing Waste and Vent<br />
Lines<br />
Expedite <strong>8900</strong> <strong>Nucleic</strong> <strong>Acid</strong> <strong>Synthesis</strong> System User’s Guide A-5<br />
A
A<br />
Appendix A Installation<br />
A-6 PerSeptive <strong>Biosystems</strong><br />
6. Model 8909—connect the reagent tray to the instrument<br />
cabinet:<br />
• Place the instrument tray on the bench beside the<br />
instrument cabinet.<br />
• Place the Wash A and Deblock bottles in the caddy.<br />
• Attach the caps on reagent lines, which exit the<br />
instrument cabinet at the right rear of the instrument<br />
(see Figure A-1), to the appropriate bottle:<br />
• Attach the line labeled “DB8” to the deblock<br />
bottle.<br />
• Attach the line labeled “WA7” to the Wash A<br />
bottle.<br />
Installation Pour installer votre appareil, procédez comme suit :<br />
1. Placez l'appareil sur une paillasse.<br />
!<br />
!<br />
2. Procédez au raccordement électrique (voir Figure A-1).<br />
• Assurez-vous que le fil d'alimentation possède<br />
la prise compatible avec la tension utilisée.<br />
• Raccordez le fil à l'arrière de l'appareil.<br />
• Branchez-le dans la prise.<br />
3. Raccordement à la source de gaz<br />
• Utilisez l'écrou de compression fourni pour<br />
raccorder le tuyau d'alimentation en gaz au<br />
régulateur de pression de la bouteille 20 psi (1,7<br />
bar).<br />
• Raccordez le raccord rapide mâle à l'entrée gaz<br />
à l'arrière de l'appareil (voir Figure A-1).<br />
4. Flacons de rejet<br />
Les tuyaux de rejet sortent sur l'arrière droit de<br />
l'appareil (voir Figure A-1).
!<br />
!<br />
• Vérifiez les joints toriques à l'intérieur du<br />
bouchon du flacon de rejet, puis vissez<br />
complétement le bouchon sur le flacon (sur les<br />
deux flacons pour un appareil avec détecteur de<br />
trityl, voir Figure A-2).<br />
• Assurez-vous que le tuyau de rejet se déverse<br />
bien dans le flacon.<br />
• Raccordez le tube évent à une canalisation<br />
d'échappement (voir Figure A-1).<br />
5. Modèle 8909 - Fixez le portoir à réactifs sur l'appareil :<br />
• Placez le portoir sur la paillasse à côté de<br />
l'appareil<br />
• Placez les flacons de solvant de lavage "Wash<br />
A" et de solution de détritylation "Deblock" dans<br />
le portoir.<br />
• Raccordez les bouchons aux tuyaux de réactifs<br />
qui dépassent à l'arrière de l'appareil (voir<br />
Figure A-1) de la façon suivante :<br />
Le tuyau marqué "DB8" au flacon "Deblock"<br />
(solution de détritylation)<br />
Le tuyau marqué "WA7" au flacon "Wash A"<br />
(solvant de lavage).<br />
Expedite <strong>8900</strong> <strong>Nucleic</strong> <strong>Acid</strong> <strong>Synthesis</strong> System User’s Guide A-7<br />
A
A<br />
Appendix A Installation<br />
A-8 PerSeptive <strong>Biosystems</strong>
B Reagent Safety<br />
!<br />
Appendix<br />
B<br />
This appendix provides a summary of safety information<br />
for nucleic acid synthesis reagents. For complete<br />
information, refer to the MSDS (Material Safety Data<br />
Sheet) available from PerSeptive <strong>Biosystems</strong>.<br />
WARNING<br />
Most of the reagents and solvents used in nucleic acid<br />
synthesis are hazardous. Wear a lab coat, gloves and<br />
eye protection when handling reagents. Adequate<br />
ventilation is essential and working under a fume hood<br />
is recommended.<br />
AVERTISSEMENT<br />
La plupart des réactifs et solvants employés en<br />
synthèse d'acides nucléiques sont dangereux. Portez<br />
une blouse, des gants et des lunettes de protection<br />
lorsque vous manipulez des réactifs. Une ventilation<br />
adéquate est nécessaire et il est recommandé de<br />
travailler sous une hotte.<br />
Expedite <strong>8900</strong> <strong>Nucleic</strong> <strong>Acid</strong> <strong>Synthesis</strong> System User’s Guide B-1
B<br />
Appendix B Reagent Safety<br />
Acetonitrile A colorless hygroscopic liquid, extremely flammable, harmful if<br />
swallowed, inhaled or absorbed through the skin. Vapor or<br />
mist is irritating to the eyes, mucous membranes and upper<br />
respiratory tract. Symptoms of exposure may include burning<br />
sensation, coughing, wheezing, laryngitis, shortness of breath,<br />
nausea and vomiting.<br />
B-2 PerSeptive <strong>Biosystems</strong><br />
First Aid: Remove contaminated clothing and shoes. Flush<br />
eyes or skin with plenty of water for at least 15 minutes. If<br />
inhaled, remove to fresh air. If not breathing, give artificial<br />
respiration. If breathing is difficult, give oxygen. Call a<br />
physician. Wash contaminated clothing before reuse.<br />
Recommended Storage: Store under nitrogen in a cool dry<br />
place.<br />
Fire and Explosion Data: Flash point: 5°C. Extinguish with<br />
CO 2, dry chemical powder, alcohol, or polymer foam. Emits<br />
toxic fumes under fire conditions. Wear self-contained<br />
breathing apparatus and protective clothing. Use water to cool<br />
fire exposed containers. Vapors can flow along surfaces to a<br />
distant ignition source and flash back. Closed containers<br />
exposed to heat may explode.<br />
Spill or Leak Procedures: Evacuate the area. Shut off all<br />
sources of ignition and ventilate the area. Cover with an<br />
activated carbon absorbent, scoop into a closed container and<br />
transport outside. Ventilate area and wash spill site after<br />
material pickup is complete.<br />
Acetic Anhydride Acetic anhydride is a colorless liquid with a strong odor. It is<br />
harmful if swallowed, inhaled, or absorbed through the skin. It<br />
is extremely destructive to the tissue of the mucous<br />
membranes and upper respiratory tract, eyes and skin.<br />
Inhalation may be fatal as a result of spasm, inflammation and<br />
edema of the larynx and bronchi, chemical pneumonitis and<br />
pulmonary edema. Symptoms of exposure may include<br />
burning sensation, coughing, wheezing, laryngitis, shortness<br />
of breath, headache, nausea and vomiting.
Activator<br />
Solution -<br />
Amidite<br />
Chemistry<br />
Ammonium<br />
Hydroxide<br />
First Aid: Remove contaminated clothing and shoes. Flush<br />
eyes or skin with plenty of water for at least 15 minutes. If<br />
inhaled, remove to fresh air. If not breathing, give artificial<br />
respiration. If breathing is difficult, give oxygen. Call a<br />
physician. Discard contaminated shoes. Wash contaminated<br />
clothing before reuse.<br />
Recommended Storage: Keep tightly closed. Store in a cool<br />
dry place.<br />
Fire and Explosion Data: Extinguish with CO 2, dry chemical<br />
powder, alcohol or polymer foam. Wear-self contained<br />
breathing apparatus, rubber boots and heavy rubber gloves to<br />
prevent contact with the skin and eyes.<br />
Spill or Leak Procedures: Evacuate area. Wear<br />
self-contained breathing apparatus, rubber boots, and heavy<br />
rubber gloves. Cover with activated carbon adsorbent, take up<br />
and place in closed containers. Transport outdoors. Ventilate<br />
area and wash spill site after material pickup is complete.<br />
This solution contains 1H-tetrazole and acetonitrile. See the<br />
individual reagents for details of safety precautions. This is a<br />
flammable, hygroscopic solution. Keep away from open<br />
flames and avoid breathing the vapors.<br />
Recommended storage: Store at room temperature, away<br />
from light.<br />
Harmful if swallowed, inhaled or absorbed through the skin.<br />
This strong base is extremely destructive to tissue of the<br />
mucous membranes and upper respiratory tract, eyes and<br />
skin. Inhalation may be fatal as a result of spasm,<br />
inflammation and edema of the larynx and bronchi, chemical<br />
pneumonitis and pulmonary edema. Symptoms of exposure<br />
may include burning sensation, coughing, wheezing,<br />
laryngitis, shortness of breath, headache, nausea and<br />
vomiting.<br />
First Aid: Remove contaminated clothing and shoes. Flush<br />
eyes or skin with plenty of water for at least 15 minutes. Call a<br />
physician. If inhaled, remove to fresh air. If not breathing, give<br />
artificial respiration. If breathing is difficult, give oxygen.<br />
Expedite <strong>8900</strong> <strong>Nucleic</strong> <strong>Acid</strong> <strong>Synthesis</strong> System User’s Guide B-3<br />
B
B<br />
Appendix B Reagent Safety<br />
t-Butylphenoxy<br />
Acetic Anhydride<br />
Cap A (Amidite<br />
Capping Solution)<br />
Cap A (Expedite<br />
Capping Solution)<br />
B-4 PerSeptive <strong>Biosystems</strong><br />
Recommended Storage: Use fresh ammonium hydroxide<br />
(open less than 2 months). To ensure a concentrated solution<br />
after opening, aliquot the ammonium hydroxide in small<br />
volumes, cap tightly, and store in a freezer.<br />
Fire and Explosion Data: Noncombustible, emits toxic fumes<br />
under fire conditions.<br />
Spill or Leak Procedures: Evacuate area. Wear<br />
self-contained breathing apparatus. Absorb on sand or<br />
vermiculite, take up and place in closed containers. Ventilate<br />
area and wash spill site after material pickup is complete.<br />
t-Butylphenoxy acetic anhydride (tBPA) and tetrahydrofuran<br />
(THF) are components of the Expedite Cap A solution. THF is<br />
a flammable solvent which will form explosive peroxides over<br />
a period of time in the presence of oxygen. It may be harmful<br />
by inhalation, ingestion, or skin absorption. Vapor or mist is<br />
irritating to the eyes, mucous membranes and upper<br />
respiratory tract. Causes skin irritation. Exposure can cause<br />
coughing, chest pains, difficulty in breathing, nausea,<br />
dizziness and headache. The hazards from exposure to tBPA<br />
alone are not known. For further information on Cap A, see<br />
“Tetrahydrofuran (THF)” on page B-9.<br />
Recommended Storage: Store Expedite Cap A solution at<br />
room temperature, away from light. Dispose of opened bottles<br />
that are over six months old.<br />
This solution contains acetic anhydride and tetrahydrofuran<br />
(THF). See the individual reagents for details of safety<br />
precautions. THF is a flammable solvent and is irritating to<br />
eyes, skin, and mucous membranes. It will form explosive<br />
peroxides over a period of time in the presence of oxygen.<br />
Recommended Storage: At room temperature, away from<br />
light. Dispose of opened bottles that are over six months old.<br />
This solution contains t-butylphenoxy acetic anhydride and<br />
tetrahydrofuran (THF). See the individual reagents for details<br />
of safety precautions. THF is a flammable solvent and is<br />
irritating to eyes, skin, and mucous membranes. It will form<br />
explosive peroxides over a period of time in the presence of<br />
oxygen.
Cap B (Capping<br />
Activator)<br />
Recommended Storage: At room temperature, away from<br />
light. Dispose of opened bottles that are over six months old.<br />
This solution contains 1-N-methylimidazole, pyridine, and<br />
tetrahydrofuran (THF). See the individual reagents for details<br />
of safety precautions.<br />
Recommended Storage: At room temperature, away from<br />
light. Dispose of opened that are over six months old.<br />
Deblock Solution This solution contains trichloroacetic acid (TCA) and<br />
dichloromethane (DCM). See the individual reagents for<br />
details of safety precautions.<br />
Dichloromethane<br />
(DCM) (Methylene<br />
Chloride)<br />
Recommended Storage: Keep tightly closed. Store in a cool<br />
dry place.<br />
A colorless clear liquid with mild chloroform-like odor. Harmful<br />
if inhaled, irritating to skin, eyes, and mucous membranes.<br />
May cause nausea, vomiting, light-headedness, or headache.<br />
Inhalation of vapors in high concentration causes narcosis.<br />
First Aid: If inhaled, remove to fresh air. If not breathing, give<br />
artificial respiration. If breathing is difficult, give oxygen. If<br />
ingested and if conscious, induce vomiting with water. Keep<br />
airway clear. Call a physician. Flush eyes with plenty of water<br />
for at least 15 minutes. Wash skin with soap and water. Wash<br />
contaminated clothing before reuse.<br />
Recommended Storage: Store at room temperature, away<br />
from light in a solvent storage cabinet.<br />
Fire and Explosion Data: Fire involving DCM is unlikely. In<br />
the event of fire use extinguishing media appropriate for<br />
surrounding fire.<br />
Spill or Leak Procedures: Wear self-contained breathing<br />
apparatus and full protective clothing. Use water spray to<br />
reduce vapors. Take up with sand or vermiculite and place in<br />
closed container. Flush spill area with water.<br />
Expedite <strong>8900</strong> <strong>Nucleic</strong> <strong>Acid</strong> <strong>Synthesis</strong> System User’s Guide B-5<br />
B
B<br />
Appendix B Reagent Safety<br />
B-6 PerSeptive <strong>Biosystems</strong><br />
Iodine Iodine is extremely destructive to the tissue of the mucous<br />
membranes and upper respiratory tract, eyes and skin.<br />
Inhalation may be fatal as a result of spasm, inflammation and<br />
edema of the larynx and bronchi, chemical pneumonitis and<br />
pulmonary edema. Symptoms of exposure may include<br />
burning sensation, coughing, wheezing, laryngitis, shortness<br />
of breath, headache, nausea and vomiting.<br />
Monomers<br />
(Amidites)<br />
1-N-<br />
Methylimidazole<br />
First Aid: Remove contaminated clothing and shoes. Flush<br />
eyes or skin with plenty of water for at least 15 minutes. If<br />
inhaled, remove to fresh air. If not breathing, give artificial<br />
respiration. If breathing is difficult, give oxygen. Call a<br />
physician. Discard contaminated clothing and shoes.<br />
Recommended Storage: Keep tightly closed. Store in a cool<br />
dry place.<br />
Fire and Explosion Data: Emits toxic fumes under fire<br />
conditions. Extinguish with dry chemical powder. Wear self<br />
contained breathing apparatus and protective clothing to<br />
prevent contact with skin and eyes.<br />
The amidite monomers should be considered hazardous as<br />
the toxicological properties are unknown. Do not breathe the<br />
powders.<br />
Recommended Storage: Store at -20°C in a desiccator or<br />
sealed bag.<br />
1-N-Methylimidazole is a toxic chemical which is harmful if<br />
swallowed, inhaled, or absorbed through the skin. Causes<br />
burns. Inhalation may be fatal as a result of spasm,<br />
inflammation and edema of the larynx and bronchi, chemical<br />
pneumonitis and pulmonary edema. Symptoms of exposure<br />
may include burning sensation, coughing, wheezing,<br />
laryngitis, shortness of breath, headache, nausea and<br />
vomiting.<br />
First Aid: Remove contaminated clothing and shoes. Flush<br />
eyes or skin with plenty of water for at least 15 minutes. If<br />
inhaled, remove to fresh air. If not breathing, give artificial<br />
respiration. If breathing is difficult, give oxygen. Call a<br />
physician. Wash contaminated clothing before reuse.
Oxidizer<br />
Solution -<br />
Amidite<br />
Chemistry<br />
Pyridine<br />
Recommended Storage: Hygroscopic solid. Handle and<br />
store under nitrogen. Keep tightly closed. Store in a cool dry<br />
place. Keep away from heat and open flame.<br />
Fire and Explosion Data: Emits toxic fumes under fire<br />
conditions. Extinguish with CO 2 , dry chemical powder, alcohol<br />
or polymer foam, water spray. Wear self-contained breathing<br />
apparatus and protective clothing to prevent contact with skin<br />
and eyes.<br />
Spill or Leak Procedures: Evacuate area. Wear<br />
self-contained breathing apparatus, rubber boots, and heavy<br />
rubber gloves. Absorb on sand or vermiculite and place in a<br />
closed container and hold for waste disposal.<br />
This solution contains iodine, pyridine, tetrahydrofuran (THF),<br />
and water. See the individual reagents for details of safety<br />
precautions.<br />
Recommended Storage: Store at room temperature.<br />
Pyridine is a flammable liquid with a characteristic<br />
disagreeable odor. Harmful if swallowed, inhaled, or absorbed<br />
through the skin. Causes severe irritation. High concentrations<br />
are extremely destructive to tissues of the mucous<br />
membranes and upper respiratory tract, eyes and skin.<br />
Symptoms of exposure may include burning sensation,<br />
coughing, wheezing, laryngitis, gastrointestinal disturbances.<br />
Chronic effects are damage to liver and kidneys.<br />
First Aid: Remove contaminated clothing and shoes.<br />
Immediately flush eyes or skin with plenty of water for at least<br />
15 minutes. If inhaled, remove to fresh air. If not breathing,<br />
give artificial respiration. If breathing is difficult, give oxygen.<br />
Wash contaminated clothing before reuse.<br />
Recommended Storage: Store in a cool dry place. When in<br />
use, handle and store under argon. Keep away from heat,<br />
sparks, and open flame.<br />
Expedite <strong>8900</strong> <strong>Nucleic</strong> <strong>Acid</strong> <strong>Synthesis</strong> System User’s Guide B-7<br />
B
B<br />
Appendix B Reagent Safety<br />
Reaction<br />
Columns<br />
Sulfurizing<br />
Reagent<br />
B-8 PerSeptive <strong>Biosystems</strong><br />
Fire and Explosion Data: Flashpoint 20 o C. Extinguish with<br />
CO2, dry chemical powder, alcohol or polymer foam. Water<br />
may be effective for cooling but may not effect extinguishment.<br />
Wear self-contained breathing apparatus and protective<br />
clothing to prevent contact with skin and eyes. Vapor may<br />
travel considerable distance to source of ignition and flash<br />
back. Forms explosive mixture in air. Emits toxic fumes under<br />
fire conditions.<br />
Spill or Leak Procedures: Shut off all sources of ignition.<br />
Wear self-contained breathing apparatus, rubber boots, and<br />
heavy rubber gloves. Cover with dry-lime, sand, or soda ash,<br />
place in covered containers using non-sparking told and<br />
transport outdoors. Ventilate area and wash spill site after<br />
material pickup is complete.<br />
Recommended Storage: Store reaction columns dry, at 4°C<br />
and away from light.<br />
The sulfurizing reagent used in amidite synthesis of<br />
phosphorothioates is 3H-1,2-benzodithiol-3-one,<br />
1,1-dioxide.<br />
Recommended Storage: Contact supplier for information.<br />
1H-Tetrazole White powder and chips which may be harmful by inhalation,<br />
ingestion, or skin absorption. May cause irritation. The<br />
chemical, physical and toxicological properties of tetrazole<br />
have not been thoroughly investigated.<br />
First Aid: Flush eyes with plenty of water for at least<br />
15 minutes. Wash skin with soap and water. If inhaled, remove<br />
to fresh air. If not breathing, give artificial respiration. If<br />
breathing is difficult, give oxygen. Call a physician. Wash<br />
contaminated clothing before reuse.<br />
Recommended Storage: Keep tightly closed. Store in a cool<br />
dry place.<br />
Fire and Explosion Data: Extinguish with water spray, CO 2,<br />
dry chemical powder, alcohol or polymer foam. Emits toxic<br />
fumes under fire conditions. Use water spray to cool fireexposed<br />
containers. Wear self-contained breathing apparatus<br />
and protective clothing to prevent contact with skin and eyes.<br />
Container explosion may occur under fire conditions.
Tetrahydrofuran<br />
(THF)<br />
Spill or Leak Procedures: Wear self-contained breathing<br />
apparatus, rubber boots and rubber gloves. Sweep up and<br />
place in a container. Avoid raising dust. Ventilate area and<br />
wash spill site after material pickup is complete.<br />
THF is a flammable solvent which will form explosive<br />
peroxides over a period of time in the presence of oxygen. It<br />
may be harmful by inhalation, ingestion, or skin absorption.<br />
Vapor or mist is irritating to the eyes, mucous membranes and<br />
upper respiratory tract. Causes skin irritation. Exposure can<br />
cause coughing, chest pains, difficulty in breathing, nausea,<br />
dizziness and headache.<br />
First Aid: Remove contaminated clothing and shoes. Flush<br />
skin or eyes with plenty of water for at least 15 minutes. If<br />
inhaled, remove to fresh air. If not breathing, give artificial<br />
respiration. If breathing is difficult, give oxygen. Call a<br />
physician. Wash contaminated clothing before reuse.<br />
Recommended Storage: Hygroscopic, keep tightly closed.<br />
Store under nitrogen in a cool dry place. Keep away from heat,<br />
sparks, and open flame. Dispose of any opened Cap A or B<br />
bottles that are over six months old.<br />
Fire and Explosion Data: Extremely flammable, vapor may<br />
travel considerable distance to source of ignition and flash<br />
back. Container explosion may occur under fire conditions.<br />
Extinguish with CO 2 , dry chemical powder, alcohol or polymer<br />
foam. Water may be effective for cooling, but may not effect<br />
extinguishment. Wear self-contained breathing apparatus and<br />
protective clothing to prevent contact with skin and eyes.<br />
Spill or Leak Procedures: Evacuate the area. Shut off all<br />
sources of ignition. Wear self-contained breathing apparatus,<br />
rubber boots, and heavy rubber gloves. Cover with activated<br />
carbon adsorbent, place in covered containers using nonsparking<br />
tools and transport outdoors. Ventilate area and<br />
wash spill site after material pickup is complete.<br />
Expedite <strong>8900</strong> <strong>Nucleic</strong> <strong>Acid</strong> <strong>Synthesis</strong> System User’s Guide B-9<br />
B
B<br />
Appendix B Reagent Safety<br />
Trichloroacetic<br />
<strong>Acid</strong> (TCA)<br />
B-10 PerSeptive <strong>Biosystems</strong><br />
White crystals which are harmful if swallowed, inhaled, or<br />
absorbed through the skin. TCA is destructive to tissues of the<br />
mucous membranes and upper respiratory tract, eyes, and<br />
skin. Inhalation may be fatal as a result of spasm,<br />
inflammation and edema of the larynx and bronchi, chemical<br />
pneumonitis and pulmonary edema. Symptoms of exposure<br />
may include burning sensation, coughing, wheezing,<br />
laryngitis, shortness of breath, headache, nausea and<br />
vomiting. Causes blisters on contact with skin.<br />
First Aid: Remove contaminated clothing and shoes. Flush<br />
eyes or skin with plenty of water for at least 15 minutes. If<br />
inhaled, remove to fresh air. If not breathing, give artificial<br />
respiration. If breathing is difficult, give oxygen. Call a<br />
physician. Wash contaminated clothing before reuse.<br />
Recommended Storage: Keep tightly closed. Store in a cool<br />
dry place.<br />
Fire and Explosion Data: Extinguish with CO 2, dry chemical<br />
powder, alcohol, or polymer foam. Emits toxic fumes under fire<br />
conditions. Wear self-contained breathing apparatus and<br />
protective clothing to prevent contact with skin and eyes.<br />
Spill or Leak Procedures: Evacuate the area. Shut off all<br />
sources of ignition and ventilate the area. Wear self-contained<br />
breathing apparatus, rubber boots and heavy gloves. Cover<br />
with dry lime or soda ash, scoop into a closed container and<br />
transport outside. Ventilate area and wash spill site after<br />
material pickup is complete.
C Performance<br />
Specifications<br />
Reagent<br />
Handling<br />
Appendix<br />
C<br />
Table C-1 lists the specifications for the Expedite <strong>Nucleic</strong><br />
<strong>Acid</strong> <strong>Synthesis</strong> System (Models 8909 and 8905).<br />
Table C-1 Specifications for Expedite <strong>Nucleic</strong> <strong>Acid</strong> <strong>Synthesis</strong> System<br />
Model 8909 Model 8905<br />
Number of amidite bottles 9 5<br />
Number of reagent bottles 6 internally plus 2 in<br />
an external tray<br />
Number of columns 2 independent<br />
Cycle time
C<br />
Appendix C Performance Specifications<br />
Table C-1 Specifications for Expedite <strong>Nucleic</strong> <strong>Acid</strong> <strong>Synthesis</strong> System (Continued)<br />
Bottle Sizes Amidites 10 mL or 20 mL<br />
(0.5 mg or 1.0 mg)<br />
C-2 PerSeptive <strong>Biosystems</strong><br />
WSH 300 mL or 450 mL 450 mL<br />
WSH A 2000 mL N/A<br />
OX 200 mL or 450 mL 60 mL<br />
DBLK 900 mL 180 mL<br />
ACT 200 mL or 450 mL 60 mL<br />
CAP A 200 mL or 450 mL 60 mL<br />
CAP B 200 mL or 450 mL 60 mL<br />
AUX 200 mL N/A<br />
Waste—chlorinated 1 Liter<br />
Waste—organic 4 Liters<br />
Pulse volume 15.5 μL ±20%<br />
Pulse rate 2.8 to 4.5 pulses/second<br />
Blanket pressure 6 psi<br />
Inlet pressure 20 psi<br />
Gas purity (N, He, Ar) high purity, 99.995%<br />
Drip tray volume 1.7 Liter<br />
Operating Temperature 20–30 o C<br />
Operating Humidity
Table C-1 Specifications for Expedite <strong>Nucleic</strong> <strong>Acid</strong> <strong>Synthesis</strong> System (Continued)<br />
Electronics Power requirements 100–240 VAC, 47–63 HZ<br />
Operational temperature<br />
range<br />
4–40 o C<br />
Trityl Monitor Type monochrome light source<br />
Control<br />
Module<br />
Wavelength 470 mm<br />
Path length 2 nm<br />
Flow cell volume ≥60 μL<br />
Converter 12 bit A/D<br />
User Interface LCD—240x64 pixels<br />
8 soft keys;1 fixed key<br />
LED indicator<br />
Controller 68008 Microprocessor<br />
Clock Speed 5 MHZ<br />
EPROM 64 KB ROM<br />
1MB RAM<br />
DRAM 1 MB<br />
Nonvolatile RAM 50 bytes<br />
Model 8909 Model 8905<br />
External Connections Parallel printer interface (25 pin “D”<br />
connector)<br />
RS-422 multidrop serial interface<br />
connection<br />
RS-422 serial interface connection<br />
2 contact closures (external event)<br />
1 switch closure input (UPS)<br />
3.5” 1.44 MB floppy disk drive<br />
Expedite <strong>8900</strong> <strong>Nucleic</strong> <strong>Acid</strong> <strong>Synthesis</strong> System User’s Guide C-3<br />
C
C<br />
Appendix C Performance Specifications<br />
Table C-1 Specifications for Expedite <strong>Nucleic</strong> <strong>Acid</strong> <strong>Synthesis</strong> System (Continued)<br />
Pneumatics Valve/solenoid driver 64 high current/voltage drivers<br />
External<br />
Workstation<br />
C-4 PerSeptive <strong>Biosystems</strong><br />
Max. current/voltage 350 mA per driver 24 V<br />
Protection Temperature<br />
Current<br />
Transient suppression<br />
Fault indication LED/TTL signal<br />
Minimum hardware<br />
requirements<br />
Model 8909 Model 8905<br />
386SX 16 MHz<br />
100% IBM compatible<br />
4 MB RAM (8 MB recommended)<br />
60 MB hard disk<br />
VGA graphics<br />
Software platform Microsoft Windows ver. 3.1<br />
DOS ver. 5.0 or higher
D <strong>Nucleic</strong> <strong>Acid</strong><br />
<strong>Synthesis</strong><br />
Reagents<br />
Part Number Short Name<br />
Appendix<br />
D<br />
This appendix contains the part numbers for the reagents<br />
used on the Expedite <strong>Nucleic</strong> <strong>Acid</strong> <strong>Synthesis</strong> System.<br />
Table D-1 Ancillary Reagents for Model 8905<br />
Bottle<br />
Position<br />
Label Description Volume<br />
GEN 089640 Wsh 1 Acetonitrile 450 mL<br />
GEN 089690 Dblk 3 Deblock (TCA)<br />
Solution<br />
180 mL<br />
GEN 089680 Act 4 Activator Solution 60 mL<br />
GEN 089650 Ox 2 Oxidizer Solution 60 mL<br />
GEN 089610 Cap A 5 Cap A 60 mL<br />
GEN 089620 Cap B 6 Cap B 60 mL<br />
GEN 902005 Amidite Diluent 50 mL<br />
GEN 089600 Reagent Kit (contains Wsh, Dblk, Act, Ox, Cap A, Cap B,<br />
Amidite Diluent)<br />
Expedite <strong>8900</strong> <strong>Nucleic</strong> <strong>Acid</strong> <strong>Synthesis</strong> System User’s Guide D-1
D<br />
Appendix D <strong>Nucleic</strong> <strong>Acid</strong> <strong>Synthesis</strong> Reagents<br />
Part Number Short Name<br />
D-2 PerSeptive <strong>Biosystems</strong><br />
Table D-2 Ancillary Reagents for Model 8909<br />
Bottle<br />
Position<br />
GEN 002006 Wsh A 7 Acetonitrile<br />
(External)<br />
Label Description Volume<br />
2500 mL<br />
GEN 089860 Wsh 1 Acetonitrile (Internal) 300 mL<br />
GEN 089865 Wsh 1 Acetonitrile (Internal) 450 mL<br />
GEN 089890 Dblk 8 Deblock (TCA)<br />
Solution<br />
900 mL<br />
GEN 089880 Act 4 Activator Solution 200 mL<br />
GEN 089885 Act 4 Activator Solution 450 mL<br />
GEN 089850 Ox 2 Oxidizer Solution 200 mL<br />
GEN 089855 Ox 2 Oxidizer Solution 450 mL<br />
GEN 089810 Cap A 5 Cap A 200 mL<br />
GEN 089815 Cap A 5 Cap A 450 mL<br />
GEN 089820 Cap B 6 Cap B 200 mL<br />
GEN 089825 Cap B 6 Cap B 450 mL<br />
GEN 066870 Amidite Diluent 100 mL<br />
GEN 089800 Reagent Kit (contains Wsh, Dblk, Act, Ox, Cap A, Cap B,<br />
Amidite Diluent)
Table D-3 Expedite Amidites and Cap A for Model 8905<br />
Part Number Short Name Label Description Quantity<br />
GEN 084154 Exp. dA Expedite dA Cyanoethyl<br />
Phosphoramidite<br />
GEN 084155 Exp. dC Expedite dC Cyanoethyl<br />
Phosphoramidite<br />
GEN 084156 Exp. dG Expedite dG Cyanoethyl<br />
Phosphoramidite<br />
0.5 g<br />
0.5 g<br />
0.5 g<br />
GEN 066030 T T Cyanoethyl Phosphoramidite 0.5 g<br />
GEN 084280 Expedite Kit (contains A, C, G, T) 0.5 g x 4<br />
GEN 084162 Exp. Cap A Expedite Cap A 60 mL<br />
Expedite <strong>8900</strong> <strong>Nucleic</strong> <strong>Acid</strong> <strong>Synthesis</strong> System User’s Guide D-3<br />
D
D<br />
Appendix D <strong>Nucleic</strong> <strong>Acid</strong> <strong>Synthesis</strong> Reagents<br />
D-4 PerSeptive <strong>Biosystems</strong><br />
Table D-4 Expedite Amidites and Cap A for Model 8909<br />
Part Number Short Name Label Description Quantity<br />
GEN 084154 Exp. dA Expedite dA Cyanoethyl<br />
Phosphoramidite<br />
GEN 084155 Exp. dC Expedite dC Cyanoethyl<br />
Phosphoramidite<br />
GEN 084156 Exp. dG Expedite dG Cyanoethyl<br />
Phosphoramidite<br />
0.5 g<br />
0.5 g<br />
0.5 g<br />
GEN 066030 T T Cyanoethyl Phosphoramidite 0.5 g<br />
GEN 084280 Expedite Kit (contains A, C, G, T) 0.5 g x 4<br />
GEN 084151 Exp. dA Expedite dA Cyanoethyl<br />
Phosphoramidite<br />
GEN 084152 Exp. dC Expedite dC Cyanoethyl<br />
Phosphoramidite<br />
GEN 084153 Exp. dG Expedite dG Cyanoethyl<br />
Phosphoramidite<br />
1.0 g<br />
1.0 g<br />
1.0 g<br />
GEN 066031 T T Cyanoethyl Phosphoramidite 1.0 g<br />
GEN 084281 Expedite Kit (contains A, C, G, T) 1.0 g x 4<br />
GEN 084163 Exp. Cap A Expedite Cap A 200 mL
Table D-5 Standard Beta-Cyanoethyl Phosphoramidite Monomers<br />
Part Number Name Quantity<br />
GEN 066000 DMT-dAdenosine (bz) Cyanoethyl Phosphoramidite 0.5 g<br />
GEN 066010 DMT-dCytidine (bz) Cyanoethyl Phosphoramidite 0.5 g<br />
GEN 066020 DMT-dGuanosine (ibu) Cyanoethyl Phosphoramidite 0.5 g<br />
GEN 066030 DMT-Thymidine Cyanoethyl Phosphoramidite 0.5 g<br />
GEN 066040 Phosphoramidite Kit (contains A, C, G, and T) 0.5 g x 4<br />
GEN 066050 DMT-dInosine Cyanoethyl Phosphoramidite 0.25 g<br />
GEN 066060 DMT-dUridine Cyanoethyl Phosphoramidite 0.25 g<br />
GEN 066070 DMT-5- Methyl dCytidine (bz) Cyanoethyl<br />
Phosphoramidite<br />
0.25 g<br />
GEN 066001 DMT-dAdenosine (bz) Cyanoethyl Phosphoramidite 1.0 g<br />
GEN 066011 DMT-dCytidine (bz) Cyanoethyl Phosphoramidite 1.0 g<br />
GEN 066021 DMT-dGuanosine (ibu) Cyanoethyl Phosphoramidite 1.0 g<br />
GEN 066031 DMT-Thymidine Cyanoethyl Phosphoramidite 1.0 g<br />
GEN 066041 Phosphoramidite Kit (contains A, C, G, and T) 1.0 g x 4<br />
Expedite <strong>8900</strong> <strong>Nucleic</strong> <strong>Acid</strong> <strong>Synthesis</strong> System User’s Guide D-5<br />
D
D<br />
Appendix D <strong>Nucleic</strong> <strong>Acid</strong> <strong>Synthesis</strong> Reagents<br />
Table D-6 Pre-Packed Columns for Beta-Cyanoethyl Phosphoramidite <strong>Synthesis</strong><br />
Description<br />
D-6 PerSeptive <strong>Biosystems</strong><br />
<strong>Synthesis</strong><br />
Scale<br />
Part Number<br />
500 A 1000 A<br />
DMT-dAdenosine (bz)-CPG 0.05 μmol GEN 062700 - 4<br />
0.2 μmol GEN 062650 GEN 062600 4<br />
1.0 μmol GEN 061550 GEN 061500 4<br />
15 μmol GEN 061750 - 1<br />
DMT-dCytidine (bz)-CPG 0.05 μmol GEN 062710 - 4<br />
0.2 μmol GEN 062660 GEN 062610 4<br />
1.0 μmol GEN 061560 GEN 061510 4<br />
15 μmol GEN 061760 - 1<br />
DMT-dGuanosine (ibu)-CPG 0.05 μmol GEN 062720 - 4<br />
0.2 μmol GEN 062670 GEN 062620 4<br />
1.0 μmol GEN 061570 GEN 061520 4<br />
15 μmol GEN 061770 - 1<br />
DMT-Thymidine-CPG 0.05 μmol GEN 062730 - 4<br />
Column Kit contains one<br />
column each of A, C, G, and T<br />
0.2 μmol GEN 062680 GEN 062630 4<br />
1.0 μmol GEN 061580 GEN 061530 4<br />
15 μmol GEN 061780 - 1<br />
0.05 μmol GEN 062740 - 4<br />
0.2 μmol GEN 062960 GEN 062640 4<br />
1.0 μmol GEN 061590 GEN 061540 4<br />
Cols/P<br />
kg
Description<br />
Table D-7 Pre-Packed Expedite Columns<br />
<strong>Synthesis</strong><br />
Scale<br />
Part Number<br />
500 A 1000 A<br />
dAdenosine tBPA-CPG 50 nmol GEN 084164 - 4<br />
0.2 µmol GEN 084167 GEN084179 4<br />
1.0 µmol GEN084170 GEN084182 4<br />
dCytidine tBPA-CPG 50 nmol GEN 084165 - 4<br />
0.2 µmol GEN 084168 GEN084180 4<br />
1.0 µmol GEN084171 GEN084183 4<br />
dGuanosine tBPA-CPG 50 nmol GEN084166 - 4<br />
0.2 µmol GEN084169 GEN084181 4<br />
1.0 µmol GEN084172 GEN084184 4<br />
Thymidine-CPG 50 nmol GEN062730 - 4<br />
50 nmol Column kit (contains<br />
one 50 nmol column of each<br />
A, C, G, and T)<br />
0.2 µmol Column kit (contains<br />
one 0.2 µmol column of each<br />
A, C, G, and T)<br />
1.0 µmol Column kit (contains<br />
one 1.0 µmol column of each<br />
A, C, G, and T)<br />
0.2 µmol GEN062680 GEN062630 4<br />
1.0 µmol GEN061580 GEN061530 4<br />
50 nmol GEN084296 - 4<br />
0.2 µmol GEN084298 GEN084303 4<br />
1.0 µmol GEN084300 GEN084305 4<br />
Cols/P<br />
kg<br />
Expedite <strong>8900</strong> <strong>Nucleic</strong> <strong>Acid</strong> <strong>Synthesis</strong> System User’s Guide D-7<br />
D
D<br />
Appendix D <strong>Nucleic</strong> <strong>Acid</strong> <strong>Synthesis</strong> Reagents<br />
D-8 PerSeptive <strong>Biosystems</strong><br />
Table D-8 MemSyn <strong>Nucleic</strong> <strong>Acid</strong> <strong>Synthesis</strong> Devices<br />
Part Number Description<br />
GEN 050006 MemSyn A, 50 nmol scale<br />
GEN 050016 MemSyn C, 50 nmol scale<br />
GEN 050026 MemSyn G, 50 nmol scale<br />
GEN 050036 MemSyn T, 50 nmol scale<br />
GEN 050004 MemSyn A, 0.2 µmol scale<br />
GEN 050014 MemSyn C, 0.2 µmol scale<br />
GEN 050024 MemSyn G, 0.2 µmol scale<br />
GEN 050034 MemSyn T, 0.2 µmol scale
E Accessories<br />
and Spare Parts<br />
Appendix<br />
E<br />
This appendix contains the part numbers of the<br />
accessories and spare parts for the Expedite <strong>Nucleic</strong> <strong>Acid</strong><br />
<strong>Synthesis</strong> System.<br />
Accessories GEN 210222 Uninterruptable Power supply (115 Vac)<br />
kit w/cable<br />
GEN 210282 Uninterruptable Power supply (220 Vac)<br />
kit w/cable<br />
GEN 210219 Cable, Frac. Col., ISCO, <strong>8900</strong><br />
GEN 103258 Gas tank regulator, kit<br />
Miscellaneous GEN 210131 Drip tray, chassis, replacement<br />
GEN 210147 Fuse, 2A, 5x20mm, 2/pk<br />
GEN 210208 RS422 Interface card, AT style<br />
GEN 210212 Adapter, DB-25M to RJ45<br />
GEN 210209 Cable, interconnect, RJ45 flat, 14 ft.<br />
Replacement<br />
Filters<br />
GEN 210168 Kit, Reservoir. filter, 8909 (19/pk)<br />
GEN 210169 Kit, Reservoir. filter, 8905 (12/pk)<br />
Expedite <strong>8900</strong> <strong>Nucleic</strong> <strong>Acid</strong> <strong>Synthesis</strong> System User’s Guide E-1
E<br />
Appendix E Accessories and Spare Parts<br />
Replacement<br />
0-rings<br />
Replacement<br />
Reservoirs<br />
E-2 PerSeptive <strong>Biosystems</strong><br />
GEN 210164 Kit, O-ring, Rgt. Res., 8905/09<br />
GEN 210165 Kit, O-ring, Nucl. Res, 8909<br />
GEN 210166 Kit, O-ring, Nucl. Res, 8905<br />
GEN 210167 Kit, O-ring, Caddy, 8909<br />
GEN 317081 O-ring, for 38mm, cap,10/ pk<br />
GEN 105915 Bottle, 4L, amber, plastic-coated (Waste)<br />
GEN 330220 Bottle, 1L, plastic coated, (External Deblock,<br />
Trityl Waste)<br />
GEN 102461 Bottle, 2L, plastic coated (Wash)<br />
GEN 322140 Bottle, boston round, 1 oz (Monomers)<br />
GEN 322150 Bottle, boston round, 6 oz (Reagents), 8905<br />
only<br />
GEN 332160 Bottle, boston round, 8 oz (Reagents)<br />
Options GEN 210182 Expedite Workstation software<br />
GEN 600173 Multiple Oligonucleotide <strong>Synthesis</strong> System<br />
(MOSS option)<br />
GEN 600175 Expedite PNA Instrument option<br />
Documentation 601318 Documentation set containing Expedite<br />
<strong>8900</strong> <strong>Nucleic</strong> <strong>Acid</strong> <strong>Synthesis</strong> System User’s<br />
Guide and Expedite <strong>8900</strong> <strong>Nucleic</strong> <strong>Acid</strong><br />
<strong>Synthesis</strong> System Quick Reference Card<br />
601307 Multiple Oligo <strong>Synthesis</strong> System (MOSS) for<br />
the Expedite <strong>8900</strong> <strong>Nucleic</strong> <strong>Acid</strong> <strong>Synthesis</strong><br />
System User’s Guide<br />
601308 PNA Chemistry for the Expedite <strong>8900</strong><br />
<strong>Nucleic</strong> <strong>Acid</strong> <strong>Synthesis</strong> System User’s<br />
Guide<br />
601309 Expedite <strong>8900</strong> <strong>Nucleic</strong> <strong>Acid</strong> <strong>Synthesis</strong><br />
System Macintosh Interface User’s Guide
F Trityl Monitor<br />
Appendix<br />
F<br />
This appendix contains the following sections:<br />
F.1 Introduction ...................................................F-2<br />
F.2 Safety Precautions .......................................F-4<br />
F.3 Displaying Trityl Data ...................................F-6<br />
F.4 Interpreting Trityl Data ...............................F-11<br />
F.5 Trityl Monitor Alarms ..................................F-15<br />
F.6 Troubleshooting..........................................F-21<br />
Expedite <strong>8900</strong> <strong>Nucleic</strong> <strong>Acid</strong> <strong>Synthesis</strong> System User’s Guide F-1
F<br />
Appendix F Trityl Monitor<br />
F.1 Introduction<br />
F-2 PerSeptive <strong>Biosystems</strong><br />
The Expedite Trityl Monitor detects the acid-labile dimethoxy<br />
trityl (DMT) protecting group removed from the 5' end of an<br />
oligonucleotide during the deblocking step in the synthesis.<br />
The amount of DMT released from the column is an indication<br />
of the success of the addition of the last monomer to the<br />
growing oligonucleotide chain. The DMT group is an orange<br />
species in the acidic deblocking solution which the trityl<br />
monitor is tuned to detect as it passes through a flow cell.<br />
There is a photo detector on the trityl monitor board and an<br />
LED on the opposite side of the flow cell which emits light at<br />
470nm, a wavelength which DMT absorbs.<br />
NOTE: Helium is the recommended gas when an<br />
instrument is equipped with a trityl monitor because helium<br />
produces fewer bubbles during deblocking. Gas bubbles<br />
passing through the trityl monitor may interfere with its<br />
function.<br />
Service The trityl monitor must be serviced by trained PerSeptive<br />
<strong>Biosystems</strong> personnel. Do not attempt to service the trityl<br />
monitor yourself. Contact your local PerSeptive <strong>Biosystems</strong><br />
representative.<br />
Display During deblocking, the orange DMT solution passes through a<br />
flow cell. When deblocking is complete, the software displays<br />
the processed detector output as a bar chart to allow you to<br />
monitor the progress of each coupling cycle. The instrument<br />
screen can display trityl monitor determinations for up to<br />
250 couplings.<br />
NOTE: Use trityl monitor determinations only as<br />
approximations of the success rate of couplings and for<br />
estimating total yield. They are not a substitute for<br />
quantitative analysis.
Introduction<br />
The trityl monitor is mounted inside the instrument cabinet<br />
behind the columns and is inaccessible to the user. If a leak<br />
occurs, the integral drip tray drains to the column drip tray<br />
which in turn drains into the instrument drip tray.<br />
If the trityl monitor detects a total yield failure (when the yield<br />
from a deblock step has fallen below a minimum threshold), it<br />
will, at the option of the user, halt the synthesis at the end of<br />
the current cycle. When you do not want to use this feature,<br />
disable the trityl alarm for Column1, Column 2 or both. See<br />
Section F.5, Trityl Monitor Alarms, for details.<br />
Waste Fluids The trityl monitor has a diversion valve to direct chlorinated<br />
and nonchlorinated wastes to separate waste containers for<br />
ease of disposal. There are four waste lines:<br />
• Column 1 chlorinated waste<br />
• Column 1 nonchlorinated waste<br />
• Column 2 chlorinated waste<br />
• Column 2 nonchlorinated waste<br />
DMT waste is included in the chlorinated waste effluent.<br />
Four bands identify each waste tube. Waste tube band<br />
markings are summarized in Table F-1. The chlorinated waste<br />
lines can also be connected to a fraction collector to gather the<br />
trityl color for visual inspection.<br />
Table F-1 Waste Tube Band Markings<br />
Column<br />
Number<br />
1<br />
2<br />
Type of Waste<br />
Waste Tube<br />
Band Markings<br />
Chlorinated T R T 1<br />
Nonchlorinated O R G 1<br />
Chlorinated T R T 2<br />
Nonchlorinated O R G 2<br />
Fraction collector There are two event outputs (contact closures) at the back of<br />
the synthesizer that can be used to advance a fraction<br />
collector: one (Event 1) for Column 1 and one (Event 2) for<br />
Column 2. Consult the technical manual of the fraction<br />
collector for connection instructions.<br />
Expedite <strong>8900</strong> <strong>Nucleic</strong> <strong>Acid</strong> <strong>Synthesis</strong> System User’s Guide F-3<br />
F
F<br />
Appendix F Trityl Monitor<br />
F.2 Safety Precautions<br />
The following information is provided to ensure safe operation<br />
of the Expedite <strong>Nucleic</strong> <strong>Acid</strong> <strong>Synthesis</strong> System. Please read it<br />
carefully before using the instrument and observe the<br />
following safety recommendations.<br />
Electrical Use only the shielded AC cord provided. You must unplug the<br />
main power cable before you service or repair the instrument.<br />
F-4 PerSeptive <strong>Biosystems</strong><br />
WARNING<br />
To prevent electric shock, do not remove the instrument<br />
cover. There are no user serviceable parts within the<br />
cabinet. Refer servicing to qualified personnel.<br />
AVERTISSEMENT<br />
Afin d'éviter les chocs électriques, ne retirez pas le<br />
couvercle de l'appareil. Il n'y a à l'intérieur de l'appareil<br />
aucune pièce que vous puissiez remplacer vous-même.<br />
Faites appel au service technique de PerSeptive<br />
<strong>Biosystems</strong>.<br />
Gas Supply Securely anchor the tank of pressurized gas.<br />
We recommend the use of a dual stage regulator to step the<br />
pressure down to 20 psi.<br />
Operating<br />
Temperature<br />
Instrument<br />
Venting<br />
The protocols are optimized for room temperature operation<br />
(20–30 ° C).<br />
The instrument cabinet is equipped with an exhaust fan that<br />
vents vapors to the rear of the instrument. Make sure that the<br />
vent tube on the back of the instrument is connected to a<br />
suitable exhaust duct.
Reagent Handling<br />
Safety Precautions<br />
Most of the reagents and solvents used in nucleic acid<br />
synthesis are hazardous. Wear a lab coat, gloves and eye<br />
protection when handling reagents. Adequate ventilation is<br />
essential and working under a fume hood is recommended.<br />
Flammable reagents should be kept in an appropriate<br />
flameproof cabinet. Oxidizers should be isolated. Consult the<br />
Expedite <strong>8900</strong> User’s Guide, Appendix B, for information on<br />
the handling of specific chemicals.<br />
Make sure that you put the reagent bottles on the instrument<br />
in the correct position. Mixing up the bottles will contaminate<br />
the instrument. The reagent bottles on the instrument are<br />
pressurized. Take care when removing the bottles from the<br />
instrument.<br />
Waste Disposal Collect the waste generated from oligonucleotide synthesis<br />
and dispose of it in accordance with local, state, and federal<br />
regulations pertaining to toxic waste removal.<br />
Expedite <strong>8900</strong> <strong>Nucleic</strong> <strong>Acid</strong> <strong>Synthesis</strong> System User’s Guide F-5<br />
F
F<br />
Appendix F Trityl Monitor<br />
F.3 Displaying Trityl Data<br />
F-6 PerSeptive <strong>Biosystems</strong><br />
Use the following procedure to display trityl monitor data.<br />
1. If the Main menu is not displayed, press Exit as many<br />
times as necessary to display the Main menu shown in<br />
Figure F-1.<br />
Figure F-1 Main Menu<br />
NOTE: Previous trityl data is only retained until another<br />
synthesis is run, except when the instrument is<br />
communicating with an Expedite Workstation.<br />
2. From the Main menu select Stat to display the Status:<br />
Combined menu shown in Figure F-2.<br />
Figure F-2 Status: Combined
Displaying Trityl Data<br />
3. From the Status: Combined menu select Col1 or Col2 to<br />
display the Status: Column # menu shown in Figure F-3.<br />
Figure F-3 Status: Column # Menu<br />
NOTE: The number sign (#) is either 1 or 2 depending<br />
on whether Column 1 or Column 2 is selected.<br />
4. From the Status: Column # screen select Trityl to display<br />
the Status: Trityl Col # screen shown in Figure F-4. The<br />
system automatically updates the bar graph as the<br />
synthesis progresses.<br />
Figure F-4 Status: 11Trityl Col # Screen<br />
The number in the upper right corner of the screen<br />
represents the value for the highest bar on the<br />
histogram. This number is unitless and represents the<br />
raw integration value of the maximum bar (excluding<br />
the 3' bar).<br />
NOTE: Do not use this number to quantify the<br />
performance of the synthesizer. This number is only a<br />
qualitative tool for estimating the synthesis scale and<br />
for troubleshooting.<br />
Expedite <strong>8900</strong> <strong>Nucleic</strong> <strong>Acid</strong> <strong>Synthesis</strong> System User’s Guide F-7<br />
F
F<br />
Appendix F Trityl Monitor<br />
F-8 PerSeptive <strong>Biosystems</strong><br />
The number in the upper left corner of the screen is only<br />
an estimate of the synthesis scale. The scale estimation<br />
is based on the integration value of the highest bar in<br />
the graph (excluding the first bar) assuming that<br />
standard PerSeptive <strong>Biosystems</strong> protocols are used for<br />
the synthesis.<br />
Possible values for the estimated scale are listed in<br />
Table F-2.<br />
Table F-2 Trityl Viewer Scale Estimates<br />
Scale Explanation<br />
Low<br />
0.02 μmole<br />
• The estimated synthesis scale is less than<br />
0.05 μmole.<br />
• There may be a problem with the synthesis<br />
or the trityl monitor (see Section F.4,<br />
Interpreting Trityl Data)<br />
0.05 μmole The estimated synthesis scale is within the<br />
0.05 μmole range.<br />
0.2 μmole The estimated synthesis scale is within the<br />
0.2 μmole range.<br />
1.0 μmole The estimated synthesis scale is within the<br />
1.0 μmole range.<br />
15 μmole The estimated synthesis scale is within the<br />
15 μmole range.<br />
High • The estimated synthesis scale is greater<br />
than 15 μmole.<br />
• There may be a problem with the synthesis<br />
or the trityl monitor (see Section F.4,<br />
Interpreting Trityl Data)<br />
5. To view the trityl data on the other column, select Col#.
Printing Trityl<br />
Data<br />
Displaying Trityl Data<br />
Trityl data may be printed out on a printer connected to the<br />
printer port on the instrument; or captured by the Expedite<br />
Workstation Software.<br />
To obtain a printed copy of trityl monitor data, select either of<br />
the following options:<br />
• Print provides a printout similar to that shown in<br />
Figure F-5.<br />
• P-raw provides a printout that includes the raw data<br />
values.<br />
NOTE: Use trityl monitor determinations only as<br />
approximations of the success of couplings and for<br />
estimating synthesis scale. These values are not a<br />
substitute for quantitative analysis.<br />
Expedite <strong>8900</strong> <strong>Nucleic</strong> <strong>Acid</strong> <strong>Synthesis</strong> System User’s Guide F-9<br />
F
F<br />
Appendix F Trityl Monitor<br />
PerSeptive <strong>Biosystems</strong><br />
F-10 PerSeptive <strong>Biosystems</strong><br />
Figure F-5 Trityl Data Printout
F.4 Interpreting Trityl Data<br />
Interpreting Trityl Data<br />
Data from the trityl monitor is displayed in a bar graph format.<br />
Each bar, which is an indication of the success of the previous<br />
coupling, represents the cumulative photometric data<br />
collected from the trityl monitor during the deblocking step.<br />
Individual bars in the graph may be wider or narrower than the<br />
examples shown here depending on the number of couplings<br />
displayed.<br />
NOTE: Use trityl monitor determinations only as<br />
approximations of the success of couplings and for<br />
estimating synthesis scale. These values are not a<br />
substitute for quantitative analysis.<br />
Normal <strong>Synthesis</strong> A normal synthesis, shown in Figure F-6, typically shows an<br />
overall decline in the height of the bars as each monomer is<br />
added.<br />
The 3' reading (i.e., the leftmost bar of the graph) is ignored for<br />
scale estimation and trityl alarms because:<br />
• Gas trapped in the newly mounted column may<br />
interfere with the trityl monitor’s functioning resulting<br />
in an abnormal reading.<br />
• The DMT protecting group of the 3' monomer<br />
attached to the column may have been lost while in<br />
storage.<br />
Figure F-6 Normal <strong>Synthesis</strong><br />
Expedite <strong>8900</strong> <strong>Nucleic</strong> <strong>Acid</strong> <strong>Synthesis</strong> System User’s Guide F-11<br />
.<br />
F
F<br />
Appendix F Trityl Monitor<br />
F-12 PerSeptive <strong>Biosystems</strong><br />
NOTE: Always store columns in a cool desiccator to<br />
prevent spontaneous loss of the DMT protecting group.<br />
The overall appearance of the bar graph may appear ragged.<br />
This irregularity can be caused by:<br />
• Deblock solution out-gassing within the flow cell.<br />
• The DMT deblocking rate differences for various<br />
monomers. Typically the DMT group is removed from<br />
a G residue in the shortest period of time which<br />
results in a more intensely colored solution.<br />
Conversely, the DMT group is removed from a<br />
T residue in the longest period of time which results in<br />
the least intensely colored solution. Because the<br />
absorbance intensity is not linearly proportional to the<br />
concentration of DMT, the amount of DMT is<br />
underestimated for a G residue and is most<br />
representative for a T residue. Therefore, the bar for a<br />
G residue is somewhat smaller than the average and<br />
the bar for T residues is somewhat larger than<br />
average (see Figure F-5).<br />
• Electronic noise or ordinary drift in the trityl monitor.<br />
Initial Failure An initial failure is displayed by the trityl monitor as a synthesis<br />
in which the bar size quickly drops to a level which is<br />
unacceptably low (see Figure F-7).<br />
Figure F-7 Failed <strong>Synthesis</strong>
Interpreting Trityl Data<br />
If trityl monitor alarms are enabled (see Section F.5, Trityl<br />
Monitor Alarms), a total yield failure may occur and the<br />
synthesis would then be halted at the end of the current cycle.<br />
A synthesis can fail because:<br />
• The reagents have degraded<br />
• The reagents are not anhydrous<br />
• Low delivery of monomer or activator (Reservoir is<br />
empty)<br />
• Inefficient deblocking<br />
Sudden Failure A sudden failure is one in which there is a drastic decrease in<br />
bar size after initial successful couplings (see Figure F-8). A<br />
sudden failure can occur because:<br />
• A reagent bottle may be depleted of solution<br />
• A pneumatic failure may have occurred (over or under<br />
pressure, leaking gas or running out of gas)<br />
Figure F-8 Drastic Failure<br />
If trityl monitor alarms are enabled (see Section F.5, Trityl<br />
Monitor Alarms), a total yield failure may occur and the<br />
synthesis would then be halted at the end of the current cycle.<br />
NOTE: A pneumatic failure would be detected by sensors in<br />
the system unless they are disabled.<br />
Expedite <strong>8900</strong> <strong>Nucleic</strong> <strong>Acid</strong> <strong>Synthesis</strong> System User’s Guide F-13<br />
.<br />
F
F<br />
Appendix F Trityl Monitor<br />
System Failure A system failure is a failure caused by an instrument<br />
malfunction. System failures may produce a trityl display such<br />
as that shown in Figure F-9.<br />
F-14 PerSeptive <strong>Biosystems</strong><br />
Figure F-9 System Failure<br />
A system failure could be caused by one of the following:<br />
• An electronic failure. (Contact your PerSeptive<br />
<strong>Biosystems</strong> Service Representative.)<br />
• A problem with the trityl monitor optics. (Contact your<br />
PerSeptive <strong>Biosystems</strong> Service Representative.)<br />
Delivery Failure A delivery failure may be caused by the failure of fluid delivery<br />
through the reaction column. This type of failure results in<br />
random trityl monitor displays as shown in Figure F-10.<br />
Figure F-10 Delivery Failure
Trityl Monitor Alarms<br />
A fluid delivery failure can be caused by any of the following:<br />
• A pneumatic failure (running out of gas).<br />
• A blockage in the flow path (check waste tubing).<br />
• Fluid lines from the columns to the trityl monitor are<br />
switched (that is, column 1 output goes into the<br />
column 2 of the trityl monitor flow cell, or the reverse).<br />
F.5 Trityl Monitor Alarms<br />
This section describes the halting of a synthesis by the trityl<br />
monitor and how to proceed when the trityl monitor signals a<br />
total yield failure. It also describes how to enable and disable<br />
trityl monitor alarms.<br />
Halted <strong>Synthesis</strong> When the trityl monitor detects a total yield failure, the system<br />
displays the screen shown in Figure F-11. If the trityl monitor<br />
alarm is enabled, it halts the synthesis at the end of the current<br />
cycle.<br />
Figure F-11 Trityl Total Yield Failure Alarm<br />
When a synthesis has been halted, perform the following<br />
operations.<br />
1. Press OK to acknowledge the alarm. The display<br />
returns to the screen displayed before the alarm.<br />
2. See Section F.4, Interpreting Trityl Data, and determine<br />
the nature of the problem that caused the alarm.<br />
3. Correct the problem.<br />
Expedite <strong>8900</strong> <strong>Nucleic</strong> <strong>Acid</strong> <strong>Synthesis</strong> System User’s Guide F-15<br />
F
F<br />
Appendix F Trityl Monitor<br />
F-16 PerSeptive <strong>Biosystems</strong><br />
4. Determine whether you want the synthesis to continue.<br />
• If you want the synthesis to continue:<br />
• If the Main menu is not displayed, press Exit as<br />
many times as necessary to display the Main<br />
menu.<br />
• From the Main menu press Start to continue the<br />
synthesis.<br />
• If the synthesis has been compromised and you want<br />
to abort:<br />
• If the Main menu is not displayed, press Exit as<br />
many times as necessary to display the Main<br />
menu.<br />
• From the Main menu choose Seq to display the<br />
Sequence menu.<br />
• From the Sequence menu choose Abort to<br />
terminate the synthesis. The Main menu will<br />
then be displayed.<br />
If you do not want a synthesis halted by a trityl monitor alarm,<br />
change the profile to disable the alarm.<br />
NOTE: If the trityl total yield failure alarm is displayed and<br />
the synthesis has not yet come to the end of the current<br />
cycle, pressing OK will cause the synthesis to continue<br />
without halting.
Enabling/<br />
Disabling the<br />
Alarms<br />
Trityl Monitor Alarms<br />
The trityl monitor alarms are enabled by default for every<br />
profile. To customize the alarms (that is to turn them on or off<br />
for a particular profile), use the following procedure.<br />
1. If the Main menu is not displayed, press Exit as many<br />
times as necessary to display the Main menu shown in<br />
Figure F-12.<br />
Figure F-12 Main Menu<br />
2. If the profile number displayed in the Main menu is the<br />
one whose alarms you want to enable or disable, go to<br />
step 3. If the profile number is not the one you want to<br />
work with, select the desired profile number. See<br />
Section 3.6.6, Specifying a User Profile, for information<br />
on changing profiles.<br />
3. From the Main menu select Tools to display the Tools<br />
menu shown in Figure F-13.<br />
Figure F-13 Tools Menu<br />
Expedite <strong>8900</strong> <strong>Nucleic</strong> <strong>Acid</strong> <strong>Synthesis</strong> System User’s Guide F-17<br />
F
F<br />
Appendix F Trityl Monitor<br />
F-18 PerSeptive <strong>Biosystems</strong><br />
4. From the Tools menu select Config to display the Tools:<br />
Config menu shown in Figure F-14.<br />
Figure F-14 Tools: Config Menu<br />
5. From the Tools: Config menu select Profil to display the<br />
Tools—Config: Profile # menu shown in Figure F-15.<br />
Figure F-15 Tools—Config: Profile # Menu<br />
NOTE: The number sign (#) will be 1–8 depending on the<br />
number of the profile.<br />
.<br />
.
Trityl Monitor Alarms<br />
6. From the Tools—Config: Profile # menu select Edit to<br />
display the first profile configuration screen shown in<br />
Figure F-16.<br />
Figure F-16 Tools—Config—Profile: Profile # Menu<br />
7. Select More to display the second profile configuration<br />
screen shown in Figure F-17.<br />
Figure F-17 Tools—Config—Profil: Alarm Menu<br />
8. Press the soft keys to toggle the trityl alarms On and Off.<br />
• Trityl Col1 On or Off<br />
• Trityl Col2 On or Off<br />
The factory default settings for the trityl monitor alarms<br />
are shown in Figure F-17.<br />
Expedite <strong>8900</strong> <strong>Nucleic</strong> <strong>Acid</strong> <strong>Synthesis</strong> System User’s Guide F-19<br />
F
F<br />
Appendix F Trityl Monitor<br />
F-20 PerSeptive <strong>Biosystems</strong><br />
Key #<br />
The trityl monitor alarm functions that are assigned to<br />
the soft toggle keys are described in Table F-3.<br />
Table F-3 Trityl Monitor Alarms<br />
Key<br />
Name<br />
5 Trityl<br />
Col1<br />
6 Trityl<br />
Col2<br />
Function<br />
To enable or disable the trityl monitor<br />
alarm for Column1.<br />
To enable or disable the trityl monitor<br />
alarm for Column2.<br />
9. From the Tools—Config—Profile: Profile # menu select<br />
Exit to display the User Profile: Profile # screen shown in<br />
Figure F-18.<br />
Figure F-18 User Profile: Profile # Screen<br />
10. Select OK to record trityl monitor alarm setting changes<br />
in the designated profile.
F.6 Troubleshooting<br />
Troubleshooting<br />
If the following conditions arise in the ordinary use of a system<br />
with the trityl monitor installed, proceed as directed below.<br />
• The system produces the “No trityl monitor installed”<br />
messages shown in Figure F-19 when the trityl<br />
monitor is, in fact, installed. Contact your PerSeptive<br />
<strong>Biosystems</strong> Service Representative.<br />
Figure F-19 No Trityl Monitor Detected Screen<br />
• Orange fluid is observed in the column drip tray or in<br />
the removable instrument cabinet drip tray. Make sure<br />
the column is installed correctly. If orange fluid<br />
continues to appear, contact your PerSeptive<br />
<strong>Biosystems</strong> Service Representative.<br />
• The trityl monitor indicates a system failure. See<br />
Section F.4, Interpreting Trityl Data. Contact your<br />
PerSeptive <strong>Biosystems</strong> Service Representative.<br />
• Fluid is not observed dripping into the trityl waste<br />
reservoir during the deblock step may indicate<br />
diversion valve failure. Contact your PerSeptive<br />
<strong>Biosystems</strong> Service Representative.<br />
WARNING<br />
An orange color in the drip tray may indicate leakage from<br />
the trityl monitor.<br />
Expedite <strong>8900</strong> <strong>Nucleic</strong> <strong>Acid</strong> <strong>Synthesis</strong> System User’s Guide F-21<br />
F
F<br />
Appendix F Trityl Monitor<br />
F-22 PerSeptive <strong>Biosystems</strong><br />
AVERTISSEMENT<br />
Une couleur orange au niveau du plateau de récupération<br />
peut indiquer une fuite du moniteur de trityle.<br />
There are no user corrective or preventive maintenance<br />
procedures for a system with a trityl monitor beyond those<br />
already discussed in the Expedite <strong>8900</strong> <strong>Nucleic</strong> <strong>Acid</strong><br />
<strong>Synthesis</strong> System User’s Guide.
G Warranty/Service<br />
Information<br />
G.1 Limited Product Warranty<br />
Warranty<br />
period<br />
Appendix<br />
G<br />
PerSeptive <strong>Biosystems</strong>, Inc. warrants that all standard<br />
components of its new instrument workstations (excluding<br />
items replaceable by the user, such as lamps, flow cells,<br />
seals, fittings, tubing, and filters) will be free of defects in<br />
materials and workmanship for a period of one (1) year.<br />
PerSeptive will repair or replace, at its discretion, all<br />
defective components during this warranty period. After<br />
this warranty period, repairs and replacement components<br />
may be purchased from PerSeptive at its published rates.<br />
PerSeptive <strong>Biosystems</strong> also provides service agreements<br />
for post-warranty coverage.<br />
PerSeptive <strong>Biosystems</strong>, Inc., guarantees all optional<br />
accessories supplied with its instrument workstations,<br />
such as detectors, fraction collectors, printers, and special<br />
monitors, will be free of defects in materials and<br />
workmanship for a period of ninety (90) days. PerSeptive<br />
will repair or replace, at its discretion, all defective<br />
accessories during the warranty period. After this warranty<br />
period, PerSeptive will pass on to the buyer, to the extent<br />
that it is permitted to do so, the warranty of the original<br />
manufacturer for such accessories.<br />
Expedite <strong>8900</strong> <strong>Nucleic</strong> <strong>Acid</strong> <strong>Synthesis</strong> System User’s Guide G-1
G<br />
Appendix G Warranty/Service Information<br />
Warranty<br />
period effective<br />
date<br />
Warranty<br />
exceptions<br />
G-2 PerSeptive <strong>Biosystems</strong><br />
PerSeptive <strong>Biosystems</strong>, Inc., warrants that all userreplaceable<br />
items, including lamps, flow cells, fittings,<br />
tubing, and filters are free of defects in materials and<br />
workmanship when received by the buyer, but not<br />
thereafter. PerSeptive also warrants all deuterium lamps<br />
to be free of defects in materials and workmanship and to<br />
operate above one half (1/2) of the original light intensity<br />
for a period equal to the lesser of one year or 1,000 hours<br />
of use. PerSeptive will repair or replace, at its discretion,<br />
all defective replaceable items during the applicable<br />
warranty period.<br />
PerSeptive <strong>Biosystems</strong>, Inc. warrants that the software<br />
designated for use with the instrument will execute its<br />
programming instructions when properly installed on the<br />
product. PerSeptive does not warrant that the operation of<br />
the instrument or software will be uninterrupted or error<br />
free. PerSeptive <strong>Biosystems</strong> will provide any software<br />
corrections or “bug-fixes”, if and when they become<br />
available, for a period of one (1) year after installation.<br />
Any applicable warranty period under these sections will<br />
begin on the date of installation for hardware and software<br />
installed by PerSeptive personnel, unless that date has<br />
been delayed at the buyer's request. In that case, and for<br />
all hardware and software installed by the buyer, the<br />
applicable warranty period begins the date the component<br />
is received.<br />
The above warranties shall not apply to defects resulting<br />
from misuse, negligence, or accident, including without<br />
limitation: operation with incompatible solvents or samples<br />
in the system; operation outside of the environmental<br />
specifications of the instrument or accessories;<br />
performance of improper or inadequate maintenance by<br />
the user; installation of software or interfacing not supplied<br />
by PerSeptive; and modification of the instrument or the<br />
software not authorized by PerSeptive.<br />
The foregoing provisions set forth PerSeptive's sole and<br />
exclusive representations, warranties, and obligations with<br />
respect to the products, and PerSeptive makes no other<br />
warranty of any kind whatsoever, express or implied,<br />
warranties of merchantability and fitness for a particular
Warranty<br />
limitations<br />
Limited Product Warranty<br />
purpose, whether arising from a statute or otherwise in law<br />
or from a course of dealing or usage of trade. Such limited<br />
warranty is given only to buyer of any third party in the<br />
event of use of products furnished hereunder by any third<br />
party.<br />
The remedies provided herein are buyer's sole and<br />
exclusive remedies. Without limiting the generality of the<br />
foregoing, in no event shall PerSeptive be liable, whether<br />
in contact, in tort, or on any other basis, for direct, indirect,<br />
punitive, incidental, consequential, or special damages<br />
sustained by the buyer or any other person, whether or<br />
not foreseeable and whether or not PerSeptive is advised<br />
of the possibility of such damage, including without<br />
limitation, damage arising from or related to loss of use,<br />
loss of data, failure or interruption in the operation of any<br />
equipment or software, delay in repair or replacement, or<br />
for loss of revenue or profits, loss of good will, loss of<br />
business or other financial loss or personal injury or<br />
property damage.<br />
Expedite <strong>8900</strong> <strong>Nucleic</strong> <strong>Acid</strong> <strong>Synthesis</strong> System User’s Guide G-3<br />
G
G<br />
Appendix G Warranty/Service Information<br />
G.2 Damages, Claims, Returns<br />
Damages Please unpack any shipments promptly after receipt to<br />
check for any concealed damaged.<br />
If you discover damage, stop unpacking. Contact the<br />
shipping carrier and request inspection by a local agent.<br />
Secure a written report of the findings to support the claim.<br />
Do not return damaged goods to PerSeptive <strong>Biosystems</strong><br />
without first securing an inspection report, and contacting<br />
PerSeptive <strong>Biosystems</strong> Technical Support for a Return<br />
Authorization (RA) number.<br />
Claims After a damage inspection report is secured, PerSeptive<br />
<strong>Biosystems</strong> will supply replacements and process claims<br />
which are initiated by either party.<br />
Returns Please do not return any material without prior notification<br />
and authorization.<br />
If, for any reason, it becomes necessary to return material<br />
to us, please contact PerSeptive <strong>Biosystems</strong> Technical<br />
Support, or your nearest PerSeptive <strong>Biosystems</strong><br />
subsidiary or distributor for a Return Authorization (RA)<br />
number and forwarding address.<br />
G-4 PerSeptive <strong>Biosystems</strong><br />
Place the RA number in a prominent location on the<br />
outside of the shipping container, and return the material<br />
to the appropriate address.
Index<br />
* in instrument address 3-5<br />
* next to Profile 3-88<br />
* next to Sequence 3-8<br />
A<br />
Aborting a synthesis 3-7, 3-27<br />
Accessories 1-5<br />
Acetic anhydride, safety<br />
precautions B-2<br />
Acetonitrile, safety precautions B-2<br />
ACT, see Activator<br />
Activator (ACT)<br />
loading 2-34<br />
location 2-31<br />
reagent description 2-27<br />
safety precautions B-3<br />
Address, instrument<br />
asterisk (*) next to 3-5<br />
location 3-4<br />
setting 3-83<br />
valid entries 3-83<br />
zero (0) 3-83<br />
Alarm<br />
high pressure 3-89<br />
low pressure 3-89<br />
set defaults 3-89<br />
trityl fail sensor 3-90<br />
trityl monitor F-15<br />
valve fail 3-89<br />
Amidite<br />
diluent volume 2-35<br />
dissolving and loading 2-35<br />
location 2-31<br />
safety precautions B-4<br />
Ammonium hydroxide<br />
safety precautions B-3<br />
storage 2-55, B-4<br />
A-train reagents 1-12<br />
Auto restart, set default 3-92<br />
Automatic deblanket<br />
default state 2-29<br />
description 3-77<br />
disable 3-77<br />
enable or disable 3-94<br />
Autonomous mode 3-83, 3-84<br />
AUX reagent description 2-27<br />
B<br />
Bases<br />
changing case of 3-10<br />
Insert and Replace modes 3-15<br />
modified and bases for basespecific<br />
thioation 3-21<br />
modified and unmodified<br />
positions 3-20<br />
uppercase and lowercase 3-10,<br />
3-19<br />
Beaucage reagent 2-12<br />
Bench space and support A-1<br />
Biotin, adding 3-20<br />
Blanket<br />
see Automatic deblanket<br />
see Gas<br />
Boot diskette 2-18<br />
removing 1-26<br />
when to remove 2-17<br />
Bottle changing tool 3-74<br />
Expedite <strong>8900</strong> <strong>Nucleic</strong> <strong>Acid</strong> <strong>Synthesis</strong> System User’s Guide Index-1<br />
I<br />
N<br />
D<br />
E<br />
X
I<br />
N<br />
D<br />
E<br />
X<br />
Bottles<br />
pressurizing 1-16, 2-19, 2-37<br />
replenishing 2-51<br />
screwing into position 2-37<br />
B-train reagents 1-12<br />
Butylphenoxy acetic anhydride, safety<br />
precautions B-4<br />
C<br />
Caddy, reagent<br />
installation A-7<br />
Calculations<br />
melting temperature 3-24<br />
molecular weight 3-24<br />
numbered monomer or lower case<br />
positions 3-30<br />
optical density 3-24<br />
Cancel key 2-19<br />
CAP A<br />
loading 2-33<br />
location 2-31<br />
reagent description 2-27<br />
safety precautions B-4<br />
CAP B<br />
loading 2-33<br />
location 2-31<br />
reagent description 2-27<br />
safety precautions B-5<br />
Change of chemistry, clean out for 4-2<br />
Chemical kit, set default 3-92<br />
Chemical troubleshooting 4-20<br />
symptoms and solutions 4-21<br />
Chemistry<br />
available types 3-91<br />
beta-cyanoethyl<br />
phosphoramidite 2-3<br />
changing 3-95, 4-2<br />
changing by changing case of<br />
bases 2-15<br />
coupling cycle times 3-20<br />
Index-2 PerSeptive <strong>Biosystems</strong><br />
default 2-15, 3-91, 3-95<br />
default, changing 2-44, 3-96<br />
maintenance when changing 4-2<br />
rinsing requirements when<br />
changing 2-26<br />
selecting 2-15, 3-27<br />
Chlorinated waste 4-7<br />
Clear<br />
instrument log 3-80<br />
sequence 3-11<br />
Cleaving and deprotecting<br />
Expedite monomers 2-60<br />
methods 2-55<br />
reagents 2-55<br />
standard monomers 2-56<br />
Cleaving and deprotecting, Expedite<br />
monomers<br />
sealed tube 2-60<br />
syringe column 2-62<br />
time required 2-60<br />
Cleaving and deprotecting, standard<br />
monomers<br />
sealed tube 2-58<br />
syringe column 2-56<br />
Clock setting 3-82<br />
Col 2 key 3-36<br />
Col1 key 3-36<br />
Column<br />
chemistries available 1-17<br />
drip tray 1-19<br />
independent dual operation 1-3<br />
installing 2-46<br />
removing 2-54<br />
removing before priming 2-37, 3-43<br />
selecting 1-18<br />
Combined display mode 3-34<br />
key 3-36<br />
Complement, displaying 3-13<br />
Composite site, building 3-17<br />
Configuration report 3-87<br />
Configuration tool 3-81
Configure<br />
clock 3-82<br />
date 3-82<br />
host parameters 3-83<br />
time 3-82<br />
Contrast, screen, adjusting 3-78<br />
Control mode, see Mode of operation<br />
Control system<br />
pneumatic 1-20<br />
power 1-22<br />
Copy sequence 3-7, 3-32<br />
Coupling cycle<br />
extended 3-20<br />
low efficiency 4-20, 4-22<br />
number run without changing<br />
reagents 1-3<br />
standard and extended times 3-20<br />
total reagent consumed 1-3<br />
Cycle volume, prime 3-52<br />
D<br />
Damage, reporting G-4<br />
Data, trityl monitor<br />
displaying F-6<br />
interpreting F-11<br />
printing F-9<br />
Date, setting 3-82<br />
DBLK, see Deblock<br />
Deblock (DBLK)<br />
loading 2-33<br />
location 2-31<br />
prime 3-46, 3-59<br />
reagent description 2-27<br />
safety precautions B-5<br />
Default<br />
alarm settings 3-89<br />
auto restart 3-92<br />
automatic deblanket state 2-29<br />
chemical kit 3-92<br />
chemistry 3-91, 3-95<br />
direction of sequence entry 3-10<br />
DMT setting 3-92<br />
parameters and protocol 3-87<br />
profile settings 3-95<br />
protocol 3-91<br />
reverse video 3-92<br />
sequence display mode 3-93<br />
sequence grouping 3-93<br />
universal support 3-93<br />
UPS power supply 3-94<br />
Deprotecting, see Cleaving and<br />
deprotecting<br />
Diagnostics<br />
fluid test 3-74<br />
gas saver 3-70<br />
I/O 3-71<br />
leak 3-69, 3-70<br />
LED test 3-73<br />
running 3-68<br />
running before synthesis 2-40<br />
sensor check 3-71<br />
startup leak test 3-71<br />
trityl 3-74<br />
valve test 3-72<br />
valve, total pulses in 3-72<br />
valves, high/low pressure 3-72<br />
valves, solenoid 3-73<br />
Dichloromethane (DCM) (methylene<br />
chloride), safety<br />
precautions B-5<br />
Disable<br />
auto deblanket 3-94<br />
gas saver 3-90<br />
startup leak test 3-90<br />
Diskette, instrument 2-17, 2-18<br />
Display tool 3-78<br />
Display, LCD<br />
change contrast 3-78<br />
change to reverse video 3-92<br />
Displaying system information 3-85<br />
Dissolution of amidites 2-35<br />
Expedite <strong>8900</strong> <strong>Nucleic</strong> <strong>Acid</strong> <strong>Synthesis</strong> System User’s Guide Index-3<br />
I<br />
N<br />
D<br />
E<br />
X
I<br />
N<br />
D<br />
E<br />
X<br />
DMT<br />
removing automatically 2-43<br />
removing manually 2-43, 3-59<br />
DMT absorption wavelength F-2<br />
DMT protecting group<br />
description F-2<br />
set default for removal or<br />
retention 3-92<br />
specifying removal or<br />
retention 3-27<br />
DNA synthesis<br />
advantages of using Expedite 2-6<br />
base-specific thioation 3-21<br />
coupling times 3-20<br />
phosphorothioated 2-12<br />
using Thio or RNA chemistry 3-10<br />
DNA/RNA hybrid synthesis 3-22<br />
Drip tray, removing spills 1-19<br />
Drip trays 1-19<br />
Dual column synthesis 1-3<br />
E<br />
Edit<br />
sequence 3-7, 3-9<br />
user profile 3-88<br />
Electrical<br />
connections A-3, A-6<br />
safety precautions 1-23<br />
Emergency shutdown 3-39<br />
Enable<br />
auto deblanket 3-94<br />
gas saver 3-90<br />
startup leak test 3-90<br />
End-line filters, maintenance 4-3<br />
Entering the sequence 2-22<br />
Environment report 3-87<br />
Error messages 4-23<br />
Exhaust fan 1-25<br />
Exit key 2-18, 3-38<br />
Index-4 PerSeptive <strong>Biosystems</strong><br />
Expedite<br />
accessories 1-5<br />
control system software<br />
features 1-7<br />
models available 1-4<br />
nucleic acid synthesis system<br />
features 1-2<br />
workstation software 1-5<br />
Expedite monomers<br />
cleavage and deprotection 2-62<br />
protection 2-6<br />
Expedite workstation software<br />
overview 3-2<br />
requirements 1-5<br />
F<br />
Factory defaults 3-95<br />
Failures, trityl monitor F-12<br />
Features<br />
Expedite nucleic acid synthesis<br />
system 1-2<br />
software 1-7<br />
Filters, routine maintenance 4-3<br />
Final deblock 3-59<br />
First aid, reagent injury B-2<br />
Flow and Volume test 4-12<br />
Fluid transport system<br />
description 1-11<br />
diagnostics 3-74<br />
diagram, model 8909 1-13<br />
Fume hood requirements 2-28, 4-6<br />
Fuses<br />
changing 4-4<br />
location 1-22
G<br />
Gas<br />
automatic deblanket 2-29<br />
cylinder replacement 4-8<br />
enable or disable startup leak<br />
test 3-90<br />
high pressure sensor 1-21, 2-19,<br />
4-9<br />
hookup A-3, A-6<br />
leak diagnostics 3-69, 3-70<br />
low pressure sensor 1-21, 2-19, 4-9<br />
recommended A-2<br />
relief valve 1-21<br />
startup leak test 3-71, 4-10<br />
Gas leak<br />
diagnostics 1-21, 3-70, 4-9, 4-10<br />
isolation tests 4-10, 4-11<br />
Gas pressure<br />
at startup 2-19<br />
below 500 psi 4-2<br />
high and low pressure failures 4-11<br />
sensors 1-21, 3-69<br />
Gas saver<br />
description 1-21, 3-70<br />
enable or disable 3-90<br />
Grouping, sequence 3-93<br />
H<br />
Hardware requirements 1-5<br />
Help, see Technical support<br />
High pressure alarm 3-89<br />
High pressure failure 4-11, 4-19<br />
High/low pressure valves,<br />
checking 3-72<br />
Hold<br />
key 3-36, 3-38<br />
setting 3-41<br />
synthesis 3-40<br />
Host parameters 3-83<br />
I<br />
I/O diagnostic 3-71<br />
Insert mode, sequence 3-15<br />
Installation<br />
procedure A-3, A-6<br />
reagents 2-28<br />
requirements A-1, B-1<br />
trityl monitor F-2<br />
Instrument<br />
drip tray 1-19<br />
environment report 3-87<br />
maintenance 4-2<br />
name 3-85<br />
pressurizing 2-19<br />
Instrument address<br />
asterisk (*) next to 3-5<br />
location 3-4<br />
setting 3-83<br />
valid entries 3-83<br />
zero (0) 3-83<br />
Instrument log<br />
clear 3-80<br />
description 1-10, 3-79<br />
print 3-80<br />
Instrument stop key 2-49, 3-38<br />
Interpreting trityl monitor data F-11<br />
Interrupting a synthesis 2-50, 3-38<br />
Iodine, safety precautions B-6<br />
IUB codes<br />
definition 3-18<br />
enabling 3-17<br />
list of 3-18<br />
Expedite <strong>8900</strong> <strong>Nucleic</strong> <strong>Acid</strong> <strong>Synthesis</strong> System User’s Guide Index-5<br />
I<br />
N<br />
D<br />
E<br />
X
I<br />
N<br />
D<br />
E<br />
X<br />
L<br />
LCD display<br />
adjusting contrast 3-78<br />
change to reverse video 3-92<br />
description 1-8<br />
Leak diagnostics<br />
overview 1-21<br />
running 3-69, 3-70<br />
time required 3-70<br />
Leak test<br />
gas saver 2-20, 3-70<br />
startup 2-20, 3-71<br />
time required 2-41<br />
LED (Light Emitting Diode) test 3-73<br />
Len# in Sequence Editor 3-9<br />
Linkers, adding 3-20<br />
Local mode 3-83<br />
Local, mode of operation 3-84<br />
Log tool 3-79<br />
Long term shutdown 4-2<br />
Low pressure alarm 3-89<br />
Low pressure failure 4-11, 4-19<br />
Lowercase in sequences 3-19<br />
M<br />
Main menu<br />
description of 3-4<br />
keys 3-5<br />
options 3-5<br />
Maintenance<br />
changing chemistry 4-2<br />
filter and o-ring 4-3<br />
fuses 4-4<br />
low pressure 4-2<br />
routine 4-2<br />
shutdown 4-2<br />
waste disposal 4-6<br />
Markers, adding 3-20<br />
Index-6 PerSeptive <strong>Biosystems</strong><br />
Melting temperature<br />
calculation 3-24, 3-30<br />
calculation, limitation 3-24<br />
displaying 3-13, 3-31<br />
Membrane solid-support reaction<br />
devices 1-18<br />
Menus<br />
diagram 3-3<br />
overview 3-3<br />
selecting options 2-19<br />
Mixed site entry<br />
accessing mode 3-14<br />
editing keys 3-17<br />
IUB codes 3-18<br />
limitations 3-17<br />
Mode of operation 3-84<br />
features available in each 3-84<br />
setting on workstation 3-83<br />
Model 8905<br />
amidite diluent volume 2-35<br />
description 1-4<br />
reagent kit 1-17<br />
reagent kits 2-30<br />
reagent reservoirs 1-14, 1-16<br />
reservoir positions 2-31<br />
Model 8909<br />
amidite diluent volume 2-35<br />
description 1-4<br />
reagent kits 1-17, 2-30<br />
reagent reservoirs 1-16<br />
reservoir positions 2-31<br />
wash installation 2-32<br />
Molecular weight<br />
assigning to numbered and lower<br />
case positions 3-30<br />
calculation 3-24, 3-30<br />
displaying 3-13<br />
Monitoring synthesis 3-33
Monomers<br />
Expedite 2-6<br />
phosphoramidite 2-4<br />
priming 3-46, 3-57<br />
RNA 2-8, 2-9, 2-11<br />
safety precautions B-6<br />
More key 2-19<br />
MOSS option 1-6<br />
Multiple Oligonucleotide <strong>Synthesis</strong><br />
System, see MOSS<br />
N<br />
Name<br />
instrument 3-85<br />
instrument-generated 3-8<br />
profile 3-94, 3-95<br />
sequence 3-8, 3-23<br />
user profile 3-95<br />
user-generated 3-8, 3-23, 3-85<br />
N-methylimidazole, safety<br />
precautions B-6<br />
O<br />
OD, see Optical density<br />
Oligomer cleavage and<br />
deprotection 2-55<br />
Oligomer length, and pore size 1-18<br />
Operating temperature 1-24<br />
Optical density<br />
calculation 3-24, 3-30<br />
displaying 3-13<br />
Options<br />
Expedite workstation software 1-5<br />
trityl monitor 1-4<br />
UPS power supply 1-6<br />
ORG 1 and ORG 2 waste lines 4-7<br />
Organic waste 4-7<br />
O-rings, inspecting and changing 4-3<br />
Overview<br />
Expedite workstation software 3-2<br />
menus 3-3<br />
OX, see Oxidizer<br />
Oxidizer (OX)<br />
loading 2-33<br />
location 2-31<br />
reagent description 2-27<br />
safety precautions B-7<br />
silanizing 2-14<br />
P<br />
Parameters<br />
reporting instrument 3-87<br />
system 3-81<br />
Parameters, modifying 3-26<br />
Peptide <strong>Nucleic</strong> <strong>Acid</strong> oligonucleotide,<br />
see PNA<br />
Performance specifications C-1<br />
PerSeptive <strong>Biosystems</strong>, see Technical<br />
Support<br />
Phosphoramidite<br />
consumed per cycle 1-3<br />
DNA monomer protection 2-6<br />
monomers 2-4<br />
RNA monomer protection 2-8<br />
synthesis cycle 2-4<br />
Phosphorothioated DNA<br />
synthesis 2-12<br />
PNA instrument option 1-6<br />
Pneumatic system<br />
diagnostics 2-40, 3-69<br />
input pressure 1-20<br />
Pore size, columns 1-18<br />
Pos# in Sequence Editor 3-9<br />
Expedite <strong>8900</strong> <strong>Nucleic</strong> <strong>Acid</strong> <strong>Synthesis</strong> System User’s Guide Index-7<br />
I<br />
N<br />
D<br />
E<br />
X
I<br />
N<br />
D<br />
E<br />
X<br />
Power<br />
control system 1-22<br />
recovery from failure 1-10, 3-92<br />
restart after failure 3-92<br />
supply A-2<br />
Power up 2-16<br />
Preferences, setting 3-87<br />
Pressure<br />
alarms 3-89<br />
high pressure system 1-20<br />
input pressure 1-20<br />
low pressure system 1-20<br />
Pressure sensors, gas 1-21<br />
description 3-69, 4-9<br />
diagnostics 3-71<br />
setting alarms 3-89<br />
Pressurizing the system 2-19<br />
Prime<br />
all 3-46, 3-53<br />
automatic 3-53, 3-55<br />
before running synthesis 2-37<br />
cycle volume 3-52<br />
description of options 3-46<br />
final deblock 3-46, 3-59<br />
fluidics system 2-37<br />
individual 3-46, 3-49<br />
manual 3-49<br />
menu 3-43<br />
monomers 3-46, 3-57<br />
procedure 3-49<br />
pulse volume 3-52<br />
reagents 2-52, 3-46, 3-55<br />
removing column before 2-37, 3-43<br />
shutdown 3-48, 3-63<br />
startup 3-47, 3-60<br />
trityl monitor 3-52<br />
Prime individual keys 3-50<br />
Index-8 PerSeptive <strong>Biosystems</strong><br />
Print<br />
environment report 3-87<br />
instrument log 3-80<br />
key 3-38<br />
reagent resources 3-38<br />
sequence 3-7, 3-29<br />
trityl data F-9<br />
Printer 1-10<br />
Product yield, low 4-20<br />
Profile, see User profile<br />
Protocol<br />
selection 3-27<br />
set default 3-91<br />
supplied with system 1-3<br />
Pulse volume, prime 3-52<br />
Pulses, total, in Valve diagnostics 3-72<br />
Purification and analysis 2-63<br />
Purine/pyrimidine ratio<br />
calculation 3-30<br />
displaying 3-13<br />
Pyridine, safety precautions B-7<br />
R<br />
RA number G-4<br />
Reaction columns<br />
available scales 1-17<br />
safety precautions B-8<br />
Reaction devices, available<br />
scales 1-18<br />
Read user profile 3-88<br />
Reagent<br />
activator (ACT) loading 2-34<br />
amidite dissolution and<br />
loading 2-35<br />
caddy installation A-7<br />
changing during a synthesis 2-44,<br />
3-37<br />
checking resources 2-44, 2-45<br />
consumption 1-3
deblock (DBLK) loading 2-33<br />
delivery system description 1-11<br />
handling 1-25, 2-26<br />
hazard warning 1-11, 2-28, 2-57<br />
installation procedure 2-28<br />
kits 1-17, 2-29<br />
list D-1<br />
loading cap A and B 2-33<br />
model 8905 reservoirs 1-14, 1-16<br />
model 8909 reservoirs 1-16<br />
ordering information D-1<br />
oxidizer (OX) loading 2-33<br />
part numbers D-1<br />
positions of bottles 2-30<br />
preparing and loading 2-26<br />
priming 3-46, 3-55<br />
quality 4-20<br />
replenishing during synthesis 2-51<br />
requirements 1-9<br />
reservoir positions 1-15, 2-31<br />
reservoirs 1-13<br />
reset bottle volume 3-74<br />
resources, checking 3-34<br />
resources, printing 3-38<br />
safety precautions 1-25, B-1<br />
safety, spill pillow 1-19, 1-20<br />
storage 1-25<br />
tray 1-16<br />
tray installation A-6<br />
used in nucleic acid synthesis 2-27<br />
viewing resources 3-36<br />
wash (WSH A) loading 2-33<br />
wash (WSH) loading 2-34<br />
Reagents<br />
safety precautions F-5<br />
storage F-5<br />
Relief valve, blanket gas 1-21<br />
Remote mode 3-83, 3-84<br />
Replace mode, sequence 3-15<br />
Replenishing reagents 2-51<br />
Report, configuration 3-87<br />
Reservoirs<br />
position 1-15, 2-31<br />
preparation, thioate synthesis 2-15<br />
replenishing 2-51<br />
Reset reagent bottle volume 3-74<br />
Resuming synthesis<br />
after hold 3-40, 3-42<br />
after stop 3-38<br />
Return Authorization (RA) number G-4<br />
Returning damaged items G-4<br />
Reverse video, set 3-92<br />
RNA monomers 2-8, 2-9, 2-11<br />
RNA synthesis<br />
coupling times 3-20<br />
cycle 2-8<br />
sequence codes displayed 2-24<br />
using DNA chemistry 3-10<br />
Routine maintenance procedures 4-2<br />
Rsrc key 3-36<br />
Run parameters 3-26<br />
Run sequence 3-7<br />
Running<br />
sequence 3-25<br />
two simultaneous syntheses 2-42<br />
S<br />
Safety<br />
electrical 1-23<br />
gas supply 1-24<br />
precautions 1-23<br />
reagent handling 1-25<br />
vent instrument 1-25<br />
waste disposal 1-26<br />
Safety precautions<br />
ammonium hydroxide 2-57<br />
cleavage and deprotection 2-55<br />
electrical 1-23<br />
external reagent tray 1-16, 1-17<br />
gas supply 1-24<br />
reagent 2-28, B-1<br />
Expedite <strong>8900</strong> <strong>Nucleic</strong> <strong>Acid</strong> <strong>Synthesis</strong> System User’s Guide Index-9<br />
I<br />
N<br />
D<br />
E<br />
X
I<br />
N<br />
D<br />
E<br />
X<br />
reagent handling 1-11, 1-25<br />
vent instrument 1-25<br />
waste 1-26, 4-6<br />
Saving the sequence 2-25<br />
Screen contrast<br />
adjusting 3-78<br />
change to reverse video 3-92<br />
Screen saver 1-9<br />
Sealed tube cleavage and deprotection<br />
Expedite monomers 2-60<br />
standard monomers 2-58<br />
Sensor<br />
check 3-71<br />
high pressure 1-21, 2-19, 4-9<br />
low pressure 1-21, 2-19, 4-9<br />
Sequence<br />
asterisk (*) next to 3-8<br />
clear 3-11<br />
copy 3-32<br />
cursor position 3-9<br />
editor 3-9<br />
entering 2-22<br />
entry 3-15<br />
entry direction, changing 3-10<br />
entry direction, default 3-10<br />
entry keys 3-14<br />
entry modes 3-15<br />
grouping, set default 3-93<br />
information 3-13<br />
Len# 3-9<br />
maximum number stored 1-9, 3-8<br />
modifying 3-19, 3-26<br />
molecular weight 3-13<br />
names 3-8<br />
naming 3-23<br />
Pos# 3-9<br />
print 3-29<br />
run 3-25<br />
saving 2-25<br />
selecting 2-23, 3-7<br />
summary information 3-31<br />
view 3-30<br />
Index-10 PerSeptive <strong>Biosystems</strong><br />
Sequence display, set default 3-93<br />
Sequence menu<br />
description of 3-6<br />
options 3-7<br />
Sequence view keys 3-31<br />
Set default<br />
alarm 3-89<br />
auto restart 3-92<br />
chemical kit 3-92<br />
chemistry 3-91<br />
DMT removal or retention 3-92<br />
factory 3-95<br />
protocol 3-91<br />
reverse video 3-92<br />
sequence display mode 3-93<br />
sequence grouping 3-93<br />
support 3-93<br />
UPS 3-94<br />
Setting a hold point 3-41<br />
Shipping list A-3<br />
Short term shutdown 4-2<br />
Shutdown<br />
emergency 3-39<br />
long term 3-63, 4-2<br />
prime 3-48, 3-63<br />
short term 3-63, 4-2<br />
Silanizing oxidizer 2-14<br />
Single column display 3-35<br />
Site requirements A-1<br />
Soft keys 1-8, 2-18, 3-2<br />
Software<br />
features 3-2<br />
instrument 1-7<br />
instrument diskette 2-17<br />
loading 2-17<br />
menu diagram 3-3<br />
menus 3-2<br />
overview 3-2<br />
version number 3-85<br />
workstation 1-5<br />
Software defined keys 1-8
Solenoid valves, checking 3-73<br />
Spare parts list E-1<br />
Specifications, performance C-1<br />
Spill pillow 1-19, 1-20<br />
Spill tray 1-18<br />
Starting<br />
synthesis 2-48<br />
two simultaneous syntheses 2-42<br />
Startup<br />
leak test 3-71, 4-10<br />
leak test, enable or disable 3-90<br />
prime 3-47<br />
routine 3-60<br />
Status menu 3-33<br />
Stop key<br />
instrument 2-49, 3-38<br />
main menu 3-39<br />
Sulfur containing DNA 2-12, 2-27<br />
Sulfurizing reagent, safety<br />
precautions B-8<br />
Summary information, sequence 3-31<br />
Support, set default 3-93<br />
Symbols used on instrument xii<br />
<strong>Synthesis</strong><br />
aborting 3-27<br />
automatic restart after failure 3-92<br />
cycle 2-3<br />
DNA 2-6<br />
dual-column 1-3<br />
interrupting 2-50, 3-38<br />
key steps 2-2<br />
list of reagents 2-27<br />
monitoring 1-9, 2-49, 3-33<br />
parameter specification 2-42<br />
parameters 2-43, 3-26<br />
phosphorothioated DNA 2-12<br />
resuming after hold 3-40, 3-42<br />
resuming after stop 3-38<br />
RNA 2-8<br />
running 2-49, 3-25<br />
running two simultaneously 2-42<br />
starting 2-48<br />
stopping 2-49<br />
Syringe column cleavage and<br />
deprotection<br />
Expedite monomers 2-62<br />
standard monomers 2-56<br />
System<br />
initialization 2-17<br />
power up 2-16<br />
pressurizing 2-19<br />
System display keys 3-36<br />
System information, displaying 3-34,<br />
3-85<br />
System resources, viewing 3-36<br />
T<br />
Technical support, see last page of this<br />
manual<br />
Temperature, melting 3-13, 3-31<br />
Temperature, operating 1-24, A-1<br />
Tetrahydrofuran (THF), safety<br />
precautions B-9<br />
Tetrazole, safety precautions B-8<br />
Thioate synthesis<br />
coupling times 3-20<br />
reservoir preparation 2-15<br />
Thioation, base-specific 3-21<br />
Time, setting 3-82<br />
Tools<br />
configuration 3-81<br />
diagnostic 1-10, 3-68<br />
display 3-78<br />
host 3-83<br />
log 3-79<br />
menu 3-66<br />
name 3-85<br />
priming 1-10<br />
print 3-87<br />
ver 3-85<br />
Expedite <strong>8900</strong> <strong>Nucleic</strong> <strong>Acid</strong> <strong>Synthesis</strong> System User’s Guide Index-11<br />
I<br />
N<br />
D<br />
E<br />
X
I<br />
N<br />
D<br />
E<br />
X<br />
Total Pulses in Valve diagnostics 3-72<br />
Tray, reagent 1-16<br />
installation A-6<br />
Trichloroacetic acid (TCA), safety<br />
precautions B-10<br />
Trityl monitor<br />
alarms, description 3-90, F-15<br />
alarms, enabling 3-90<br />
alarms, enabling and<br />
disabling F-17<br />
connecting fraction collector F-3<br />
description 1-4<br />
diagnostics 3-74<br />
display key 3-36<br />
displaying data F-6<br />
drip tray 1-19<br />
estimate of synthesis scale F-8<br />
failures F-12<br />
function F-2<br />
installing F-2<br />
interpreting data F-11<br />
location F-3<br />
maximum number of<br />
determinations<br />
displayed F-2<br />
priming 3-52<br />
printing F-9<br />
recommended gas for use with F-2<br />
total yield failure F-3<br />
troubleshooting F-21<br />
viewer scale estimates F-8<br />
waste F-3<br />
Index-12 PerSeptive <strong>Biosystems</strong><br />
Troubleshooting<br />
blockage 4-12<br />
chemical 4-20<br />
column selection screen not<br />
displayed 3-25<br />
diagnostics 3-68<br />
flow and volume test 4-12<br />
gas leaks 4-11<br />
gas pressure below 500 psi 4-2<br />
mechanical 4-17<br />
pressure failures 4-11<br />
symptoms and solutions 4-18<br />
trityl monitor F-21<br />
volume delivery 4-12<br />
TRT 1 and TRT 2 waste lines 4-7<br />
U<br />
Universal support, set default 3-93<br />
Unpacking instructions A-2<br />
UPS power supply<br />
backup period 1-6<br />
description 1-6<br />
set defaults 3-94<br />
User interface 1-8<br />
User profile<br />
asterisk (*) next to 3-88<br />
changing chemistry 3-95<br />
edit 3-89<br />
maximum number stored 1-10,<br />
3-87<br />
name 3-94, 3-95<br />
naming 3-95<br />
selecting 3-88<br />
set to factory defaults 3-88<br />
specifying 3-87<br />
User’s guide structure xi
V<br />
Valves<br />
failure alarm 3-89<br />
high/low pressure, checking 3-72<br />
solenoid, checking 3-73<br />
Total Pulse number in<br />
diagnostics 3-72<br />
Version information 3-85<br />
View sequence 3-7, 3-30<br />
Voltage selection 1-23, 4-5<br />
Volume<br />
prime cycle 3-52<br />
prime pulse 3-52<br />
W<br />
Warnings, see alarms<br />
Warranty<br />
damages, claims, returns G-4<br />
exceptions G-2<br />
information G-1<br />
period G-1<br />
Wash (WSH)<br />
loading 2-33, 2-34<br />
location 2-31<br />
reagent description 2-27<br />
Waste<br />
bottle installation A-5, A-6<br />
chlorinated 4-6, F-3<br />
disposal 1-26, 4-7<br />
disposal of organic 4-7<br />
hazard warning 4-6<br />
ORG1 and ORG 2 4-7<br />
organic 4-6<br />
reservoir volume 1-18<br />
safety precautions 1-26, F-5<br />
spill tray 1-18<br />
system 1-18<br />
trityl monitor F-3<br />
TRT 1 and TRT 2 4-7<br />
Weight of instrument A-1<br />
Workstation software 1-5<br />
WSH, see Wash<br />
Expedite <strong>8900</strong> <strong>Nucleic</strong> <strong>Acid</strong> <strong>Synthesis</strong> System User’s Guide Index-13<br />
I<br />
N<br />
D<br />
E<br />
X
I<br />
N<br />
D<br />
E<br />
X<br />
Index-14 PerSeptive <strong>Biosystems</strong>