Martin DMX Interface user manual - TextFiles.com
Martin DMX Interface user manual - TextFiles.com
Martin DMX Interface user manual - TextFiles.com

You also want an ePaper? Increase the reach of your titles
YUMPU automatically turns print PDFs into web optimized ePapers that Google loves.
P/N 35000013<br />
<strong>Martin</strong> <strong>DMX</strong> <strong>Interface</strong><br />
<strong>user</strong> <strong>manual</strong>
©1999 <strong>Martin</strong> Professional A/S, Denmark.<br />
All rights reserved. No part of this <strong>manual</strong> may be<br />
reproduced, in any form or by any means, without<br />
permission in writing from <strong>Martin</strong> Professional A/S,<br />
Denmark.<br />
Printed in Denmark.<br />
P/N 35000013, revision #990504-MA
Introduction. . . . . . . . . . . . . . . . . . . . . . . . . . . . . . . . . . . . . . . . .4<br />
Package contents. . . . . . . . . . . . . . . . . . . . . . . . . . . . . . . . . . . . . . . . . . . . . . . 4<br />
AC Power Connection . . . . . . . . . . . . . . . . . . . . . . . . . . . . . . . .5<br />
To install a plug on the mains lead. . . . . . . . . . . . . . . . . . . . . . . . . . . . . . . . . . 5<br />
Data Connection . . . . . . . . . . . . . . . . . . . . . . . . . . . . . . . . . . . . .6<br />
Re<strong>com</strong>mended cable . . . . . . . . . . . . . . . . . . . . . . . . . . . . . . . . . . . . . . . . . . . . 6<br />
Connections . . . . . . . . . . . . . . . . . . . . . . . . . . . . . . . . . . . . . . . . . . . . . . . . . . . 6<br />
To connect the <strong>DMX</strong> <strong>Interface</strong> to the <strong>DMX</strong> link . . . . . . . . . . . . . . . . . . . . . . . . 7<br />
To connect <strong>Martin</strong> fixtures to the <strong>DMX</strong> <strong>Interface</strong> . . . . . . . . . . . . . . . . . . . . . . . 7<br />
DIP-switch Settings . . . . . . . . . . . . . . . . . . . . . . . . . . . . . . . . . .8<br />
<strong>DMX</strong> address and mode setting. . . . . . . . . . . . . . . . . . . . . . . . . . . . . . . . . . . . 8<br />
To set the 10-position DIP-switch . . . . . . . . . . . . . . . . . . . . . . . . . . . . . . . . . . 8<br />
To set the 6-position DIP-switch . . . . . . . . . . . . . . . . . . . . . . . . . . . . . . . . . . 10<br />
<strong>Martin</strong> address setting . . . . . . . . . . . . . . . . . . . . . . . . . . . . . . . . . . . . . . . . . . 11<br />
Operation. . . . . . . . . . . . . . . . . . . . . . . . . . . . . . . . . . . . . . . . . .12<br />
Status LEDs . . . . . . . . . . . . . . . . . . . . . . . . . . . . . . . . . . . . . . . . . . . . . . . . . . 12<br />
<strong>DMX</strong> protocols . . . . . . . . . . . . . . . . . . . . . . . . . . . . . . . . . . . . . . . . . . . . . . . . 12<br />
RoboColor MSD 200 . . . . . . . . . . . . . . . . . . . . . . . . . . . . . . . . . . . . . . . . . . . 13<br />
RoboColor . . . . . . . . . . . . . . . . . . . . . . . . . . . . . . . . . . . . . . . . . . . . . . . . . . . 14<br />
RoboColor II . . . . . . . . . . . . . . . . . . . . . . . . . . . . . . . . . . . . . . . . . . . . . . . . . . 15<br />
RoboScan 804/805 . . . . . . . . . . . . . . . . . . . . . . . . . . . . . . . . . . . . . . . . . . . . 16<br />
RoboScan 1004/1005 . . . . . . . . . . . . . . . . . . . . . . . . . . . . . . . . . . . . . . . . . . 17<br />
RoboScan 1016 . . . . . . . . . . . . . . . . . . . . . . . . . . . . . . . . . . . . . . . . . . . . . . . 18<br />
RoboScan 1020 . . . . . . . . . . . . . . . . . . . . . . . . . . . . . . . . . . . . . . . . . . . . . . . 19<br />
RoboScan Pro 218. . . . . . . . . . . . . . . . . . . . . . . . . . . . . . . . . . . . . . . . . . . . . 21<br />
RoboScan 1220 . . . . . . . . . . . . . . . . . . . . . . . . . . . . . . . . . . . . . . . . . . . . . . . 23<br />
RoboScan 1220 II . . . . . . . . . . . . . . . . . . . . . . . . . . . . . . . . . . . . . . . . . . . . . 23<br />
RoboScan 1220 IIR . . . . . . . . . . . . . . . . . . . . . . . . . . . . . . . . . . . . . . . . . . . . 25<br />
RoboZap . . . . . . . . . . . . . . . . . . . . . . . . . . . . . . . . . . . . . . . . . . . . . . . . . . . . 28<br />
RoboZap MSR 1200 . . . . . . . . . . . . . . . . . . . . . . . . . . . . . . . . . . . . . . . . . . . 29<br />
Centrepiece . . . . . . . . . . . . . . . . . . . . . . . . . . . . . . . . . . . . . . . . . . . . . . . . . . 30<br />
3
INTRODUCTION 1<br />
The <strong>Martin</strong> <strong>DMX</strong> <strong>Interface</strong> converts <strong>DMX</strong> data into <strong>Martin</strong> data to allow you to<br />
control an older, <strong>Martin</strong>-protocol-only fixture with a <strong>DMX</strong> controller. The <strong>DMX</strong><br />
<strong>Interface</strong> supports the following <strong>Martin</strong> products:<br />
Fixture Type Fixtures per <strong>Interface</strong><br />
RoboColor MSD 8<br />
RoboColor 8<br />
RoboColor II 8<br />
RoboScan 804/805 8<br />
RoboScan 1004/1005 8<br />
RoboScan 1016 8<br />
RoboScan 1020 4<br />
RoboScan Pro 218 8<br />
RoboScan Pro 1220 4<br />
RoboScan Pro 1220 II 4<br />
RoboScan Pro 1220 IIR 4<br />
RoboZap 8<br />
RoboZap MSR 1200 8<br />
Centrepiece 8<br />
Note! A separate <strong>DMX</strong> <strong>Interface</strong> is required for each type of fixture.<br />
The <strong>DMX</strong> <strong>Interface</strong> operates only one type of fixture at a time. It can operate<br />
multiple fixtures of the same type. The table above shows the maximum number<br />
of each fixture type that can be operated with a single <strong>DMX</strong> <strong>Interface</strong>.<br />
P A C K A G E C O N T E N T S<br />
Please make sure that you received the following with your <strong>DMX</strong> <strong>Interface</strong>:<br />
• 1 X <strong>Martin</strong> Professional <strong>DMX</strong> <strong>Interface</strong><br />
• 1 X Terminator Plug<br />
4 Introduction<br />
Table 1: Supported fixtures
AC POWER CONNECTION 2<br />
Warning! For safe operation, the <strong>DMX</strong> <strong>Interface</strong> must be grounded<br />
(earthed).<br />
Important! Check voltage setting before applying power.<br />
Before use verify that the fixture’s voltage switch is set correctly for the local AC<br />
voltage. The switch can be set for 115 or 230 V: use the setting that is closest to<br />
the local supply voltage.<br />
Do not connect the <strong>DMX</strong> <strong>Interface</strong> to an electrical dimmer system: doing so can<br />
damage the electronics.<br />
To install a plug on the mains lead<br />
The fixture’s mains lead must be fitted with a grounding-type cord cap that<br />
fits your power distribution cable or outlet. Consult a qualified electrician if<br />
you have any doubts about proper installation.<br />
• Following the cord cap manufacturer’s instructions, connect the yellow and<br />
green wire to ground (earth), the brown wire to live, and the blue wire to<br />
neutral. The table below shows some pin identification schemes.<br />
Wire Pin Marking Screw color<br />
brown live “L” yellow or brass<br />
blue neutral “N” silver<br />
yellow/green ground green<br />
Table 2: Plug markings<br />
AC Power Connection 5
DATA CONNECTION 3<br />
This section describes how to place the <strong>DMX</strong> <strong>Interface</strong> in the data link between<br />
the <strong>DMX</strong> controller and the <strong>Martin</strong> fixtures.<br />
RECOMMENDED CABLE<br />
Reliable data <strong>com</strong>munication begins with the right cable. Standard microphone<br />
cable cannot transmit <strong>DMX</strong> data reliably over long runs. For best results, use<br />
cable specifically designed for RS-485 applications. Your <strong>Martin</strong> dealer can<br />
supply high quality cable in various lengths.<br />
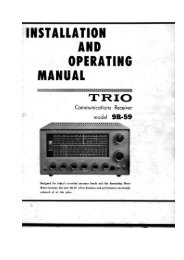
CONNECTIONS<br />
The <strong>DMX</strong> IN and <strong>DMX</strong> OUT sockets are wired for <strong>DMX</strong> data with pin 1 to<br />
ground, pin 2 to signal - (cold), and pin 3 to signal + (hot). This is the standard pin<br />
assignment for <strong>DMX</strong> devices.<br />
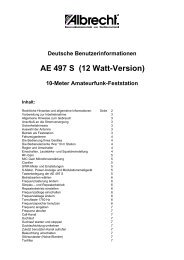
One or more adaptor cables may be required to connect the <strong>DMX</strong> <strong>Interface</strong><br />
because many devices have 5-pin connectors and others may have reversed signal<br />
polarity, that is, pin 2 hot and pin 3 cold.<br />
5-pin to 3-pin<br />
Adaptor<br />
Male Female<br />
1<br />
2<br />
3<br />
4<br />
5<br />
6 Data Connection<br />
1<br />
2<br />
3<br />
P/N 11820005<br />
3-pin to 5-pin<br />
Adaptor<br />
Male Female<br />
1<br />
2<br />
3<br />
1<br />
2<br />
3<br />
4<br />
5<br />
P/N 11820004<br />
3-pin to 3-pin<br />
Phase-Reversing<br />
Adaptor<br />
Male Female<br />
1<br />
2<br />
3<br />
1<br />
2<br />
3<br />
P/N 11820006
To connect the <strong>DMX</strong> <strong>Interface</strong> to the <strong>DMX</strong> link<br />
Up to 32 devices may be connected to the <strong>DMX</strong> link. The <strong>DMX</strong> <strong>Interface</strong> and all<br />
fixtures connected to the <strong>Martin</strong> link count as just 1 device.<br />
1 Connect the data cable <strong>com</strong>ing from the controller output to the <strong>DMX</strong> IN<br />
socket on the <strong>DMX</strong> <strong>Interface</strong>. If you are using 5-pin XLR connectors, you will<br />
need to insert a 5-pin male to 3-pin female adaptor cable such as P/N<br />
11820005.<br />
2 If connecting additional <strong>DMX</strong> fixtures to the <strong>DMX</strong> link after the <strong>DMX</strong> <strong>Interface</strong>,<br />
connect <strong>DMX</strong> OUT on the <strong>DMX</strong> <strong>Interface</strong> to the input of the next device. If the<br />
device has a 5-pin XLR input, insert a 3-pin to 5-pin adaptor cable such as<br />
P/N 11820004. If the device has reversed polarity (pin-3 cold), use a phasereversing<br />
adaptor such as P/N 11820006.<br />
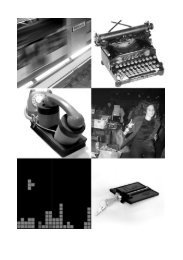
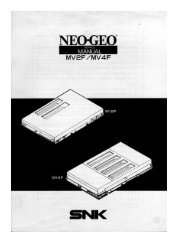
3 Terminate the <strong>DMX</strong> link. If the <strong>DMX</strong> <strong>Interface</strong> is the<br />
last device on the link, simply set pin-9 of the <strong>DMX</strong>-<br />
Link DIP-switch to the ON position (down).<br />
Otherwise, insert a male termination plug (P/N<br />
91613017) into the <strong>DMX</strong> output of the last fixture<br />
on the <strong>DMX</strong> link. A termination plug is simply an<br />
XLR connector with a 120 ohm, 0.25 W resistor<br />
soldered across pins 2 and 3.<br />
To connect <strong>Martin</strong> fixtures to the <strong>DMX</strong><br />
<strong>Interface</strong><br />
Male<br />
Termination Plug<br />
Male XLR<br />
1<br />
2<br />
120<br />
3<br />
P/N 91613017<br />
All fixtures connected to the <strong>DMX</strong> <strong>Interface</strong> must be of the same type.<br />
1 Connect a data cable to the <strong>Martin</strong> Link output socket on the front panel of<br />
the <strong>DMX</strong> <strong>Interface</strong> and the data input of the first <strong>Martin</strong> fixture. Use a 3-pin<br />
XLR cable wired with pin 1 to pin 1, pin 2 to pin 2, and pin 3 to pin 3.<br />
2 Connect the output of the <strong>Martin</strong> fixture closest to the <strong>DMX</strong> <strong>Interface</strong> to the<br />
input of the next <strong>Martin</strong> fixture. You can connect up to 4 or 8 identical fixtures<br />
depending on type. See Table 1 on page 4 for the number that can be<br />
connected.<br />
3 Terminate the <strong>Martin</strong> link by inserting a male termination plug (P/N 91613017)<br />
into the data output of the last fixture on the <strong>Martin</strong> link.<br />
Data Connection 7
DIP-SWITCH SETTINGS 4<br />
The <strong>DMX</strong> <strong>Interface</strong> has 2 DIP-switches on the front panel that must be set before<br />
operating. The 10-position DIP-switch is for selecting the first <strong>DMX</strong> address,<br />
<strong>DMX</strong> mode, and link termination. The 6-position DIP-switch is for selecting the<br />
type of product that is used with the interface.<br />
<strong>DMX</strong> ADDRESS AND MODE SETTING<br />
Some fixtures can be operated in 2 modes: reduced <strong>DMX</strong> or full <strong>DMX</strong>. Full<br />
<strong>DMX</strong> mode provides greater control but requires more <strong>DMX</strong> channels. The mode<br />
is set using pin 10 of the 10-position DIP-switch on the front panel of the <strong>DMX</strong><br />
<strong>Interface</strong>.<br />
See the protocol for your fixture to see which modes are available and the number<br />
of <strong>DMX</strong> channels required.<br />
To set the 10-position DIP-switch<br />
Important! The <strong>DMX</strong> address assigned (on the controller) to the first<br />
fixture connected to the <strong>DMX</strong> <strong>Interface</strong> must be an oddnumbered<br />
<strong>DMX</strong> channel. Consecutive, uninterrupted <strong>DMX</strong><br />
channels must be assigned to all additional fixtures.<br />
1 On the controller, assign an odd-numbered <strong>DMX</strong> address to the first <strong>Martin</strong><br />
fixture connected to the <strong>DMX</strong> <strong>Interface</strong>.<br />
2 Find the address in the table below. Read the settings for pins 1 - 4 to the left<br />
and read the settings for pins 5 - 8 above the address. “0” means OFF and “1”<br />
means ON.<br />
3 Flip pins 1 - 8 ON (down) or OFF (up) as required. Flip pin 9 OFF for reduced<br />
<strong>DMX</strong> mode or, if available, ON for full <strong>DMX</strong> mode operation.<br />
4 Flip pin 10 OFF if additional <strong>DMX</strong> fixtures or interfaces are connected after the<br />
<strong>DMX</strong> <strong>Interface</strong>. Flip pin 10 ON to terminate the <strong>DMX</strong> link only if the <strong>DMX</strong><br />
<strong>Interface</strong> is the last device.<br />
5 In the <strong>DMX</strong> protocol for your fixture, find the number of <strong>DMX</strong> channels<br />
required for the selected <strong>DMX</strong> mode.<br />
8 DIP-switch Settings
6 If the next fixture is connected to the same <strong>DMX</strong> <strong>Interface</strong>, assign it to the<br />
first available <strong>DMX</strong> address on the controller. For example, if the first fixture<br />
is at address 11 and uses 7 channels, then address the next fixture to<br />
channel 18.<br />
7 If the next fixture is connected to a different <strong>DMX</strong> <strong>Interface</strong>, assign it to the<br />
first available odd-numbered <strong>DMX</strong> channel on the controller. For example, if<br />
the first fixture is at address 11 and uses 7 channels, then address the next<br />
fixture to channel 19. Set the <strong>DMX</strong> address of the second interface to this<br />
channel.<br />
8 If the next fixture is not connected to a <strong>DMX</strong> <strong>Interface</strong>, you may assign it to<br />
any convenient <strong>DMX</strong> address.<br />
�� � � � � � � � � � � � � � � � �<br />
������������������ �� � � � � � � � � � � � � � � � �<br />
�������<br />
�� � � � � � � � � � � � � � � � �<br />
������ �� � � � � � � � � � � � � � � � �<br />
�� �� �� ��<br />
� � � � � �� �� �� ��� ��� ��� ��� ��� ��� ��� ��� ��� ��� ��� ���<br />
� � � � � �� �� �� ��� ��� ��� ��� ��� ��� ��� ��� ��� ��� ��� ���<br />
� � � � � �� �� ��� ��� ��� ��� ��� ��� ��� ��� ��� ��� ��� ��� ���<br />
� � � � � �� �� ��� ��� ��� ��� ��� ��� ��� ��� ��� ��� ��� ��� ���<br />
� � � � � �� �� ��� ��� ��� ��� ��� ��� ��� ��� ��� ��� ��� ��� ���<br />
� � � � �� �� �� ��� ��� ��� ��� ��� ��� ��� ��� ��� ��� ��� ��� ���<br />
� � � � �� �� �� ��� ��� ��� ��� ��� ��� ��� ��� ��� ��� ��� ��� ���<br />
� � � � �� �� �� ��� ��� ��� ��� ��� ��� ��� ��� ��� ��� ��� ��� ���<br />
� � � � �� �� �� ��� ��� ��� ��� ��� ��� ��� ��� ��� ��� ��� ��� ���<br />
� � � � �� �� �� ��� ��� ��� ��� ��� ��� ��� ��� ��� ��� ��� ��� ���<br />
� � � � �� �� �� ��� ��� ��� ��� ��� ��� ��� ��� ��� ��� ��� ��� ���<br />
� � � � �� �� �� ��� ��� ��� ��� ��� ��� ��� ��� ��� ��� ��� ��� ���<br />
� � � � �� �� �� ��� ��� ��� ��� ��� ��� ��� ��� ��� ��� ��� ��� ���<br />
� � � � �� �� �� ��� ��� ��� ��� ��� ��� ��� ��� ��� ��� ��� ��� ���<br />
� � � � �� �� �� ��� ��� ��� ��� ��� ��� ��� ��� ��� ��� ��� ��� ���<br />
� � � � �� �� �� ��� ��� ��� ��� ��� ��� ��� ��� ��� ��� ��� ��� ���<br />
Table 3: <strong>DMX</strong> address settings<br />
DIP-switch Settings 9
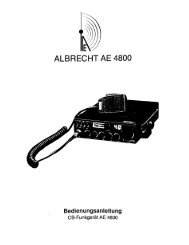
To set the 6-position DIP-switch<br />
Every <strong>Martin</strong> product supported by the <strong>DMX</strong> <strong>Interface</strong> has a Product Select code<br />
that must be set on the 6-position DIP-switch as shown below.<br />
Product Product Select DIP-switch setting<br />
RoboColor MSD 200 1<br />
RoboColor (1st version) 2<br />
RoboColor II 3<br />
RoboScan 804/805 5<br />
RoboScan 1004/1005 6<br />
RoboScan 1016 7<br />
RoboScan 1020 10<br />
RoboScan Pro 218 11<br />
RoboScan Pro 1220 12<br />
RoboScan Pro 1220 II 13<br />
RoboScan Pro 1220 IIR 14<br />
RoboZap 15<br />
RoboZap MSR 1200 16<br />
Centrepiece 17<br />
Table 4: Product select settings<br />
10 DIP-switch Settings<br />
ON<br />
ON<br />
ON<br />
ON<br />
ON<br />
ON<br />
ON<br />
ON<br />
ON<br />
ON<br />
ON<br />
ON<br />
ON<br />
ON<br />
1 2 3 4 5 6<br />
1 2 3 4 5 6<br />
1 2 3 4 5 6<br />
1 2 3 4 5 6<br />
1 2 3 4 5 6<br />
1 2 3 4 5 6<br />
1 2 3 4 5 6<br />
1 2 3 4 5 6<br />
1 2 3 4 5 6<br />
1 2 3 4 5 6<br />
1 2 3 4 5 6<br />
1 2 3 4 5 6<br />
1 2 3 4 5 6<br />
1 2 3 4 5 6
MARTIN ADDRESS SETTING<br />
The DIP-switch on each fixture connected to the <strong>DMX</strong> <strong>Interface</strong> must be set to a<br />
<strong>Martin</strong> address from 1 to 8.<br />
Important! The <strong>Martin</strong> address of the first fixture connected to the <strong>DMX</strong><br />
<strong>Interface</strong> is always 1.<br />
If the fixture uses 1 <strong>Martin</strong> channel, the next address is 2; if it uses 2 <strong>Martin</strong><br />
channels, the next address is 3.<br />
Please refer to the fixture’s <strong>user</strong> guide for address settings.<br />
DIP-switch Settings 11
OPERATION 5<br />
Once you have connected the devices and set all the DIP-switches you are ready<br />
to operate the <strong>Martin</strong> fixtures with your <strong>DMX</strong> controller. The protocols at the<br />
back of this <strong>manual</strong> describe how each fixture responds to <strong>DMX</strong> <strong>com</strong>mands.<br />
STATUS LEDS<br />
The LEDs on the front panel indicate the system’s status. When you first apply<br />
power to the <strong>DMX</strong> <strong>Interface</strong>, the green LED blinks approximately once per<br />
second to show that it is sending a default signal and waiting for <strong>DMX</strong> data from<br />
the controller. Both LEDs blink rapidly when data is received.<br />
If the <strong>DMX</strong> signal fails the red LED lights for approximately two seconds and<br />
then goes out. The green LED flashes as on power up, indicating that a default<br />
reset signal is being sent to all units.<br />
<strong>DMX</strong> PROTOCOLS<br />
The following section includes the <strong>DMX</strong> protocol for every <strong>Martin</strong> product<br />
supported by the <strong>DMX</strong> <strong>Interface</strong>. The protocols list the ways the fixtures repond<br />
to <strong>DMX</strong> <strong>com</strong>mands sent from the controller.<br />
The protocols are also available from the Service and Support area of the <strong>Martin</strong><br />
web site at http://www.martin.dk.<br />
12 Operation
ROBOCOLOR MSD 200<br />
<strong>DMX</strong> channels, <strong>DMX</strong> channels,<br />
reduced mode full mode <strong>Martin</strong> channels Product select<br />
4 7 1 1<br />
Channel Value Effect<br />
1<br />
2<br />
3<br />
4<br />
5 (F)<br />
6 (F)<br />
7 (F)<br />
(F) Full <strong>DMX</strong> mode only<br />
0 - 5<br />
6 - 120<br />
121 - 252<br />
253 - 255<br />
0 - 10<br />
11 - 168<br />
169 - 255<br />
0 - 4<br />
55 - 59<br />
110 - 114<br />
165 - 169<br />
220 - 255<br />
0 - 4<br />
55 - 59<br />
110 - 114<br />
165 - 169<br />
220 - 255<br />
0 - 255<br />
0 - 255<br />
0 - 255<br />
Shutter / Reset Unit<br />
Shutter Closed (Light off)<br />
Shutter Open (Light on)<br />
Strobe on (Fast -> Slow)<br />
Reset Unit<br />
Dimmer<br />
Dimmer full ON (no light)<br />
Dimmer (ON -> Off)<br />
Dimmer full OFF (Light)<br />
Color 1<br />
White<br />
Red<br />
Blue<br />
Green<br />
Yellow<br />
Color 2<br />
White<br />
Orange<br />
Pink<br />
Mauve<br />
Cyan<br />
Color 1 Speed<br />
Speed (fast -> slow)<br />
Color 2 Speed<br />
Speed (fast -> slow)<br />
Dimmer Speed<br />
Speed (fast -> slow)<br />
RoboColor MSD 200 13
(F) Full <strong>DMX</strong> mode only<br />
Note: When using the strobe the color function will be suspended. The colors will reappear<br />
when strobe is deselected.<br />
14 RoboColor<br />
ROBOCOLOR<br />
<strong>DMX</strong> channels, <strong>DMX</strong> channels,<br />
reduced mode full mode <strong>Martin</strong> channels Product select<br />
5 6 1 2<br />
Channel Values Effect<br />
1<br />
2-5<br />
6 (F)<br />
0 - 5<br />
6 - 120<br />
121 - 252<br />
253 - 255<br />
0 - 2<br />
45 - 47<br />
90 - 92<br />
135 - 137<br />
180 - 182<br />
225 - 255<br />
0 - 255<br />
Shutter / Reset Unit<br />
Shutter Closed (Light off)<br />
Shutter Open (Light on)<br />
Strobe on (Fast -> Slow)<br />
Reset Unit<br />
Color (Head 1-4)<br />
White<br />
Red<br />
Blue<br />
Green<br />
Yellow<br />
Blackout<br />
Color Speed (All heads)<br />
(Speed fast -> slow)
ROBOCOLOR II<br />
<strong>DMX</strong> channels, <strong>DMX</strong> channels,<br />
reduced mode full mode <strong>Martin</strong> channels Product select<br />
5 6 1 3<br />
Channel Values Effect<br />
1<br />
2-5<br />
6 (F)<br />
0 - 5<br />
6 - 40<br />
41 - 80<br />
81 - 120<br />
121 - 252<br />
253 - 255<br />
0 - 9<br />
10 - 19<br />
20 - 29<br />
30 - 39<br />
40 - 49<br />
50 - 59<br />
60 - 69<br />
70 - 79<br />
80 - 89<br />
90 - 99<br />
100 - 109<br />
110 - 119<br />
120 - 129<br />
130 - 139<br />
140 - 149<br />
150 - 159<br />
160 - 169<br />
170 - 179<br />
180 - 189<br />
190 - 199<br />
200 - 209<br />
210 - 219<br />
220 - 229<br />
230 - 239<br />
240 - 255<br />
0 - 255<br />
Shutter / Reset Unit<br />
Lamp off<br />
Lamp on<br />
Stand-alone, music trigger<br />
Stand-alone, auto trigger<br />
Strobe on (Fast -> Slow)<br />
Reset Unit<br />
Color (Head 1-4)<br />
Black<br />
Black / White<br />
White<br />
White / Magenta<br />
Magenta<br />
Magenta / Pink<br />
Pink<br />
Pink / Red<br />
Red<br />
Red / Orange<br />
Orange<br />
Orange / Dark Yellow<br />
Dark Yellow<br />
Dark Yellow / Yellow<br />
Yellow<br />
Yellow / Light Green<br />
Light Green<br />
Light Green / Green<br />
Green<br />
Green / Cyan<br />
Cyan<br />
Cyan / Light Blue<br />
Light Blue<br />
Light Blue / Dark Blue<br />
Dark Blue<br />
Color Speed (All heads)<br />
(Speed fast -> slow)<br />
(F) Full <strong>DMX</strong> mode only<br />
Note: The fixture strobes between the current color and the one before it. To strobe with<br />
white, set all heads to white. Color positioning while strobing is disabled in full <strong>DMX</strong> mode.<br />
RoboColor II 15
16 RoboScan 804/805<br />
ROBOSCAN 804/805<br />
<strong>DMX</strong> channels, <strong>DMX</strong> channels,<br />
reduced mode full mode <strong>Martin</strong> channels Product select<br />
5 N/A 1 5<br />
Channel Values Effect<br />
1<br />
2<br />
3<br />
4<br />
5<br />
0 - 5<br />
6 - 252<br />
253 - 255<br />
0 - 50<br />
51 - 100<br />
101 - 150<br />
151 - 200<br />
201 - 255<br />
0 - 63<br />
64 - 127<br />
128 - 191<br />
192 - 255<br />
0 - 30<br />
31 - 223<br />
224 - 255<br />
0 - 12<br />
13 - 241<br />
242 - 255<br />
Power / Reset Unit<br />
Power Off<br />
Power On<br />
Reset Unit<br />
Color<br />
White<br />
Red<br />
Blue<br />
Green<br />
Yellow<br />
Gobo (805 only)<br />
Open<br />
Holes<br />
Star<br />
Circle<br />
Pan<br />
Max Left<br />
Left --> Right (127 Neutral)<br />
Max Right<br />
Tilt<br />
Max Up<br />
Up --> Down (127 Neutral)<br />
Max Down
ROBOSCAN 1004/1005<br />
<strong>DMX</strong> channels, <strong>DMX</strong> channels,<br />
reduced mode full mode <strong>Martin</strong> channels Product select<br />
5 N/A 1 6<br />
Channel Values Effect<br />
1<br />
2<br />
3<br />
4<br />
5<br />
0 - 5<br />
6 - 120<br />
121 - 252<br />
253 - 255<br />
0 - 18<br />
19 - 72<br />
73<br />
74 - 127<br />
128<br />
129 - 182<br />
183<br />
184 - 237<br />
238 - 255<br />
0 - 12<br />
13 - 88<br />
89<br />
90 - 165<br />
166<br />
167 - 242<br />
243 - 255<br />
0 - 30<br />
31 - 223<br />
224 - 255<br />
0 - 12<br />
13 - 241<br />
242 - 255<br />
Shutter / Reset Unit<br />
Shutter Closed (Light off)<br />
Shutter open (Light on)<br />
Strobe on (Fast -> Slow)<br />
Reset Unit<br />
Color<br />
White<br />
White --> Red<br />
Red<br />
Red --> Blue<br />
Blue<br />
Blue --> Green<br />
Green<br />
Green --> Yellow<br />
Yellow<br />
Gobo<br />
Open<br />
Open --> Holes<br />
Holes<br />
Holes --> Star<br />
Star<br />
Star --> Cone<br />
Cone<br />
Pan<br />
Max Left<br />
Left -> Right (127 = Neutral)<br />
Max Right<br />
Tilt<br />
Max Up<br />
Up--> Down (127 = Neutral)<br />
Max Down<br />
RoboScan 1004/1005 17
18 RoboScan 1016<br />
ROBOSCAN 1016<br />
<strong>DMX</strong> channels, <strong>DMX</strong> channels,<br />
reduced mode full mode <strong>Martin</strong> channels Product select<br />
5 N/A 1 7<br />
Channel Values Effect<br />
1<br />
2<br />
3<br />
4<br />
5<br />
0 - 5<br />
6 - 120<br />
121 - 252<br />
253 - 255<br />
0 - 38<br />
50<br />
62<br />
74<br />
86<br />
98<br />
110<br />
122<br />
134<br />
146<br />
158<br />
170<br />
182<br />
194<br />
206<br />
218 - 255<br />
0 - 38<br />
50<br />
62<br />
74<br />
86<br />
98<br />
110<br />
122<br />
134<br />
146<br />
158<br />
170<br />
182<br />
194<br />
206<br />
218 - 255<br />
0 - 30<br />
31- 223<br />
224 - 255<br />
0 - 12<br />
13 - 241<br />
242- 255<br />
Shutter / Reset Unit<br />
Shutter closed (Light off)<br />
Shutter open (Light on)<br />
Strobe on (Fast -> Slow)<br />
Reset unit<br />
Color<br />
White<br />
Flame Red<br />
Light Blue<br />
Fern Green<br />
Yellow<br />
Primary Green<br />
Mauve<br />
Medium Blue<br />
Cyan<br />
Primary Red<br />
Orange<br />
Light Green<br />
Amber<br />
Pink<br />
Dark Lavender<br />
Deep Orange<br />
Gobo<br />
Gobo 1<br />
Gobo 2<br />
Gobo 3<br />
Gobo 4<br />
Gobo 5<br />
Gobo 6<br />
Gobo 7<br />
Gobo 8<br />
Gobo 9<br />
Gobo 10<br />
Gobo 11<br />
Gobo 12<br />
Gobo 13<br />
Gobo 14<br />
Gobo 15<br />
Gobo 16<br />
Pan<br />
Max Left<br />
Left --> Right (127 = Neutral)<br />
Max Right<br />
Tilt<br />
Max Up<br />
Up --> Down (127 = Neutral)<br />
Max Down
ROBOSCAN 1020<br />
<strong>DMX</strong> channels, <strong>DMX</strong> channels,<br />
reduced mode full mode <strong>Martin</strong> channels Product select<br />
12 N/A 2 10<br />
Channel Values Effect<br />
1<br />
2<br />
3<br />
4<br />
5<br />
0 - 5<br />
6 - 120<br />
121 - 252<br />
253 - 255<br />
0 - 10<br />
11 - 220<br />
221 - 255<br />
0 - 37<br />
57<br />
77<br />
97<br />
117<br />
137<br />
157<br />
177<br />
197<br />
217 - 255<br />
0 - 37<br />
57<br />
77<br />
97<br />
117<br />
137<br />
157<br />
177<br />
197<br />
217 - 255<br />
0 - 37<br />
57<br />
77<br />
97<br />
117<br />
137<br />
157<br />
177<br />
197<br />
217 - 255<br />
Shutter / Reset Unit<br />
Shutter closed (Light off)<br />
Shutter open (Light on)<br />
Strobe on (Fast -> Slow)<br />
Reset unit<br />
Dimmer<br />
Dimmer full on (No Light)<br />
Dimmer (On -> Off)<br />
Dimmer full off (Light)<br />
Color 1<br />
White<br />
R61<br />
B51<br />
G51/56<br />
Y52<br />
G50/55<br />
M47/63<br />
B42<br />
C54<br />
R65<br />
Color 2<br />
White<br />
O56<br />
G49/59<br />
Y54<br />
Y52<br />
P47/58<br />
M47/63<br />
M49/65<br />
C54<br />
T48/53<br />
Gobo 1<br />
Open<br />
Stars<br />
Star<br />
Dots<br />
Cone<br />
Pling<br />
Dot-Circle<br />
Bells<br />
Flower<br />
Turbine<br />
RoboScan 1020 19
20 RoboScan 1020<br />
6<br />
7<br />
8<br />
9<br />
10<br />
11<br />
12<br />
0 - 37<br />
57<br />
77<br />
97<br />
117<br />
137<br />
157<br />
177<br />
197<br />
217 - 255<br />
0 -10<br />
11 - 239<br />
240 - 255<br />
0 -48<br />
49 -205<br />
206 -255<br />
0 - 10<br />
43<br />
76<br />
109<br />
142<br />
175 - 255<br />
0 - 255<br />
0 - 255<br />
0 - 255<br />
Gobo 2<br />
Open<br />
Logo<br />
Triangle<br />
Sun<br />
Holes<br />
Raster<br />
Bars<br />
Turbine<br />
Flash<br />
Star<br />
Focus<br />
Default<br />
Min. --> Max (140 = Default)<br />
Default<br />
Iris<br />
Default<br />
Full open -> Full Close<br />
Full Close<br />
Prism<br />
Open<br />
3 Facet<br />
Open<br />
5 Facet<br />
Open<br />
9 Facet<br />
Pan<br />
Left --> Right (127 = Neutral)<br />
Tilt<br />
Up -- > Down (127 = Neutral)<br />
Movement Speed<br />
(Speed fast -> slow)
ROBOSCAN PRO 218<br />
<strong>DMX</strong> channels, <strong>DMX</strong> channels,<br />
reduced mode full mode <strong>Martin</strong> channels Product select<br />
7 N/A 1 11<br />
Channel Values Effect<br />
1<br />
2<br />
3<br />
4<br />
5<br />
0 - 5<br />
6 - 120<br />
121 - 252<br />
253 - 255<br />
0 - 10<br />
11 - 168<br />
169 - 255<br />
0 - 34<br />
45<br />
56<br />
67<br />
78<br />
89<br />
100<br />
111<br />
122<br />
133<br />
144<br />
155<br />
166<br />
177<br />
188<br />
199<br />
210<br />
221 - 255<br />
0 - 34<br />
45<br />
56<br />
67<br />
78<br />
89<br />
100<br />
111<br />
122<br />
133<br />
144<br />
155<br />
166<br />
177<br />
188<br />
199<br />
210<br />
221 - 255<br />
0 - 255<br />
Shutter / Reset Unit<br />
Shutter Closed (Light off)<br />
Shutter Open (Light on)<br />
Strobe on (Fast -> Slow)<br />
Reset Unit<br />
Dimmer<br />
Dimmer full ON (no light)<br />
Dimmer (ON -> Off)<br />
Dimmer full OFF (Light)<br />
Color<br />
White<br />
R61<br />
B51<br />
G51/56<br />
Y52<br />
G50/55<br />
M47/63<br />
B46<br />
C54<br />
R65<br />
O56<br />
G49/59<br />
Y54<br />
P47/58<br />
M49/65<br />
O59<br />
MultiColor 1<br />
MultiColor 2<br />
Gobo<br />
Open<br />
Half<br />
Dot<br />
Vertical Bar<br />
Horizontal Bar<br />
Arrow<br />
Fat Cone<br />
Triangle<br />
Star<br />
Dots<br />
Bells<br />
Cone<br />
Flash<br />
Raster<br />
Dot Circle<br />
Bars<br />
Window<br />
Turbine<br />
Pan<br />
Left --> Right (127 = Neutral)<br />
RoboScan Pro 218 21
22 RoboScan Pro 218<br />
6<br />
7<br />
0 - 255<br />
0 - 255<br />
Tilt<br />
Up -- > Down (127 = Neutral)<br />
Movement Speed<br />
Speed (fast -> slow)
ROBOSCAN 1220<br />
<strong>DMX</strong> channels, <strong>DMX</strong> channels,<br />
reduced mode full mode <strong>Martin</strong> channels Product select<br />
12 15 2 12<br />
Note: The original 1220 has a separate shutter and dimmer. The 1220 II has a <strong>com</strong>bined<br />
shutter and dimmer. Neither the 1220 nor the 1220 II has rotating gobos.<br />
ROBOSCAN 1220 II<br />
<strong>DMX</strong> channels, <strong>DMX</strong> channels,<br />
reduced mode full mode <strong>Martin</strong> channels Product select<br />
12 15 2 13<br />
Channel Values Effect<br />
1<br />
2<br />
3<br />
4<br />
0 - 5<br />
6 - 115<br />
116 - 247<br />
248 - 251<br />
252 - 255<br />
0 - 10<br />
11 - 220<br />
221 - 255<br />
0 - 37<br />
57<br />
77<br />
97<br />
117<br />
137<br />
157<br />
177<br />
197<br />
217 - 255<br />
0 - 37<br />
57<br />
77<br />
97<br />
117<br />
137<br />
157<br />
177<br />
197<br />
217 - 255<br />
Shutter / Reset Unit / Power<br />
Shutter Closed (Light off)<br />
Shutter open (Light on)<br />
Strobe on (Fast --> Slow)<br />
Reset Unit<br />
Lamp On (Power on)<br />
Dimmer<br />
Dimmer full on (No Light)<br />
Dimmer (On -> Off)<br />
Dimmer Full Off (Light)<br />
Color 1<br />
White<br />
R61<br />
B51<br />
G51/56<br />
Y52<br />
G50/55<br />
M47/63<br />
B42<br />
C54<br />
R65<br />
Color 2<br />
White<br />
O56<br />
G49/59<br />
Y54<br />
Y52<br />
P47/58<br />
M47/63<br />
M49/65<br />
C54<br />
T48/53<br />
RoboScan 1220 23
(F) Full <strong>DMX</strong> mode only<br />
24 RoboScan 1220 II<br />
5<br />
6<br />
7<br />
8<br />
9<br />
10<br />
11<br />
12<br />
13 (F)<br />
14 (F)<br />
15 (F)<br />
0 - 37<br />
57<br />
77<br />
97<br />
117<br />
137<br />
157<br />
177<br />
197<br />
217 - 255<br />
0 - 37<br />
57<br />
77<br />
97<br />
117<br />
137<br />
157<br />
177<br />
197<br />
217 - 255<br />
0 -10<br />
11 - 239<br />
240 - 255<br />
0 -48<br />
49 -205<br />
206 -255<br />
0 - 10<br />
43<br />
76<br />
109<br />
142<br />
175 - 255<br />
0 - 255<br />
0 - 255<br />
0 - 255<br />
0 - 255<br />
0 - 255<br />
0 - 255<br />
Gobo 1<br />
Open<br />
Stars<br />
Star<br />
Dots<br />
Cone<br />
Pling<br />
Dot-Circle<br />
Bells<br />
Flower<br />
Turbine<br />
Gobo 2<br />
Open<br />
Logo<br />
Triangle<br />
Sun<br />
Holes<br />
Raster<br />
Bars<br />
Turbine<br />
Flash<br />
Star<br />
Focus<br />
Default<br />
Min. --> Max (140 = Default)<br />
Default<br />
Iris<br />
Default<br />
Full open --> Full Close<br />
Full Close<br />
Prism<br />
Open<br />
3 Facet<br />
Open<br />
5 Facet<br />
Open<br />
9 Facet<br />
Pan<br />
Left --> Right (127 = Neutral)<br />
Tilt<br />
Up --> Down (127 = Neutral)<br />
Pan/Tilt Speed<br />
(Speed fast -> slow)<br />
Color Speed<br />
(Speed fast -> slow)<br />
Gobo Speed<br />
(Speed fast -> slow)<br />
Focus/Iris/Dimmer Speed<br />
(Speed fast -> slow)
ROBOSCAN 1220 IIR<br />
<strong>DMX</strong> channels, <strong>DMX</strong> channels,<br />
reduced mode full mode <strong>Martin</strong> channels Product select<br />
12 16 2 14<br />
Note: The 1220 IIR has a <strong>com</strong>bined shutter and dimmer and rotating gobos.<br />
Channel Values Effect<br />
1<br />
2<br />
3<br />
4<br />
5<br />
0 - 5<br />
6 - 115<br />
116 - 247<br />
248 - 251<br />
252 - 255<br />
0 - 10<br />
11 - 220<br />
221 - 255<br />
0 - 37<br />
57<br />
77<br />
97<br />
117<br />
137<br />
157<br />
177<br />
197<br />
217 - 255<br />
0 - 37<br />
57<br />
77<br />
97<br />
117<br />
137<br />
157<br />
177<br />
197<br />
217 - 255<br />
0 - 37<br />
57<br />
77<br />
97<br />
117<br />
137<br />
157<br />
177<br />
197<br />
217 - 255<br />
Shutter / Reset Unit / Power<br />
Shutter Closed (Light off)<br />
Shutter open (Light on)<br />
Strobe on (Fast --> Slow)<br />
Reset Unit<br />
Lamp On (Power on)<br />
Dimmer<br />
Dimmer full on (No Light)<br />
Dimmer (On -> Off)<br />
Dimmer Full Off (Light)<br />
Color 1<br />
White<br />
R61<br />
B51<br />
G51/56<br />
Y52<br />
G50/55<br />
M47/63<br />
B42<br />
C54<br />
R65<br />
Color 2<br />
White<br />
O56<br />
G49/59<br />
Y54<br />
Y52<br />
P47/58<br />
M47/63<br />
M49/65<br />
C54<br />
T48/53<br />
Gobo 1<br />
Open<br />
Stars<br />
Star<br />
Dots<br />
Cone<br />
Pling<br />
Dot-Circle<br />
Bells<br />
Flower<br />
Turbine<br />
RoboScan 1220 IIR 25
6<br />
(Reduced mode only)<br />
6 (F)<br />
0 - 15<br />
16 - 44<br />
45 - 46<br />
47 - 75<br />
76 - 104<br />
105 - 106<br />
107 - 135<br />
136 - 164<br />
165 - 166<br />
167 - 195<br />
196 - 224<br />
225 - 226<br />
227 - 255<br />
26 RoboScan 1220 IIR<br />
7<br />
8<br />
9<br />
10<br />
0 - 3<br />
4 - 7<br />
8 - 11<br />
12 - 15<br />
16 - 19<br />
20 - 48<br />
49<br />
50 - 78<br />
79 - 107<br />
108<br />
109 - 137<br />
138 - 166<br />
167<br />
168 - 196<br />
197 - 225<br />
226<br />
227 - 255<br />
0 -10<br />
11 - 239<br />
240 - 255<br />
0 -48<br />
49 -205<br />
206 -255<br />
0 - 10<br />
43<br />
76<br />
109<br />
142<br />
175 - 255<br />
0 - 255<br />
Rotating Gobo Selection and Rotation:<br />
Reduced mode only<br />
Open Gobo - No Rotation<br />
Gobo 1 - CW Rotation Fast --> Slow<br />
Gobo 1 Stop<br />
Gobo 1 - CCW Rotation Slow --> Fast<br />
Gobo 2 - CW Rotation Fast --> Slow<br />
Gobo 2 Stop<br />
Gobo 2 - CCW Rotation Slow --> Fast<br />
Gobo 3 - CW Rotation Fast --> Slow<br />
Gobo 3 Stop<br />
Gobo 3 - CCW Rotation Slow --> Fast<br />
Gobo 4 - CW Rotation Fast --> Slow<br />
Gobo 4 Stop<br />
Gobo 4 - CCW Rotation Slow --> Fast<br />
Rotating Gobo Selection, Index and<br />
Rotation: Full mode only<br />
Open Gobo - No Rotation<br />
Gobo 1 - indexed (set index on ch. 16)<br />
Gobo 2 - indexed (set index on ch. 16)<br />
Gobo 3 - indexed (set index on ch. 16)<br />
Gobo 4 - indexed (set index on ch. 16)<br />
Gobo 1 - CW Rotation Fast -> Slow<br />
Gobo 1 Stop<br />
Gobo 1 - CCW Rotation Slow -> Fast<br />
Gobo 2 - CW Rotation Fast -> Slow<br />
Gobo 2 Stop<br />
Gobo 2 - CCW Rotation Slow -> Fast<br />
Gobo 3 - CW Rotation Fast -> Slow<br />
Gobo 3 Stop<br />
Gobo 3 - CCW Rotation Slow -> Fast<br />
Gobo 4 - CW Rotation Fast -> Slow<br />
Gobo 4 Stop<br />
Gobo 4 - CCW Rotation Slow -> Fast<br />
Focus<br />
Default<br />
Min. --> Max (140 = Default)<br />
Default<br />
Iris<br />
Default<br />
Full open --> Full Close<br />
Full Close<br />
Prism<br />
Open<br />
3 Facet<br />
Open<br />
5 Facet<br />
Open<br />
9 Facet<br />
Pan<br />
Left --> Right (127 = Neutral)
11<br />
12<br />
13 (F)<br />
14 (F)<br />
15 (F)<br />
16 (F)<br />
(F) Full <strong>DMX</strong> mode only<br />
0 - 255<br />
0 - 255<br />
0 - 255<br />
0 - 255<br />
0 - 255<br />
0 - 119<br />
120<br />
121 - 239<br />
Tilt<br />
Up --> Down (127 = Neutral)<br />
Pan/Tilt Speed<br />
(Speed fast -> slow)<br />
Color Speed<br />
(Speed fast -> slow)<br />
Gobo Speed<br />
(Speed fast -> slow)<br />
Focus/Iris/Dimmer Speed<br />
(Speed fast -> slow)<br />
Rotating Gobo Orientation<br />
- 216° --> Default Index<br />
Default Index<br />
Default Index --> 214.2 degrees<br />
Gobos are reindexed whenever a new gobo<br />
is selected or the current gobo has been<br />
rotating continuously.<br />
RoboScan 1220 IIR 27
Note: When using the strobe the color function will be suspended. The colors will reappear<br />
when strobe is deselected.<br />
28 RoboZap<br />
ROBOZAP<br />
<strong>DMX</strong> channels, <strong>DMX</strong> channels,<br />
reduced mode full mode <strong>Martin</strong> channels Product select<br />
4 N/A 1 15<br />
Channel Values Effect<br />
1<br />
2<br />
3<br />
4<br />
0 - 5<br />
6 - 120<br />
121 - 252<br />
253 - 255<br />
0 - 2<br />
48 - 50<br />
96 - 98<br />
144 - 146<br />
192 - 194<br />
240 - 255<br />
0 - 2<br />
48 - 50<br />
96 - 98<br />
144 - 146<br />
192 - 194<br />
240 - 255<br />
0 - 123<br />
124 - 131<br />
132 - 255<br />
Shutter / Reset Unit<br />
Shutter Closed (Light off)<br />
Shutter Open (Light on)<br />
Strobe on (Fast -> Slow)<br />
Reset Unit<br />
Color Right<br />
White<br />
Red<br />
Blue<br />
Green<br />
Yellow<br />
Blackout<br />
Color Left<br />
White<br />
Red<br />
Blue<br />
Green<br />
Yellow<br />
Blackout<br />
Rotation<br />
Rotate Right (Slow -> Fast)<br />
Stop<br />
Rotate Left (Slow -> Fast)
ROBOZAP MSR 1200<br />
<strong>DMX</strong> channels, <strong>DMX</strong> channels,<br />
reduced mode full mode <strong>Martin</strong> channels Product select<br />
6 N/A 1 16<br />
Channel Values Effect<br />
1 121 - 252<br />
253 - 255<br />
2&3<br />
4&5<br />
6<br />
0 - 37<br />
57<br />
77<br />
97<br />
117<br />
137<br />
157<br />
197<br />
217<br />
237 - 255<br />
0 - 37<br />
57<br />
77<br />
97<br />
117<br />
137<br />
157<br />
197<br />
217<br />
237 - 255<br />
0 - 123<br />
124 - 131<br />
132 - 255<br />
Shutter / Reset Unit<br />
Strobe on (Fast -> Slow)<br />
Reset Unit<br />
Color Right & Left<br />
Primary Red<br />
White<br />
Flame Red<br />
Light Blue<br />
Fern Green<br />
Yellow<br />
Primary Green<br />
Mauve<br />
Dark Blue<br />
Cyan<br />
Gobo Right & Left<br />
Black Out<br />
Open<br />
Stars<br />
Star<br />
Dots<br />
Cone<br />
Pling<br />
Dot-Circles<br />
Bells<br />
Flower<br />
Rotation<br />
Rotate Right (Fast -> Slow)<br />
Stop<br />
Rotate Left (Slow -> Fast)<br />
As the Zap MSR uses it's gobo wheels to perform blackout there is no light on function on<br />
this channel. You must use channels 4 and 5 to move the gobos from their blackout positions.<br />
Also please note when using the strobe function the gobo function will be suspended. The<br />
gobos will reappear when strobe is deselected.<br />
RoboZap MSR 1200 29
30 Centrepiece<br />
CENTREPIECE<br />
<strong>DMX</strong> channels, <strong>DMX</strong> channels,<br />
reduced mode full mode <strong>Martin</strong> channels Product select<br />
7 N/A 1 17<br />
Channel Values Effect<br />
1<br />
0 - 49<br />
50 - 99<br />
100 - 149<br />
150 - 199<br />
200 - 247<br />
248 - 252<br />
253 - 255<br />
2 - 5 0 - 198<br />
199 - 255<br />
6<br />
7<br />
0 - 123<br />
124 - 131<br />
132 - 255<br />
0 - 123<br />
124 - 131<br />
132 - 255<br />
Reset Fixture, Stand-Alone, Lamp On<br />
Manual Control<br />
Stand-Alone Random Music<br />
Stand-Alone Random Auto<br />
Stand-Alone Music<br />
Stand-Alone Auto<br />
Reset Fixture<br />
Lamp On<br />
When running stand-alone, the<br />
Centrepiece will not respond to any other<br />
<strong>com</strong>mands.<br />
Tilt 1-4<br />
Full Closed --> Full Open<br />
Full Open<br />
Color Carousel<br />
Rotate Right (Fast --> Slow)<br />
Stop<br />
Rotate Left (Slow --> Fast)<br />
Mirror Rotation<br />
Rotate Right (Fast --> Slow)<br />
Stop<br />
Rotate Left (Slow --> Fast)
�����������������������<br />
Olof Palmes Allé 18 8200 Aarhus N Denmark<br />
Tel.: +45 8740 0000 Fax: +45 8740 0010 URL: http://www.martin.dk