

O Scale Trains Magazine Online
O Scale Trains Magazine Online
O Scale Trains Magazine Online
- TAGS
- trains
- oscalemag.com

Create successful ePaper yourself
Turn your PDF publications into a flip-book with our unique Google optimized e-Paper software.
Whenever I can, I use Grandt Line<br />
products for my windows, doors and<br />
other architectural details. I like the quality<br />
of the line and the broad selection.<br />
For this station, being the chief cook,<br />
bottle washer, and architect, I selected<br />
Grandt Line #3720 double-hung windows<br />
(nine are required) for my large windows.<br />
These windows require 3/4” x 1-15/32”<br />
openings. For me, cutting window openings<br />
is a pain, but it’s part of the scratchbuilding<br />
mystique and well worth the<br />
effort when you get those walls up and<br />
the windows are crisply displayed. Cutting<br />
out the walls and windows is when I<br />
like to slip a CD into my shop player. For<br />
me, there’s nothing like the Harvard Glee<br />
Club singing a Thomas Tallis mass to slow<br />
down the X-Acto blade and improve the<br />
quality of my work. It keeps my head into<br />
the work at hand. Hey, some people like<br />
rock. Others gotta have a TV going at the<br />
bench. I like listening to the long-haired<br />
choral groups.<br />
I used Grandt Line #3602 service<br />
doors, which require 23/32” x 1-11/16”<br />
openings. The auto bay opening is 2” high<br />
x 2-1/8” wide. These double doors are<br />
scratchbuilt, though you might be able to<br />
find something suitable in molded plastic<br />
or white metal. A five-section roll-up<br />
door could also be used. The eave end<br />
small upper windows are a pair of Grandt<br />
Line #2 windows I had on hand. They<br />
are meant to ventilate the cavernous attic<br />
space and require 15/32” x 5/8” openings.<br />
Other windows would work as well.<br />
When the walls were done (but before<br />
I installed the service bay door and<br />
Grandt Line windows and doors), I laid<br />
the walls face up on a sheet of newspaper<br />
and lightly sprayed them with a spraycan<br />
of Testors Flat White paint. I lightly<br />
covered the basswood to impart a faded<br />
weathered look and to ensure the scribed<br />
board lines were readily visible. You can<br />
crank up the airbrush for this operation,<br />
but it’s not necessary as long you don’t<br />
get too close with that spraycan nozzle.<br />
If you’re not comfortable working with<br />
spraycans, practice on some old newspapers<br />
before you spray the walls. The wall<br />
trim is done next (Photo 2).<br />
Pre-painting lengths of uncut trim<br />
boards makes life easier if you’re doing<br />
2<br />
the trim in a second color. I sprayed<br />
lengths of 1/32” x 1/16”, 1/32” x 3/32”,<br />
1/32 x 3/8”, and 1/8” square basswood<br />
strips with a can of Testors #13080 Zinc<br />
Chromate primer. Why they call this paint<br />
“Zinc Chromate” is beyond me. True Zinc<br />
Chromate has a yellowish-green hue and<br />
this paint is a nice deep red. In any case,<br />
I liked the color, so I used it. At this same<br />
time, while I had the spraycan out, I shot<br />
the Grandt Line windows and doors with<br />
the same paint.<br />
I glued pre-painted 1/8” square corner<br />
trim strips to the front and rear (longer)<br />
walls with the trim faces set flush with the<br />
face of the siding. The other pre-painted<br />
strips were used to trim the front triangular<br />
dormer face, the auto bay doors and<br />
door frame. The trim patterns are shown<br />
on the drawings. With the walls still in the<br />
flat, I installed the Grandt line windows<br />
and doors. Don’t do the glazing yet, as<br />
you’ll want to decal the walls and spray<br />
them with Testors Dull Cote before you<br />
add the window glazing.<br />
The two auto service doors are simple<br />
affairs, cut from 1/16” thick 1/16” scribed<br />
basswood sheet per the drawings and<br />
then framed with pre-painted stripwood.<br />
You could leave one or both doors ajar<br />
to offer a peek into the auto bay interior.<br />
I added 1/8” square basswood reinforcing<br />
strips to the inside faces of the eave<br />
ends, as they had a tendency to bow in<br />
after they were painted. No doubt, being<br />
painted only on the outside caused this<br />
problem. These basswood strips also<br />
increase the gluing surface for the roofing<br />
yet to come (Photo 3).<br />
3<br />
I decaled my walls and service bay<br />
doors with Microscale HO and O <strong>Scale</strong><br />
Sinclair Gas decals. I soaked them into<br />
the scribed-board siding using Walthers<br />
decal solvent. After the decals were nicely<br />
incorporated into the board siding, I<br />
over-sprayed them with Testors Dull Cote.<br />
Now you can add the windows glazing.<br />
It’s much easier to glaze the windows<br />
with the walls still unassembled. I use<br />
Aleene’s Original Tacky Glue to attach<br />
my glazing. It dries clear and won’t cloud<br />
the acetate.<br />
The floor in my structure is 1/8” balsa<br />
sheet butt-glued with CA glue to the requisite<br />
width. I notched out the floor to<br />
accommodate the auto service and service<br />
door frames and the 1/8” square corner<br />
trim strips. That done, we can throw<br />
up the walls.<br />
I began with an end wall. I used CA<br />
slow-setting glue here, along with a small<br />
square to ensure the end wall was square<br />
to the floor when the glue kicked. Make<br />
sure that end wall is centered between<br />
the front and back edges of the balsa<br />
floor. The end walls fit between the front<br />
and back walls.<br />
I find using CA kicker really speeds<br />
up assembly. When the first wall was<br />
in place and trued up, I simply hit the<br />
floor-to-wall joint with a small shot of<br />
kicker and I had an instantly cured glue<br />
joint. The back wall went up next. When<br />
making these wall-to-floor glue joints, I<br />
always apply the CA glue from the inside<br />
of the structure. That way, no glue can<br />
seep through the joint to the finished wall<br />
exterior face. I reinforce the corner joints<br />
with a second application of CA glue,<br />
and then sprinkle baking soda onto the<br />
still-wet CA glue. This combination creates<br />
rock-hard corner fillets (Photo 4).<br />
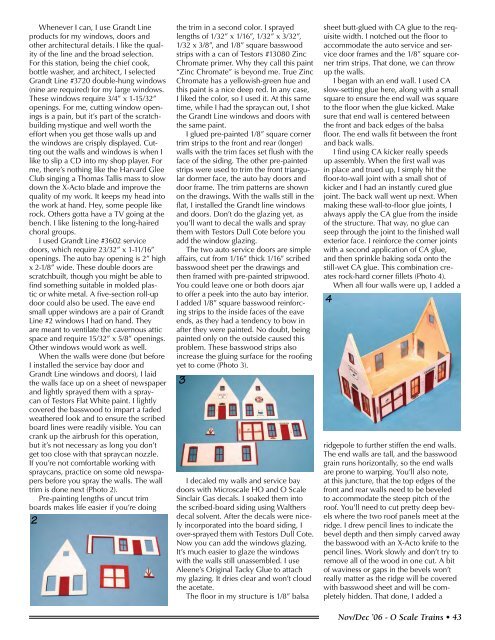
When all four walls were up, I added a<br />
4<br />
ridgepole to further stiffen the end walls.<br />
The end walls are tall, and the basswood<br />
grain runs horizontally, so the end walls<br />
are prone to warping. You’ll also note,<br />
at this juncture, that the top edges of the<br />
front and rear walls need to be beveled<br />
to accommodate the steep pitch of the<br />
roof. You’ll need to cut pretty deep bevels<br />
where the two roof panels meet at the<br />
ridge. I drew pencil lines to indicate the<br />
bevel depth and then simply carved away<br />
the basswood with an X-Acto knife to the<br />
pencil lines. Work slowly and don’t try to<br />
remove all of the wood in one cut. A bit<br />
of waviness or gaps in the bevels won’t<br />
really matter as the ridge will be covered<br />
with basswood sheet and will be completely<br />
hidden. That done, I added a<br />
Nov/Dec ’06 - O <strong>Scale</strong> <strong>Trains</strong> •


