unning o-scale 2-rail trains from a 3-rail Controller In the Nov/Dec 2005 (#23) and Jan/Feb 2006 (#24) issues of O <strong>Scale</strong> <strong>Trains</strong>, I described the construction of an AC power supply to use with various command control systems. Basically it was just a transformer, but in a form safer and sturdier than the naked transformer that command control systems vendors sometimes recommend. In the Mar/Apr 2006 (#25) issue, reader Gordon Hall correctly pointed out that a three-rail power unit, the Lionel Powerhouse 180, could be used instead. The current Lionel catalog lists it as 6-22983, for $99.99. Now, I would like to put the shoe on the other foot. Any 3- Rail modelers, who want to convert to 2-Rail (or just try it out) without also jumping into command control, have a simple job of providing power for their two-rail layout. Your present variable voltage train controller, such as a Lionel ZW, is plenty powerful; it ran three-rail trains with those smoke units and lighted passenger cars. However, it generates alternating current (AC), so it will not work for two-rail direct current (DC) applications without modification. Fortunately, it is relatively easy to add a rectifier to turn the AC into DC, and a reversal switch to exchange the two output wires (thus reversing the DC polarity and the locomotive direction). When you’re done, the old controller speed lever is still used to control speed, while the new switch is used to select direction. A few additional parts would also be nice. You’ll need a metal box to protect the wiring and present a neat appearance. This box will also be a heat sink for the rectifier, and house a capacitor (to smooth the DC and so reduce the chance of the locomotive motor buzzing), a circuit breaker to protect against a short circuit, and input and output connectors or terminal blocks to ease the hookup. The rectifier will use up about 1.8 volts, which generates nine watts of heat at five amperes of current, about the same heat as an old-style Christmas tree bulb. The input wires connect to a ZW track output and the output wires actually connect to the track. Of course, you also need a two-rail locomotive with insulated wheels and no center rail electrical pickup or E-unit. This is the standard locomotive arrangement in 2-Rail so you can purchase one from any of several vendors. You could also get one of the new MTH 2-Rail/3-Rail convertible locomotives, or you can convert or have converted one of your three-rail locomotives. Joe Foehrkolb, trading as Baldwin Forge and Machine (see Joe’s ad on page 30), specializes in 3-Rail to 2-Rail conversions. By the way, your three-rail cars will also need to be changed to insulated wheels. That’s not so bad, because you want to change out the oversize three-rail wheels anyway. The power conversion unit is quite simple and, while I show one implementation in Photo 1, you should feel free to do it your way. A rectifier (more properly a bridge rectifier) has four leads. One is marked “+” for the positive output wire. The one opposite to this is for the negative output wire and sometimes marked “– ”. The other two, in between, are leads for the AC 62 • O <strong>Scale</strong> <strong>Trains</strong> - Nov/Dec ’06 input wires, connected either way. A double-pole/double-throw toggle switch is used to reverse the output. It has six terminals for connecting wires, four at the corners and two in the middle. When the switch is actuated, each middle terminal is connected to the end (corner) terminal at one end or the other. In this application, the diagonally opposite terminals are connected together and then to the track outputs. The input wires (from the rectifier output) are connected to the two middle terminals (Photo 2). An optional capacitor can be added to smooth out the DC voltage. It should be sized to withstand a voltage greater than the maximum that could be applied. A 50V rating is sufficient. The capacitance value is not critical. 30 microfarads is sufficient. Remember that a capacitor is polarized; the wire marked “+” should go to the positive lead and the “– ” wire to the negative lead. typical Parts List: 1 Ten-ampere Bridge Rectifier (Radio Shack # 276-1185) 1 Ten-ampere Double-pole/Double-throw Toggle Switch (Radio Shack # 275-709) 1 Box with Metal Top (Radio Shack # 270-1805) Optional: 30-microfarad (50V or more) Filter Capacitor. You’ll find circuit breaker and terminal options discussed in the previous series of articles (in OST #23 and #24). We’ll close with a final thought. If you used TMCC for your three-rail layout, you might want to convert directly to two-rail TMCC. Train America Studios (4137 Boardman-Canfield Road, Suite LL02, Canfield, Ohio, 44406, (330) 533-7181 [www.scalecommand.com] can provide this conversion for you. u 2 1
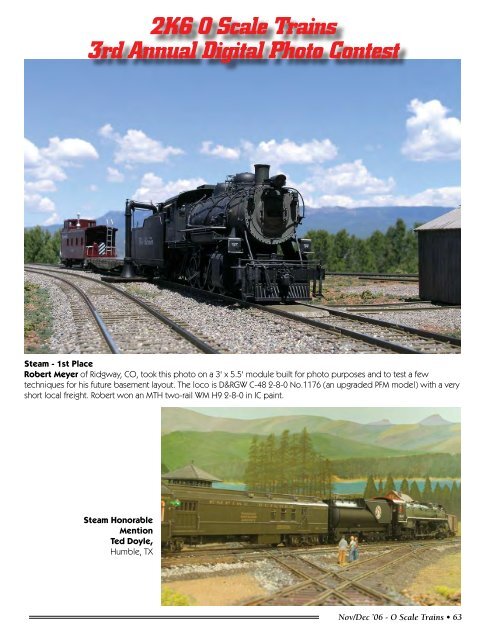
2K6 O <strong>Scale</strong> <strong>Trains</strong> 3rd Annual Digital Photo Contest Steam - 1st Place Robert Meyer of Ridgway, CO, took this photo on a 3' x 5.5' module built for photo purposes and to test a few techniques for his future basement layout. The loco is D&RGW C-48 2-8-0 No.1176 (an upgraded PFM model) with a very short local freight. Robert won an MTH two-rail WM H9 2-8-0 in IC paint. Steam Honorable Mention Ted Doyle, Humble, TX Nov/Dec ’06 - O <strong>Scale</strong> <strong>Trains</strong> • 6