“ giflex ® ” ge-t flexible couplings
“ giflex ® ” ge-t flexible couplings
“ giflex ® ” ge-t flexible couplings

You also want an ePaper? Increase the reach of your titles
YUMPU automatically turns print PDFs into web optimized ePapers that Google loves.
CHIARAVALLI Trasmissioni spa<br />
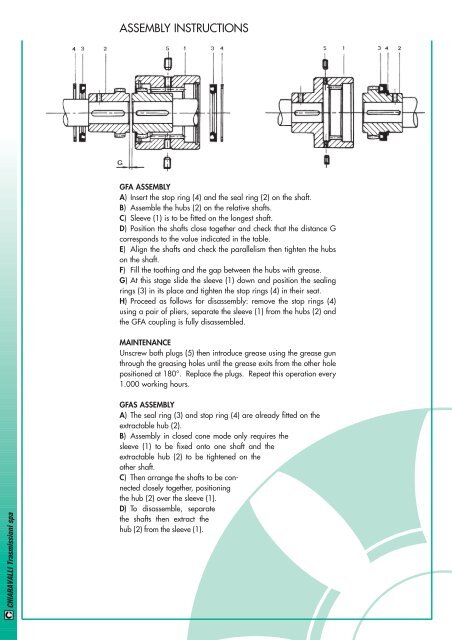
ASSEMBLY INSTRUCTIONS<br />
GFA ASSEMBLY<br />
A) Insert the stop ring (4) and the seal ring (2) on the shaft.<br />
B) Assemble the hubs (2) on the relative shafts.<br />
C) Sleeve (1) is to be fitted on the lon<strong>ge</strong>st shaft.<br />
D) Position the shafts close to<strong>ge</strong>ther and check that the distance G<br />
corresponds to the value indicated in the table.<br />
E) Align the shafts and check the parallelism then tighten the hubs<br />
on the shaft.<br />
F) Fill the toothing and the gap between the hubs with grease.<br />
G) At this sta<strong>ge</strong> slide the sleeve (1) down and position the sealing<br />
rings (3) in its place and tighten the stop rings (4) in their seat.<br />
H) Proceed as follows for disassembly: remove the stop rings (4)<br />
using a pair of pliers, separate the sleeve (1) from the hubs (2) and<br />
the GFA coupling is fully disassembled.<br />
MAINTENANCE<br />
Unscrew both plugs (5) then introduce grease using the grease gun<br />
through the greasing holes until the grease exits from the other hole<br />
positioned at 180°. Replace the plugs. Repeat this operation every<br />
1.000 working hours.<br />
GFAS ASSEMBLY<br />
A) The seal ring (3) and stop ring (4) are already fitted on the<br />
extractable hub (2).<br />
B) Assembly in closed cone mode only requires the<br />
sleeve (1) to be fixed onto one shaft and the<br />
extractable hub (2) to be tightened on the<br />
other shaft.<br />
C) Then arran<strong>ge</strong> the shafts to be connected<br />
closely to<strong>ge</strong>ther, positioning<br />
the hub (2) over the sleeve (1).<br />
D) To disassemble, separate<br />
the shafts then extract the<br />
hub (2) from the sleeve (1).