radio controlled clock with appointment alarm - Technoline
radio controlled clock with appointment alarm - Technoline
radio controlled clock with appointment alarm - Technoline

You also want an ePaper? Increase the reach of your titles
YUMPU automatically turns print PDFs into web optimized ePapers that Google loves.
Istruction manual WT-181<br />
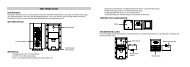
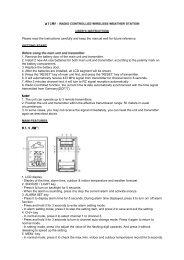
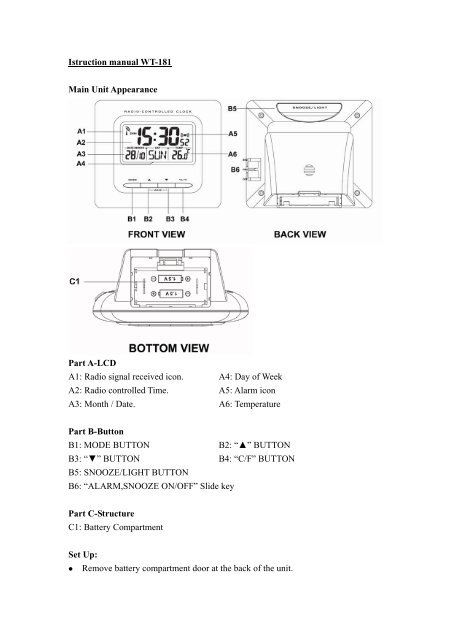
Main Unit Appearance<br />
Part A-LCD<br />
A1: Radio signal received icon. A4: Day of Week<br />
A2: Radio <strong>controlled</strong> Time. A5: Alarm icon<br />
A3: Month / Date. A6: Temperature<br />
Part B-Button<br />
B1: MODE BUTTON B2: “▲” BUTTON<br />
B3: “▼” BUTTON B4: “C/F” BUTTON<br />
B5: SNOOZE/LIGHT BUTTON<br />
B6: “ALARM,SNOOZE ON/OFF” Slide key<br />
Part C-Structure<br />
C1: Battery Compartment<br />
Set Up:<br />
� Remove battery compartment door at the back of the unit.
� Insert one AA battery.<br />
� Press "RESET" hole inside the battery door the unit <strong>with</strong> a pin.<br />
Radio Controlled Time:<br />
� The <strong>clock</strong> automatically starts scanning the DCF frequency signal after new<br />
batteries inserted ( “ “ flashes on the LCD)<br />
� The <strong>clock</strong> automatically scans the time signal at 3:00a.m. everyday<br />
to maintain accurate timing. For failed reception in 4 minutes, scanning stops<br />
( “ “ on LCD disappear) and repeats again at 4:00a.m., 5:00a.m., and<br />
6:00a.m.<br />
� The <strong>clock</strong> manually scans the time signal by hold ▲”(B2) & “▼”(B3) buttons. For<br />
failed reception in 4 minutes, scanning stops (“ “ on LCD disappear) and<br />
repeats again in the next hour. e.g. scanning at 8:20a.m. fail, it will scan again at<br />
9:00a.m.<br />
� Hold ▲”(B2) & “▼”(B3) button for 3 seconds to stop scanning.<br />
* flashes indicate now is receiving DCF signal<br />
Turns on indicate signal received successfully<br />
“DST” shown on the LCD if it is in Daylight Saving Time Mode<br />
Manual Time Setting:<br />
� Press “MODE” (B1) button to select time display.<br />
� Hold “MODE” (B1) button for 3 seconds and time flashes.<br />
� Press “▲”(B2) & “▼”(B3) to adjust Time, Year, Month and Date.<br />
� The setting sequence is shown as follow: Hour, Minutes, Second, Year, Month, Day,<br />
Language of Weekday,Time Zone.<br />
� Press “MODE” (B1) button to confirm each setting.<br />
� There are 7 languages, English, German, French, Spanish, Italian, Dutch and<br />
Denmark, for day-of-week. The languages and their selected abbreviations for each<br />
day of the week are shown in the following table.
Language<br />
Sunday<br />
Monday Tuesday Wednesday Thursday Friday Saturday<br />
English, EN SUN MON TUE WED THU FRI SAT<br />
German, GE SON MON DIE MIT DON FRE SAM<br />
French, FR DIM LUN MAR MER JEU VEN SAM<br />
Spanish, ES DOM LUN MAR MIE JUE VIE SAB<br />
Italian, IT DOM LUN MAR MER GIO VEN SAB<br />
Dutch, NE ZON MAA DIN WOE DON VRI ZAT<br />
Denmark, DA SON MAN TIR ONS TOR FRE LOR<br />
� The Time zone is used for the countries where can receive the DCF time signal but<br />
the time zone is different from the German time.<br />
� When the country time is faster than the German time for 1 hr, the zone should be<br />
set to +1. Then the <strong>clock</strong> will automatically set 1 hour faster from the signal time<br />
received.<br />
� The Time Setting Mode will automatically exit in 10 seconds <strong>with</strong>out any<br />
adjustment.<br />
Daily Alarm Setting :<br />
� Press “MODE”(B1) to select Alarm Time Display<br />
� Hold “MODE”(B1) for 3 seconds and Alarm Time flashes.<br />
� Pressing “▲”(B2) & “▼”(B3) buttons to adjust the <strong>alarm</strong> time.<br />
� Press “MODE”(B1) to confirm each setting.<br />
Snooze Alarm Function :<br />
� Slide the “ALARM,ANOOZE NO/OFF” (B6) switch to ON to switch on the <strong>alarm</strong>.<br />
" " appears on the display<br />
� Slide the “ALARM,ANOOZE NO/OFF” (B6) switch to SNOOZE to switch the<br />
snooze <strong>alarm</strong>. "Zz" appears on the display.<br />
� Press SNOOZE/LIGHT (B5) when <strong>alarm</strong> alerts. The <strong>alarm</strong> snoozes for 4 minutes,<br />
then it alerts again. “Zz” flashes on the LCD during the snooze time.<br />
� Simply press other buttons or slide “ALARM,ANOOZE NO/OFF” (B6) switch to<br />
OFF to stop snooze <strong>alarm</strong>.
Back Light:<br />
� Press SNOOZE/LIGHT (B5), back light states for 3 seconds<br />
� Back light states for 3 seconds when <strong>alarm</strong> alerts<br />
Notes:<br />
� All function keys do not work when the <strong>radio</strong> signal is being scanned<br />
� If the unit does not work properly, please take off the batteris. Wait a few second<br />
for the all display turn off. Insert batteris again. The unit will reset.<br />
� Avoid placing the <strong>clock</strong> near interference sources/metal frames such as computer<br />
monitor or TV sets<br />
� Placing the <strong>clock</strong> closer to a window/towards the general direction of the<br />
Transmitter. The signal is weaker in basement<br />
� Never use the <strong>clock</strong> in bathroom or any other area <strong>with</strong> high humidity<br />
� The operating temperature of the <strong>clock</strong> is 0˚C – 50˚C<br />
� The <strong>clock</strong> loses its time information when the battery is removed