29" (73.7cm) gas dryer installationinstructions instrucciones ... - Sears
29" (73.7cm) gas dryer installationinstructions instrucciones ... - Sears
29" (73.7cm) gas dryer installationinstructions instrucciones ... - Sears

You also want an ePaper? Increase the reach of your titles
YUMPU automatically turns print PDFs into web optimized ePapers that Google loves.
• Use clamps to seal all joints. Exhaust vent must not be<br />
connected or secured with screws or other fastening devices<br />
which extend into the interior of the duct. Do not use duct<br />
tape.<br />
IMPORTANT: Observe all governing codes and ordinances.<br />
improper venting can cause moisture and lint to collect<br />
indoors, which may resumt in:<br />
[] Moisture damage to woodwork, furniture, paint,<br />
wa!lpaper, carpets, etc.<br />
[] Housecleaning problems and health problems.<br />
Use a heavy metal vent. Do not use plastic or metal foil vent.<br />
Rigid metal vent is recommended to prevent crushing and kinking.<br />
Flexible metal vent must be fully extended and supported when<br />
the <strong>dryer</strong> is in its final position. Remove excess flexible metal vent<br />
to avoid sagging and kinking that may result in reduced airflow<br />
and poor performance.<br />
An exhaust hood should cap the vent to prevent rodents and<br />
insects from entering the home.<br />
Exhaust hood must be at least 12" (30.5 cm) from the ground or<br />
any object that may be in the path of the exhaust (such as<br />
flowers, rocks or bushes, etc.).<br />
If using an existing vent system, clean lint from the entire length<br />
of the system and make sure exhaust hood is not plugged with<br />
lint. Replace any plastic or metal foil vent with rigid metal or<br />
flexible metal vent.<br />
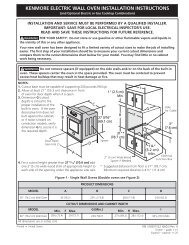
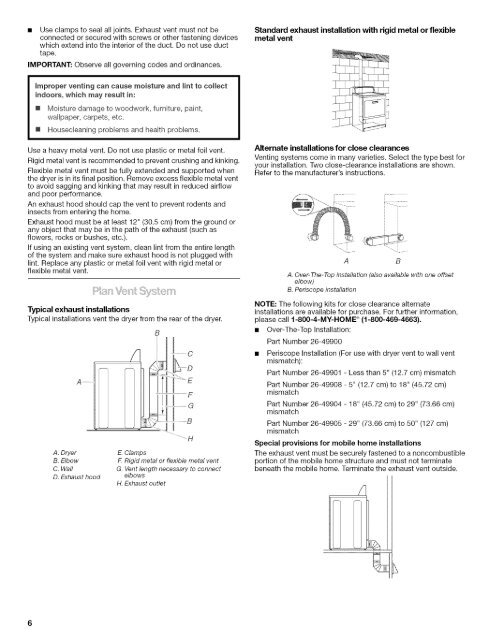
Typical exhaust installations<br />
Typical installations vent the <strong>dryer</strong> from the rear of the <strong>dryer</strong>.<br />
A ............<br />
A. Dryer<br />
B. Elbow<br />
C. Wall<br />
D. Exhaust hood<br />
E-- E<br />
B<br />
E, Clamps<br />
F. Rigid metal or flexible metal vent<br />
G. Vent length necessary to connect<br />
elbows<br />
H. Exhaust outlet<br />
Standard exhaust installation with rigid metal or flexible<br />
metal vent<br />
Alternate installations for close clearances<br />
Venting systems come in many varieties. Select the type best for<br />
your installation. Two close-clearance installations are shown.<br />
Refer to the manufacturer's instructions.<br />
A B<br />
A. Over-The-Top installation (also available with one offset<br />
elbow)<br />
B. Periscope installation<br />
NOTE: The following kits for close clearance alternate<br />
installations are available for purchase. For further information,<br />
please call 1-800-4-MY-HOME ®(1-800-469-4663).<br />
• Over-The-Top Installation:<br />
Part Number 26-49900<br />
Periscope Installation (For use with <strong>dryer</strong> vent to wall vent<br />
mismatch):<br />
Part Number 26-49901 - Less than 5" (12.7 cm) mismatch<br />
Part Number 26-49908 - 5" (12.7 cm) to 18" (45.72 cm)<br />
mismatch<br />
Part Number 26-49904 - 18" (45.72 cm) to 29" (73.66 cm)<br />
mismatch<br />
Part Number 26-49905 - 29" (73.66 cm) to 50" (127 cm)<br />
mismatch<br />
Special provisions for mobile home installations<br />
The exhaust vent must be securely fastened to a noncombustible<br />
portion of the mobile home structure and must not terminate<br />
beneath the mobile home. Terminate the exhaust vent outside.<br />
S