Istruzioni per l'uso - Indesit.at
Istruzioni per l'uso - Indesit.at
Istruzioni per l'uso - Indesit.at

You also want an ePaper? Increase the reach of your titles
YUMPU automatically turns print PDFs into web optimized ePapers that Google loves.
Maintenance and care<br />
Switching the appliance off<br />
Disconnect your appliance from the electricity<br />
supply before carrying out any work on it.<br />
Cleaning the appliance<br />
• The stainless-steel or enamel-co<strong>at</strong>ed external<br />
parts as well as the rubber seals may be cleaned<br />
using a sponge th<strong>at</strong> has been soaked in<br />
lukewarm w<strong>at</strong>er and neutral soap. If these stains<br />
are difficult to remove, use only specialised<br />
products. After cleaning, rinse and dry<br />
thoroughly. Do not use abrasive powders or<br />
corrosive substances.<br />
• Ideally, the inside of the oven should be cleaned<br />
after each use, when it is still lukewarm. Use hot<br />
w<strong>at</strong>er and detergent, rinse and dry with a soft<br />
cloth. Do not use abrasive products.<br />
• The accessories can be washed like everyday<br />
crockery (even in your dishwasher).<br />
! Never use steam cleaners or pressure cleaners on<br />
the appliance.<br />
Cleaning the oven door<br />
Clean the glass part of the oven door using a<br />
sponge and a non-abrasive cleaning product, then<br />
dry thoroughly with a soft cloth. Do not use rough<br />
abrasive m<strong>at</strong>erial or sharp metal scra<strong>per</strong>s as these<br />
could scr<strong>at</strong>ch the surface and cause the glass to<br />
crack. To clean more thoroughly, you can remove the<br />
oven door.<br />
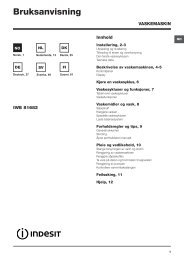
1. Open the oven door fully<br />
(see diagram).<br />
Inspecting the seals<br />
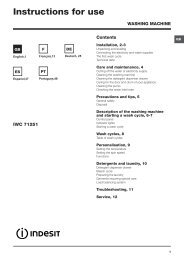
3. Grip the door on the two<br />
external sides and close it<br />
approxim<strong>at</strong>ely half way.<br />
Unlock the door by pressing<br />
on the clamps , then pull the<br />
door towards you lifting it out<br />
of its se<strong>at</strong> (see diagram).<br />
To replace the door, reverse<br />
this sequence.<br />
Check the door seals around the oven <strong>per</strong>iodically. If<br />
the seals are damaged, please contact your nearest<br />
After-sales Service Centre (see Assistance). We<br />
recommend not using the oven until the seals have<br />
been replaced.<br />
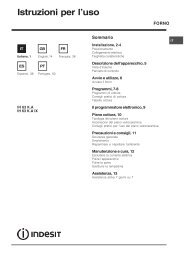
Replacing the light bulb<br />
To replace the oven light bulb:<br />
F<br />
1. Remove the glass cover of the lamp-holder.<br />
2. Remove the light bulb and replace it with a similar<br />
one: W<strong>at</strong>tage 25 W, cap E 14.<br />
3. Replace the glass cover (see diagram).<br />
GB<br />
Assistance<br />
F<br />
2. lift up and turn the small<br />
levers situ<strong>at</strong>ed on the two<br />
hinges; (see diagram).<br />
! Never use the services of an unauthorised<br />
technician.<br />
Please have the following inform<strong>at</strong>ion to hand:<br />
• The type of problem encountered.<br />
• The appliance model (Mod.).<br />
• The serial number (S/N).<br />
The l<strong>at</strong>ter two pieces of inform<strong>at</strong>ion can be found on<br />
the d<strong>at</strong>a pl<strong>at</strong>e loc<strong>at</strong>ed on the appliance.<br />
23