Manual de instalación y mantenimiento - AstralPool
Manual de instalación y mantenimiento - AstralPool
Manual de instalación y mantenimiento - AstralPool

Create successful ePaper yourself
Turn your PDF publications into a flip-book with our unique Google optimized e-Paper software.
5.2.2 Types of lighting<br />
The Remote Control – Modulator – Transformer – Led Projector unit enables you to create different lighting settings insi<strong>de</strong> the pool with two<br />
operation options:<br />
Set colour: Selection of a set colour among twelve possibilities.<br />
1<br />
Red 7 Sky-blue<br />
2 Green 8 Pale Violet<br />
3 Blue 9 Orange<br />
4 Yellow 10 Magenta<br />
5 Cyan 11 Emerald green<br />
6 Purple 12 White<br />
Automatic sequence of colours: Selection of eight colour sequence programmes. Each programme is <strong>de</strong>fined by the lighting time of each colour<br />
and the transition time from one colour to another according to the following table:<br />
SEQUENCE<br />
1 Red Green Blue<br />
2 Cyan Purple Yellow<br />
3 Green<br />
Emerald<br />
green<br />
4 Red Orange Green Orange<br />
5 Red Magenta Blue Magenta<br />
Cyan Sky-blue Blue Sky-blue Cyan<br />
6 Red Orange Green Cyan Blue Magenta<br />
7<br />
Pale<br />
Violet<br />
Emerald<br />
green<br />
Purple Cyan Yellow White Yellow Cyan Purple<br />
8 Red Green Blue Yellow Cyan Purple<br />
Pale<br />
Violet<br />
Sky-blue Orange Magenta<br />
Emerald<br />
green<br />
White<br />
6. MAINTENANCE:<br />
This lamp does not require any type of maintenance work. If you notice that the lamp is not working properly, please contact our customer<br />
attention service.<br />
THIS PRODUCT DOES NOT CONTAIN ANY ELEMENTS THAT CAN BE HANDLED, DISMANTLED OR REPLACED BY THE USER. IT IS<br />
FORBIDDEN TO ACCESS INSIDE THE PRODUCT, OTHERWISE THE GUARANTEE OF THE PRODUCT WILL BECOME INVALID.<br />
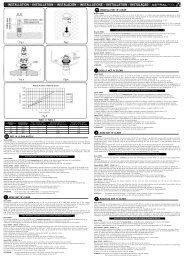
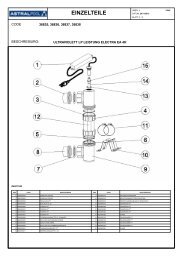
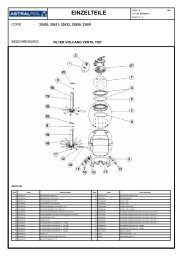
7. CHANGE OF LAMP:<br />
First, you have to extract the projector up to the edge of the swimming pool (Fig. 1), you must turn the 2 screws (no 1) to the position OPEN<br />
until the wedge of fixation gives up (Fig. 6 and 7).<br />
To remove the lamp, unscrew the 6 nuts (no. 10) which secure the <strong>de</strong>corative ring (no. 2) to the base of the floodlamp (no. 9) (Fig. 10).<br />
Remove the lamp (no. 6) from the insi<strong>de</strong> of the base of the floodlamp (Fig. 9) and disconnect the two terminals, loosening the two screws which<br />
secure them to the lamp (Fig. 10).<br />
Change the lamp and assemble the Floodlamp, in the opposite or<strong>de</strong>r <strong>de</strong>scribed in point 4 of assembly, taking special care to:<br />
• Connect the cable terminals to the lamp, using the 2 screws supplied with the lamp (Fig. 12).<br />
• Fully centre the 110x11 O-ring (no. 8) in its seat.<br />
• Firmly tighten the nuts.<br />
Attention:<br />
• Before any handling ensure that there is NO voltage supplied to the floodlamp.<br />
• The new lamp should have the same characteristics as that supplied with the floodlamp, of led PAR56, 12 V.<br />
• In or<strong>de</strong>r to ensure full watertightness, clean the seat of the O-ring (no. 6) for the lamp or replace the O-ring if you observe any notches or<br />
permanent damage.<br />
8. SAFETY WARNINGS:<br />
ATTENTION<br />
THE HOLES AT THE BACK OF THE LAMP (FIG. 11) SHOULD BE LEFT FREE WHEN ASSEMBLING THE PROJECTOR, SO THAT WATER<br />
CAN FLOW INSIDE FOR OPTIMUM PERFORMANCE OF THE LAMP.<br />
• The persons who are in charge of assembly should have the required qualifications for this type of work.<br />
• If the end cable of this light fitting is damaged, it should only be replaced by the manufacturer, its technical service or by a similarly qualified<br />
person, to avoid any danger.<br />
• Avoid making contact with the electric voltage.<br />
• Comply with the current standards regarding acci<strong>de</strong>nt prevention.<br />
• In this regard, the IEC 364-7-702 standards must be observed. WIRING IN BUILDINGS. SPECIAL WIRING. SWIMMING POOLS.<br />
• Any operation related to the maintenance or replacement of parts should be performed with the floodlamp disconnected from the electric<br />
power system.<br />
• Do not handle with wet feet.<br />
• The lamp is <strong>de</strong>signed TO BE USED ONLY SUBMERGED IN WATER and TO OPERATE ONLY WITH A SAFETY TRANSFORMER.<br />
• The manufacturer is not responsible in any circumstances for assembly, installation or start-up of any electric components which have been<br />
inserted or handled at locations other than its own premises.<br />
• The projector is equipped with a 2x1.5 section cable according to the power of the lamp supplied. If the lamp is changed, the cable section<br />
should be recalculated and changed if necessary.<br />
4