Introducción a las piezas de repuesto - Hitecsa
Introducción a las piezas de repuesto - Hitecsa
Introducción a las piezas de repuesto - Hitecsa
You also want an ePaper? Increase the reach of your titles
YUMPU automatically turns print PDFs into web optimized ePapers that Google loves.
Guía <strong>de</strong> funcionamiento<br />
Función Temporizador ON/OFF<br />
Fijar correctamente el reloj antes <strong>de</strong> poner en marcha el funcionamiento TIMER<br />
1.Puesta en marcha <strong>de</strong> la unidad<br />
Después <strong>de</strong> haber puesto en marcha la unidad, seleccionar el modo <strong>de</strong> funcionamiento<br />
<strong>de</strong>seado el modo <strong>de</strong> funcionamiento aparecerá en la LCD)<br />
2.Selección <strong>de</strong> modo TIMER<br />
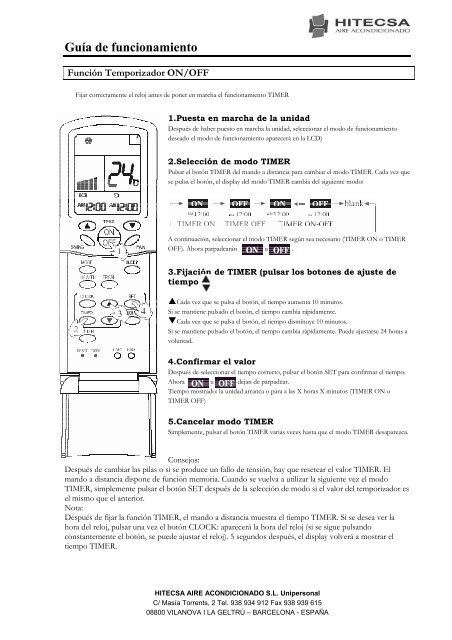
Pulsar el botón TIMER <strong>de</strong>l mando a distancia para cambiar el modo TIMER. Cada vez que<br />
se pulsa el botón, el display <strong>de</strong>l modo TIMER cambia <strong>de</strong>l siguiente modo:<br />
A continuación, seleccionar el modo TIMER según sea necesario (TIMER ON o TIMER<br />
OFF). Ahora parpa<strong>de</strong>arán u .<br />
3.Fijación <strong>de</strong> TIMER (pulsar los botones <strong>de</strong> ajuste <strong>de</strong><br />
tiempo<br />
�Cada vez que se pulsa el botón, el tiempo aumenta 10 minutos.<br />
Si se mantiene pulsado el botón, el tiempo cambia rápidamente.<br />
�Cada vez que se pulsa el botón, el tiempo disminuye 10 minutos.<br />
Si se mantiene pulsado el botón, el tiempo cambia rápidamente. Pue<strong>de</strong> ajustarse 24 horas a<br />
voluntad.<br />
4.Confirmar el valor<br />
Después <strong>de</strong> seleccionar el tiempo correcto, pulsar el botón SET para confirmar el tiempo.<br />
Ahora u <strong>de</strong>jan <strong>de</strong> parpa<strong>de</strong>ar.<br />
Tiempo mostrado: la unidad arranca o para a <strong>las</strong> X horas X minutos (TIMER ON o<br />
TIMER OFF)<br />
5.Cancelar modo TIMER<br />
Simplemente, pulsar el botón TIMER varias veces hasta que el modo TIMER <strong>de</strong>saparezca.<br />
Consejos:<br />
Después <strong>de</strong> cambiar <strong>las</strong> pi<strong>las</strong> o si se produce un fallo <strong>de</strong> tensión, hay que resetear el valor TIMER. El<br />
mando a distancia dispone <strong>de</strong> función memoria. Cuando se vuelva a utilizar la siguiente vez el modo<br />
TIMER, simplemente pulsar el botón SET <strong>de</strong>spués <strong>de</strong> la selección <strong>de</strong> modo si el valor <strong>de</strong>l temporizador es<br />
el mismo que el anterior.<br />
Nota:<br />
Después <strong>de</strong> fijar la función TIMER, el mando a distancia muestra el tiempo TIMER. Si se <strong>de</strong>sea ver la<br />
hora <strong>de</strong>l reloj, pulsar una vez el botón CLOCK: aparecerá la hora <strong>de</strong>l reloj (si se sigue pulsando<br />
constantemente el botón, se pue<strong>de</strong> ajustar el reloj). 5 segundos <strong>de</strong>spués, el display volverá a mostrar el<br />
tiempo TIMER.<br />
HITECSA AIRE ACONDICIONADO S.L. Unipersonal<br />
C/ Masía Torrents, 2 Tel. 938 934 912 Fax 938 939 615<br />
08800 VILANOVA I LA GELTRÚ – BARCELONA - ESPAÑA


