Shower Bead Inst EN-SP.cdr - Trim-Tex
Shower Bead Inst EN-SP.cdr - Trim-Tex
Shower Bead Inst EN-SP.cdr - Trim-Tex

You also want an ePaper? Increase the reach of your titles
YUMPU automatically turns print PDFs into web optimized ePapers that Google loves.
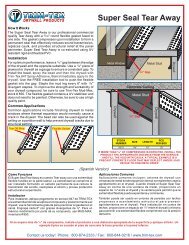
How It Works<br />
The <strong>Trim</strong>-<strong>Tex</strong> <strong>Shower</strong> <strong>Bead</strong> is designed to quickly and easily finish<br />
drywall terminating to shower/bath enclosures. <strong>Shower</strong> <strong>Bead</strong> uses<br />
less drywall compound than filling the gap while the tear away strip<br />
protects the shower/tub flange from mud, making clean up a breeze.<br />
The <strong>Shower</strong> <strong>Bead</strong> features an extra long mud leg allowing you to<br />
simply staple the shower bead to the drywall.<br />
INC.<br />
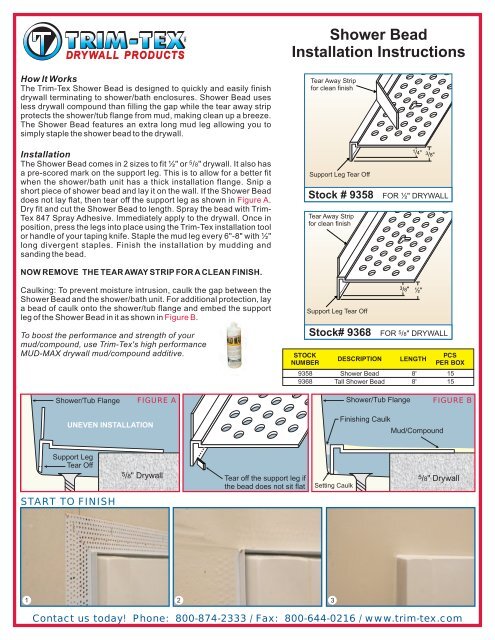
<strong>Shower</strong> <strong>Bead</strong><br />
<strong>Inst</strong>allation <strong>Inst</strong>ructions<br />
Tear Away Strip<br />
for clean finish<br />
<strong>Inst</strong>allation<br />
The <strong>Shower</strong> <strong>Bead</strong> comes in 2 sizes to fit ½" or 5/ 8 " drywall. It also has<br />
a pre-scored mark on the support leg. This is to allow for a better fit<br />
when the shower/bath unit has a thick installation flange. Snip a<br />
short piece of shower bead and lay it on the wall. If the <strong>Shower</strong> <strong>Bead</strong><br />
does not lay flat, then tear off the support leg as shown in Figure A.<br />
Dry fit and cut the <strong>Shower</strong> <strong>Bead</strong> to length. Spray the bead with <strong>Trim</strong>-<br />
<strong>Tex</strong> 847 Spray Adhesive. Immediately apply to the drywall. Once in<br />
position, press the legs into place using the <strong>Trim</strong>-<strong>Tex</strong> installation tool<br />
or handle of your taping knife. Staple the mud leg every 6"-8" with ½"<br />
long divergent staples. Finish the installation by mudding and<br />
sanding the bead.<br />
NOW REMOVE THE TEAR AWAY STRIP FOR A CLEAN FINISH.<br />
Support Leg Tear Off<br />
Stock # 9358<br />
Tear Away Strip<br />
for clean finish<br />
1/ 4 "<br />
3/ 8 "<br />
FOR ½" DRYWALL<br />
Caulking: To prevent moisture intrusion, caulk the gap between the<br />
<strong>Shower</strong> <strong>Bead</strong> and the shower/bath unit. For additional protection, lay<br />
a bead of caulk onto the shower/tub flange and embed the support<br />
leg of the <strong>Shower</strong> <strong>Bead</strong> in it as shown in Figure B.<br />
To boost the performance and strength of your<br />
mud/compound, use <strong>Trim</strong>-<strong>Tex</strong>'s high performance<br />
MUD-MAX drywall mud/compound additive.<br />
Support Leg Tear Off<br />
Stock# 9368<br />
DESCRIPTION<br />
3/" 8 ½"<br />
FOR 5/ 8 " DRYWALL<br />
L<strong>EN</strong>GTH<br />
9358<br />
9368<br />
<strong>Shower</strong> <strong>Bead</strong><br />
Tall <strong>Shower</strong> <strong>Bead</strong><br />
8'<br />
8'<br />
15<br />
15<br />
<strong>Shower</strong>/Tub Flange<br />
FIGURE A<br />
<strong>Shower</strong>/Tub Flange<br />
FIGURE B<br />
UNEV<strong>EN</strong> INSTALLATION<br />
Finishing Caulk<br />
Mud/Compound<br />
Support Leg<br />
Tear Off<br />
5/ 8 " Drywall<br />
Tear off the support leg if<br />
the bead does not sit flat<br />
Setting Caulk<br />
5/ 8 " Drywall<br />
START TO FINISH<br />
1 2 3<br />
Contact us today! Phone: 800-874-2333 / Fax: 800-644-0216 / www.trim-tex.com
INC.<br />
<strong>Inst</strong>rucciones de <strong>Inst</strong>alación<br />
<strong>Shower</strong> <strong>Bead</strong><br />
Como Funciona<br />
El <strong>Shower</strong> <strong>Bead</strong> es diseñado para que acabe el espacio entre la<br />
tabla roca y la tina/regadera rápido y fácilmente. El <strong>Shower</strong> <strong>Bead</strong><br />
reduce la cantidad de compuesto que se pone entre la tabla roca y la<br />
extremidad de la tina. Las tiras protectoras protegen la tina del<br />
compuesto, para una limpieza rápida. El <strong>Shower</strong> <strong>Bead</strong> tiene la<br />
extremidad extra larga que le permite simplemente engrapar el<br />
esquinero a la tabla roca.<br />
<strong>Inst</strong>alación<br />
El <strong>Shower</strong> <strong>Bead</strong> viene en 2 tamaños, para tabla roca de ½” o 5/ 8 ”.<br />
También tiene una extremidad de suporte que ya esta marcada para<br />
quitarse. Esto permite que quede mejor cuando la extremidad de la<br />
tina/regadera este mas larga de lo normal. Corte un pedazo<br />
pequeño del esquinero y póngalo en la tabla roca. Si el <strong>Shower</strong> <strong>Bead</strong><br />
no esta plano, entonces quite la extremidad de soporte como se<br />
indica en la Figura A. Corte el <strong>Shower</strong> <strong>Bead</strong> a la medida. Aplique<br />
Adhesivo en Aerosol 847 de <strong>Trim</strong>-<strong>Tex</strong> al esquinero. Ponga el<br />
esquinero en la tabla roca de inmediato. Ya en posición, presione la<br />
extremidad usando el mango de su espátula. Engrape la extremidad<br />
de cada 6” a 8” con grapas de ½”. Acabe la instalación poniendo el<br />
compuesto y lijando el esquinero.<br />
Ahora quite las tiras protectoras para un acabado limpio.<br />
Aplicando Silicón: Para prevenir que entre la humedad, aplique<br />
silicón al espacio que esta entre el <strong>Shower</strong> <strong>Bead</strong> y la unidad bañera.<br />
Para protección adicional, aplique silicón en la parte inferior de la<br />
extremidad de la tina/regadera y incruste la extremidad con suporte<br />
del <strong>Shower</strong> <strong>Bead</strong> como se indica en la Figura B.<br />
Tiras protectoras<br />
para un<br />
acabado limpio<br />
Extremidad con suporte<br />
Stock # 9358<br />
Tiras protectoras<br />
para un<br />
acabado limpio<br />
Extremidad con suporte<br />
Stock# 9368<br />
1/ 4 "<br />
FOR ½" DRYWALL<br />
3/" 8 ½"<br />
3/ 8 "<br />
FOR 5/ 8 " DRYWALL<br />
Para aumentar el rendimiento y resistencia del compuesto,<br />
use el aditivo MUD-MAX de <strong>Trim</strong>-<strong>Tex</strong> de alto rendimiento.<br />
DESCRIPTION<br />
L<strong>EN</strong>GTH<br />
9358<br />
9368<br />
<strong>Shower</strong> <strong>Bead</strong><br />
Tall <strong>Shower</strong> <strong>Bead</strong><br />
8'<br />
8'<br />
15<br />
15<br />
Extremidad de la tina<br />
FIGURA A<br />
Extremidad de la tina<br />
FIGURA B<br />
<strong>Inst</strong>alalación Dispareja<br />
Silicón<br />
Compuesto<br />
Extremidad con<br />
suporte<br />
5/ 8 " Tabla roca<br />
Quite la extremidad de<br />
suporte si el esquinero<br />
no esta plano<br />
Silicón<br />
5/ 8 " Tabla roca<br />
START TO FINISH<br />
1 2 3<br />
Contact us today! Phone: 800-874-2333 / Fax: 800-644-0216 / www.trim-tex.com