INSTALLATION MANUAL/USER'S MANUAL - Dural Irrigation
INSTALLATION MANUAL/USER'S MANUAL - Dural Irrigation
INSTALLATION MANUAL/USER'S MANUAL - Dural Irrigation

Create successful ePaper yourself
Turn your PDF publications into a flip-book with our unique Google optimized e-Paper software.
07WTM002887 57004-24 rJ.qxd 2/13/07 11:51 AM Page 22<br />
Black<br />
White<br />
Green<br />
Pigtails<br />
24VAC-OUT SENSOR COMMON PUMP 1 2 3 4 5 6 24VAC-IN<br />
Exit Nipple<br />
AC Sub-Plate<br />
Cord Restraint<br />
Line Cord<br />
• Connect the source power conduit to the entrance of the junction<br />
box, following all the appropriate codes.<br />
• Connect the source wires to the wires extending from the<br />
sprinkler timer.<br />
• Take care to follow the correct color code. For USA: connect the<br />
Green for Ground, Black for Live, and White for Neutral. Often the<br />
source ground may be bare copper conductor rather than green<br />
wire. For Europe: Live is Brown and Neutral is Blue, there is no<br />
ground connection required. Be sure that all wires are connected to<br />
the proper source wire.<br />
• Make sure all connections are made with code-approved insulated<br />
connectors.<br />
• Be sure to place a weatherproof gasket and lid on the junction box.<br />
• Proceed to Section 8 on page 15<br />
Appendix B: Rain Sensor and the Rain Sensor<br />
Bypass Switch (Sensor sold separately)<br />
A rain sensor or other type of micro-switch weather sensor may be<br />
connected to the sprinkler timer. The purpose of the sensor is to<br />
stop watering when precipitation is sufficient.<br />
CONNECTING A RAIN SENSOR<br />
• Connect the rain sensor wires to the wiring terminal ports<br />
(yellow in color) labeled “Sensor” [See Figure B1]<br />
Note: Refer to your rain sensor manual for specific wiring instructions.<br />
• Place the sensor on/off switch to the “on” position to<br />
begin operation.<br />
'AA' SIZE TTERY BA<br />
'AA' SIZE TTERY BA<br />
OPEN<br />
24VAC-OUT SENSOR COMMON PUMP 1 2 3 4 5 6 24VAC-IN<br />
ENGLISH<br />
RAIN SENSOR BYPASS<br />
Caution: Do not connect the sprinkler timer to one phase of a three-phase<br />
power system used by a pump or other electrical equipment.<br />
Important: This sprinkler timer has an Exit Nipple-mounted external<br />
power connection. Use this 1/2 inch (13mm) NPT nipple to connect the<br />
sprinkler timer to a standard electrical junction box (UL Listed or equivalent<br />
or comply with IEC or EN standards or equivalent).<br />
• Turn off the AC power at the AC circuit breaker and apply an<br />
appropriate safety lockout. Verify that the power has been turned<br />
off to the installation site using an AC voltmeter set for the correct<br />
measurement range.<br />
• Use power feed wire of 14 gauge (AWG) minimum with a temperature<br />
rating of 155 degrees Fahrenheit (68 degrees Celsius) or higher.<br />
• Install the conduit and associated fittings. Connect the AC electrical<br />
power wiring to the source by following all the right codes and<br />
local standards.<br />
• Connect the junction box (not included) to the NPT nipple.<br />
[See Figure A5]<br />
22<br />
Figure A4: Removing “Line Cord”<br />
'AA' SIZE TTERY BA<br />
'AA' SIZE TTERY BA<br />
1/2" (13 mm)<br />
NPT Nipple<br />
Junction<br />
Box<br />
Wire<br />
Connectors<br />
OPEN<br />
24VAC-OUT SENSOR COMMON PUMP 1 2 3 4 5 6 24VAC-IN<br />
Figure A5: Using a Junction Box<br />
This sprinkler timer is equipped with a sensor override “on/off” switch.<br />
This switch is for use during maintenance and repairs, so the sprinkler<br />
timer can be operated even if the rain sensor is in active mode.<br />
IMPORTANT: If the rain sensor switch is in the “on” position and<br />
no sensor is connected, the sprinkler timer will not operate. To resume<br />
sprinkler timer operation place the switch in the off position.<br />
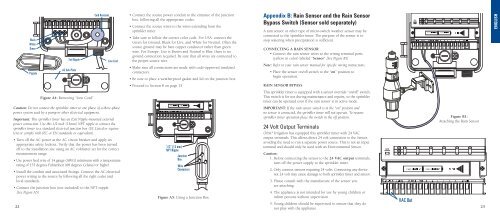
24 Volt Output Terminals<br />
Orbit ® <strong>Irrigation</strong> has equipped this sprinkler timer with 24 VAC<br />
output terminals. This allows direct 24 volt connection to the Sensor,<br />
avoiding the need to run a separate power source. This is not an input<br />
terminal and should only be used with an Environmental Sensor.<br />
Caution:<br />
1. Before connecting the sensor to the 24 VAC output terminals,<br />
turn off the power supply to the sprinkler timer.<br />
2. Only connect sensors requiring 24 volts. Connecting any device<br />
not 24 volt may cause damage to both sprinkler timer and sensor.<br />
3. Please consult with the manufacture of the sensor you<br />
are attaching.<br />
4. The appliance is not intended for use by young children or<br />
infirm persons without supervision<br />
5. Young children should be supervised to ensure that they do<br />
not play with the appliance<br />
VAC Out<br />
'AA' SIZE TTERY BA<br />
'AA' SIZE TTERY BA<br />
Figure B1:<br />
Attaching the Rain Sensor<br />
OPEN<br />
24VAC-OUT SENSOR COMMON PUMP 1 2 3 4 5 6 24VAC-IN<br />
23