www.bullard.com 41 Series Airline Filters User Manual
www.bullard.com 41 Series Airline Filters User Manual
www.bullard.com 41 Series Airline Filters User Manual
- No tags were found...

You also want an ePaper? Increase the reach of your titles
YUMPU automatically turns print PDFs into web optimized ePapers that Google loves.
<strong>41</strong> <strong>Series</strong> <strong>Airline</strong> <strong>Filters</strong><br />
<strong>User</strong> <strong>Manual</strong><br />
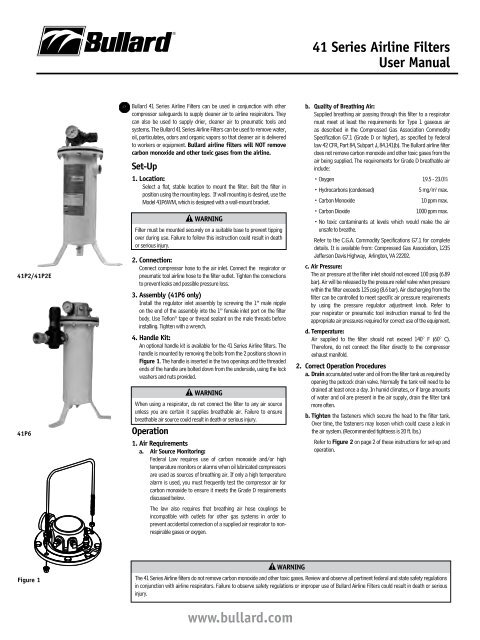
<strong>41</strong>P2/<strong>41</strong>P2E<br />
<strong>41</strong>P6<br />
Bullard <strong>41</strong> <strong>Series</strong> <strong>Airline</strong> <strong>Filters</strong> can be used in conjunction with other<br />
<strong>com</strong>pressor safeguards to supply cleaner air to airline respirators. They<br />
can also be used to supply drier, cleaner air to pneumatic tools and<br />
systems. The Bullard <strong>41</strong> <strong>Series</strong> <strong>Airline</strong> <strong>Filters</strong> can be used to remove water,<br />
oil, particulates, odors and organic vapors so that cleaner air is delivered<br />
to workers or equipment. Bullard airline filters will NOT remove<br />
carbon monoxide and other toxic gases from the airline.<br />
Set-Up<br />
1. Location:<br />
Select a flat, stable location to mount the filter. Bolt the filter in<br />
position using the mounting legs. If wall mounting is desired, use the<br />
Model <strong>41</strong>P6WM, which is designed with a wall-mount bracket.<br />
Warning<br />
Filter must be mounted securely on a suitable base to prevent tipping<br />
over during use. Failure to follow this instruction could result in death<br />
or serious injury.<br />
2. Connection:<br />
Connect <strong>com</strong>pressor hose to the air inlet. Connect the respirator or<br />
pneumatic tool airline hose to the filter outlet. Tighten the connections<br />
to prevent leaks and possible pressure loss.<br />
3. Assembly (<strong>41</strong>P6 only)<br />
Install the regulator inlet assembly by screwing the 1’’ male nipple<br />
on the end of the assembly into the 1’’ female inlet port on the filter<br />
body. Use Teflon ® tape or thread sealant on the male threads before<br />
installing. Tighten with a wrench.<br />
4. Handle Kit:<br />
An optional handle kit is available for the <strong>41</strong> <strong>Series</strong> <strong>Airline</strong> filters. The<br />
handle is mounted by removing the bolts from the 2 positions shown in<br />
Figure 1. The handle is inserted in the two openings and the threaded<br />
ends of the handle are bolted down from the underside, using the lock<br />
washers and nuts provided.<br />
Warning<br />
When using a respirator, do not connect the filter to any air source<br />
unless you are certain it supplies breathable air. Failure to ensure<br />
breathable air source could result in death or serious injury.<br />
Operation<br />
1. air Requirements<br />
a. Air Source Monitoring:<br />
Federal Law requires use of carbon monoxide and/or high<br />
temperature monitors or alarms when oil lubricated <strong>com</strong>pressors<br />
are used as sources of breathing air. If only a high temperature<br />
alarm is used, you must frequently test the <strong>com</strong>pressor air for<br />
carbon monoxide to ensure it meets the Grade D requirements<br />
discussed below.<br />
The law also requires that breathing air hose couplings be<br />
in<strong>com</strong>patible with outlets for other gas systems in order to<br />
prevent accidental connection of a supplied air respirator to nonrespirable<br />
gases or oxygen.<br />
b. Quality of Breathing Air:<br />
Supplied breathing air passing through this filter to a respirator<br />
must meet at least the requirements for Type 1 gaseous air<br />
as described in the Compressed Gas Association Commodity<br />
Specification G7.1 (Grade D or higher), as specified by federal<br />
law 42 CFR, Part 84, Subpart J, 84.1<strong>41</strong>(b). The Bullard airline filter<br />
does not remove carbon monoxide and other toxic gases from the<br />
air being supplied. The requirements for Grade D breathable air<br />
include:<br />
• Oxygen 19.5 - 23.0%<br />
• Hydrocarbons (condensed)<br />
5 mg/m 3 max.<br />
• Carbon Monoxide<br />
10 ppm max.<br />
• Carbon Dioxide<br />
1000 ppm max.<br />
• No toxic contaminants at levels which would make the air<br />
unsafe to breathe.<br />
Refer to the C.G.A. Commodity Specifications G7.1 for <strong>com</strong>plete<br />
details. It is available from: Compressed Gas Association, 1235<br />
Jefferson Davis Highway, Arlington, VA 22202.<br />
c. Air Pressure:<br />
The air pressure at the filter inlet should not exceed 100 psig (6.89<br />
bar). Air will be released by the pressure relief valve when pressure<br />
within the filter exceeds 125 psig (8.6 bar). Air discharging from the<br />
filter can be controlled to meet specific air pressure requirements<br />
by using the pressure regulator adjustment knob. Refer to<br />
your respirator or pneumatic tool instruction manual to find the<br />
appropriate air pressures required for correct use of the equipment.<br />
d. Temperature:<br />
Air supplied to the filter should not exceed 140° F (60° C).<br />
Therefore, do not connect the filter directly to the <strong>com</strong>pressor<br />
exhaust manifold.<br />
2. Correct Operation Procedures<br />
a. Drain accumulated water and oil from the filter tank as required by<br />
opening the petcock drain valve. Normally the tank will need to be<br />
drained at least once a day. In humid climates, or if large amounts<br />
of water and oil are present in the air supply, drain the filter tank<br />
more often.<br />
b. Tighten the fasteners which secure the head to the filter tank.<br />
Over time, the fasteners may loosen which could cause a leak in<br />
the air system. (Re<strong>com</strong>mended tightness is 20 ft. lbs.)<br />
Refer to Figure 2 on page 2 of these instructions for set-up and<br />
operation.<br />
Figure 1<br />
Warning<br />
The <strong>41</strong> <strong>Series</strong> <strong>Airline</strong> filters do not remove carbon monoxide and other toxic gases. Review and observe all pertinent federal and state safety regulations<br />
in conjunction with airline respirators. Failure to observe safety regulations or improper use of Bullard <strong>Airline</strong> <strong>Filters</strong> could result in death or serious<br />
injury.<br />
<strong>www</strong>.<strong>bullard</strong>.<strong>com</strong>
Cartridge Replacement<br />
Warning<br />
Use only Bullard <strong>41</strong>AF cartridges as replacements. Bullard Model <strong>41</strong><br />
<strong>Series</strong> <strong>Airline</strong> <strong>Filters</strong> are designed to use only Bullard filter cartridges.<br />
Failure to use the correct filter cartridge could result in death or serious<br />
injury.<br />
The frequency of filter cartridge replacement depends on the conditions of<br />
the particular air system in which the filter is installed. However, the filter<br />
cartridge should be replaced immediately if:<br />
a. The user smells or tastes contaminants in the air being supplied to<br />
an air-supplied respirator, or;<br />
b. There is a large pressure drop in the system, even though the<br />
<strong>com</strong>pressor and other <strong>com</strong>ponents appear to be operating<br />
correctly.<br />
Corrective Action<br />
1. Shut off air supply and drain filter as described on the reverse side of<br />
this instruction sheet. Disconnect the filter from the air source before<br />
servicing.<br />
2. Replace the Cartridge:<br />
a. Separate the filter head from the tank by removing the bolts and<br />
lock washers from the underside.<br />
b. After removing the cartridge, clean the inside of the tank to remove<br />
any remaining contaminants.<br />
c. Insert a new Bullard Model <strong>41</strong>AF filter cartridge. Tighten the<br />
fasteners across from each other and not in a circular sequence.<br />
This will help prevent warping of the filter head.<br />
3. Record the date the filter was replaced on the label attached to the<br />
airline filter tank. You can develop a filter cartridge replacement schedule<br />
by monitoring the frequency with which the cartridge needs to be<br />
changed.<br />
4. If conditions are not improved, do not use the filter until appropriate<br />
corrective measures have been taken.<br />
Replaceable Filter Cartridge 7-Stage Operation<br />
Cartridges effectively trap and remove impurities with little pressure loss.<br />
The supplied-air enters the filter at inlet connector (A), travels through<br />
6 layers of filter material and exits at outlet connector (B) (refer to<br />
Figure 3). Filter materials work in sequence to trap and hold water, oil,<br />
particulates, odors, and organic vapors so that cleaner air is delivered to<br />
workers or equipment.<br />
1. Water is removed by condensation of air in outer cylinder.<br />
2. Carded cotton removes particulates.<br />
3. Activated alumina adsorbs oil and moisture.<br />
4. Activated charcoal removes odors and moisture.<br />
5. Felt material removes particulates.<br />
6. Carded cotton removes particulates.<br />
7. Respiratory felt at final stage acts as a final filter before air is transferred<br />
to worker or air driven tools.<br />
Warning<br />
Filter cartridge must be changed periodically for maximum efficiency.<br />
Frequency of cartridge changes depends on operating conditions.<br />
Cartridge should be changed immediately if respirator wearer feels,<br />
smells or tastes contaminants inside the respirator. Filter tank should<br />
be drained at least daily to remove trapped water and oil (a petcock is<br />
provided on the bottom of the tank for this purpose). Failure to follow<br />
these instructions could result in death or serious injury.<br />
1/4” (6 mm) Outlets<br />
(not shown)<br />
Outlet Air<br />
Pressure Gauge<br />
Pressure Relief Valve<br />
3/8” Outlet (7 mm)<br />
Pressure Regulator<br />
Adjustment Knob<br />
3/8” Outlet<br />
(7 mm)<br />
Outlet<br />
Connector<br />
(B)<br />
Fasteners<br />
(securing filter<br />
tank to the head)<br />
Air Inlet (1” npt-fem) (25<br />
mm)<br />
Inlet<br />
Connector<br />
(A)<br />
Cartridge Replacement<br />
(A Model <strong>41</strong>P2 is<br />
diagrammed for<br />
illustration purposes.)<br />
Drain Petcock<br />
Legs<br />
(with mounting<br />
capabilities)<br />
Figure 2 Figure 3<br />
2<br />
<strong>www</strong>.<strong>bullard</strong>.<strong>com</strong>
<strong>41</strong> <strong>Series</strong> <strong>Airline</strong> <strong>Filters</strong><br />
<strong>User</strong> <strong>Manual</strong><br />
Bullard <strong>41</strong>EAK European Adapter Kit<br />
The Bullard <strong>41</strong>EAK European Adapter Kit is supplied to ac<strong>com</strong>modate the<br />
threaded coupling and fitting requirements and standards of Europe.<br />
This Kit contains:<br />
1 ea. 1” (25 mm) X 3/4” (19 mm) pipe reducing bushing<br />
2 ea. 1/4” (6 mm) MPT British thread adapter<br />
1 ea. 3/8” (7 mm) X 1/4” (6 mm) reducing bushing<br />
Installing Adapters:<br />
1. Before using <strong>41</strong>P2E filter:<br />
• Locate the 1” (25 mm) X 3/4” (19 mm) Pipe Reducing Bushing in the<br />
<strong>41</strong>EAK Kit bag.<br />
• Apply thread sealant to the 1” (25 mm) X 3/4” (19 mm) Pipe Reducing<br />
Bushing.<br />
• Install the 1” (25 mm) X 3/4” (19 mm) Pipe Reducing Bushing into the<br />
air inlet on side of filter (refer to Figure 4 below).<br />
• Tighten with a wrench until wrench tight.<br />
2. If only one air outlet is required:<br />
• Locate the 1/4” (6 mm) MPT British Thread adapter in the <strong>41</strong>EAK Kit<br />
bag.<br />
• Remove the existing pipe-to-hose adapter from the SIDE of the top<br />
mounted regulator, using a wrench.<br />
• Apply thread sealant to the 1/4” (6 mm) MPT British Thread adapter.<br />
• Install the 1/4” (6 mm) MPT British Thread adapter into the open port<br />
(refer to Figure 5 below).<br />
• Tighten with a wrench until wrench tight.<br />
3. If a second air outlet is required.<br />
• Locate the 3/8” (7 mm) X 1/4” (6 mm) MPT bushing and the 1/4” (6<br />
mm) MPT British Thread adapter in the <strong>41</strong>EAK Kit bag.<br />
• Remove the existing pipe plug from the TOP of the top mounted<br />
regulator, using a wrench.<br />
• Apply thread sealant to the 3/8” (7 mm) X 1/4” (6 mm) MPT bushing.<br />
• Install the 3/8” (7 mm) X 1/4” (6 mm) MPT bushing into the open port<br />
(refer to Figure 6 below).<br />
• Tighten with a wrench until wrench tight.<br />
• Apply thread sealant to the 1/4” (6 mm) MPT British thread adapter.<br />
• Install the 1/4” (6 mm) MPT British Thread adapter into the open end<br />
of the 3/8” (7 mm) X 1/4” (6 mm) bushing that was installed in the step<br />
above (refer to Figure 7 below).<br />
• Tighten with a wrench until wrench tight.<br />
Figure 4 Figure 5 Figure 6 Figure 7<br />
Warranty Information<br />
Bullard warrants to the original purchaser that the <strong>Airline</strong> Filter is free of<br />
defects in materials and workmanship under normal use and service for a<br />
period of one (1) year from the date of manufacture. Under this warranty,<br />
Bullard’s obligation is limited to repairing or replacing, at its option, articles<br />
that are returned within the warranty period and that, after examination,<br />
are shown to Bullard’s satisfaction to be defective, subject to the following<br />
limitations:<br />
a) <strong>Airline</strong> Filter must be returned to Bullard with shipping charges prepaid.<br />
b) <strong>Airline</strong> Filter must not be altered from its original factory configuration.<br />
c) <strong>Airline</strong> Filter must not have been misused, abused or damaged in<br />
storage or transit.<br />
In no event shall Bullard be responsible for damages resulting from loss of<br />
use or other indirect, incidental, consequential or special costs, expenses<br />
or damages incurred by the purchaser, notwithstanding that Bullard has<br />
been advised of the possibility of such damages.<br />
ANY IMPLIED WARRANTIES, INCLUDING WARRANTIES OF<br />
MERCHANTABILITY AND FITNESS FOR PARTICULAR PURPOSE, ARE<br />
LIMITED TO ONE (1) YEAR FROM THE DATE THE <strong>Airline</strong> Filter WAS<br />
MANUFACTURED.<br />
The above limitations or exclusions may not apply in all states.<br />
Some states do not allow the exclusion or limitation of incidental or<br />
consequential damages, or allow limitations on how long an implied<br />
warranty lasts. This warranty gives you specific legal rights, and you may<br />
have other rights which vary between states.<br />
RETURN AUTHORIZATIONS<br />
Contact Customer Service to obtain written permission to return product.<br />
<strong>Airline</strong> <strong>Filters</strong> cannot be returned without written permission. Material<br />
returned for credit will be subject to factory inspection. Current products<br />
or products under warranty will be subject to a restocking charge.<br />
Returned articles should be sent to Bullard with shipping charges prepaid.<br />
<strong>41</strong>EAK European Adapter Kit<br />
<strong>www</strong>.<strong>bullard</strong>.<strong>com</strong> 3
Specifications<br />
<strong>Airline</strong> Filter Model <strong>41</strong>A Model <strong>41</strong>P2 Model <strong>41</strong>P6 Model <strong>41</strong>P6WM Model <strong>41</strong>P2E<br />
Max. Air Flow Rate 100 cfm* (2830 lpm) 75 cfm (2120 lpm) 75 cfm (2120 lpm) 75 CFM (2120 lpm) 75 cfm (2120 lpm)<br />
Inlet Connection 1” NPT (Fem.) 1” NPT (Fem.) 1” NPT (Fem.) 1” NPT (Fem.) 3<br />
⁄4” (19 mm) NPT (Fem.)<br />
Outlet Connection 1” NPT (Fem.) 2 outlets 1 ⁄4” & 6 outlets 6 outlets 2 outlets<br />
3<br />
⁄8” NPT (Fem.) 3<br />
⁄8” NPT (Fem.) 3<br />
⁄8” NPT (Fem.) 1<br />
⁄4” (6 mm) BPT (Fem.)<br />
Specifications/Ordering Information<br />
4<br />
Americas:<br />
E.D. Bullard Company<br />
1898 Safety Way<br />
Cynthiana, KY <strong>41</strong>031-9303<br />
Toll free: 877-BULLARD (285-5273)<br />
Tel: 859-234-6616<br />
Fax: 859-234-8987<br />
<strong>www</strong>.<strong>bullard</strong>.<strong>com</strong><br />
Relief Valve – 125 psig (8.6 bar) 125 psig (8.6 bar) 125 psig (8.6 bar) 125 psig (8.6 bar)<br />
Tank Diameter 5 1 ⁄2” (14 cm) 5 1 ⁄2” (14 cm) 5 1 ⁄2” (14 cm) 5 1 ⁄2” (14 cm) 5 1 ⁄2” (14 cm)<br />
Height 19” (48 cm) 23 1 ⁄2” (60 cm) 25 1 ⁄4” (64 cm) 22” (56 cm) 23 1 ⁄2” (60 cm)<br />
Weight 19 lb. (8.6 kg) 22 lb. (10 kg) 24 lb. (10.9 kg) 28 lb. (12.7 kg) 22 lb. (10 kg)<br />
*At maximum re<strong>com</strong>mended pressure of 100 psig (6.9 bar)<br />
Ordering Information<br />
Catalog<br />
Catalog<br />
Number Description Number Description<br />
Bullard <strong>Airline</strong> <strong>Filters</strong><br />
<strong>41</strong>A Single-outlet filter. Pressure gauge, relief<br />
valve, and pressure regulator not included<br />
<strong>41</strong>P2 2-outlet filter with pressure gauge, relief<br />
valve, pressure regulator, and hose adapter<br />
fitting<br />
<strong>41</strong>P6 6-outlet filter with pressure gauge, relief<br />
valve, pressure regulator, and hose adapter<br />
fitting<br />
<strong>41</strong>P6WM 6-outlet filter with wall-mount bracket,<br />
pressure gauge, relief valve, pressure<br />
regulator, and hose adapter fitting.<br />
<strong>41</strong>P2E 2-outlet filter with pressure gauge, relief<br />
valve, pressure regulator, and hose adapter<br />
fitting, plus adapters suitable for European<br />
threaded connections<br />
Europe:<br />
Bullard GmbH<br />
Lilienthalstrasse 12<br />
53424 Remagen • Germany<br />
Tel: +49-2642 999980<br />
Fax : +49-2642 9999829<br />
<strong>www</strong>.<strong>bullard</strong>extrem.<strong>com</strong><br />
Asia-Pacific:<br />
Bullard Asia Pacific Pte. Ltd.<br />
LHK Building<br />
701, Sims Drive, #04-03<br />
Singapore 387383<br />
Tel: +65-6745-0556<br />
Fax: +65-6745-5176<br />
<strong>www</strong>.<strong>bullard</strong>.<strong>com</strong><br />
Replacement Parts<br />
<strong>41</strong>AF Replacement filter cartridge<br />
<strong>41</strong>P6UPK 6-outlet manifold upgrade (includes<br />
manifold, regulator assembly, relief valve,<br />
and gauge) for <strong>41</strong>P6<br />
<strong>41</strong>P2M 2-outlet manifold assembly (includes<br />
manifold with regulator, relief valve and<br />
gauge) for <strong>41</strong>P2 and <strong>41</strong>P2E<br />
<strong>41</strong>PRV Pressure Relief Valve for <strong>41</strong>P2, <strong>41</strong>P2E,<br />
and <strong>41</strong>P6/<strong>41</strong>P6WM airline filters. Set at<br />
125 psig (8.6 bar).<br />
<strong>41</strong>RG Regulator Gauge for <strong>41</strong>P2, <strong>41</strong>P2E, and <strong>41</strong>P6<br />
airline filters<br />
<strong>41</strong>P2R<br />
<strong>41</strong>EAK<br />
<strong>41</strong>HK<br />
<strong>41</strong>P2 regulator and assembly (For use with<br />
flat top design only)<br />
European adapter kit for <strong>41</strong>P2E containing<br />
(1) 1” (25 mm) x 3 ⁄4 “ (19 mm) Pipe<br />
Reducing Bushing,<br />
(1) 3 ⁄8” (7 mm) x 1 ⁄4” (6 mm) Reducing<br />
Bushing and<br />
(2) 1 ⁄4” (6 mm) MPT British Thread<br />
Adapters.<br />
Handle kit, <strong>41</strong> <strong>Series</strong> (optional)<br />
ISO 9001<br />
certified<br />
©2011 Bullard. All rights reserved.<br />
Teflon is a registered trademark of E.I. DuPont de Nemours Co.<br />
6091100067B (1011)
Filtros de Aire Serie <strong>41</strong><br />
<strong>Manual</strong> de Instrucciones<br />
<strong>41</strong>P2/<strong>41</strong>P2E<br />
<strong>41</strong>P6<br />
Manija<br />
Figure 1<br />
Los filtros para linea de aire Bullard pueden utilizarse en conjunto con otros<br />
equipos de seguridad para <strong>com</strong>presores con el fin de proporcionar aire<br />
más limpio a respiradores de linea de aire. También pueden emplearse<br />
para suministrar aire más seco y limpio a herramientas y sistemas<br />
neumáticos. Los Filtros de Aire Serie <strong>41</strong> de Bullard se pueden usar para<br />
remover agua, aceite, partículas, olores y vapores orgánicos para entregar<br />
aire mas limpio a trabajadores o equipos. Los filtros Bullard para<br />
linea de aire no eliminarán el monóxido de carbono u otros<br />
gases tóxicos.<br />
Instalación<br />
1. Ubicación:<br />
Seleccione un lugar plano y estable para montar el filtro. Atornille el<br />
filtro en su posición sirviéndose de los soportes de montaje. Si desea<br />
instalarlo en la pared, utilice el modelo <strong>41</strong>P6WM, que está equipado<br />
con un soporte de pared.<br />
Atención<br />
El filtro debe montarse correctamente en una superficie adecuada para<br />
evitar que volque mientras esté en uso. El incumplimiento de estas<br />
instrucciones puede provocar la muerte o heridas graves.<br />
2. Conexión:<br />
Conecte la manguera del <strong>com</strong>presor a la entrada de aire. Conecte la<br />
manguera del respirador o de la herramienta neumática a la salida del<br />
filtro. Apriete las conexiones para evitar fugas o posibles pérdidas de<br />
presión.<br />
3. Ensamble (Solamente para Modelo <strong>41</strong>P6)<br />
Instale el regulador de presión de entrada atornillando el Macho de 1” en<br />
el extremo del ensamble a la entrada Hembra de 1” en el tanque del filtro.<br />
Use cinta Teflón u otro tipo de sellador en la rosca Macho para obtener un<br />
sello óptimo. Apriete con una llave.<br />
4. Instalacion de Manija<br />
Una manija opcional está disponible para el Filtro de Aire Serie <strong>41</strong>. Para<br />
instalar la manija, remueva los tornillos en las dos posiciones ilustradas en<br />
Figura 1. Inserte la Manija en los dos orificios del cabezal y sujete con<br />
las tuercas y arandelas, incluidas con el Kit, en la parte inferior del cabezal.<br />
Atención<br />
Cuando utilice un respirador, no conecte el filtro a cualquier fuente<br />
de aire a menos que esté seguro de que proporciona aire respirable.<br />
La incapacidad de asegurar el suministro de aire respirable puede<br />
provocar la muerte o heridas graves.<br />
Funcionamiento<br />
1. Requisitos del aire<br />
a. Control de la fuente de aire:<br />
La ley federal exige el uso de detectores o alarmas de<br />
monóxido de carbono y altas temperaturas cuando se emplean<br />
<strong>com</strong>presores lubricados con aceite <strong>com</strong>o fuentes de aire<br />
para respirar. Si únicamente se utiliza una alarma de altas<br />
temperaturas, debe <strong>com</strong>probar con frecuencia que el aire del<br />
<strong>com</strong>presor no contenga monóxido de carbono para garantizar<br />
que cumple los requisitos para aire Grado “D” detallados más<br />
adelante.<br />
La ley también exige que las conexiones de la manguera de aire<br />
respirable sean in<strong>com</strong>patibles con las salidas de otros sistemas<br />
de gas, para evitar una posible conexión accidental de un<br />
respirador de suministro de aire a gases u oxígeno no respirables.<br />
b. Calidad del aire:<br />
El aire respirable suministrado que pasa por este filtro hasta<br />
un respirador debe cumplir <strong>com</strong>o mínimo los requisitos de aire<br />
gaseoso del Tipo 1, tal <strong>com</strong>o se describe en la Especificación de<br />
Materias G7.1 de la Compressed Gas Association (Grado D o<br />
superior), según lo prescrito por la ley federal 42 CFR, apartado<br />
84, subapartado J, 84.1<strong>41</strong>(b). El filtro Bullard para linea de aire<br />
no elimina el monóxido de carbono u otros gases tóxicos del aire<br />
suministrado. Los requisitos del aire respirable Grado D incluyen:<br />
• Oxígeno................................................................................19,5 - 23,0%<br />
• Hidrocarburos (condensados).............................................5 mg/m3<br />
máx.<br />
• Monóxido de carbono......................................................10 ppm máx.<br />
• Dióxido de carbono.....................................................1000 ppm máx.<br />
• Ningún contaminante tóxico en concentraciones que harían que<br />
fuese peligroso respirar el aire.<br />
Consulte la Especificación de Materias G7.1 de la C.G.A. para<br />
obtener datos <strong>com</strong>pletos. Puede solicitarla en: Compressed Gas<br />
Association, 1235 Jefferson Davis Highway, Arlington, VA 22202.<br />
c. Presión del aire:<br />
La presión del aire en la entrada del filtro no debe superar los<br />
6,89 bar (100 psig). La válvula de alivio de la presión soltará aire<br />
cuando la presión dentro del filtro supere los 8,6 bar (125 psig).<br />
La descarga de aire desde el filtro puede controlarse para que<br />
cumpla requisitos específicos de presión del aire utilizando el<br />
botón de ajuste del regulador de presión. Consulte el manual<br />
de instrucciones del respirador o herramienta neumática para<br />
averiguar las presiones de aire adecuadas para el correcto<br />
funcionamiento del equipo.<br />
d. Temperatura:<br />
El aire suministrado al filtro no debe superar los 60° C (140° F).<br />
Por lo tanto, no conecte el filtro directamente al colector de<br />
escape del <strong>com</strong>presor.<br />
2. Procedimientos para el correcto<br />
funcionamiento<br />
a. Drene el agua acumulada y el aceite del tanque del filtro,<br />
según sea necesario, abriendo la válvula de desagüe del grifo<br />
de des<strong>com</strong>presión. Normalmente, el tanque deberá vaciarse<br />
<strong>com</strong>o mínimo una vez al día. En ambientes húmedos, o si en el<br />
suministro de aire hay grandes cantidades de agua y aceite, vacíe<br />
el tanque del filtro con mayor frecuencia.<br />
b. Apriete las abrazaderas que fijan la cabeza al tanque del filtro.<br />
Con el paso del tiempo, las abrazaderas pueden aflojarse, lo que<br />
podría provocar una fuga en el sistema de aire. (La estanqueidad<br />
re<strong>com</strong>endada es de 27,12 Newton-metros).<br />
Consulte la Figura 2 de la página 2 de esta hoja de instrucciones<br />
para la instalación y la puesta en marcha.<br />
Atención<br />
Los filtros para linea de aire de la Serie <strong>41</strong> no eliminan el monóxido de carbono y otros gases tóxicos. Se re<strong>com</strong>ienda que revise y<br />
cumpla todas las normativas de seguridad federales y estatales relativas a respiradores de linea de aire. El incumplimiento de la<br />
normativa de seguridad o el uso inapropiado de los filtros Bullard para linea de aire pueden provocar la muerte o heridas graves.<br />
<strong>www</strong>.<strong>bullard</strong>.<strong>com</strong> 5<br />
Instalación/Funcionamiento
Sustitución del cartucho<br />
Atención<br />
Utilice únicamente cartuchos de repuesto Bullard <strong>41</strong>AF. Los filtros<br />
Bullard para linea de aire de la Serie <strong>41</strong> están diseñados para utilizar<br />
únicamente cartuchos de filtro Bullard. El uso de un cartucho de filtro<br />
incorrecto podría provocar la muerte o heridas graves.<br />
La frecuencia de sustitución del cartucho del filtro depende de las<br />
condiciones específicas del sistema de aire en el que esté instalado el filtro.<br />
Sin embargo, el cartucho del filtro debe cambiarse de inmediato, si:<br />
a. El usuario huele o detecta contaminantes en el aire suministrado a<br />
un respirador de aire, o;<br />
b. Si hay una caída de presión importante en el sistema, aunque<br />
aparentemente el <strong>com</strong>presor y los demás <strong>com</strong>ponentes funcionen<br />
correctamente.<br />
Acción correctora<br />
1. Corte el suministro de aire y purgue el filtro tal <strong>com</strong>o se describe en el<br />
dorso de esta hoja de instrucciones. Desconecte el filtro de la fuente de<br />
aire antes de iniciar la operación de mantenimiento.<br />
2. Cambie el cartucho:<br />
a. Remueva los tornillos y tuercas que sujetan el cabezal al tanque del<br />
filtro por la parte inferior y proceda a separar el cabezal del tanque.<br />
b. Una vez cambiado el cartucho, limpie el interior del tanque para<br />
eliminar cualquier resto de contaminantes.<br />
c. Introduzca un nuevo cartucho de filtro Bullard modelo <strong>41</strong>AF. Apriete<br />
las abrazaderas en cruz y no en secuencia circular. Esto le ayudará<br />
a evitar la deformación del cabezal del filtro.<br />
3. Registre la fecha en la que se cambió el filtro en la etiqueta del tanque<br />
del filtro. Puede elaborar un calendario de sustitución del cartucho del<br />
filtro controlando la frecuencia con la que es preciso cambiar el cartucho.<br />
4. Si las condiciones no mejoran, no utilice el filtro hasta que se hayan<br />
tomado las medidas correctoras apropiadas.<br />
Funcionamiento en 7 pasos del cartucho sustituible<br />
del filtro<br />
Los cartuchos atrapan y eliminan eficazmente las impurezas con muy poca<br />
pérdida de presión. El aire suministrado entra en el filtro en el conector de<br />
entrada (A), viaja a través de 6 capas de material de filtrado y se expulsa<br />
en el conector de salida (B) (véase la Figura 3). Los materiales de<br />
filtrado trabajan de manera secuencial para captar y retener agua, aceite,<br />
partículas, olores, y vapores orgánicos, de forma que los trabajadores o el<br />
equipamiento reciban aire más limpio.<br />
1. Se elimina el agua por condensación del aire en el cilindro exterior.<br />
2. El algodón cardado elimina las partículas.<br />
3. La alúmina activada adsorbe el aceite y la humedad.<br />
4. El carbón activado elimina los olores y la humedad.<br />
5. El material de fieltro elimina las partículas.<br />
6. El algodón cardado elimina las partículas.<br />
7. En la fase final, el fieltro respiratorio actúa <strong>com</strong>o filtro final antes de que<br />
el aire sea conducido al trabajador o a las herramientas propulsadas por<br />
aire.<br />
Atención<br />
El cartucho del filtro debe cambiarse periódicamente para garantizar<br />
su máxima eficacia. La frecuencia de las sustituciones de los cartuchos<br />
depende de las condiciones de funcionamiento. El cartucho deberá ser<br />
sustituido de inmediato si el usuario del respirador nota, huele o percibe<br />
contaminantes dentro del respirador. El tanque del filtro debe purgarse<br />
<strong>com</strong>o mínimo a diario para eliminar el agua y el aceite retenidos (a este<br />
efecto, hay un grifo de des<strong>com</strong>presión en la parte inferior del tanque).<br />
El incumplimiento de estas instrucciones puede provocar la muerte o<br />
heridas graves.<br />
Sustitución del cartucho<br />
6<br />
Manómetro de Salida<br />
Válvula de Alivio<br />
Cierre<br />
(sujeta tanque a<br />
cabezal)<br />
(Diagrama de Filtro<br />
modelo <strong>41</strong>P2 es usado<br />
para illustras las<br />
diferentes partes)<br />
Salidas de 1/4” (6 mm)<br />
(no ilustradas)<br />
Válvula de drenado<br />
Salida de 3/8” (7 mm)<br />
Botón Regulador de<br />
Presión<br />
Entrada de Aire (1” NPT<br />
Hembra) (25 mm)<br />
Patas<br />
(disenãdas<br />
para montado<br />
en plataforma)<br />
Conector<br />
de Entrada<br />
(A<br />
Manija<br />
Figura 2 Figura 3<br />
<strong>www</strong>.<strong>bullard</strong>.<strong>com</strong><br />
Conector<br />
de Salida<br />
de 3/8” (7<br />
mm) (B)
Filtros de Aire Serie <strong>41</strong><br />
<strong>Manual</strong> de Instrucciones<br />
Kit de adaptadores europeos Bullard<br />
<strong>41</strong>EAK<br />
El kit de adaptadores europeos Bullard <strong>41</strong>EAK se suministra para cumplir<br />
con los requisitos y estándares europeos de la conexión roscada y el<br />
montaje:<br />
1 boquilla reductora para conducto de 25 mm (1”) X 19 mm (3/4”)<br />
2 adaptador de rosca inglesa MPT (rosca de tubo macho) de 6 mm<br />
(1/4”)<br />
1 boquilla reductora de 7 mm (3/8”) X 6 mm (1/4”)<br />
Instalación de los adaptadores:<br />
1. Antes de utilizar el filtro <strong>41</strong>P2E:<br />
• Tome la boquilla reductora del conducto de 25 mm (1”) X 19 mm (3/4”)<br />
en la bolsa del kit <strong>41</strong>EAK.<br />
• Aplique sellador de rosca a la boquilla reductora de 25 mm (1”) X 19 mm<br />
(3/4”).<br />
• Instale la boquilla reductora de 25 mm (1”) X 19 mm (3/4”) dentro de la<br />
entrada del aire, en el lado del filtro (véase la Figura 4).<br />
• Apriete con una llave inglesa hasta que quede apretada.<br />
2. Si sólo se precisa una salida de aire:<br />
•<br />
Tome el adaptador de rosca inglesa MPT de 6 mm (1/4”) en la bolsa del<br />
kit <strong>41</strong>EAK.<br />
• Quite el adaptador existente del conducto a la manguera desde el LADO<br />
del regulador montado en la parte superior con la ayuda de una llave<br />
inglesa.<br />
• Aplique sellador de rosca al adaptador de rosca inglesa MPT de 6 mm<br />
(1/4”).<br />
• Instale el adaptador de rosca inglesa MPT de 6 mm (1/4”) en el puerto<br />
abierto (véase la Figura 5).<br />
• Apriete con una llave inglesa hasta que quede apretada.<br />
3. Si se precisa una segunda salida de aire:<br />
• Tome la boquilla de rosca de tubo macho de 7 mm (3/8”) X 6 mm (1/4”)<br />
y el adaptador de rosca inglesa MPT de 6 mm (1/4”) en la bolsa del kit<br />
<strong>41</strong>EAK.<br />
• Quite el tapón del conducto existente desde ARRIBA del regulador<br />
instalado en la parte superior con la ayuda de una llave inglesa.<br />
• Aplique sellador de rosca a la boquilla de rosca de tubo macho de 7 mm<br />
(3/8”) X 6 mm (1/4”).<br />
• Instale la boquilla de rosca de tubo macho de 7 mm (3/8”) X 6 mm<br />
(1/4”) en el puerto abierto (véase la Figura 6).<br />
• Apriete con una llave inglesa hasta que quede apretada.<br />
• Aplique sellador de rosca en el adaptador de rosca inglesa MPT de 6 mm<br />
(1/4”).<br />
• Instale el adaptador de rosca inglesa MPT de 6 mm (1/4”) en el extremo<br />
abierto de la boquilla de 7 mm (3/8”) X 6 mm (1/4”) que instaló en el<br />
paso anterior (véase la Figura 7).<br />
• Apriete con una llave inglesa hasta que quede apretada.<br />
Información de la garantía<br />
Bullard garantiza al <strong>com</strong>prador original por un (1) año a partir de la fecha<br />
de fabricación que Los filtros para linea de aire están libres de defectos<br />
en materiales y mano de obra bajo condiciones normales de uso y de<br />
servicio. Bajo esta garantía, la responsabilidad de Bullard se limita a<br />
reparar o cambiar, lo que Bullard elija, los artículos que han sido devueltos<br />
dentro del período de garantía y que, luego de revisarlos, se muestran<br />
defectuosos según el parecer de Bullard. Estos artículos están sujetos a<br />
estas limitaciones:<br />
a) Los filtros para linea de aire deben devolverse a Bullard con el valor de<br />
embarque prepagado.<br />
b) Los filtros para linea de aire no deben ser alteradas de su configuración<br />
original de fábrica; y<br />
c) Los filtros para linea de aire no deben haber sido mal usadas,<br />
maltratadas o dañadas ni en el almacenamiento ni en el transporte.<br />
En ningún caso Bullard será responsable de daños que resulten por<br />
dejar de usar ni de otros costos, gastos o daños indirectos, incidentales,<br />
consecuentes o especiales incurridos por el <strong>com</strong>prador, aunque Bullard<br />
haya sido advertido de la posibilidad de tales daños.<br />
Figura 5 Figura 6 Figura 7<br />
CUALQUIER GARANTÍA EXPLÍCITA, INCLUIDAS LAS GARANTÍAS DE<br />
COMERCIABILIDAD Y ADECUACIÓN PARA UN PROPÓSITO PARTICULAR,<br />
ESTÁN LIMITADAS A UN(1) AÑO A PARTIR DE LA FECHA EN QUE FUERON<br />
FABRICADAS Los filtros para linea de aire.<br />
Las limitaciones o exclusiones indicadas pueden no aplicarse en todos los<br />
estados. Algunos estados no permiten la exclusión o limitación de daños<br />
incidentales o consecuentes, ni permiten limitaciones en cuanto a la<br />
duración de una garantía implícita. Esta garantía le proporciona derechos<br />
legales específicos, y usted puede tener otros derechos que varían de<br />
estado a estado.<br />
AUTORIZACIÓN DE DEVOLUCIÓN<br />
Póngase en contacto con Servicio al Cliente para obtener un permiso<br />
escrito de devolución del producto. Los filtros para linea de aire no pueden<br />
devolverse sin el permiso escrito. Los materiales devueltos por crédito<br />
serán sujetos a una inspección de fábrica. Los productos actuales o los<br />
productos bajo garantía estarán sujetos a un pago de renovación. Los<br />
artículos devueltos deben enviarse a Bullard con los gastos de embarque<br />
prepagados.<br />
Kit de adaptadores europeos <strong>41</strong>EAK<br />
<strong>www</strong>.<strong>bullard</strong>.<strong>com</strong> 7
Especificaciones<br />
Filtro para<br />
linea de aire Modelo <strong>41</strong>A Modelo <strong>41</strong>P2 Modelo <strong>41</strong>P6 Modelo <strong>41</strong>P6WM Modelo <strong>41</strong>P2E<br />
Caudal máximo 2830 lpm 2120 lpm 2120 lpm 2120 lpm 2120 lpm<br />
de aire (100 cfm*) (75 cfm) (75 cfm) (75 cfm) (75 cfm)<br />
Conexión<br />
de entrada NPT de 1” NPT de 1” NPT de 1” NPT de 1” NPT (Hembra) de 19 mm<br />
(Hembra) (Hembra) (Hembra) (Hembra) (3⁄4”)<br />
Conexión NPT de 1” (Hembra) 2 salidas de 1⁄4” 6 salidas 6 salidas 2 salidas<br />
de salida & NPT (Hembra) NPT (Hembra) NPT (Hembra) BPT (Hembra) de 6 mm de<br />
3⁄8” de 3⁄8” de 3⁄8” (1⁄4”)<br />
Válvula<br />
de descarga – 8,6 bar (125 psig) 8,6 bar (125 psig) 8,6 bar (125 psig) 8,6 bar (125 psig)<br />
Diámetro<br />
del tanque 14 cm (51⁄2”) 14 cm (51⁄2”) 14 cm (51⁄2”) 14 cm (51⁄2”) 14 cm (5 1⁄2”)<br />
Altura 48 cm (19”) 60 cm (231⁄2”) 64 cm (25 1⁄4”) 56 cm (22”) 60 cm (23 1⁄2”)<br />
Peso 8.6 kg (19 lb.) 10 kg (22 lb.) 10,9 kg (24 lb.) 12,7 kg (28 lb.) 10 kg (22 lb.)<br />
*A una presión máxima re<strong>com</strong>endada de 6,9 bar (100 psig). NPT = rosca de tubo inglesa. MPT = rosca de tubo macho<br />
Información para pedidos<br />
Número<br />
Número<br />
de artículo DescripcióN DE artículo Descripción<br />
Especificaciones/Información para pedidos<br />
8<br />
Americas:<br />
E.D. Bullard Company<br />
1898 Safety Way<br />
Cynthiana, KY <strong>41</strong>031-9303<br />
Toll free: 877-BULLARD (285-5273)<br />
Tel: 859-234-6616<br />
Fax: 859-234-8987<br />
<strong>www</strong>.<strong>bullard</strong>.<strong>com</strong><br />
Filtros Bullard para conductos de aire<br />
<strong>41</strong>A Filtro de una sola salida. Manómetro, válvula de alivio<br />
y regulador de presión no incluidos<br />
<strong>41</strong>P2 Filtro de 2 salidas con manómetro, válvula de alivio,<br />
regulador de presión y accesorio adaptador para<br />
manguera<br />
<strong>41</strong>P6 Filtro de 6 salidas con manómetro, válvula de alivio,<br />
regulador de presión y accesorio adaptador para<br />
manguera<br />
<strong>41</strong>P6WM Filtro de 6 salidas con soporte de pared, manómetro,<br />
válvula de alivio, regulador de presión y accesorio<br />
adaptador para manguera<br />
<strong>41</strong>P2E Filtro de 2 salidas con manómetro, válvula de alivio,<br />
regulador de presión, y accesorio adaptador para<br />
manguera, además de adaptadores apropiados para<br />
conexiones roscadas europeas<br />
Piezas de repuesto<br />
<strong>41</strong>AF Cartucho de repuesto del filtro<br />
<strong>41</strong>P6UPK Mejora del colector múltiple de 6 salidas (incluye<br />
colector múltiple, conjunto del regulador, válvula de<br />
descarga, y manómetro) para <strong>41</strong>P6<br />
Europe:<br />
Bullard GmbH<br />
Lilienthalstrasse 12<br />
53424 Remagen • Germany<br />
Tel: +49-2642 999980<br />
Fax : +49-2642 9999829<br />
<strong>www</strong>.<strong>bullard</strong>extrem.<strong>com</strong><br />
Asia-Pacific:<br />
Bullard Asia Pacific Pte. Ltd.<br />
LHK Building<br />
701, Sims Drive, #04-03<br />
Singapore 387383<br />
Tel: +65-6745-0556<br />
Fax: +65-6745-5176<br />
<strong>www</strong>.<strong>bullard</strong>.<strong>com</strong><br />
<strong>41</strong>P2M<br />
<strong>41</strong>PRV<br />
Conjunto de colector múltiple de 2 salidas (incluye<br />
colector múltiple con regulador, válvula de descarga<br />
y manómetro) para <strong>41</strong>P2 y <strong>41</strong>P2E<br />
Válvula de descarga de la presión para los filtros de<br />
conductos de aire <strong>41</strong>P2, <strong>41</strong>P2E,y <strong>41</strong>P6/<strong>41</strong>P6WM.<br />
Regular a 8.6 bar (125 psig)<br />
<strong>41</strong>RG Manómetro del regulador para los filtros de<br />
conductos de aire <strong>41</strong>P2, <strong>41</strong>P2E, y <strong>41</strong>P6<br />
<strong>41</strong>P2R Regulador y conjunto <strong>41</strong>P2 (para uso únicamente con<br />
diseño de superficie plana)<br />
<strong>41</strong>EAK Kit de adaptación europeo para <strong>41</strong>P2E que incluye (1)<br />
boquilla reductora para conducto de 25 mm (1”) x 19<br />
mm (3⁄4 “),(1) boquilla reductora de 7 mm (3⁄8”) x<br />
6 mm (1⁄4”) y(2) adaptadores de rosca inglesa MPT<br />
de 6 mm (1/4”).<br />
<strong>41</strong>HK<br />
Kit de Manija para Filtro de Aire Serie <strong>41</strong>(opcional)<br />
ISO 9001<br />
certified<br />
©2011 Bullard. All rights reserved.<br />
Teflon is a registered trademark of E.I. DuPont de Nemours Co.<br />
6091100067B (1011)
Luftleitungsfilter<br />
der Serie <strong>41</strong><br />
<strong>41</strong>P2/<strong>41</strong>P2E<br />
<strong>41</strong>P6<br />
Abbildung 1<br />
Benutzerhandbuch<br />
Luftleitungsfilter der Bullard-<strong>41</strong>-Modellreihe können in Verbindung mit<br />
anderen Kompressor-Schutzvorrichtungen eingesetzt werden, um saubere<br />
Luft an Atemschutzgeräte zu liefern. Darüber hinaus können die Filter<br />
eingesetzt werden, um die Sauberkeit der an pneumatische Werkzeuge<br />
und Systeme gelieferten Luft zu verbessern. Des Weiteren können<br />
Bullard-Luftleitungsfilter der Serie <strong>41</strong> verwendet werden, um Wasser, Öl,<br />
Partikel, Gerüche und organische Dämpfe zu entfernen und Arbeiter oder<br />
Anlagen mit saubererer Luft zu versorgen. Bullard-Luftleitungsfilter<br />
entfernen KEIN Kohlenmonoxid und andere giftige Gase aus<br />
Luftleitungen.<br />
Installation<br />
1. Standort:<br />
Wählen Sie für die Installation einen flachen und stabilen Standort.<br />
Verschrauben Sie den Filter mithilfe der Standfüße an der<br />
ausgewählten Position. Im Fall einer gewünschten Wandmontage<br />
verwenden Sie das Modell <strong>41</strong>P6WM, das mit einer Wandhalterung<br />
ausgestattet ist.<br />
WARNUNG<br />
Die Filter müssen sicher auf einem geeigneten Untergrund installiert<br />
werden, um zu verhindern, dass sie während des Gebrauchs umkippen.<br />
Eine Nichtbeachtung dieser Anweisung kann zu tödlichen oder<br />
schweren Verletzungen führen.<br />
2. Anschluss:<br />
Verbinden Sie den Kompressorschlauch mit der Luftzufuhr. Verbinden<br />
Sie den Luftschlauch des Atemgeräts oder des pneumatischen<br />
Werkzeugs mit der Auslassöffnung des <strong>Filters</strong>. Ziehen Sie die<br />
Verbindungen fest an, um Lecks und einen möglichen Druckverlust zu<br />
vermeiden.<br />
3. Montage (nur <strong>41</strong>P6)<br />
Installieren Sie die Reglereinlass-Baugruppe, indem Sie<br />
den 1“-Einschraubstutzen am Ende der Komponenten in die<br />
1“-Gewindeöffnung am Filtergehäuse schrauben. Verkleben Sie das<br />
Gewinde des Einschraubstutzens mit Teflon®-Band oder Gewinde-<br />
Isoliermittel, bevor Sie den Stutzen einschrauben. Ziehen Sie die<br />
Schraubverbindung mit einem Schraubenschlüssel an.<br />
4. Handgriff-Montagekit:<br />
Für die Luftleitungsfilter der Serie <strong>41</strong> steht ein optionales Handgriff-<br />
Montagekit zur Verfügung. Um den Griff zu montieren, entfernen Sie<br />
die beiden Schrauben aus den in Abbildung 1 gezeigten Positionen. Der<br />
Griff wird in die beiden Öffnungen eingeführt und die Gewindeenden<br />
werden mit den beiliegenden Unterlegscheiben und Muttern von unten<br />
verschraubt.<br />
WARNUNG<br />
Wenn Sie ein Atemgerät verwenden, verbinden Sie den Filter nicht mit<br />
einer Luftquelle, wenn Sie sich nicht sicher sind, dass diese Atemluft<br />
liefert. Eine Nichtbeachtung dieser Anweisung kann zu tödlichen oder<br />
schweren Verletzungen führen.<br />
Betrieb<br />
1. Luftanforderungen<br />
a. Überwachung der Luftquelle<br />
Gemäß den gesetzlichen Vorschriften erfordert der Einsatz<br />
von ölgeschmierten Kompressoren als Quelle für Atemluft die<br />
Anwendung von Kohlenmonoxid- bzw. Temperaturüberwachungs-<br />
und Alarmsystemen. Wenn nur ein Hochtemperaturalarm<br />
verwendet wird, müssen Sie die Kompressorluft regelmäßig auf<br />
Kohlenmonoxid überprüfen, um sicherzustellen, dass diese den<br />
nachfolgend erläuterten Anforderungen der Klasse D entspricht.<br />
Gemäß den gesetzlichen Vorschriften dürfen die Verbindungsstücke<br />
von Atemluftschläuchen darüber hinaus nicht mit den<br />
Austrittsöffnungen anderer Gassysteme kompatibel sein, um ein<br />
versehentliches Verbinden eines Atemgeräts mit nicht atembaren<br />
Gasen oder Sauerstoff zu verhindern.<br />
b. Qualität der Atemluft:<br />
Durch diesen Filter einem Atemgerät zugeführte Atemluft<br />
muss mindestens die Anforderungen an gasförmige Luft<br />
des Typs 1 gemäß der Beschreibung der Compressed Gas<br />
Association Commodity Specification G7.1 (Klasse D oder höher)<br />
gemäß der Definition des Bundesgesetzes 42 CFR, Abschnitt<br />
84, Unterabschnitt J, 84.1<strong>41</strong>(b) entsprechen. Der Bullard-<br />
Luftleitungsfilter entfernt kein Kohlenmonoxid und keine anderen<br />
giftigen Gase aus der Zufuhrluft. Die Anforderungen an Atemluft<br />
der Kategorie D umfassen:<br />
• Sauerstoff 19,5 – 23,0%<br />
• (kondensierte) Wasserkohlenstoffe 5 mg/m³ max.<br />
• Kohlenmonoxid<br />
10 ppm max.<br />
• Kohlendioxid<br />
1000 ppm max.<br />
• Keine giftigen Schmutzstoffe in einer Menge, durch die das<br />
Einatmen der Luft die Gesundheit gefährden würde.<br />
Weitere Informationen hierzu finden Sie in den C.G.A. Commodity<br />
Specifications G7.1. Diese kann unter der folgenden Adresse angefordert<br />
werden: Compressed Gas Association, 1235 Jefferson Davis Highway,<br />
Arlington, VA 22202.<br />
c. Luftdruck:<br />
Der Luftdruck am Filtereinlass darf nicht mehr als 100 psig (6,89<br />
bar) betragen. Sofern der Druck in dem Filter einen Wert von<br />
125 psig (8,6 bar) übersteigt, kann Luft durch das Luftablassventil<br />
abgelassen werden. Der Luftablass aus dem Filter kann gesteuert<br />
werden, um die jeweiligen Luftdruckanforderungen zu erfüllen.<br />
Hierzu kann der Druckregler-Einstellknopf verwendet werden.<br />
Informationen zum richtigen Luftdruck für die sachgemäße<br />
Anwendung des Geräts finden Sie im Handbuch Ihres<br />
pneumatischen Werkzeugs oder Atemgeräts.<br />
d. Temperatur:<br />
Die Temperatur der dem Luft zugeführten Filter darf nicht mehr<br />
als 140°F (60°C) betragen. Schließen Sie den Filter daher niemals<br />
direkt an den Abluftkrümmer des Kompressors an.<br />
2. Verfahrensanweisungen für den sachgemäßen<br />
Betrieb<br />
a. Entfernen Sie angesammeltes Wasser oder Öl aus dem Filtertank<br />
nach Bedarf, indem Sie das Ablassventil öffnen. Der Tank muss<br />
normalerweise mindestens einmal pro Tag entleert werden. In<br />
feuchten Klimaregionen oder im Fall großer Mengen Wasser und<br />
Öl in der Luftzufuhr muss der Filtertank häufiger entlüftet werden.<br />
b. Ziehen Sie die Befestigungselemente, die den Kopf des Filtertanks<br />
sichern, an. Die Befestigungselemente können sich im Lauf der Zeit<br />
lösen und so zu einem Leck im Luftsystem führen (der empfohlene<br />
Dichtheitswert beträgt 20 ft. lbs).<br />
Anweisungen zur Installation und für den Betrieb finden Sie in<br />
Abbildung 2 auf Seite 2 der vorliegenden Anleitung.<br />
WARNUNG<br />
Die Luftleitungsfilter der Serie <strong>41</strong> beseitigen kein Kohlenmonoxid oder andere giftige Gase. Beachten Sie alle nationalen oder regionalen<br />
Sicherheitsvorschriften in Verbindung mit Luftschlauch-Atemgeräten. Die Nichtbeachtung der Sicherheitsvorschriften oder ein unsachgemäßer Gebrauch<br />
von Bullard-Luftleitungsfiltern kann zu tödlichen oder schweren Verletzungen führen.<br />
<strong>www</strong>.<strong>bullard</strong>.<strong>com</strong><br />
Installation/Betrieb<br />
9
Austausch der Filterkartusche<br />
WARNUNG<br />
Verwenden Sie für den Austausch ausschließlich Bullard-<strong>41</strong>AF-<br />
Kartuschen. Die Luftleitungsfilter der Bullard-Modellreihe <strong>41</strong> sind<br />
ausschließlich für den Betrieb mit Bullard-Filterkartuschen ausgelegt.<br />
Die Verwendung ungeeigneter Filterkartuschen kann zu tödlichen oder<br />
schweren Verletzungen führen.<br />
Die Häufigkeit des Filterkartuschenwechsels richtet sich nach den<br />
Bedingungen des jeweiligen Luftzufuhrsystems, in dem der Filter installiert<br />
wird. Die Filterkartusche sollte jedoch unverzüglich gewechselt werden,<br />
wenn:<br />
a. der Benutzer Schmutzstoffe in der dem luftgespeisten Atemgerät<br />
zugeführten Luft riecht oder schmeckt oder<br />
b. ein erheblicher Druckabfall im System auftritt, obwohl der<br />
Kompressor und andere Komponenten einwandfrei zu<br />
funktionieren scheinen.<br />
Korrekturmaßnahmen<br />
1. Schalten Sie die Luftzufuhr und den Ablassfilter wie auf der Rückseite<br />
dieser Anleitung beschrieben ab. Trennen Sie den Filter vor der Wartung<br />
von der Luftquelle.<br />
2. Wechseln der Kartusche:<br />
a. Trennen Sie den Filterkopf von dem Tank, indem Sie die Schrauben<br />
und Unterlegscheiben von der Unterseite entfernen.<br />
b. Nachdem Sie die Kartusche entnommen haben, reinigen Sie den<br />
Tank von innen, um alle Restschmutzstoffe zu entfernen.<br />
c. Setzen Sie eine neue Billard-<strong>41</strong>AF-Filterkartusche ein. Ziehen Sie die<br />
Befestigungselemente jeweils in gegenüber liegender und nicht in<br />
kreisförmiger Reihenfolge an, um eine Verwerfung des Filterkopfs<br />
zu vermeiden.<br />
3. Tragen Sie das Datum des Filterwechsels auf dem Aufkleber auf<br />
dem Luftleitungs-Filtertank ein. Sie können einen Wechselplan für<br />
die Filterkartuschen erstellen, indem Sie beobachten, wie häufig die<br />
Kartusche gewechselt werden muss.<br />
4. Wenn sich die Betriebsbedingungen hierdurch nicht verbessern,<br />
verwenden Sie den Filter erst wieder, wenn entsprechende<br />
Korrekturmaßnahmen getroffen wurden.<br />
7-Stufen-Betrieb der austauschbaren Filterkartusche<br />
Kartuschen binden und entfernen Verunreinigungen effektiv bei geringem<br />
Druckverlust. Die Zuluft gelangt am Eintrittsanschluss (A) in den Filter,<br />
wird durch 6 Schichten Filtermaterial geleitet und verlässt den Filter am<br />
Auslassanschluss (B) (siehe Abbildung 3). Das in Reihe angeordnete<br />
Filtermaterial bindet Wasser, Öl, Partikel, Gerüche und organische Dämpfe,<br />
sodass dem Arbeiter oder dem Gerät sauberere Luft zugeführt wird.<br />
1. Wasser wird durch Kondensation der Luft im äußeren Zylinder entfernt.<br />
2. Partikel werden durch Baumwollvlies entfernt.<br />
3. Aktivtonerde absorbiert Öl und Feuchtigkeit.<br />
4. Aktivkohle beseitigt Gerüche und Feuchtigkeit.<br />
5. Filzmaterial entfernt Partikel.<br />
6. Baumwollvlies entfernt Partikel.<br />
7. Der Atemfilz der letzten Stufe dient als letzter Filter, bevor die Luft dem<br />
Mitarbeiter oder dem luftbetriebenen Werkzeug zugeführt wird.<br />
WARNUNG<br />
Die Filterkartusche muss regelmäßig gewechselt werden, um eine<br />
optimale Wirkung zu gewährleisten. Die Häufigkeit des Filterwechsels<br />
richtet sich nach den Betriebsbedingungen. Die Kartusche sollte<br />
unverzüglich gewechselt werden, wenn der Träger der Atemmaske<br />
Schmutzstoffe innerhalb der Maske spürt, riecht oder schmeckt.<br />
Der Filtertank sollte mindestens täglich geleert werden, um<br />
herausgefiltertes Wasser und Öl zu entfernen (der Boden des Tanks<br />
ist zu diesem Zweck mit einem Ablasshahn ausgestattet). Eine<br />
Nichtbeachtung dieser Anweisungen kann zu tödlichen oder schweren<br />
Verletzungen führen.<br />
¼“ (6 mm) Auslassöffnungen<br />
(nicht abgebildet)<br />
Austrittsluft-<br />
Druckmesser<br />
Druckablassventil<br />
3/8“ Auslassöffnung (7 mm)<br />
Einstellknopf des<br />
Druckreglers<br />
3/8“ Auslassöffnung<br />
(7 mm)<br />
Auslassanschluss (B)<br />
Austausch der Filterkartusche<br />
Befestigungselemente (zur<br />
Befestigung des Filtertanks<br />
am Kopf)<br />
(Die Abbildung zeigt ein<br />
Modell <strong>41</strong>P2 als Beispiel.)<br />
Ablasshahn<br />
Lufteinlass (1“ NPT-FEM)<br />
(25 mm)<br />
Standfüße (mit<br />
Montagevorrichtung)<br />
Einlassanschluss (A)<br />
Abbildung 2 Abbildung 3<br />
10<br />
<strong>www</strong>.<strong>bullard</strong>.<strong>com</strong>
<strong>41</strong> <strong>Series</strong> <strong>Airline</strong> <strong>Filters</strong><br />
<strong>User</strong> <strong>Manual</strong><br />
Europäisches Adapter-Kit Bullard <strong>41</strong>EAK<br />
Das europäische Adapter-Kit Bullard <strong>41</strong>EAK dient der Aufnahme der<br />
Gewindeverbindung und der Anpassung an die europäischen Anforderungen und<br />
Normen.<br />
Dieses Kit enthält:<br />
1 ea. 1“ (25 mm) x 3/4“ (19 mm) Reduzierhülse<br />
2 ea. 1/4“ (6 mm) MPT britischer Gewindeadapter<br />
1 ea. 3/8“ (7 mm) x 1/4“ (6 mm) Reduzierhülse<br />
Installation der Adapter:<br />
1. Vor der Verwendung des <strong>41</strong>P2E-<strong>Filters</strong>:<br />
• Entnehmen Sie die 1“ (25 mm) x 3/4“ (19 mm) Reduzierhülse aus dem Beutel<br />
des <strong>41</strong>EAK-Kits.<br />
• Tragen Sie Gewindeisoliermittel auf die 1“ (25 mm) x 3/4“ (19 mm)<br />
Reduzierhülse auf.<br />
• Installieren Sie die 1“ (25 mm) x 3/4“ (19 mm) Reduzierhülse in dem<br />
Lufteinlass auf der Seite des <strong>Filters</strong> (siehe Abbildung 4 unten).<br />
• Ziehen Sie das Gewinde mit dem Schraubenschlüssel schlüsselfest an.<br />
2. Wenn nur ein Luftauslass benötigt wird:<br />
• Entnehmen Sie den 1/4“ (6 mm) MPT britischen Gewindeadapter aus dem<br />
Beutel des <strong>41</strong>EAK-Kits.<br />
• Entfernen Sie den vorhandenen Leitungsschlauchadapter von der SEITE des<br />
auf der Oberseite montierten Reglers mit einem Schraubenschlüssel.<br />
• Geben Sie Isoliermittel auf den 1/4“ (6 mm) MPT britischen Gewindeadapter.<br />
• Installieren Sie den 1/4“ (6 mm) MPT britischen Gewindeadapter an dem<br />
offenen Anschluss (siehe Abbildung 5 unten).<br />
• Ziehen Sie die Verbindung mit einem Schraubenschlüssel schlüsselfest an.<br />
3. Wenn ein zweiter Luftauslass benötigt wird:<br />
• Entnehmen Sie die 3/8“ (7 mm) x 1/4“ (6 mm) MPT-Reduzierhülse und den<br />
1/4“ (6 mm) MPT britischen Gewindeadapter aus dem Beutel des <strong>41</strong>EAK-Kits.<br />
• Entfernen Sie den vorhandenen Leitungsstopfen von der OBERSEITE des oben<br />
angebrachten Reglers mit einem Schraubenschlüssel.<br />
• Geben Sie Isoliermittel auf die 3/8“ (7 mm) x 1/4“ (6 mm) MPT-<br />
Reduzierhülse.<br />
• Installieren Sie die 3/8“ (7 mm) x 1/4“ (6 mm) MPT-Reduzierhülse an dem<br />
offenen Anschluss (siehe Abbildung 6 unten).<br />
• Ziehen Sie die Verbindung mit einem Schraubenschlüssel schlüsselfest an.<br />
• Geben Sie Isoliermittel auf den 1/4“ (6 mm) MPT britischen Gewindeadapter.<br />
• Installieren Sie den 1/4“ (6 mm) MPT britischen Gewindeadapter an dem<br />
offenen Ende der 3/8“ (7 mm) x 1/4“ (6 mm) Reduzierhülse, die im vorigen<br />
Schritt angebracht wurde (siehe Abbildung 7 unten).<br />
• Ziehen Sie die Verbindung mit einem Schraubenschlüssel schlüsselfest an.<br />
Abbildung 4 Abbildung 5 Abbildung 6 Abbildung 7<br />
Garantiehinweise<br />
Bullard gewährt dem ursprünglichen Käufer eine Garantie von einem (1) Jahr<br />
ab dem Herstellungsdatum auf Material- und Herstellungsfehler bei normalem<br />
Gebrauch und normaler Wartung auf den Luftleitungsfilter. Die Haftung der Firma<br />
Bullard im Rahmen dieser Garantie ist auf die Reparatur oder den Ersatz nach<br />
eigenem Ermessen von Artikeln, die innerhalb der Garantiefrist zurückgegeben<br />
werden und nach einer Prüfung zur Zufriedenheit von Bullard und vorbehaltlich der<br />
nachfolgenden Beschränkungen einen Mangel aufweisen, beschränkt:<br />
a) Der Luftleitungsfilter muss Bullard franko zurückgegeben werden.<br />
b) Die ursprüngliche werkseitige Konfiguration des Luftleitungsfilters darf nicht<br />
verändert worden sein.<br />
c) Der Luftleitungsfilter darf nicht unsachgemäß gebraucht, zweckentfremdet oder<br />
während der Lagerung oder des Transports beschädigt worden sein.<br />
Bullard haftet in keinem Fall für Schäden aufgrund eines Nutzungsverlusts sowie für<br />
indirekte, Neben-, Folge- oder besondere Kosten, Aufwendungen oder Schäden des<br />
Käufers, selbst wenn Bullard von der Möglichkeit solcher Schäden Kenntnis hatte.<br />
ALLE INDIREKTEN GARANTIEN EINSCHLIESSLICH IN BEZUG AUF DIE<br />
MARKTGÄNGIGKEIT UND DIE EIGNUNG FÜR EINEN BESTIMMTEN ZWECK SIND<br />
AUF EIN (1) JAHR AB DEM DATUM DER HERSTELLUNG DES LUFTLEITUNGSFILTERS<br />
BESCHRÄNKT.<br />
Die vorgenannten Garantiebeschränkungen oder -ausschlüsse gelten unter<br />
Umständen nicht in allen Ländern. Einige Länder verbieten den Ausschluss oder die<br />
Beschränkung von Neben- oder Folgeschäden oder erlauben Beschränkungen der<br />
Dauer einer indirekten Garantie. Die vorliegende Garantie gesteht Ihnen bestimmte<br />
gesetzliche Rechte zu. Darüber hinaus können Sie weitere landesspezifische<br />
Rechtsansprüche haben.<br />
RÜCKSENDEGENEHMIGUNGEN<br />
Wenden Sie sich an den Kundendienst, um eine schriftliche Rücksendegenehmigung<br />
für das Produkt zu erhalten. Luftleitungsfilter können nicht ohne eine schriftliche<br />
Genehmigung zurückgesendet werden. Für eine Gutschrift zurückgesendetes<br />
Material unterliegt einer werkseitigen Prüfung. Aktuelle Produkte oder Produkte,<br />
für die noch eine Garantie besteht, unterliegen einer Rücknahmegebühr.<br />
Zurückgegebene Artikel müssen franko an Bullard zurückgesendet werden.<br />
Europäisches Adapter-Kit <strong>41</strong>EAK<br />
<strong>www</strong>.<strong>bullard</strong>.<strong>com</strong> 11
Spezifikationen<br />
Luftleitungsfilter Modell <strong>41</strong>A Modell <strong>41</strong>P2 Modell <strong>41</strong>P6 Modell <strong>41</strong>P6Wm Modell <strong>41</strong>P2E<br />
Maximaler<br />
Luftdurchsatz<br />
100 cfm* (2830<br />
lpm)<br />
75 cfm (2120 lpm) 75 cfm (2120 lpm) 75 cfm (2120 lpm) 75 cfm (2120 lpm)<br />
Einlassanschluss<br />
1“ NPT<br />
(Innengewinde)<br />
1“ NPT<br />
(Innengewinde)<br />
1“ NPT<br />
(Innengewinde)<br />
1“ NPT<br />
(Innengewinde)<br />
3/4“ (19 mm) NPT<br />
(Innengewinde)<br />
Auslassanschluss<br />
1“ NPT<br />
(Innengewinde)<br />
2 Auslassöffnungen<br />
1/4“ & 3/8“ NPT<br />
(Innengewinde)<br />
6 Auslassöffnungen<br />
3/8“ NPT<br />
(Innengewinde)<br />
6 Auslassöffnungen<br />
3/8“ NPT<br />
(Innengewinde)<br />
2 Auslassöffnungen<br />
1/4“ (6 mm) BPT<br />
(Innengewinde)<br />
Ablassventil 125 psig (8,6 bar) 125 psig (8,6 bar) 125 psig (8,6 bar) 125 psig (8,6 bar)<br />
Tankdurchmesser 5 ½“ (14 cm) 5 ½“ (14 cm) 5 ½“ (14 cm) 5 ½“ (14 cm) 5 ½“ (14 cm)<br />
Höhe 19“ (48 cm) 23 ½“ (60 cm) 25 ¼“ (64 cm) 22“ (56 cm) 23 ½“ (60 cm)<br />
Gewicht 19 lb (8,6 kg) 22 lb (10 kg) 24 lb (10,9 kg) 28 lb (12,7 kg) 22 lb (10 kg)<br />
*Bei empfohlenem Maximaldruck von 100 psig (6,9 bar)<br />
Bestellinformationen<br />
Katalog-Nr. Beschreibung Katalog-Nr. Beschreibung<br />
Spezifikationen/Bestellinformationen<br />
12<br />
Americas:<br />
E.D. Bullard Company<br />
1898 Safety Way<br />
Cynthiana, KY <strong>41</strong>031-9303<br />
Toll free: 877-BULLARD (285-5273)<br />
Tel: 859-234-6616<br />
Fax: 859-234-8987<br />
<strong>www</strong>.<strong>bullard</strong>.<strong>com</strong><br />
Bullard-Luftleitungsfilter<br />
<strong>41</strong>A Filter mit einer Auslassöffnung.<br />
Druckmesser, Ablassventil und Druckregler<br />
nicht enthalten<br />
<strong>41</strong>P2 Filter mit zwei Auslassöffnungen,<br />
Druckmesser, Ablassventil, Druckregler und<br />
Schlauchadapter.<br />
<strong>41</strong>P6 Filter mit 6 Auslassöffnungen,<br />
Druckmesser, Ablassventil, Druckregler und<br />
Schlauchadapter<br />
<strong>41</strong>P6WM Filter mit 6 Auslassöffnungen und<br />
Wandhalterung, Druckmesser, Ablassventil,<br />
Druckregler und Schlauchadapter<br />
<strong>41</strong>P2E Filter mit 2 Auslassöffnungen,<br />
Druckmesser, Ablassventil, Druckregler<br />
und Schlauchadapter sowie Adapter für<br />
europäische Schraubverbindungen<br />
Europe:<br />
Bullard GmbH<br />
Lilienthalstrasse 12<br />
53424 Remagen • Germany<br />
Tel: +49-2642 999980<br />
Fax : +49-2642 9999829<br />
<strong>www</strong>.<strong>bullard</strong>extrem.<strong>com</strong><br />
Asia-Pacific:<br />
Bullard Asia Pacific Pte. Ltd.<br />
LHK Building<br />
701, Sims Drive, #04-03<br />
Singapore 387383<br />
Tel: +65-6745-0556<br />
Fax: +65-6745-5176<br />
<strong>www</strong>.<strong>bullard</strong>.<strong>com</strong><br />
Ersatzteile<br />
<strong>41</strong>AF Ersatz-Filterkartusche<br />
<strong>41</strong>P6UPK Nachrüstsatz für 6 Auslassöffnungen<br />
(einschließlich Anschlüsse, Regler-<br />
Baugruppe, Ablassventile und<br />
Druckmesser) für <strong>41</strong>P6<br />
<strong>41</strong>P2M Baugruppe für 2 Auslassöffnungen<br />
(einschließlich Anschlussstück mit Regler,<br />
Ablassventil und Druckmesser) für <strong>41</strong>P2<br />
und <strong>41</strong>P2E<br />
<strong>41</strong>PRV Druckablassventil für <strong>41</strong>P2-, <strong>41</strong>P2Eund<br />
<strong>41</strong>P6/<strong>41</strong>P6PWM-Luftleitungsfilter.<br />
Voreingestellt auf 125 psig (8,6 bar).<br />
<strong>41</strong>RG Reglermessanzeige für <strong>41</strong>P2-, <strong>41</strong>P2E- und<br />
<strong>41</strong>P6-Luftleitungsfilter<br />
<strong>41</strong>P2R <strong>41</strong>P2-Regler und Baugruppe (nur<br />
kompatibel mit Modellen mit flacher<br />
Oberseite)<br />
<strong>41</strong>EAK Europäisches Adapter-Kit für <strong>41</strong>P2E –<br />
enthält (1) 1“ (25 mm) x 3/4“ (19 mm)<br />
Reduzierhülse, (1) 3/8“ (7 mm) x 1/4“ (6<br />
mm) Reduzierhülse und (2) 1/4“ (6 mm)<br />
MPT britische Gewindeadapter.<br />
<strong>41</strong>HK Griff-Montagekit, <strong>41</strong>er-Serie (optional)<br />
ISO 9001<br />
certified<br />
©2011 Bullard. All rights reserved.<br />
Teflon is a registered trademark of E.I. DuPont de Nemours Co.<br />
6091100067B (1011)