Instrucciones de instalación y montaje de la válvula de ... - SOCLA
Instrucciones de instalación y montaje de la válvula de ... - SOCLA
Instrucciones de instalación y montaje de la válvula de ... - SOCLA

You also want an ePaper? Increase the reach of your titles
YUMPU automatically turns print PDFs into web optimized ePapers that Google loves.
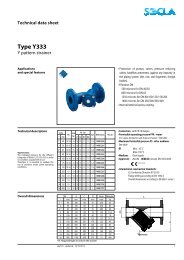
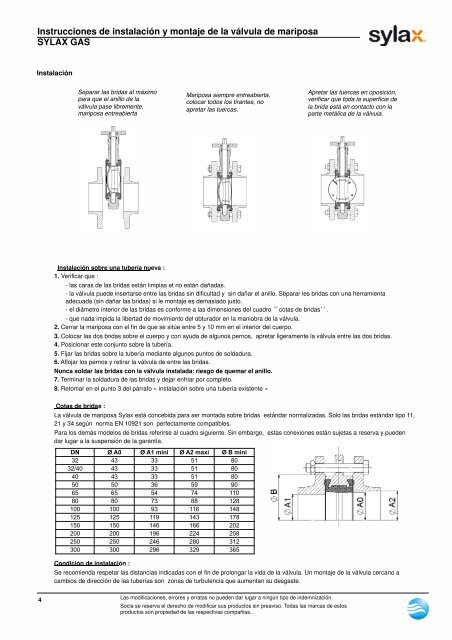
<strong>Instrucciones</strong> <strong>de</strong> insta<strong>la</strong>ción y <strong>montaje</strong> <strong>de</strong> <strong>la</strong> válvu<strong>la</strong> <strong>de</strong> mariposa<br />
SYLAX GAS<br />
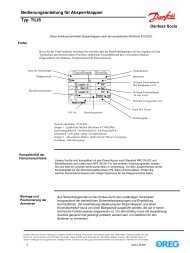
Insta<strong>la</strong>ción<br />
Separar <strong>la</strong>s bridas al máximo<br />
para que el anillo <strong>de</strong> <strong>la</strong><br />
válvu<strong>la</strong> pase libremente,<br />
mariposa entreabierta<br />
Mariposa siempre entreabierta,<br />
colocar todos los tirantes, no<br />
apretar <strong>la</strong>s tuercas.<br />
Apretar <strong>la</strong>s tuercas en oposición,<br />
verificar que toda <strong>la</strong> superficie <strong>de</strong><br />
<strong>la</strong> brida está en contacto con <strong>la</strong><br />
parte metálica <strong>de</strong> <strong>la</strong> válvu<strong>la</strong>.<br />
<br />
Insta<strong>la</strong>ción sobre una tubería nueva :<br />
1. Verificar que :<br />
- <strong>la</strong>s caras <strong>de</strong> <strong>la</strong>s bridas están limpias et no están dañadas.<br />
- <strong>la</strong> válvu<strong>la</strong> pue<strong>de</strong> insertarse entre <strong>la</strong>s bridas sin dificultad y sin dañar el anillo. Separar les bridas con una herramienta<br />
a<strong>de</strong>cuada (sin dañar <strong>la</strong>s bridas) si le <strong>montaje</strong> es <strong>de</strong>masiado justo.<br />
- el diámetro interior <strong>de</strong> <strong>la</strong>s bridas es conforme a <strong>la</strong>s dimensiones <strong>de</strong>l cuadro cotas <strong>de</strong> bridas.<br />
- que nada impida <strong>la</strong> libertad <strong>de</strong> movimiento <strong>de</strong>l obturador en <strong>la</strong> maniobra <strong>de</strong> <strong>la</strong> válvu<strong>la</strong>.<br />
2. Cerrar <strong>la</strong> mariposa con el fin <strong>de</strong> que se sitúe entre 5 y 10 mm en el interior <strong>de</strong>l cuerpo.<br />
3. Colocar <strong>la</strong>s dos bridas sobre el cuerpo y con ayuda <strong>de</strong> algunos pernos, apretar ligeramente <strong>la</strong> válvu<strong>la</strong> entre <strong>la</strong>s dos bridas.<br />
4. Posicionar este conjunto sobre <strong>la</strong> tubería.<br />
5. Fijar <strong>la</strong>s bridas sobre <strong>la</strong> tubería mediante algunos puntos <strong>de</strong> soldadura.<br />
6. Aflojar los pernos y retirar <strong>la</strong> válvu<strong>la</strong> <strong>de</strong> entre <strong>la</strong>s bridas.<br />
Nunca soldar <strong>la</strong>s bridas con <strong>la</strong> válvu<strong>la</strong> insta<strong>la</strong>da: riesgo <strong>de</strong> quemar el anillo.<br />
7. Terminar <strong>la</strong> soldadura <strong>de</strong> <strong>la</strong>s bridas y <strong>de</strong>jar enfriar por completo.<br />
8. Retomar en el punto 3 <strong>de</strong>l párrafo «insta<strong>la</strong>ción sobre una tubería existente»<br />
Cotas <strong>de</strong> bridas :<br />
La válvu<strong>la</strong> <strong>de</strong> mariposa Sy<strong>la</strong>x está concebida para ser montada sobre bridas estándar normalizadas. Solo <strong>la</strong>s bridas estándar tipo 11,<br />
21 y 34 según norma EN 10921 son perfectamente compatibles.<br />
Para los <strong>de</strong>más mo<strong>de</strong>los <strong>de</strong> bridas referirse al cuadro siguiente. Sin embargo, estas conexiones están sujetas a reserva y pue<strong>de</strong>n<br />
dar lugar a <strong>la</strong> suspensión <strong>de</strong> <strong>la</strong> garantía.<br />
DN Ø A0 Ø A1 mini Ø A2 maxi Ø B mini<br />
32 43 33 51 80<br />
32/40 43 33 51 80<br />
40 43 33 51 80<br />
50 50 36 59 90<br />
65 65 54 74 110<br />
80 80 73 88 128<br />
100 100 93 116 148<br />
125 125 119 143 178<br />
150 150 146 166 202<br />
200 200 196 224 258<br />
250 250 246 280 312<br />
300 300 296 329 365<br />
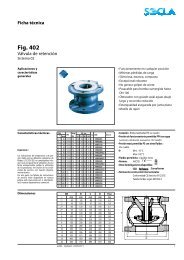
Condición <strong>de</strong> insta<strong>la</strong>ción :<br />
Se recomienda respetar <strong>la</strong>s distancias indicadas con el fin <strong>de</strong> prolongar <strong>la</strong> vida <strong>de</strong> <strong>la</strong> válvu<strong>la</strong>. Un <strong>montaje</strong> <strong>de</strong> <strong>la</strong> válvu<strong>la</strong> cercano a<br />
cambios <strong>de</strong> dirección <strong>de</strong> <strong>la</strong>s tuberías son zonas <strong>de</strong> turbulencia que aumentan su <strong>de</strong>sgaste.<br />
4<br />
Las modificaciones, errores y erratas no pue<strong>de</strong>n dar lugar a ningún tipo <strong>de</strong> in<strong>de</strong>mnización.<br />
Soc<strong>la</strong> se reserva el <strong>de</strong>recho <strong>de</strong> modificar sus productos sin preaviso. Todas <strong>la</strong>s marcas <strong>de</strong> estos<br />
productos son propiedad <strong>de</strong> <strong>la</strong>s respectivas compañias..