istruzioni va/01 - Bpt
istruzioni va/01 - Bpt
istruzioni va/01 - Bpt
Create successful ePaper yourself
Turn your PDF publications into a flip-book with our unique Google optimized e-Paper software.
Istruzioni alimentatore VA/<strong>01</strong><br />
Instructions for power supplier VA/<strong>01</strong><br />
Anweisungen für Netzgerät VA/<strong>01</strong><br />
Instructions pour l’alimentateur VA/<strong>01</strong><br />
Instrucciones del alimentador VA/<strong>01</strong><br />
Instruções do alimentador VA/<strong>01</strong><br />
BPT S.p.A.<br />
Via Cornia, 1<br />
33079 Sesto al Reghena-PN-Italy<br />
www.bpt.it-info@bpt.it<br />
Avvertenze generali<br />
• Leggere attentamente le <strong>istruzioni</strong>, prima di iniziare l’installazione ed eseguire<br />
gli interventi come specificato dal costruttore;<br />
• Dopo aver tolto l’imballaggio assicurarsi dell’integrità dell’apparecchio;<br />
• Gli elementi dell’imballaggio (sacchetti in plastica, polistirolo espanso, ecc.) non<br />
devono essere lasciati alla portata dei bambini in quanto potenziali fonti di pericolo;<br />
• L’installazione, la programmazione, la messa in servizio e la manutenzione del<br />
prodotto deve essere effettuata soltanto da personale tecnico qualificato ed<br />
opportunamente addestrato nel rispetto delle normative vigenti ivi comprese<br />
le osser<strong>va</strong>nze sulla prevenzione infortuni;<br />
• Operare in ambienti sufficientemente illuminati e idonei per la salute e utilizzare<br />
strumenti, utensili ed attrezzature in buono stato;<br />
• Il dispositivo è adatto all’installazione da interno, esclusi<strong>va</strong>mente in luoghi<br />
asciutti e non polverosi;<br />
• Non ostruire le aperture o fessure di ventilazione o di smaltimento di calore;<br />
• L’impianto elettrico dovrà essere realizzato in conformità con le normative in<br />
vigore nel paese di installazione;<br />
• Prima di collegare le apparecchiature alimentate a tensione di rete accertarsi<br />
che i dati di targa siano rispondenti a quelli della rete di distribuzione;<br />
• Proteggere le apparecchiature alimentate a tensione di rete con un interruttore<br />
di rete onnipolare con una separazione dei contatti di almeno 3 mm;<br />
• I conduttori dei cablaggi non utilizzati devono essere isolati.<br />
• Per prevenire contatti accidentali, fascettare separatemente i cavi di collegamento<br />
alla rete e quelli dei segnali in bassissima tensione.<br />
• Le schede elettroniche possono essere seriamente danneggiate dalle scariche<br />
elettrostatiche: qualora vi sia bisogno di maneggiarle indossare idonei indumenti<br />
e calzature antistatiche o, almeno, assicurarsi preventi<strong>va</strong>mente di aver<br />
rimosso ogni carica residua toccando con la punta delle dita una superficie<br />
metallica connessa all’impianto di terra (es. lo chassis di un elettrodomestico);<br />
• Saldare le giunzioni e la parte terminale dei fili onde evitare malfunzionamenti<br />
causati dall’ossidazione degli stessi;<br />
• Al termine dell’installazione, verificare sempre il corretto funzionamento<br />
dell’apparecchiatura e dell’impianto nel suo insieme;<br />
• Prima di effettuare qualunque operazione di pulizia o di manutenzione, togliere<br />
l’alimentazione al dispositivo; nel caso di apparecchiature alimentate a tensione di<br />
rete togliere l’alimentazione, aprendo l’interruttore posto a monte dello stesso;<br />
• In caso di guasto e/o cattivo funzionamento di un dispositivo, distaccarlo<br />
dall’alimentazione e non manometterlo;<br />
• Per l’eventuale riparazione rivolgersi solamente ad un centro di assistenza tecnica<br />
autorizzato dal costruttore e comunque utilizzare sempre i ricambi forniti<br />
da <strong>Bpt</strong> s.p.a.;<br />
L’apparecchio dovrà essere destinato unicamente all’uso per il quale è<br />
stato espressamente concepito.<br />
Il mancato rispetto delle prescrizioni sopra elencate può compromettere<br />
la sicurezza dell’apparecchio.<br />
Il costruttore non può comunque essere considerato responsabile per<br />
eventuali danni deri<strong>va</strong>nti da usi impropri, erronei ed irragionevoli.<br />
SMALTIMENTO<br />
Assicurarsi che il materiale d’imballaggio non venga disperso nell’ambiente, ma<br />
smaltito seguendo le norme vigenti nel paese di utilizzo del prodotto.<br />
Alla fine del ciclo di vita dell’apparecchio evitare che lo stesso venga disperso<br />
nell’ambiente. Lo smaltimento dell’apparecchiatura deve essere effettuato rispettando<br />
le norme vigenti e privilegiando il riciclaggio delle sue parti costituenti. Sui<br />
componenti, per cui è previsto lo smaltimento con riciclaggio, sono riportati il<br />
simbolo e la sigla del materiale.<br />
General Precautions<br />
• Read the instructions carefully before starting installation and proceed as specified<br />
by the manufacturer;<br />
• After removing the packaging, check the condition of the unit;<br />
• The packaging items (plastic bags, expanded polystyrene, etc.) must not be handled<br />
by children as they may be dangerous;<br />
• Installation, programming, commissioning and maintenance of the product must<br />
only be performed by qualified technicians who have been properly trained in<br />
compliance with current standards, including health and safety regulations;<br />
• Operate in sufficiently lighted areas that are conducive to health and use tools,<br />
utensils and equipment that are in good working order;<br />
• The device is suitable for indoor installation, exclusively in dry and non-dusty areas;<br />
• Do not obstruct the openings or slots used for ventilation or heat disposal;<br />
• The electrical system must comply with current standards in the country of installation;<br />
• Before connecting the equipment powered by mains voltage, make sure that the<br />
rating plate data corresponds to that of the distribution network;<br />
• Protect the equipment powered by mains voltage with an omnipolar switch with<br />
contacts separated by at least 3 mm;<br />
• Wires belonging tocables that are not used must beinsulated.<br />
• To prevent accidental contacts, clamp the network connection cables and the very<br />
low voltage signal cables separately.<br />
• The electronic cards can be seriously damaged by discharges of static electricity:<br />
if they are to be handled, wear suitable clothing and anti-static footwear, or at<br />
least, ensure static electricity has been discharged by touching with the fingertip<br />
a metallic surface connected to the earth system (e.g. the chassis of a household<br />
appliance);<br />
• Weld the joints and the ends of the wires to prevent malfunctions caused by wire<br />
oxidation;<br />
• Upon completion of installation, always check for correct operation of the unit<br />
and the system as a whole;<br />
• The installer must make sure that the information for the user, where applicable,<br />
is present and is delivered;<br />
• Before performing any cleaning or maintenance operation, disconnect the power<br />
supply to the device; if the equipment is powered by mains voltage disconnect the<br />
power supply, opening the switch located upstream of it;<br />
• In the case of device failure or malfunction, disconnect it from the power supply<br />
and do not tamper with it;<br />
• Should the unit be in need of repair, contact only a technical support centre authorised<br />
by the manufacturer and always use spare parts provided by <strong>Bpt</strong> s.p.a.;<br />
The equipment must only be used for the purpose for which it was<br />
explicitly designed.<br />
Failure to follow the instructions provided above may compromise the<br />
unit’s safety.<br />
The manufacturer declines all liability for any damage as a result of<br />
improper, incorrect or unreasonable use.<br />
DISPOSAL<br />
Do not litter the environment with packaging material: make sure it is disposed<br />
of according to the regulations in force in the country where the product is used.<br />
When the equipment reaches the end of its life cycle, avoid discarding in the<br />
environment. The equipment must be disposed of in compliance with current<br />
regulations, recycling its component parts wherever possible. Components that<br />
qualify as recyclable waste feature the rele<strong>va</strong>nt symbol and material acronym.<br />
Allgemeine Hinweise<br />
• Vor der Installation die Anweisungen aufmerksam lesen, und alle Arbeiten wie<br />
vom Hersteller angegeben ausführen.<br />
• Das Gerät aus der Verpackung nehmen und seine Unversehrtheit kontrollieren.<br />
• Die Verpackungsteile (Plastiktüten, Polystyrolschaum usw.) dürfen nicht in<br />
Reichweite von Kindern gelassen werden, da sie potentielle Gefahrenquellen<br />
darstellen.<br />
• Die Installation, die Programmierung, die Inbetriebnahme und die Wartung<br />
des Produkts dürfen nur non qualifiziertem und einschlägig ausgebildetem<br />
Fachpersonal unter Beachtung der geltenden Bestimmungen und Unfallverhütungsmaßnahmen<br />
ausgeführt werden.<br />
• In ausreichend beleuchteten und nicht gesundheitsschädigenden Räumen<br />
arbeiten und Instrumente und Werkzeuge in gutem Zustand benutzen.<br />
• Die Vorrichtung eignet sich zur Installation in Gebäuden, ausschließlich in trockenen<br />
und staubfreien Umgebungen.<br />
• Nicht die Öffnungen oder Schlitze zur Belüftung bzw. Wärmeableitung verschließen.<br />
• Die Elektroanlage muss entsprechend den im Installationsland geltenden Bestimmungen<br />
ausgeführt werden.<br />
• Vor dem Anschluss der mit Netzspannung versorgten Geräte ist zu prüfen, ob<br />
die Daten des Typenschilds denen des Verteilernetzes entsprechen.<br />
• Die netzgespeisten Geräte mit einem allpoligen Netzschalter mit einem Kontaktabstand<br />
von mindestens 3 mm schützen.<br />
• Unbenutzte Kabelleiterisolieren.<br />
• Um ungewollten Kontakten vorzubeugen, die Netzanschlusskabel und die<br />
Niederspannung führenden Signalleitungen getrennt umbinden.<br />
• Die Platinen können durch elektrostatische Entladungen schwer beschädigt<br />
werden: falls es notwendig sein sollte, sie zu berühren, geeignete Kleidung<br />
und antistatische Schuhe tragen oder sich zumindest vorher vergewissern,<br />
dass jede Restladung beseitigt wurde, indem man mit den Fingerspitzen eine<br />
Metalloberfläche berührt, die mit der Erdungsanlage verbunden ist (z.B. das<br />
Gehäuse eines Elektrogeräts).<br />
• Die Verbindungsstellen und das Ende der Leiter verschweißen, um Störungen<br />
durch Oxidation derselben zu vermeiden.<br />
• Nach Abschluss der Installationsarbeiten immer den korrekten Betrieb des<br />
Geräts und der gesamten Anlage prüfen.<br />
• Der Installateur muss sich vergewissern, dass die Hinweise für den Benutzer,<br />
falls vorgesehen, auf den Geräten vorhanden sind.<br />
• Vor allen Reinigungs- oder Wartungsarbeiten die Vorrichtung von der Spannung<br />
trennen. Im Falle von netzgespeisten Geräten die Versorgung abtrennen,<br />
indem der Schalter vor demselben geöffnet wird.<br />
• Im Fall einer Störung und/oder eines fehlerhaften Betriebs eines Geräts, dieses<br />
sofort von der Stromversorgung trennen und keine unautorisierten Eingriffe<br />
durchführen.<br />
• Wenden Sie sich für eventuelle Reparaturarbeiten ausschließlich an eine vom<br />
Hersteller autorisierte Kundendienststelle und benutzen sie in jedem Fall immer<br />
von <strong>Bpt</strong> s.p.a. gelieferte Ersatzteile.<br />
Das Gerät darf ausschließlich für die Zwecke benutzt werden, für die<br />
es ausdrücklich konzipiert wurde.<br />
Die Nichtbeachtung der oben angeführten Vorschriften kann die Sicherheit<br />
des Geräts beeinträchtigen.<br />
Der Hersteller haftet nicht für Schäden, die durch einen unsachgemäßen,<br />
falschen oder unvernünftigen Gebrauch verursacht werden.<br />
ENTSORGUNG<br />
Sicherstellen, dass das Verpackungsmaterial nicht die Umwelt belastet, sondern<br />
den geltenden Vorschriften des Bestimmungslandes entsprechend entsorgt wird.<br />
Das nicht mehr benutzbare Gerät umweltfreundlich entsorgen. Die Entsorgung<br />
des Geräts hat gemäß den geltenden Vorschriften zu erfolgen und es ist vorzugsweise<br />
eine Wiederverwertung der Bauteile vorzusehen. Die wieder verwertbaren<br />
Bauteile sind mit dem betreffenden Symbol und Materialzeichen versehen.<br />
Avertissements généraux<br />
• Lire attentivement les instructions a<strong>va</strong>nt de commencer l’installation et effectuer<br />
les opérations comme spécifié par le fabricant;<br />
• Après l’avoir déballé, vérifier que l’appareil soit en bon état;<br />
• Ne pas laisser les éléments d’emballage (sachets en plastique, polystyrène expansé,<br />
etc.) à la portée des enfants car ils constituent une source potentielle de<br />
danger;<br />
• L’installation, la programmation, la mise en service et l’entretien du produit ne<br />
doivent être effectués que par du personnel technique qualifié et spécialisé, en<br />
respectant les normes en vigueur, y compris celles en matière de prévention des<br />
accidents;<br />
• Tra<strong>va</strong>iller dans des lieux salubres et suffisamment éclairés et n’utiliser que des<br />
outils et instruments en bon état;<br />
• Le dispositif est adapté pour l’installation à l’intérieur, exclusivement dans des lieux<br />
secs et non poussiéreux;<br />
• Ne pas obstruer les ouvertures ou les fissures de ventilation ou d’élimination de chaleur;<br />
• L’installation électrique devra être réalisée en conformité aux normes en vigueur<br />
dans le pays d’installation;<br />
• A<strong>va</strong>nt de raccorder les appareils, contrôler que les indications reportées sur la<br />
plaque correspondent à celles du réseau électrique;<br />
• Protéger les appareils alimentés avec tension de réseau avec un interrupteur de<br />
réseau omnipolaire avec une séparation des contacts d’au moins 3 mm;<br />
• Les conducteurs descâblages qui ne sont pas utilisésdoivent être isolés.<br />
• Pour éviter les contacts accidentels, serrer séparément les câbles de branchement<br />
au réseau et ceux des signaux en très basse tension.<br />
• Les décharges électrostatiques peuvent causer de sérieux dommages aux cartes<br />
électroniques : a<strong>va</strong>nt de les manipuler, porter des vêtements adéquats et des<br />
chaussures antistatiques, ou éliminer préalablement toute charge résiduelle en<br />
touchant avec la pointe des doigts une surface métallique reliée à la ligne de terre<br />
(ex : châssis d’un électroménager).<br />
• Souder les jonctions et la partie terminale des fils afin d’éviter des dysfonctionnements<br />
déri<strong>va</strong>nt de l’oxydation de ceux-ci;<br />
• À la fin de l’installation, toujours contrôler le bon fonctionnement de l’appareil et<br />
de toute l’installation;<br />
• L’installateur doit contrôler que les informations utiles à l’utilisateur soient présentes<br />
et fournies;<br />
• A<strong>va</strong>nt d’effectuer toute opération de nettoyage ou d’entretien, couper l’alimentation<br />
électrique du dispositif ; en cas d’appareils alimentés avec tension de réseau,<br />
couper l’alimentation en ouvrant l’interrupteur situé en amont de ceux-ci;<br />
• En cas de panne et/ou de mau<strong>va</strong>is fonctionnement d’un dispositif, le débrancher<br />
du réseau électrique, sans tenter aucune réparation;<br />
• Pour toute réparation, adressez-vous uniquement à un centre d’assistance technique<br />
agréé par le fabricant et dans tous les cas utiliser toujours des pièces de<br />
rechange fournies par <strong>Bpt</strong> s.p.a.;<br />
L’appareil n’est destiné qu’à l’utilisation pour laquelle il a été expressément<br />
conçu.<br />
Le non-respect des prescriptions susmentionnées pourrait compromettre<br />
la sécurité de l’appareil.<br />
Le fabricant ne pourra dans tous les cas être retenu responsable des<br />
dommages déri<strong>va</strong>nt d’une utilisation incorrecte ou erronée.<br />
ELIMINATION<br />
S’assurer que le matériel d’emballage n’est pas abandonné dans la nature et qu’il est<br />
éliminé conformément aux normes en vigueur dans le pays d’utilisation du produit.<br />
À la fin du cycle de vie de l’appareil, faire en sorte qu’il ne soit pas abandonné<br />
dans la nature.<br />
L’appareil doit être éliminé conformément aux normes en vigueur et en privilégiant<br />
le recyclage de ses pièces.<br />
Le symbole et le sigle du matériau sont indiqués sur les pièces pour lesquelles le<br />
recyclage est prévu.<br />
Advertencias generales<br />
• Lea atentamente las instrucciones antes de comenzar la instalación, y realice las<br />
intervenciones tal y como especifica el fabricante;<br />
• Tras haberlo sacado de su embalaje, compruebe el buen estado del aparato;<br />
• Los elementos del embalaje (bolsas de plástico, poliestireno expandido, etc.) no<br />
deben dejarse al alcance de los niños, ya que son potenciales fuentes de peligro;<br />
• La instalación, la programación, la puesta en servicio y el mantenimiento del<br />
producto deben ser efectuados solamente por personal técnico cualificado que<br />
cuente con la formación pertinente, cumpliendo las normati<strong>va</strong>s vigentes, incluidas<br />
las normas de prevención de accidentes;<br />
• Trabaje en entornos suficientemente iluminados e idóneos para la salud, y<br />
utilice herramientas, utensilios y equipamiento en buen estado;<br />
• El dispositivo debe instalarse únicamente en interiores secos y no polvorientos;<br />
• No obstruya las aberturas o ranuras de ventilación o e<strong>va</strong>cuación de calor;<br />
• La instalación eléctrica deberá realizarse conforme a las normati<strong>va</strong>s vigentes en<br />
el país de instalación;<br />
• Antes de conectar los aparatos alimentados con tensión de red, asegúrese de<br />
que los datos de placa correspondan a los de la red de distribución.<br />
• Proteja los aparatos alimentados con tensión de red mediante un interruptor de<br />
red omnipolar con una separación entre contactos de al menos 3 mm;<br />
• Es preciso aislar losconductores de los cableados noutilizados.<br />
• Para evitar contactos accidentales, sujete con abrazaderas, por separado, los<br />
cables de conexión a la red eléctrica y los de las señales a muy baja tensión.<br />
• Las tarjetas electrónicas pueden sufrir graves daños por descargas electroestáticas:<br />
siempre que se necesite manipularlas, póngase prendas y calzado antiestáticos<br />
o, al menos, asegúrese previamente de haber eliminado toda carga<br />
residual tocando con la punta de los dedos una superficie metálica conectada a<br />
la instalación de tierra (ej.: el bastidor de un electrodoméstico);<br />
• Suelde las junturas y la parte terminal de los hilos para evitar funcionamientos<br />
defectuosos causados por su oxidación;<br />
• Al final del proceso de instalación, compruebe el correcto funcionamiento del<br />
equipo y de la instalación en su conjunto;<br />
• El instalador debe asegurarse de que la información para el usuario, donde esté<br />
previsto, esté presente y se entregue a este.<br />
• Antes de efectuar cualquier operación de limpieza o mantenimiento, corte la<br />
alimentación del dispositivo; en caso de aparatos alimentados con tensión de<br />
red, corte la alimentación abriendo el interruptor situado aguas arriba de él;<br />
• En caso de avería y/o funcionamiento defectuoso de un dispositivo, desconéctelo<br />
de la alimentación y no lo manipule;<br />
• Si es necesario efectuar reparaciones, acuda únicamente a un centro de asistencia<br />
técnica autorizado por el fabricante, y en cualquier caso utilice siempre los<br />
recambios suministrados por <strong>Bpt</strong> s.p.a.;<br />
El aparato deberá destinarse únicamente al uso para el que ha sido<br />
expresamente concebido.<br />
El incumplimiento de las anteriores instrucciones puede poner el peligro<br />
la seguridad del aparato.<br />
En cualquier caso, el fabricante no asumirá ninguna responsabilidad por<br />
posibles daños deri<strong>va</strong>dos de usos impropios, incorrectos o irrazonables.<br />
ELIMINACION<br />
Comprobar que no se tire al medioambiente el material de embalaje, sino que sea<br />
eliminado conforme a las normas vigentes en el país donde se utilice el producto.<br />
Al final del ciclo de vida del aparato evítese que éste sea tirado al medioambiente.<br />
La eliminación del aparato debe efectuarse conforme a las normas vigentes y<br />
privilegiando el reciclaje de sus partes componentes.<br />
En los componentes, para los cuales está prevista la eliminación con reciclaje, se<br />
indican el símbolo y la sigla del material.<br />
Advertências gerais<br />
• Leia com atenção as instruções, antes de iniciar a instalação e efectue as operações<br />
conforme o especificado pelo fabricante;<br />
• Após ter removido a embalagem certifique-se de que o aparelho está íntegro;<br />
• Os elementos da embalagem (sacos de plástico, isopor, etc.) não devem ser deixados<br />
ao alcance das crianças porque são fontes potenciais de perigo;<br />
• A instalação, a programação, a colocação em serviço e a manutenção do produto<br />
devem ser efectuadas apenas por pessoal técnico qualificado e com formação<br />
adequada, cumprindo as normas em vigor, inclusive as disposições sobre a prevenção<br />
de acidentes;<br />
• Trabalhe em ambientes suficientemente iluminados e adequados para a saúde e<br />
utilize instrumentos, ferramentas e equipamentos em bom estado;<br />
• O dispositivo è próprio para a instalação em interiores, exclusi<strong>va</strong>mente em local<br />
seco e sem poeiras;<br />
• Não obstrua as aberturas ou fendas de ventilação ou de eliminação de calor;<br />
• A instalação eléctrica tem de ser realizada em conformidade com as normas em<br />
vigor no país de instalação;<br />
• Antes de ligar os dispositivos alimentados com a tensão de rede verifique se os<br />
dados da placa correspondem aos da rede de distribuição;<br />
• Proteja os dispositivos alimentados com tensão de rede com um interruptor de<br />
rede unipolar com uma separação dos contactos de pelo menos 3 mm;<br />
• Os condutores dosconectores não utilizados devemser isolados.<br />
• Para prevenir contactos acidentais, aplicar braçadeiras para separar os cabos de<br />
ligação à rede e os cabos dos sinais em baixíssima tensão.<br />
• As placas electrónicas podem ser danificadas seriamente pelas descargas<br />
electrostáticas: se for necessário manuseá-las, use roupas idóneas e calçado<br />
antiestático ou, pelo menos, verifique previamente de ter removido<br />
qualquer carga residual tocando com a ponta dos dedos numa superfície<br />
metálica conectada à instalação de terra (ex. o chassis de um electrodoméstico);<br />
• Solde as junções e a parte terminal dos fios a fim de evitar falsos alarmes causados<br />
pela oxidação dos mesmos;<br />
• No fim da instalação verifique sempre o funcionamento correcto do equipamento<br />
e da instalação no seu conjunto;<br />
• O instalador deve certificar-se de que as informações para o utilizador, se previstas,<br />
estão presentes e são entregues;<br />
• Antes de efectuar qualquer operação de limpeza ou de manutenção, desligue o<br />
dispositivo da rede de alimentação eléctrica; no caso de dispositivos alimentados<br />
com tensão de rede corte a alimentação, abrindo o interruptor situado antes dos<br />
mesmos;<br />
• No caso de a<strong>va</strong>ria e/ou mau funcionamento de um dispositivo, desligue-o da<br />
alimentação e não o abra;<br />
• Para a eventual reparação dirija-se apenas a um centro de assistência técnica<br />
autorizado pelo fabricante e utilize sempre as peças de reposição fornecidas pela<br />
<strong>Bpt</strong> s.p.a.;<br />
O aparelho deve ser destinado unicamente ao uso para o qual foi<br />
expressamente concebido.<br />
O não cumprimento dos conselhos enumerados acima pode comprometer<br />
a segurança do aparelho.<br />
O fabricante não pode, em todo o caso, ser considerado responsável por<br />
eventuais danos decorrentes de usos impróprios, errados e irracionais.<br />
ELIMINAÇÃO<br />
Assegure-se que o material da embalagem não seja abandonado no ambiente,<br />
mas eliminado seguindo as normas vigentes no país de uso do produto.<br />
No fim do ciclo de vida do aparelho evite que o mesmo seja abandonado no ambiente.<br />
A eliminação do equipamento deve ser efectuada respeitando as normas<br />
vigentes e privilegiando a reciclagem dos seus componentes. Nos componentes,<br />
para os quais é prevista a eliminação com reciclagem, está indicado o símbolo<br />
e a sigla do material.<br />
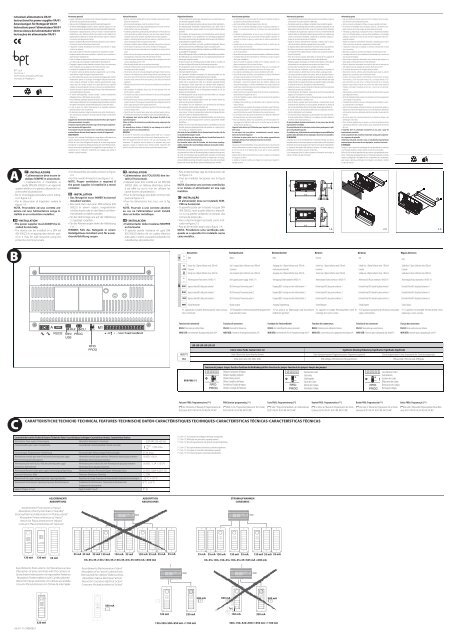
A<br />
IT - INSTALLAZIONE<br />
• L’alimentatore deve essere installato<br />
SEMPRE in orizzontale.<br />
• L’apparecchio è installabile su<br />
guida DIN (EN 50022) in un apposito<br />
quadro elettrico o a parete utilizzando i coprimorsetti<br />
di protezione.<br />
• Per lo smontaggio procedere come indicato<br />
in figura 2-3.<br />
• Per le dimensioni di ingombro vedere la<br />
figura 1-A.<br />
NOTA. Provvedere ad una corretta areazione<br />
nel caso l’alimentatore venga installato<br />
in un contenitore metallico.<br />
EN - INSTALLATION<br />
• The power supplier must ALWAYS be installed<br />
horizontally.<br />
• The device can be installed on a DIN rail<br />
(EN 50022) in an appropriate electric panel<br />
or it may be wall-mounted using the<br />
protective terminal covers.<br />
• For disassembly, proceed as shown in figure<br />
2-3.<br />
• For the overall dimensions see figure 1-A.<br />
NOTE. Proper ventilation is required if<br />
the power supplier is installed in a metal<br />
container.<br />
DE - INSTALLATION<br />
• Das Netzgerät muss IMMER horizontal<br />
installiert werden.<br />
• Das Gerät kann auf einer DIN-Schiene (EN<br />
50022) in einem eigens vorgesehenen<br />
Schaltschrank oder an der Wand mit Klemmendeckeln<br />
installiert werden.<br />
• Für die Demontage wie auf der Abbildung<br />
2-3 gezeigt vorgehen.<br />
• Für die Abmessungen siehe die Abbildung<br />
1-A.<br />
HINWEIS Falls das Netzgerät in einem<br />
Metallgehäuse installiert wird, für ausreichende<br />
Belüftung sorgen.<br />
FR - INSTALLATION<br />
• L’alimentateur doit TOUJOURS être installé<br />
à l’horizontale.<br />
• L’appareil peut être installé sur rail DIN (EN<br />
50022) dans un tableau électrique prévu<br />
à cet effet ou sur le mur en utilisant les<br />
cache-bornes de protection.<br />
• Pour le démontage, procéder comme indiqué<br />
à la figure 2-3.<br />
• Pour les dimensions hors tout, voir la fig.<br />
1-A.<br />
NOTE. Pourvoir à une correcte aération<br />
au cas où l’alimentateur serait installé<br />
dans un boîtier métallique.<br />
ES - INSTALACIÓN<br />
• El alimentador debe instalarse SIEMPRE<br />
en horizontal.<br />
• El aparato puede instalarse en guía DIN<br />
(EN 50022) dentro de un cuadro eléctrico<br />
adecuado o sobre una pared utilizando los<br />
cubrebornes de protección.<br />
• Para el desmontaje, siga las indicaciones de<br />
la figura 2-3.<br />
• Para las medidas necesarias vea la figura<br />
1-A.<br />
NOTA. Garantice una correcta ventilación<br />
si se instala el alimentador en una caja<br />
metálica.<br />
PT - INSTALAÇÃO<br />
• O alimentador deve ser instalado SEM-<br />
PRE na horizontal.<br />
• O aparelho pode ser instalado na guia DIN<br />
(EN 50022), num quadro eléctrico específico<br />
ou na parede utilizando as tampas dos<br />
bornes de protecção.<br />
• Para a desmontagem proceda como indicado<br />
na figura 2-3.<br />
• Para as dimensões totais veja a figura 1-A.<br />
NOTA. Providencie uma ventilação adequada<br />
se o aparelho for instalado numa<br />
caixa metálica.<br />
106<br />
145<br />
210<br />
210<br />
A<br />
B<br />
43,5<br />
7,5 57<br />
64,5<br />
45<br />
1-A 2-A<br />
3<br />
2<br />
1<br />
3-A<br />
B<br />
M1 A<br />
Morsettiere Terminal boards Klemmenbretter Borniers Borneras Réguas de bornes<br />
~ Rete Mains Netz Secteur red<br />
rede<br />
~<br />
Uscita Aux 1 Open Collector max 100 mA Aux 1 output Open Collector max 100 mA Ausgang Aux 1 Open Collector max 100 mA Sortie Aux 1 Open Collector max 100 mA Salida Aux 1 Open Collector máx. 100 mA Saída Aux 1 Open Collector máx 100 mA<br />
+12V Comune Common Gemeinsamer Kontakt Commun Común Comum<br />
Uscita Aux 2 Open Collector max 100 mA Aux 2 output Open Collector max 100 mA Ausgang Aux 2 Open Collector max 100 mA Sortie Aux 2 Open Collector max 100 mA Salida Aux 2 Open Collector máx. 100 mA Saída Aux 2 Open Collector máx 100 mA<br />
+<br />
–<br />
Alimentazione Posti esterni 18 VDC (*) Entry panel power supply 18 VDC (*) Versorgung Außenstationen18 VDC (*) Alimentation Postes extérieurs 18 VDC (*) Alimentación Placas exteriores 18 VDC (*) Alimentação Placas botoneiras 18 VDC (*)<br />
BIN1 Ingresso linea BUS dal posto esterno 1 BUS line input from entry panel 1 Eingang BUS-Leitung von der Außenstation 1 Entrée ligne BUS du poste extérieur 1 Entrada línea BUS desde la placa exterior 1 Entrada linha BUS da placa botoneira 1<br />
BIN2 Ingresso linea BUS dal posto esterno 2 BUS line input from entry panel 2 Eingang BUS-Leitung von der Außenstation 2 Entrée ligne BUS du poste extérieur 2 Entrada línea BUS desde la placa exterior 2 Entrada linha BUS da placa botoneira 2<br />
BIN3 Ingresso linea BUS dal posto esterno 3 BUS line input from entry panel 3 Eingang BUS-Leitung von der Außenstation 3 Entrée ligne BUS du poste extérieur 3 Entrada línea BUS desde la placa exterior 3 Entrada linha BUS da placa botoneira 3<br />
BOUT Uscita Montante Busbar output Ausgang Trägerleitung Sortie Montant Salida Bajante Saída Coluna<br />
(*) L’apparecchio è protetto elettronicamente contro sovraccarichi<br />
e cortocircuiti.<br />
(*) The appliance is electronically protected against overloads<br />
and short circuits.<br />
(*) Das Gerät ist vor Überlastungen und Kurzschlüssen<br />
elektronisch geschützt.<br />
(*) L’appareil est protégé électroniquement contre les<br />
surcharges et les courts-circuits.<br />
(*) El aparato incluye protección electrónica contra sobrecargas<br />
y cortocircuitos.<br />
(*) O aparelho está protegido electronicamente contra<br />
sobrecargas e curtos-circuitos.<br />
A<br />
RS232<br />
DL2 DL1<br />
MINI PROG<br />
USB<br />
+<br />
–<br />
M1<br />
+12V BIN1 BIN2 BIN3 BOUT<br />
Funzione dei connettori Function of connectors Funktion der Steckverbinder Fonction des connecteurs Función de los conectores Função dos conectores<br />
RS232: Riser<strong>va</strong>to per utilizzi futuri. RS232: Reserved for future use. RS232: Für zukünftige Benutzung reserviert. RS232 : Réservé pour utilisations futures. RS232: Reser<strong>va</strong>do para usos futuros. RS232: Reser<strong>va</strong>do para usos futuros.<br />
MINI USB: Connettore per la programmazione da PC MINI USB: Connector for programming from a PC MINI USB: Steckverbinder für die Programmierung mit PC MINI USB : Connecteur pour la programmation depuis PC MINI USB: Conector para la programación desde PC MINI USB: Conector para a programação com PC<br />
RFID<br />
PROG<br />
LED-LED-LED-LED-LED-LED<br />
Colore-Colour-Farbe-Couleur-Color-Cor<br />
Significato-Meaning-Bedeutung-Signification-Significado-Significado<br />
DL1 (**) Giallo-Yellow-Gelb-Jaune-Amarillo-Amarelo Stato di programmazione-Programming status-Programmierungsstand État de programmation-Estado de programación-Estado de programação<br />
DL2 Verde-Green-Grün-Vert-Verde-Verde USB collegata-USB connected-USB angeschlossen USB raccordée-USB conectado-USB ligada<br />
Funzione dei jumper-Jumper function-Funktion der Verbindungsdrähte-Fonction des jumper-Función de los jumpers-Função dos jumpers<br />
A<br />
RFID PROG (**)<br />
RFID<br />
PROG<br />
+<br />
– M1<br />
Default-Condizione di Riposo<br />
Default-Standby condition<br />
Default-Ruhezustand<br />
Défaut-Condition de Repos<br />
Por defecto-Estado de reposo<br />
Default-Condição de Repouso<br />
A<br />
RFID<br />
PROG<br />
+<br />
– M1<br />
Inserimento Codici<br />
Code entry<br />
Codeeingabe<br />
Saisie des Codes<br />
Adición de Códigos<br />
Introdução Códigos<br />
A<br />
RFID<br />
PROG<br />
+<br />
– M1<br />
Cancellazione Codici<br />
Code deletion<br />
Löschen der Codes<br />
Effacement des Codes<br />
Eliminación de Códigos<br />
Eliminação Códigos<br />
Pulsante PROG: Programmazione (**) PROG button: programming (**) Taste PROG: Programmierung (**) Bouton PROG : Programmation (**) Botón PROG: Programación (**) Botão PROG: Programação (**)<br />
(**) Fare riferimento al “Manuale di Programmazione dei<br />
Posti Esterni DC/<strong>01</strong>-DVC/<strong>01</strong>-DC/<strong>01</strong> ME-DVC/<strong>01</strong> ME”.<br />
(**) Refer to the “Programming Manual for Entry Panels<br />
DC/<strong>01</strong>-DVC/<strong>01</strong>-DC/<strong>01</strong> ME-DVC/<strong>01</strong> ME”.<br />
(**) Siehe “Programmierhandbuch der Außenstationen<br />
DC/<strong>01</strong>-DVC/<strong>01</strong>-DC/<strong>01</strong> ME-DVC/<strong>01</strong> ME”.<br />
(**) Se référer au “Manuel de Programmation des Postes<br />
Extérieurs DC/<strong>01</strong>-DVC/<strong>01</strong>-DC/<strong>01</strong> ME-DVC/<strong>01</strong> ME”.<br />
(**) Consulte el “Manual de Programación de las Placas<br />
Exteriores DC/<strong>01</strong>-DVC/<strong>01</strong>-DC/<strong>01</strong> ME-DVC/<strong>01</strong> ME”.<br />
(**) Consulte o “Manual de Programação das Placas Botoneiras<br />
DC/<strong>01</strong>-DVC/<strong>01</strong>-DC/<strong>01</strong> ME-DVC/<strong>01</strong> ME”.<br />
C<br />
CARATTERISTICHE TECNICHE-TECHNICAL FEATURES-TECHNISCHE DATEN-CARACTÉRISTIQUES TECHNIQUES-CARACTERÍSTICAS TÉCNICAS-CARACTERÍSTICAS TÉCNICAS<br />
Caratteristiche tecniche-Technical features-Technische Daten-Caractéristiques techniques-Características técnicas-Características técnicas<br />
Alimentazione-Power supply-Stromversorgung Alimentation-Alimentación-Alimentação 230 VAC 50÷60 Hz<br />
Corrente assorbita-Input current-Stromaufnahme<br />
Courant absorbé-Corriente absorbida-Corrente consumida<br />
I max =350 mA AC<br />
AC<br />
Potenza dissipata-Dissipated power-Verlustleistung Puissance dissipée-Potencia disipada-Potência dissipada 25 W max<br />
Alimentazione nominale posti esterni-Entry terminal nominal power supply-<br />
Nennstromversorgung Außenstationen<br />
Alimentazione posti esterni di picco-Peak entry terminal power supply-<br />
Spitzenstrom Außenstationen<br />
Alimentation nominale postes extérieurs-Alimentación nominal placas exteriores-<br />
Alimentação nominal das placas botoneiras<br />
Alimentation postes extérieurs de crête-Alimentación de pico placas exteriores-<br />
Alimentação de pico das placas botoneiras<br />
18 VDC-0,6 A<br />
18 VDC-1,1A
V+<br />
V–<br />
V+<br />
V–<br />
V+<br />
V–<br />
V+<br />
V–<br />
–<br />
+<br />
SEC<br />
230V 50Hz 18V 10VA<br />
PRI<br />
D<br />
NVMKIT/X1<br />
SW2<br />
BUS<br />
2<br />
M1<br />
A<br />
MITHO<br />
M1<br />
AL<br />
–<br />
+<br />
1<br />
B<br />
B<br />
A<br />
SW1<br />
SW1<br />
LOCAL<br />
CN1<br />
CN1<br />
M1<br />
B<br />
-<br />
M2<br />
B<br />
MM<br />
VAS/100MH<br />
230V<br />
–<br />
+ 18V<br />
+ 18V –<br />
230V<br />
SW4<br />
RS232<br />
A<br />
VA/<strong>01</strong><br />
CN2<br />
M1<br />
+12V<br />
+<br />
-<br />
BIN1<br />
BIN2<br />
BIN3<br />
BOUT<br />
DVC/<strong>01</strong><br />
M1<br />
-<br />
+<br />
BOUT<br />
M2<br />
-<br />
-<br />
-<br />
2<br />
2<br />
XDV/304<br />
SW0<br />
1 2<br />
OUT<br />
SW2<br />
12V<br />
SW3<br />
VA/<strong>01</strong><br />
3 4<br />
IN<br />
SW4<br />
DVC/<strong>01</strong><br />
BOUT<br />
-<br />
+<br />
M1<br />
DVC/<strong>01</strong><br />
M1<br />
-<br />
+<br />
BOUT<br />
VA/<strong>01</strong><br />
VAS/100.30<br />
4<br />
4<br />
2 2<br />
YKP/3<strong>01</strong>+YV<br />
B<br />
+<br />
-<br />
+<br />
-<br />
3<br />
M1<br />
SW3<br />
4<br />
OPHERA<br />
(OPHERA/B)<br />
M1<br />
B<br />
+<br />
-<br />
AL<br />
SW2<br />
BUS<br />
SW1<br />
4<br />
12V<br />
M2<br />
-<br />
-<br />
-<br />
M2<br />
-<br />
-<br />
-<br />
12V<br />
LOCAL<br />
SW9<br />
BUS<br />
SW1<br />
VAS/100.30<br />
LOCAL<br />
B<br />
B<br />
A<br />
1<br />
212<br />
G<br />
VA/<strong>01</strong><br />
2<br />
C<br />
VA/<strong>01</strong><br />
VA/<strong>01</strong><br />
B<br />
4<br />
4<br />
4<br />
VSC/<strong>01</strong><br />
RS232<br />
A<br />
VA/<strong>01</strong><br />
CN2<br />
M1<br />
+12V<br />
+<br />
-<br />
BIN1<br />
BIN2<br />
BIN3<br />
BOUT<br />
DVC/<strong>01</strong><br />
M1<br />
-<br />
+<br />
BOUT<br />
M2<br />
-<br />
-<br />
L1 L2 L3<br />
Lb<br />
La<br />
Lc<br />
+<br />
–<br />
+<br />
–<br />
+<br />
–<br />
+<br />
–<br />
C<br />
VSC/<strong>01</strong><br />
-<br />
12V<br />
XDV/304<br />
Ld<br />
SW4<br />
ON<br />
1 2 3<br />
V4<br />
V3<br />
V2<br />
V1<br />
-<br />
-<br />
-<br />
-<br />
B<br />
+<br />
-<br />
–<br />
+<br />
–<br />
+<br />
–<br />
+<br />
DVC/<strong>01</strong><br />
M1<br />
-<br />
+<br />
BOUT<br />
M2<br />
-<br />
-<br />
-<br />
Distanze<br />
Distances<br />
Abstände<br />
Distances<br />
Distancias<br />
Distâncias<br />
VCM/2D<br />
L1, L2, L3 ≤100 m<br />
L1+L2+L3<br />
≤300 m<br />
Distanze<br />
Distances<br />
Abstände<br />
Le<br />
Distances<br />
Distancias<br />
Distâncias<br />
VA/<strong>01</strong><br />
12V<br />
La+Le<br />
VCM/1D<br />
≤100 m<br />
Lb+Le<br />
≤100 m<br />
Lc+Le<br />
≤100 m<br />
Ld+Le<br />
≤100 m<br />
Distanze<br />
Distances<br />
Abstände<br />
Distances<br />
Distancias<br />
Distâncias<br />
La+Le+L1(L2, L3)<br />
≤150 m<br />
Lb+Le+L1(L2, L3)<br />
≤150 m<br />
Lc+Le+ L1(L2, L3)<br />
≤150 m<br />
Ld+Le+ L1(L2, L3)<br />
≤150 m<br />
La+Lb+Lc+Ld+Le+L1+L2+L3<br />
≤600 m<br />
E<br />
Programmazione di un gruppo intercomunicante<br />
Programming an intercom group<br />
Programmierung einer Teilnehmergruppe<br />
Programmation d’un groupe d’intercommunication<br />
Programación de un grupo intercomunicante<br />
Programação de um grupo intercomunicador<br />
Disabilitazione della funzione intercomunicante<br />
Disabling the intercom function<br />
Abschaltung der Teilnehmerfunktion<br />
Désacti<strong>va</strong>tion de la fonction d’intercommunication<br />
Deshabilitación de la función intercomunicante<br />
Desabilitação da função intercomunicador<br />
A<br />
A<br />
La programmazione del gruppo intercomunicante deve essere effettuata SOLO SUCCESSIVAMENTE all’assegnazione<br />
a tutti i deri<strong>va</strong>ti interni del tasto o del codice di chiamata.<br />
The intercom group must be programmed ONLY AFTER assigning the key or the call code to all the internal<br />
extensions.<br />
Die Programmierung der Teilnehmergruppe kann ERST NACH der Zuordnung aller Innensprechstellen der<br />
Taste oder des Rufcodes durchgeführt werden.<br />
VA/<strong>01</strong><br />
A<br />
<br />
VA/<strong>01</strong><br />
<br />
<br />
A<br />
<br />
beep<br />
VA/<strong>01</strong><br />
VA/<strong>01</strong><br />
<br />
>25’’<br />
PROG<br />
25’’<br />
PROG<br />
Esempi Di Collegamento<br />
Connection examples<br />
Anschlussbeispiele<br />
PROG<br />
PROG<br />
2<br />
2<br />
+<br />
– M1<br />
RFID<br />
PROG<br />
+<br />
– M1<br />
RFID<br />
PROG<br />
+<br />
– M1<br />
RFID<br />
PROG<br />
VA/<strong>01</strong> VA/<strong>01</strong><br />
- Premere e mantenere premuto il tasto PROG dell’alimentatore per almeno 25 secondi finchè il led PROG lampeggia in modo veloce . Posizionare il<br />
jumper RFID PROG dell’alimentatore in posizione “–” per almeno 20 secondi. Passato tale tempo, si uscirà dalla fase di programmazione.<br />
Per riabilitare la funzione medesima è sufficiente ripetere la procedura di programmazione precedentemente descritta.<br />
- Press and hold down the power supplier PROG key for at least 25 seconds until the PROG LED starts to flash quickly . Place the power supply RFID PROG jumper<br />
in position “–” for at least 20 seconds. The programming phase will end after this amount of time has passed.<br />
To reacti<strong>va</strong>te the function, simply repeat the previously described programming procedure.<br />
- Die Taste PROG des Netzgerätes für mindestens 25 Sekunden gedrückt halten bis die Led PROG schnell zu blinken beginnt . Den Verbindungsdraht<br />
RFID PROG des Netzgerätes für mindestens 20 Sekunden in Stellung “–” bringen. Nach Versteichen dieser Zeit, verlässt man die Programmierung.<br />
Um die gleiche Funktion wieder zuzuschalten, genügt es, den zuvor beschriebenen Programmierablauf zu wiederholen.<br />
- Appuyer sur la touche PROG de l’alimentateur et la maintenir enfoncée pendant au moins 25 secondes jusqu’à ce que la led PROG clignote rapidement . Positionner<br />
le jumper RFID PROG de l’alimentateur en position “–” pendant au moins 20 secondes. Une fois ce délai écoulé, on sortira de la phase de programmation.<br />
Pour réactiver cette fonction, il suffit de répéter la procédure de programmation décrite précédemment.<br />
- Pulse y mantenga pulsado el botón PROG del alimentador durante al menos 25 segundos, hasta que el led PROG parpadee rápidamente . Coloque<br />
el jumper RFID PROG del alimentador en posición “–” durante al menos 20 segundos. Transcurrido este tiempo se saldrá del modo de programación.<br />
Para volver a habilitar la función basta repetir el procedimiento de programación descrito antes.<br />
- Prima e mantenha premida a tecla PROG do alimentador durante pelo menos 25 segundos até o led PROG piscar de modo rápido . Coloque o jumper RFID<br />
PROG do alimentador na posição “–” durante pelo menos 20 segundos. Passado esse tempo, sai da fase de programação. Para reabilitar esta função basta<br />
repetir o processo de programação descrito anteriormente.<br />
Al termine riposizionare il jumper RFID PROG in posizione di riposo : la procedura NON termina automaticamente!<br />
At the end, return the RFID PROG jumper to its standby position : the procedure will NOT end automatically!<br />
Am Ende den Verbindungsdraht RFID PROG wieder in der Ruhestellung positionieren: der Vorgang endet NICHT automatisch!<br />
À la fin repositionner le jumper RFID PROG en position de repos : la procédure NE s’arrête PAS automatiquement!<br />
Al concluir, vuel<strong>va</strong> a colocar el jumper RFID PROG en posición de reposo : ¡el procedimiento NO concluye automáticamente!<br />
No fim recoloque o jumper RFID PROG na posição de repouso : o processo NÃO termina automaticamente!<br />
2<br />
2<br />
2<br />
2<br />
VSE/3<strong>01</strong><br />
VA/<strong>01</strong> VA/<strong>01</strong><br />
Exemples De Raccordement<br />
Ejemplos De Conexión<br />
Exemplos De Ligação<br />
A A B A VSE/3<strong>01</strong> VSE/3<strong>01</strong><br />
VSE/3<strong>01</strong><br />
BVSE/3<strong>01</strong><br />
2<br />
VA/<strong>01</strong><br />
2<br />
2<br />
VSE/3<strong>01</strong><br />
VA/<strong>01</strong><br />
VA/<strong>01</strong> VA/<strong>01</strong><br />
4<br />
4<br />
2<br />
2<br />
VA/<strong>01</strong><br />
4<br />
2<br />
4<br />
4<br />
4<br />
4<br />
4<br />
4<br />
Una volta che un deri<strong>va</strong>to interno stato incluso in un gruppo intercomunicante mediante l’assegnazione<br />
del tasto di chiamata, non è più possibile escluderlo dal gruppo medesimo. Qualora<br />
invece si voglia cambiare il tasto di chiamata di un deri<strong>va</strong>to interno già programmato come intercomunicante<br />
ovvero aggiungere al gruppo nuovi deri<strong>va</strong>ti interni, è sufficiente ripetere la sequenza<br />
di operazioni descritta per “Programmazione di un gruppo intercomunicante”.<br />
Once an internal extension has been included in an intercom group through the assignment<br />
of a call key, it can no longer be excluded from the group. If you want to change the call key for<br />
an internal extension that is already programmed as intercommunicating or add new internal<br />
extensions to the group, simply repeat the sequence of steps described for “Programming an<br />
intercom group”.<br />
Une fois qu’un poste intérieur a été inclus dans un groupe d’intercommunication par l’attribution<br />
de la touche d’appel, il n’est plus possible de l’exclure de ce groupe. Si, en re<strong>va</strong>nche,<br />
l’on souhaite changer la touche d’appel d’un poste intérieur déjà programmé comme en intercommunication<br />
ou bien ajouter au groupe de nouveaux postes intérieurs, il suffit de répéter la<br />
séquence d’opérations décrite pour la “Programmation d’un groupe d’intercommunication”.<br />
Wenn eine Innensprechstelle mit Zuordnung der Ruftaste in eine Teilnehmergruppe aufgenommen<br />
wurde, kann sie von dieser Gruppe nicht mehr ausgeschlossen werden. Wenn man die<br />
Ruftaste einer bereits als Teilnehmer programmierten Innensprechstelle ändern will, genügt es<br />
die Reihenfolge der unter “Programmierung einer Teilnehmergruppe” beschriebenen Vorgänge<br />
zu wiederholen.<br />
Una vez incluido un deri<strong>va</strong>do interno en un grupo intercomunicante mediante la asignación<br />
del botón de llamada, ya no se puede excluirlo de ese grupo. Si se quisiese cambiar el botón de<br />
llamada de un deri<strong>va</strong>do interno ya programado como intercomunicante, o bien añadir al grupo<br />
nuevos deri<strong>va</strong>dos internos, basta repetir la secuencia de operaciones descrita para la “Programación<br />
de un grupo intercomunicante”.<br />
Após um deri<strong>va</strong>do interno ter sido incluído num grupo intercomunicador com a atribuição da<br />
tecla de chamada, deixa de ser possível excluí-lo desse mesmo grupo. Se desejar mudar a tecla<br />
de chamada de um deri<strong>va</strong>do interno já programado como intercomunicador ou seja adicionar<br />
ao grupo novos deri<strong>va</strong>dos internos, é suficiente repetir a sequência de operações descrita para<br />
“Programação de um grupo intercomunicador”.<br />
Tramite l’alimentatore VA/<strong>01</strong> è possibile programmare un gruppo di deri<strong>va</strong>ti interni intercomunicanti con la procedura precedentemente descritta. Qualora ci sia l’esigenza di configurare più di un gruppo<br />
intercomunicante è necessario ricorrere all’utilizzo dei dispositivi VSE/3<strong>01</strong>. Non è possibile configurare contemporaneamente un gruppo intercomunicante con VA/<strong>01</strong> ed altri con VSE/3<strong>01</strong>.<br />
A group of intercommunicating internal extensions can be programmed with the VA/<strong>01</strong> power supplier following the previously described procedure. If it is necessary to configure more than one intercom group,<br />
VSE/3<strong>01</strong>devices must be used. It is not possible to configure one intercom group with VA/<strong>01</strong> and other groups with VSE/3<strong>01</strong> at the same time.<br />
Über das Netzgerät VA/<strong>01</strong> kann man mit der zuvor beschriebenen Verfahrensweise eine Gruppe teilnehmender Innensprechstellen programmieren. Wenn mehr als eine Teilnehmergruppe konfiguriert<br />
werden soll, muss auf den Gebrauch der Vorrichtungen VSE/3<strong>01</strong> zurückgegriffen werden. Die gleichzeitige Konfiguration einer Teilnehmergruppe mit VA/<strong>01</strong> und anderer Gruppen mit VSE/3<strong>01</strong>ist nicht<br />
möglich.<br />
À l’aide de l’alimentateur VA/<strong>01</strong>, il est possible de programmer un groupe de postes intérieurs en intercommunication avec la procédure décrite précédemment. S’il y a l’exigence de configurer plus d’un groupe d’intercommunication,<br />
il faut recourir à l’utilisation des dispositifs VSE/3<strong>01</strong>. Il n’est pas possible de configurer en même temps un groupe d’intercommunication avec VA/<strong>01</strong> et d’autres avec VSE/3<strong>01</strong>.<br />
Mediante el alimentador VA/<strong>01</strong> se puede programar un grupo de deri<strong>va</strong>dos internos intercomunicantes con el procedimiento descrito antes. Si se necesitase configurar más de un grupo intercomunicante,<br />
será necesario utilizar los dispositivos VSE/3<strong>01</strong>. No se pueden configurar simultáneamente un grupo intercomunicante con VA/<strong>01</strong> y otros con VSE/3<strong>01</strong>.<br />
Através do alimentador VA/<strong>01</strong> é possível programar um grupo de deri<strong>va</strong>dos internos intercomunicadores com o processo descrito anteriormente. Se for necessário configurar mais do que um grupo intercomunicador<br />
é preciso usar os dispositivos VSE/3<strong>01</strong>. Não é possível configurar contemporaneamente um grupo intercomunicador com VA/<strong>01</strong> e outros com VSE/3<strong>01</strong>.


