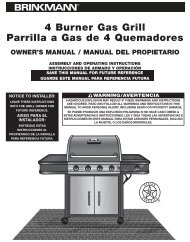
4 Burner Gas Grill Parrilla a Gas de 4 Quemadores - Brinkmann
4 Burner Gas Grill Parrilla a Gas de 4 Quemadores - Brinkmann
4 Burner Gas Grill Parrilla a Gas de 4 Quemadores - Brinkmann
- No tags were found...

You also want an ePaper? Increase the reach of your titles
YUMPU automatically turns print PDFs into web optimized ePapers that Google loves.
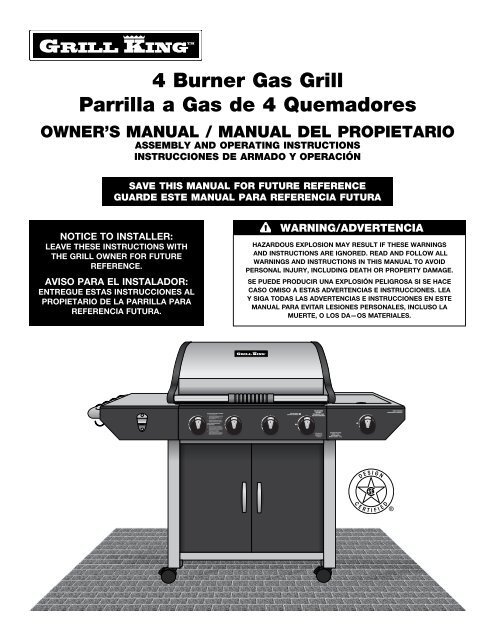
4 <strong>Burner</strong> <strong>Gas</strong> <strong>Grill</strong><strong>Parrilla</strong> a <strong>Gas</strong> <strong>de</strong> 4 <strong>Quemadores</strong>OWNER’S MANUAL / MANUAL DEL PROPIETARIOASSEMBLY AND OPERATING IN STRUC TIONSINSTRUCCIONES DE ARMADO Y OPERACIÓNSAVE THIS MANUAL FOR FUTURE REFERENCEGUARDE ESTE MANUAL PARA REFERENCIA FUTURANOTICE TO INSTALLER:LEAVE THESE INSTRUCTIONS WITHTHE GRILL OWNER FOR FUTUREREFERENCE .AVISO PARA EL INSTALADOR:ENTREGUE ESTAS INSTRUCCIONES ALPROPIETARIO DE LA PARRILLA PARAREFERENCIA FUTURA.WARNING/ADVERTENCIAHAZARDOUS EXPLOSION MAY RESULT IF THESE WARNINGSAND INSTRUCTIONS ARE IGNORED. READ AND FOLLOW ALLWARNINGS AND INSTRUCTIONS IN THIS MANUAL TO AVOIDPERSONAL INJURY, INCLUDING DEATH OR PROPERTY DAMAGE.SE PUEDE PRODUCIR UNA EXPLOSIÓN PELIGROSA SI SE HACECASO OMISO A ESTAS ADVERTENCIAS E INSTRUCCIONES. LEAY SIGA TODAS LAS ADVERTENCIAS E INSTRUCCIONES EN ESTEMANUAL PARA EVITAR LESIONES PERSONALES, INCLUSO LAMUERTE, O LOS DA—OS MATERIALES.
IMPORTANT SAFETYWARNINGSWE WANT YOU TO ASSEMBLE AND USE YOUR GRILL AS SAFELY AS POSSIBLE.THE PURPOSE OF THIS SAFETY ALERT SYMBOL IS TO ATTRACT YOUR ATTENTION TOPOSSIBLE HAZARDS AS YOU ASSEMBLE AND USE YOUR GRILL.WHEN YOU SEE THE SAFETY ALERT SYMBOLPAY CLOSE ATTENTION TO THE INFORMATION WHICH FOLLOWS!READ ALL SAFETY WARNINGS AND INSTRUCTIONS CAREFULLYBEFORE ASSEMBLING AND OPERATING YOUR GRILL.IF YOU SMELL GAS:DANGER1. Shut off gas to the appliance.2. Extinguish any open flame.3. Open lid.4. If odor continues, keep away from the appliance and immediately call your gas supplier or yourfire <strong>de</strong>partment.WARNING1. Do not store or use gasoline or other flammable liquids or vapors in the vicinity of this or anyother appliance.2. An LP cylin<strong>de</strong>r not connected for use shall not be stored in the vicinity of this or any otherappliance.DANGERa) Do not store a spare LP cylin<strong>de</strong>r un<strong>de</strong>r or near this appliance.b) Never fill the cylin<strong>de</strong>r beyond 80% full.c) If the information in (a) and (b) is not followed exactly, a fire causing <strong>de</strong>ath orserious injury may occur.1
TABLE OF CONTENTS:General Warnings. .............................................. 3-4LP <strong>Gas</strong> Cylin<strong>de</strong>r (Tank) Specifications and Installation .................. 4-6Hose & Regulator Specifications and Installation ...................... 6-7Leak Testing. .................................................. 7-8Pre-start Check List ............................................... 9Lighting Instructions. ........................................... 9-10Operating the <strong>Grill</strong> ............................................ 11-12Using Other Features of the <strong>Grill</strong> .................................... 12Proper Care and Maintenance. .................................. 13-15Transporting and Storage ......................................... 15Trouble Shooting ............................................. 16-17<strong>Grill</strong> Cooking Tips. ............................................... 17Assembly Instructions ......................................... 18-27Warranty Information ..................................... Back CoverDANGER:WARNING:CAUTION:Indicates an imminently hazardous situation which, if not avoi<strong>de</strong>d, will result in <strong>de</strong>ath orserious injury.Be alert to the possibility of serious bodily injury if the instructions are not followed. Besure to read and carefully follow all of the messages.Indicates a potentially hazardous situation which, if not avoi<strong>de</strong>d, may result in minor ormo<strong>de</strong>rate injury.CALIFORNIA PROPOSITION 65 WARNINGThis product contains chemicals, including lead in the brass of certain component parts, that areknown to the State of California to cause cancer, and birth <strong>de</strong>fects or other reproductive harm.Wash hands after handling. When used, this product emits fuel combustion chemicals that are knownto the State of California to cause cancer, and birth <strong>de</strong>fects or other reproductive harm.Follow all instructions in this manual and use only in well ventilated, outdoor area.FOR COVERS, ACCESSORIES AND OTHER PRODUCTS, PLEASE VISIT US ONLINE AT:2
GENERAL WARNINGS:WARNING• Leak test all connections before first use, even if grill was purchased fully assembled and aftereach tank refill. Check the propane tank rubber seal for damage.• Always check the grill and propane tank prior to each use as indicated in the “Checking forLeaks” & “Pre-Start Check List” sections of this manual.• Never use natural gas in a unit <strong>de</strong>signed for liquid propane gas.• Never use charcoal, lava rocks or wood briquets in a gas grill. Flavoring chips must becontained in a metal smoking box to contain ash and prevent fires.• Ensure flames come out of all burner ports at each use. Spi<strong>de</strong>rs and insects like to build nestsin burner tubes. Blocked burner tubes can prevent gas flow to the burners and could result in aburner tube fire or fire beneath the grill.• Never check for leaks using a match or open flame.• Never use or store gasoline, lighter fluid, paint thinner, or other flammable vapors and liquids orcombustible materials in or near your grill.• DO NOT block ventilation areas in si<strong>de</strong>s, back or cart compartment of grill.• DO NOT cover cooking grates or other components with aluminum foil, as this blocksventilation and damage to grill or personal injury may occur.• Never place more than 15 pounds on the si<strong>de</strong> tables. DO NOT lean on the si<strong>de</strong> tables. DO NOTlift grill using si<strong>de</strong> tables.• Keep children and pets away from hot grill. DO NOT allow children to use or play near this grill.• DO NOT leave the grill unatten<strong>de</strong>d while ON or in use.• DO NOT allow the gas hose to come in contact with hot surfaces. Redirect the gas hose ifnecessary.• DO NOT allow grease or hot drippings to fall on hose and regulator assembly. If this occurs,turn gas supply OFF at once. Empty grease tray/cup and clean the hose and regulator assemblyand inspect for damage before use.• Never cook on the grill without the grease cup/tray in position.• Keep any electrical supply cords away from water or heated surfaces.• DO NOT use water on a grease fire. Closing the lid to extinguish a grease fire is not possible.Use type BC dry chemical fire extinguisher or smother with dirt, sand or baking soda.• DO NOT use while un<strong>de</strong>r the influence of drugs or alcohol.• FOR OUTDOOR USE ONLY. DO NOT operate indoors or in an enclosed area such as a garage,shed or breezeway.• Position your grill outdoors on a non-combustible level surface in a well ventilated location, asafe distance 10 ft. (3.1 m) from combustible materials, buildings and overhangs.• Apartment dwellers: Check with management and follow the requirements and fire co<strong>de</strong>s forusing an LP gas grill in your apartment complex. Only use outsi<strong>de</strong> on the ground (not on abalcony, patio, garage, etc) with a 15 foot (4.6 m) minimum clearance on all si<strong>de</strong>s from any wall,structure or combustible material.• Maintain a minimum clearance of 36 inches (91 cm) between all si<strong>de</strong>s of grill, <strong>de</strong>ck railings,walls or other combustible material. Not adhering to these clearances may prevent properventilation and can increase the risk of a fire and/or property damage, which could also resultin personal injury. DO NOT use grill un<strong>de</strong>r overhead unprotected combustible construction.• DO NOT use or install this grill in or on a recreational vehicle and/or boat.• DO NOT build this mo<strong>de</strong>l grill in any built-in or sli<strong>de</strong> in construction.• If a bristle brush is used to clean any of the cooking surfaces, ensure no loose bristles remainon the cooking surfaces prior to grilling as loose bristles may attach to food.• DO NOT store items in cart that can catch fire or damage your grill (such as swimming poolsupplies/chemicals, table cloth, wood chips).3
• <strong>Grill</strong> is hot when in use. To avoid burns:• DO NOT attempt to move the grill.• Block the wheels so the unit does not acci<strong>de</strong>ntally move.• Wear protective gloves or oven mitts.• DO NOT touch any hot grill surfaces.• DO NOT wear loose clothing or allow hair to come in contact with grill.• Not for commercial use. DO NOT use this grill for anything other than its inten<strong>de</strong>d purpose.USE CAUTION AND COMMON SENSE WHEN OPERATING YOUR GAS GRILL.FAILURE TO ADHERE TO THE SAFETY WARNINGS AND GUIDELINES IN THISMANUAL COULD RESULT IN SEVERE BODILY INJURY OR PROPERTY DAMAGE.SAVE THIS MANUAL FOR FUTURE REFERENCE.LP GAS CYLINDER (TANK) SPECIFICATIONS AND INSTALLATION:WARNING• ONLY connect this grill to a Type 1 cylin<strong>de</strong>r valve. The Type 1 valve can be i<strong>de</strong>ntified with thelarge external threads on the valve outlet.• DO NOT connect to a propane cylin<strong>de</strong>r exceeding a 20 lb. (9.1 kg) capacity.• DO NOT connect to a cylin<strong>de</strong>r that uses any other type of valve connection <strong>de</strong>vice.• Inspect the propane tank valve rubber seal for cracks, wear or <strong>de</strong>terioration prior to use. Adamaged rubber seal can cause a gas leak, possibly resulting in an explosion, fire or severebodily harm.• Turn off the cylin<strong>de</strong>r valve when your grill is not in use.• Handle the tank with care.• Always secure the cylin<strong>de</strong>r in an upright position.• Never connect an unregulated LP gas cylin<strong>de</strong>r to your grill.• DO NOT expose LP gas cylin<strong>de</strong>rs to excessive heat or ignition sources.• DO NOT store a spare LP gas cylin<strong>de</strong>r un<strong>de</strong>r or near your grill.• Allow only qualified LP gas <strong>de</strong>alers to fill or repair your LP gas cylin<strong>de</strong>r.• DO NOT allow the cylin<strong>de</strong>r to be filled beyond 80% capacity.• Read and follow all warnings and instructions that are on the cylin<strong>de</strong>r and that accompany thisproduct.DANGER• DO NOT store a spare LP gas cylin<strong>de</strong>r (full or empty) un<strong>de</strong>r or near your grill. This could causeexcess pressure to be expelled through the vapor relief valve resulting in fire, explosion, orsevere personal injury, including <strong>de</strong>ath.• Propane gas is heavier than air and will collect in low areas. Proper ventilation is extremelyimportant. Keep the ventilation opening(s) of the LP gas cylin<strong>de</strong>r enclosure free and clear fromobstructions and <strong>de</strong>bris.• DO NOT insert any foreign objects into the cylin<strong>de</strong>r valve outlet as this could damage therubber seal. Do not use propane tank with a damaged rubber seal. A damaged rubber seal cancause a gas leak, possibly resulting in explosion, fire, severe bodily harm, or <strong>de</strong>ath. Inspectrubber seal for cracks, wear or <strong>de</strong>terioration prior to use.• Always keep cylin<strong>de</strong>r (tank) in upright position during use, transit or storage.4
LP GAS CYLINDER (TANK) SPECIFICATIONS:LP gas cylin<strong>de</strong>r (not supplied with this grill)The LP (Liquid Propane) gas cylin<strong>de</strong>r specifically <strong>de</strong>signed to be used with this grill must be 12” (30.5cm) diameter x 18” (45.7 cm) tall and have a 20 lb. (9.1 kg) capacity incorporating a Type 1 cylin<strong>de</strong>r valveand an over-filling protection <strong>de</strong>vice (OPD).This grill is <strong>de</strong>signed to fit Worthington, Manchester or SMPC brand 20 lb. (9.1 kg) cylin<strong>de</strong>rs. Other brandDOT cylin<strong>de</strong>rs may fit this grill if the cylin<strong>de</strong>r has similar dimensions of the top and bottom rings.The installation of this appliance must be in accordance with:All applicable local co<strong>de</strong>s, or in the absence of local co<strong>de</strong>s, either:• National Fuel <strong>Gas</strong> Co<strong>de</strong> ANSI Z223.1 NFPA 54• Natural <strong>Gas</strong> and Propane Installation Co<strong>de</strong>: CAN/CGA B149.1• Natural <strong>Gas</strong> Installation Co<strong>de</strong>: CAN/CGA B149.1 (Canada)• Propane Installation Co<strong>de</strong>: CAN/CGA B149.2 (Canada)To check your local co<strong>de</strong>s, see your local LP gas <strong>de</strong>aler or natural gas company. This grill was notinten<strong>de</strong>d to be connected to a natural gas supply line. If an external electrical source is utilized, it must beelectrically groun<strong>de</strong>d in accordance with local co<strong>de</strong>s, or in the absence of local co<strong>de</strong>s, with the NationalElectrical Co<strong>de</strong>, ANSI/NFPA 70, or the Canadian Electrical Co<strong>de</strong>, CSA 22.1.When purchasing or exchanging a cylin<strong>de</strong>r for your gas grill, it must be constructed and marked inaccordance with the specifications for LP gas cylin<strong>de</strong>rs of the U.S. Department of Transportation (DOT)or the National Standard of Canada, CAN/CSA-B339 Cylin<strong>de</strong>rs, Spheres and Tubes for Transportationof Dangerous Goods; and Commission, as applicable; and provi<strong>de</strong>d with a listed over-filling prevention<strong>de</strong>vice (OPD), and provi<strong>de</strong>d with a cylin<strong>de</strong>r connection <strong>de</strong>vice compatible with the connection for outdoorcooking appliances.The cylin<strong>de</strong>r must also be equipped with:• A shut-off valve terminating in a Type 1 gas cylin<strong>de</strong>r valve outlet.• A Type 1 valve that prevents gas flow until a positive seal is obtained.• An arrangement for vapor withdrawal.• A collar to protect the cylin<strong>de</strong>r shut-off valve.• A safety relief <strong>de</strong>vice having direct communication with the vapor space of the cylin<strong>de</strong>r.• A listed over-filling prevention <strong>de</strong>vice (OPD).FILLING THE LP GAS CYLINDER (TANK):WARNING• Allow only qualified licensed LP gas <strong>de</strong>alers to properly fill or repair your LP gas cylin<strong>de</strong>r.• New tanks should be purged prior to filling; inform LP gas <strong>de</strong>aler if you are using a new tank.• DO NOT allow the cylin<strong>de</strong>r to be filled beyond 80% capacity. Over-filled tanks can create adangerous condition. Over-filled tanks can build-up pressure and cause the relief valve to expelpropane gas vapors. The vapor is combustible and if it comes in contact with a spark source orflame an explosion causing severe burns, bodily harm, or <strong>de</strong>ath could occur.• Always use a protective cylin<strong>de</strong>r cap when grill is not connected to cylin<strong>de</strong>r.• If you exchange a cylin<strong>de</strong>r with a qualified exchange program, the new cylin<strong>de</strong>r must havea Type 1 valve and an over-filling prevention <strong>de</strong>vice (OPD).• Inspect the propane tank valve rubber seal for cracks, wear or <strong>de</strong>terioration prior to use. Adamaged rubber seal can cause a gas leak, possibly resulting in an explosion, fire or severebodily harm.5
LP GAS CYLINDER (TANK) RUBBER SEAL INSPECTION:• Inspect the propane tank valve rubber seal for cracks, wearor <strong>de</strong>terioration prior to use. A damaged rubber seal cancause a gas leak, possibly resulting in an explosion, fire orsevere bodily harm.• Inspection should be done each time the propane tank isconnected to the grill, has been refilled, exchanged or hasnot been used for more than 60 days.• Do not use a propane tank with a damaged rubber seal.Exchange the tank or have the rubber seal replaced at aqualified propane filling station.GoodRubber SealDamagedRubber SealINSTALLING THE LP GAS CYLINDER (TANK) ONTO THE GRILL:1. Check that the cylin<strong>de</strong>r valve is closed by turning the knob clockwise. Inspect cylin<strong>de</strong>r valve rubber seal forcracks or <strong>de</strong>terioration. Do not use propane tank with damaged seal as a gas leak may occur.2. Place the cylin<strong>de</strong>r into the tank hol<strong>de</strong>r in the bottom of cabinet.3. Orient the cylin<strong>de</strong>r such that the valve opening faces the right si<strong>de</strong> of the grill, and the hose is not kinked ordamaged.4. Lift tank retention wire to secure cylin<strong>de</strong>r into tank hol<strong>de</strong>rTank Retention WireTank Hol<strong>de</strong>rHOSE & REGULATOR SPECIFICATION AND INSTALLATION:WARNING• DO NOT attempt to connect grill, as purchased for LP (propane) gas, to any other fuel supplysource such as a natural gas line.• DO NOT use any other pressure regulator/hose assembly other than the one supplied with yourgrill. Replacement pressure regulator/hose assembly must be part No 155-3412-0, which can beobtained by contacting customer service at 877-862-3449.• DO NOT attempt to adjust or repair a regulator. The regulator is <strong>de</strong>signed to operate at amaximum output pressure of 11 inches of water column (2.74 kPa).• Ensure the tank valve is CLOSED prior to connecting the LP gas cylin<strong>de</strong>r to your grill. Turn thevalve knob clockwise to properly close the valve. Read and follow all instructions and warningson the supply hose safety tags. Read and follow all warnings in this manual concerning the safeuse of LP gas cylin<strong>de</strong>rs and the hose and regulator before connecting cylin<strong>de</strong>r to grill. Read andfollow all warnings on the LP cylin<strong>de</strong>r.6
HOSE AND REGULATOR:Your grill is equipped with a Type 1 connection <strong>de</strong>vice with the following features:1. The system will not allow gas flow from the cylin<strong>de</strong>r until a positive connection to the valve has beenma<strong>de</strong>.Note:The cylin<strong>de</strong>r valve and all grill burner knobs must be turned OFF before any connection isma<strong>de</strong> or removed.2. A regulator flow limiting <strong>de</strong>vice, when activated, restricts the flow of gas to 10 cubic feet per hour. Ifthe flow limiting <strong>de</strong>vice is activated, perform Regulator Resetting Procedure.Note:If your grill will not get hot enough to cook, the flow limiting <strong>de</strong>vice may have been activated.CONNECTING HOSE AND REGULATOR:1. Inspect the propane tank valve rubber seal for cracks, wear or<strong>de</strong>terioration prior to use. A damaged rubber seal can cause a gasleak, possibly resulting in an explosion, fire or severe bodily harm.Do not use a propane tank with a damaged rubber seal.2. Attach or <strong>de</strong>tach regulator to the LP gas cylin<strong>de</strong>r only whencylin<strong>de</strong>r is at rest in tank hol<strong>de</strong>r.3. Check that the cylin<strong>de</strong>r valve is closed by turning the knobclockwise.4. Check that the grill’s burner control knobs are in the “OFF”positions.Inspect Rubber Seal(see page 6)5. Visually inspect the hose assembly prior to each use for evi<strong>de</strong>nce of damage, excess wear, or<strong>de</strong>terioration. If found, replace the assembly before using your grill. Only the manufacturer’s suppliedreplacement should be used.6. Remove the protective plastic cap from the cylin<strong>de</strong>r valve.7. Check that the hose does not contain kinks, does not contact sharp edges, and does not contactsurfaces that may become hot during use.8. Hold regulator and insert the brass nipple into the LP cylin<strong>de</strong>r valve outlet. Ensure that the <strong>de</strong>vice iscentered properly.9. Turn the large coupling nut clockwise by hand and tighten to a full stop. Take care not to cross threadthe coupling nut onto the cylin<strong>de</strong>r valve. Do not use tools to tighten connection.Note: If you are unable to make the connection, repeat Steps 7 and 8.10. Leak check all fittings before lighting your grill. See section on “Leak Testing” in this manual.REGULATOR RESETTING PROCEDURE:If your grill will not get hot enough to cook, the flow limiting <strong>de</strong>vice may have been activated.Mini Reset:Turn ALL burner control knobs to “OFF”, turn off the cylin<strong>de</strong>r valve. Wait one minute. Slowly turncylin<strong>de</strong>r valve ON and relight grill. If burner flame is higher and grill heats up properly – proceed withcooking.Full Reset:Turn ALL burner control knobs to “OFF”, turn off the cylin<strong>de</strong>r valve. Disconnect hose and regulatorfrom cylin<strong>de</strong>r. Wait two minutes, reattach hose and regulator and perform leak test.LEAK TESTING:WARNING• Never use your grill without leak testing all gas connections, hoses and propane tank. Followthe section on “Leak Testing” in this manual for proper procedures.7
To prevent fire or explosion hazard:• DO NOT smoke or permit ignition sources in the area while conducting a leak test.• Perform test OUTDOORS in a well ventilated area that is protected from the wind.• Never perform a leak test with a match or open flame.• Never perform a leak test while the grill is in use or while grill is still hot.WHEN TO PERFORM A LEAK TEST:• After assembling your grill and before lighting for the first time, even if purchased fully assembled.• Every time the LP gas cylin<strong>de</strong>r is refilled, exchanged or if any of the gas components are disconnected orreplaced.• Any time your grill has been moved.• At least once per year or if your grill has not been used for more than 60 days.CHECKING FOR LEAKS:CAUTION: Strong odors, colds, sinus congestion, etc. may prevent the <strong>de</strong>tection of propane byNote:smell. Use caution and common sense when testing for leaks.The leak test must be performed in an area that has a<strong>de</strong>quate lighting in or<strong>de</strong>r to see ifbubbles are <strong>de</strong>veloping and not in a windy or noisy area so larger leaks can be <strong>de</strong>tected bysmell or sound.1. Create a mixture of 50% water and 50% liquid dishwashing soap.2. Open the lid.3. Ensure all control knobs are set to the “OFF” position.4. Turn on the gas at the cylin<strong>de</strong>r valve. Turn the cylin<strong>de</strong>r valve knob counterclockwiseto full open. If you hear a rushing sound or smell gas, turn thegas off. Tighten any leaking connections. If leak is <strong>de</strong>tected at connectionnut and tightening does not stop leak, reinspect propane tank rubber seal.5. Apply the soapy water mixture to the following:ABCDEFGHIJDANGERSupply tank (cylin<strong>de</strong>r) welds.Connection nut to tank valve.Back si<strong>de</strong> of connection nut to brass nipple.Brass nipple connection into regulator.Regulator connections to gas supply hoses.<strong>Gas</strong> supply hose connection to si<strong>de</strong> burner valve assembly.Si<strong>de</strong> burner valve stem cap.Si<strong>de</strong> burner connection to hose.Hose connection to gas manifold.The full length of gas supply hose.Tank valve to cylin<strong>de</strong>r.Watch For Bub blesKB6. Check each place listed (A–K) for growing bubbles, which indicates a leak.ALarge leaks may not be <strong>de</strong>tected by bubbles but should produce a rushingsound or gas smell.7. Turn off gas supply at cylin<strong>de</strong>r valve.8. Turn on control knobs to release gas pressure in hose.9. Turn control knobs to “OFF” position.10. Tighten any leaking connections. If leak is <strong>de</strong>tected at connection nut and tightening does not stopleak, reinspect propane tank rubber seal. (see page 6)11. Repeat soapy water test until no leaks are <strong>de</strong>tected.12. Turn off gas supply at cylin<strong>de</strong>r valve until you are ready to use your grill.13. Wash off soapy residue with cold water and towel dry.14. Wait 5 minutes to allow all gas to evacuate the area before lighting grill.WARNING: DO NOT use the grill if leaks cannot be stopped. Contact a qualified gas appliance repairservice. 8KIGJHEFDC
• Ensure that the grill is properly assembled.PRE-START CHECK LIST:DANGERProperty damage, bodily harm, severe burns, and <strong>de</strong>ath could result from failure to follow thesesafety steps. These steps should be performed after the grill has been assembled and prior toeach use. DO NOT operate this grill until you have read and un<strong>de</strong>rstand ALL of the warnings andinstructions in this manual.• Inspect the gas supply hose for burns, chaffing, kinks, and proper routing before each use. If it isevi<strong>de</strong>nt there is excessive abrasion or wear, or the hose is cut, it must be replaced prior to the grillbeing used. Replace with hose and regulator Mo<strong>de</strong>l No. 155-3412-0, which can be obtained bycontacting customer service at 877-862-3449.• Leak check all gas connections, hose and propane tank. See section on “Leak Testing”.• Ensure that all electrical supply cords are properly groun<strong>de</strong>d. Keep any electrical supply cord and thefuel supply hose away from any heated surfaces. Hose should be at least 3 inches from hot surfaces.• Position your grill on a non-combustible level surface in a well ventilated location, a safe distance10 ft. (3.1 m) from combustible materials, buildings and overhangs.• Properly place the empty grease cup un<strong>de</strong>r the grease drain hole in the bottom of the grill to catchgrease during use.• DO NOT block ventilation areas in si<strong>de</strong>s, back or cart compartment of grill.LIGHTING INSTRUCTIONS:WARNINGRead, un<strong>de</strong>rstand and follow all warnings and instructions contained in this manual. DO NOT skipany of the warnings and instructions contained in the preceding sections of this manual.Follow the instructions exactly.1. OPEN THE GRILL LID before attempting to light a burner so that fumes do not accumulateinsi<strong>de</strong> the grill. An explosion could occur if grill lid is down.2. Check that all burner control knobs and the cylin<strong>de</strong>r valve are turned to the “OFF” position.3. Turn on the fuel supply by slowly rotating the cylin<strong>de</strong>r valve knob counter-clockwise to fullopen.4. DO NOT stand with head, body, or arms over the grill when lighting.9LIGHTING THE MAIN BURNERS:1. Open lid before lighting burner.2. Make sure all control knobs are in the “OFF” position.3. Push and hold down the IGNITION BURNER control knob and turnSLOWLY (2 to 3 seconds) to “HIGH”. You should hear the igniter click.Note: Step 3 may need to be repeated 2-3 times to light grill.4. If ignition does NOT occur in 5 seconds, turn control knob to “OFF”, wait5 minutes to allow gas to dissipate and repeat lighting procedure.5. To light other burners, push and turn control knobs to “HIGH” in sequence from right to left.6. If burner does not ignite using the igniter, see “Match Lighting the Main <strong>Burner</strong>s” section.7. To turn off, turn each control knob clockwise until it locks in the “OFF” position. This does not turn offthe gas flow from the cylin<strong>de</strong>r.Note:If burner does not light or flame is too low, See “Trouble Shooting” section of the ownersmanual.
MATCH LIGHTING THE MAIN BURNERS:1. Open lid before lighting burner.2. Make sure all control knobs are in the “OFF” position.3. Place a paper match in the end of the matchlighter. Strike the matchand place through lighting hole in the left hand si<strong>de</strong> of the grill toapproximately 1/2” (1 to 2 cm) from the burner.4. Turn on the FAR LEFT burner control knob to the “HIGH” position. Theburner should light within 5 seconds.5. If the burner does not light, turn the control knob to “OFF” and wait5 minutes for gas to dissipate and repeat lighting procedure.6. Once lit, light adjacent burners in sequence by pressing in and rotating the control knob to the “HIGH”position.7. If the burner does not light within the first few attempts of match lighting, there is a problem with thegas supply. Turn off the gas at the burner and cylin<strong>de</strong>r. DO NOT attempt to operate the grill until theproblem is found and corrected.Note: If burner does not light or flame is too low, See “Trouble Shooting” section of the ownersmanual.LIGHTING THE SIDE BURNER:1. Open lid before lighting si<strong>de</strong> burner.2. Make sure control knob is in the “OFF” position.3. Push and hold down si<strong>de</strong> burner control knob and SLOWLYLighting HoleMatchlighter(2 to 3 seconds) turn to “HIGH”. You should hear the igniter click.Note: Step 3 may need to be repeated 2-3 times to light si<strong>de</strong> burner.4. If ignition does NOT occur in 5 seconds, turn control knob to “OFF”, wait5 minutes to allow gas to dissipate and repeat lighting procedure.5. If burner does not ignite using the igniter, see “Match Lighting the Si<strong>de</strong> <strong>Burner</strong>” section.6. To turn off, turn control knob clockwise until it locks in “OFF” position.Note: If burner does not light or flame is too low, See “Trouble Shooting” section of the ownersmanual.MATCH LIGHTING THE SIDE BURNER:1. Open lid before lighting si<strong>de</strong> burner.2. Make sure control knob is in the “OFF” position.3. Strike and carefully place a match approximately 1/2” (1 to 2 cm) from the burner.4. Turn the si<strong>de</strong> burner control knob to the “HIGH” position. The burner should light within 5 seconds.5. If the burner does not light, turn the control knob to “OFF” and wait 5 minutes for gas to dissipate andrepeat lighting procedure.6. If the burner does not light within the first few attempts of match lighting, there is a problem with thegas supply. Turn off the gas at the burner and cylin<strong>de</strong>r. DO NOT attemptto operate the grill until the problem is found and corrected.Note: If burner does not light or flame is too low, See “Trouble Shooting”section of the owners manual.Note: Observe flame height when lit: Flame should be a Blue/Yellowcolor between 1”–2” when burner is on “HIGH”.See section in manual on burner adjustment to adjust flame.10
OPERATING THE GRILL:WARNING• Read and follow all warnings and instructions contained in the preceding sections of thismanual.• Never use charcoal, lava rocks or wood briquets in a gas grill. Flavoring chips must becontained in a metal smoking box to contain ash and prevent fires.• DO NOT cover cooking grates or other components with aluminum foil, as this blocksventilation and damage to grill or personal injury may occur.• DO NOT leave your grill unatten<strong>de</strong>d while “ON” or in use.• DO NOT move grill when in use.• DO NOT use water on a grease fire. Closing the lid to extinguish a grease fire is not possible.Use type BC dry chemical fire extinguisher or smother with dirt, sand or baking soda.• Never cook on the grill without the grease cup/tray in place.BREAKING IN YOUR GRILL:• In manufacturing and preserving the components of your grill, oil residue may be present on theburners and cooking surfaces of your grill.• Before cooking on your grill for the first time you should preheat it for 15 minutes on “HIGH” to burnoff these residual oils.PREHEATING THE GRILL:• Prior to each use, it is recommen<strong>de</strong>d that you preheat your grill. This ensures that the grilling surfacesare at the <strong>de</strong>sired temperatures to sear the food sugars when cooking. After lighting your grill, set themain burner control knobs to the “HIGH” position for 5 to 10 minutes. Close the lid during the preheatperiod.CONTROLLING FLARE-UPS/GREASE FIRES:• Flare-ups are a part of cooking meats on a gas grill. This adds to the unique flavor of cooking on a gasgrill. Use caution when opening the lid as sud<strong>de</strong>n flare-ups may occur. Excessive flare-ups can overcookyour food and cause a dangerous situation for you and your grill. Excessive flare-ups result fromthe build-up of grease in your grill. If this should occur, DO NOT pour water onto the flames. This cancause the grease to splatter and could result in serious burns or bodily harm.• If grease fire occurs while lid is open, leave lid open, turn burner knobs to “OFF”, turn off LP cylin<strong>de</strong>rvalve. If possible, relocate food to a different section of cooking grate and allow grease to burn out orsmother the flames with baking soda.• If grease fire occurs while lid is closed, leave lid closed, as a sud<strong>de</strong>n burst of air may increase flames.Turn burner knobs to “OFF”, turn off LP cylin<strong>de</strong>r valve. Allow grease to burn out.• Never pour water on a grease fire as grease may splatter/spread and could result in bodily injury orproperty damage.• If grease fire does not quickly burn out or the fire is growing/spreading, use type BC dry chemical fireextinguisher or smother with dirt, sand or baking soda. Closing the lid to extinguish a grease fire is notpossible.TO MINIMIZE FLARE-UPS:• Trim excess fat from meats prior to cooking.• Cook meats with high fat contents (chicken or pork) on Low settings or indirectly.• Ensure that your grill is on level ground and the grease is allowed to evacuate the grill through the drainhole in the bottom and into grease cup/tray.• Clean grill frequently to minimize grease buildup.INDIRECT COOKING:• Indirect cooking is the process of cooking your food without the heat source being directly un<strong>de</strong>r yourfood. You can sear meats over a high flame on one si<strong>de</strong> of the grill while slow cooking a roast on the other11 (unlit) si<strong>de</strong> of the grill.
ROTISSERIE COOKING:• Your grill was pre-drilled from factory to inclu<strong>de</strong> mounting holes for a rotisserie (sold separately). Donot use a rotisserie not specifically manufactured for this grill.• Read and follow all instructions provi<strong>de</strong>d with the rotisserie. Save instructions for future reference.• Do not use the si<strong>de</strong> burner when using a rotisserie.WARNING• When using an AC current rotisserie, it must be electrically groun<strong>de</strong>d in accordance with localco<strong>de</strong>s, or in the absence of local co<strong>de</strong>s:• In the US: The National Electrical Co<strong>de</strong> – ANSI-NFPA No. 70 – Latest Edition• In Canada: the Canadian Electrical Co<strong>de</strong> – CSA C22.1• The Rotisserie is equipped with a three pronged plug for your protection against electrical shock.This plug should be plugged directly into a properly groun<strong>de</strong>d 3 prong receptacle. Never cut orremove the grounding plug. Any extension cord must also have a 3 prong receptacle.• All electrical supply cords should be kept away from water and any hot surfaces of the grill.TURNING OFF THE GRILL:1. Turn off the cylin<strong>de</strong>r valve.2. Turn all burner control knobs to the “OFF” position.Note: Turn off LP cylin<strong>de</strong>r first to prevent gas from being left in the systemun<strong>de</strong>r pressure.CAUTION: The cylin<strong>de</strong>r valve should always be in the off, or closed, positionwhen the grill is not in use.• Read instructions on lighting your grill to light the si<strong>de</strong> burner.• Never close the si<strong>de</strong> burner cover when the burner is lit.• Use a 10” diameter pot or smaller that does NOT have an exten<strong>de</strong>d handle when cooking on the si<strong>de</strong>burner. Center pot over burner.• Never place more than 15 pounds on the si<strong>de</strong> burner. The si<strong>de</strong> burner is not constructed to holdweight exceeding 15 pounds.• Use caution to avoid bumping grill, si<strong>de</strong> burner or pot to prevent pot from spilling contents possiblyleading to severe burns.• DO NOT use si<strong>de</strong> burner to <strong>de</strong>ep fry food in oil to avoid dangers associated with oil igniting creatinga very dangerous situation.THE SIDE BURNER:To turn off the cylin<strong>de</strong>r valve, turnknob clockwise until it stops.USING OTHER FEATURES OF THE GRILL:WARNING• The si<strong>de</strong> burner can be used to prepare si<strong>de</strong> dishes such as beans, potatoes, corn, or to warmsauces.• The burner valve can be adjusted from high to low <strong>de</strong>pending upon your cooking <strong>de</strong>mands.12
WARNING:PROPER CARE & MAINTENANCE:If a bristle brush is used to clean any of the cooking surfaces, ensure no loose bristlesremain on the cooking surfaces prior to grilling as loose bristles may attach to food.CLEANING INTERIOR OF GRILL:• We recommend cleaning off food residue immediately after cooking by gently scrubbing grates withwire bristle brush and then turning burners to HIGH for approximately 5 minutes.WARNING: DO NOT leave grill unatten<strong>de</strong>d when grill is on. Wear oven mitts to protect from burns.• The heat from the burners will burn off most food/grease residue from grates & heat tents and turn itto an ash like substance which will fall to the bottom of the firebox or grease tray. After the grill cools(approximately 30 minutes) remove grates and heat tents and brush the ash and any grease out ofthe firebox. Clean and replace grease cup. Inspect the heat tents for damage or <strong>de</strong>terioration beforereinstalling in the grill. (Replacements can be or<strong>de</strong>red by calling 877-862-3449.)• Wash the grates and heat tents with a mild <strong>de</strong>tergent and rinse with hot water periodically if <strong>de</strong>sired.CAUTION: DO NOT allow ash residue to remain on the grease tray or firebox as it could block propergrease drainage of the grill.INTERIOR OF GRILL LID:• Smoke will accumulate insi<strong>de</strong> grill lid and may flake onto your food. Clean the insi<strong>de</strong> of the grill lid withscrub brush and baking soda/water solution. Dry thoroughly. Do not mistake this for paint. The interiorof gas grill lids are not painted.MAINTAINING EXTERIOR OF GRILL:• To protect your grill from excessive rust, the unit must be kept clean and covered at all times when notin use.• Painted surfaces. Wash with mild <strong>de</strong>tergent or non-abrasive cleaner and warm soapy water.• Stainless steel surfaces. To maintain your grill’s appearance, wash with mild <strong>de</strong>tergent and warmsoapy water and wipe dry with a soft cloth after each use. Baked-on grease <strong>de</strong>posits may require theuse of an abrasive plastic cleaning pad. Use only in direction of brushed finish to avoid damage. Donot use abrasive pad on areas with graphics. Car wax may help protect the exterior finish of your grill.• Porcelain surfaces. Because of glass-like composition, most residue can be wiped away with asolution of baking soda and water or specially formulated cleaner. Use non-abrasive scouring pow<strong>de</strong>rsuch as baking soda for stubborn stains.• Plastic and rubber parts. Wash with warm soapy water and wipe dry. Do not use citrisol, abrasivecleaners, <strong>de</strong>greasers or a concentrated grill cleaner on plastic parts. Damage to and failure of partscan result.RUST:• Discoloration, rust and rust pits can occur as a result of high cooking temperatures, acidic marina<strong>de</strong>s,grease fires and exposure to coastal climates or other natural elements.• Rust spots on the interior surface can be buffed, cleaned, then lightly coated with vegetable oil orvegetable oil spray to minimize rusting.• Never use cleaners containing chlorine or store swimming pool supplies or chemicals in cartcompartment as chlorine promotes rust.13
BURNER CLEANING AND MAINTENANCE:• Keep the appliance free and clear of combustible materials, gasoline and other flammable vapors andliquids.• Keep the ventilation openings of the cylin<strong>de</strong>r enclosure free and clear of <strong>de</strong>bris.• Visually check burner flames for proper operation (see pictorial in “<strong>Burner</strong> Assembly/Maintenance”un<strong>de</strong>r Proper Care and Maintenance). Spi<strong>de</strong>rs or other insects can nest in the burner causing gasblockage.• For safe grilling and peak performance of your grill, perform these checks at least twice per year orafter exten<strong>de</strong>d periods of storage.• Be sure to tighten up all hardware (nuts, bolts, screws, etc.) at least twice per year.CAUTION: Some parts may contain sharp edges. Wear protective gloves if necessary.• Remove the cooking grills, heat distribution plates, and burners from insi<strong>de</strong> your grill. Use a brushwith hot water and <strong>de</strong>tergent to remove excess residue. NEVER use a commercial oven cleaner.Rinse completely with water. Towel dry and replace all components as <strong>de</strong>scribed in the assemblyinstructions.BURNER ASSEMBLY/MAINTENANCE:• Although your burners are constructed of stainless steel,they may corro<strong>de</strong> as a result of the extreme heat and acidsfrom cooking foods. Regularly inspect the burners for cracks,abnormal holes, and other signs of corrosion damage. If found,replace the burner.• DO NOT block ventilation areas in si<strong>de</strong>s, back or cartcompartment of grill. <strong>Burner</strong> tubes can become blocked byspi<strong>de</strong>rs and other insects building their nests. Blocked burnertubes can prevent gas flow to the burners and could result ina burner tube fire or fire beneath the grill. To clean the <strong>Burner</strong>Assembly follow these instructions to clean and/or replace partsof burner assembly or if you have trouble igniting the grill.1. Turn gas off at control knobs and LP cylin<strong>de</strong>r tank valve.2. Remove cooking grills and heat distribution plates.3. Remove bolt from each burner “foot” using a screwdriver.4. Carefully lift each crossover channel up and away from burners.5. Carefully lift each burner up and away from valve openings.6. Use a narrow bottle brush or a stiff wire bent into a small hookto run through each burner tube or use compressed air to blowinto burner tube and out the flame ports. Check each port tomake sure air comes out each hole.CAUTION: Wear eye protection when using compressed air.7. Use a wire brush to clean the entire outer surface of burner toremove food residue and dirt.8. Check burner for damage, if any cracks or holes arefound replace burner.9. Install burner in grill and carefully align crossover channelsbetween burners and orient burners CORRECTLY.IMPORTANT: <strong>Burner</strong> opening must sli<strong>de</strong> over valve nozzle.10. Replace bolt in each burner and crossover channel.Note: Follow the “<strong>Gas</strong> Leak Testing” section of this manual.Relight burners to verify proper operation.11. Replace heat distribution plates and cooking grills.DebrisBoltCrossover ChannelValve Nozzle<strong>Burner</strong> OpeningPROPER VALVE TO BURNER ALIGNMENT14
BURNER ADJUSTMENTWARNING• DO NOT attempt to adjust burner air shutter until grill has cooled down for approximately30 minutes. Failure to do so could cause severe burns.• Normal flame should be soft blue with yellow tips between 1 in. - 2 in. when burner is on “HIGH”.Depending on elevation, burner air shutter may need to be adjusted to obtain correct air to fuel ratio.CORRECTINCORRECTSoft blue flame with yellow tipsWavy with yellow flames• To adjust air shutter, loosen set screw and rotate air shutter to <strong>de</strong>sired position to achieve normalflame. Tighten set screw after adjustment is ma<strong>de</strong>. Relight the grill to observe flame. Incrementaladjustments may be nee<strong>de</strong>d to achieve a good flame.TRANSPORTING AND STORAGE:Set Screw15WARNING• Never move a grill when hot or in use.• Make sure that cylin<strong>de</strong>r valve is closed and burner knobs are in the off position.• DO NOT store a spare LP gas cylin<strong>de</strong>r (filled or empty) un<strong>de</strong>r or near the grill.• Never store flammable liquids or spray canisters un<strong>de</strong>r or near the grill.• If the outdoor cooking gas appliance is not in use, the gas must be turned off at the LP gassupply cylin<strong>de</strong>r.• Storage of an outdoor cooking gas appliance indoors is permissible only if the cylin<strong>de</strong>r isdisconnected and removed from the outdoor cooking gas appliance.• Cylin<strong>de</strong>rs must not be stored in a building or enclosure, including garages and sheds.• Cylin<strong>de</strong>rs must be kept out of reach of children.BEFORE STORING YOUR GRILL:• Ensure that the cylin<strong>de</strong>r valve is fully closed.• Clean all surfaces. Lightly coat the burners with cooking oil to prevent excess rusting.• If storing the grill indoors, disconnect the LP tank and leave the LP tank OUTDOORS.• Place dust cap on cylin<strong>de</strong>r valve outlet whenever the cylin<strong>de</strong>r is not in use. Only install the type of dustcap on the cylin<strong>de</strong>r valve outlet that is provi<strong>de</strong>d with the cylin<strong>de</strong>r valve. Other types of caps or plugsmay result in leakage of propane.• Check and clean burner prior to use after storing, at the beginning of grilling season or after a periodof not being used. Spi<strong>de</strong>rs and insects like to build nests in burner tubes (especially during col<strong>de</strong>rmonths). Blocked burner tubes can prevent gas flow to the burners and could result in a burner tubefire or fire beneath the grill. See “<strong>Burner</strong> Assembly/Maintenance” un<strong>de</strong>r Proper Care and Maintenance.• If storing the grill outdoors, cover the grill with a grill cover for protection from the weather.
TROUBLE SHOOTING:To see trouble shooting or assembly vi<strong>de</strong>os, visit us atProblem Possible Cause Prevention/Cure<strong>Burner</strong> will not light LP gas tank valve is closed Make sure regulator is securely attached to the LP gas tank, turn LPgas tank valve to “OPEN”<strong>Grill</strong> does not get hotenoughIrregular flame pattern.Flame does not run fulllength of burnerFlame is yellow or orangeLP gas tank is low or emptyLP gas leakCoupling nut and regulator not fully connectedObstruction of gas flow<strong>Burner</strong> may not be properly seatedSpi<strong>de</strong>r webs or insect nest in venturi<strong>Burner</strong> ports clogged or blockedBattery needs to be changedWires or electro<strong>de</strong> covered with cooking residueElectro<strong>de</strong> and burners are wetElectro<strong>de</strong> cracked or broken - sparks at crackWire loose or disconnectedWire is shorting (sparking) between ignitor an<strong>de</strong>lectro<strong>de</strong>Bad ignitorOut of gasFlow limiting <strong>de</strong>vice may have been activated<strong>Burner</strong> ports are clogged or blockedNew burner may have residual manufacturingoilsSpi<strong>de</strong>r webs or insect nest in venturiFood residue, grease, etc.Poor alignment of valve to burner venturiAir shutter on burner needs adjustmentCheck if LP gas tank is empty. If empty, replace or refill1. Turn LP gas tank valve to “CLOSED”2. Wait 5 minutes for gas to clear3. Follow “Leak Testing” in the owner’s manualSee section on “Connecting Hose and Regulator”1. Clear burner tubes2. Check for bent or kinked hoseReseat burner and valve. Refer to “<strong>Burner</strong> Assembly/Maintenance”instructionsClean venturi and burner tubeClean burner portsReplace the battery (follow assembly step for inserting battery)Clean wire and/or electro<strong>de</strong> with rubbing alcoholWipe dry with clothReplace electro<strong>de</strong>Reconnect wire or replace electro<strong>de</strong>/wire assemblyReplace ignitor wire/electro<strong>de</strong> assemblyReplace ignitorReplace or refill LP gas tank1. Mini Reset:a. Turn control knobs and LP gas tank valve to “OFF”b. Wait one minute and relight grill per “Lighting Instructions”2. If flames are still too low, perform a Full ResetFull Reset:a. Turn control knobs and LP gas tank valve to “OFF”b. Disconnect regulator from propane tankc. Inspect LP cylin<strong>de</strong>r rubber seald. Wait 1 minutee. Reconnect regulator and perform “Leak Testing” on allconnections.f. Light grill per “Lighting Instructions”Clean burner portsBurn grill for 15 minutes on “HIGH” with the lid closedClean venturi and burner tubeClean burnerAssure burner venturi is properly engaged with valveSee section on “<strong>Burner</strong> Adjustment”16
Problem Possible Cause Prevention/CureFlame blow out High or gusting winds Do not use grill in high windsLow on LP gas<strong>Burner</strong> holes may be obstructedFlow limiting <strong>de</strong>vice trippedReplace or refill LP gas tankRefer to “<strong>Burner</strong> Assembly/Maintenance” instructionsRefer to “Regulator Resetting Procedure”Flare-up Grease buildup Clean all grill parts per “Proper Care and Maintenance” instructionsGrease fireFlashback (fire in burnertubes) / knobs meltingInsi<strong>de</strong> of lid is peeling(like paint peeling)Excess fat in meatExcessive cooking temperatureGrease trapped by food buildup around burnersystem<strong>Burner</strong> and/or burner tubes are blockedBaked on grease buildup has turned into carbonand is flaking offTrim fat from meat before grillingAdjust (lower) cooking temperature1. Turn control knobs and LP gas tank valve to “OFF”2. Leave lid in closed position and let fire burn out3. After grill cools, remove and clean all parts per “Proper Care andMaintenance” instructionsClean burners and/or burner tubesClean thoroughly per “Proper Care and Maintenance” instructionsGRILL COOKING TIPS:CLEANLINESS:• Always wash hands thoroughly with soap and hot water prior to handling food and after handling rawmeat, uncooked poultry or seafood.• When using a platter to carry raw meat, uncooked poultry or seafood to the grill, make sure to washthe platter thoroughly with soap and hot water before placing cooked foods back on the platter or usedifferent platters for raw and cooked foods.• Never use the same utensils when handling raw meat, uncooked poultry or seafood unless you washthe utensils thoroughly with soap and hot water.• Never re-use marina<strong>de</strong> from raw meat or uncooked poultry on foods that have been cooked and areready to be served.GRILLING TO PROPER TEMPERATURE:• Use a meat thermometer to be sure food has reached a safe internal temperature.• The USDA recommends the minimum temperature be reached for the following food items:Chops ................... 145° F (62.8° C)Roasts ................... 145° F (62.8° C)Ground Meat .............. 160° F (71° C)Seafood .................. 145° F (62.8° C)Pork ..................... 145° F (62.8° C)Vegetables ................ 145° F (62.8° C)Poultry ................... 165° F (73.9° C)HELPFUL HINTS:• If you pre-cook meat or poultry, do so immediately before grilling.• Never <strong>de</strong>frost meat at room temperature or on a countertop.• Refrigerate leftovers within 2 hours of taking food off the grill.• For additional information, please phone the USDA’s toll free Meat & Poultry Hotline at 800-535-4555.17
ASSEMBLY INSTRUCTIONS:READ ALL SAFETY WARNINGS & ASSEMBLY INSTRUCTIONS CAREFULLYBEFORE ASSEMBLING OR OPERATING YOUR GRILL.WE RECOMMEND TWO PEOPLE WORK TOGETHER WHEN AS SEM BLING THIS UNIT.The following tool is required to assemble this <strong>Grill</strong> King 4 <strong>Burner</strong> <strong>Gas</strong> <strong>Grill</strong>:• Phillips Head ScrewdriverPARTS LIST:123456789101 <strong>Grill</strong> Body Assembly1 Left Si<strong>de</strong> Table1 Si<strong>de</strong> <strong>Burner</strong> Assembly1 Left Si<strong>de</strong> Table Front Panel1 Si<strong>de</strong> <strong>Burner</strong> Assembly Front Panel1 Warming Rack3 Cooking Grates1 Si<strong>de</strong> <strong>Burner</strong> Control Knob4 Heat Distribution Plates2 Door Handles1112131415161718191 Grease Cup1 Foldable Cart1 Si<strong>de</strong> <strong>Burner</strong> Grate1 Towel Bar1 Grease Tray4 Towel Bar Hooks1 Tank Retention Wire4 Locking Casters1 Bottom PanelTo see trouble shooting or assembly vi<strong>de</strong>os, visit us at18
16113142364 571098151211171918FOR COVERS, ACCESSORIES AND OTHER PRODUCTS, PLEASE VISIT US ONLINE AT:(Proof of purchase will be required.)Inspect contents of the box to ensure all parts are inclu<strong>de</strong>d and undamaged.19
Choose a good, cleared assembly areaand get a friend to help you put your grilltogether. Lay card board down to protectgrill finish and assembly area.CAUTION! Some parts may containsharp edges. Wearprotective gloves ifnecessary.Step 1Unfold the cart and stand upright.Step 2Attach the bottom panel to the cartby placing keyholes over bolts,sli<strong>de</strong> down into place and tightensecurely.Step 3Remove wing nuts from cart frame.Attach bottom panel to cart frameusing pre-attached wing nuts.20
Note:With the help of a friend,turn the cart assembly over.Try to minimize the stress tothe legs.Step 4Attach four locking casters to thelegs of the cart frame. Tightensecurely using hex nut wrenchprovi<strong>de</strong>d.Note:With the help of a friend,turn the cart to its uprightposition. Try to minimize thestress to the legs.Step 5Attach tank retention wire to thebottom panel by placing the legsinto two holes as shown.Step 6Remove pre-attached bolts fromdoor handles and attach handles todoors. Tighten bolts securely.21
<strong>Grill</strong> BodyAssemblyNote: When performing Step 7,Lift grill body from front andrear panels to avoid injury tohands and fingers.Step 7Cart FrameWith the help of a friend, place grillbody assembly on assembled cartframe. Align brackets topre-attached bolts on the fireboxsupport. Push and lock into place.Tighten pre-attached bolts.22
Step 8Attach front panel to si<strong>de</strong> burnerassembly by insertingpre-attached bolts on front panelinto the keyholes on the si<strong>de</strong> burnerassembly. Tighten bolts securely.Pre-attachedBoltsStep 9Attach front panel to left si<strong>de</strong> tableby inserting pre-attached bolts onthe front panel into the keyholes onsi<strong>de</strong> table. Tighten bolts securely.Pre-attachedBoltsStep 10Remove pre-attached bolts fromtowel bar. Sli<strong>de</strong> four towel bar hooksonto towel bar, then secure to leftsi<strong>de</strong> table using pre-attached bolts.23
Step 11Remove M6 X 12 mm bolt from leftsi<strong>de</strong> of control panel. Attach thesi<strong>de</strong> table assembly to the left si<strong>de</strong>of firebox. Place table over boltsand sli<strong>de</strong> toward back of grill, thentighten securely. Attach left si<strong>de</strong>table front panel to grill body usingthe removed M6 X 12 mm bolt.Step 12Remove M6 X 12 mm bolt fromright si<strong>de</strong> of control panel. Attachthe si<strong>de</strong> burner assembly to theright si<strong>de</strong> firebox. Place si<strong>de</strong>burner assembly over bolts andsli<strong>de</strong> toward back of grill, thentighten securely. Attach si<strong>de</strong> burnerfront panel to grill body using theremoved M6 X 12 mm bolt.24
Step 13Insert the si<strong>de</strong> burner valveassembly through the holes inthe si<strong>de</strong> burner front panel, thenfirmly seat the valve nozzle into theburner venturi. Rotate burner valveassembly counterclockwise to lockin place with keyholes. Then tightenpre-attached bolts. Place the si<strong>de</strong>burner control knob on the si<strong>de</strong>burner valve stem.Valve NozzleSi<strong>de</strong> <strong>Burner</strong>Valve<strong>Burner</strong> VenturiWarning: Never use your grillwithout leak testing all gasconnections and hoses.See the section on “LeakTesting” in this manual forproper procedures.KeyholesBezelSi<strong>de</strong> <strong>Burner</strong>Control KnobSi<strong>de</strong> <strong>Burner</strong>Valve StemStep 14Place the si<strong>de</strong> burner grate onto thesi<strong>de</strong> burner table.Step 15Attach si<strong>de</strong> burner igniter lead wireto the electro<strong>de</strong> as illustrated.Electro<strong>de</strong>Si<strong>de</strong> <strong>Burner</strong>Igniter Lead25
Step 16Insert grease tray into tracks onbacksi<strong>de</strong> of grill. Hang grease cupfrom brackets on bottom of greasetray.Grease CupGrease TrayWarming RackCooking GratesStep 17Place the heat distribution plates onlower level of grill body assemblydirectly above burners.HeatDistributionPlatesStep 18Place cooking grates on supportribs directly above heat distributionplates.BracketsStep 19Place warming rack in brackets so that itsits above the cooking grills.26
27<strong>Grill</strong> King 3412 (Assembled)
IMPORTANTES ADVERTENCIASDE SEGURIDADES NUESTRO DESEO QUE ARME Y UTILICE SU PARRILLA EN LA FORMA MÁS SEGURAPOSIBLE. EL PROPÓSITO DE ESTE SÍMBOLO DE ALERTA DE SEGURIDAD ES QUEUSTED PRESTE ATENCIÓN A LOS POSIBLES PELIGROS CUANDO ARME Y UTILICE SUPARRILLA.¡CUÁNDO VEA ESTE SÍMBOLO DE ALERTA DE SEGURIDAD PRESTE ESPECIALATENCIÓN A LA INFORMACIÓN A CONTINUACIÓN!LEA DETENIDAMENTE TODAS LAS ADVERTENCIAS DE SEGURIDAD E INSTRUCCIONESANTES DE ARMAR Y USAR LA PARRILLA.SI HUELE GAS:1. Apague el gas al artefacto.2. Apague cualquier llama expuesta.3. Abra la tapa.PELIGRO4. Si el olor persiste, subsistencia lejos <strong>de</strong> la aplicación y llame <strong>de</strong> inmediato a su proveedor <strong>de</strong>gas o a los bomberos.ADVERTENCIA1. No guar<strong>de</strong> ni use gasolina ni otros líquidos inflamables con vapores en las cercanías <strong>de</strong> este o<strong>de</strong> ningún otro artefacto.2. Un cilindro <strong>de</strong> propano líquido que no esté conectado para ser utilizado no <strong>de</strong>be ser mantenidocerca <strong>de</strong> éste o ningún otro artefacto.PELIGROa) NO guar<strong>de</strong> un cilindro <strong>de</strong> gas <strong>de</strong> propano líquido <strong>de</strong> reserva <strong>de</strong>bajo o cerca <strong>de</strong>este artefacto.b) Nunca llene el cilindro más <strong>de</strong> 80%.c) Si la información en (a) y (b) no se sigue exactamente, ae pue<strong>de</strong> producir unincendio y causar lesiones o hasta la muerte.28
TABLA DE CONTENIDOS:Advertencias Generales ........................................ 30-31Especificaciones e Instalación <strong>de</strong>l Cilindro (Tanque) <strong>de</strong> <strong>Gas</strong> LP ........ 31-33Especificaciones e Instalación <strong>de</strong> la Manguera y el Regulador ......... 33-34Pruebas <strong>de</strong> Detección <strong>de</strong> Fugas ................................. 34-35Lista <strong>de</strong> Comprobación Previa al Arranque. ........................... 36Instrucciones <strong>de</strong> Encendido. .................................... 36-37Funcionamiento <strong>de</strong> la <strong>Parrilla</strong>. ................................... 38-39Uso <strong>de</strong> Otras Funciones <strong>de</strong> la <strong>Parrilla</strong> ................................ 39Cuidado y Mantenimiento A<strong>de</strong>cuados. ............................ 40-42Transporte y Almacenamiento ...................................... 42Solución <strong>de</strong> Problemas ........................................ 43-44Sugerencias para Cocinar con la <strong>Parrilla</strong>. ............................. 45Instrucciones <strong>de</strong> Armado ....................................... 46-55Información <strong>de</strong> la Garantía. .............................. ContracubiertaPELIGRO:ADVERTENCIA:PRECAUCIÓN:Indica una situación inminentemente peligrosa que, <strong>de</strong> no evitarse, causará la muerteo lesiones graves.De no cumplir con estas instrucciones, esté alerta a la posibilidad <strong>de</strong> sufrir lesionesfísicas graves. Cerciórese <strong>de</strong> leer y <strong>de</strong> seguir cuidadosamente todos los mensajes.Indica una situación potencialmente peligrosa que, <strong>de</strong> no evitarse, pue<strong>de</strong> causarlesiones menores o mo<strong>de</strong>radas.ADVERTENCIA DE LA PROPUESTA 65 DE CALIFORNIAEste producto contiene sustancias químicas, incluido plomo en el bronce <strong>de</strong> ciertas partescomponentes, reconocidas por el estado <strong>de</strong> California como causantes <strong>de</strong> cáncer, <strong>de</strong>fectos congénitosy otras afecciones <strong>de</strong>l aparato reproductor. Lávese las manos <strong>de</strong>spués <strong>de</strong> manejarlo. Cuando se usa,este producto emite químicos <strong>de</strong> combustión <strong>de</strong> combustible reconocidos por el estado <strong>de</strong> Californiacomo causantes <strong>de</strong> cáncer, <strong>de</strong>fectos congénitos u otras afecciones <strong>de</strong>l aparato reproductor. Siga todaslas instrucciones en este manual y úselo solamente en un área bien ventilada en exteriores.PARA OBTENER INFORMACIÓN SOBRE TAPAS, ACCESORIOS Y OTROS PRODUCTOS,POR FAVOR VISÍTENOS ONLINE EN:29
ADVERTENCIAS GENERALES:ADVERTENCIA• Antes <strong>de</strong> usar la parrilla por primera vez, pruebe todas las conexiones en busca <strong>de</strong> fugas, incluso sicompró la parrilla totalmente armada y cada vez que vuelva a cargar el tanque. Inspeccione el sello <strong>de</strong>caucho <strong>de</strong>l tanque <strong>de</strong> propano en busca <strong>de</strong> daños.• Siempre inspeccione la parrilla y el tanque <strong>de</strong> propano antes <strong>de</strong> cada uso como se indica en las secciones“Pruebas <strong>de</strong> Detección <strong>de</strong> Fugas” y “Lista <strong>de</strong> Comprobación Previa al Arranque” <strong>de</strong> este manual.• Nunca use gas natural en una unidad diseñada para usarse con gas propano líquido.• Nunca use carbón, rocas volcánicas o briquetas <strong>de</strong> ma<strong>de</strong>ra en una parrilla a gas. Los copos saborizantes<strong>de</strong>ben colocarse en una caja para ahumar <strong>de</strong> metal para contener las cenizas y evitar incendios.• Asegúrese <strong>de</strong> que las llamas salgan por todos los orificios <strong>de</strong> los quemadores en cada uso. Es común quelas arañas y los insectos construyan sus nidos en los tubos <strong>de</strong> los quemadores. El bloqueo <strong>de</strong> los tubos<strong>de</strong> los quemadores pue<strong>de</strong> evitar la circulación <strong>de</strong> gas a los quemadores, lo que podría causar un incendioen el tubo <strong>de</strong>l quemador o <strong>de</strong>bajo <strong>de</strong> la parrilla.• Nunca inspeccione si hay fugas con un fósforo o con una llama.• Nunca use o almacene gasolina, líquido para encen<strong>de</strong>r, diluyente <strong>de</strong> pintura, u otros líquidos o vaporesinflamables o materiales combustibles en la parrilla o cerca <strong>de</strong> esta.• NO bloquee las áreas <strong>de</strong> ventilación en los laterales, la parte posterior o el compartimiento <strong>de</strong>l carrito <strong>de</strong>la parrilla.• NO cubra las rejillas para cocinar u otros componentes con papel <strong>de</strong> aluminio, dado que esto bloquea laventilación y pue<strong>de</strong> ocasionar daños a la parrilla o lesiones personales.• Nunca coloque más <strong>de</strong> 15 libras sobre las mesas laterales. NO se apoye en las mesas laterales. NOlevante la parrilla <strong>de</strong> las mesas laterales.• Mantenga a los niños y a las mascotas alejados <strong>de</strong> la parrilla caliente. NO permita que los niños usen laparrilla o jueguen cerca <strong>de</strong> esta.• NO <strong>de</strong>je la parrilla sin supervisión cuando esté encendida o cuando se esté usando.• NO permita que la manguera <strong>de</strong> gas entre en contacto con superficies calientes. De ser necesario,coloque la manguera <strong>de</strong> gas en otra dirección.• NO permita que caiga grasa o que gotee material caliente sobre el conjunto <strong>de</strong>l regulador y la manguera.Si ocurre esto, cierre el suministro <strong>de</strong> gas <strong>de</strong> inmediato. Antes <strong>de</strong> usar, vacíe el <strong>de</strong>pósito/la batea para lagrasa, limpie el conjunto <strong>de</strong>l regulador y la manguera, e inspeccione si hay daños.• Nunca cocine en la parrilla sin el <strong>de</strong>pósito o la batea para la grasa en su lugar.• Mantenga los cables <strong>de</strong> suministro eléctrico alejados <strong>de</strong>l agua y <strong>de</strong> las superficies calientes.• NO use agua para apagar un incendio <strong>de</strong> grasa. No cierre la tapa para apagar un incendio <strong>de</strong> grasa. Useun extintor <strong>de</strong> incendios <strong>de</strong> polvo químico tipo BC, o apáguelo con tierra, arena o bicarbonato.• NO use la parrilla cuando esté bajo la influencia <strong>de</strong> drogas o alcohol.• PARA USO EN EXTERIORES SOLAMENTE. NO la use en interiores o en un ambiente cerrado, como ungaraje, un galpón o un corredor techado.• Coloque la parrilla en un lugar bien ventilado al aire libre y sobre una superficie nivelada no combustible,a una distancia segura <strong>de</strong> 10 pies (3.1 m) <strong>de</strong> materiales combustibles, edificaciones y salientes.• Habitantes <strong>de</strong> <strong>de</strong>partamentos: Para usar la parrilla a gas LP en su complejo <strong>de</strong> <strong>de</strong>partamentos, consultena la administración y cumplan con los requisitos y los códigos <strong>de</strong> protección contra incendios. Utilícenlasolamente en exteriores y sobre el terreno (no en un balcón, un patio, un garaje, etc.), a una distanciamínima <strong>de</strong> 15 pies (4.6 m) <strong>de</strong> cada lado a cualquier pared, estructura o material combustible.• Mantenga una distancia mínima <strong>de</strong> 36” (91 cm) entre todos los lados <strong>de</strong> la parrilla, las barandas <strong>de</strong> lasterrazas <strong>de</strong> ma<strong>de</strong>ra, las pare<strong>de</strong>s u otros materiales combustibles. El incumplimiento <strong>de</strong> estas indicacionessobre distancias pue<strong>de</strong> evitar la correcta ventilación y aumentar el riesgo <strong>de</strong> incendio o <strong>de</strong> daño a lapropiedad, lo que también podría causar lesiones personales. NO use la parrilla <strong>de</strong>bajo <strong>de</strong> construccionesáreas combustibles sin protección.• NO use ni instale esta parrilla en o sobre una embarcación o un vehículo <strong>de</strong> uso recreativo.• NO construya este mo<strong>de</strong>lo <strong>de</strong> parrilla en una construcción empotrada o corrediza.• Si usa un cepillo <strong>de</strong> cerdas para limpiar cualquiera <strong>de</strong> las superficies para cocinar, asegúrese <strong>de</strong> que noque<strong>de</strong>n cerdas sueltas sobre dichas superficies antes <strong>de</strong> usar la parrilla, ya que las cerdas sueltas sepue<strong>de</strong>n pegar a la comida.30
• NO almacene artículos en el carrito que puedan pren<strong>de</strong>rse fuego o dañar la parrilla (como químicos osuministros para piscinas, manteles, trozos <strong>de</strong> ma<strong>de</strong>ra).• Cuando la parrilla se usa, está caliente. Para evitar quemaduras:• NO intente mover la parrilla.• Trabe las ruedas <strong>de</strong> manera que la unidad no se mueva acci<strong>de</strong>ntalmente.• Use guantes protectores o manoplas para horno.• NO toque ninguna <strong>de</strong> las superficies calientes <strong>de</strong> la parrilla.• NO use ropa holgada ni permita que el cabello entre en contacto con la parrilla.• La parrilla no es para uso comercial. NO use esta parrilla para ningún otro fin que para el que fuediseñada.CUANDO USE LA PARRILLA A GAS, TENGA CUIDADO Y USE EL SENTIDO COMÚN.DE NO CUMPLIRSE LAS ADVERTENCIAS DE SEGURIDAD Y LAS PAUTAS DE ESTEMANUAL, PODRÍAN OCASIONARSE LESIONES PERSONALES GRAVES O DAÑOS A LAPROPIEDAD. GUARDE ESTE MANUAL COMO REFERENCIA FUTURA.ESPECIFICACIONES E INSTALACIÓN DEL CILINDRO (TANQUE) DE GAS LP:ADVERTENCIA• SOLO conecte esta parrilla a una válvula <strong>de</strong> cilindro Tipo 1. La válvula Tipo 1 se pue<strong>de</strong> i<strong>de</strong>ntificar porlas roscas externas gran<strong>de</strong>s en la salida <strong>de</strong> la válvula.• NO la conecte a un cilindro <strong>de</strong> propano con una capacidad superior a 20 lb (9.1 kg).• NO la conecte a un cilindro que tenga cualquier otro tipo <strong>de</strong> dispositivo <strong>de</strong> conexión <strong>de</strong> válvula.• Antes <strong>de</strong> usar, inspeccione el sello <strong>de</strong> caucho <strong>de</strong> la válvula <strong>de</strong>l tanque <strong>de</strong> propano en busca <strong>de</strong>fisuras, <strong>de</strong>sgaste o signos <strong>de</strong> <strong>de</strong>terioro. Un sello <strong>de</strong> caucho dañado pue<strong>de</strong> causar una fuga <strong>de</strong> gas, loque posiblemente <strong>de</strong>rive en una explosión, un incendio o lesiones corporales graves.• Cuando no use la parrilla, cierre la válvula <strong>de</strong>l cilindro.• Manipule el tanque con cuidado.• Siempre asegure el cilindro en posición vertical.• Nunca conecte a la parrilla un cilindro <strong>de</strong> gas LP que no cumpla con las reglamentaciones.• NO exponga los cilindros <strong>de</strong> gas LP a fuentes <strong>de</strong> ignición o calor excesivo.• NO almacene un cilindro <strong>de</strong> gas LP <strong>de</strong> repuesto <strong>de</strong>bajo <strong>de</strong> la parrilla o cerca <strong>de</strong> esta.• Permita que solo distribuidores <strong>de</strong> gas LP calificados llenen o reparen el cilindro <strong>de</strong> gas LP.• Al cargar el cilindro, NO <strong>de</strong>be superarse el 80 % <strong>de</strong> su capacidad.• Lea y siga todas las advertencias y las instrucciones incluidas en el cilindro y en este producto.PELIGRO• NO almacene un cilindro <strong>de</strong> gas LP <strong>de</strong> repuesto (lleno o vacío) <strong>de</strong>bajo <strong>de</strong> la parrilla o cerca <strong>de</strong> esta.Esto podría causar que se libere un exceso <strong>de</strong> presión a través <strong>de</strong> la válvula <strong>de</strong> <strong>de</strong>scarga <strong>de</strong> vapor,lo que a su vez podría causar un incendio, una explosión o lesiones personales graves, incluida lamuerte.• El gas propano es más pesado que el aire y se acumula en las zonas bajas. Es extremadamenteimportante que la ventilación sea a<strong>de</strong>cuada. Mantenga el o los orificios <strong>de</strong> ventilación <strong>de</strong>l gabinete<strong>de</strong>l cilindro <strong>de</strong> gas LP <strong>de</strong>spejados y libres <strong>de</strong> obstrucciones y <strong>de</strong>sechos.• NO introduzca ningún objeto extraño en la salida <strong>de</strong> la válvula <strong>de</strong>l cilindro, dado que esto podríadañar el sello <strong>de</strong> caucho. No use el tanque <strong>de</strong> propano si el sello <strong>de</strong> caucho está dañado. Un sello<strong>de</strong> caucho dañado pue<strong>de</strong> causar una fuga <strong>de</strong> gas, lo que posiblemente <strong>de</strong>rive en una explosión, unincendio, lesiones corporales graves o la muerte. Antes <strong>de</strong> usar, inspeccione el sello <strong>de</strong> caucho enbusca <strong>de</strong> fisuras, <strong>de</strong>sgaste o signos <strong>de</strong> <strong>de</strong>terioro.• Mantenga siempre el cilindro (tanque) en posición vertical al usarlo, transportarlo o almacenarlo.31
ESPECIFICACIONES DEL CILINDRO (TANQUE) DE GAS LP:Cilindro <strong>de</strong> gas LP (no suministrado con esta parrilla)El cilindro <strong>de</strong> gas LP (propano líquido) específicamente diseñado para usarse con esta parrilla <strong>de</strong>be tener 12”(30.5 cm) <strong>de</strong> diámetro × 18” (45.7 cm) <strong>de</strong> alto y una capacidad <strong>de</strong> 20 lb (9.1 kg), con una válvula <strong>de</strong>l cilindroTipo 1 y un dispositivo <strong>de</strong> protección contra sobrecarga (OPD).Esta parrilla está diseñada para usarse con cilindros <strong>de</strong> 20 lb (9.1 kg) <strong>de</strong> marca Worthington, Manchester oSMPC. Los cilindros <strong>de</strong> otras marcas que cumplen con las especificaciones <strong>de</strong> DOT pue<strong>de</strong>n adaptarse a estaparrilla si el anillo superior y el anillo inferior <strong>de</strong>l cilindro tienen dimensiones similares.La instalación <strong>de</strong> este electrodoméstico <strong>de</strong>be realizarse <strong>de</strong> acuerdo con:Todos los códigos locales correspondientes o, ante la ausencia <strong>de</strong> códigos locales, ya sea:• Código Nacional <strong>de</strong> <strong>Gas</strong> Combustible: ANSI Z223.1 NFPA 54• Código <strong>de</strong> Instalación <strong>de</strong> <strong>Gas</strong> Natural y Propano: CAN/CGA B149.1• Código <strong>de</strong> Instalación <strong>de</strong> <strong>Gas</strong> Natural: CAN/CGA B149.1 (Canadá)• Código <strong>de</strong> Instalación <strong>de</strong> <strong>Gas</strong> Propano: CAN/CGA B149.2 (Canadá)Para consultar los códigos locales, póngase en contacto con la compañía <strong>de</strong> gas natural o con el distribuidor<strong>de</strong> gas LP <strong>de</strong> su zona. Esta parrilla no fue diseñada para ser conectada a una línea <strong>de</strong> suministro <strong>de</strong> gasnatural. Si se usa una fuente <strong>de</strong> alimentación eléctrica externa, <strong>de</strong>be conectarse eléctricamente a tierraconforme a los códigos locales o, <strong>de</strong> no existir tales códigos, conforme al Código Eléctrico Nacional, ANSI/NFPA 70, o al Código Eléctrico Canadiense, CSA 22.1.Cuando compre o canjee un cilindro para la parrilla <strong>de</strong> gas, cerciórese <strong>de</strong> que esté construido y señalizadoconforme a las especificaciones para cilindros <strong>de</strong> gas LP <strong>de</strong>l Departamento <strong>de</strong> Transporte (DOT) <strong>de</strong> losEstados Unidos o <strong>de</strong> la norma nacional <strong>de</strong> Canadá CAN/CSA-B339 sobre cilindros, esferas y tubos para eltransporte <strong>de</strong> mercancías peligrosas; y <strong>de</strong> la Comisión, según corresponda; y <strong>de</strong> que incluya un dispositivo<strong>de</strong> protección contra sobrecarga (OPD) registrado y un dispositivo <strong>de</strong> conexión <strong>de</strong>l cilindro compatible con laconexión para artefactos <strong>de</strong> cocina para exteriores.El cilindro <strong>de</strong>be estar equipado con:• Una válvula <strong>de</strong> cierre con una salida <strong>de</strong> válvula <strong>de</strong>l cilindro <strong>de</strong> gas Tipo 1.• Una válvula Tipo 1 que evite que el gas circule hasta que se establezca un sello positivo.• Un sistema para la extracción <strong>de</strong> vapor.• Un collar para proteger la válvula <strong>de</strong> cierre <strong>de</strong>l cilindro.• Un dispositivo <strong>de</strong> carga <strong>de</strong> seguridad que tenga comunicación directa con el espacio <strong>de</strong> vapor<strong>de</strong>l cilindro.• Un dispositivo <strong>de</strong> protección contra sobrecarga (OPD) registrado.CARGA DEL CILINDRO (TANQUE) DE GAS LP:ADVERTENCIA• Permita que solo distribuidores <strong>de</strong> gas LP registrados y calificados llenen o reparena<strong>de</strong>cuadamente el cilindro <strong>de</strong> gas LP.• Antes <strong>de</strong> cargarlos, los tanques nuevos <strong>de</strong>ben ser purgados; informe al distribuidor <strong>de</strong> gas LP siestá usando un tanque nuevo.• Al cargar el cilindro, NO <strong>de</strong>be superarse el 80 % <strong>de</strong> su capacidad. Los tanques sobre saturadospue<strong>de</strong>n generar condiciones peligrosas. En los tanques sobrecargados se pue<strong>de</strong> acumular presióny esto pue<strong>de</strong> causar la emisión <strong>de</strong> vapores <strong>de</strong> gas propano a través <strong>de</strong> la válvula <strong>de</strong> <strong>de</strong>scarga.El vapor es combustible y podría provocar una explosión que cause quemaduras graves, dañoscorporales o la muerte, si entra en contacto con una fuente <strong>de</strong> chispas o una llama.• Cuando la parrilla no esté conectada al cilindro, siempre use una tapa protectora <strong>de</strong> cilindro.• Si canjea un cilindro a través <strong>de</strong> un programa <strong>de</strong> canje calificado, el cilindro nuevo <strong>de</strong>be tener unaválvula Tipo 1 y un dispositivo <strong>de</strong> protección contra sobrecarga (OPD).• Antes <strong>de</strong> usar, inspeccione el sello <strong>de</strong> caucho <strong>de</strong> la válvula <strong>de</strong>l tanque <strong>de</strong> propano en busca <strong>de</strong>fisuras, <strong>de</strong>sgaste o signos <strong>de</strong> <strong>de</strong>terioro. Un sello <strong>de</strong> caucho dañado pue<strong>de</strong> causar una fuga <strong>de</strong> gas,lo que posiblemente <strong>de</strong>rive en una explosión, un incendio o lesiones corporales graves.32
INSPECCIÓN DEL SELLO DE CAUCHO DEL CILINDRO (TANQUE) DE GAS LP:• Antes <strong>de</strong> usar, inspeccione el sello <strong>de</strong> caucho <strong>de</strong> la válvula<strong>de</strong>l tanque <strong>de</strong> propano en busca <strong>de</strong> fisuras, <strong>de</strong>sgaste osignos <strong>de</strong> <strong>de</strong>terioro. Un sello <strong>de</strong> caucho dañado pue<strong>de</strong>causar una fuga <strong>de</strong> gas, lo que posiblemente <strong>de</strong>rive en unaexplosión, un incendio o lesiones corporales graves.• La inspección <strong>de</strong>be llevarse a cabo cada vez que el tanque<strong>de</strong> propano se conecta a la parrilla, se vuelve a cargar, secanjea o no se ha usado durante más <strong>de</strong> 60 días.• No use un tanque <strong>de</strong> propano si el sello <strong>de</strong> caucho estádañado. Canjee el tanque o solicite el reemplazo <strong>de</strong>l sello <strong>de</strong>caucho en un centro <strong>de</strong> carga <strong>de</strong> gas propano calificado.Sello <strong>de</strong> Caucho enCondicionesSello <strong>de</strong> CauchoDañadoINSTALACIÓN DEL CILINDRO (TANQUE) DE GAS LP EN LA PARRILLA:1. Verifique que la válvula <strong>de</strong>l cilindro esté cerrada girando la perilla hacia la <strong>de</strong>recha. Inspeccione el sello <strong>de</strong>caucho <strong>de</strong> la válvula <strong>de</strong>l cilindro en busca <strong>de</strong> fisuras o signos <strong>de</strong> <strong>de</strong>terioro. No use el tanque <strong>de</strong> propanosi el sello está dañado, ya que podría ocurrir una fuga <strong>de</strong> gas.2. Coloque el cilindro en el sujetador <strong>de</strong>l tanque en la parte inferior <strong>de</strong>l gabinete.3. Oriente el cilindro <strong>de</strong> modo que la abertura <strong>de</strong> la válvula que<strong>de</strong> <strong>de</strong> frente al lado correcto <strong>de</strong> la parrilla yque la manguera no se dañe o que<strong>de</strong> retorcida4. Levante el alambre <strong>de</strong> cerradura <strong>de</strong>l tanque para asegurar el cilindro en sostenedor <strong>de</strong>l tanque.Cable <strong>de</strong> Tanque<strong>de</strong> RetenciónSujetador <strong>de</strong>l TanqueESPECIFICACIONES E INSTALACIÓNDEL REGULADOR Y LA MANGUERA:ADVERTENCIA• NO intente conectar el asador a ninguna otra fuente <strong>de</strong> suministro <strong>de</strong> combustible, como una línea<strong>de</strong> gas natural, ya que se compró para gas LP (propano).• NO use ningún otro conjunto <strong>de</strong> regulador <strong>de</strong> presión y manguera que no sea el suministrado conla parrilla. Como conjunto <strong>de</strong> regulador <strong>de</strong> presión y manguera <strong>de</strong> repuesto <strong>de</strong>be usar la parte n.º155-3412-0, que pue<strong>de</strong> obtener a través <strong>de</strong>l servicio <strong>de</strong> atención al cliente llamando al877-862-3449.• NO intente ajustar o reparar un regulador. El regulador está diseñado para funcionar a una presión<strong>de</strong> salida máxima <strong>de</strong> 11 pulgadas <strong>de</strong> columna <strong>de</strong> agua (2.74 kPa).• Asegúrese <strong>de</strong> que la válvula <strong>de</strong>l tanque esté CERRADA antes <strong>de</strong> conectar el cilindro <strong>de</strong> gas LP ala parrilla. Para cerrar la válvula correctamente, gire la perilla <strong>de</strong> la válvula hacia la <strong>de</strong>recha. Lea ysiga todas las instrucciones y advertencias que se encuentran en las etiquetas <strong>de</strong> seguridad <strong>de</strong> lamanguera <strong>de</strong> suministro. Antes <strong>de</strong> conectar el cilindro a la parrilla, lea y siga todas las advertenciasincluidas en este manual con relación al uso seguro <strong>de</strong> los cilindros <strong>de</strong> gas LP, y <strong>de</strong>l regulador y lamanguera. Lea y siga todas las advertencias incluidas en el cilindro <strong>de</strong> gas LP.33
REGULADOR Y MANGUERA:La parrilla viene equipada con un dispositivo <strong>de</strong> conexión Tipo 1 con las siguientes características:1. El sistema no permitirá la circulación <strong>de</strong> gas <strong>de</strong>s<strong>de</strong> el cilindro hasta que se establezca una conexiónpositiva a la válvula.Nota: La válvula <strong>de</strong>l cilindro y todas las perillas <strong>de</strong> los quemadores <strong>de</strong> la parrilla <strong>de</strong>ben estar cerradasantes <strong>de</strong> realizar o quitar cualquier conexión.2. Cuando viene equipado y se activa, un dispositivo <strong>de</strong> restricción <strong>de</strong>l flujo <strong>de</strong>l regulador restringe lacirculación <strong>de</strong> gas a 10 pies cúbicos por hora. Si se activa el dispositivo <strong>de</strong> restricción <strong>de</strong>l flujo, lleve acabo el procedimiento <strong>de</strong> restablecimiento <strong>de</strong>l regulador.Nota: Si la parrilla no se calienta lo suficiente como para cocinar, esposible que el dispositivo <strong>de</strong> restricción <strong>de</strong>l flujo esté activado.CONEXIÓN DEL REGULADOR Y LA MANGUERA:1. Antes <strong>de</strong> usar, inspeccione el sello <strong>de</strong> caucho <strong>de</strong> la válvula <strong>de</strong>l tanque<strong>de</strong> propano en busca <strong>de</strong> fisuras, <strong>de</strong>sgaste o signos <strong>de</strong> <strong>de</strong>terioro.Un sello <strong>de</strong> caucho dañado pue<strong>de</strong> causar una fuga <strong>de</strong> gas, lo queposiblemente <strong>de</strong>rive en una explosión, un incendio o lesiones corporalesgraves. No use un tanque <strong>de</strong> propano si el sello <strong>de</strong> caucho está dañado.2. Conecte o <strong>de</strong>sconecte el regulador <strong>de</strong>l cilindro <strong>de</strong> gas LP solo cuando elcilindro esté apoyado en el sujetador <strong>de</strong>l tanque.3. Verifique que la válvula <strong>de</strong>l cilindro esté cerrada girando la perilla hacia la <strong>de</strong>recha.Inspección <strong>de</strong>l Sello <strong>de</strong> Caucho(consulte la página 33)4. Verifique que las perillas <strong>de</strong> control <strong>de</strong> los quemadores <strong>de</strong> la parrilla estén en la posición “APAGADO”.5. Inspeccione visualmente el conjunto <strong>de</strong> la manguera antes <strong>de</strong> cada uso en busca <strong>de</strong> daños, <strong>de</strong>sgasteexcesivo o signos <strong>de</strong> <strong>de</strong>terioro. Si <strong>de</strong>tecta alguna <strong>de</strong> estas condiciones, reemplace el conjunto antes <strong>de</strong>usar la parrilla. Solo <strong>de</strong>be usarse el repuesto suministrado por el fabricante.6. Quite la tapa protectora <strong>de</strong> plástico <strong>de</strong> la válvula <strong>de</strong>l cilindro.7. Verifique que la manguera no tenga dobleces y que no esté en contacto con bor<strong>de</strong>s filosos y consuperficies que puedan calentarse durante el uso.8. Sostenga el regulador e introduzca la boquilla <strong>de</strong> bronce en la salida <strong>de</strong> la válvula <strong>de</strong>l cilindro <strong>de</strong> gas LP.Cerciórese <strong>de</strong> que el dispositivo esté centrado a<strong>de</strong>cuadamente.9. Gire la tuerca <strong>de</strong> acoplamiento gran<strong>de</strong> manualmente y ajústela por completo. Tenga cuidado <strong>de</strong> noenroscar la tuerca <strong>de</strong> acoplamiento a la válvula <strong>de</strong>l cilindro. No use herramientas para ajustar la conexión.Nota: Si no pue<strong>de</strong> hacer la conexión, repita los pasos 7 y 8.10. Antes <strong>de</strong> encen<strong>de</strong>r la parrilla, inspeccione todos los conectores en busca <strong>de</strong> fugas. Consulte la sección“Pruebas <strong>de</strong> Detección <strong>de</strong> Fugas” <strong>de</strong> este manual.PROCEDIMIENTO DE RESTABLECIMIENTO DEL REGULADOR:Si la parrilla no se calienta lo suficiente como para cocinar, es posible que el dispositivo <strong>de</strong> restricción <strong>de</strong>lflujo esté activado.Restablecimiento mínimo:Coloque TODAS las perillas <strong>de</strong> control <strong>de</strong> los quemadores en la posición “APAGADO” y cierre la válvula<strong>de</strong>l cilindro. Espere un minuto. Lentamente, abra la válvula <strong>de</strong>l cilindro y vuelva a encen<strong>de</strong>r la parrilla. Si lallama <strong>de</strong> los quemadores es alta y la parrilla se calienta a<strong>de</strong>cuadamente, proceda a cocinar.Restablecimiento total:Coloque TODAS las perillas <strong>de</strong> control <strong>de</strong> los quemadores en la posición “APAGADO” y cierre la válvula<strong>de</strong>l cilindro. Desconecte el regulador y la manguera <strong>de</strong>l cilindro. Espere dos minutos, vuelva a conectar elregulador y la manguera, y realice la prueba <strong>de</strong> <strong>de</strong>tección <strong>de</strong> fugas.PRUEBAS DE DETECCIÓN DE FUGAS:ADVERTENCIA• Nunca use la parrilla sin haber realizado las pruebas <strong>de</strong> <strong>de</strong>tección <strong>de</strong> fugas en todas lasconexiones <strong>de</strong> gas, las mangueras y el tanque <strong>de</strong> propano. Consulte la sección “Pruebas <strong>de</strong>Detección <strong>de</strong> Fugas” <strong>de</strong> este manual para conocer los procedimientos correctos.34
CUÁNDO LLEVAR A CABO UNA PRUEBA DE DETECCIÓN DE FUGAS:• Después <strong>de</strong> armar la parrilla y antes <strong>de</strong> encen<strong>de</strong>rla por primera vez, incluso se la compró totalmente armada.• Cada vez que el cilindro <strong>de</strong> gas LP se vuelve a cargar o se canjea, o si se <strong>de</strong>sconecta o se reemplaza cualquiera <strong>de</strong>los componentes <strong>de</strong> gas.• Siempre que mueva la parrilla <strong>de</strong> lugar.• Al menos una vez al año o si la parrilla no se usó durante más <strong>de</strong> 60 días.INSPECCIÓN PARA DETECTAR FUGAS:35PRECAUCIÓN:Nota:Los olores fuertes, los resfriados, la congestión <strong>de</strong> los senos paranasales, entre otras cosas,pue<strong>de</strong>n impedir la <strong>de</strong>tección <strong>de</strong> gas propano por medio <strong>de</strong>l olfato. Tenga cuidado y use elsentido común al realizar las pruebas <strong>de</strong> <strong>de</strong>tección <strong>de</strong> fugas.La prueba <strong>de</strong> <strong>de</strong>tección <strong>de</strong> fugas <strong>de</strong>be llevarse a cabo en áreas correctamente iluminadas para po<strong>de</strong>r ver sise hacen burbujas, y en áreas sin viento y sin ruidos para po<strong>de</strong>r <strong>de</strong>tectar las fugas más gran<strong>de</strong>s por medio<strong>de</strong>l olfato o <strong>de</strong>l oído.1. Haga una mezcla <strong>de</strong> 50% <strong>de</strong> agua y 50% <strong>de</strong> jabón líquido para lavar platos.2. Abra la tapa.3. Asegúrese <strong>de</strong> que las perillas <strong>de</strong> control estén en la posición “APAGADO”.4. Permita que circule gas a través la válvula <strong>de</strong>l cilindro. Para ello, gire la perilla <strong>de</strong>la válvula <strong>de</strong>l cilindro hacia la izquierda hasta abrirla por completo. Si escucha unzumbido o huele gas, apague el gas. Ajuste las conexiones que tengan fugas. Sila fuga se <strong>de</strong>tecta en la tuerca <strong>de</strong> conexión y ajustarla no <strong>de</strong>tiene la fuga, vuelva ainspeccionar el sello <strong>de</strong> caucho <strong>de</strong>l tanque <strong>de</strong> propano.5. Aplique la mezcla <strong>de</strong> agua jabonosa a lo siguiente:ABCDEFGHIJSoldadura <strong>de</strong>l tanque (cilindro) <strong>de</strong> suministro.Tuerca <strong>de</strong> conexión a la válvula <strong>de</strong>l tanque.Lado posterior <strong>de</strong> la tuerca <strong>de</strong> conexión al niple <strong>de</strong> latón.Conexión <strong>de</strong>l niple <strong>de</strong> latón al regulador.Conexiones <strong>de</strong>l regulador a las mangueras <strong>de</strong> suministro <strong>de</strong> gas.Conexión <strong>de</strong> la manguera <strong>de</strong> suministro <strong>de</strong> gas al conjunto <strong>de</strong> la válvula <strong>de</strong> lahornilla lateral.Tapa <strong>de</strong>l vástago <strong>de</strong> la válvula <strong>de</strong> la hornilla lateral.Conexión <strong>de</strong> la hornilla lateral a la manguera.Conexión <strong>de</strong> la manguera al múltiple <strong>de</strong> gas.El largo completo <strong>de</strong> la manguera <strong>de</strong> suministro <strong>de</strong> gas.Válvula <strong>de</strong>l tanque al cilindroK6. Verifique cada lugar enumerado (A-J) para <strong>de</strong>tectar la formación <strong>de</strong> burbujas queindiquen una fuga <strong>de</strong> gas. Es posible que las fugas gran<strong>de</strong>s no se <strong>de</strong>tecten pormedio <strong>de</strong> burbujas, sino que produzcan un sonido <strong>de</strong> ráfaga u olor a gas.7. Cierre el suministro <strong>de</strong> gas en la válvula <strong>de</strong>l cilindro.8. Abra las perillas <strong>de</strong> control para liberar la presión <strong>de</strong> gas en la manguera.9. Coloque las perillas <strong>de</strong> control en la posición “APAGADO”.10. Ajuste las conexiones con fugas. Si la fuga se <strong>de</strong>tecta en la tuerca <strong>de</strong> conexión y ajustarla no <strong>de</strong>tiene la fuga, vuelva ainspeccionar el sello <strong>de</strong> caucho <strong>de</strong>l tanque <strong>de</strong> propano (consulte la página 33).11. Repita la prueba con el agua jabonosa hasta que no se <strong>de</strong>tecten más fugas.12. Cierre el suministro <strong>de</strong> gas en la válvula <strong>de</strong>l cilindro hasta que usted esté listo para usar la parrilla.13. Enjuague los residuos jabonosos con agua fría y seque con una toalla.14. Antes <strong>de</strong> encen<strong>de</strong>r la parrilla, espere 5 minutos para que todo el gas se disipe <strong>de</strong>l área.ADVERTENCIA:PELIGROPara prevenir los peligros vinculados con los incendios o explosiones:• NO fume ni permita que haya fuentes <strong>de</strong> ignición en la zona don<strong>de</strong> lleve a cabo una prueba <strong>de</strong><strong>de</strong>tección <strong>de</strong> fugas.• Realice la prueba en un área bien ventilada AL AIRE LIBRE, protegida contra el viento.• Nunca lleve a cabo una prueba <strong>de</strong> <strong>de</strong>tección <strong>de</strong> fugas con un fósforo o una llama.• Nunca lleve a cabo una prueba <strong>de</strong> <strong>de</strong>tección <strong>de</strong> fugas con la parrilla en uso o aún calienteSoyez à l’affût <strong>de</strong>s bullesNO use la parrilla si no pue<strong>de</strong> <strong>de</strong>tener las fugas. Póngase en contacto con un centro <strong>de</strong> servicios<strong>de</strong> reparación <strong>de</strong> artefactos <strong>de</strong> gas calificado.KIJGHEFDCBA
LISTA DE COMPROBACIÓN PREVIA AL ARRANQUE:PELIGROSi no se siguen estos pasos, pue<strong>de</strong>n ocurrir daños a la propiedad, lesiones corporales, quemadurasgraves y la muerte. Estos pasos <strong>de</strong>ben llevarse a cabo <strong>de</strong>spués <strong>de</strong> que la parrilla se armó y antes<strong>de</strong> cada uso. NO use esta parrilla hasta haber leído y entendido TODAS las advertencias y lasinstrucciones incluidas en este manual.• Asegúrese <strong>de</strong> que la parrilla esté correctamente armada.• Antes <strong>de</strong> usar, inspeccione la manguera <strong>de</strong> suministro <strong>de</strong> gas para <strong>de</strong>tectar quemaduras, <strong>de</strong>sgastey dobleces, y para verificar si está correctamente dispuesta. Si observa una abrasión o un <strong>de</strong>sgasteexcesivos evi<strong>de</strong>ntes, o si la manguera está cortada, <strong>de</strong>be reemplazarla antes <strong>de</strong> usar la parrilla.Reemplácela por el mo<strong>de</strong>lo <strong>de</strong> regulador y manguera n.º 155-3412-0, que pue<strong>de</strong> obtener a través <strong>de</strong>lservicio <strong>de</strong> atención al cliente llamando al 877-862-3449.• Inspeccione todas las conexiones <strong>de</strong> gas, la manguera y el tanque <strong>de</strong> propano en busca <strong>de</strong> fugas.Consulte la sección “Pruebas <strong>de</strong> Detección <strong>de</strong> Fugas”.• Asegúrese <strong>de</strong> que todos los cables <strong>de</strong> suministro eléctrico estén correctamente puestos a tierra.Mantenga los cables <strong>de</strong> suministro eléctrico y la manguera <strong>de</strong> suministro <strong>de</strong> gas combustible alejados <strong>de</strong>las superficies calientes. La manguera <strong>de</strong>be estar al menos a 3” <strong>de</strong> las superficies calientes.• Coloque la parrilla en un lugar bien ventilado sobre una superficie nivelada no combustible, a unadistancia segura <strong>de</strong> 10 pies (3.1 m) <strong>de</strong> materiales combustibles, edificaciones y salientes.• Coloque correctamente el <strong>de</strong>pósito para la grasa vacío <strong>de</strong>bajo <strong>de</strong>l orificio <strong>de</strong> drenaje <strong>de</strong> la grasa en laparte inferior <strong>de</strong> la parrilla para recoger la grasar durante el uso.• NO bloquee las áreas <strong>de</strong> ventilación en los laterales, la parte posterior o el compartimiento <strong>de</strong>l carrito <strong>de</strong>la parrilla.INSTRUCCIONES DE ENCENDIDO:ADVERTENCIALea, entienda y siga todas las advertencias y las instrucciones incluidas en este manual. NO omitaninguna instrucción ni advertencia contenida en las secciones prece<strong>de</strong>ntes <strong>de</strong> este manual.Siga las instrucciones con exactitud.1. ABRA LA TAPA DE LA PARRILLA antes <strong>de</strong> intentar encen<strong>de</strong>r un quemador para que no se acumulehumo en el interior <strong>de</strong> la parrilla. Si la tapa está cerrada, podría ocurrir una explosión.2. Verifique que todas las perillas <strong>de</strong> control <strong>de</strong> los quemadores y la válvula <strong>de</strong> cilindro estén en laposición “APAGADO”.3. Abra el suministro <strong>de</strong> gas combustible girando lentamente la perilla <strong>de</strong> la válvula <strong>de</strong>l cilindro haciala izquierda hasta que esté completamente abierta.4. NO apoye la cabeza, el cuerpo o los brazos sobre la parrilla cuando esté encendida.ENCENDIDO DE LOS QUEMADORES PRINCIPALES:1. Abra la tapa antes <strong>de</strong> encen<strong>de</strong>r la hornilla.2. Verifique que todas las perillas <strong>de</strong> control estén en la posición “APAGADO”.3. Empuje y gire la PERILLA DE CONTROL <strong>de</strong> la hornilla lentamente (2 a 3 segundos)a la posición “ALTO”. Se <strong>de</strong>bería escuchar el sonido clik <strong>de</strong>l encen<strong>de</strong>dor.Nota: Pue<strong>de</strong> ser que el Paso 3 se necesite repetir 2-3 veces para encen<strong>de</strong>r parrilla.4. Si la hornilla NO se encien<strong>de</strong> en 5 segundos, gire la perilla <strong>de</strong> control a la posición “APAGADO”, espere5 minutos para que se disipe el gas y repita el procedimiento <strong>de</strong> encendido.5. Para encen<strong>de</strong>r las <strong>de</strong>más hornillas, empuje y gire las perillas <strong>de</strong> contro <strong>de</strong> la hornillas a “ALTO” ensucesión <strong>de</strong>s<strong>de</strong> la <strong>de</strong>recha a la izquierda.6. Si no se encien<strong>de</strong> la hornilla al usar el encen<strong>de</strong>dor, consulte la sección <strong>de</strong> “Encendido <strong>de</strong> las hornillasprincipales con un cerillo”.7. Para apagar, gire cada perilla <strong>de</strong> control en sentido horario hasta que se trabe en la posición “APAGADO”.Esto no apaga el flujo <strong>de</strong> gas <strong>de</strong>l cilindro.Nota: Si el quemador no se encien<strong>de</strong> o la llama es muy baja, consulte la sección “Solución <strong>de</strong>problemas” <strong>de</strong>l manual <strong>de</strong>l propietario.36
37ENCENDIDO DE LOS QUEMADORES PRINCIPALES CON FÓSFOROS:1. Abra la tapa antes <strong>de</strong> encen<strong>de</strong>r un quemador.Orifice d’allumage2. Asegúrese <strong>de</strong> que todas las perillas <strong>de</strong> control estén en la posición“APAGADO”.3. Coloque un fósforo <strong>de</strong> papel en el extremo <strong>de</strong>l encen<strong>de</strong>dor. Encienda elfósforo e introdúzcalo en el orificio <strong>de</strong> encendido en el costado izquierdo <strong>de</strong>la asador a aproximadamente 1/2” (<strong>de</strong> 1 cm a 2 cm) <strong>de</strong>l quemador.4. Gire la perilla <strong>de</strong> control <strong>de</strong>l quemador QUE ESTÁ EN EL EXTREMOAllumeur-allumetteIZQUIERDO a la posición “ALTO”. El quemador <strong>de</strong>bería encen<strong>de</strong>rse en5 segundos.5. Si el quemador no se encien<strong>de</strong>, gire la perilla <strong>de</strong> control a la posición “APAGADO”, espere5 minutos para que el gas se disipe y repita el procedimiento <strong>de</strong> encendido.6. Una vez encendido, encienda los quemadores adyacentes en forma secuencial presionando y girandocada perilla <strong>de</strong> control a la posición “ALTO”.7. Si el quemador no se encien<strong>de</strong> en uno <strong>de</strong> los primeros intentos <strong>de</strong> encendido con un fósforo, hay unproblema con el suministro <strong>de</strong> gas. Cierre el suministro <strong>de</strong> gas en el quemador y en el cilindro. NO intenteusar la asador hasta que el problema se haya <strong>de</strong>tectado y corregido.Nota: Si el quemador no se encien<strong>de</strong> o la llama es muy baja, consulte la sección “Solución <strong>de</strong>problemas” <strong>de</strong>l manual <strong>de</strong>l propietario.ENCENDIDO DE LA HORNILLA LATERAL:1. Abra la tapa antes <strong>de</strong> encen<strong>de</strong>r el quemador lateral.2. Asegúrese <strong>de</strong> que la perilla <strong>de</strong> control esté en la posición “APAGADO”.3. Presione y mantenga presionado el quemador lateral perilla <strong>de</strong> control ygírela lentamente (2 a 3 segundos) a “ALTO”. Usted <strong>de</strong>be oír el clic <strong>de</strong>lencen<strong>de</strong>dor.Nota: Pue<strong>de</strong> ser que el Paso 3 se necesite repetir 2-3 veces paraencen<strong>de</strong>r parrilla.4. Si la ignición NO ocurre en el plazo <strong>de</strong> 5 segundos, gire la perilla <strong>de</strong> control a la posición “APAGADO”,espere 5 minutos para que el gas se disipe y repita el procedimiento <strong>de</strong> encendido.5. Si el quemador no se encien<strong>de</strong> con el encen<strong>de</strong>dor; consulte “Encendido <strong>de</strong>l Quemador Lateral” sección.6. Para apagar el quemador, gire la perilla <strong>de</strong> control hacia la <strong>de</strong>recha hasta que trabe en la posición“APAGADO”.Nota: Si el quemador no se encien<strong>de</strong> o la llama es muy baja, consulte la sección “Solución <strong>de</strong>problemas” <strong>de</strong>l manual <strong>de</strong>l propietario.ENCENDIDO DE LA HORNILLA LATERAL CON FÓSFOROS:1. Abra la tapa <strong>de</strong> la hornilla lateral antes <strong>de</strong> encen<strong>de</strong>rla.2. Gire la perilla <strong>de</strong> control <strong>de</strong> la hornilla a la posición “APAGADO”.3. Prenda y coloque un cerillo aproximadamente a 1/2” pulgada (1 a 2 cm) <strong>de</strong> la hornilla.4. Gire la perilla <strong>de</strong> control <strong>de</strong> la hornilla lateral a la posición “ALTO”. La hornilla <strong>de</strong>be encen<strong>de</strong>rseen 5 segundos.5. Si la hornilla no se encien<strong>de</strong>, gire la perilla <strong>de</strong> control a la posición“APAGADO” y espere5 minutos para que se disipe el gas y repita el procedimiento <strong>de</strong> encendido.6. Si la hornilla no se encien<strong>de</strong> <strong>de</strong>spués <strong>de</strong> varios intentos con un cerillo,entonces hay un problema con el suministro <strong>de</strong> gas. Cierre el gas enla hornilla y en el cilindro. NO trate <strong>de</strong> operar la asador hasta haberencontrado y corregido el problema.Nota: Si el quemador no se encien<strong>de</strong> o la llama es muy baja, consulte lasección “Solución <strong>de</strong> problemas” <strong>de</strong>l manual <strong>de</strong>l propietario.Nota: Observe la altura <strong>de</strong> la llama una vez encendida: La llama <strong>de</strong>be ser <strong>de</strong> color azul/amarillo y<strong>de</strong>be ser <strong>de</strong> 1” a 2” cuando el quemador está en la posición “ALTO”.Consulte la sección <strong>de</strong>l manual sobre el ajuste <strong>de</strong> los quemadores para regular la llama.
FUNCIONAMIENTO DE LA PARRILLA:ADVERTENCIA• Lea y siga todas las advertencias y las instrucciones incluidas en las secciones anteriores <strong>de</strong> estemanual.• Nunca use carbón, rocas volcánicas o briquetas <strong>de</strong> ma<strong>de</strong>ra en una parrilla a gas. Los copossaborizantes <strong>de</strong>ben colocarse en una caja para ahumar <strong>de</strong> metal para contener las cenizas y evitarincendios.• NO cubra las rejillas para cocinar u otros componentes con papel <strong>de</strong> aluminio, dado que estobloquea la ventilación y pue<strong>de</strong> ocasionar daños a la parrilla o lesiones personales.• NO <strong>de</strong>je la parrilla sin supervisión cuando esté encendida o cuando se esté usando.• NO mueva la parrilla cuando se esté usando.• NO use agua para apagar un incendio <strong>de</strong> grasa. No cierre la tapa para apagar un incendio <strong>de</strong>grasa. Use un extintor <strong>de</strong> incendios <strong>de</strong> polvo químico tipo BC, o apáguelo con tierra, arena obicarbonato.• Nunca cocine en la parrilla sin el <strong>de</strong>pósito o la batea para la grasa en su lugarPUESTA A PUNTO DE LA PARRILLA:• Como consecuencia <strong>de</strong> la fabricación y para la preservación <strong>de</strong> los componentes <strong>de</strong> la parrilla, es posibleque haya residuos <strong>de</strong> aceite en los quemadores y en las superficies para cocinar <strong>de</strong> la parrilla.• Antes <strong>de</strong> cocinar en la parrilla por primera vez, <strong>de</strong>be precalentarla durante 15 minutos en la posición“ALTO” para quemar estos aceites residuales hasta eliminarlos.PRECALENTAMIENTO DE LA PARRILLA:• Antes <strong>de</strong> cada uso, es recomendable que precaliente la parrilla. Esto garantiza que las superficies <strong>de</strong> laparrilla tengan la temperatura <strong>de</strong>seada para dorar los azúcares <strong>de</strong> los alimentos al cocinar. Después <strong>de</strong>encen<strong>de</strong>r la parrilla, coloque las perillas <strong>de</strong> control <strong>de</strong> los quemadores en la posición “ALTO” durante 5 a10 minutos. Durante el período <strong>de</strong> precalentamiento, cierre la tapa.CONTROL DE LAS LLAMARADAS Y LOS INCENDIOS DE GRASA:• Las llamaradas forman parte <strong>de</strong> cocinar carne en una parrilla a gas. Es lo que contribuye al sabor único<strong>de</strong> cocinar en una parrilla a gas. Tenga cuidado al abrir la tapa, dado que pue<strong>de</strong>n generarse llamaradasrepentinas. Un exceso <strong>de</strong> llamaradas pue<strong>de</strong> recocer la comida y causar una situación peligrosa parausted y para la parrilla. Las llamaradas excesivas ocurren como consecuencia <strong>de</strong> la acumulación <strong>de</strong> grasaen la parrilla. De ocurrir esto, NO vierta agua sobre las llamas. Esto pue<strong>de</strong> causar salpicaduras <strong>de</strong> grasaque pue<strong>de</strong>n conllevar quemaduras o daños corporales graves.• Si ocurre un incendio <strong>de</strong> grasa, <strong>de</strong>je la tapa abierta, gire las perillas <strong>de</strong> los quemadores a la posición“APAGADO” y cierre la válvula <strong>de</strong>l cilindro <strong>de</strong> gas LP. Si es posible, reubique la comida en una seccióndiferente <strong>de</strong> la rejilla para cocinar y <strong>de</strong>je que la grasa arda hasta consumirse o apague las llamas conbicarbonato.• Si ocurre un incendio <strong>de</strong> grasa con la tapa cerrada, <strong>de</strong>je la tapa cerrada, ya que una corriente <strong>de</strong> airerepentina pue<strong>de</strong> aumentar las llamas. Coloque las perillas <strong>de</strong> los quemadores en la posición “APAGADO”y cierre la válvula <strong>de</strong>l cilindro <strong>de</strong> gas LP. Deje que la grasa arda hasta consumirse.• Nunca vierta agua en un incendio <strong>de</strong> grasa, dado que la grasa pue<strong>de</strong> salpicar o esparcirse, y provocarlesiones corporales o daños a la propiedad.• Si el incendio <strong>de</strong> grasa no se consume rápidamente, o aumenta o se esparce, use un extintor <strong>de</strong>incendios <strong>de</strong> polvo químico tipo BC, o apáguelo con tierra, arena o bicarbonato. No cierre la tapa paraapagar un incendio <strong>de</strong> grasa.PARA MINIMIZAR LAS LLAMARADAS:• Quítele el exceso <strong>de</strong> grasa a la carne antes <strong>de</strong> cocinarla.• Cocine carnes con alto contenido <strong>de</strong> grasa (pollo o cerdo) con una llama baja o indirectamente.• Asegúrese <strong>de</strong> que la parrilla esté sobre una superficie nivelada y <strong>de</strong> que la grasa pueda escurrirse por laparrilla a través <strong>de</strong>l orificio <strong>de</strong> drenaje en la parte inferior hasta el <strong>de</strong>pósito o la batea para la grasa.• Limpie la parrilla con frecuencia para minimizar la acumulación <strong>de</strong> grasa.COCCIÓN INDIRECTA:• La cocción indirecta es el proceso que le permite cocinar la comida sin que esta esté directamente sobrela fuente <strong>de</strong> calor. Pue<strong>de</strong> dorar la carne sobre una llama alta en un lado <strong>de</strong> la parrilla y cocinar lentamenteun asado en el otro lado <strong>de</strong> la parrilla (sin encen<strong>de</strong>r).38
COCCIÓN CON ASADOR:• La parrilla tiene orificios preperforados <strong>de</strong> fábrica para montar un asador (se ven<strong>de</strong> por separado). No useningún asador que no haya sido fabricado específicamente para esta parrilla.• Lea y siga todas las instrucciones provistas con el asador. Guar<strong>de</strong> las instrucciones como referenciafutura.• No use el quemador lateral cuando use un asador.ADVERTENCIA• Cuando use un asador para corriente CA, <strong>de</strong>be estar puesto eléctricamente a tierra conforme a loscódigos locales o, <strong>de</strong> no existir tales códigos:• En los Estados Unidos: El Código Eléctrico Nacional, ANSI-NFPA n.º 70, última edición• En Canadá: El Código Eléctrico Canadiense, CSA C22.1• El asador viene equipado con un enchufe <strong>de</strong> tres patillas para proteger contra <strong>de</strong>scargas eléctricas.Este enchufe <strong>de</strong>be enchufarse directamente en un tomacorriente para enchufes <strong>de</strong> tres patillascorrectamente puesto a tierra. Nunca corte o quite el enchufe con toma <strong>de</strong> tierra. Si usa un cable <strong>de</strong>extensión, también <strong>de</strong>be tener un tomacorriente para enchufes tres patillas.• Todos los cables <strong>de</strong> suministro eléctrico <strong>de</strong>ben mantenerse alejados <strong>de</strong>l agua y <strong>de</strong> las superficiescalientes <strong>de</strong> la parrilla.APAGADO DE LA PARRILLA:1. Cierre la válvula <strong>de</strong>l cilindro.2. Coloque todas las perillas <strong>de</strong> control <strong>de</strong> los quemadores en la posición“APAGADO”.Nota: Primero cierre el cilindro <strong>de</strong> gas LP para evitar que que<strong>de</strong> gas en elsistema bajo presión.PRECAUCIÓN: Cuando la parrilla no se usa, la válvula <strong>de</strong>l cilindro <strong>de</strong>be estarsiempre en la posición apagado o cerrada.Para cerrar la válvula <strong>de</strong>l cilindro, gire la perillahacia la <strong>de</strong>recha hasta que haga tope.USO DE OTRAS FUNCIONES DE LA PARRILLA:ADVERTENCIA• Lea las instrucciones <strong>de</strong> encendido <strong>de</strong> la parrilla para encen<strong>de</strong>r el quemador lateral.• Nunca cierre la cubierta <strong>de</strong>l quemador lateral cuando el quemador esté encendido.• Cuando cocine en el quemador lateral, use una olla <strong>de</strong> 10” <strong>de</strong> diámetro o más pequeña SIN un mangoextendido. Centre la ola en el quemador.• Nunca coloque más <strong>de</strong> 15 libras sobre el quemador lateral. El quemador lateral no está construido parasoportar un peso superior a 15 libras.• Tenga cuidado <strong>de</strong> no sacudir la parrilla, el quemador lateral o la olla para evitar que se <strong>de</strong>rrame elcontenido <strong>de</strong> la olla, lo que posiblemente cause quemaduras graves.• NO use el quemador lateral para freír comida en aceite a fin <strong>de</strong> evitar los peligros asociados con laignición <strong>de</strong> aceite, lo que pue<strong>de</strong> crear una situación muy peligrosa.LA HORNILLA LATERAL:• La hornilla lateral pue<strong>de</strong> usarse para preparar platillos <strong>de</strong> acompañamiento como frijoles, papas, maíz opara calentar salsas.• La válvula <strong>de</strong> la hornilla <strong>de</strong>be ajustarse <strong>de</strong> llama fuerte a llama suave <strong>de</strong> acuerdo con sus exigencias <strong>de</strong>cocina.39
ADVERTENCIA:CUIDADO Y MANTENIMIENTO ADECUADOS:Si usa un cepillo <strong>de</strong> cerdas para limpiar cualquiera <strong>de</strong> las superficies para cocinar,asegúrese <strong>de</strong> que no que<strong>de</strong>n cerdas sueltas sobre dichas superficies antes <strong>de</strong> usar laparrilla, ya que las cerdas sueltas se pue<strong>de</strong>n pegar a la comida.LIMPIEZA DEL INTERIOR DE LA PARRILLA:• Recomendamos limpiar los residuos <strong>de</strong> comida inmediatamente <strong>de</strong>spués <strong>de</strong> cocinar raspando concuidado las rejillas con un cepillo <strong>de</strong> cerdas <strong>de</strong> alambre y luego encen<strong>de</strong>r los quemadores en la posición“ALTO” durante unos 5 minutos.ADVERTENCIA:NO <strong>de</strong>je la parrilla sin supervisión cuando está encendida. Use manoplas para horno paraprotegerse contra las quemaduras.• El calor <strong>de</strong> los quemadores quemará la mayor parte <strong>de</strong> los residuos <strong>de</strong> comida y grasa <strong>de</strong> las rejillas y losdifusores <strong>de</strong>calor, y los convertirán en una sustancia tipo ceniza que caerá al fondo <strong>de</strong> la caja <strong>de</strong> fuego o en la bateapara la grasa. Después <strong>de</strong> que la parrilla se enfríe (aproximadamente 30 minutos), quite las rejillas ylos difusores <strong>de</strong> calor, y cepille las cenizas y la grasa <strong>de</strong> la caja <strong>de</strong> fuego. Limpie y vuelva a colocar el<strong>de</strong>pósito para la grasa. Antes <strong>de</strong> volver a colocar los difusores <strong>de</strong> calor en la parrilla, inspecciónelos enbusca <strong>de</strong> daños o signos <strong>de</strong> <strong>de</strong>terioro. (Para solicitar repuestos, llame al 877-862-3449).• Si lo <strong>de</strong>sea, lave las rejillas y los difusores <strong>de</strong> calor con un <strong>de</strong>tergente suave y enjuáguelos con aguacaliente periódicamente.PRECAUCIÓN:NO <strong>de</strong>je residuos <strong>de</strong> cenizas en la batea para la grasa o en la caja <strong>de</strong> fuego, ya que estopue<strong>de</strong> evitar el correcto drenaje <strong>de</strong> la grasa <strong>de</strong> la parrilla.INTERIOR DE LA TAPA DE LA PARRILLA:• Dentro <strong>de</strong> la tapa <strong>de</strong> la parrilla se acumulará humo, que pue<strong>de</strong> caer sobre la comida. Limpie el interior<strong>de</strong> la tapa <strong>de</strong> la parrilla con un cepillo para fregar, y una solución <strong>de</strong> agua y bicarbonato. Séquelaminuciosamente. No confunda esto con pintura. El interior <strong>de</strong> las tapas <strong>de</strong> las parrillas a gas no se pinta.MANTENIMIENTO EXTERIOR DE LA PARRILLA:• Para proteger la parrilla contra el exceso <strong>de</strong> óxido, la unidad <strong>de</strong>be mantenerse limpia y cubierta siempreque no se use.• Superficies pintadas. Lávelas con un <strong>de</strong>tergente suave o un limpiador no abrasivo y agua tibia jabonosa.• Superficies <strong>de</strong> acero inoxidable. Para mantener la apariencia <strong>de</strong> la parrilla, lávelas con un <strong>de</strong>tergentesuave y agua tibia jabonosa, y séquelas con un paño suave <strong>de</strong>spués <strong>de</strong> cada uso. Es posible que para los<strong>de</strong>pósitos <strong>de</strong> grasa pegada se necesite una esponja abrasiva <strong>de</strong> plástico. Úsela solo en la dirección <strong>de</strong>lacabado pulido para evitar daños. No use la esponja abrasiva en las áreas con gráficos. Para proteger elacabado exterior <strong>de</strong> la parrilla, pue<strong>de</strong> usar cera para auto.• Superficies <strong>de</strong> porcelana. Debido a la composición similar al vidrio, la mayoría <strong>de</strong> los residuos pue<strong>de</strong>nlimpiarse con una solución <strong>de</strong> agua y bicarbonato o con un limpiador espacialmente formulado. Use unpolvo limpiador no abrasivo, como bicarbonato, para las manchas difíciles.• Partes <strong>de</strong> plástico y <strong>de</strong> caucho. Lávelas con agua tibia jabonosa y séquelas. En las partes <strong>de</strong> plástico, nouse citrisol, limpiadores abrasivos, <strong>de</strong>sengrasantes ni limpiadores para parrilla concentrados. Esto podríaconllevar daños y el mal funcionamiento <strong>de</strong> algunas partes.ÓXIDO:• Como resultado <strong>de</strong> las altas temperaturas <strong>de</strong> cocción, los adobos ácidos, los incendios <strong>de</strong> grasa, y laexposición a climas costeros u a otros elementos naturales, pue<strong>de</strong> observarse <strong>de</strong>coloración, óxido opicaduras <strong>de</strong> óxido.• Las manchas <strong>de</strong> óxido en la superficie interior se pue<strong>de</strong>n pulir, limpiar y cubrir ligeramente con aceitevegetal o con aceite vegetal en aerosol para minimizar la oxidación.• Nunca use limpiadores que contengan cloro ni almacene químicos o suministros para piscinas en elcompartimiento <strong>de</strong>l carrito, ya que el cloro promueve el óxido.40
LIMPIEZA Y MANTENIMIENTO DE LOS QUEMADORES:• Mantenga el artefacto libre <strong>de</strong> materiales combustibles, gasolina, y otros líquidos y vapores inflamables.• Mantenga las aberturas <strong>de</strong> ventilación <strong>de</strong>l gabinete <strong>de</strong>l cilindro <strong>de</strong>spejadas y libres <strong>de</strong> <strong>de</strong>sechos.• Inspeccione visualmente las llamas <strong>de</strong> los quemadores para corroborar su correcto funcionamiento (vea elgráfico ilustrativo en el apartado “Conjunto <strong>de</strong> los <strong>Quemadores</strong>/Mantenimiento” <strong>de</strong> la sección “Cuidado yMantenimiento A<strong>de</strong>cuados”). Las arañas y otros insectos pue<strong>de</strong>n construir sus nidos en los quemadores, loque ocasionaría un bloqueo <strong>de</strong>l gas.• Para cocinar en forma segura y obtener el máximo rendimiento <strong>de</strong> la parrilla, realice estas verificaciones almenos dos veces al año o <strong>de</strong>spués <strong>de</strong> períodos prolongados <strong>de</strong> almacenamiento.• Asegúrese <strong>de</strong> ajustar todas las piezas metálicas (tuercas, pernos, tornillos, etc.) al menos dos veces al año.PRECAUCIÓN: Algunas piezas pue<strong>de</strong>n contener bor<strong>de</strong>s filosos. De ser necesario, use guantes protectores.• Quite los rejillas, las placas <strong>de</strong> distribución <strong>de</strong> calor y los quemadores <strong>de</strong>l interior <strong>de</strong> la parrilla. Use un cepillocon agua caliente y <strong>de</strong>tergente para quitar el exceso <strong>de</strong> residuos. NUNCA use un limpiador para hornocomercial. Enjuague bien con agua. Use una toalla para secar y vuelva a colocar todos los componentes,según se <strong>de</strong>scribe en las instrucciones <strong>de</strong> montaje.CONJUNTO DE LOS QUEMADORES/MANTENIMIENTO:• Si bien los quemadores están hechos <strong>de</strong> acero inoxidable, pue<strong>de</strong>n corroerse como resultado <strong>de</strong>l calor extremoy <strong>de</strong> los ácidos <strong>de</strong>rivados <strong>de</strong> la cocción <strong>de</strong> comida. Periódicamente, inspeccione los quemadores en busca <strong>de</strong>fisuras, orificios anormales y otros signos <strong>de</strong> <strong>de</strong>terioro por corrosión. De encontrarlos, reemplace el quemador.• NO bloquee las áreas <strong>de</strong> ventilación en los laterales, la parte posterior o el compartimiento <strong>de</strong>l carrito<strong>de</strong> la parrilla. Las arañas y otros insectos pue<strong>de</strong>n construir sus nidos en los tubos <strong>de</strong> los quemadores ypue<strong>de</strong>n bloquearlos. El bloqueo <strong>de</strong> los tubos <strong>de</strong> los quemadores pue<strong>de</strong> evitar la circulación <strong>de</strong> gas a losquemadores, lo que podría causar un incendio en el tubo <strong>de</strong>l quemador o <strong>de</strong>bajo <strong>de</strong> la parrilla. Para limpiar oreemplazar piezas <strong>de</strong>l conjunto <strong>de</strong> los quemadores, o si tiene problemas para encen<strong>de</strong>r la parrilla, siga estasinstrucciones.1. Cierre el suministro <strong>de</strong> gas en las perillas <strong>de</strong> control y en la válvula <strong>de</strong>lcilindro (tanque) <strong>de</strong> gas LP.2. Quite los rejillas y las placas <strong>de</strong> distribución <strong>de</strong> calor.3. Quite el perno <strong>de</strong> la base <strong>de</strong> cada quemador con un <strong>de</strong>stornillador.4. Con cuidado, levante y quite cada canal <strong>de</strong> interconexión <strong>de</strong> losquemadores.5. Con cuidado, levante y quite cada quemador <strong>de</strong> las aberturas <strong>de</strong> lasválvulas.6. Use un cepillo para botella angosto o un alambre duro doblado en ungancho pequeño para pasarlo a través <strong>de</strong>l tubo <strong>de</strong> cada quemador,o sople aire comprimido <strong>de</strong>ntro <strong>de</strong>l tubo <strong>de</strong> cada quemador en lospuertos <strong>de</strong> las llamas. Inspeccione cada puerto para asegurarse <strong>de</strong>que el aire salga por cada orificio.PRECAUCIÓN: Cuando use aire comprimido, use guantes protectores.7. Use un cepillo <strong>de</strong> alambre para limpiar toda la parte exterior <strong>de</strong> losquemadores, y quitar la suciedad y los residuos <strong>de</strong> comida.8. Inspeccione los quemadores en busca <strong>de</strong> daños; en el caso <strong>de</strong><strong>de</strong>tectar fisuras o agujeros, reemplácelos.9. Instale los quemadores en la parrilla y, con cuidado, alinee los canales<strong>de</strong> interconexión entre los quemadores y oriente los quemadoresCORRECTAMENTE.IMPORTANTE: La abertura <strong>de</strong>l quemador <strong>de</strong>be <strong>de</strong>slizarse sobre laboquilla <strong>de</strong> la válvula.10. Vuelva a colar los pernos y las tuercas a cada quemadory a cada canal <strong>de</strong> interconexión.Nota: Siga las instrucciones <strong>de</strong> la sección “Pruebas <strong>de</strong> Detección<strong>de</strong> Fugas” incluidas en este manual. Vuelva a encen<strong>de</strong>r losquemadores para verificar que funcionen correctamente.11. Vuelva a colocar las placas <strong>de</strong> distribución <strong>de</strong> calor y los rejillas.Boquilla <strong>de</strong>la VálvulaPernoCanal <strong>de</strong> InterconexiónResiduosAbertura <strong>de</strong>lQuemador41ALINEACIÓN CORRECTA DELA VÁLVULA Y EL QUEMADOR
AJUSTE DE LOS QUEMADORES:ADVERTENCIA• NO intente ajustar el obturador <strong>de</strong> aire <strong>de</strong> los quemadores hasta que la parrilla se haya enfriado duranteaproximadamente 30 minutos. Si no cumple con esta indicación, pue<strong>de</strong> sufrir quemaduras graves.• Las llamas normales <strong>de</strong>ben ser <strong>de</strong> color azul claro con puntas amarillas, y <strong>de</strong>ben ser <strong>de</strong> entre 1” y 2”cuando el quemador está en la posición “ALTO”. Según la elevación, es posible que <strong>de</strong>ba ajustarse elobturador <strong>de</strong> aire <strong>de</strong> los quemadores hasta obtener la proporción <strong>de</strong> aire-gas combustible correcta.CORRECTOINCORRECTOLlama <strong>de</strong> color azulclaro con puntas amarillasLlama amarilla irregular• Para ajustar el obturador <strong>de</strong> aire, afloje el tornillo <strong>de</strong> sujeción y gire el obturador <strong>de</strong> aire a la posición<strong>de</strong>seada hasta obtener una llama normal. Después <strong>de</strong> realizar los ajustes, apriete el tornillo <strong>de</strong> sujeción.Vuelva a encen<strong>de</strong>r la parrilla para observar las llamas. Probablemente se requieran ajustes incrementaleshasta lograr la llama.TRANSPORTE Y ALMACENAMIENTO:ADVERTENCIATornillo <strong>de</strong> sujeción• Nunca mueva una parrilla cuando está caliente o cuando se usa.• Asegúrese <strong>de</strong> que la válvula <strong>de</strong>l cilindro esté cerrada y <strong>de</strong> que las perillas <strong>de</strong> los quemadores esténen la posición apagado.• NO almacene un cilindro <strong>de</strong> gas LP <strong>de</strong> repuesto (lleno o vacío) <strong>de</strong>bajo <strong>de</strong> la parrilla o cerca <strong>de</strong> esta.• Nunca almacene líquidos inflamables o aerosoles <strong>de</strong>bajo <strong>de</strong> la parrilla o cerca <strong>de</strong> esta.• Si el artefacto <strong>de</strong> cocina a gas para exteriores no se usa, el suministro <strong>de</strong> gas <strong>de</strong>be estar cerradoen el cilindro <strong>de</strong> gas LP.• Un artefacto <strong>de</strong> cocina a gas para exteriores solo se pue<strong>de</strong> almacenar en interiores si el cilindro se<strong>de</strong>sconectó y se quitó <strong>de</strong>l artefacto <strong>de</strong> cocina a gas para exteriores.• Los cilindros no <strong>de</strong>ben almacenarse en edificaciones o cerramientos, incluidos garajes y galpones.• Los cilindros <strong>de</strong>ben mantenerse fuera <strong>de</strong>l alcance <strong>de</strong> los niños.ANTES DE ALMACENAR LA PARRILLA:• Asegúrese <strong>de</strong> que la válvula <strong>de</strong>l cilindro esté totalmente cerrada.• Limpie todas las superficies. Cubra ligeramente los quemadores con aceite para cocinar para evitar la oxidación en exceso.• Si almacena la parrilla en interiores, <strong>de</strong>sconecte el tanque <strong>de</strong> gas LP y déjelo AL AIRE LIBRE.• Coloque la tapa <strong>de</strong> polvo sobre la salida <strong>de</strong> la válvula <strong>de</strong>l cilindro cuando el cilindro no está en uso. Sólo instale eltipo <strong>de</strong> tapa <strong>de</strong> polvo en la salida <strong>de</strong> la válvula <strong>de</strong> cilindro que se proporciona con la válvula <strong>de</strong>l cilindro. Otros tipos<strong>de</strong> tapas o tapones pue<strong>de</strong>n provocar fugas <strong>de</strong> propano.• Inspeccione y limpie los quemadores antes <strong>de</strong> usar <strong>de</strong>spués <strong>de</strong> almacenar, al comienzo <strong>de</strong> la temporada <strong>de</strong>parrilladas o <strong>de</strong>spués <strong>de</strong> no haberlos usado durante un período. Es común que las arañas y los insectos construyansus nidos en los tubos <strong>de</strong> los quemadores (en especial, durante los meses más fríos). El bloqueo <strong>de</strong> los tubos <strong>de</strong> losquemadores pue<strong>de</strong> evitar la circulación <strong>de</strong> gas a los quemadores, lo que podría causar un incendio en el tubo <strong>de</strong>lquemador o <strong>de</strong>bajo <strong>de</strong> la parrilla. Consulte el apartado “Conjunto <strong>de</strong> los <strong>Quemadores</strong>/Mantenimiento” <strong>de</strong> la sección“Cuidado y Mantenimiento A<strong>de</strong>cuados”.• Si almacena la parrilla en exteriores, cúbrala con una cubierta para parrillas para protegerla <strong>de</strong> la intemperie.42
SOLUCIÓN DE PROBLEMAS:Para ver vi<strong>de</strong>os <strong>de</strong> montaje o solución <strong>de</strong> problemas, visítenos en:Problema Causa posible Prevención/CuidadoEl quemador noencien<strong>de</strong>La parrilla no se calientalo suficienteEl patrón <strong>de</strong> la llama esirregular. No se forma lallama en toda la longitud<strong>de</strong>l quemadorLa válvula <strong>de</strong>l tanque <strong>de</strong> gas LP está cerradaEl nivel <strong>de</strong>l tanque <strong>de</strong> gas LP es bajo o el tanqueestá vacíoHay una fuga <strong>de</strong> gas LPEl regulador y la tuerca <strong>de</strong> acoplamiento noestán totalmente conectadosEl flujo <strong>de</strong> gas está bloqueadoEs posible que el quemador no estécorrectamente apoyadoEs posible que haya telarañas o nidos <strong>de</strong>insectos en los tubos venturi <strong>de</strong> los quemadoresLos puertos <strong>de</strong> los quemadores están obstruidoso bloqueadosEs preciso cambiar la bateríaLos cables o el electrodo están cubiertos conresiduos <strong>de</strong> comidaEl electrodo y los quemadores están húmedosEl electrodo está rajado o está roto (chispas enla rajadura).Hay un cable flojo o <strong>de</strong>sconectadoHay un cable en cortocircuito (chisporroteo)entre el dispositivo <strong>de</strong> encendido y el electrodoEl dispositivo <strong>de</strong> encendido no funcionacorrectamenteSe acabó el gasEs posible que se haya activado el dispositivo<strong>de</strong> restricción <strong>de</strong>l flujoLos puertos <strong>de</strong> los quemadores están obstruidoso bloqueadosEl obturador <strong>de</strong> aire <strong>de</strong>l quemador <strong>de</strong>beajustarseCerciórese <strong>de</strong> que el regulador esté conectado al tanque <strong>de</strong> gas LP confirmeza; gire la válvula <strong>de</strong>l tanque <strong>de</strong> gas LP a la posición “ABIERTA”Verifique si el tanque <strong>de</strong> gas LP está vacío. Si está vacío,reemplácelo o vuelva a cargarlo1. Gire la válvula <strong>de</strong>l tanque <strong>de</strong> gas LP a la posición “CERRADA”2. Espere 5 minutos para que el gas se disipe3. Siga las instrucciones <strong>de</strong> la sección “Pruebas <strong>de</strong> Detección <strong>de</strong> Fugas”incluidas en el manual <strong>de</strong>l propietarioConsulte la sección “Conexión <strong>de</strong>l Regulador y la Manguera”1. Limpie el conjunto <strong>de</strong> los quemadores2. Inspeccione si la manguera está doblada o retorcidaVuelva a apoyar el quemador y la válvula. Consulte las instrucciones<strong>de</strong> la sección “Conjunto <strong>de</strong> los <strong>Quemadores</strong>/Mantenimiento”Limpie el conjunto <strong>de</strong> los quemadores y los tubos venturi <strong>de</strong> losquemadoresLimpie los puertos <strong>de</strong> los quemadoresReemplace la batería (siga el paso <strong>de</strong> montaje para insertar la batería)Limpie el cableado o el electrodo con alcohol rectificadoSéquelos con un pañoReemplace el electrodoVuelva a conectar el cable, o reemplace el conjunto <strong>de</strong>l cable/electrodoReemplace el conjunto <strong>de</strong>l cable/electrodo <strong>de</strong>l dispositivo <strong>de</strong> encendidoReemplace el dispositivo <strong>de</strong> encendidoReemplace o vuelva a cargar el tanque <strong>de</strong> gas LP1. Restablecimiento mínimo:a. Gire las perillas <strong>de</strong> control y la válvula <strong>de</strong>l tanque <strong>de</strong> gas LP a laposición “APAGADO”b. Espere un minuto y vuelva a encen<strong>de</strong>r la parrilla según las“Instrucciones <strong>de</strong> Encendido”2. Si las llamas aún son muy bajas, lleve a cabo un restablecimiento totalRestablecimiento total:a. Gire las perillas <strong>de</strong> control y la válvula <strong>de</strong>l tanque <strong>de</strong> gas LP a laposición “APAGADO”b. Desconecte el regulador <strong>de</strong>l tanque <strong>de</strong> propanoc. Inspeccione el sello <strong>de</strong> caucho <strong>de</strong>l cilindro <strong>de</strong> gas LPd. Espere 1 minutoe. Vuelva a conectar el regulador y realice las “Pruebas <strong>de</strong> Detección <strong>de</strong>Fugas” en todas las conexionesf. Encienda la parrilla según las “Instrucciones <strong>de</strong> Encendido”Limpie los puertos <strong>de</strong> los quemadoresConsulte la sección “Ajuste <strong>de</strong> los <strong>Quemadores</strong>”43
Problema Causa posible Prevención/CuidadoLa llama es amarilla oanaranjadaEs posible que el quemador nuevo contengaaceites residuales <strong>de</strong> la fabricaciónEs posible que haya telarañas o nidos<strong>de</strong> insectos en los tubos venturi <strong>de</strong> losquemadores.Residuos <strong>de</strong> comida, grasa, etcLa alineación entre la válvula y el tubo venturi<strong>de</strong>l quemador es incorrecta.El obturador <strong>de</strong> aire <strong>de</strong>l quemador <strong>de</strong>beajustarseEncienda la parrilla durante 15 minutos en la posición “ALTO” conla tapa cerradaLimpie el conjunto <strong>de</strong> los quemadores y los tubos venturi <strong>de</strong> losquemadoresLimpie el conjunto <strong>de</strong> los quemadoresAsegúrese <strong>de</strong> que los tubos venturi <strong>de</strong> los <strong>Quemadores</strong> esténcorrectamente conectados con la válvulaConsulte la sección “Ajuste <strong>de</strong> los <strong>Quemadores</strong>”La llama se apaga Vientos fuertes o ráfagas <strong>de</strong> viento No use la parrilla si hay vientos fuertesBajo nivel <strong>de</strong> gas LPEs posible que los orificios <strong>de</strong> los quemadoresestén obstruidosSe activó el dispositivo <strong>de</strong> restricción <strong>de</strong>l flujoReemplace o vuelva a cargar el tanque <strong>de</strong> gas LPConsulte las instrucciones <strong>de</strong> la sección “Conjunto <strong>de</strong> los<strong>Quemadores</strong>/Mantenimiento”Consulte la sección “Procedimiento <strong>de</strong> Restablecimiento <strong>de</strong>lRegulador”.Se forman llamaradas Acumulación <strong>de</strong> grasa Limpie todas las piezas <strong>de</strong> la parrilla según las instruccionesincluidas en la sección “Cuidado y Mantenimiento A<strong>de</strong>cuados”.Se generan incendios <strong>de</strong>grasaRetorno <strong>de</strong> la llama(incendio en los tubos<strong>de</strong> los quemadores)/Derretimiento <strong>de</strong> lasperillasEl interior <strong>de</strong> la tapa se<strong>de</strong>scascara (como el<strong>de</strong>scascaramiento <strong>de</strong>pintura).Exceso <strong>de</strong> grasa en la carneTemperatura <strong>de</strong> cocción excesivaHay grasa atascada por acumulación <strong>de</strong>comida entorno al sistema <strong>de</strong> los quemadoresLos quemadores o los tubos <strong>de</strong> losquemadores están bloqueadosLa acumulación <strong>de</strong> grasa pegada se convirtióen carbón y se está <strong>de</strong>scascarandoQuítele la grasa a la carne antes <strong>de</strong> cocinarlaAjuste (baje) la temperatura <strong>de</strong> cocción1. Gire las perillas <strong>de</strong> control y la válvula <strong>de</strong>l tanque <strong>de</strong> gas LP a laposición “APAGADO”2. Deje la tapa abierta o cerrada, y permita que el incendio seapague. Use un extintor <strong>de</strong> incendios tipo BC o bicarbonato,arena o tierra para apagar el incendio, <strong>de</strong> ser necesario3. Después <strong>de</strong> que la parrilla se enfríe, quite y limpie todas laspiezas según las instrucciones <strong>de</strong> la sección “Cuidado yMantenimiento A<strong>de</strong>cuados”.Limpie los quemadores y el conjunto <strong>de</strong> los quemadoresLimpie todo minuciosamente según las instrucciones incluidas en lasección “Cuidado y Mantenimiento A<strong>de</strong>cuados”.44
SUGERENCIAS PARA COCINAR CON LA PARRILLA:HIGIENE:• Siempre lávese las manos minuciosamente con jabón y agua caliente antes <strong>de</strong> manipular la comida y<strong>de</strong>spués <strong>de</strong> manipular carne vacuna o <strong>de</strong> pollo cruda, o mariscos/pescados.• Cuando use una fuente para transportar carne vacuna o <strong>de</strong> pollo cruda, o mariscos/pescado hasta laparrilla, asegúrese <strong>de</strong> lavar la fuente minuciosamente con jabón y agua caliente antes <strong>de</strong> colocar lacomida cocida en dicha fuente, o use fuentes diferentes para los alimentos crudos y la comida cocida.• Nunca use los mismos utensilios para manipular carne vacuna o <strong>de</strong> pollo cruda, o mariscos/pescado,salvo que los lave minuciosamente con jabón y agua caliente.• Nunca vuelva a usar el adobo <strong>de</strong> carne vacuna o <strong>de</strong> pollo cruda en alimentos que han sido cocidos yestán listos para ser servidos.ASAR A LA TEMPERATURA ADECUADA:• Use un termómetro para carne para asegurarse <strong>de</strong> que la comida haya alcanzado una temperaturainterna segura.• El Departamento <strong>de</strong> Agricultura <strong>de</strong> los Estados Unidos recomienda que se alcance las siguientestemperaturas mínimas para los siguientes alimentos:Chuletass ................ 145° F (62.8° C)Carne picada .............. 160° F (71° C)Cerdo .................... 145° F (62.8° C)Pollo ..................... 165° F (73.9° C)Carne asada ..................... 145° F (62.8° C)Mariscos/Pescado. . . . . . . . . . . . . . . . 145° F (62.8° C)Vegetales ....................... 145° F (62.8° C)SUGERENCIAS ÚTILES:• Si precoce la carne vacuna o <strong>de</strong> pollo, hágalo inmediatamente antes <strong>de</strong> asarlas.• Nunca <strong>de</strong>scongele la carne a temperatura ambiente o en una encimera.• Refrigere las sobras en el plazo <strong>de</strong> 2 horas <strong>de</strong> haber retirado la comida <strong>de</strong> la parrilla.• Para obtener información adicional, llame a la línea gratuita “Carne y Aves” <strong>de</strong>l Departamento <strong>de</strong>Agricultura <strong>de</strong> los Estados Unidos al 800-535-4555.45
INSTRUCCIONES DE ARMADO:LEA TODAS LAS ADVERTENCIAS DE SEGURIDAD Y LAS INSTRUCCIONES DE MONTAJECON CUIDADO ANTES DE ARMAR O USAR LA PARRILLA.PARA ARMAR LA UNIDAD, RECOMENDAMOS QUE DOS PERSONAS TRABAJEN ENFORMA CONJUNTA.Para amar esta parrilla a gas reforzada <strong>Grill</strong> King <strong>Parrilla</strong> a <strong>Gas</strong> <strong>de</strong> 4 <strong>Quemadores</strong> serequieren las siguientes herramientas:• DestornilladorLISTA DE PARTES:1234567891 Montaje <strong>de</strong>l Cuerpo <strong>de</strong> la <strong>Parrilla</strong>1 Mesa Lateral Izquierda1 Conjunto <strong>de</strong> la Quemador Lateral1 Panel Frontal <strong>de</strong> la Mesa LateralIzquierda1 Panel Frontal <strong>de</strong> la Quemador Lateral1 Anaquel para Calentar3 Rejillas para Cocinar1 Perilla <strong>de</strong> Control <strong>de</strong>l Quemador Lateral4 Placas <strong>de</strong> Distribución <strong>de</strong> Calor1112131415161718191 Recipiente para la Grasa1 Carro Plegable1 Rejilla <strong>de</strong> el Quemador Lateral1 Barra <strong>de</strong> Toalla1 Ban<strong>de</strong>ja para la Grasa4 Ganchos para Toallas1 Cable <strong>de</strong> Tanque <strong>de</strong> Retención4 Ruedas <strong>de</strong> Bloqueo1 Panel Inferior102 Manijas <strong>de</strong> las PuertasPara ver la resolución <strong>de</strong> problemas o ví<strong>de</strong>os <strong>de</strong> montaje, visítenos en:46
16113142364 571098151211171918PARA CUBIERTAS, ACCESORIOS Y OTROS PRODUCTOS, FAVOR DE VISITARNOS POR LA REDMUNDIAL EN:(La prueba <strong>de</strong> compra se requiere.)Inspeccione el contenido <strong>de</strong> la caja para verificar que todas las partes estén incluidas e intactas.47
Elija un área <strong>de</strong> montaje buena,<strong>de</strong>spejada y consiga un amigo paraque lo ayu<strong>de</strong> a armar la parrilla.Coloque cartones <strong>de</strong>bajo paraproteger el acabado <strong>de</strong> la parrilla yel área <strong>de</strong> montaje.CUIDADO!Algunas piezas pue<strong>de</strong>ncontener bor<strong>de</strong>s cortantes.Use guantes protectores <strong>de</strong> sernecesario.Paso 1Despliegue el carro y colocaren posición vertical.Paso 2Ate el sostenedor <strong>de</strong>l tanque alcarro colocando los orificios <strong>de</strong>llave sobre los pernos, resbaleabajo <strong>de</strong>ntro <strong>de</strong> lugar y aprietecon seguridad.Paso 3Retire las tuercas <strong>de</strong> alas <strong>de</strong>el marco <strong>de</strong>l carro. Conecteel panel inferior al carrocon tuercas <strong>de</strong> alas preconectadas.48
Nota: Voltee el conjunto <strong>de</strong>lcarro con la ayuda <strong>de</strong> unamigo. Trate <strong>de</strong> minimizarla tensión sobre laspatas.Paso 4Conecte cuatro ruedas <strong>de</strong>bloqueo a las piernas <strong>de</strong>lmarco <strong>de</strong>l carro. Apriete conuna llave <strong>de</strong> tuerca hexagonalprovista.Nota: Voltee el conjunto <strong>de</strong>lcarro a su posiciónvertical con la ayuda<strong>de</strong> un amigo. Trate <strong>de</strong>minimizar la tensiónsobre las patas.Paso 5Conecte el cable <strong>de</strong> tanque<strong>de</strong> retención a la parte inferior<strong>de</strong>l panel colocando las patasen los dos orificios como semuestra.Paso 6Retire los pernos preconectados<strong>de</strong> tiradores <strong>de</strong> laspuertas y coloque las manijas<strong>de</strong> las puertas. Apriete lospernos.49
Paso 8Conecte el panel frontal almontaje <strong>de</strong>l quemador lateralinsertando los pernos preconectadosen el panel frontalen los orificios <strong>de</strong> el montaje<strong>de</strong>l quemador lateral. Aprietelos pernos.PernosPreanexadosPaso 9Conecte el panel frontal ala mesa lateral izquierdainsertando pernos preconectadosen el panel frontalen los orificios <strong>de</strong> mesa lateral.Apriete los pernos.PernosPreanexadosPaso 10Retire pernos pre-conectadosen la barra <strong>de</strong> toalla. Deslicecuatro ganchos para toallassobre la barra <strong>de</strong> toalla,asegure a la mesa lateralizquierda usando pernos preconectados.51
Paso 11Quite el perno M6 X 12 mm<strong>de</strong>l lado izquierdo <strong>de</strong>l panel<strong>de</strong> control. Anexe el montaje<strong>de</strong> la mesa lateral a la caja<strong>de</strong>l fogón <strong>de</strong>l lateral izquierdo.Coloque la mesa sobre lospernos y <strong>de</strong>slícela hacia atrás<strong>de</strong> la parrilla, luego ajústelafirmemente. Sujete el panelfrontal <strong>de</strong> la mesa lateralizquierda al cuerpo <strong>de</strong> la parrillacon el perno M6 X 12 mm.Paso 12Quite el perno M6 X 12 mm<strong>de</strong>l lado <strong>de</strong>recho <strong>de</strong>l panel<strong>de</strong> control. Anexe el montaje<strong>de</strong>l quemador lateral a lacaja <strong>de</strong>l fogón <strong>de</strong>l lateral<strong>de</strong>recho. Coloque el montaje<strong>de</strong>l quemador lateral sobre lospernos y <strong>de</strong>slice hacia atrás<strong>de</strong> la parrilla, luego ajústelofirmemente. Sujete el panelfrontal <strong>de</strong>l quemador lateralal cuerpo <strong>de</strong> la parrilla con unperno pre-atado M6 X 12 mm.52
Paso 13Inserte el montaje <strong>de</strong> la válvula<strong>de</strong>l quemador lateral a través<strong>de</strong> los orificios en el panelfrontal <strong>de</strong>l quemador lateral,luego asiente la boquilla <strong>de</strong> laválvula firmemente <strong>de</strong>ntro <strong>de</strong>lventuri <strong>de</strong>l quemador. Roteel montaje <strong>de</strong> la válvula <strong>de</strong>lquemador hacia la izquierdapara trabarlo con los orificiosen su lugar. Luego ajuste lospernos preanexados. Coloquela perilla <strong>de</strong> control <strong>de</strong>lquemador lateral en el vástago<strong>de</strong> la válvula <strong>de</strong>l quemadorlateral.Válvula <strong>de</strong>lQuemadorLateralOrificiosBoquilla <strong>de</strong>la VálvulaBiselVenturi <strong>de</strong> QuemadorPerilla <strong>de</strong> Control <strong>de</strong>lQuemador LateralVálvula <strong>de</strong>l Vástago<strong>de</strong>l Quemador LateralPaso 14Coloque la rejilla <strong>de</strong>l quemadorlateral en la mesa <strong>de</strong>lquemador lateral.Paso 15Anexe el cable conductor <strong>de</strong>lencen<strong>de</strong>dor <strong>de</strong>l quemadorlateral al electrodo, como seilustra.ADVERTENCIA:Nunca use la parrilla sinantes haber verificado laexistencia <strong>de</strong> fugas en todaslas mangueras y conexiones<strong>de</strong> gas. Consulte la secciónsobre «Pruebas <strong>de</strong> Detección<strong>de</strong> Fugas» en este manual paracumplir con los procedimientosapropiados.Conductor <strong>de</strong>lEncen<strong>de</strong>dor<strong>de</strong>l QuemadorLateralElectrodo53
Recipientepara la GrasaBan<strong>de</strong>ja parala GrasaPaso 16Inserte la ban<strong>de</strong>ja <strong>de</strong> la grasaen los surcos posteriores <strong>de</strong> laparrilla. Cuelgue el recipientepara la grasa sobre lossoportes en la parte inferior <strong>de</strong>la ban<strong>de</strong>ja <strong>de</strong> la grasa.Anaquel paraCalentarRejillas paraCocinarPaso 17Coloque las placas <strong>de</strong>distribución <strong>de</strong>l calor en el nivelinferior <strong>de</strong>l montaje <strong>de</strong>l cuerpo<strong>de</strong> la parrilla, directamentesobre los quemadores.Placas <strong>de</strong>Distribución<strong>de</strong>l CalorPaso 18Coloque las parrillas paracocinar sobre las costillas <strong>de</strong>apoyo directamente sobre lasplacas <strong>de</strong> distribución <strong>de</strong>l calor.SoportesPaso 19Coloque el anaquel paracalentar en los soportes paraque se asiente sobre lasparrillas para cocinar.54
FOR COVERS, ACCESSORIES AND OTHER PRODUCTS, PLEASE VISIT US ONLINE AT:PARA CUBIERTAS, ACCESORIOS Y OTROS PRODUCTOS, FAVOR DE VISITARNOS POR LA RED MUNDIAL EN:WARRANTYThe <strong>Brinkmann</strong> Corporation warrants to the original pur chas er that the <strong>Grill</strong> King 4 <strong>Burner</strong> <strong>Gas</strong> <strong>Grill</strong> is free from <strong>de</strong>fects due to workmanshipor materials for:Five-year: on stainless steel tube burnersThree-year: on all other stainless steel partsOne-year: on valves, frame, housing, cart, igniter, cooking grates and other related partsThe <strong>Brinkmann</strong> Corporation’s obligations un<strong>de</strong>r this warranty are limited to the following gui<strong>de</strong>lines:• This warranty does not cover grills that have been altered/modified or damaged due to: normal wear, rust, abuse, improper maintenanceand/or improper use.• This warranty does not cover surface scratches, rust or heat damage to the finish, which is consi<strong>de</strong>red normal wear.• The <strong>Brinkmann</strong> Corporation may elect to repair or replace damaged units covered by the terms of this warranty.• This warranty extends to the original purchaser only and is not trans fer able or assignable to subsequent purchasers.The <strong>Brinkmann</strong> Corporation requires reasonable proof of purchase. Therefore, we strongly recommend that you retain your sales receipt orinvoice. To obtain replacement parts for your <strong>Grill</strong> King 4 <strong>Burner</strong> <strong>Gas</strong> <strong>Grill</strong> un<strong>de</strong>r the terms of this warranty, please call Customer ServiceDepartment at 877-862-3449. A receipt will be required. The <strong>Brinkmann</strong> Corporation will not be responsible for any grills forwar<strong>de</strong>d to uswithout prior authorization.EXCEPT AS ABOVE STATED, THE BRINKMANN CORPORATION MAKES NO OTHER EXPRESS WARRANTY.THE IMPLIED WARRANTIES OF MERCHANTABILITY AND FITNESS FOR A PARTICULAR PURPOSE ARE LIMITED IN DURATION TO THOSELISTED ABOVE FROM THE DATE OF PURCHASE. SOME STATES DO NOT ALLOW LIM I TA TIONS ON HOW LONG AN IMPLIED WARRANTYLASTS, SO THE ABOVE LIMITATION MAY NOT APPLY TO YOU.ANY LIABILITY FOR INDIRECT, INCIDENTAL OR CONSEQUENTIAL DAMAGES ARISING FROM THE FAILURE OF THE GRILL KING 4BURNER GAS GRILL TO COMPLY WITH THIS WARRANTY OR ANY IMPLIED WARRANTY IS EXCLUDED. CUSTOMER ACKNOWLEDGESTHAT THE PURCHASE PRICE CHARGED IS BASED UPON THE LIMITATIONS CONTAINED IN THE WARRANTY SET OUT ABOVE. SOMESTATES DO NOT ALLOW THE EXCLUSION OR LIMITATION OF INCIDENTAL OR CONSEQUENTIAL DAMAGES, SO THE ABOVE LIMITATIONOR EXCLUSION MAY NOT APPLY TO YOU. THIS WARRANTY GIVES YOU SPECIFIC LEGAL RIGHTS, AND YOU MAY ALSO HAVE OTHERRIGHTS WHICH VARY FROM STATE TO STATE.GARANTÍAThe <strong>Brinkmann</strong> Corporation garantiza al comprador original que la parrilla <strong>Grill</strong> King <strong>Parrilla</strong> a <strong>Gas</strong> <strong>de</strong> 4 <strong>Quemadores</strong> está libre <strong>de</strong> <strong>de</strong>fectos <strong>de</strong>materiales o mano <strong>de</strong> obra:De por vida: los quemadores <strong>de</strong> acero inoxidable <strong>de</strong> tuboTres-años: en todas las piezas <strong>de</strong> acero inoxidable restantesUn-año: en válvulas, armazón, envoltura, carro, encen<strong>de</strong>dor, rejillas <strong>de</strong> cocinar y piezas relacionadasLas obligaciones <strong>de</strong> The <strong>Brinkmann</strong> Corporation con respecto a esta garantía se limitan a lo siguiente:• Esta garantía no cubre parrillas que hayan sido alteradas/modificado o dañadas <strong>de</strong>bido a: uso normal, herrumbre, maltrato, mantenimientoina<strong>de</strong>cuado y/o uso inapropiado.• Esta garantía no cubre rayones superficiales, daño por herrumbre o por calor al acabado, lo cual se consi<strong>de</strong>ra como uso normal.• The <strong>Brinkmann</strong> Corporation pue<strong>de</strong> <strong>de</strong>cidir reparar o reemplazar las unida<strong>de</strong>s dañadas cubiertas bajo los términos <strong>de</strong> esta garantía.• Esta garantía se otorga al comprador original únicamente y no es transferible o asignable a los compradores posteriores.The <strong>Brinkmann</strong> Corporation exige un comprobante <strong>de</strong> compra razonable. Por lo tanto, le recomendamos enfáticamente que retenga su reciboo factura <strong>de</strong> venta. Para obtener partes <strong>de</strong> repuesto para la parrilla <strong>Grill</strong> King <strong>Parrilla</strong> a <strong>Gas</strong> <strong>de</strong> 4 <strong>Quemadores</strong> bajo los términos <strong>de</strong> estagarantía, sírvase contactar al Departamento <strong>de</strong> Servicio al Cliente al 877-862-3449. Se exigirá la presentación <strong>de</strong> un recibo. The <strong>Brinkmann</strong>Corporation no será responsable <strong>de</strong> ninguna parrilla <strong>de</strong>vuelta a nosotros sin autorización previa.EXCEPTO POR LO INDICADO ARRIBA, THE BRINKMANN CORPORATION NO OTORGA NINGUNA OTRA GARANTÍA EXPRESA.LAS GARANTÍAS IMPLÍCITAS DE COMERCIABILIDAD Y ADECUACIÓN CON UN FIN EN PARTICULAR SON DE DURACIÓN LIMITADADE ACUERDO A LO INDICADO ARRIBA A PARTIR DE LA FECHA DE COMPRA. ALGUNOS ESTADOS NO PERMITEN LIMITACIONES DEDURACIÓN DE UNA GARANTÍA IMPLÍCITA; POR LO TANTO, LA LIMITACIÓN ANTERIOR PODRÍA NO SER APLICABLE EN SU CASO.SE EXCLUYE CUALQUIER RESPONSABILIDAD POR DAÑOS INDIRECTOS, INCIDENTALES O CONSIGUIENTES DERIVADOS DE LA FALTADE CUMPLIMIENTO DE ESTA GARANTÍA O DE CUALQUIER GARANTÍA IMPLÍCITA DE GRILL KING PARRILLA A GAS DE 4 QUEMADORES.EL CLIENTE RECONOCE QUE EL PRECIO DE COMPRA COBRADO SE BASA EN LAS LIMITACIONES CONTENIDAS EN LA GARANTÍAANTERIOR. ALGUNOS ESTADOS NO PERMITEN LA EXCLUSIÓN O LIMITACIÓN DE LOS DAÑOS INCIDENTALES O CONSIGUIENTES; PORLO TANTO, LA LIMITACIÓN O EXCLUSIÓN ANTERIOR PODRÍA NO SER APLICABLE EN SU CASO. ESTA GARANTÍA LE OTORGA DERECHOSLEGALES ESPECÍFICOS Y USTED PUEDE TENER ADEMÁS OTROS DERECHOS QUE VARÍAN DE UN ESTADO A OTRO.140-3412-DZ1012©2012 The <strong>Brinkmann</strong> CorporationDallas, Texas 75244 U.S.A.Owner’s Manual for Mo<strong>de</strong>lManual <strong>de</strong>l Propietario para el Mo<strong>de</strong>lo810-3412-D