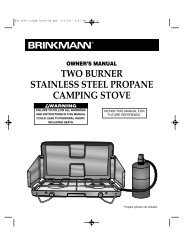
TWO BURNER PROPANE CAMPING STOVE - Brinkmann
TWO BURNER PROPANE CAMPING STOVE - Brinkmann
TWO BURNER PROPANE CAMPING STOVE - Brinkmann

You also want an ePaper? Increase the reach of your titles
YUMPU automatically turns print PDFs into web optimized ePapers that Google loves.
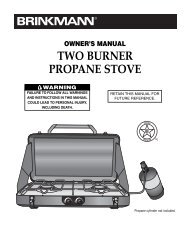
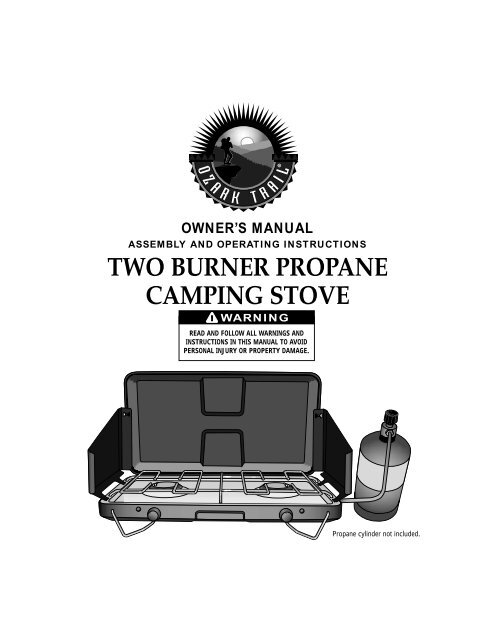
OWNER’S MANUALASSEMBLY AND OPERATING INSTRUCTIONS<strong>TWO</strong> <strong>BURNER</strong> <strong>PROPANE</strong><strong>CAMPING</strong> <strong>STOVE</strong>WARNINGREAD AND FOLLOW ALL WARNINGS ANDINSTRUCTIONS IN THIS MANUAL TO AVOIDPERSONAL INJURY OR PROPERTY DAMAGE.Propane cylinder not included.
IMPORTANT SAFETY WARNINGSWE WANT YOU TO ASSEMBLE AND USE YOUR <strong>STOVE</strong> AS SAFELY AS POSSIBLE.THE PURPOSE OF THIS SAFETY ALERT SYMBOLIS TO ATTRACT YOUR ATTENTION TO POSSIBLE HAZARDSAS YOU ASSEMBLE AND USE YOUR <strong>STOVE</strong>.WHEN YOU SEE THE SAFETY ALERT SYMBOL ,PAY CLOSE ATTENTION TO THE INFORMATION WHICH FOLLOWS!READ ALL SAFETY WARNINGS AND INSTRUCTIONS CAREFULLYBEFORE ASSEMBLING AND OPERATING YOUR <strong>STOVE</strong>.WARNING• This stove is to be used outdoors only. Do not operate indoors (house, tent, garage) or in any unventilated orenclosed area. In windy weather, stove should be located in an outdoor area that is protected from the wind.• All burning appliances consume oxygen. The stove uses oxygen from the air and may produce CO (CarbonMonoxide), which is a colorless, odorless gas. Ample ventilation must be provided to avoid endangering your life.Be certain that the area in which this appliance is used is properly ventilated at all times. Do not use inunventilated or enclosed areas.• Only use stove on a level, noncombustible, stable surface (concrete, ground, etc.) Do not use on wooden or othersurfaces that could burn. Do not place stove any closer than 24" to a wall and 36" to a ceiling.• Do not use on apartment balconies, patios, recreational vehicles, campers or boats.• Propane gas is extremely flammable, follow these instructions:• Use only 14.1 oz. or 16.4 oz. propane fuel cylinder as approved by United States Department ofTransportation (DOT).• Always attach or detach propane cylinder outdoors away from flame, pilot lights and only when appliance iscool to touch.• Always inspect appliance, propane cylinder and propane connections for damage, dirt or debris beforeattaching propane cylinder.• Always use appliance in upright position. Protect propane cylinder from excessive heat.• Screw propane cylinder into appliance and HAND TIGHTEN ONLY.• Check all gas connections by following directions in the "Gas Leak Testing" section on page 4 of this manual.Never test for gas leaks with a lighted match or open flame. Do not operate this stove with a gas leak.• Propane is heavier than air and can accumulate in low places. Keep propane cylinder, at all times, in a wellventilated area. If you smell gas – leave the area immediately and call for help.• Do not use appliance or propane cylinder if either has been damaged or modified.• When transporting or storing appliance always disconnect propane cylinder.• Turn the stove "ON" and "OFF" with the propane cylinder valve; use the burner control knobs ONLY to adjustthe flame. Read all warnings on or accompanying propane cylinder.• Never store propane cylinder in an enclosed area (house, garage, etc.). Store outdoors in a well ventilated,shaded area, away from any heat source or open flame and away from children’s reach.• Disconnect the propane cylinder from the stove when not in use. A safety cap should be placed on thepropane cylinder.• In case of grease fire, do not use water to extinguish flame. Turn gas "OFF" at propane cylinder and use fireextinguisher approved for use with gas appliances or other appropriate means to extinguish flame.1
WARNING• Keep hands, face and hair away from burners. Use long matches or long-nosed lighter to light the burners. Donot wear loose clothing or allow long hair to hang freely while lighting or using stove.• Do not leave stove unattended when hot or in use. Only adults are to operate this stove; keep children and petssafely away. Carefully monitor all activity around stove to avoid burns or other injuries.• Always snap down legs to form a "V" with the stove base to prevent the stove from becoming unstable whilein use.• Do not move stove while in use or while pot contains hot liquid.• Avoid touching hot surfaces, wear oven mitts to protect your hands and non-slick shoes.• Avoid bumping into stove or boiling pot to prevent hot liquid spills or overturning stove.• Do not use or store stove near gasoline or other flammable liquids, gases or where flammable vapors may bepresent.• Do not use this stove and boiling pot for other than its intended purpose.• Only use replacement/accessory parts manufactured by The <strong>Brinkmann</strong> Corporation. Repairs should beperformed by The <strong>Brinkmann</strong> Corporation.• Properly dispose of all packaging materials.USE CAUTION AND COMMON SENSE WHEN OPERATING YOUR <strong>STOVE</strong>.FAILURE TO ADHERE TO THE SAFETY WARNINGS AND GUIDELINES IN THISMANUAL COULD RESULT IN BODILY INJURY OR PROPERTY DAMAGE.SAVE THIS MANUAL FOR FUTURE REFERENCE.ASSEMBLY INSTRUCTIONSREAD ALL SAFETY WARNINGS & ASSEMBLY INSTRUCTIONS CAREFULLYBEFORE ASSEMBLING OR OPERATING YOUR <strong>STOVE</strong>.Inspect contents of the box to ensure all parts are included and undamaged.FOR MISSING PARTS, PLEASE CALL CUSTOMER SERVICE AT 1-800-527-0717.(Proof of purchase will be required.)1PARTS LIST:123456789Cooking GridCook TopBurner AssemblyWind GuardLeg WireCaseControl KnobRegulator/Valve AssemblyLid Assembly543296782
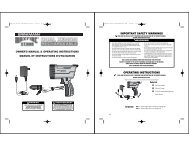
Step 1Snap down legs to form a "V" with the stovebase.Notched Support ArmStep 2Open lid and align the two wind guards byinserting notched support arms into windguards.Step 3Remove regulator/valve assembly.Regulator KnobBurner Control KnobsRegulator/ Valve AssemblyWARNING: Always snap down legs to form a "V" with the stovebase to prevent the stove from becoming unstablewhile in use.Step 4Before attaching propane cylinder, makesure the regulator and burner control knobsare in the "OFF" position.Step 5Attach propane cylinder to regulator/valveassembly by turning propane cylindercounter-clockwise. HAND TIGHTEN ONLY.NOTE:Use propane cylinder upright whenpossible to prevent flare-ups.Step 6Attach regulator/valve assembly to stovefitting. HAND TIGHTEN ONLY.Stove Fitting3
GAS LEAK TESTINGTHE GAS LEAK TESTING PROCEDURE MUST BE PERFORMEDEVERY TIME THE CYLINDER IS CONNECTED TO <strong>STOVE</strong>.WARNING• Gas leak testing must be performed outdoors in a well ventilated area.• During the gas leak testing procedure, always keep unit away from open flames, sparks or lit cigarettes.• Never use a flame to check for gas leaks.• Always use the regulator valve knob to turn the unit "OFF". The control knobs are used when lighting the burnersand to adjust the flame.• Never use a unit that has a gas leak. Contact The <strong>Brinkmann</strong> Corporation’s Customer Service Department forreplacement parts at 1-800-527-0717.Step 1Make sure the regulator knob and control knobs are inthe "OFF" position.Step 2Make sure regulator/valve assembly is properly attachedto propane cylinder refer to "Assembly Instructions".Attach regulator/valve assembly to the side of theCamping Stove. HAND TIGHTEN ONLY.Step 3Prepare a soapy water solution (one part dishwashingliquid to three parts water) to test for gas leaks in theassembly hose and connections. Apply a generousamount of the soapy mixture to the regulator stem, theentire length of hose and Camping Stove fitting (locatedon the right side of stove).Step 4With the control knobs in the "OFF" position, open theregulator valve two full turns (counter-clockwise). Next,check for bubbles at regulator valve, along the entirelength of hose and at the Camping Stove fitting. DO NOTLEAVE GAS ON FOR MORE THAN 10 SECONDS. If soapymixture starts bubbling, gas is leaking through theconnection or hose. Turn the regulator valve "OFF" andretighten the connection that is leaking gas. Repeatprocedure with soapy mixture until gas no longer leaks.NEVER USE A FLAME TO CHECK FOR GAS LEAKS. Turnthe regulator valve "OFF" after each test.Step 5Once all gas leaks have been sealed, WAIT AT LEAST 5MINUTES FOR GAS FUMES TO DISSIPATE BEFORELIGHTING THE <strong>BURNER</strong>S.Carefully follow "Operating Instructions" to light theburner and properly operate this unit.Regulator/ ValveAssemblyNOTE:Stove FittingUse propane cylinder upright whenpossible to prevent flare-ups. Makesure not to cross-thread fittingswhile tightening.Watch for BubblesPropane Cylinder Valve4
OPERATING INSTRUCTIONSPLACE THE <strong>STOVE</strong> OUTDOORS ON A HARD, LEVEL, NONCOMBUSTIBLESURFACE AWAY FROM ANY COMBUSTIBLE MATERIAL. IN WINDY WEATHER,THE <strong>STOVE</strong> SHOULD BE LOCATED IN AN OUTDOOR AREA THAT ISPROTECTED FROM THE WIND. GAS LEAK TESTING PROCEDURE MUSTBE PERFORMED EVERY TIME THE <strong>STOVE</strong> IS USED.READ ALL SAFETY WARNINGS AND INSTRUCTIONS CAREFULLY BEFOREOPERATING YOUR <strong>STOVE</strong>.NOTE:Use propane cylinderupright when possibleto prevent flare-ups.Step 1Make sure the regulator knob and control knobs are in the "OFF" position.Step 2Fully open the propane cylinder valve by turning regulator knobcounter-clockwise.Step 3Using a long match, hold the flame beside burner. Turn the control knobSLOWLY until the burner lights.WARNING: If the burner does not light within 5 seconds, turn the regulatorknob and control knobs "OFF" immediately. Wait at least5 minutes until gas fumes have dissipated before attempting tolight burner again.Step 4To light the second burner, reduce the flame on the first, lit burner andrepeat Step 3.Step 5When food is done, turn stove "OFF". Always turn regulator knob "OFF"first, then turn the control knobs "OFF".Step 6Allow stove to cool completely, then follow instructions in the"After-Use Safety" and "Proper Care & Maintenance" sections of thismanual.Regulator Knob5Burner Control Knobs
AFTER-USE SAFETYWARNING• Always allow the stove to cool completely before handling.• Always disconnect the propane cylinder from stove when not in use - a safety cap should be placed on thepropane cylinder.PROPER CARE & MAINTENANCE• Cover and store stove in a protected area away from children and pets.• Never store propane cylinder in an enclosed area (house, garage, etc.). Store outdoors in a well ventilated, shadedarea away from any heat source or open flame.• Due to the intense heat from burner, it is normal for paint burn off and discoloration to occur on stove during thefirst few uses.• To protect your stove from excessive rust, the unit must be kept clean and covered at all times when not in use.We strongly suggest storing the stove indoors in a shed, garage or storage room. Disconnect the LP cylinder andleave the LP cylinder outdoors.• If rust appears on the exterior surface of your stove, clean and buff the affected area with steel wool or fine gritemery cloth. Touch-up with a good quality high-temperature resistant paint.• Wash cooking grill with hot, soapy water, rinse well and dry.• Clean inside and outside of stove by wiping off with a damp cloth.6
©2002 The <strong>Brinkmann</strong> CorporationDallas, Texas 75244 U.S.Awww.brinkmanncorp.comONE YEAR LIMITED WARRANTYFor one year from date of purchase, The <strong>Brinkmann</strong> Corporation warrants the Tabletop Camping Stove against defects due toworkmanship or materials to the original purchaser. The <strong>Brinkmann</strong> Corporation’s obligations under this warranty are limited tothe following guidelines:• This warranty does not cover stoves that have been altered or damaged due to: normal wear, abuse, impropermaintenance, improper use, disassembly of parts and/or attempted repair by anyone other than an authorized employee ofThe <strong>Brinkmann</strong> Corporation.• This warranty does not cover surface scratching or heat damage to the finish, which is considered normal wear.• The <strong>Brinkmann</strong> Corporation may elect to repair or replace damaged units covered by the terms of this warranty.• This warranty extends to the original purchaser only and is not transferable or assignable to subsequent purchasers.The <strong>Brinkmann</strong> Corporation requires reasonable proof of purchase. Therefore, we strongly recommend that you retain your salesreceipt or invoice. To obtain replacement parts for your Tabletop Camping Stove under the terms of this warranty, please callCustomer Service Department at 1-800-527-0717. A receipt will be required. The <strong>Brinkmann</strong> Corporation will not beresponsible for any stoves forwarded to us without prior authorization.EXCEPT AS ABOVE STATED, THE BRINKMANN CORPORATION MAKES NO OTHER EXPRESS WARRANTY.THE IMPLIED WARRANTIES OF MERCHANTABILITY AND FITNESS FOR A PARTICULAR PURPOSE ARE LIMITED IN DURATIONTO ONE YEAR FROM THE DATE OF PURCHASE. SOME STATES DO NOT ALLOW LIMITATIONS ON HOW LONG AN IMPLIEDWARRANTY LASTS, SO THE ABOVE LIMITATION MAY NOT APPLY TO YOU.ANY LIABILITY FOR INDIRECT, INCIDENTAL OR CONSEQUENTIAL DAMAGES ARISING FROM THE FAILURE OF THE TABLETOP<strong>CAMPING</strong> <strong>STOVE</strong> TO COMPLY WITH THIS WARRANTY OR ANY IMPLIED WARRANTY IS EXCLUDED. CUSTOMERACKNOWLEDGES THAT THE PURCHASE PRICE CHARGED IS BASED UPON THE LIMITATIONS CONTAINED IN THE WARRANTYSET OUT ABOVE. SOME STATES DO NOT ALLOW THE EXCLUSION OR LIMITATION OF INCIDENTAL OR CONSEQUENTIALDAMAGES, SO THE ABOVE LIMITATION OR EXCLUSION MAY NOT APPLY TO YOU. THIS WARRANTY GIVES YOU SPECIFICLEGAL RIGHTS, AND YOU MAY ALSO HAVE OTHER RIGHTS WHICH VARY FROM STATE TO STATE.140-0100-13/02Owner’s Manual for Model842-0100-0