- Page 8 and 9: GX-A604 SPEAKER CONNECTIONS: 3-CHAN
- Page 10 and 11: GX-A604 speaker connections: 2-chan
- Page 12 and 13: Using the speaker-level inputsIf yo
- Page 14 and 15: GX-A602 speaker connections: bridge
- Page 16: gx-a3001 speaker connectionsMinimum
- Page 19 and 20: EnglishGX-A602L+L-R-R+Line-levelInp
- Page 21 and 22: EnglishRear Crossover control: The
- Page 23 and 24: EnglishSET THE BASS BOOSTGX-A604: W
- Page 25 and 26: EnglishPROBLEMSound only comes from
- Page 27 and 28: GX-A604/GX-A602/GX-A3001Verstärker
- Page 29 and 30: DeutschINSTALLATIONSORTVerstärker
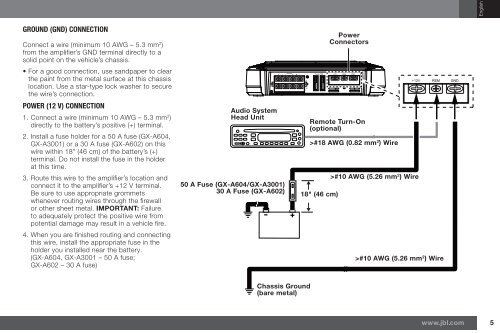
- Page 31 and 32: DeutschMASSE-ANSCHLUSS (GND)Schlie
- Page 33 and 34: DeutschGX-A604 EINGANGSANSCHLÜSSE:
- Page 35 and 36: DeutschGX-A604 EINGANGSANSCHLÜSSE:
- Page 37 and 38: DeutschGX-A604 EINGANGSANSCHLÜSSE:
- Page 39 and 40: DeutschGX-A602 EINGANGSANSCHLÜSSE:
- Page 41 and 42: DeutschGX-A602 EINGANGSANSCHLÜSSE:
- Page 43 and 44: DeutschGX-A3001 EINGANGSANSCHLUSSVe
- Page 45 and 46: DeutschGX-A602L+L-R-R+Line-PegelEin
- Page 47 and 48: DeutschRückwärtiger Frequenzweich
- Page 50 and 51: FEHLERBEHEBUNGWenn Ihr Verstärker
- Page 52 and 53:
Technische DatenMax. Leistung (15,5
- Page 54 and 55:
introductionMERCI d'avoir acheté u
- Page 56 and 57:
connexions d'alimentation et de mas
- Page 58 and 59:
connexions aux haut-parleurs et des
- Page 60 and 61:
CONNEXIONS DES HAUT-PARLEURS AU GX-
- Page 62 and 63:
Connexions des haut-parleurs au GX-
- Page 64 and 65:
Utilisation d'entrées de niveau ha
- Page 66 and 67:
Connexions des haut-parleurs au GX-
- Page 68 and 69:
Connexions des haut-parleurs au GX-
- Page 70 and 71:
Commandes, connexions d'entrée et
- Page 72 and 73:
églage des commandes de répartiti
- Page 74 and 75:
GX-A602 : fonctionnement avec 2 can
- Page 76 and 77:
RÉSOLUTION DES PROBLÈMESSi votre
- Page 78 and 79:
SpécificationsPuissance max (15,5
- Page 80 and 81:
introduzioneGRAZIE per aver acquist
- Page 82 and 83:
connessioni di alimentazione e terr
- Page 84 and 85:
connessioni dei diffusori e di ingr
- Page 86 and 87:
CONNESSIONI DEI DIFFUSORI GX-A604:
- Page 88 and 89:
Connessioni dei diffusori GX-A604:
- Page 90 and 91:
Uso degli ingressi del livello dei
- Page 92 and 93:
Connessioni dei diffusori GX-A602:
- Page 94 and 95:
Connessioni dei diffusori gx-a3001:
- Page 96 and 97:
Controlli, connessioni di ingresso
- Page 98 and 99:
impostazione dei controlli del cros
- Page 100 and 101:
GX-A602: funzionamento a 2 canaliIn
- Page 102 and 103:
RICERCA GUASTISe l'amplificatore no
- Page 104 and 105:
SpecificheGX-A604 GX-A602 GX-A3001A
- Page 106 and 107:
IntroducciónGRACIAS por comprar un
- Page 108 and 109:
Conexiones de alimentación y a tie
- Page 110 and 111:
Conexiones del altavoz y de entrada
- Page 112 and 113:
CONEXIONES DEL ALTAVOZ GX-A604 FUNC
- Page 114 and 115:
Conexiones del altavoz GX-A604 Func
- Page 116 and 117:
Uso de las entradas de nivel del al
- Page 118 and 119:
Conexiones del altavoz GX-A602: Fun
- Page 120 and 121:
Conexiones del altavoz gx-a3001Impe
- Page 122 and 123:
Controles, conexiones de entrada e
- Page 124 and 125:
Fijar los controles de crucetaGX-A6
- Page 126 and 127:
GX-A602: Funcionamiento en 2 canale
- Page 128 and 129:
PROBLEMAS Y SOLUCIONESSi el amplifi
- Page 130 and 131:
EspecificacionesPotencia máxima (1
- Page 132 and 133:
ВведениеБЛАГОДАРИ
- Page 134 and 135:
Силовое соединение
- Page 136 and 137:
Подключение динами
- Page 138:
подклюЧение динаМи
- Page 141 and 142:
РусскийподклюЧени
- Page 143 and 144:
РусскийподклюЧени
- Page 146 and 147:
Подключение динами
- Page 148 and 149:
Органы управления,
- Page 150 and 151:
Управление кроссов
- Page 152 and 153:
GX-A602: 2-канальная си
- Page 154 and 155:
поиск и устРанение
- Page 156 and 157:
Технические характ
- Page 158 and 159:
JBL ® GX www.jbl.com GX 1 GX-A602
- Page 160 and 161:
(-) GX GX (+) (-) 4
- Page 162 and 163:
(+) (+) (-) (-) (+) (-) GX-A60
- Page 164 and 165:
GX-A604 3 2 ohms4 ohms• FL FR (
- Page 166 and 167:
GX-A604 4 ohmsSpeakerFuses 20A10
- Page 168 and 169:
L+L-R-R+ GX GX-A602 2 ohms FL FR (
- Page 170 and 171:
GX-A602 4 ohms RL (+) RR (-) 2-oh
- Page 172 and 173:
GX-A3001 2 ohms4 ohms2 GX-A3001 Fus
- Page 174 and 175:
GX-A60418
- Page 176 and 177:
GX-A6044 “4CH” “ON” 6" x
- Page 178 and 179:
GX-A602• 6" “HP” • 6" x 9
- Page 180 and 181:
JBL LED • +12V GND • +12V
- Page 182 and 183:
15.5V1kHz10%THD2 ohmsGX-A604 GX-A60
- Page 184 and 185:
소개JBL ® GX 시리즈 앰프를
- Page 186 and 187:
전원 및 접지 연결중요: 설
- Page 188 and 189:
스피커 및 입력 연결반드
- Page 190 and 191:
GX-A604 스피커 연결: 3채널
- Page 192 and 193:
gX-a604 스피커 연결: 2채널
- Page 194 and 195:
스피커 레벨 입력 사용소
- Page 196 and 197:
gX-a602 스피커 연결: 브리지
- Page 198 and 199:
gX-a3001 스피커 연결스피커
- Page 200 and 201:
제어, 입력 연결 및 표시기
- Page 202 and 203:
크로스 오버 제어 설정gX-a6
- Page 204 and 205:
gX-a602: 2채널 작동크로스오
- Page 206 and 207:
문제 해결앰프가 생각한
- Page 208 and 209:
사양최대 전원(15.5V, 1kHz, 10
- Page 210 and 211:
はじめにJBL ® GXシリーズ
- Page 212 and 213:
電 力 接 続 とアース 接
- Page 214 and 215:
スピーカーと 入 力 接 続
- Page 216 and 217:
GX-A604 スピーカーの 接 続
- Page 218 and 219:
gX-a604 スピーカーの 接 続
- Page 220 and 221:
スピーカーレベルの 入 力
- Page 222 and 223:
gX-a602スピーカー 接 続 : 2
- Page 224 and 225:
gX-a3001 スピーカーの 接 続
- Page 226 and 227:
コントロール、 入 力 接
- Page 228 and 229:
20クロスオーバー コント
- Page 230 and 231:
gX-a602: 2チャンネル での
- Page 232 and 233:
トラブルシューティング
- Page 234 and 235:
仕 様 書最 大 出 力 (15.5V
- Page 236 and 237:
InleidingDank u voor de aankoop van
- Page 238 and 239:
voeding- en aarde-aansluitingenbela
- Page 240 and 241:
luidspreker- en ingangaansluitingen
- Page 242 and 243:
GX-A604 LUIDSPREKERAANSLUITINGEN: 3
- Page 244 and 245:
GX-A604 luidsprekeraansluitingen: 2
- Page 246 and 247:
De luidsprekerniveau-ingangen gebru
- Page 248 and 249:
GX-A602 luidsprekeraansluitingen: d
- Page 250 and 251:
gx-a3001 luidsprekeraansluitingenMi
- Page 252 and 253:
Bedieningselementen, ingangaansluit
- Page 254 and 255:
de crossover-regelaars instellenGX-
- Page 256 and 257:
GX-A602: 2-kanaals functieCrossover
- Page 258 and 259:
PROBLEMEN OPLOSSENAls uw versterker
- Page 260 and 261:
SpecificatiesMaximaal vermogen (15,
- Page 262 and 263:
introduktionTACK SÅ MYCKET för at
- Page 264 and 265:
anslutning av ström och jordningVI
- Page 266 and 267:
anslutning av högtalare och ingån
- Page 268 and 269:
GX-A604 HÖGTALARANSLUTNINGAR: 3-KA
- Page 270 and 271:
GX-A604 högtalaranslutningar: 2-ka
- Page 272 and 273:
Använda högtalarnivåingångarnaO
- Page 274 and 275:
GX-A602 högtalaranslutningar: öve
- Page 276 and 277:
GX-A3001 högtalaranslutningarMinst
- Page 278 and 279:
Kontroller, ingångar och indikator
- Page 280 and 281:
Ställ in delningskontrollerGX-A604
- Page 282 and 283:
GX-A602: 2-kanalsdriftReglage för
- Page 284 and 285:
FELSÖKNINGOm din förstärkare int
- Page 286 and 287:
SpecifikationerMax effekt (15,5 V,
- Page 288 and 289:
indledningTAK for dit køb af en JB
- Page 290 and 291:
strøm- og steltilslutningervigtigt
- Page 292 and 293:
højttaler og indgangstilslutninger
- Page 294 and 295:
GX-A604-HØJTTALERTILSLUTNINGER: 3-
- Page 296 and 297:
GX-A604-højttalertilslutninger: 2-
- Page 298 and 299:
Brug af højttalerniveauindgangeneH
- Page 300 and 301:
GX-A602-højttalertilslutninger: dr
- Page 302 and 303:
GX-A3001-højttalertilslutningerMin
- Page 304 and 305:
Kontroller, indgangsstik og indikat
- Page 306 and 307:
indstil crossoverkontrollerGX-A604:
- Page 308 and 309:
GX-A602: 2-kanalsdriftKontakt til c
- Page 310 and 311:
PROBLEMLØSNINGHvis din forstærker
- Page 312 and 313:
SpecifikationerMaks. effekt (15,5 V
- Page 314 and 315:
JohdantoKIITÄMME TEITÄ JBL ® GX-
- Page 316 and 317:
Sähkö- ja maaliitännätTärkeä
- Page 318 and 319:
Kaiutin ja tuloliitännätLiitä ai
- Page 320 and 321:
GX-A604-KAIUTINLIITÄNNÄT: 3-KANAV
- Page 322 and 323:
GX-A604-kaiutinliitännät: 2-kanav
- Page 324 and 325:
Kaiutintason tulojen käyttäminenJ
- Page 326 and 327:
GX-A602 kaiutinliitännät; silloit
- Page 328 and 329:
gx-a3001-kaiutinliitännätKaiuttim
- Page 330 and 331:
Säädöt, tuloliitännät ja merkk
- Page 332 and 333:
Aseta jakautumisen säädötGX-A604
- Page 334 and 335:
GX-A602: 2-kanavainen toimintaJakos
- Page 336 and 337:
VIANMÄÄRITYSJos vahvistimesi ei t
- Page 338 and 339:
Tekniset tiedotMaksimiteho (15,5 V,
- Page 340 and 341:
IntroduçãoOBRIGADO por adquirir u
- Page 342 and 343:
Ligações à terra e de alimentaç
- Page 344 and 345:
Ligações de colunas e entradasLig
- Page 346 and 347:
LIGAÇÕES DE COLUNAS PARA GX-A604:
- Page 349 and 350:
PortuguêsLIGAÇÕES DE ENTRADAS PA
- Page 351 and 352:
PortuguêsLIGAÇÕES DE ENTRADAS PA
- Page 353 and 354:
PortuguêsLIGAÇÕES DE ENTRADAS PA
- Page 355 and 356:
PortuguêsLIGAÇÕES DE ENTRADAS PA
- Page 357 and 358:
PortuguêsGX-A602L+L-R-R+Conectores
- Page 359 and 360:
PortuguêsInterruptor de filtro de
- Page 361 and 362:
PortuguêsDEFINIR O REFORÇO DE GRA
- Page 363 and 364:
PortuguêsPROBLEMAO som é emitido
- Page 365 and 366:
GX-A604/GX-A602/GX-A3001功 率 放
- Page 367 and 368:
繁 體中 文安 裝 位 置放
- Page 369 and 370:
繁 體中 文接 地 (GND) 連 接
- Page 371 and 372:
繁 體中 文GX-A604 輸 入 連
- Page 373 and 374:
繁 體中 文GX-A604 輸 入 連
- Page 375 and 376:
繁 體中 文GX-A604 輸 入 連
- Page 377 and 378:
繁 體中 文GX-A602 輸 入 連
- Page 379 and 380:
繁 體中 文GX-A602 輸 入 連
- Page 381 and 382:
繁 體中 文GX-A3001 輸 入 連
- Page 383 and 384:
繁 體中 文GX-A602L+L-R-R+GX-A30
- Page 385 and 386:
繁 體中 文後 分 頻 控 制
- Page 387 and 388:
繁 體中 文設 定 低 音 加
- Page 389 and 390:
繁 體中 文問 題原 因 和
- Page 391 and 392:
GX-A604/GX-A602/GX-A3001Wzmacniacz
- Page 393 and 394:
PolskiUMIEJSCOWIENIE MONTAŻUWzmacn
- Page 395 and 396:
PolskiPODŁĄCZENIE MASY (GND)Podł
- Page 397 and 398:
PolskiPODŁĄCZANIE SYGNAŁÓW WEJ
- Page 399 and 400:
PolskiPODŁĄCZANIE SYGNAŁÓW WEJ
- Page 401 and 402:
PolskiPODŁĄCZANIE SYGNAŁÓW WEJ
- Page 403 and 404:
PolskiPODŁĄCZANIE SYGNAŁÓW WEJ
- Page 405 and 406:
PolskiPODŁĄCZANIE SYGNAŁÓW WEJ
- Page 407 and 408:
PolskiPODŁĄCZANIE SYGNAŁÓW WEJ
- Page 409 and 410:
PolskiGX-A602L+L-R-R+GX-A3001Złąc
- Page 411 and 412:
PolskiRegulator zwrotnicy głośnik
- Page 413 and 414:
PolskiNASTAWA FUNKCJI PODBICIA TON
- Page 415 and 416:
PolskiPROBLEMTylko niektóre głoś
- Page 417 and 418:
GX-A604/GX-A602/GX-A3001güç ampli
- Page 419 and 420:
TürkçeKURULUM KONUMUAmplifikatör
- Page 421 and 422:
TürkçeTOPRAK (GND) BAĞLANTISIAmp
- Page 423 and 424:
TürkçeGX-A604 GİRİŞ BAĞLANTIL
- Page 425 and 426:
TürkçeGX-A604 GİRİŞ BAĞLANTIL
- Page 427 and 428:
TürkçeGX-A604 GİRİŞ BAĞLANTIL
- Page 429 and 430:
TürkçeGX-A602 GİRİŞ BAĞLANTIL
- Page 431 and 432:
TürkçeGX-A602 GİRİŞ BAĞLANTIL
- Page 433 and 434:
TürkçeGX-A3001 GİRİŞ BAĞLANTI
- Page 435 and 436:
TürkçeGX-A602L+L-R-R+GX-A3001Hat
- Page 437 and 438:
TürkçeArka Geçiş kontrolü: Sub
- Page 439 and 440:
TürkçeBAS ARTIRMA AYARIGX-A604: B
- Page 441 and 442:
TürkçeSORUNSes sadece amplifikat
- Page 443 and 444:
GX-A604/GX-A602/GX-A3001power ampli
- Page 445 and 446:
BahasaIndonesiaLOKASI PEMASANGANAmp
- Page 447 and 448:
BahasaIndonesiaKONEKSI GROUND (GND)
- Page 449 and 450:
BahasaIndonesiaKONEKSI INPUT GX-A60
- Page 451 and 452:
BahasaIndonesiaKONEKSI INPUT GX-A60
- Page 453 and 454:
BahasaIndonesiaKONEKSI INPUT GX-A60
- Page 455 and 456:
BahasaIndonesiaKONEKSI INPUT GX-A60
- Page 457 and 458:
BahasaIndonesiaKONEKSI INPUT GX-A60
- Page 459 and 460:
BahasaIndonesiaKONEKSI INPUT GX-A30
- Page 461 and 462:
BahasaIndonesiaGX-A602L+L-R-R+Konek
- Page 463 and 464:
BahasaIndonesiaKontrol Crossover Be
- Page 465 and 466:
BahasaIndonesiaMENGATUR BASS BOOSTG
- Page 467 and 468:
BahasaIndonesiaMASALAHBunyi hanya m
- Page 469 and 470:
BahasaIndonesiawww.jbl.com27