VEC156BD ENGLISH - Black & Decker ServiceNet
VEC156BD ENGLISH - Black & Decker ServiceNet
VEC156BD ENGLISH - Black & Decker ServiceNet
- No tags were found...

Create successful ePaper yourself
Turn your PDF publications into a flip-book with our unique Google optimized e-Paper software.
<strong>VEC156BD</strong> <strong>ENGLISH</strong> 10/2/08 9:40 AM Page 6SERVICE INFORMATIONAll <strong>Black</strong> & <strong>Decker</strong> Service Centers are staffed with trained personnel to provide customerswith efficient and reliable power tool service. Whether you need technical advice, repair, orgenuine factory replacement parts, contact the <strong>Black</strong> & <strong>Decker</strong> location nearest you. To findyour local service location, refer to the yellow page directory under "Tools—Electric" or call:1-800-544-6986 or visit www.blackanddecker.comFULL TWO-YEAR HOME USE WARRANTY<strong>Black</strong> & <strong>Decker</strong> (U.S.) Inc. warrants this product for two years against any defects inmaterial or workmanship. The defective product will be replaced or repaired at no charge ineither of two ways.The first, which will result in exchanges only, is to return the product to the retailer fromwhom it was purchased (provided that the store is a participating retailer). Returns shouldbe made within the time period of the retailer’s policy for exchanges (usually 30 to 90 daysafter the sale). Proof of purchase may be required. Please check with the retailer for theirspecific return policy regarding returns that are beyond the time set for exchanges.The second option is to take or send the product (prepaid) to a <strong>Black</strong> & <strong>Decker</strong> owned orauthorized Service Center for repair or replacement at our option. Proof of purchase maybe required.<strong>Black</strong> & <strong>Decker</strong> owned and authorized Service Centers are listed under"Tools-Electric" in the yellow pages of the phone directory.This warranty does not apply to accessories. This warranty gives you specific legal rightsand you may have other rights which vary from state to state or province to province.Should you have any questions, contact the manager of your nearest <strong>Black</strong> & <strong>Decker</strong>Service Center. This product is not intended for commercial use.FREE WARNING LABEL REPLACEMENT: If your warning labels become illegible or aremissing, call 1-800-544-6986 for a free replacement.1,000,000 Power Series SpotlightCordless . RechargeableINSTRUCTION MANUALCatalog No.<strong>VEC156BD</strong>53SBE231887Imported by<strong>Black</strong> & <strong>Decker</strong> (U.S.)Inc.,701 E. Joppa Rd.Towson, MD 21286 U.S.A.See ‘Tools-Electric’– Yellow Pages –for Service &SalesThank you for choosing <strong>Black</strong> & <strong>Decker</strong>!Go to www.<strong>Black</strong>and<strong>Decker</strong>.com/NewOwnerto register your new product.PLEASE READ BEFORE RETURNING THISPRODUCT FOR ANY REASON:If you have a question or experience a problem with your <strong>Black</strong> & <strong>Decker</strong> purchase, go toHTTP://WWW.BLACKANDDECKER.COM/INSTANTANSWERSfor instant answers 24 hours a day.If you can’t find the answer or do not have access to the internet,call 1-800-544-6986 from 8 a.m. to 5 p.m. EST Mon. -- Fri. to speak with an agent.Please have the catalog number available when you call.SAVE THIS INSTRUCTION MANUAL FOR FUTURE REFERENCE.Part No. 90104834 Copyright © 2008 <strong>Black</strong> & <strong>Decker</strong> MADE IN CHINASept. ‘08VEA EL ESPAÑOL EN LA CONTRAPORTADA.INSTRUCTIVO DE OPERACIÓN, CENTROS DE SERVICIO Y PÓLIZA DE GARANTÍA.ADVERTENCIA: LÉASE ESTE INSTRUCTIVO ANTES DE USAR EL PRODUCTO.6
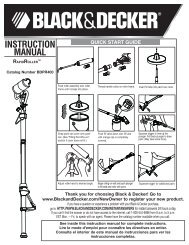
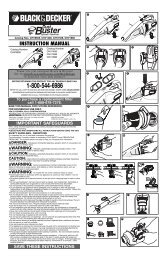
<strong>VEC156BD</strong> <strong>ENGLISH</strong> 10/2/08 9:40 AM Page iiIMPORTANT SAFETY INFORMATION, SAVE THESE INSTRUCTIONSTO REDUCE THE RISK OF INJURY, USER MUST READ AND UNDERSTANDTHIS INSTRUCTIONAL MANUAL. THIS MANUAL CONTAINS IMPORTANTINFORMATION REGARDING THE OPERATION AND WARRANTY OF THISPRODUCT. PLEASE RETAIN FOR FUTURE REFERENCE.IMPORTANT SAFETY INFORMATIONWARNINGS• Contains non-spillable sealed lead acid batteries. They must be recycled ordisposed of properly.• DO NOT dispose of batteries in fire, as this may result in an explosion.• DO NOT open battery or short circuit, this may cause the battery to leak orget hot causing personal injury. Any disposal questions call toll-free1-800-544-6986.• RISK OF FIRE/ELECTRIC SHOCK — do not plug in a power supply without thebulb lens and cover in place.• ALL HALOGEN LIGHTS GIVE OFF HEAT.– Do not touch lens while operating.– Keep combustibles away from spotlight lens. Extreme heat can cause fires.– Never place the light face-down on any surface when lit.CAUTIONS• Never look directly into the light or shine the light into another person’s eyes.• Keep sharp objects away from lens — it is glass and can break.• Do not immerse spotlight in water.• Do not drop or throw spotlight. It contains glass and a sealed lead acid battery.• Only replace bulb with type indicated in specifications (6 volt, H3 55 watt quartz halogen).• Use only with AC or DC charging adapters that are provided with unit. Plug in thecharging adapter at the spotlight first, then plug into the charging source.• DO NOT OVERCHARGE:– AC recharge up to 14 hours maximum.– DC recharge up to 14 hours maximum.• NEVER ATTEMPT TO USE THE AC CHARGER AND DC CHARGING PORT SIMULTANEOUSLY.• After charging/recharging, disconnect charging adapter or extension cord and wait 5minutes before use.• Do not crush, cut, pull or expose charging adapter cords to extreme heat.• Position charging adapter cords so they do not become entangled or become a safetyhazard. Keep charging adapter cords away from sharp edges.• Use in a dry location only.• Do not open body casing. There are no user-serviceable parts inside.THIS UNIT IS NOT A TOY AND SHOULD ONLY BE OPERATED BY ADULTS. KEEP AWAYFROM CHILDREN!Read This User’s Manual Before Using This Spotlight.SAVE THESE INSTRUCTIONSThis device complies with part 15 of the FCC rules. Operation is subject to the followingtwo conditions: (1) this device may not cause harmful interference, and (2) this devicemust accept any interference received, including interference that may cause undesiredoperation.This equipment has been tested and found to comply with the limits for a Class B digitaldevice, pursuant to part 15 of the FCC Rules. These limits are designed to providereasonable protection against harmful interference in a residential installation. Thisequipment generates, uses and can radiate radio frequency energy and, if not installedand used in accordance with the instructions, may cause harmful interference to radiocommunications. However, there is no guarantee that interference will not occur in aparticular installation. If equipment does cause harmful interference to radio or televisionreception, which can be determined by turning the equipment off and on, the user isencouraged to try to correct the interference by one or more of the following measures:• Reorient or relocate the receiving antenna.• Increase the separation between equipment and receiver.• Connect the equipment into an outlet on a circuit different from that to which thereceiver is connected.• Consult the dealer or an experienced radio/TV technician for help.iiTABLE OF CONTENTSIntroduction . . . . . . . . . . . . . . . . . . . . . . . . . . . . . . . . . . . . . . . . . . . . . . . . . . . . . . . . 1Features . . . . . . . . . . . . . . . . . . . . . . . . . . . . . . . . . . . . . . . . . . . . . . . . . . . . . . . . . . . 1Charging/Recharging the Spotlight . . . . . . . . . . . . . . . . . . . . . . . . . . . . . . . . . . . . . . 2Operating Instructions . . . . . . . . . . . . . . . . . . . . . . . . . . . . . . . . . . . . . . . . . . . . . . . 3Care and Maintenance . . . . . . . . . . . . . . . . . . . . . . . . . . . . . . . . . . . . . . . . . . . . . . . . 3Spotlight Bulb Replacement . . . . . . . . . . . . . . . . . . . . . . . . . . . . . . . . . . . . . . . . . 3Battery Replacement/Disposal . . . . . . . . . . . . . . . . . . . . . . . . . . . . . . . . . . . . . . . 412 Volt DC Plug Fuse Replacement . . . . . . . . . . . . . . . . . . . . . . . . . . . . . . . . . . 5Troubleshooting . . . . . . . . . . . . . . . . . . . . . . . . . . . . . . . . . . . . . . . . . . . . . . . . . . . . . 5Specifications . . . . . . . . . . . . . . . . . . . . . . . . . . . . . . . . . . . . . . . . . . . . . . . . . . . . . . . 5INTRODUCTIONThank you for choosing the <strong>Black</strong> & <strong>Decker</strong> 1,000,000 Power Series Spotlight. Please read this guide carefully before use to ensure optimumperformance and to avoid damage to the unit.FEATURES• Powerful, focused quartz halogen beam• 3-position electronic spotlight dimmer control to conserve power and extendruntimes• Protective rubber safety guard (bezel) around lens• Rubber safety cap protects battery compartment• Comfortable pistol grip and lanyard• Battery Status LED Indicator displays battery charge level while charging, orwhenever area light is turned on• UL listed, built-in 120 volt AC charger• 12 volt DC charging adapter included• Rechargeable, non-spillable, sealed lead acid batteryRUBBER BEZELQUARTZ HALOGENBULBTRIGGER(ON/OFF AND DIMMERCONTROL)CARRYLANYARD1TRIGGER LOCKBATTERY STATUSLED INDICATOR120 VOLT ACCHARGER(BACK OF UNIT)DC CHARGINGPORTPISTOL GRIP HANDLE
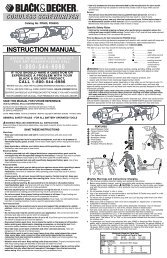
<strong>VEC156BD</strong> <strong>ENGLISH</strong> 10/2/08 9:40 AM Page 2CHARGING/RECHARGING THE SPOTLIGHTThis unit is shipped in a partially charged state. Charge unit BEFORE first useusing the 120 Volt AC Charger for 12-14 hours or until the green Battery StatusLED lights. Charge after each use until green LED lights.Charging/Recharging Using the 120 Volt AC ChargerPlug a standard North American 120 volt AC extension cord into the 120 Volt ACCharger on the back of the unit.HOUSEHOLD EXTENSION CORD(NOT INCLUDED)Make sure the Spotlight is OFF (the Trigger Lock is in the OFF position and theTrigger is not depressed).Charge until the Battery Status LED Indicator green LED lights (approximately 12-14 hours). DO NOT CHARGE FOR LONGER THAN 14 HOURS.Charging/Recharging Using the 12 Volt DC Charging AdapterPlug the barrel tip of the supplied 12 Volt DC Charging Adapter into the 12 VoltDC Charging Port.12 VOLT DC CHARGING ADAPTER2BATTERY STATUSLED INDICATORSBUILT-IN 120VAC CHARGER12 VOLT DCCHARGING PORTInsert the 12 volt DC plug end into the accessory outlet of your vehicle or other 12volt DC power source.Make sure the Spotlight is OFF (the Trigger Lock is in the OFF position and theTrigger is not depressed).Charge until the Battery Status LED Indicator green LED lights (approximately12-14 hours). DO NOT CHARGE FOR LONGER THAN 14 HOURS.Make sure the DC source (jump-starter, battery pack, vehicle accessory outlet,etc.) is 12 volt DC and is able to supply at least one half amp at 12 volt DC for 8hours. This means a battery pack should be charged with at least 4 amp hourscapacity.Note: When using a vehicle’s 12 volt DC accessory outlet as a charging source, beaware that some vehicles require you to turn on the ignition to power theaccessory outlet.WARNING• NEVER ATTEMPT TO USE THE AC CHARGER AND DC CHARGING PORTSIMULTANEOUSLY.OPERATING INSTRUCTIONSTo turn the Spotlight ON, depress the Trigger. Pressing the Trigger repeatedly atone second intervals advances the brightness level from dim to brightest.To lock the Trigger in the ON position, squeeze the trigger switch and move thetrigger locking button (located on the side of the handle) to locked position. Thespotlight will stay on until the lock is moved to the OFF position and the trigger isreleased.CARE AND MAINTENANCEAll batteries lose charge with time, especially when they are warm. Recharge theunit every two months when not in frequent use, preferably using the 120 volt ACmethod.Never submerge the unit in water. If the unit gets dirty, gently clean the outersurfaces of the spotlight unit with a soft cloth moistened with a mild solution of waterand detergent.The quartz halogen bulb is the only user-replaceable part in the Spotlight.Periodically inspect the condition of adapters, connectors and wires. ContactTechnical Support toll-free at 800-544-6986 to replace any components that havebecome worn or broken.Spotlight Bulb ReplacementTo replace the bulb, you will need a small Phillips screwdriver and a 6 volt H3 55watt replacement bulb. During installation, avoid touching the glass part of thebulb. Bulb life may be shortened by installing a bulb with dirt or fingerprints on it.The bulb can be wiped clean with a cloth moistened with alcohol.QUARTZ HALOGENBULBRUBBER BEZEL COVERRETAINING RINGRUBBER“O” RING1. Disconnect the unit from any charging adapters.2. Push the rubber bezel forward toward the front of the spotlight to reveal twosmall Phillips screws in the retaining ring.3. Using the screwdriver, remove (counterclockwise) the two screws. Set themaside.4. Lift off the retaining ring, glass lens and rubber “O” ring and set them aside.5. Carefully remove the reflector and bulb assembly.3TRIGGERTRIGGER LOCKREFLECTORTRIGGERSWITCHRUBBEREND CAPTRIGGER LOCK
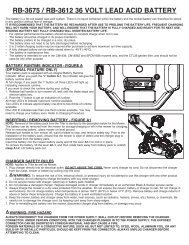
<strong>VEC156BD</strong> <strong>ENGLISH</strong> 10/2/08 9:40 AM Page 4BULBHAIRPIN RETAININGWIRESPHILLIPSHEADSCREWSWARNINGS• Do not dispose of the battery in fire as this may result in an explosion.• Before disposing of the battery, protect exposed terminals with heavy-dutyelectrical tape to prevent shorting (shorting can result in injury or fire).• Do not expose battery to fire or intense heat as it may explode.• For more information on recycling this battery, call toll-free 800-544-6986.4REFLECTOR6. Disconnect the bulb wire from the red power wire.7. Unsnap the hairpin retaining wires from the reflector’s flange.8. Using the screwdriver, loosen the retaining screw to remove the bulb from thereflector (no need to completely remove this screw).9. Lift out the bulb and detach wire.10. Insert the replacement bulb into the reflector’s flange.11. Put back and secure the hairpin retaining wires.12. Connect the bulb power wire to the red power wire.13. Tighten the retaining screw on the flange.14. Place the reflector in position in the body of the spotlight.15. Replace the rubber “O” ring in the groove around the perimeter of thereflector.16. Replace glass and retaining ring so the screw holes are aligned.17. Secure retaining ring with two screws.18. Replace rubber bezel.19. Operate switch to ensure proper operation of spotlight.WARNINGTo reduce the risk of electric shock, replace bulb with 6 volt H3 55 watt only.Battery Replacement/DisposalBattery ReplacementThe battery should last the service life of the unit. Contact Technical Support tollfreeat 800-544-6986 for any information you may need.The RBRC SealThe RBRC (Rechargeable Battery Recycling Corporation) Seal on the leadacid battery (or battery pack) indicates that the costs to recycle the battery (orbattery pack) at the end of its useful life have already been paid by <strong>Black</strong> &<strong>Decker</strong>. In some areas, it is illegal to place spent lead acid batteries in thetrash or municipal solid waste stream and the RBRC program provides anenvironmentally conscious alternative.RBRC in cooperation with <strong>Black</strong> & <strong>Decker</strong> and other battery users, has establishedprograms in the United States and Canada tofacilitate the collection of spent lead acid batteries. Help protect our environment andconserve natural resources by returning the lead acid battery to an authorized<strong>Black</strong> & <strong>Decker</strong> service center or to your local retailer for recycling. You may also contactyour local recycling center for information on where to drop off the spent battery, or call1-800-8-BATTERY.12 Volt DC Charging Adapter Plug Fuse ReplacementThe fuse in the plug end of the 12 Volt DC Charging Adapter protects theadapter’s charging circuit. If the 120 Volt AC Charger operates, but the DCcharging adapter does not, then this fuse may be opened (blown).To replace the fuse:1. Unscrew the end cap of the DC plug (counterclockwise).2. Remove spring center contact and fuse.3. Check fuse with a continuity checker.4. If blown, locate a replacement 0.5 amp/250 volt fuse.5. Replace the fuse, spring, contact and end cap.6. Screw end cap clockwise until it is finger tight – DO NOT OVER-TIGHTEN.7. Test for proper operation of the 12 Volt DC Charging Adapter.TROUBLESHOOTINGNo Battery Status Indicator LEDs Light When Charging1. Check connection to the 120 Volt AC Charger or 12 Volt DC Charging Port.2. Check connection to AC or DC power source.3. Confirm there is a functioning AC or DC current.Unit Will Not Operate1. The Spotlight will not operate when charging. Be sure all adapters aredisconnected before Spotlight use.2. If you suspect the bulb is blown, check the filament. If the filament is coiledand unbroken, the bulb is not blown. If bulb is blown, replace it.3. The battery may be completely discharged. Charge the unit following thedirections on page 2.4. If the Spotlight does not operate after recharging as directed, contactTechnical Support toll-free at 800-544-6986.SPECIFICATIONSSpotlight Bulb:Battery:AC Charger:DC Plug Fuse:6 volt, H3 series, 55 wattMaintenance-free, sealed lead acid,6 volt, 3 amp hourUL Listed Class 2, 12 volt DC (500 mA)0.5A/250 V5
<strong>VEC156BD</strong> french 10/2/08 9:41 AM Page 6DÉPANNAGELes voyants indicateurs DEL d’état de la pile ne s’allument pas en cours de charge.1. Vérifier la connexion du chargeur secteur de 120 volts ou du port de charge encourant continu de 12 volts.2. Vérifier la connexion de la source d’alimentation secteur ou en courant continu.3. Confirmer la présence d’un courant alternatif ou continu.L’unité ne fonctionne pas.1. Le projecteur ne fonctionne pas en cours de charge. S’assurer de bien débranchertous les adaptateurs avant d’utiliser le projecteur.2. Si l’ampoule semble grillée, vérifier l’état du filament. Si le filament est enroulé etintact, l’ampoule est bonne. Si elle est grillée, la remplacer.3. La pile est peut-être complètement déchargée. Charger l’unité selon les directivesdécrites à la page 2.4. Si le projecteur ne fonctionne toujours pas après une recharge effectuée selon lesdirectives, communiquer avec le Service d’assistance technique en composant sansfrais le 800-544-6986.FICHE TECHNIQUEAmpoule du projecteur : 6 volts, série H3 de 55 wattsPile : au plomb scellée, sans entretien, de 6 volts, 3 ampères-heureChargeur secteur : homologué UL, classe 2, courant continu de 12 volts (500 mA)Fusible de la fiche de courant continu : 0,5 A, 250 VINFORMATION SUR LES RÉPARATIONSTous les centres de réparation <strong>Black</strong> & <strong>Decker</strong> sont dotés de personnel qualifié en matièred’outillage électrique; ils sont donc en mesure d’offrir à leur clientèle un service efficace etfiable. Que ce soit pour un avis technique, une réparation ou des pièces de rechangeauthentiques installées en usine, communiquer avec l’établissement <strong>Black</strong> & <strong>Decker</strong> leplus près de chez vous. Pour trouver l’établissement de réparation de votre région,consulter le répertoire des Pages jaunes à la rubrique « Outils électriques » ou composerle numéro suivant : 1-800-544-6986 ou consulter le site www.blackanddecker.comGARANTIE COMPLÈTE DE DEUX ANS POUR UNE UTILISATION DOMESTIQUE<strong>Black</strong> & <strong>Decker</strong> (É.-U.) Inc. garantit ce produit pour une durée de deux ans contre toutdéfaut de matériau ou de fabrication. Le produit défectueux sera remplacé ou réparé sansfrais de l’une des deux façons suivantes :La première façon consiste en un simple échange chez le détaillant qui l’a vendu (pourvuqu’il s’agisse d’un détaillant participant). Tout retour doit se faire durant la périodecorrespondant à la politique d’échange du détaillant (habituellement, de 30 à 90 joursaprès l’achat). Une preuve d’achat peut être requise. Vérifier auprès du détaillant pourconnaître sa politique concernant les retours hors de la période définie pour les échanges.La deuxième option est d’apporter ou d’envoyer le produit (transport payé d’avance) à uncentre de réparation autorisé ou à un centre de réparation de <strong>Black</strong> & <strong>Decker</strong> pour faireréparer ou échanger le produit, à notre discrétion. Une preuve d’achat peut être requise.Les centres <strong>Black</strong> & <strong>Decker</strong> et les centres de service autorisés sont répertoriés dans lespages jaunes, sous la rubrique « Outils électriques ».Cette garantie ne s’applique pas aux accessoires. Cette garantie vous accorde des droitslégaux spécifiques et vous pourriez avoir d’autres droits qui varient d’un État ou d’uneprovince à l’autre. Pour toute question, communiquer avec le directeur du centre deréparation <strong>Black</strong> & <strong>Decker</strong> le plus près de chez vous. Ce produit n’est pas destiné à unusage commercial.REMPLACEMENT GRATUIT DES ÉTIQUETTES D’AVERTISSEMENT : si les étiquettesd’avertissement deviennent illisibles ou sont manquantes, composer le 1-800-544-6986pour en obtenir le remplacement gratuit.Imported by / Importé par<strong>Black</strong> & <strong>Decker</strong> Canada Inc.100 Central Ave.Brockville (Ontario) K6V 5W6Pièce nº 90104834Sept. ‘08Voir la rubrique “Outilsélectriques”des Pages Jaunespour le service et les ventes.Copyright © 2008 <strong>Black</strong> & <strong>Decker</strong> FABRIQUÉ EN CHINE6MODE D’EMPLOIProjecteur 1,000,000 Power Series Sans fil • RechargeableNuméro de catalogue :<strong>VEC156BD</strong>53SBE231887Merci d’avoir choisi <strong>Black</strong> & <strong>Decker</strong>!Consulter le site Webwww.<strong>Black</strong>and<strong>Decker</strong>.com/NewOwnerpour enregistrer votre nouveau produit.À LIRE AVANT DE RETOURNER CE PRODUITPOUR QUELQUE RAISON QUE CE SOIT :Si des questions ou des problèmes surgissent après l’achat d’un produit <strong>Black</strong> & <strong>Decker</strong>,consulter le site WebHTTP://WWW.BLACKANDDECKER.COM/INSTANTANSWERSpour obtenir des réponses instantanément 24 heures par jour.Si la réponse est introuvable ou en l’absence d’accès à Internet, composer le1-800-544-6986 de 8 h à 17 h HNE, du lundi au vendredi, pour parler avec un agent.Prière d’avoir le numéro de catalogue sous la main lors de l’appel.CONSERVER CE MANUEL POUR UN USAGE ULTÉRIEUR.
<strong>VEC156BD</strong> french 10/2/08 9:41 AM Page iiRENSEIGNEMENTS IMPORTANTS RELATIFS À LA SÉCURITÉ.CONSERVER CES DIRECTIVES.AFIN DE RÉDUIRE LE RISQUE DE BLESSURES, L’UTILISATEUR DOIT LIREET COMPRENDRE LE PRÉSENT MODE D’EMPLOI. IL CONTIENTD’IMPORTANTS RENSEIGNEMENTS RELATIFS AU FONCTIONNEMENT ETÀ LA GARANTIE DE CE PRODUIT. LE CONSERVER POUR RÉFÉRENCE FUTURE.RENSEIGNEMENTS IMPORTANTS RELATIFS À LASÉCURITÉAVERTISSEMENTS• Comprend des piles au plomb scellées, sans déversement. Elles doivent êtrerecyclées ou éliminées de manière appropriée.• NE PAS jeter les piles dans les flammes. Une telle pratique pourrait se solder parune explosion.• NE PAS ouvrir la pile et NE PAS la court-circuiter. De telles pratiques peuventprovoquer des fuites ou de la chaleur pouvant causer des blessures corporelles.Pour toutes les questions relatives à l’élimination des piles, composer sans fraisle 1-800-544-6986.• Risque d’incendie ou de choc électrique : ne pas brancher le projecteur à uneprise sans la lentille de protection de l’ampoule et le couvercle en place.• Toutes les ampoules halogènes produisent de la chaleur.– Ne pas toucher à la lentille en cours de fonctionnement.– Éloigner les matières combustibles de la lentille du projecteur. La chaleurextrême risque de provoquer un incendie.– Ne jamais déposer, sur une surface, le projecteur du côté de la lentille lorsqu’ilest allumé.MISES EN GARDE• Ne jamais regarder directement le faisceau lumineux ni le pointer dans les yeux d’uneautre personne.• Éloigner les objets pointus de la lentille. Elle est en verre et peut se briser.• Ne pas immerger le projecteur dans l’eau.• Ne pas échapper ni lancer le projecteur. Il contient du verre et des piles au plomb scellées.• Remplacer l’ampoule uniquement par une autre du type indiqué à la section fichetechnique (6 volts, H3 de 55 watts, quartz-halogène).• Utiliser uniquement avec les adaptateurs de charge secteur ou en courant continu quisont livrés avec l’unité. Brancher d’abord l’adaptateur de charge au projecteur, puisbrancher le tout à la source d’alimentation.• Ne pas surcharger : – Par secteur, maximum de 14 heures de charge.– En courant continu, maximum de 14 heures de charge.• NE JAMAIS UTILISER LE CHARGEUR SECTEUR ET LE PORT DE CHARGE ENCOURANT CONTINU SIMULTANÉMENT.• Après la charge/recharge, débrancher l’adaptateur de charge ou la rallonge et attendre5 minutes avant d’utiliser l’unité.• Ne pas écraser, ni couper, ni tirer les cordons des adaptateurs de charge. Les protégerde la chaleur extrême.• Positionner les cordons des adaptateurs de charge de sorte qu’ils ne s’enchevêtrentpas ou qu’ils ne présentent pas un risque à la sécurité. Éloigner les cordons desadaptateurs de charge des bords tranchants.• Utiliser uniquement dans un environnement sec.• Ne pas ouvrir le corps du boîtier. Aucune pièce à l’intérieur ne peut être réparée parl’utilisateur.CETTE UNITÉ N’EST PAS UN JOUET ET EST CONÇUE UNIQUEMENT POUR UNEUTILISATION PAR DES ADULTES. LA CONSERVER HORS DE LA PORTÉE DES ENFANTS!Lire le présent manuel de l’utilisateur avant d’utiliser ce projecteur.CONSERVER CES DIRECTIVESCet appareil est conforme aux dispositions du paragraphe 15 des règlements de la FCC.Son fonctionnement est régi par les deux conditions suivantes : (1) cet appareil ne doit pascauser d’interférence nuisible et (2) cet appareil doit accepter toutes les interférencesreçues, y compris celles qui risquent d’en gêner le fonctionnement.Ce matériel a été testé et a été déclaré conforme aux limites en vigueur concernant leséquipements numériques de catégorie B, en vertu du paragraphe 15 de la réglementationFCC. Ces limites ont pour but d’établir des normes visant à protéger les installations contretoute interférence nuisible en milieu résidentiel. Ce matériel produit, consomme et peutémettre une énergie de radiofréquence et, s’il n’est pas installé et utilisé conformément auxinstructions qui l’accompagnent, il peut entraîner des interférences nuisibles dans lescommunications radio. Cependant, nous ne garantissons pas l’absence d’interférence danstous les types d’environnement. Si, après avoir effectué une vérification en mettantl’appareil hors tension puis sous tension, l’utilisateur s’aperçoit que ce matériel provoquedes interférences nuisibles dans la réception des signaux de radio ou de télévision, il luifaudra essayer de corriger ces interférences en prenant une ou plusieurs des mesures cidessous: • Réorienter ou repositionner l’antenne de réception.• Éloigner le plus possible le matériel du récepteur.• Brancher le matériel dans une prise électrique située sur un circuit différent de celui durécepteur.• Consulter le distributeur ou un technicien radio/télévision.TABLE DES MATIÈRESIntroduction . . . . . . . . . . . . . . . . . . . . . . . . . . . . . . . . . . . . . . . . . . . . . . . . . . . . . . . . . 1Caractéristiques . . . . . . . . . . . . . . . . . . . . . . . . . . . . . . . . . . . . . . . . . . . . . . . . . . . . . 1Charge/Recharge du projecteur . . . . . . . . . . . . . . . . . . . . . . . . . . . . . . . . . . . . . . . . . 2Fonctionnement . . . . . . . . . . . . . . . . . . . . . . . . . . . . . . . . . . . . . . . . . . . . . . . . . . . . . 3Soins et entretien . . . . . . . . . . . . . . . . . . . . . . . . . . . . . . . . . . . . . . . . . . . . . . . . . . . . 3Remplacement de l’ampoule du projecteur . . . . . . . . . . . . . . . . . . . . . . . . . . . . . . . 3Remplacement/Élimination de la pile . . . . . . . . . . . . . . . . . . . . . . . . . . . . . . . . . . . 5Remplacement du fusible de la fiche de l’adaptateur en courant continu de 12 volts 5Dépannage . . . . . . . . . . . . . . . . . . . . . . . . . . . . . . . . . . . . . . . . . . . . . . . . . . . . . . . . . 5Fiche technique . . . . . . . . . . . . . . . . . . . . . . . . . . . . . . . . . . . . . . . . . . . . . . . . . . . . . . 6INTRODUCTIONMerci d’avoir choisi le projecteur <strong>Black</strong> & <strong>Decker</strong> 1 000 000 Power Series.Lire attentivement le présent guide avant l’utilisation afin de garantir desperformances optimales et d’éviter tout dommage à l’unité.CARACTÉRISTIQUES• Puissant faisceau concentré au quartz-halogène• Projecteur avec gradateur électronique à 3 positions pour économiser l’énergieet prolonger la durée de fonctionnement.• Protecteur en caoutchouc (anneau) autour de la lentille• Capuchon de protection en caoutchouc qui protège le compartiment à piles• Poignée pistolet confortable avec cordon de transport• Le voyant indicateur DEL d’état de la pile affiche le niveau de charge de la pileen cours de chargement ou chaque fois que l’éclairage de travail est soustension• Chargeur secteur de 120 volts intégré et homologué UL qui fonctionne avecune rallonge domestique standard (non comprise)• Adaptateur de charge en courant continu de 12 volts compris• Pile au plomb scellée, rechargeable et sans déversementii1
<strong>VEC156BD</strong> spanish 10/2/08 9:43 AM Page iiINFORMACIÓN IMPORTANTE SOBRE SEGURIDAD.GUARDE ESTAS INSTRUCCIONESPARA DISMINUIR EL RIESGO DE LESIONES, EL USUARIO DEBE LEER YCOMPRENDER ESTE MANUAL DE INSTRUCCIONES. ESTE MANUALCONTIENE INFORMACIÓN IMPORTANTE CON RESPECTO A LA OPERACIÓNY LA GARANTÍA DE ESTE PRODUCTO. POR FAVOR, CONSÉRVELO PARAFUTURAS CONSULTAS.INFORMACIÓN IMPORTANTE DE SEGURIDADADVERTENCIAS• Contiene una batería sellada anti-derrame con ácido de plomo, la cual debe serreciclada o desechada apropiadamente.• NO deseche las baterías en el fuego ya que puede ocasionar una explosión.• NO abra la batería o provoque un corto circuito; esto puede ocasionar que labatería gotee o se caliente y causar daños personales. Para preguntas acerca decómo desechar las baterías, llame al número gratuito 1 800 544 6986• RIESGO DE INCENDIO/DESCARGA ELÉCTRICA - no conecte el reflector a unafuente de alimentación sin colocarle el lente y la cubierta al bombillo.• TODAS LAS LUCES HALÓGENAS EMITEN CALOR.– No toque el lente mientras la unidad esté en uso.– Mantenga cualquier combustible lejos del lente del reflector. ElPRECAUCIONES• Nunca mire directamente a la luz ni la apunte directamente a los ojos de otra persona.• Mantenga los objetos afilados lejos del lente del reflector --el vidrio puede romperse.• No sumerja el reflector en agua.• No tire ni deje caer el reflector. Contiene vidrio y una batería sellada con ácido deplomo.• Reemplace el bombillo solamente con el tipo indicado en las especificaciones (unbombillo de halógeno de cuarzo H3 de 6 voltios de 55 vatios).• Use sólo los adaptadores CA o CC que vienen con esta unidad. Primero, conecte eladaptador de carga al reflector y después conéctelo a la fuente de carga.• NO SOBRECARGUE:– Recarga de CA de 14 horas como máximo.– Recarga de CC de 14 horas como máximo.• NUNCA TRATE DE USAR EL CARGADOR DE CA Y EL PUERTO DE RECARGA CCA LA VEZ.• Después de cargar/recargar, desconecte el adaptador de recarga o extensión eléctricay espere 5 minutos antes usar el reflector.• No aplaste, corte, hale o exponga los cables del adaptador de carga al calor extremo.• Coloque los cables del adaptador de carga de manera que no se enreden o seconviertan en un peligro de seguridad. Mantenga los cables del adaptador de cargaalejados de bordes afilados.• Use la unidad en lugares secos solamente.• No abra la cubierta del reflector. No contiene piezas serviciables por el usuario.ESTA UNIDAD NO ES UN JUGUETE Y DEBE USARSE POR ADULTOS SOLAMENTE.¡MANTENGALA LEJOS DEL ALCANZE DE LOS NIÑOS!Lea este manual del usuario antes de usar este reflector.CONSERVE ESTAS INSTRUCCIONESiiEste mecanismo cumple con la parte 15 de las normas de la Comisión Federal deComunicaciones de Estados Unidos (FCC, por su sigla en inglés). La operación estásujeta a las dos condiciones siguientes: (1) este mecanismo puede no causarinterferencia perjudicial, y (2) este mecanismo puede aceptar cualquier interferenciarecibida, incluyendo interferencia que puede provocar una operación no deseada.Este equipo ha sido probado y se encontró que cumple con los límites para dispositivodigital Clase B, según la parte 15 de las normas de la FCC. Estos límites estándiseñados para proteger razonablemente contra interferencia perjudicial en unainstalación residencial. Este equipo genera, usa y puede irradiar energía en frecuenciade radio y, si no se instala y se usa de acuerdo con las instrucciones, puede provocarinterferencia perjudicial en las comunicaciones de radio. Sin embargo, no hay garantíade que la interferencia no ocurra en una instalación en particular. Si el equipo provocainterferencia perjudicial en la recepción de radio o televisión, lo que se puede determinaral apagar y encender el equipo, el usuario debe tratar de corregir la interferenciamediante una o más de las siguientes medidas:• Cambiar la orientación o la ubicación de la antena de recepción.• Aumentar la separación entre el equipo y el receptor.• Conectar el equipo a un tomacorriente sobre un circuito diferente de aquel al que estáconectado el receptor.• Consultar al vendedor o pedir la ayuda de un técnico en radio y televisión con experiencia.ÍNDICE DE TEMASIntroducción . . . . . . . . . . . . . . . . . . . . . . . . . . . . . . . . . . . . . . . . . . . . . . . . . . . . . . . . 1Características . . . . . . . . . . . . . . . . . . . . . . . . . . . . . . . . . . . . . . . . . . . . . . . . . . . . . . 1Carga/recarga del reflector . . . . . . . . . . . . . . . . . . . . . . . . . . . . . . . . . . . . . . . . . . . . 2Instrucciones para el funcionamiento . . . . . . . . . . . . . . . . . . . . . . . . . . . . . . . . . . . 3Cuidado y mantenimiento . . . . . . . . . . . . . . . . . . . . . . . . . . . . . . . . . . . . . . . . . . . . . 3Reemplazo del bombillo reflector . . . . . . . . . . . . . . . . . . . . . . . . . . . . . . . . . . . . . 3Reemplazo/desecho de la batería . . . . . . . . . . . . . . . . . . . . . . . . . . . . . . . . . . . . 4Reemplazo del fusible para enchufe de 12 Voltios CC . . . . . . . . . . . . . . . . . . . . 5Detección de problemas . . . . . . . . . . . . . . . . . . . . . . . . . . . . . . . . . . . . . . . . . . . . . . 5Especificaciones . . . . . . . . . . . . . . . . . . . . . . . . . . . . . . . . . . . . . . . . . . . . . . . . . . . . 6INTRODUCCIÓNGracias por comprar el Reflector Inalámbrico y Recargable 1,000,000Power Series. Antes de usarlo, por favor lea cuidadosamente esta guía paraasegurar un desempeño óptimo de la unidad y evitarle daños.CARACTERÍSTICAS• Reflector con poderoso bombillo direccional de halógeno de cuarzo• Regulador de intensidad de luz de 3 posiciones para ahorrar energía y prolongarel tiempo de duración• Goma protectora (borde saliente) de seguridad alrededor del lente• Tapa de goma de seguridad para proteger el compartimiento de la batería• Cómoda asa tipo pistola y cordón para llevar el reflector• Panel LED que indica el nivel de carga de la batería mientras está cargando ocuando la luz de área está encendida• Cargador de 120 voltios CA incorporado, certificado for UL• Cargador de 12 voltios CC incluído• Batería sellada recargable con ácido de plomo (anti-derrame)1
<strong>VEC156BD</strong> spanish 10/2/08 9:43 AM Page 2BORDESALIENTE DEGOMABOMBILLOHALÓGENO DECUARZODISPARADOR(ENCENDIDO/APAGADO/REGULADOR DE INTENSIDADDE LA LUZ)CORDÓN PARALLEVARCARGA Y RECARGA DEL REFLECTOREsta unidad se envía parcialmente cargada. Cargue la unidad ANTES de usarlapor primera vez utilizando el cargador de 120 voltios CA, durante 12-14 horas ohasta que se encienda la luz LED verde del Indicador de Carga de la Batería.Cargue después de cada uso hasta que la luz LED verde se encienda.Carga/recarga desde una fuente de 120 Voltios CAEnchufe un cable de extensión estándar Norte Américano de 120 voltios CA alcargador de 120 voltios CA localizado en la parte trasera de la unidad.INDICADOR LEDDEL ESTADO DECARGA DE LABATERÍAEXTENSIÓN (NO INCLUIDA)Asegúrese que el reflector está apagado (la cerradura del Disparador está en laposición de OFF y el disparador no está hundido).Cargue hasta que se encienda la luz LED verde del Indicador de carga de labatería (aproximadamente de 12-14 horas). NUNCA CARGUE LA UNIDAD PORMÁS DE 14 HORAS.Carga/recarga desde una fuente de 12 Voltios CCEnchufe la punta tubular metálica del adaptador de 12 Voltios CC al puerto derecarga de 12 Volitos CC.ADAPTADOR DE CARGA DE 12 VOLTIOS CC2INDICADOR LEDDEL ESTADO DECARGA DE LABATERÍAPUERTO CA PARARECARGAR(TRASERO DEUNIDAD)PUERTO CCPARA RECARGARCERRADURA DELDISPARADORASA TIPO PISTOLAPARA AGARRARCARGADORINCORPORADODE 120VOLTIOS CAPUERTO DERECARGA CCIntrodusca el tomacorriente de 12 voltios al enchufe para accesorios de suvehículo o a cualquier otra fuente de alimentación de 12 voltios.Asegúrese que el reflector está apagado (la cerradura del Disparador está en laposición de OFF y el disparador no está hundido).Cargue hasta que se encienda la luz LED verde del Indicador de carga de labatería (aproximadamente de 12-14 horas). NUNCA CARGUE LA UNIDAD PORMÁS DE 14 HORAS USANDO ESTE MÉTODO.Asegúrese que la fuente CC (puente auxiliar de arranque, batería portátil,enchufe para accesorios del vehículo, etc.) sea de 12 voltios CC. La fuente CCdebe tener la capacidad de suministrar al menos medio amperio a un nivel de 12voltios CC por 8 horas. Esto significa que una batería portátil debe estar cargadacon un mínimo de capacidad de 4 horas amperios.Nota: Cuando utilize el enchufe para accesorios de 12 voltios de un vehículocomo fuente de carga, preste atención a que algunos vehículos requierenque se encienda la marcha para alimentar el enchufe de accesorios.ADVERTENCIA• NUNCA INTENTE UTILIZAR EL CARGADOR DE LA CA Y EL PUERTO DECARGA DE LA C.C. SIMULTÁNEAMENTE.INSTRUCCIONES PARA EL FUNCIONAMIENTOPara encender el reflector inalámbrico presione el disparador. Si presiona eldisparador en intervalos de un segundo, el nivel de intensidad de la luz aumentade más tenue a más brillante.CERRADURA DELDISPARADORPara bloquear el interruptor en la posición ON (encendido), oprima el interruptordisparador y mueva el botón de bloqueo del interruptor (ubicado al costado delmango) a la posición de bloqueo. El reflector permanecerá encendido hasta queel seguro sea movido a la posición de APAGADO y el interruptor sea liberado.CUIDADO Y MANTENIMIENTOTodas las baterías pierden carga con el tiempo, especialmente cuando estántibias. Recargue la unidad cada dos meses si no la usa con frecuencia,preferiblemente por medio del método de 120 voltios CA.No sumerja este reflector en agua. Si la unidad se ensucia, limpie las superficiesexteriores con cuidado. Utilize una tela suave humedecida con una mezcla diluidade agua y detergente.El bombillo halógeno de cuarzo es la única parte del reflector reemplazable por elusuario. Periódicamente inspeccione la condición de los adaptadores de carga,conectores y cables. Si algun componente se ha roto o desgastado, llame gratisal departamento de Apoyo Técnico al (800) 544-6986 para reemplazarlo.Reemplazo de bombillo del reflectorPara reemplazar el bombillo de 6 voltios tipo H3 de 55 vatios usted necesitará undestornillador Phillips pequeño y un bombillo de reemplazo. Durante lainstalación, evite tocar la parte de vidrio del bombillo. Las huellas dactilares y lamugre pueden acortar su duración si se instala sucio. El bombillo puede limpiarsecon una tela humedecida en alcohol.3DISPARADOR
<strong>VEC156BD</strong> spanish 10/2/08 9:43 AM Page 4BOMBILLOHALÓGENO DECUARZOGOMA PROTECTORA1. Desconecte la unidad de cualquiera de los dos adaptadores de carga.2. Empuje la goma protectora de borde saliente hacia la parte delantera del reflectorpara acceder a los dos tornillos pequeños Phillips que están en el anillo sujetador.3. Usando el destornillador, remueva los dos tornillos (contrario al sentido de lasmanecillas del reloj). Colóquelos a un lado.4. Quite el anillo sujetador, el lente de vidrio y el anillo de goma en forma de "O"y colóquelos a un lado.5. Retire cuidadosamente el montaje de reflector y bombillo.BOMBILLOANILLO SUJETADORANILLO “O”DE GOMA6. Desconecte el cable del bombillo del cable rojo de electricidad.7. Separe las horquillas de los cables sujetadores de la pestaña del reflector.8. Utilizando el destornillador, afloje el tornillo sujetador para remover el bombillodel reflector (no necesita sacar el tornillo por completo).9. Saque el bombillo y desprenda el cable.10. Coloque el bombillo de reemplazo en la pestaña del reflector.11. Coloque de nuevo las horquillas de los cables sujetadores y asegúrelas.12. Conecte el cable de electricidad del bombillo al cable rojo de electricidad.13. Apriete el tornillo sujetador en la pestaña.14. Coloque el reflector en su posición dentro de la unidad.15. Coloque el anillo sujetador "O" en la ranura que está alrededor del perímetro del reflector.16. Coloque el vidrio y el anillo sujetador de manera que los huecos de los tornillos coincidan.17. Asegure el anillo sujetador con dos tornillos.18. Coloque el borde saliente de goma.19. Pase el interruptor para asegurarse que el reflector está operando adecuadamente.ADVERTENCIA: Pare reducir el riesgo de descarga eléctricasólo reemplace con bombillos de 6 voltios y 55 vatios de tipo H3.Reemplazo/desecho de la bateríaReemplazo de la bateríaSe recomienda que la unidad sea devuelta al fabricante para el reemplazo dela batería. Comuníquese con Servicio al cliente, llamando a la línea gratuita(800) 544-6986.4REFLECTORHORQUILLA DE CABLESSUJETADORESTORNILLOSDE CABEZAPHILLIPSDISPARADORREFLECTORCERRADURADELDISPARADORFUNDA DEGOMAPOSTERIOREL SELLO RBRCEl sello RBRC (Corporación de reciclado de baterías recargables)que se encuentra sobre la batería de plomo-ácido (o paquete de baterías)indica que los costos para reciclar la batería (o el paquete de baterías) alfinal de su vida útil ya han sido pagados por <strong>Black</strong> & <strong>Decker</strong>. En algunaszonas, es ilegal tirar las baterías usadas de plomo-ácido en la basura o en el depósitode desechos sólidos del municipio. El programa RBRC proporciona una alternativa deconciencia sobre el cuidado del medio ambiente.RBRC en cooperación con <strong>Black</strong> & <strong>Decker</strong> y otros usuarios de baterías, establecióprogramas en los Estados Unidos y Canadá para facilitar la recolección de baterías deplomo-ácido ya usadas. Ayude a proteger nuestro medio ambiente y a conservar losrecursos naturales devolviendo las baterías de plomo-ácido ya usadas a un centro demantenimiento autorizado <strong>Black</strong> & <strong>Decker</strong> o a un comerciante minorista para que seanrecicladas. También puede comunicarse con el centro de reciclado para obtenerinformación sobre dónde dejar las baterías, o llamar al 1-800-8-BATTERY.ADVERTENCIAS• No deseche la batería en el fuego ya que puede ocasionar una explosión.• Antes de desechar la batería, proteja las terminales descubiertas con cintaeléctrica para trabajos pesados. De esta manera previene cortos circuitos (loscortos circuitos pueden ocasionar lesiones e incendios).• No exponga la batería al fuego o al calor extremo ya que puede explotar.• Para más información acerca del reciclaje de la batería llame al número gratuito800-544-6986.Reemplazo del fusible del enchufe del adaptador de carga de12 Voltios CCEl fusible que está en la toma CC protege el circuito de carga del adaptador derecarga. Sí el recargador CA opera pero el adaptador de carga CC no, el fusiblepuede estar abierto.Para substituir el fusible:1. Destornille la tapa trasera del enchufe de CC (en sentido contrario a las manecillasdel reloj).2. Retire el resorte central de contacto y el fusible.3. Inspeccione el fusible con un control de continuidad.4. En caso de estar quemado, busque un fusible de reemplazo de 0.5 amp/250 voltios.5. Coloque el fusible, el resorte de contacto y el cobertor posterior.6. Atornille la tapa trasera en sentido de las manecillas del reloj hasta que estéapretado. NO LO APRIETE DEMASIADO.7. Asegúrese que el adaptador de carga CC esté funcionado de forma correcta.DETECCIÓN DE PROBLEMASDurante la carga no se enciende ninguna luz LED en el indicador deestado de carga de la batería1. Verfique la conexión al cargador de 120 Voltios CA o al puerto de carga de 12 Voltios CC2. Verifique la conexión a la fuente de alimentación CA o CC3. Confirme que hay corriente CA o CCLa unidad no funciona1. El reflector no funciona mientras se está cargando. Asegúrese que todos losadaptadores están desconectados antes de usar el reflector.2. Si sospecha que el bombillo está fundido, examine el filamento. Si el filamento estáintacto y enroscado, el bombillo no está fundido. Si el bombillo está fundido, reemplácelo.3. La batería puede estar descargada por completo. Cargue la unidad siguiendo lasinstrucciones en la página 2.4. Si el reflector no funciona después de recargarlo como se indica, llame gratis aldepartamento de Apoyo Técnico al (800) 544-6986.5