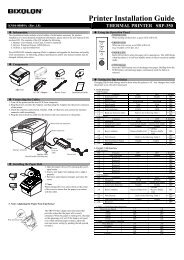
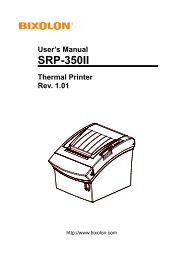
• Table 1 – Emulation Selection• Table 2 – Transmission Speed (bps) SelectionEmulation 1-1 1-2 TransmissionSetting Citizen Mode2-7 2-8 2-5 2-6BXL/POS OFF OFF 2400 ON ON ON ONBXL/POS-KP ON ON 4800 OFF ON OFF ONSTAR OFF ON 9600 OFF OFF OFF OFFCITIZEN ON OFF 19200 ON OFF ON OFF- BXL/POS-KP (Kitchen <strong>Printer</strong> Mode): Buzzer will sound when the automatic cutting function isactivated or paper is low.• Table 3 – International Language SelectionCountry DSW1-5 DSW1-6 DSW1-7 Code PageU.S.A ON ON ON Page 0 (PC437 : USA)France OFF ON ONGermany ON OFF ON Page 2 (PC850 : Multilingual)U.K OFF OFF ONDenmark ON ON OFFSweden OFF ON OFFPage 5 (PC865 : Nordic)Italy ON OFF OFF Page 2 (PC850 : Multilingual)WindowsCodeOFF OFF OFF Windows Code◈ Self-Test1. Turn the printer off and close the rear cover.2. While holding down the FEED button, turn on the printer and continue to hold until thepaper begins to feed. The self-test begins to print the printer settings and cuts the paper andpauses. (ERROR lamp will be on.)3. Press the FEED button to print the rolling ASCII pattern.4. When the rolling ASCII pattern is printed, the self-test mode automatically ends.※ NoteThe self-test lets you know if your printer is operating properly. It checks the print quality,ROM version, and DIP switch settings.◈ SpecificationItemDetailsPrinting Method Serial impact dot matrixHead Pin9-pin serialDot Pitch 0.352mm (1/72”)Dot Pin Diameter 0.28mm (0.01”)Printing Direction Bi-directional (logic seeking) with friction speedCharacter per line Max 42 (Characters)Printing speed *1) 5.1 lines/ secPrinting Width63.5 mmLine Interval 4.233 mm (1/6”)Font 7 × 9 / 9 × 9<strong>Printer</strong> Character SetAlphanumeric Character : 95International Character : 48Extended Graphic : 128 × 27 pageSMPS Input Voltage 100~240 VACFrequency50 / 60 HzSMPS Output Voltage 24VDCTemperatureOperating : 0~40℃ (32~104℉)Storage : -20~60℃ (-4~140℉)HumidityOperating : 10~80% RH (Non-condensing)Storage : 10~90% RH (Non-condensing)Mechanism Life *2) 18,000,000 LinesAuto Cutter1,500,000 CutsPaper TypePaper RollRoll Width76±0.5 mmPaperRoll Diameter Max ø83 mm (3.27")Paper Thickness Thickness : 1-ply 0.06~0.085 mmPaper WeightWeight : 52.3~64g/m 2 (0.115~0.1411 lb)Paper Tube (Outer) Max ø19mm (0.75")StandardRRC-201BRColorBlack and RedRibbon Size13 mm (W)CartridgeLifeRRC-201BR : 1,500,000 characters (Black)750,000 characters (Red)(7×9 font continual printing, ASCII, 25℃)※ Note*1) Printing speed may be slower depending on the data transmission speed and thecombination of control commands.*2) The above values are calculated under printing level 2 with recommended paper atnormal temperature. The values may vary with environment temperature, printing level,etc.* The specifications of print density for the black mark.(DensiEye 700 used)Density print of the black mark: 1.0 or moreDensity of the non-black mark: 0.1 or less◈ Serial (RS-232C) Fixed Interface Model Windows Driver<strong>Installation</strong>: SRP-275IIA,AG,C,CG (IFA-S TYPE)1. After running the product installation CD, run the SRP-275II > Drivers > WindowsDriver > Drivers > English > SRP-275II_WIN_Vx.x.x.exe file.2. In the opening installation window, click on Next.3. In the Select Port Type window, select one Serial Port and click Next.(Figure 1.)4. In the Installer window, select Yes and the computer will reboot.5. After rebooting, open Start > Settings > <strong>Printer</strong>s & Fax > <strong>BIXOLON</strong> SRP-275II Icon> Right-Click > Properties.6. In the Properties window, select the Port tab and click on the Port Settings. Check to seethat the information is identical to the self-test results after installation.SELF TESTDIP Switch setup statusInterpreter (DIP1_1,2): BXL/POSAutoCut (DIP1 _ 3): DisabledMemory S/W (DIP1 _ 5): OffLogo Print (DIP1 _ 6): OffNear_end (DIP1 _ 7): EnabledRx ErrorPrint(DIP2 _ 1): Print ?Black mark (DIP2 _ 2): DisableHandShaking (DIP2 _ 3): RTS/DSRWord Length (DIP2 _ 4): 8Parity (DIP2 _ 5): NoneBaud Rate (DIP2_7,8): 192007. In the Properties window, after selecting the General tab, click on Print Test Page toconfirm that printing is normal.◈ Parallel (IEEE1284) Fixed Interface Model Windows Driver<strong>Installation</strong>: SRP-275IIAP,APG,CP,CPG (IFG-P TYPE)1. After running the product installation CD, run the SRP-275II > Drivers > WindowsDriver > Drivers > English > SRP-275II_WIN_Vx.x.x.exe_Vx.x.x.exe file.2. In the opening installation window, click on Next.3. In the Select Port Type window, select one Parallel Port and click Next.(Refer to Figure 1.)4. In the Installer window, select Yes and the computer will reboot.5. After rebooting, open Start > Settings > <strong>Printer</strong>s & Fax > <strong>BIXOLON</strong> SRP-275II Icon> Right-Click > Properties.6. In the Properties window, after selecting the General tab, click on Print Test Page toconfirm that printing is normal.◈ USB Fixed Interface Model Windows Driver <strong>Installation</strong>:SRP-275IIAU,AUG,CU,CUG (IFG-U TYPE)1. After running the product installation CD, run the SRP-275II > Drivers > WindowsDriver > Drivers > English > SRP-275II_WIN_Vx.x.x.exe_Vx.x.x.exe file.2. In the opening installation window, click on Next.3. In the Select Port Type window, select USB and click Next. (Refer to Figure 1.)4-1. If using Windows 2000/VISTA/2008 Server/7:1 After the Information window appears, turn the printer off and back on and click Yes.2 After installation is complete, reboot the computer.4-2. If using Windows XP/2003 Server:1 After the Information window appears, turn the printer off and back on and click Yes.2 After the New Hardware Detected window appears, continue to click Next to install theUSB drive, and then reboot the computer.※ NoteWhen the digital registration message appears during installation, click on either OK orContinue Anyway.5. After rebooting, open Start > Settings > <strong>Printer</strong>s & Fax > <strong>BIXOLON</strong> SRP-275II Icon> Right-Click > Properties.6. In the Properties window, after selecting the General tab, click on Print Test Page toconfirm that printing is normal.◈ Ethernet Fixed Interface Model Windows Driver <strong>Installation</strong>:SRP-275IIAE,AEG,CE,CEG (IFA-EP TYPE)Refer to the user manual regarding separate Ethernet interface cards.(Refer to the CD)◈ WEEE (Waste Electrical and Electric Equipment)This marking shown on the product or its literature, indicates that is should not bedisposed with other household wastes at the end of its working life, To preventpossible harm to the environment or human health from uncontrolled waste disposal,please separate this from other types of wastes and recycle it responsibly to promotethe sustainable reuse of material resources. Household users should contact either theretailer where they purchased this product, or their local government office, for detailsof where and how they can take this item for environmentally safe recycling. Businessusers should contact their supplier and check the terms and conditions of the purchasecontract. This product should not be mixed with other commercial wastes for disposal.☎ <strong>BIXOLON</strong> Co., Ltd.● Website http://www.bixolon.com● Korea Headquarters(Add) 7th~8th FL, Miraeasset Venture Tower, 685, Sampyeong-dong, Bundang-gu, Seongnam-si,Gyeonggi-do, 463-400, Korea(Tel.) +82-31-218-5500● U.S. Office(Add) <strong>BIXOLON</strong> America Inc., 3171 Fujita St, Torrance, CA 90505(Tel.) +1-858 764 4580● Europe Office(Add) <strong>BIXOLON</strong> Europe GmbH, Tiefenbroicher Weg 35 40472 Düsseldorf(Tel.) +49 (0)211 68 78 54 0
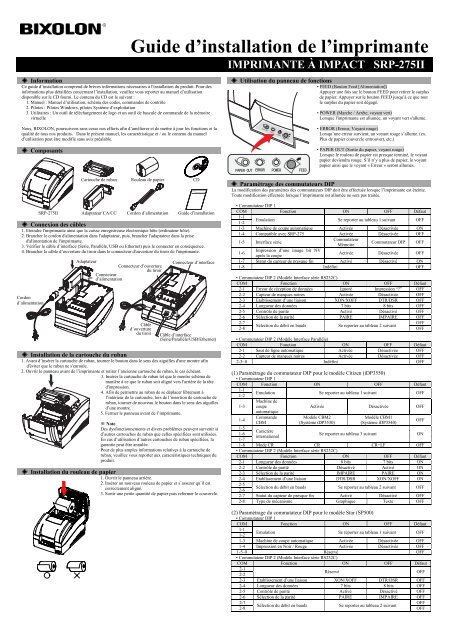
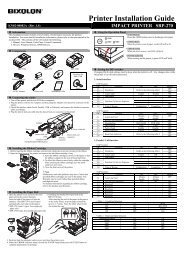
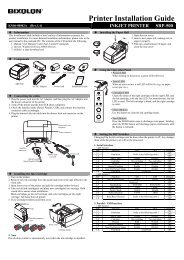
◈ InformationCe guide d’installation comprend de brèves informations nécessaires à l'installation du produit. Pour desinformations plus détaillées concernant l’installation, veuillez vous reporter au manuel d’utilisationdisponible sur le CD fourni. Le contenu du CD est le suivant :1. Manuel : Manuel d’utilisation, schéma des codes, commandes de contrôle2. Pilotes : Pilotes Windows, pilotes Système d’exploitation3. Utilitaires : Un outil de téléchargement de logo et un outil de bascule de commande de la mémoirevirtuelle<strong>Guide</strong> d’installation de l’imprimanteIMPRIMANTE À IMPACT SRP-275II◈ Utilisation du panneau de fonctions• FEED (Bouton Feed [Alimentation])Appuyer une fois sur le bouton FEED pour retirer le surplusde papier. Appuyer sur le bouton FEED jusqu’à ce que toutle surplus du papier soit dégagé.• POWER (Marche / Arrête, voyant vert)Lorsque l'imprimante est allumée, un voyant vert s'allume.Nous, <strong>BIXOLON</strong>, poursuivons sans cesse nos efforts afin d’améliorer et de mettre à jour les fonctions et laqualité de tous nos produits. Dans le présent manuel, les caractéristique et / ou le contenu du manueld’utilisation peut être modifié sans avis préalable.◈ ComposantsPAPER OUT ERROR POWER FEED• ERROR (Erreur, Voyant rouge)Lorsqu’une erreur survient, un voyant rouge s’allume. (ex.Plus de papier couvercle entrouvert, etc.)• PAPER OUT (Sortie du papier, voyant rouge)Lorsque le rouleau de papier est presque terminé, le voyantpapier deviendra rouge. S’il n’y a plus de papier, le voyantpapier ainsi que le voyant « Erreur » seront allumés.Cartouche de ruban Rouleau de papier CDSRP-275IIAdaptateur CA/CC Cordon d’alimentation <strong>Guide</strong> d’installation◈ Connexion des câbles1. Eteindre l'imprimante ainsi que la caisse enregistreuse électronique hôte (ordinateur hôte).2. Brancher le cordon d'alimentation dans l'adaptateur, puis, brancher l'adaptateur dans la prised'alimentation de l'imprimante.3. Vérifier le câble d’interface (Série, Parallèle, USB ou Ethernet) puis le connecter en conséquence.4. Brancher le câble d’ouverture du tiroir dans le connecteur d'ouverture du tiroir de l'imprimante.AdaptateurConnecteur d’ouvertureConnecteur d’interfacedu tiroirConnecteurd’alimentationCordond’alimentationCâbled’ouverturedu tiroirCâble d’interface(Série/Parallèle/USB/Ethernet)◈ <strong>Installation</strong> de la cartouche du ruban1. Avant d’insérer la cartouche de ruban, tourner le bouton dans le sens des aiguilles d'une montre afind'éviter que le ruban ne s'enroule.2. Ouvrir le panneau avant de l’imprimante et retirer l’ancienne cartouche de ruban, le cas échéant.3. Insérer la cartouche de ruban tel que le montre schéma demanière à ce que le ruban soit aligné vers l'arrière de la têted'impression.4. Afin de permettre au ruban de se déplacer librement àl’intérieur de la cartouche, lors de l’insertion de cartouche deruban, tourner de nouveau le bouton dans le sens des aiguillesd’une montre.5. Fermer le panneau avant de l’imprimante.※ NoteDes dysfonctionnements et divers problèmes peuvent survenir sid’autres cartouches de ruban que celles spécifiées sont utilisées.En cas d’utilisation d’autres cartouches de ruban spécifiées, lagarantie peut être annulée.Pour de plus amples informations relatives à la cartouche deruban, veuillez vous reporter aux caractéristiques techniques duproduit.◈ <strong>Installation</strong> du rouleau de papier1. Ouvrir le panneau arrière.2. Insérer un nouveau rouleau de papier et s’assurer qu’il estcorrectement aligné.3. Sortir une petite quantité de papier puis refermer le couvercle.◈ Paramétrage des commutateurs DIPLa modification des paramètres des commutateurs DIP doit être effectuée lorsque l’imprimante est éteinte.Toute modification effectuée lorsque l’imprimante est allumée ne sera pas traitée.• Commutateur DIP 1COM Fonction ON OFF Défaut1-11-2Emulation Se reporter au tableau 1 suivant OFF1-3 Machine de coupe automatique Activée Désactivée ON1-4 Compatible avec SRP-275 Activée Désactivée OFF1-5 Interface sérieCommutateurMémoireCommutateur DIP OFF1-6Impression d’une image bit NVaprès la coupeActivée Désactivée OFF1-7 Statut du capteur de presque fin Activé Désactivé ON1-8 Indéfini OFF• Commutateur DIP 2 (Modèle Interface série RS232C)COM Fonction ON OFF Défaut2-1 Erreur de réception de données Ignoré Impression “?” OFF2-2 Capteur de marques noires Activée Désactivée OFF2-3 Etablissement d’une liaison XON/XOFF DTR/DSR OFF2-4 Longueur des données 7 bits 8 bits OFF2-5 Contrôle de parité Activé Désactivé OFF2-6 Sélection de la parité PAIRE IMPAIRE OFF2-7OFFSélection du débit en baudsSe reporter au tableau 2 suivant2-8 OFF• Commutateur DIP 2 (Modèle Interface Parallèle)COM Fonction ON OFF Défaut2-1 Saut de ligne automatique Activée Désactivée OFF2-2 Capteur de marques noires Activée Désactivée OFF2-3~8 Indéfini OFF(1) Paramétrage du commutateur DIP pour le modèle Citizen (iDP3550)• Commutateur DIP 1COM Fonction ON OFF Défaut1-11-2Emulation Se reporter au tableau 1 suivant OFFMachine de1-3 coupeautomatiqueActivée Désactivée OFF1-4CommandeCBMModèle CBM2(Système iDP3530)Modèle CBM1(Système iDP3540)1-5Caractère1-6international1-7Se reporter au tableau 3 suivantON1-8 Mode CR CR CR+LF OFF• Commutateur DIP 2 (Modèle Interface série RS232C)COM Fonction ON OFF Défaut2-1 Longueur des données 8 bits 7 bits ON2-2 Contrôle de parité Désactivé Activé ON2-3 Sélection de la parité IMPAIRE PAIRE ON2-4 Etablissement d’une liaison DTR/DSR XON/XOFF ON2-52-6Sélection du débit en bauds Se reporter au tableau 2 suivant OFF2-7 Statut du capteur de presque fin Activé Désactivé OFF2-8 Type de mécanisme Graphique Texte OFFOFF(2) Paramétrage du commutateur DIP pour le modèle Star (SP500)• Commutateur DIP 1COM Fonction ON OFF Défaut1-11-2Emulation Se reporter au tableau 1 suivant OFF1-3 Machine de coupe automatique Activée Désactivée OFF1-4 Impression en Noir / Rouge Activée Désactivée OFF1-5~8 Réservé OFF• Commutateur DIP 2 (Modèle Interface série RS232C)COM Fonction ON OFF Défaut2-12-2RéservéOFF2-3 Etablissement d’une liaison XON/XOFF DTR/DSR OFF2-4 Longueur des données 7 bits 8 bits OFF2-5 Contrôle de parité Activé Désactivé OFF2-6 Sélection de la parité PAIRE IMPAIRE OFF2-7OFFSélection du débit en baudsSe reporter au tableau 2 suivant2-8 OFF