Contact Grill - GE :: Housewares
Contact Grill - GE :: Housewares
Contact Grill - GE :: Housewares

You also want an ePaper? Increase the reach of your titles
YUMPU automatically turns print PDFs into web optimized ePapers that Google loves.
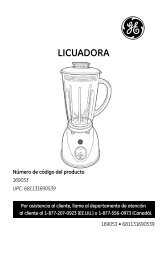
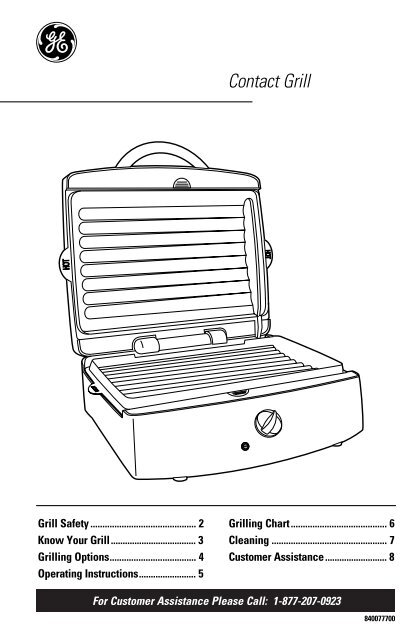
g<strong>Contact</strong> <strong>Grill</strong><strong>Grill</strong> Safety ............................................ 2Know Your <strong>Grill</strong>.................................... 3<strong>Grill</strong>ing Options.................................... 4Operating Instructions........................ 5<strong>Grill</strong>ing Chart........................................ 6Cleaning ................................................ 7Customer Assistance.......................... 8For Customer Assistance Please Call: 1-877-207-0923840077700
<strong>Grill</strong> Safety2IMPORTANT SAFEGUARDSIn order to prevent the risk of fire, electric shock, burns or other injury or damage, followthese instructions carefully. When using electrical appliances, basic safety precautions shouldalways be followed including the following:1. Read all instructions.2. Do not touch hot surfaces. Use handlesor knobs.3. To protect against risk of electrical shock,do not immerse appliance, cord or plug inwater or other liquid.4. Close supervision is necessary when anyappliance is used by or near children.5. Unplug from outlet when not in use andbefore cleaning. Allow to cool beforeputting on or taking off parts, and beforecleaning the appliance.6. Do not operate any appliance with adamaged cord or plug, or after theappliance malfunctions or is dropped ordamaged in any manner. Call our toll-freecustomer assistance number for informationon examination, repair or electricalor mechanical adjustment.7. Do not use outdoors.8. The use of accessory attachments notrecommended by the appliancemanufacturer may cause injuries orserious damage to the unit.9. Do not let cord hang over edge of tableor counter, or touch hot surfaces,including stove.10. Do not place on or near a hot gas orelectric burner, or in a heated oven.11. Extreme caution must be used whenmoving an appliance containing hot oilor other hot liquids.12. To disconnect, turn any control to “OFF,”then remove plug from wall outlet.13. Do not use appliance for other thanintended purpose.14. For units with detachable cooking plates,be sure they are secured before cooking.SAVE THESE INSTRUCTIONS!Consumer Safety InformationThis appliance is intended for householduse only.This appliance is equipped with a groundedtype3-wire cord (3-prong plug). This type ofplug will only fit into an electrical outletmade for a 3-prong plug. This is a safetyfeature intended to help reduce the risk ofelectrical shock. If the plug should fail to fitcontact a qualified electrician to replace theobsolete outlet. Do not attempt to defeatthe safety purpose of the grounding pin bymodifying the plug in any way.To reduce risk of electrical shock, do notimmerse the grill in water.To avoid an electrical circuit overload do notuse another high wattage appliance on thesame circuit with the grill.The length of the cord used on thisappliance was selected to reduce the hazardsof becoming tangled in, or tripping over alonger cord. If a longer cord is necessary agrounded type 3-wire extension cord may beused. The electrical rating of the extensioncord must be equal to or greater than therating of the grill. Care must be taken toarrange the extension cord so that it will notdrape over the countertop or tabletop whereit can be pulled on by children or accidentallytripped over.An extension cord should be connected tothe appliance first, before it is plugged intothe outlet.CAUTION: Escaping steam can burn. Alwaysuse a hot mitt to protect hand when openingthe grill.
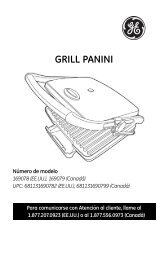
Know Your <strong>Grill</strong>Parts and Features1 Cover2 Removable Nonstick <strong>Grill</strong> Surfaces3 Spatula/Scraper4 Base5 Timer6 Drip Cup7 Support Leg217345 6Optional Features (on select models)Drain SpoutCord WrapRemovable GridsDrain SpoutLocking TabPush tab towardoutside edge torelease grids.3
<strong>Grill</strong>ing OptionsThe grill may be used in two different positions:Closed CoverThis will cook the food on both sidesat the same time. This is the quickestmethod.FlatOpen the grill for more grilling surface.This will require a longer cooking timebut you can cook twice as much.1. Flip up the support leg, then lift coverstraight up(this willdisengage thelocked hinge).Supportleg2. Lower the cover as far as it will goto the flatposition.4
Operating InstructionsBEFORE FIRST USE: Please wash the cooking surfaces of the grill as instructedunder “Cleaning.”1. First lock grids in place, then pluginto 120 volt AC outlet.2. Brush grilling surfaces with oil orspray with nonstick cooking spray.3. Preheat grill by turning timer to5 minutes. Keep cover closed.4. When preheated, raise grill cover.Place food to be cooked onto grilland lower grill cover. Always use grillwith drip cup in place.5. Set timer. The ON light comes onwhen the timer is set.6. When timer rings, use a hot mitt andcarefully liftgrill cover andcheck food tosee if cookedto desireddegree. Donot cut foodon nonstickgrilling surface.If additional cooking time is needed,reset timer.7. To turn food, use the spatula/scraperincluded with your grill, or anotherutensil safe for nonstick surfaces.8. When food is cooked to desireddegree, remove the food andunplug the grill. Let cool slightlybefore cleaning.CAUTION: Escaping steam can burn.Always use a hot mitt to protect handwhen opening the grill.5
<strong>Grill</strong>ing ChartREMEMBER to preheat grill 5 minutes with cover closed.The following times are guidelines.FoodBeef strip steak, boneless,fresh (8 oz.)Chicken breast, boneless,fresh (4 oz.)Chicken breast, boneless,frozen (4 oz.)Fish fillet squares, frozen(about 2 oz.)Frankfurter (hot dog)Hamburger (beef orturkey), fresh (4 oz.)Hamburger (beef orturkey), frozen (4 oz.)Pork chops, boneless, fresh(4 oz., 3 ⁄4" thick)Pork chops, boneless,frozen (4 oz.)Cook Time5 min.5-8 min.10-12 min.6-8 min.5 min.5-7 min.10-12 min.6-8 min.10-12 min.DonenessSlightly pink in center;brown on outsideNo longer pink in centerNo longer pink in centerFish looks whiteHeated throughNo longer pink in centerNo longer pink in centerNo longer pink in centerNo longer pink in center6
Cleaning1. Unplug grill from electrical outletand allow to cool.2. While holding grid, slide locking tabto release andremove grid.Open grill flatand repeatwith othergrid. DO NOTREMOVELocking TabTHE GRIDWITH THEGRILL IN AN UPRIGHT POSITION.THE GRILL MUST BE FLAT TOREMOVE GRID.3. Wash grids in hot soapy water. Rinsethen dry. Grids may also be washedin dishwasher.4. Do not use steel wool or any typeof abrasive cleaner to clean the grill,as it will damage the nonstick grillingsurface, and void the warranty.5. Use a clean, damp cloth to wipe cleanthe outside of grill.6. Empty drip cup. Wash drip cup andspatula/scraper in hot, soapy water.Rinse and dry. They can also be putin top rack of dishwasher.7. If grease drips over the grids into thereflector pans,the reflectorpans must alsobe cleaned.Using a soapy,damp cloth,carefully wipeentire surfaceof reflectorpan to remove all grease. Let dry.WARNING: To reduce the risk ofelectrical shock, do not immerse the grillin water or other liquid. Do not clean thegrill in the dishwasher.7
Customer AssistanceIf you have a claim under this warranty, please call our Customer AssistanceNumber. For faster service please have model, series, and type numbers ready foroperator to assist you. These numbers can be found on the bottom of your grill.MODEL: ________________ TYPE: _________________ SERIES: __________________Customer Assistance Number: 1-877-207-0923Keep this number for future reference!E-mail inquiries: www.wal-mart.comTwo-Year Limited WarrantyWhat does your warranty cover?• Any defect in material or workmanship.For how long after the original purchase?• Two years.What will we do?• Provide you with a new, or at our option,a reconditioned unit.• The exchange unit is warranted for theremainder of your product’s originaltwo-year warranty period.How do you make a warranty claim?• Save your receipt.• Properly pack your unit. We recommendusing the original carton and packingmaterials.• Return the product to your nearestWAL ★ MART store or call CustomerAssistance at 1-877-207-0923.What does your warranty not cover?• Glass parts, glass containers, cutter/strainer,blades and/or agitators.• Commercial use or any other use notfound in printed directions.• Damage from misuse, abuse, or neglect.• Products purchased or serviced outsidethe USA.How does state law relate to this warranty?• This warranty gives you specific legal rights,and you may also have other rights whichvary from state to state.• WAL ★ MART expressly disclaims all responsibilityfor consequential damages orincidental losses caused by use of thisappliance. Some states do not allow thisexclusion or limitation of incidental orconsequential losses so the foregoingdisclaimer may not apply to you.What if you purchased your product in theU.S., Canada or Mexico and encounter aproblem while using it outside the countryof purchase?• The warranty is valid only in the country ofpurchase and if you follow the warrantyclaim procedure as noted.g is a trademark ofGeneral Electric Companyand is used under license byWAL ★ MART Stores, Inc.Bentonville, AR 727168400777008WAL ★ MART Stores, Inc.Bentonville, AR 7271611/00
gParrilla de <strong>Contact</strong>oInstrucciones de seguridadpara la parrilla ...................................... 2Conozca su parrilla.............................. 3Opciones para asar a la parrilla...... 4Instrucciones de operación.............. 5Tabla de tiempos de cocción .......... 6Limpieza ................................................ 7Asistencia al cliente .......................... 8Para obtener asistencia, llame al: 1-877-207-0923840077700
peligros de quedar enganchado o tropezarsobre un cordón más largo. Si se necesita uncordón más largo, se puede usar un cordónde alargue trifilar con conexión a tierra. Laclasificación nominal eléctrica del cordónde alargue deberá ser igual o mayor que laclasificación nominal de la parrilla. Esimportante tener cuidado de colocar elcordón de alargue para que no se plieguesobre el mostrador o la mesera en dondeniños puedan tirar del mismo o tropezarseaccidentalmente.Un cordón de alargue deberá conectarseprimero al aparato antes de ser enchufadoen el tomacorriente.PRECAUCIÓN: El vapor que se escapa de laparrilla puede causar quemaduras. Siempreuse un guante resistente al calor paraproteger sus manos cuando abra la parrilla.Conozca su parrillaPiezas y Características12CubiertaSuperficies para asar desmontablesy no adherentes134567Espátula/rasquetaBaseTemporizadorBandeja de goteoPata de apoyo2345 673
Características opcionales (en modelos seleccionados)Pico de drenaje Envoltura del cordón Rejillas desmontablesPico de drenajeLengüeta de trabaEmpuje la lengüetahacia el bordeexterior para soltarlas rejillas.Opciones para asar a la parrillaLa parrilla se puede usar en dos posiciones diferentes:Cubierta cerradaEsto cocinará los alimentos de amboslados al mismo tiempo. Este es elmétodo más rápido.4
PlanaAbra la parrilla para obtener unasuperficie mayor para asar. Estorequerirá un tiempo más largo decocción, pero se podrá cocinar eldoble de cantidad.1. Levante la pata de apoyo y luegolevante lacubierta haciaarriba (estodesengancharála bisagratrabada).Pata deapoyo2. Baje la cubierta lo más posible a laposiciónplana.Instrucciones de operaciónANTES DEL PRIMER USO: Lave las superficies de cocción de la parrilla según lasinstrucciones que aparecen en “Limpieza”.1. Primerotrabe las rejillas en su lugar yluego enchufe en un tomacorrientede CA de 120 voltios.2. Cepille las superficies de asar conaceite o rocíe con aerosol de cocinaantiadherente.3. Precaliente la parrilla colocando eltemporizador a 5 minutos. Mantengala cubierta cerrada.4. Cuando la parrilla se haya calentado,levante la cubierta. Coloque elalimento que desee cocinar en laparrilla y baje la cubierta. Siempreuse la parrilla con la bandeja degoteo colocada en su lugar.5. Coloque el temporizador. La luz deencendido “ON” se encenderá cuandohaya graduado el temporizador.5
6. Cuando suene el temporizador, useun guanteresistente alcalor y cuidadosamentelevante lacubierta dela parrilla ychequee elalimento paraverificar si se ha cocinado según sudeseo. No corte alimentos sobre unasuperficie de asar antiadherente. Si senecesita más tiempo de cocción,reposicione el temporizador.7. Para voltear el alimento, use laespátula/rasqueta que viene incluidacon su parrilla u otro utensilio seguropara superficies antiadeherentes.8. Cuando el alimento se haya cocinadosegún sus deseos, sáquelo ydesenchufe la parrilla. Deje que seenfríe un poco antes de limpiarla.PRECAUCIÓN: El vapor que se escapade la parrilla también puede causarquemaduras. Siempre use un guanteresistente al calor para proteger susmanos cuando abra la parrilla.Tabla de tiempos de cocciónRECUERDE que se debe calentar la parrilla durante 5 minutos con la cubierta cerradaantes de cocinar.Los siguientes tiempos son indicaciones solamente.AlimentoBife de carne de res,deshuesado, fresco (8 onzas)Pechuga de pollo,deshuesada, fresca (4 onzas)Pechuga de pollo, deshuesada,congelada (4 onzas)Cuadrados de filete de pescado,congelados (unas 2 onzas)Salchichas (hot dogs)Hamburguesa (de carne de reso de pavo), fresca (4 onzas)Hamburguesa (de carne de reso de pavo), congelada (4 onzas)Chuletas de cerdo,deshuesadas, frescas (4 onzas,3⁄4 pulg de espesor)Chuletas de cerdo, deshuesadas,congeladas (4 onzas)Tiempo decocción5 minutos5-8 minutos10-12minutos6-8 minutos5 minutos5-7 minutos10-12minutos6-8 minutos10-12minutosGrado de cocciónLigeramente rosado en elcentro; asado en el exteriorYa no está rosada en el centroYa no está rosada en el centroEl pescado tiene un aspectoblancoCaliente en el interiorYa no está rosada en el centroYa no está rosada en el centroYa no está rosada en el centroYa no está rosada en el centro6
Limpieza1. Desenchufe la parrilla deltomacorriente y deje que se enfríe.2. Mientras sostiene la rejilla, deslice lalengüeta detraba parasoltar y retirarla rejilla. Abrala parrillahasta quequede plana yLengüeta de trabarepita elprocedimientocon la otra rejilla. NO SAQUE LAREJILLA CON LA PARRILLA ENPOSICIÓN VERTICAL. LAPARRILLA DEBE ESTAR PLANAPARA PODER RETIRAR LA REJILLA.3. Lave las rejillas en agua calientejabonosa. Enjuague y luego seque.Las rejillas también se pueden lavaren el lavavajillas.4. No use fibra metálica ni ningún otrotipo de limpiador abrasivo paralimpiar la parrilla, ya que podrádañar la superficie de asarantiadherente y anulará la garantía.5. Use un paño limpio y húmedo paralimpiar el exterior de la parrilla.6. Vacíe la bandeja de goteo. Lave labandeja de goteo y la espátula/rasqueta en agua jabonosa caliente.Enjuague y seque. Estas también sepueden colocar en la rejilla superiordel lavavajillas.7. Si gotea grasa sobre las rejillas hacialas bandejaspara derrames,también sedeberánlimpiar lasbandejas.Use un pañohúmedo yjabonoso paralimpiar cuidadosamente toda lasuperficie de la bandeja paraderrames. Deje secar.ADVERTENCIA: Para reducir el riesgo dechoques eléctricos, no sumerja la parrillaen agua ni en ningún otro líquido. Nolimpie la parrilla en el lavavajillas.7
Asistencia al ClienteSi desea hacer un reclamo bajo esta garantía, sírvase llamar a nuestro Número deAsistencia al Cliente. Para un servicio más rápido es importante que tenga el modelo,la serie y los números del tipo listos para que el operador lo pueda ayudar. Estosnúmeros se pueden encontrar en la parte inferior de su parilla.MODELO:________________ TIPO:_________________ SERIE: __________________Número de Asistencia al Cliente: 1-877-207-0923¡Guarde este número para referencia futura!Solicitud de información por e-mail: www.wal-mart.comGarantía Limitada de Dos Años¿Qué cubre su garantía?• Todo defecto de material o mano de obra.¿Por cuánto tiempo después de lacompra inicial?• Dos años.¿Qué haremos?• Le suministraremos una unidad nuevao reacondicionada, a nuestra opción.• La unidad de cambio estará garantizadapor el resto del período de garantía dedos años de su producto original.¿Cómo hacer un reclamo bajo garantía?• Guarde su recibo.• Empaque su unidad debidamente.Recomendamos usar la caja y losmateriales de empaque originales.• Devuelva el producto a su tiendaWAL ★ MART más cercana o llame alNúmero de Asistencia al Cliente al1-877-207-0923.¿Qué es lo que la garantía no cubre?• Partes de vidrio, envases de vidrio,cortador/colador, cuchillas y/o agitadores.• Uso comercial o cualquier otro uso que no seencuentre en las instrucciones impresas.• Daños debido al mal uso, abuso, onegligencia.• Productos comprados o reparados fuerade los Estados Unidos.¿Cuál es la relación entre las leyes estatalesy esta garantía?• Esta garantía le otorga derechos legalesespecíficos, y es posible que usted tambiéntenga otros derechos que varían de un estadoal otro.• WAL ★ MART expresamente niega todaresponsabilidad por daños consecuentes opérdidas incidentales causadas por el uso deeste aparato. Ciertos estados no permitenesta exclusión o limitación de pérdidas incidentaleso consecuentes de manera que esposible que el descargo de responsabilidadque antecede no corresponda en su caso.¿Qué sucede si usted adquirió su producto enlos Estados Unidos, Canadá o México y encuentraun problema cuando lo está usando fueradel país de compra?• La garantía es válida solamente en el país decompra y si usted sigue el procedimiento dereclamo bajo garantía que se indica.g es una marca de comerciode General Electric Companyusada bajo licencia porWAL ★ MART Stores, Inc.Bentonville, AR 727168400777008WAL ★ MART Stores, Inc.Bentonville, AR 7271611/00