
Create successful ePaper yourself
Turn your PDF publications into a flip-book with our unique Google optimized e-Paper software.
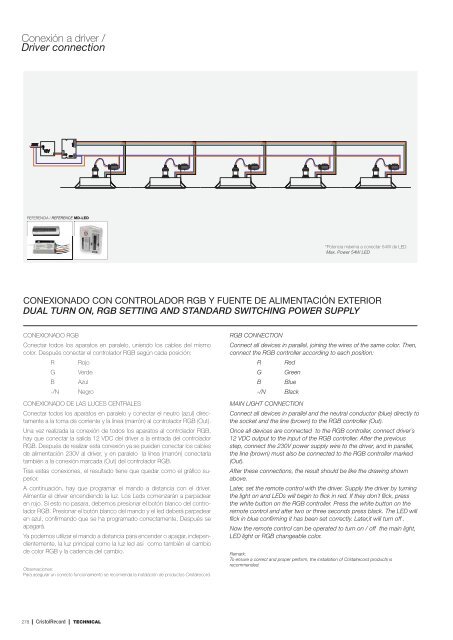
R<br />
Conexión a driver /<br />
Driver connection<br />
230V<br />
N<br />
L<br />
12V<br />
-<br />
+<br />
DC<br />
OUT<br />
G<br />
B<br />
REFERENCIA / REFERENCE MD-LED<br />
*Potencia máxima a conectar 54W de LED.<br />
Max. Power 54W LED<br />
CONEXIONADO CON CONTROLADOR RGB Y FUENTE DE ALIMENTACIÓN EXTERIOR<br />
DUAL TURN ON, RGB SETTING AND STANDARD SWITCHING POWER SUPPLY<br />
CONEXIONADO RGB<br />
Conectar todos los aparatos en paralelo, uniendo los cables del mismo<br />
color. Después conectar el controlador RGB según cada posición:<br />
R Rojo<br />
G Verde<br />
B Azul<br />
-/N Negro<br />
CONEXIONADO DE LAS LUCES CENTRALES<br />
Conectar todos los aparatos en paralelo y conectar el neutro (azul) directamente<br />
a la toma de corriente y la línea (marrón) al controlador RGB (Out).<br />
Una vez realizada la conexión de todos los aparatos al controlador RGB,<br />
hay que conectar la salida 12 VDC del driver a la entrada del controlador<br />
RGB. Después de realizar esta conexión ya se pueden conectar los cables<br />
de alimentación 230V al driver, y en paralelo la línea (marrón) conectarla<br />
también a la conexión marcada (Out) del controlador RGB.<br />
Tras estas conexiones, el resultado tiene que quedar como el gráfi co superior.<br />
A continuación, hay que programar el mando a distancia con el driver.<br />
Alimentar el driver encendiendo la luz. Los Leds comenzarán a parpadear<br />
en rojo. Si esto no pasara, debemos presionar el botón blanco del controlador<br />
RGB. Presionar el botón blanco del mando y el led deberá parpadear<br />
en azul, confi rmando que se ha programado correctamente. Después se<br />
apagará.<br />
Ya podemos utilizar el mando a distancia para encender o apagar, independientemente,<br />
la luz principal como la luz led así como también el cambio<br />
de color RGB y la cadencia del cambio.<br />
Observaciones:<br />
Para asegurar un correcto funcionamiento se recomienda la instalación de productos <strong>Cristalrecord</strong>.<br />
RGB CONNECTION<br />
Connect all devices in parallel, joining the wires of the same color. Then,<br />
connect the RGB controller according to each position:<br />
R Red<br />
G Green<br />
B Blue<br />
-/N Black<br />
MAIN LIGHT CONNECTION<br />
Connect all devices in parallel and the neutral conductor (blue) directly to<br />
the socket and the line (brown) to the RGB controller (Out).<br />
Once all devices are connected to the RGB controller, connect driver´s<br />
12 VDC output to the input of the RGB controller. After the previous<br />
step, connect the 230V power supply wire to the driver, and in parallel,<br />
the line (brown) must also be connected to the RGB controller marked<br />
(Out).<br />
After these connections, the result should be like the drawing shown<br />
above.<br />
Later, set the remote control with the driver. Supply the driver by turning<br />
the light on and LEDs will begin to fl ick in red. If they don´t fl ick, press<br />
the white button on the RGB controller. Press the white button on the<br />
remote control and after two or three seconds press black. The LED will<br />
fl ick in blue confi rming it has been set correctly. Later,it will turn off .<br />
Now the remote control can be operated to turn on / off the main light,<br />
LED light or RGB changeable color.<br />
Remark:<br />
To ensure a correct and proper perform, the installation of <strong>Cristalrecord</strong> products is<br />
recommended.<br />
278 | | TECHNICAL