
You also want an ePaper? Increase the reach of your titles
YUMPU automatically turns print PDFs into web optimized ePapers that Google loves.
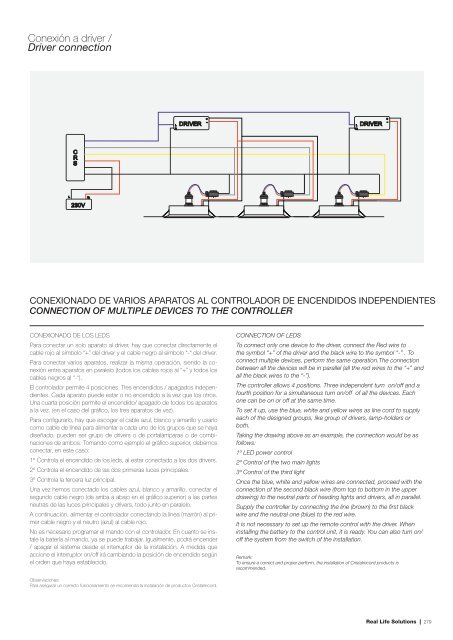
Conexión a driver /<br />
Driver connection<br />
L<br />
N<br />
DRIVER<br />
+ +<br />
- -<br />
L DRIVER<br />
N<br />
C<br />
R<br />
S<br />
L<br />
230V<br />
N<br />
CONEXIONADO DE VARIOS APARATOS AL CONTROLADOR DE ENCENDIDOS INDEPENDIENTES<br />
CONNECTION OF MULTIPLE DEVICES TO THE CONTROLLER<br />
CONEXIONADO DE LOS LEDS<br />
Para conectar un solo aparato al driver, hay que conectar directamente el<br />
cable rojo al símbolo “+” del driver y el cable negro al símbolo “-“ del driver.<br />
Para conectar varios aparatos, realizar la misma operación, siendo la conexión<br />
entre aparatos en paralelo (todos los cables rojos al “+” y todos los<br />
cables negros al “-“).<br />
El controlador permite 4 posiciones. Tres encendidos / apagados independientes.<br />
Cada aparato puede estar o no encendido a la vez que los otros.<br />
Una cuarta posición permite el encendido/ apagado de todos los aparatos<br />
a la vez. (en el caso del gráfi co, los tres aparatos de vez).<br />
Para confi gurarlo, hay que escoger el cable azul, blanco y amarillo y usarlo<br />
como cable de línea para alimentar a cada uno de los grupos que se haya<br />
diseñado, pueden ser grupo de drivers o de portalámparas o de combinaciones<br />
de ambos. Tomando como ejemplo el gráfi co superior, debemos<br />
conectar, en este caso:<br />
1º Controla el encendido de los leds, al estar conectado a los dos drivers.<br />
2º Controla el encendido de las dos primeras luces principales.<br />
3º Controla la tercera luz principal.<br />
Una vez hemos conectado los cables azul, blanco y amarillo, conectar el<br />
segundo cable negro (de arriba a abajo en el gráfi co superior) a las partes<br />
neutras de las luces principales y drivers, todo junto en paralelo.<br />
A continuación, alimentar el controlador conectando la línea (marrón) al primer<br />
cable negro y el neutro (azul) al cable rojo.<br />
No es necesario programar el mando con el controlador. En cuanto se instale<br />
la batería al mando, ya se puede trabajar. Igualmente, podrá encender<br />
/ apagar el sistema desde el interruptor de la instalación. A medida que<br />
accione el interruptor on/off irá cambiando la posición de encendido según<br />
el orden que haya establecido.<br />
CONNECTION OF LEDS<br />
To connect only one device to the driver, connect the Red wire to<br />
the symbol “+” of the driver and the black wire to the symbol “-” . To<br />
connect multiple devices, perform the same operation.The connection<br />
between all the devices will be in parallel (all the red wires to the “+” and<br />
all the black wires to the “-”).<br />
The controller allows 4 positions. Three independent turn on/off and a<br />
fourth position for a simultaneous turn on/off of all the devices. Each<br />
one can be on or off at the same time.<br />
To set it up, use the blue, white and yellow wires as line cord to supply<br />
each of the designed groups, like group of drivers, lamp-holders or<br />
both.<br />
Taking the drawing above as an example, the connection would be as<br />
follows:<br />
1º LED power control<br />
2º Control of the two main lights<br />
3º Control of the third light<br />
Once the blue, white and yellow wires are connected, proceed with the<br />
connection of the second black wire (from top to bottom in the upper<br />
drawing) to the neutral parts of heading lights and drivers, all in parallel.<br />
Supply the controller by connecting the line (brown) to the fi rst black<br />
wire and the neutral one (blue) to the red wire.<br />
It is not necessary to set up the remote control with the driver. When<br />
installing the battery to the control unit, it is ready. You can also turn on/<br />
off the system from the switch of the installation.<br />
Remark:<br />
To ensure a correct and proper perform, the installation of <strong>Cristalrecord</strong> products is<br />
recommended.<br />
Observaciones:<br />
Para asegurar un correcto funcionamiento se recomienda la instalación de productos <strong>Cristalrecord</strong>.<br />
Real Life Solutions | 279