RBM-20 Module - Quickstart Guide - v1.2 - Pearl Music Europe
RBM-20 Module - Quickstart Guide - v1.2 - Pearl Music Europe
RBM-20 Module - Quickstart Guide - v1.2 - Pearl Music Europe

You also want an ePaper? Increase the reach of your titles
YUMPU automatically turns print PDFs into web optimized ePapers that Google loves.
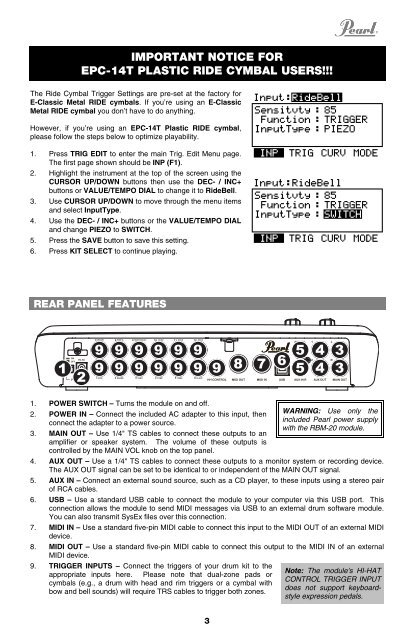
IMPORTANT NOTICE FOR<br />
EPC-14T PLASTIC RIDE CYMBAL USERS!!!<br />
The Ride Cymbal Trigger Settings are pre-set at the factory for<br />
E-Classic Metal RIDE cymbals. If you’re using an E-Classic<br />
Metal RIDE cymbal you don’t have to do anything.<br />
However, if you’re using an EPC-14T Plastic RIDE cymbal,<br />
please follow the steps below to optimize playability.<br />
1. Press TRIG EDIT to enter the main Trig. Edit Menu page.<br />
The first page shown should be INP (F1).<br />
2. Highlight the instrument at the top of the screen using the<br />
CURSOR UP/DOWN buttons then use the DEC- / INC+<br />
buttons or VALUE/TEMPO DIAL to change it to RideBell.<br />
3. Use CURSOR UP/DOWN to move through the menu items<br />
and select InputType.<br />
4. Use the DEC- / INC+ buttons or the VALUE/TEMPO DIAL<br />
and change PIEZO to SWITCH.<br />
5. Press the SAVE button to save this setting.<br />
6. Press KIT SELECT to continue playing.<br />
REAR PANEL FEATURES<br />
1 2<br />
9<br />
9<br />
9<br />
9<br />
9<br />
9<br />
9<br />
9<br />
9<br />
9<br />
9<br />
9<br />
1. POWER SWITCH – Turns the module on and off.<br />
2. POWER IN – Connect the included AC adapter to this input, then<br />
connect the adapter to a power source.<br />
3. MAIN OUT – Use 1/4" TS cables to connect these outputs to an<br />
amplifier or speaker system. The volume of these outputs is<br />
controlled by the MAIN VOL knob on the top panel.<br />
3<br />
7 6<br />
4. AUX OUT – Use a 1/4" TS cables to connect these outputs to a monitor system or recording device.<br />
The AUX OUT signal can be set to be identical to or independent of the MAIN OUT signal.<br />
5. AUX IN – Connect an external sound source, such as a CD player, to these inputs using a stereo pair<br />
of RCA cables.<br />
6. USB – Use a standard USB cable to connect the module to your computer via this USB port. This<br />
connection allows the module to send MIDI messages via USB to an external drum software module.<br />
You can also transmit SysEx files over this connection.<br />
7. MIDI IN – Use a standard five-pin MIDI cable to connect this input to the MIDI OUT of an external MIDI<br />
device.<br />
8. MIDI OUT – Use a standard five-pin MIDI cable to connect this output to the MIDI IN of an external<br />
MIDI device.<br />
9. TRIGGER INPUTS – Connect the triggers of your drum kit to the<br />
appropriate inputs here. Please note that dual-zone pads or<br />
cymbals (e.g., a drum with head and rim triggers or a cymbal with<br />
bow and bell sounds) will require TRS cables to trigger both zones.<br />
9<br />
8<br />
5<br />
5<br />
4<br />
4<br />
3<br />
3<br />
WARNING: Use only the<br />
included <strong>Pearl</strong> power supply<br />
with the <strong>RBM</strong>-<strong>20</strong> module.<br />
Note: The module's HI-HAT<br />
CONTROL TRIGGER INPUT<br />
does not support keyboardstyle<br />
expression pedals.