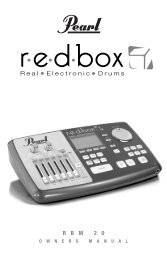
RBM-20 Module - Quickstart Guide - v1.2 - Pearl Music Europe
RBM-20 Module - Quickstart Guide - v1.2 - Pearl Music Europe
RBM-20 Module - Quickstart Guide - v1.2 - Pearl Music Europe

You also want an ePaper? Increase the reach of your titles
YUMPU automatically turns print PDFs into web optimized ePapers that Google loves.
16. PAD ID – Turns PAD ID on or off. When PAD ID is on, striking a trigger automatically selects it for<br />
editing. Alternatively, you can select a trigger by highlighting the trigger field in the LCD with the<br />
CURSOR UP/DOWN buttons then using the DEC- / INC+ buttons or VALUE/TEMPO DIAL.<br />
17. DRUM / LAYER – Press this button then INST (F1) to edit the Instrument assigned to a trigger input.<br />
While editing, pressing it toggles between the two Layers of the trigger. The current Layer (A or B) will<br />
be highlighted on the top-right corner of the LCD.<br />
18. EDIT ACCOMP – Press this button to adjust the settings for your Accompaniment. The adjustable<br />
parameters will be shown in the LCD.<br />
19. PREVIEW – Press this velocity-sensitive button to preview the sound of the current trigger. This can<br />
be useful when programming the <strong>RBM</strong>-<strong>20</strong> if it is not connected to your drum kit, if it is not convenient to<br />
strike the pads, etc.<br />
<strong>20</strong>. SAVE – Press this button to save changes made to the current Kit, Sequence, trigger settings, or<br />
global settings. Use the VALUE/TEMPO DIAL or DEC- / INC+ buttons to select a destination where the<br />
current Kit or Sequence will be stored. When saving a Kit, its Instruments and all its parameters will<br />
also be stored. When saving a Sequence, it will remember its corresponding Kit and Accompaniment.<br />
21. SEQ / SONG – Press this button to access the module's Sequencer where you can create and edit<br />
drum and accompaniment patterns.<br />
22. MUTE DRUMS – Press this button to mute the drum track of a Sequence.<br />
23. MUTE ACCOMP – Press this button to mute the Accompaniment track of a Sequence.<br />
24. STOP – Stops playback of the current Sequence. Hold down STOP and turn the VALUE/TEMPO DIAL<br />
to "scrub" forwards and backwards through the Sequence. Hold down STOP and press DEC- / INC+ to<br />
"step" forwards or backwards through each "event" in the Sequence. While navigating the Sequence in<br />
these ways, you will hear the Sequence play as you move through it.<br />
25. PLAY / � – Plays the current Sequence. You can also hold down STOP and press this button to move<br />
back to the previous bar in the Sequence.<br />
26. RECORD / � – Records a new Sequence. You can also hold down STOP and press this button to<br />
move to the next bar in the Sequence.<br />
27. TAP TEMPO – Tap this button at the desired rate to enter a new tempo for the Sequence. You can<br />
also change the tempo by holding down the TAP TEMPO button and using the VALUE/TEMPO DIAL or<br />
DEC- / INC+ buttons.<br />
SELECTING AND EDITING KITS<br />
The <strong>RBM</strong>-<strong>20</strong> <strong>Module</strong> has 100 Preset Kits and 100 User Kits, which you can select from the Main Screen.<br />
You can adjust the sounds, tuning, volume, panning, etc. for each Kit as well as their individual pad sounds.<br />
In addition, you may choose a different Accompaniment for each Kit.<br />
To select a Kit:<br />
1. Press the KIT SELECT button to bring up the Main Screen.<br />
2. Use the DEC- / INC+ buttons or the VALUE/TEMPO to<br />
select a Kit.<br />
3. Hit the triggers to try out the sounds of the Kit. To adjust the<br />
levels of various instruments that make up the Kit, slide the<br />
faders of the MIXER to change the levels of the<br />
corresponding triggers. (Use A/B SELECT to toggle<br />
between Banks A and B to access all available triggers.)<br />
5